

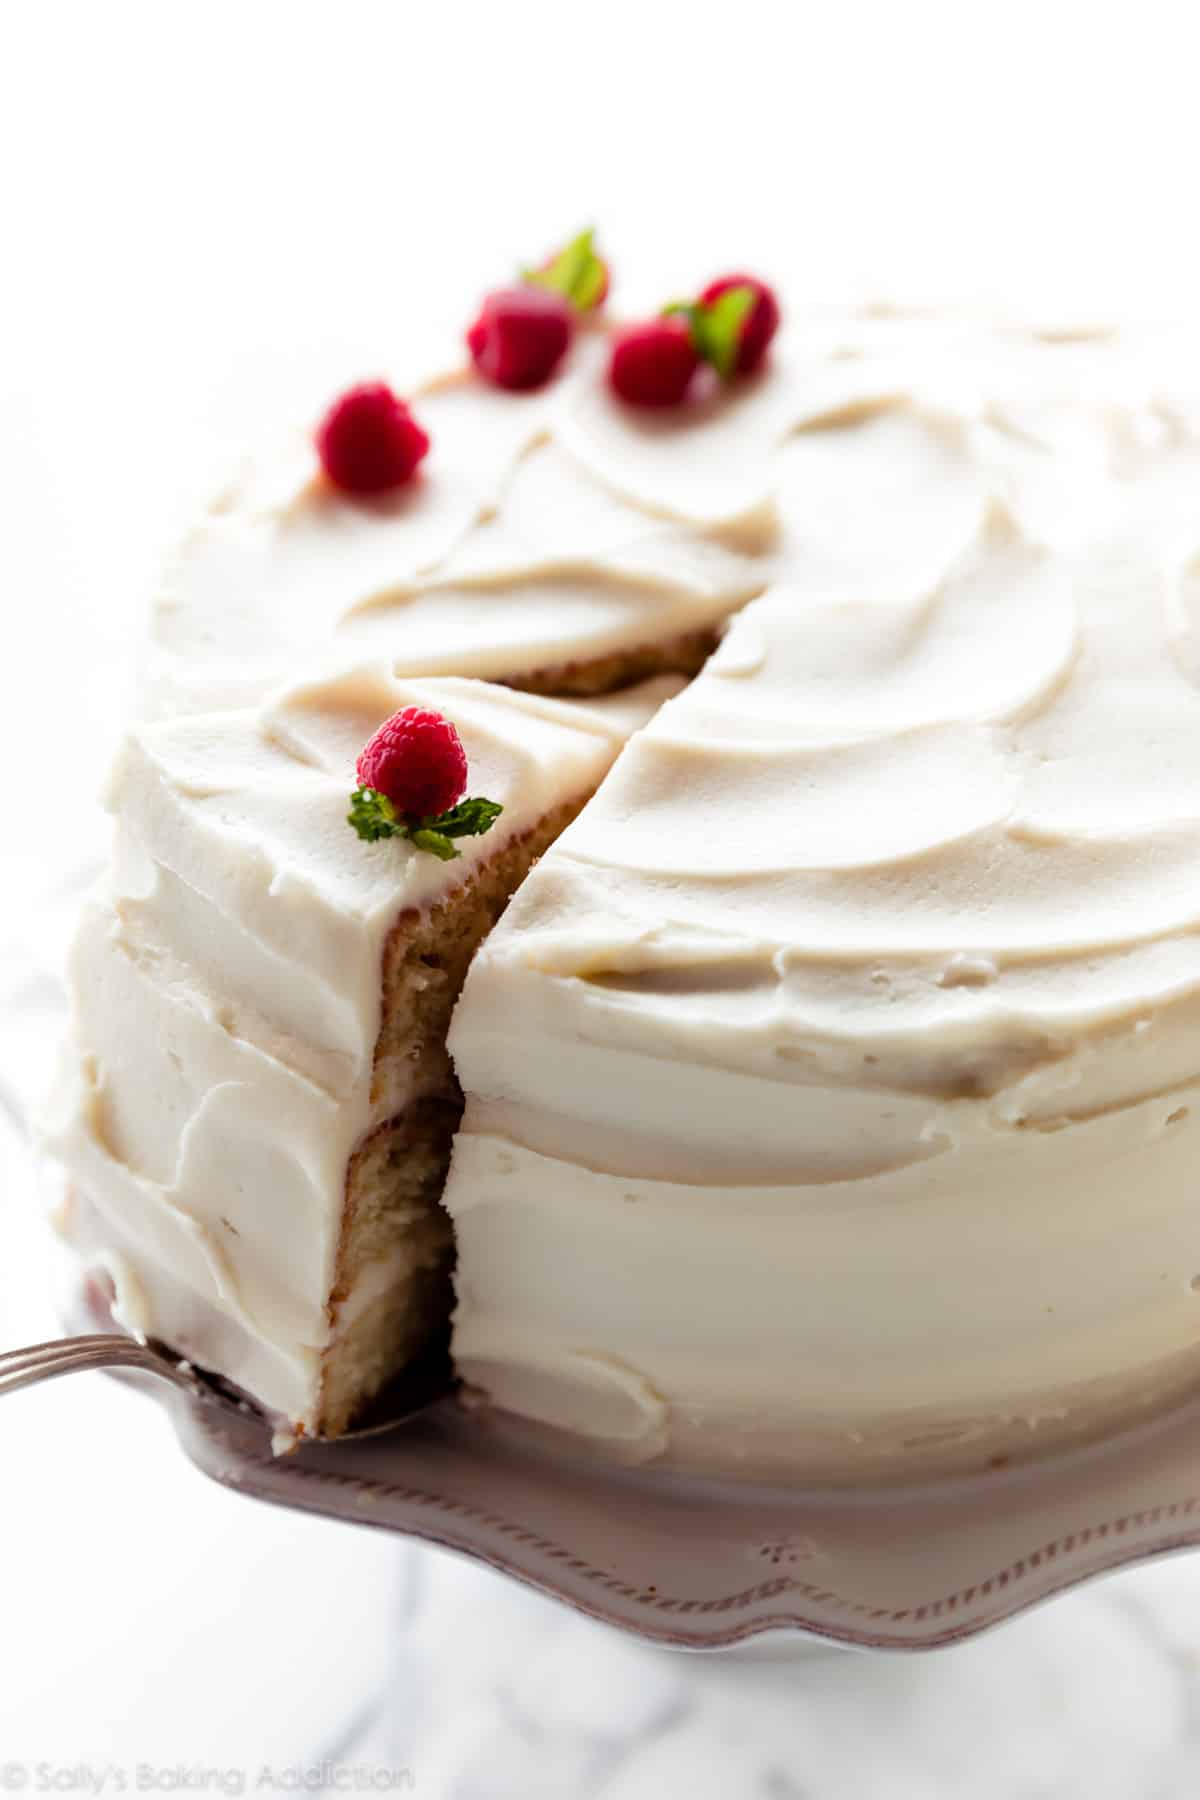
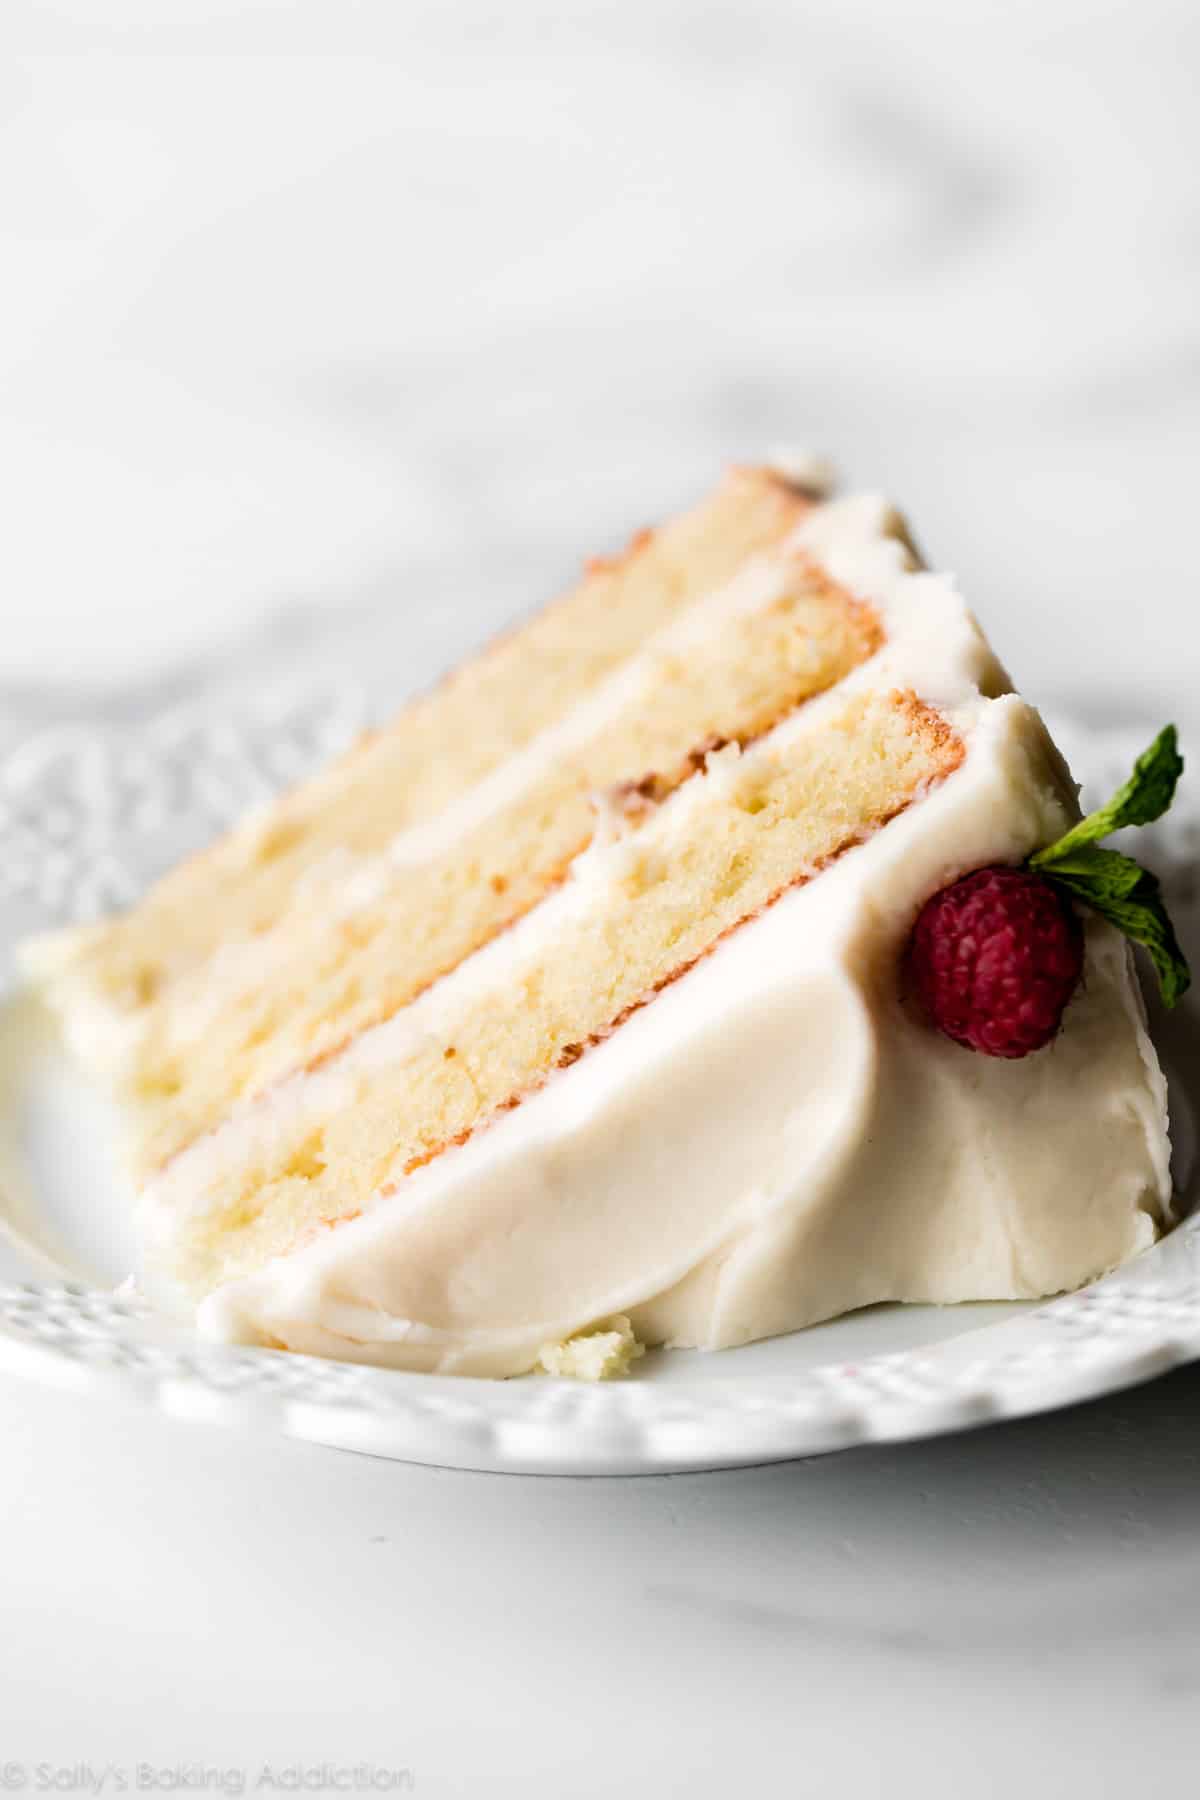
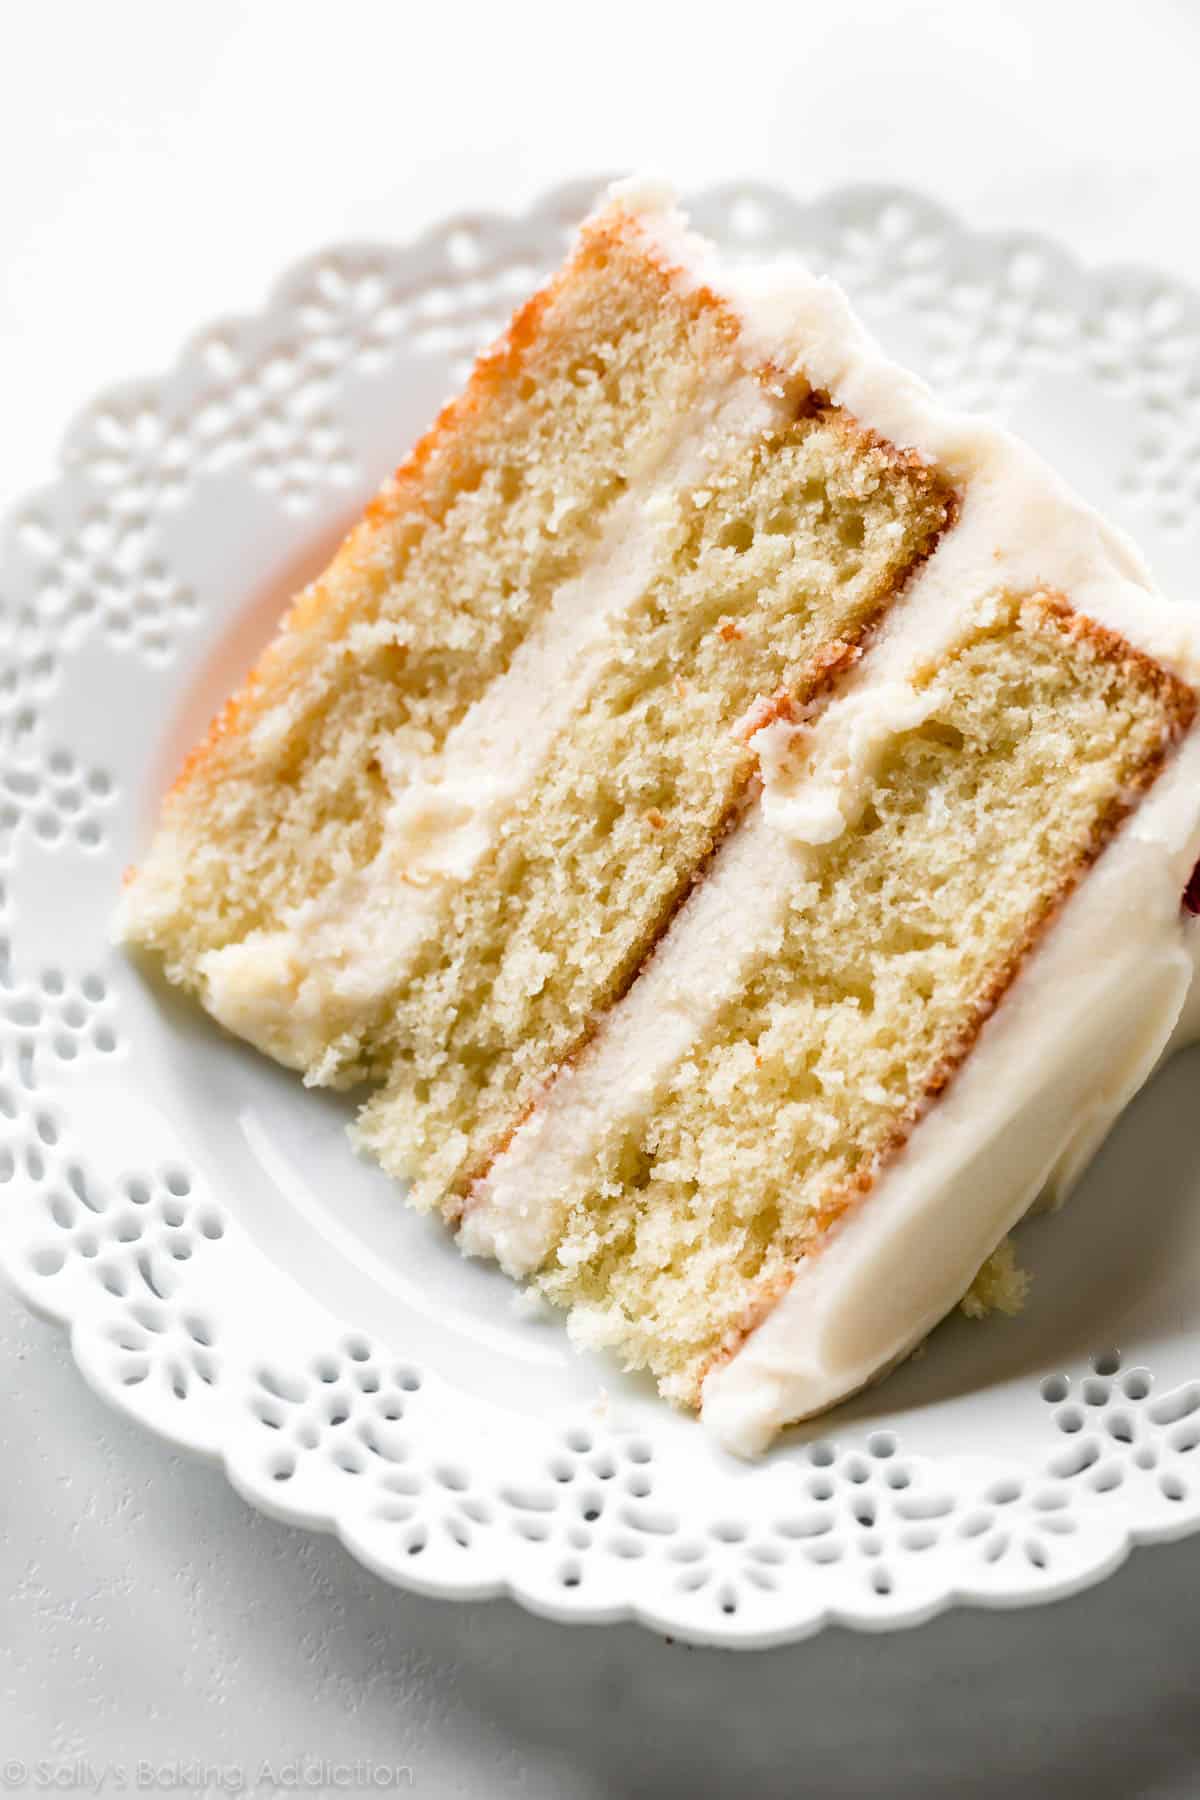
With its outstanding vanilla flavor, pillowy soft crumb, and creamy vanilla buttercream, this is truly the best vanilla cake I’ve ever had. And after 1 bite, I guarantee you’ll agree.
One reader, Sarah, commented: “This cake is elite. Texture, flavor, sturdiness for frosting and decorating, freezes well… It was a beautiful centerpiece and dessert for a baby shower. Thank you! ★★★★★“
One reader, Candice, commented: “This is truly the best vanilla cake I have ever tasted! It is among the best cakes I have made in my 20+ years of baking… ★★★★★“
One reader, Rary, commented: “Off. The. Charts. Absolutely scrumptious! ★★★★★“
Out of all the cake recipes on my website, there’s a glaring absence. There’s white cake with a pristine soft crumb, vanilla naked cake with a flavorful tight crumb, and checkerboard cake with a whimsical design.
What about a classic vanilla layer cake draped in vanilla buttercream? I already have homemade vanilla cupcakes and a vanilla 6 inch cake covered and now in all its crowning glory (and after plenty recipe testing catastrophes), I present you with cake perfection:
This is the best vanilla cake I’ve ever had.
What Makes it the Best Vanilla Cake?
Let’s count the ways!
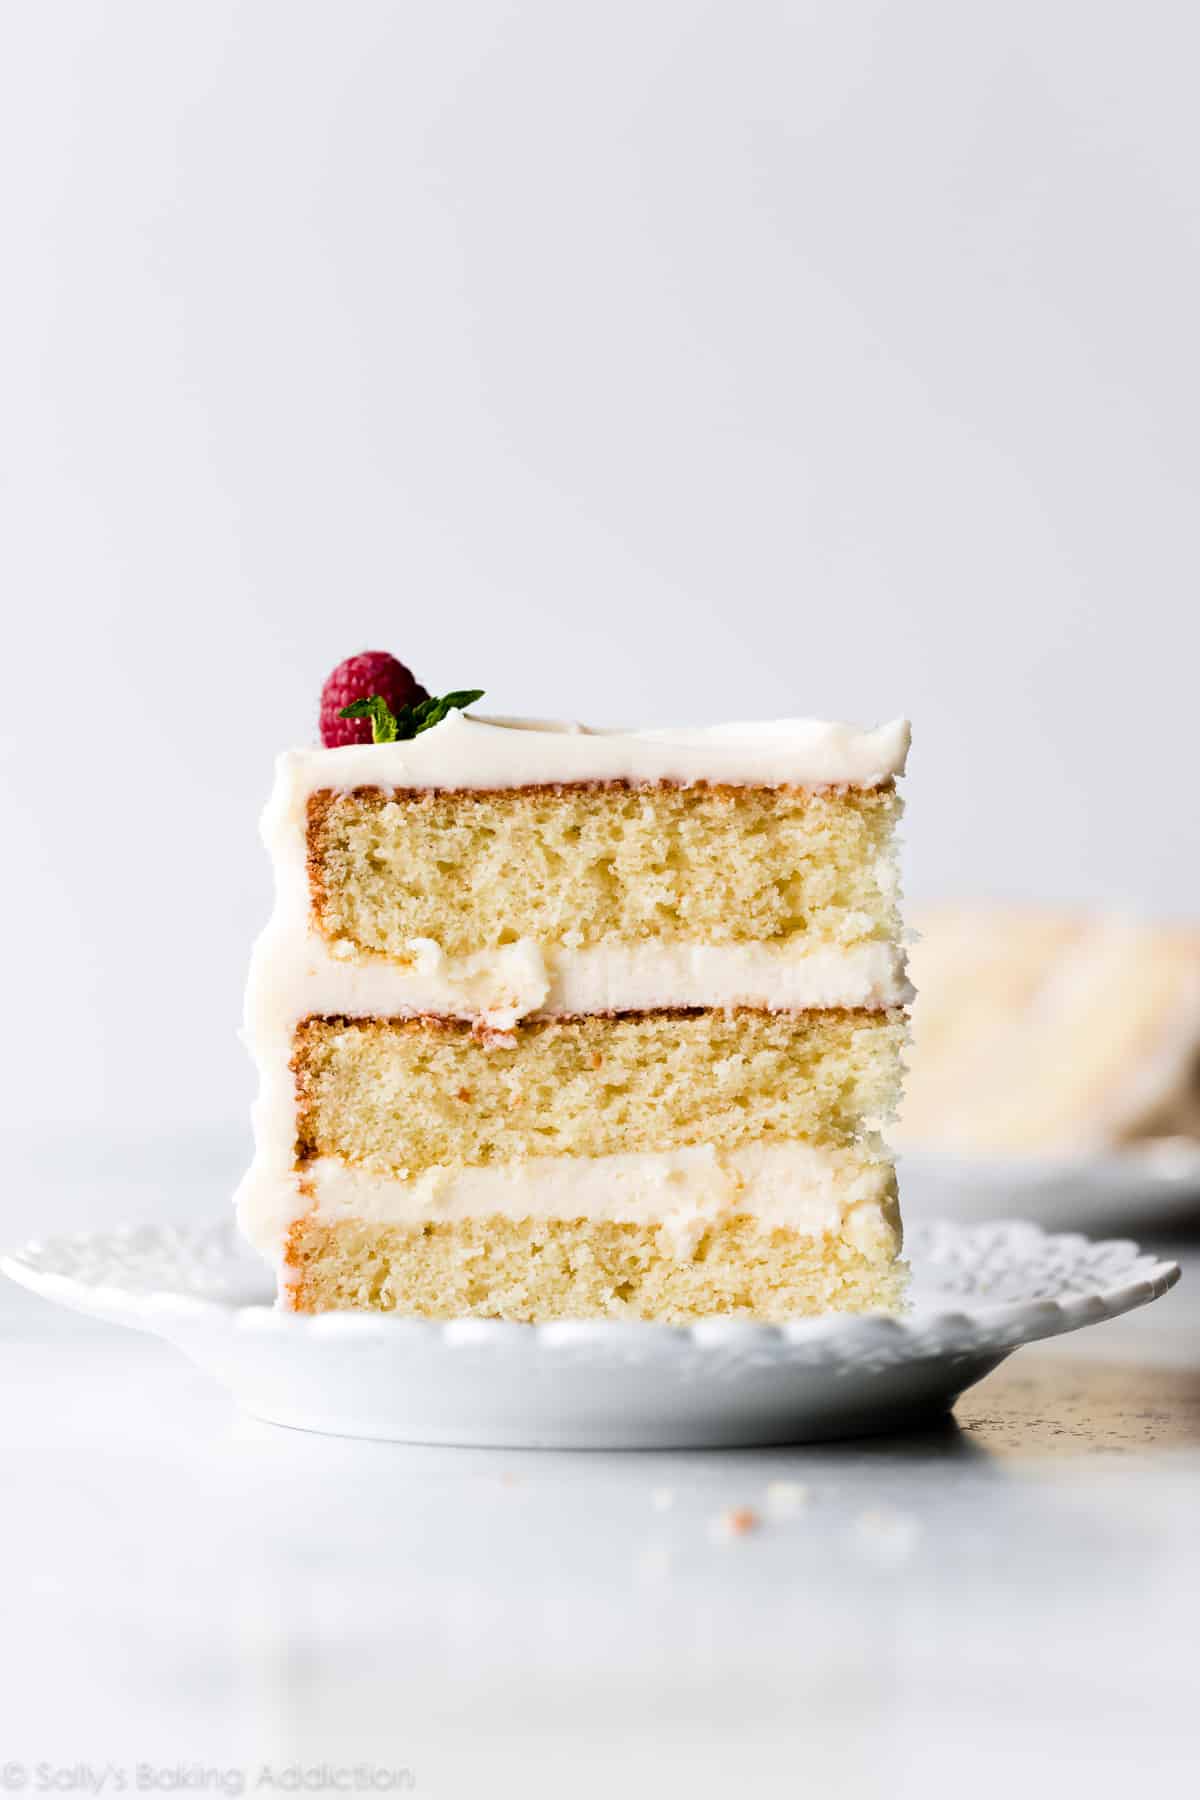
- Soft, light crumb from cake flour
- Fluffy from extra egg whites
- Buttery and cakey from creamed butter
- Stick-to-your-fork moist from eggs & buttermilk
- Extra flavor from pure vanilla extract
Not to mention its versatility: This vanilla cake batter is strong enough for shaped cakes, tiered cakes (see the slight variation in my homemade wedding cake recipe), and holds up beautifully under fondant. Use this batter for vanilla cupcakes, Bundt cake, or even piñata cake. It’s classy enough for a wedding celebration, but unassuming enough for a big family dinner.
Behind the Vanilla Cake Recipe
After years of cake successes and flops, I’m confident in this homemade vanilla cake. During my recipe testing, I combined my white cake recipe and naked cake recipe. These are two reader favorites and I knew they’d be the best starting point. At first there were too many eggs and I quickly learned sifting cake flour was NOT doing any favors.
You need the following power ingredients:
- Cake Flour: If you want a fluffy and soft bakery-style vanilla cake, cake flour is the secret. The cake will be denser and heavier using all-purpose flour.
- Eggs & 2 additional egg whites: 3 whole eggs provide structure, moisture, and richness. 2 extra egg whites keep the cake light and airy. I don’t recommend using 4 whole eggs; stick to the 3 egg & 2 egg white combination.
- Baking Powder & Baking Soda: Remember the differences in baking powder vs baking soda and why we use both in some recipes? Using enough baking powder to give these layers height gave the cake a bitter aftertaste. Baking soda allows us to use less baking powder.
- Buttermilk: Buttermilk is an acidic ingredient and baking soda requires an acid to work. Plus buttermilk yields an EXTRA moist cake crumb. See recipe note about using a DIY buttermilk substitute.
For more prominent vanilla flavor, use homemade vanilla extract. (What a fun DIY gift!) This vanilla cake batter is moderately thick and fits perfectly in 3 9-inch cake pans. We actually use the same exact batter to make snickerdoodle cake.
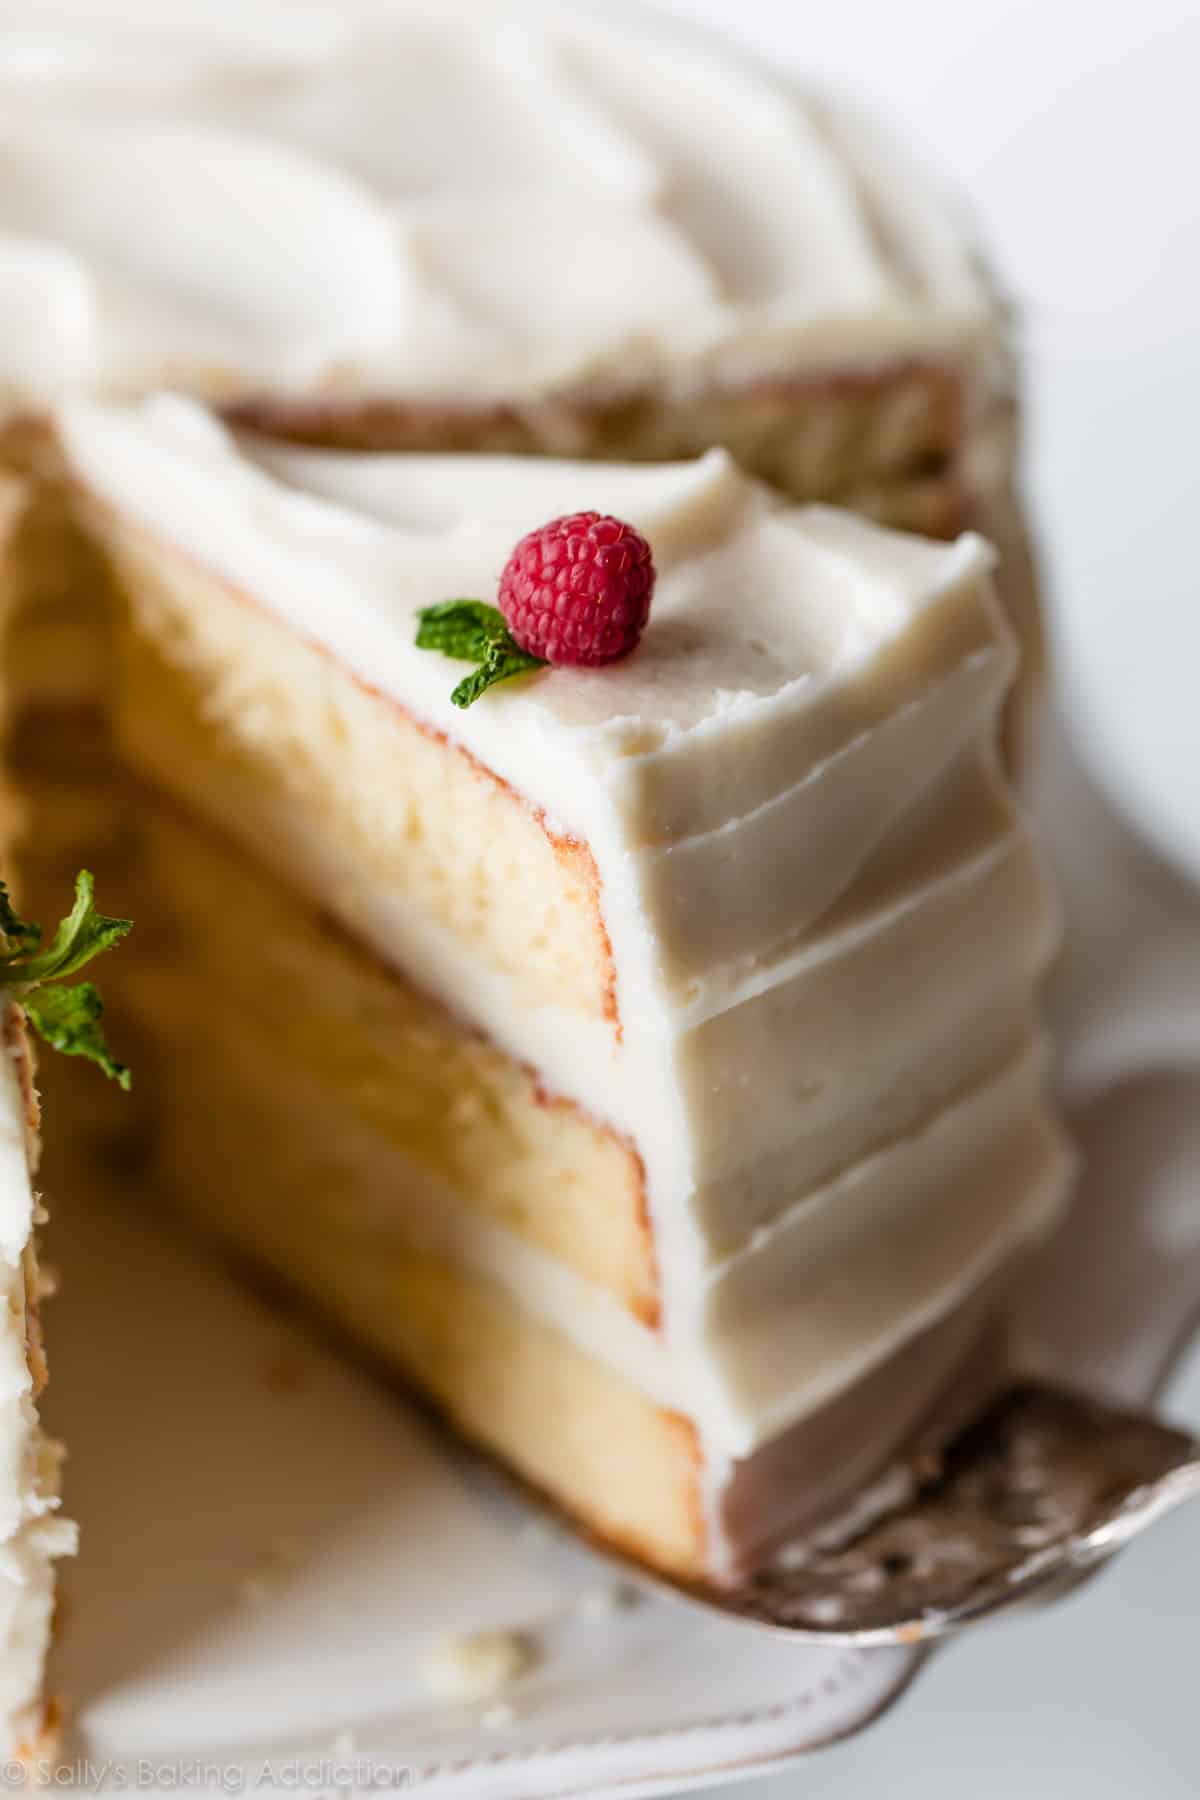
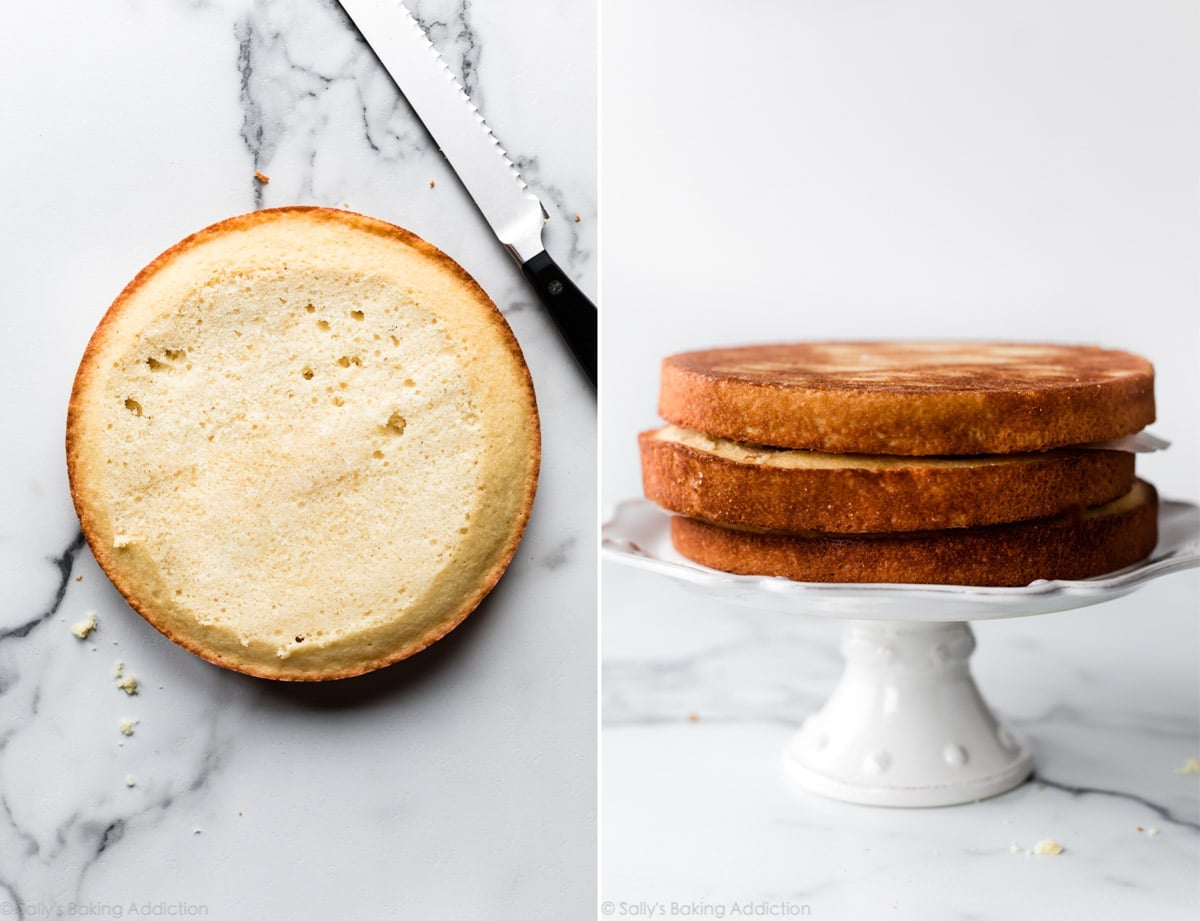
Do you know how to level a cake? Let me help. It’s really easy. You can use a fancy cake leveler, but I use a serrated knife. Carefully slice off the tippy top of the cooled cake layers, creating a flat surface. Leveling cakes doesn’t require a ruler, talent, or any mathematical equations. Instead, just use your eyes, hands, and a knife.
Leveling the cake layers promises a straight and sturdy layer cake.

How Much Frosting Between Cake Layers?
I always eyeball the amount of frosting between cake layers, but I measured when I decorated the pictured cake. The vanilla buttercream recipe below yields about 6 cups of frosting. I recommend you use about 1.5 heaping cups of buttercream between each cake layer and reserve the last 3 cups for outside the cake. If you are going to add a filling such as raspberry cake filling, you’ll use less frosting between the layers. You can use this detailed how to assemble and decorate a layer cake post as a guide!
Cake Decoration Inspiration: For a simple look, stick with vanilla buttercream, fresh berries, and mint sprigs. You can also decorate with chocolate buttercream (I recommend the same amount from this piñata cake), rainbow sprinkles, a chocolate ganache drip like on this chocolate chip cake, or even beautiful buttercream flowers.

Homemade Vanilla Cake Success Tips
Learn from my mistakes and bake the best cake on the 1st try!
- Follow the recipe closely. Use each power ingredient listed.
- Use room temperature ingredients. The batter mixes together evenly when all the cake ingredients are roughly the same temperature. This also reduces the risk of over-mixing and over-baking. Set out your ingredients 1 hour before beginning. Read more about why room temperature ingredients are important.
- Line your cake pans with parchment. Place your cake pans on a large sheet of parchment paper. Trace the bottom of the cake pan with a pencil. Cut parchment paper into rounds. Grease the pan and the parchment paper. Parchment paper rounds guarantee seamless removal from the pan because the cake slides right out.
- Cool cake layers completely. I’ve tried taking shortcuts by assembling a layer cake with semi-warm cake layers. Well, the frosting completely melts and causes the entire cake to collapse. Make sure each layer is cool– refrigerate or freeze the layers if you need to!
- Refrigerate decorated cake. After frosting the cake, place it in the refrigerator for at least 1 hour. This is optional, but it sets the frosting and cake layers. You’ll get beautifully clean slices because the crumbs are cool and tight.
Great read: Check out Tessa’s Top 10 Best Layer Cake Tips.
Finding the perfect vanilla cake recipe requires a celebration. Luckily we have cake!!!
More Classic Cake Recipes
And here is my perfected vanilla cupcakes recipe.
Print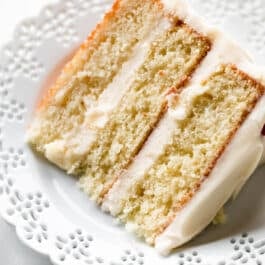
Best Vanilla Cake
- Prep Time: 35 minutes
- Cook Time: 25 minutes
- Total Time: 4 hours (includes cooling)
- Yield: 12-14 servings
- Category: Dessert
- Method: Baking
- Cuisine: American
Description
With its outstanding vanilla flavor, pillowy soft crumb, and creamy vanilla buttercream, this is truly the best vanilla cake I’ve ever had. Make sure you read through the recipe and recipe notes before beginning. This recipe yields approximately 8 cups of batter which is helpful if you need this batter for different cake pan sizes and conversions.
Ingredients
- 3 and 2/3 cups (433g) cake flour (spooned & leveled)
- 1 teaspoon salt
- 2 teaspoons baking powder
- 3/4 teaspoon baking soda
- 1 and 1/2 cups (340g) unsalted butter, softened to room temperature
- 2 cups (400g) granulated sugar
- 3 large eggs + 2 additional egg whites, at room temperature*
- 1 Tablespoon pure vanilla extract (yes, a Tablespoon!)
- 1 and 1/2 cups (360ml) buttermilk, at room temperature*
Vanilla Buttercream
- 1 and 1/2 cups (340g) unsalted butter, softened to room temperature
- 5 and 1/2 cups (650g) confectioners’ sugar
- 1/3 cup (80ml) whole milk or heavy cream
- 1 and 1/2 teaspoons pure vanilla extract
- 1/8 teaspoon salt
Instructions
- Preheat oven to 350°F (177°C). Grease three 9-inch cake pans, line with parchment paper rounds, then grease the parchment paper. Parchment paper helps the cakes seamlessly release from the pans. (If it’s helpful, see this parchment paper rounds for cakes video & post.)
- Make the cake: Whisk the cake flour, salt, baking powder, and baking soda together. Set aside.
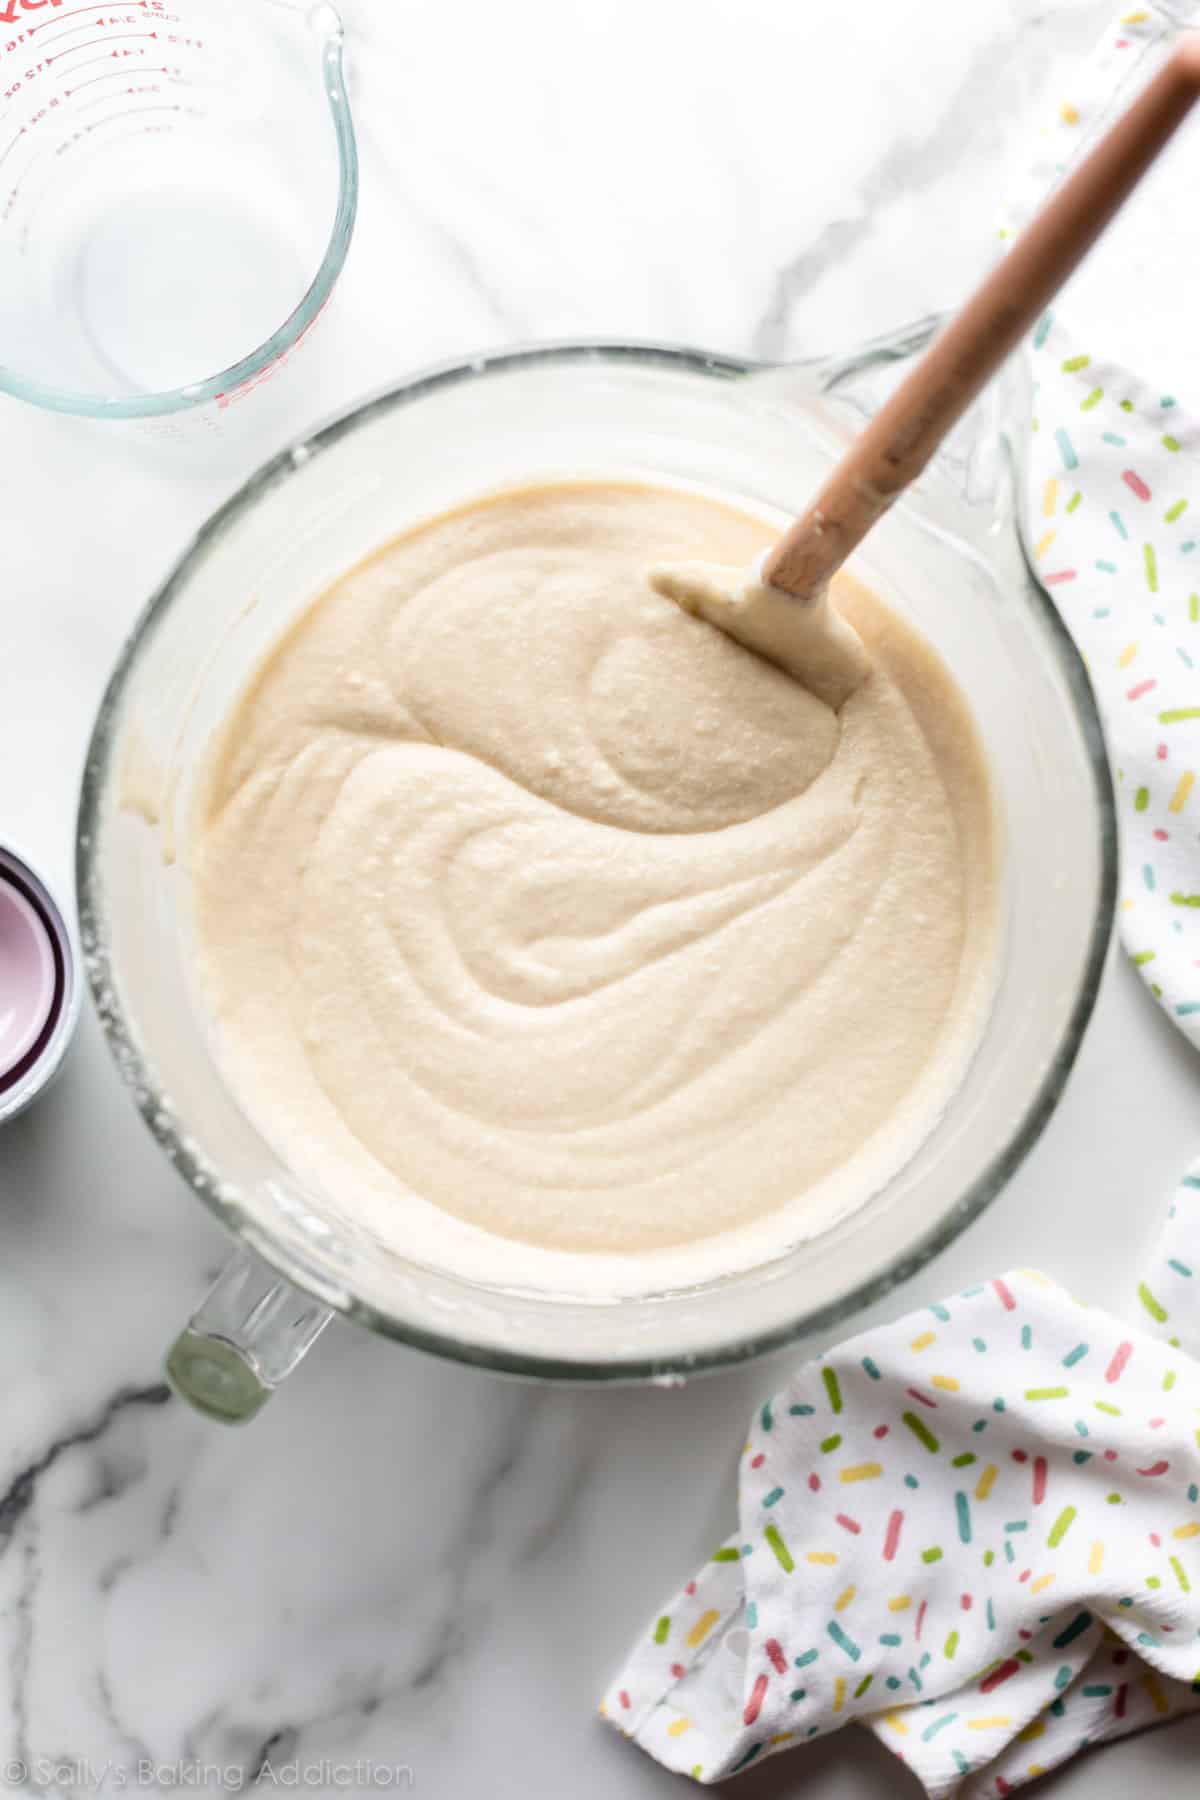
- Using a handheld or stand mixer fitted with a paddle or whisk attachment, beat the butter and sugar together on high speed until smooth and creamy, about 3 minutes. Scrape down the sides and up the bottom of the bowl with a silicone spatula as needed. Beat in the 3 eggs, 2 egg whites, and vanilla extract on high speed until combined, about 2 minutes. (Mixture will look curdled as a result of the egg liquid and solid butter combining.) Scrape down the sides and up the bottom of the bowl as needed. With the mixer on low speed, add the dry ingredients just until combined. With the mixer still running on low, pour in the buttermilk and mix just until combined. You may need to whisk it all by hand to make sure there are no lumps at the bottom of the bowl. The batter will be slightly thick.
- Pour batter evenly into cake pans. Weigh them to ensure accuracy, if desired. Bake for around 23-26 minutes or until the cakes are baked through. To test for doneness, insert a toothpick into the center of the cake. If it comes out clean, it’s done. Allow cakes to cool completely in the pans set on a wire cooling rack. The cakes must be completely cool before frosting and assembling.
- Make the frosting: In a large bowl using a handheld mixer or stand mixer fitted with a whisk or paddle attachment, beat the butter on medium speed until creamy, about 2 minutes. Add confectioners’ sugar, milk, vanilla extract, and salt with the mixer running on low. Increase to high speed and beat for 2 minutes. Add more confectioners’ sugar if frosting is too thin, more milk if frosting is too thick, or an extra pinch of salt if frosting is too sweet.
- Assemble and decorate: Using a large serrated knife, slice a thin layer off the tops of the cakes to create a flat surface. Discard (or crumble over ice cream!). Place 1 cake layer on your cake stand, cake turntable, or serving plate. Evenly cover the top with about 1 and 1/2 cups of frosting. Top with 2nd cake layer and evenly cover the top with about 1 and 1/2 cups of frosting. Top with the third cake layer. Spread the remaining frosting all over the top and sides. I use and recommend an icing spatula to apply the frosting.
- Refrigerate cake for at least 1 hour before slicing. This helps the cake hold its shape when cutting.
- Cover leftover cake tightly and store in the refrigerator for up to 5 days.
Notes
- Make Ahead & Freezing Instructions: The cake layers can be baked, cooled, and covered tightly at room temperature overnight. Likewise, the frosting can be prepared then covered and refrigerated overnight. Let the frosting sit at room temperature to slightly soften for 10 minutes before assembling and frosting. Frosted cake or unfrosted cake layers can be frozen up to 2-3 months. Thaw overnight in the refrigerator and bring to room temperature before decorating/serving. See how to freeze cakes for detailed instructions.
- Special Tools (affiliate links): 9-inch Round Cake Pans | Glass Mixing Bowl | Whisk | Electric Mixer (Handheld or Stand) | Silicone Spatula | Kitchen Scale (optional) | Cooling Rack | Large Icing Spatula | Cake Turntable | Bench Scraper | Cake Carrier (for storing and transporting)
- 9×13-inch Cake: I recommend using my white cake batter instead. Both use similar ingredients and produce a deliciously light vanilla cake. See recipe notes for the 9×13 inch version.
- 2 Layer Cake: I recommend using my 2 layer white cake batter instead. Both use similar ingredients and produce a deliciously light vanilla cake.
- Bundt Cake: This vanilla cake batter will fit into a 10-12 cup or larger Bundt pan. I’m unsure of the exact bake time (likely around an hour), but use a toothpick to test for doneness. Same oven temperature.
- Cupcakes: Fill cupcake liners 2/3 full. Bake at 350°F (177°C) for 19-21 minutes. Yields about 3 dozen. Or try my vanilla cupcakes recipe.
- Cake Flour: To prevent a dry-tasting cake, make sure you are spooning and leveling the flour or weighing it. For the best results, I strongly recommend cake flour. You can find it in the baking aisle and I have many more recipes using it. Usually a homemade cake flour substitute works, but this recipe uses far too much cake flour and the homemade substitute is not ideal.
- Eggs: 3 whole eggs provide structure, moisture, and richness. 2 extra egg whites keep the cake light and airy. I don’t recommend using 4 whole eggs; stick to the 3 egg & 2 egg white combination. Here are recipes using leftover egg yolks.
- Buttermilk: If you don’t have buttermilk, you can make a DIY buttermilk substitute. Add 2 teaspoons of white vinegar or lemon juice to a liquid measuring cup. Then add enough whole milk to the same measuring cup until it reaches 1 and 1/2 cups. (In a pinch, lower fat or nondairy milks work for this soured milk, but the cake won’t taste as moist or rich.) Stir it around and let sit for 5 minutes. The homemade “buttermilk” will be somewhat curdled and ready to use in the recipe.
- Why is everything at room temperature? All refrigerated items should be at room temperature so the batter mixes together easily and evenly. Read more about why room temperature ingredients are important.
- Want chocolate frosting instead? I recommend the recipe/amount of chocolate frosting I use for Piñata Cake.
- Sprinkle Cake: To make a sprinkle cake, fold about 3/4 cup (135g) of sprinkles into the cake batter. Avoid nonpareils (the little balls), which tend to bleed their color. Or try this confetti birthday cake, which is quite similar to this recipe.


Reader Comments and Reviews
Hi Sally,
I was just wondering if you could substitute the sprinkles for chocolate chips or will it ruin the texture of the cake?
Hi Eesha! We recommend mini chocolate chips for this cake batter, about 1 – 1.5 cups.
Sally
I’m really going out on a limb here and baking this cake for my teacher’s gala birthday and all our friends will be there. Am stumped by the use of a paddle or whisk on a mixer. I don’t have a stand mixer, only a hand one with beaters. Can I use the hand/beater contraption, or a hand whisk? Or should I buy a new hand mixer with a whisk? Will it make a significant difference? If so, maybe I can get a neighbor that has a stand mixer with a paddle and borrow their kitchen for the cake batter? Please advise. Thanks. P.S. I’m not usually a baker but I really want to try this recipe.
Hi Merideth, you can use your hand mixer here — not a problem!
Hey, love the recipe. If I made this in four, 4inch pans instead of three 9 inch pans, do you have any suggestions as far as baking time?
Hi Rebekka, we’re unsure of the exact bake time, but it will be much shorter. Also, be sure to only fill your pans half way — you’ll have leftover batter for some cupcakes. You may even want to follow the recipe for vanilla cake in this 6 inch cakes post instead — it will be closer to what you need, with just a bit of leftover batter.
I made this in 4, 6 inch pans. I checked them every few minutes starting at 25 minutes. I honestly can’t remember how long they baked, but it was about 35 minutes. They were perfect!!!
Hi Sally,
I am hoping to make this cake today but only have two 6 inch cake pans. How do I use the pans to work with this recipe?
Hi Sami, for a 6 inch cake, we’d recommend following the vanilla cake from this 6 inch cakes post instead. You can bake the two layers, let them cool and remove the cakes, and then use one of the cooled pans to bake the third layer. Or, you can make the two layers (filling the pans half way), and then using the leftover batter for a few cupcakes. Enjoy!
Hi Sally! I have some of the vanilla sugar I made around the holidays (yes, your recipe ) do you think it would be ok in this recipe? And should I add any additional vanilla? I’m thinking it would work ok but I wanted to check with the expert . Thanks for all of your delicious recipes!
Hi Donna, absolutely! Simply use the vanilla sugar in place of the granulated sugar with no other changes to the recipe. Let us know how it goes!
Hi Sally! I have two 8″ pan, how will I cut down the ingredients? Thank you!
Hi Eve, for a two layer cake, we recommend using our 2 layer white cake batter instead. Both use similar ingredients and produce a deliciously light vanilla cake. Bake time will be slightly longer to account for the extra batter in your 8 inch pans. Or, if you decide to use this recipe, fill your 2 pans half way and use the leftover batter for a few cupcakes. Let us know how it turns out for you!
I made this recipe and doubled it in a 6 quart Kitchen Aid. It gave me enough batter to make 2, 8 inch round layers – 2 inch deep and 36 cup cakes. I have made it with salted butter ( omitted salt in recipe to adjust for it) and I have made it with unsalted butter. It works out either way. I prefer to use salted butter in the icing rather than risk any grittiness from adding salt.
Excellent recipe! I normally freeze an un-iced cake overnight to set the crumb but I did not do this and it crumb coated without any issues.
Instead of whisking the dry ingredients, I did sift them together.
Using the measurements listed for cream added, the icing was spreadable and easy to decorate with. I normally add cream until it feels right.
I highly recommend this recipe and will make again
Hi Sally! I love your work-your recipes are such a hit every time.
Question: I made exactly as written (I love your tips and notes to put my mind at ease-curdling butter egg mixture eek!), but my batter was thicker than yours in the video. As a result I’m struggling with big air bubbles. The cake still baked beautifully, lovely texture and crumb, but I’m confused. Triple checked the measurements and weighed where possible.. second batch was the same, though banging the pan a lot helped… any thoughts? Thanks again!!
Hi Niki! As long as your cake is coming out soft and tasty, I wouldn’t worry! Banging the pans before baking is our best tip for getting rid of air bubbles, but also be careful to not over-mix your batter – this would incorporate more air. Thanks so much for making this recipe!
Hi thanks so much!
Just wanted to ask if I can use heavy whipping cream for the buttercream ?
Hi Linique, yes, heavy whipping cream and heavy cream are essentially the same thing so that will work just fine. Hope you enjoy the cake!
Hello!! I love your recipes soo much
I just wanted to ask if its okay to use normal butter instead of unsalted ?
Hi Linique, if using salted butter in the cake, reduce the added salt down to 1/2 teaspoon. You can use it in the frosting too, then just salt it to taste.
Hi Sally,
Have loved all of your recipes that I have tried (I didn’t even like red velvet until I tried your recipe and now my co-workers request it for birthdays). Is this cake sturdy enough to use for an ice cream cake?
Hi Lisa, yes, this cake should hold up well as part of an ice cream cake. Enjoy!
Very confusing recipe, full of blah blah blah. The butter is not even in the ingredient.
I was making this cake and once I took it out of the pan it cracked down the middle. Is there a reason this happened or can you tell me ways to help be more gentle.
How many cups will this make? I’m using a Wilton rectangle 11X15 Pan..
Hi Kristie, this recipe yields *about* 8 cups of batter. You can use our Cake Pan Sizes and Conversions guide to help scale it for your needs. Enjoy!
I only have 2 x 8.5″ cake tins. Looking at your earlier comment about making the cake smaller, could I use my tins but reduce the ingredients by 3/4? (I haven’t got any 6″ tins either!)
Hi Sherrie, you can use your 8.5″ cake pans for slightly thicker layers, no need to alter the recipe any. Bake time may be a minute or two longer — use a toothpick to test for doneness. Happy baking!
Thank you: I had been trying to work out the maths and needed a cold flannel on my head!!
Can i sub the flour & baking powder for supreme sponge self-raising (9.4% protein)?? Thanks
Hi Charlotte, we don’t recommend it — using self-raising flour would require recipe testing in order to guarantee results. Best to stick with cake flour here!
Made this today for my daughter’s bday. Cake is delicious, but the edges crumbled entirely when I popped the cakes out of the pan. Edges literally just fell out separate from the main part of the cake, so they were not stuck to the pan. This made it impossible to frost. What did I do wrong? I did not time the cooling period, but waited what seemed like a long time and cakes were cool to the touch. I ran a knife along the edge too. Pans were buttered well before I poured batter in, and used buttered parchment paper too. Does it need a solid hour to set? Or is crumbling edges a sign of some other issue? I want to make this again, but am hesitant to do so if the cake is so hard to frost.
Amazing.
I loved it
I just made this cake, I followed the recipe step by step except for letting it cool long enough to icing. Both the cake and icing are absolutely delicious. This cake melts in your mouth!
Thank you for sharing this recipe!
Hello Sally
I love love your vanilla cake recipe , however it’s too much cake
How can I bake it in half?
Hi Sawsan, You can halve this recipe for a smaller cake, or you might follow our 6 inch vanilla cake recipe instead. Equally delicious!
I love this recipe so much but can we use all purpose flour instead of cake flour
Can you please tell me why in your vanilla cake recipe you use cake flour but in Funfetti cake you use all purpose flour?
Hi Lisa! You can use cake flour in the funfetti cake recipe. In fact, these days, I often do! See recipe note. It produces a softer crumb.
This was the best vanilla recipe I’ve tried! Loved the taste and texture and it was so fluffy and moist! Thank you so much for this! I used this with your lemon curd recipe and I made a raspberry frosting and the cake was superb! My brother said it was the best cake he’s ever had! Note for others: I did cut the sugar by about 1/2 cup (I typically reduce the sugar for all recipes because I do not like sweet cakes).
Made this cake for my son’s birthday. It was easy to prepare, get out of the pans & frost. I added some raspberries & mint leaves as decoration. It was moist, dense & many compliments were bestowed. A definite addition to the cake roster!
Hi, I’ve had this recipe saved for a couple years now – I just noticed the screenshot of the one I have from 2 years ago has 420g of cake flour where I see you’ve now updated it to 433g. Should I be adjusting for more?
Hi Liv, use 433g of cake flour. (Honestly using 420 grams or 433 grams or anywhere in between will produce the same result– it’s very slight in a cake this large.)
I tried this recipe this weekend for a birthday cake and it was perfect. It was dense but super moist with great flavor and everyone raved about it! Thank you!!
Hi Sally. I have tried many of your recipes and they always taste fantastic! I have a concern about cooling
cakes completely in the pan though. It seems to add condensation to the cakes and they’re gummy on the tops/bottoms. Also, it seems my oven runs hot, I’ve replaced baking soda/powder etc. My cakes rise and fall. Any suggestions for these issues? Thanks in advance and I just love your recipes! They always taste great and your instructions are so precise and helpful.
Hi Brigette, Thank you so much for trying our recipes! Some bakers may disagree, but we always cool our cakes completely inside the pans. However, if condensation is becoming a problem for you, try cool the cake in the pan for 30 minutes, then remove it from the pan to continue cooling.
If you know your oven runs hot, it’s very helpful to have an oven thermometer. You can read more about this and we link to an inexpensive thermometer we like in our post 10 Baking Tips for Perfect Cakes.
Sinking cakes are often due to an under-baked center. Fixing your oven temperature and an extra minute or two in the oven should help!
I love, love this recipe however I have had the same problem. My cupcakes come out of 2 different ovens, 350 degrees (tested by portable oven thermometer) and look beautiful . An hour later and the sink and are sticky.
I have tried repeatedly and get the same result. I did not th thave buttermilk so i used your recipe -once with vinegar and once with lemon juice-and the same result. Next try will be with real buttermilk . I will check back .
I made this vanilla cake yesterday!!! I didn’t have cake flour,so I used 3 cups of all purpose flour and 2/3 cup of corn starch…because its summer, I don’t like to use the oven for too long!!! I baked it on a sheet pan 21× 15 inch pan, baked fir 14 minutes, turned once end it turned out amazing!!! I cut into 6 pieces to stack with buttercream!!! For the buttercream, I did not add cream, I used the zest of a lime and juice of a lime!!! So fresh!!! It was amazing!!!
Would it be possible to cut the sugar in this recipe down and use 1/4 or 1/3 cup less than is called for?
Hi Sue, we haven’t tried reducing the sugar in this recipe, so we’re uncertain of the results. You can certainly try, but keep in mind that sugar plays a larger role beyond taste, and reducing it may impact the structure and texture, too.
I am interested in adding a strawberry filling in between layers . Has anyone done this successfully?
Hi Kathryne, absolutely. We do still like to use a light layer of frosting when using fruit fillings to keep the layers from sliding around. You might also want to pipe a border around the layer to keep the filling from coming out the sides. Hope you enjoy this cake!
How could I down scale this recipe for a 6” x 3” cake pan?
Hi Gonie, you can use our cake pan sizes and conversions guide to scale this recipe, or you might also enjoy the vanilla cake from our 6 inch cake recipes post — it’s the perfect amount for 3, 6 inch pans.