

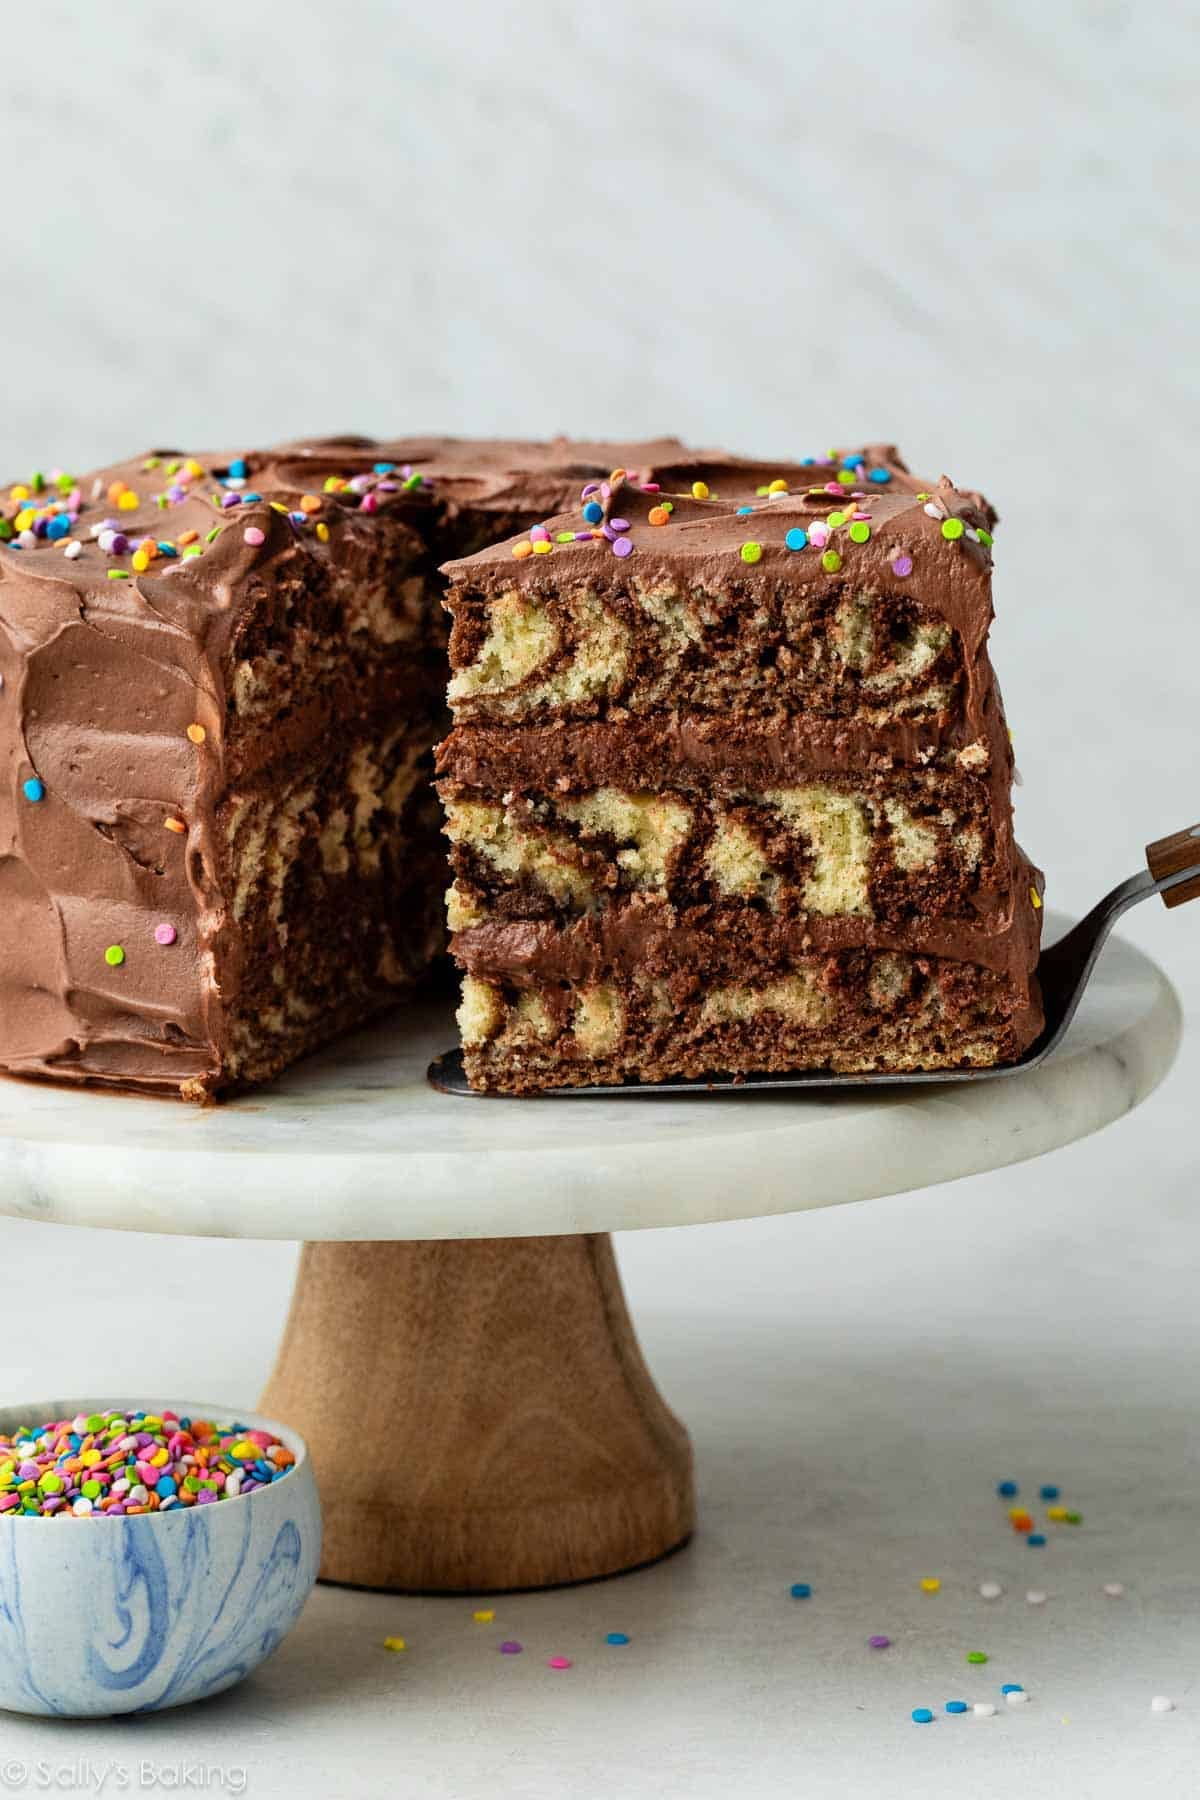
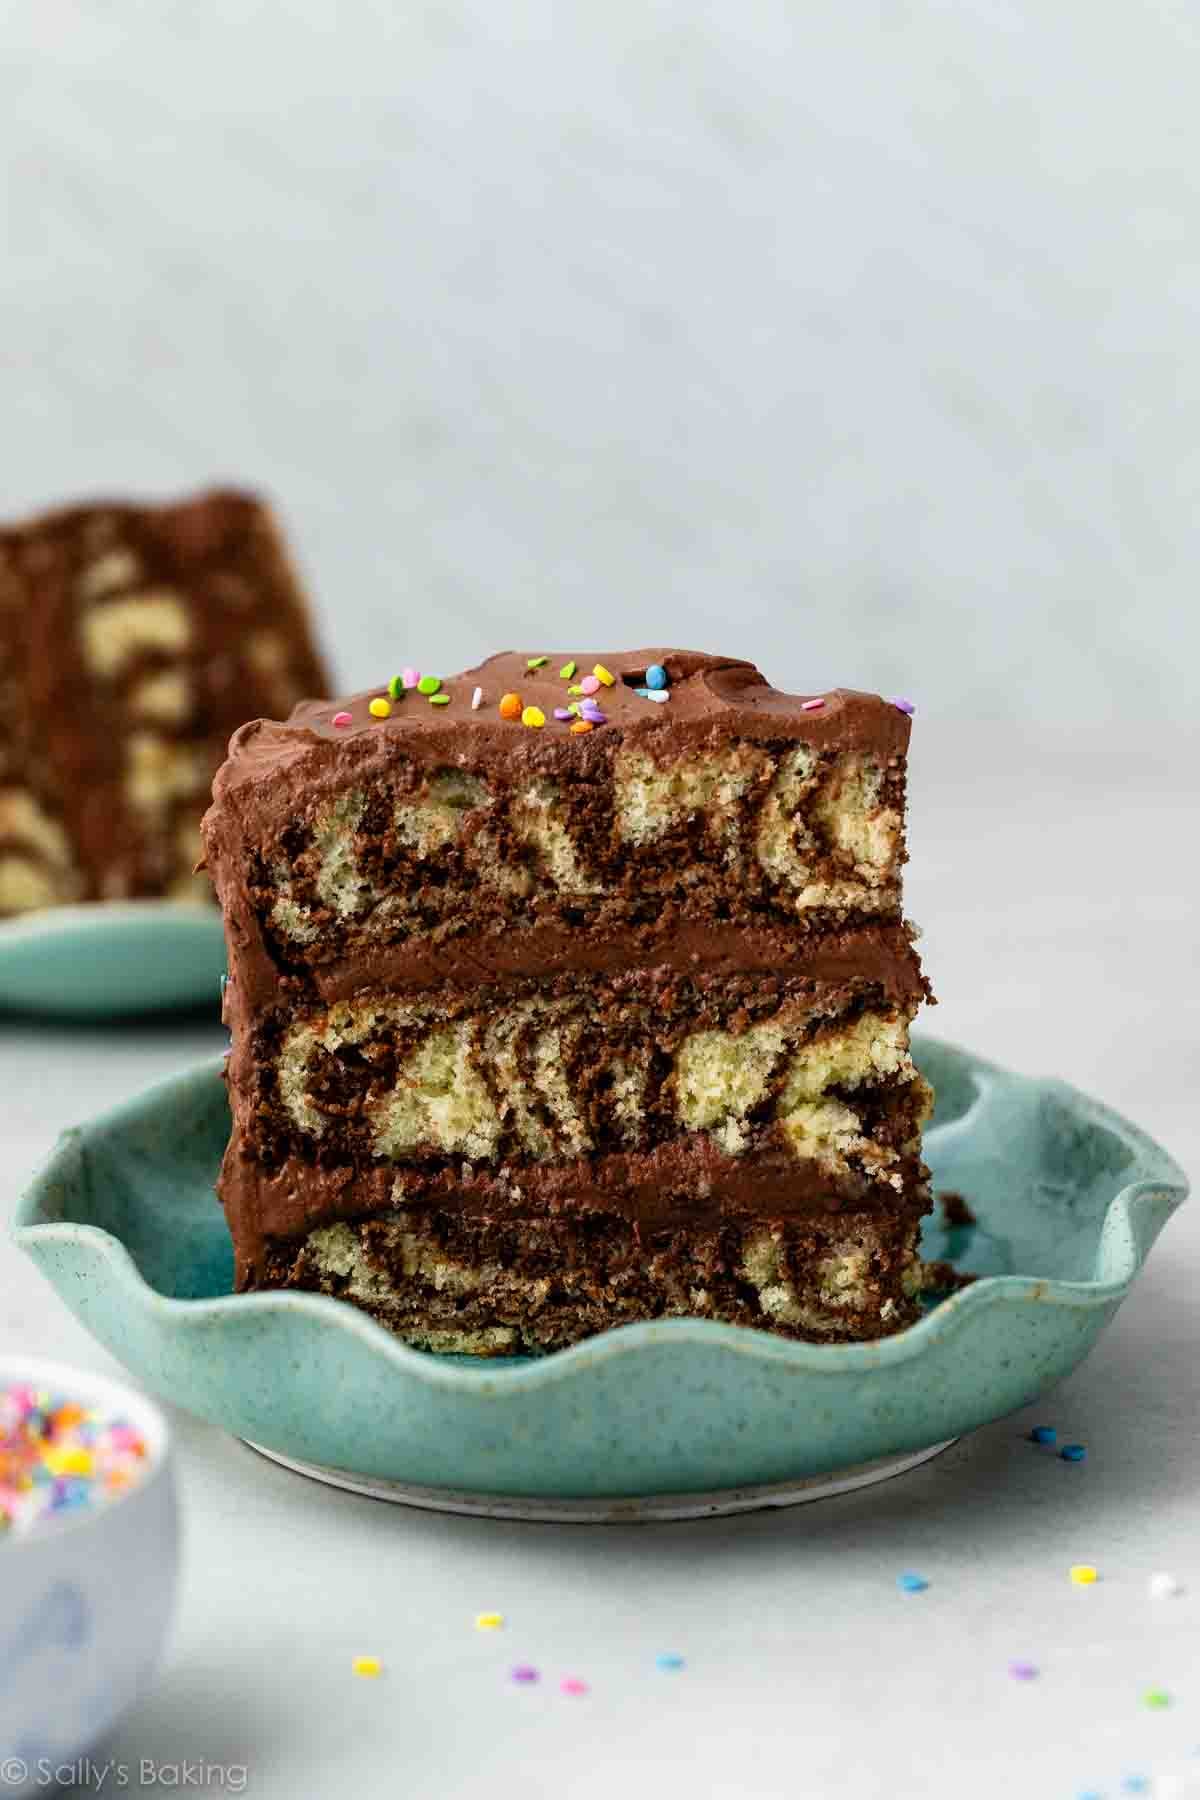
This 3-layer zebra cake features mesmerizing swirls of chocolate and vanilla, plus a silky chocolate cream cheese frosting. This marbled cake is easier than it looks because it starts with just 1 batter!
I originally shared this recipe in 2017, and I’ve since updated it with new photos, a video, and extra success tips for consistently great results.
You’re looking at chocolate and vanilla cakes baked together in a striking striped pattern. Pretty impressive, right? Much easier than you think to pull off, too. Like marble loaf cake but a little more flashy. Zebra cake is often baked as a single-layer cake or a Bundt cake, but I needed a fun and towering cake for a friend’s birthday. And an excuse to make chocolate cream cheese frosting!
*No zebras were harmed in the making of this cake. 😉
One reader, Erin, commented: “This cake is delicious! It’s fun to make, and the final product looks astounding. The cake has a wonderfully soft and fluffy texture. And the frosting!! That chocolate cream cheese frosting has to be the best kind of frosting I have ever had. It’s creamy, smooth, chocolate-y, and downright perfect. Even my dad, who hates frosting, loved it. It’s nice because it’s not as tooth-decayingly sweet as normal buttercream. And the cream cheese adds a fabulous tang! This is definitely my new favorite chocolate frosting recipe. ★★★★★“
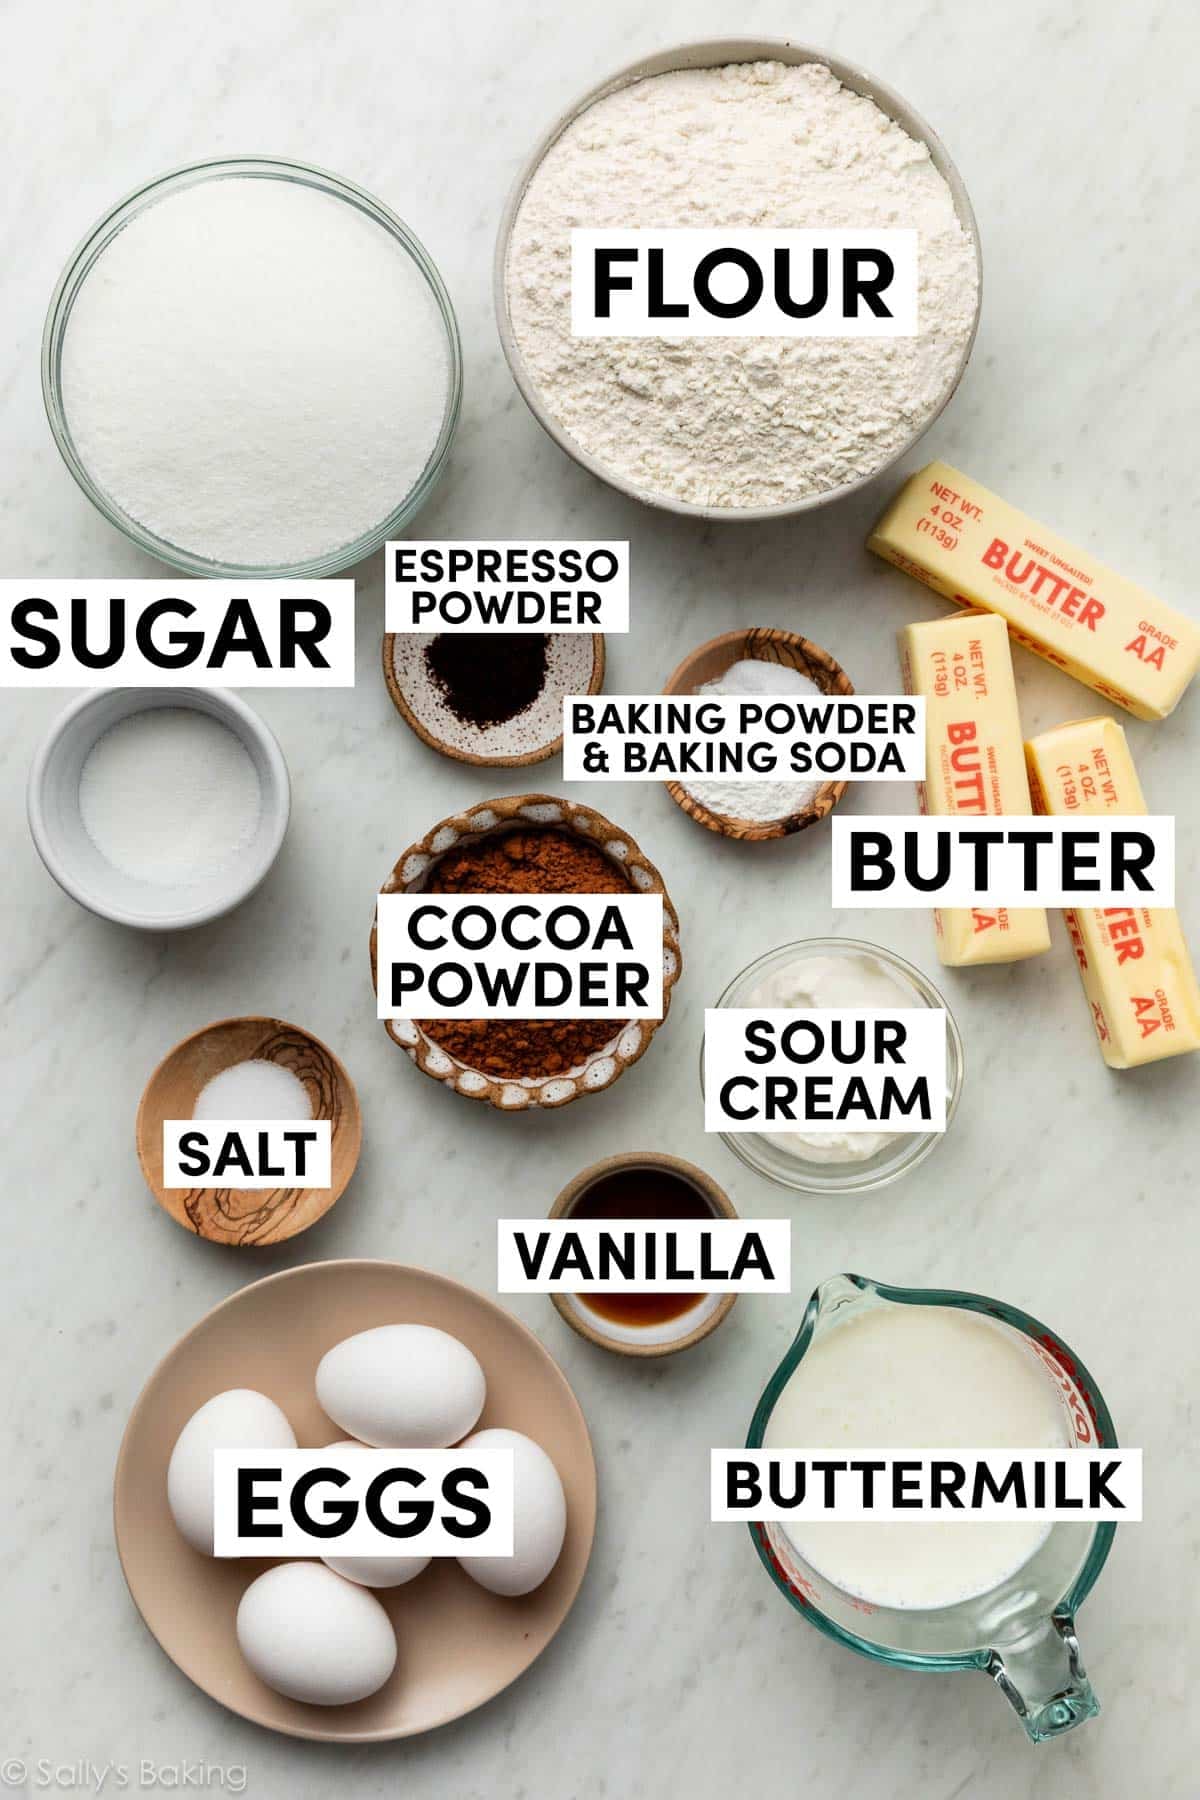
Ingredients You Need
- All-Purpose Flour: Cake flour is too light to stand up to this particular cake. Use all-purpose here, and be sure to sift it before measuring. Sifting the flour rids any clumps and aerates it, which I find important in a cake recipe that uses this much flour.
- Baking Powder & Baking Soda: These leaveners lift the cake up while baking.
- Salt: To balance out the sweet.
- Proper Room-Temperature Butter: To achieve a good rise, properly cream the butter and sugar together. You have the crutch of baking powder and baking soda, but the cake’s crumb truly sings when that creaming process steps in. You need softened, room-temperature butter, which is actually still cool and firm to the touch, not soft and greasy. Butter that’s too cold or too warm won’t mix properly.
- Sugar: We’re using granulated sugar to sweeten this zebra cake.
- Eggs: While I sometimes use only the egg whites to make white cake, we’re using whole eggs today. We don’t want a crumb as light and fluffy as the white cake; rather, this crumb is similar to the rich, moist texture of yellow cake.
- Sour Cream: It adds moisture and richness, and makes for a creamy, tender texture in every bite.
- Pure Vanilla: Reach for pure vanilla extract—a full Tablespoon goes in the cake batter, and then you’ll use it to flavor the frosting, too. You’ll really taste it in this recipe, so I don’t recommend using imitation vanilla here.
- Buttermilk: Store-bought buttermilk gives the best result, but you can make a DIY buttermilk substitute if you can’t find it in your grocery store.
- Cocoa Powder: Use unsweetened cocoa powder, and either Dutch-process or natural cocoa is fine. There’s enough acid in the cake batter that it wouldn’t make a difference. (Learn why that’s important here: Dutch-Process vs Natural Cocoa Powder.)
- Espresso Powder: Optional, for a deeper chocolate flavor.
Recipe Testing Zebra Cake
Back in 2018 when I was working on this recipe, I started with a basic vanilla cake/yellow cake hybrid recipe: my checkerboard cake. I ADORE this cake, which tastes like a cross between a mega-buttery yellow cake and lighter vanilla cake.
But if I’m not careful, I can over-cream the butter + sugar or over-mix the batter since there’s so much of it. Additionally, there’s extra mixing involved when you turn half of the vanilla cake batter into chocolate cake batter. Over-mixing can leave you with a denser-tasting cake. I wanted to avoid that, so I slightly reduced the flour and added a little more baking powder for lift + airiness. I added some sour cream too, for a little extra moisture. (Never hurts!) Totally worked—this cake is so moist!
Made From 1 Batter
The cake batter follows a simple, familiar process. Whisk the dry ingredients together, then work on the wet ingredients. In a separate bowl, use a mixer to cream the butter and sugar together. Beat in eggs, then the sour cream and vanilla. Pour in the dry ingredients and then with the mixer running, slowly add the buttermilk.
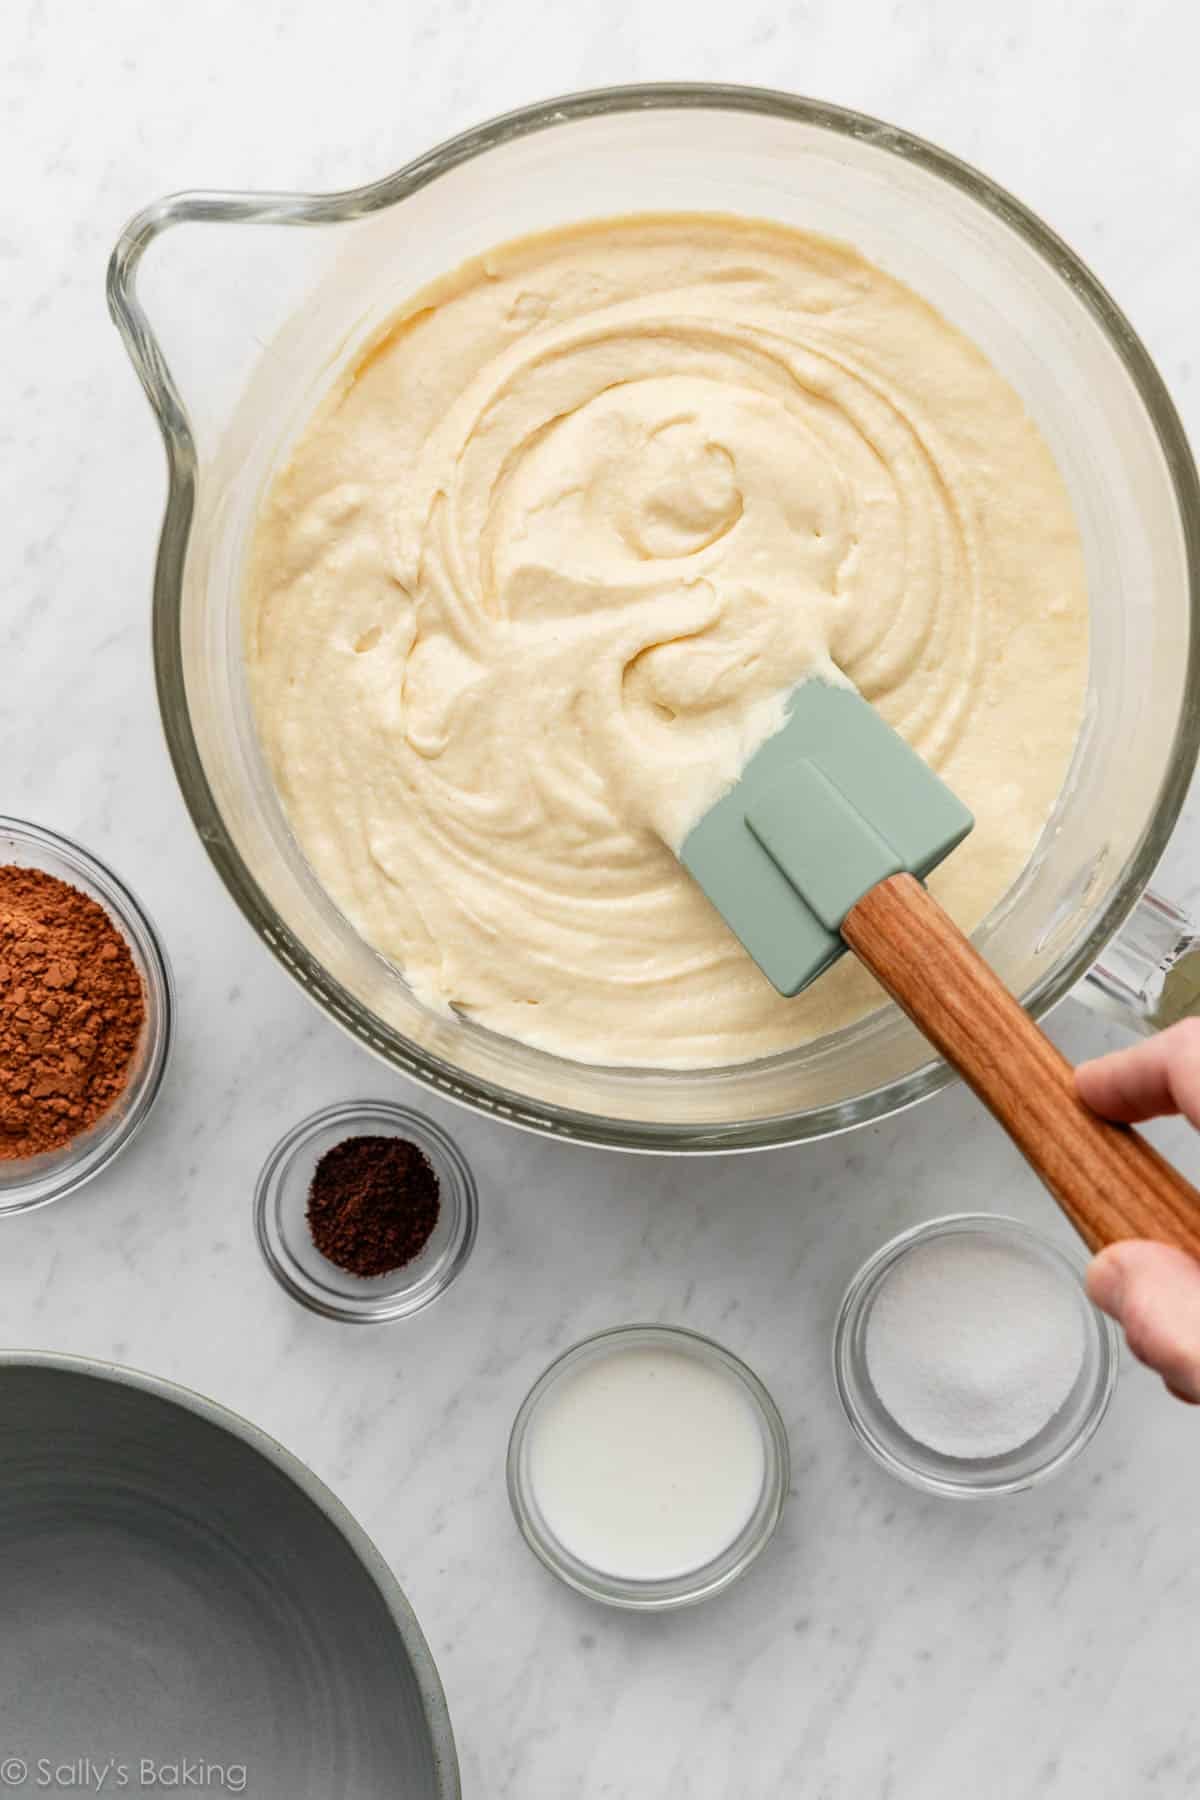
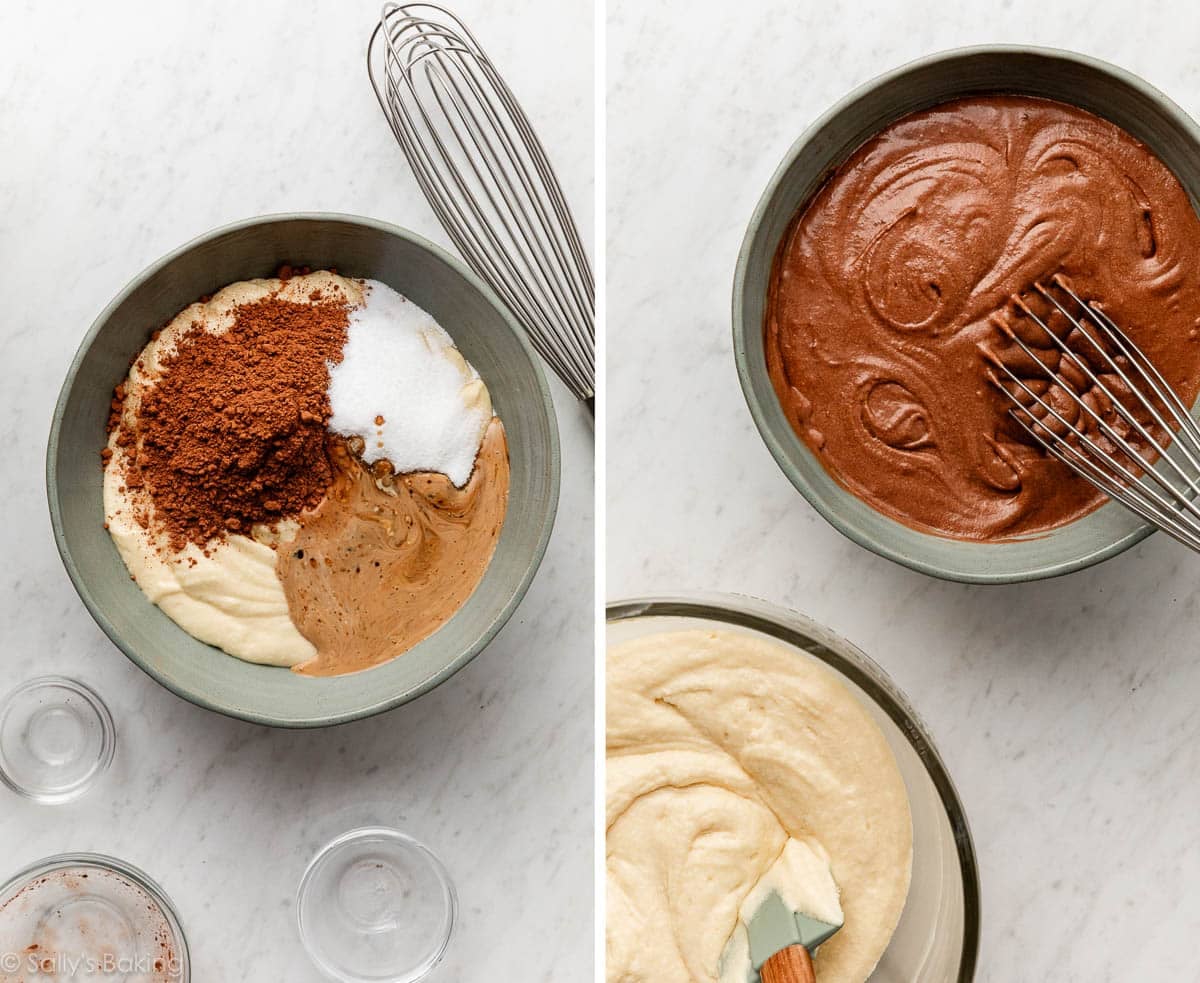
The chocolate cake is made from the vanilla batter, so you don’t have to prepare two completely separate batters. YAY! Divide the batter in half and add cocoa powder to one.
But since we’re adding a dry and bitter ingredient to the chocolate batter, it will dry out the cake. A little sugar and warm milk or buttermilk solved that problem. (Warmth helps the cocoa powder bloom/dissolve.) Both the vanilla cake and chocolate cake are so moist. We did it!
You can also add a little espresso powder to the chocolate batter. Just to help bring out the chocolate flavor. This is an optional ingredient. You can find it in the coffee or baking aisle at the grocery store, or online.
IMPORTANT: This is a thick batter, which is important for this recipe because as you are layering the two batters together, it helps keep them separate, whereas a thin, runny batter would end up just spreading all together.
Use Parchment Paper Rounds for Cakes
Lining cake pans with parchment rounds is the trick I use every single time I bake a round cake, whether I’m making a 1-layer sprinkle cake, a 9-layer Smith Island cake, or today’s recipe. Store-bought pre-cut parchment rounds are convenient, but it’s really easy to just make them yourself. You can cut the exact pan size you need, whether you’re making a 6-inch cake, an 8-inch cake, or a 9-inch cake. If you don’t make a lot of round cakes, just cut them as you need them. If you bake a lot, cut many at a time and store them with your baking pans, ready for the next time you bake.
Very lightly grease the cake pan with butter or nonstick spray. Place the parchment paper round inside, and then grease the parchment, too. Yes, you grease the pan and then also grease the parchment. This creates an ultra-nonstick environment for your cake. The cake won’t stick to the pan, and the parchment round won’t stick to the cake. For more tips on this method, see Parchment Paper Rounds for Cakes.
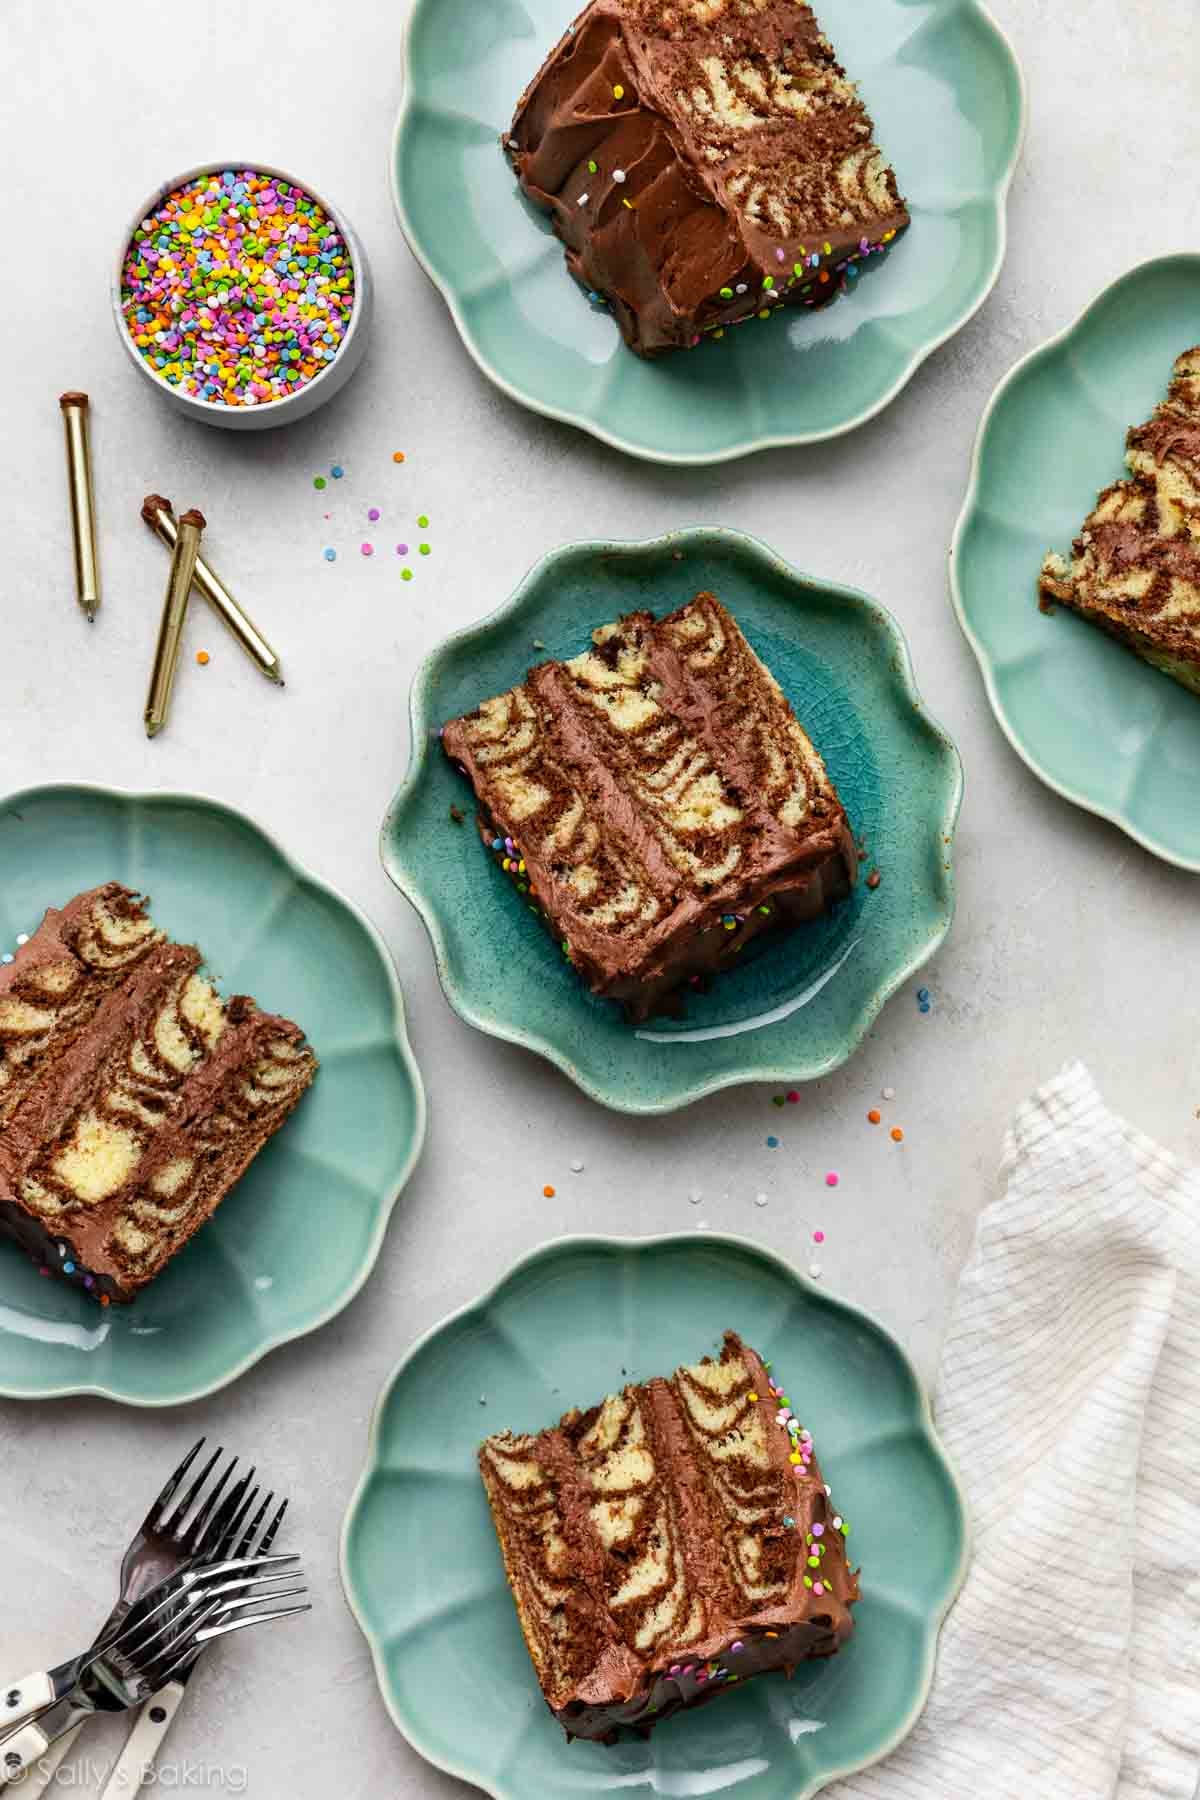
How to Make Zebra Stripe Cake Layers
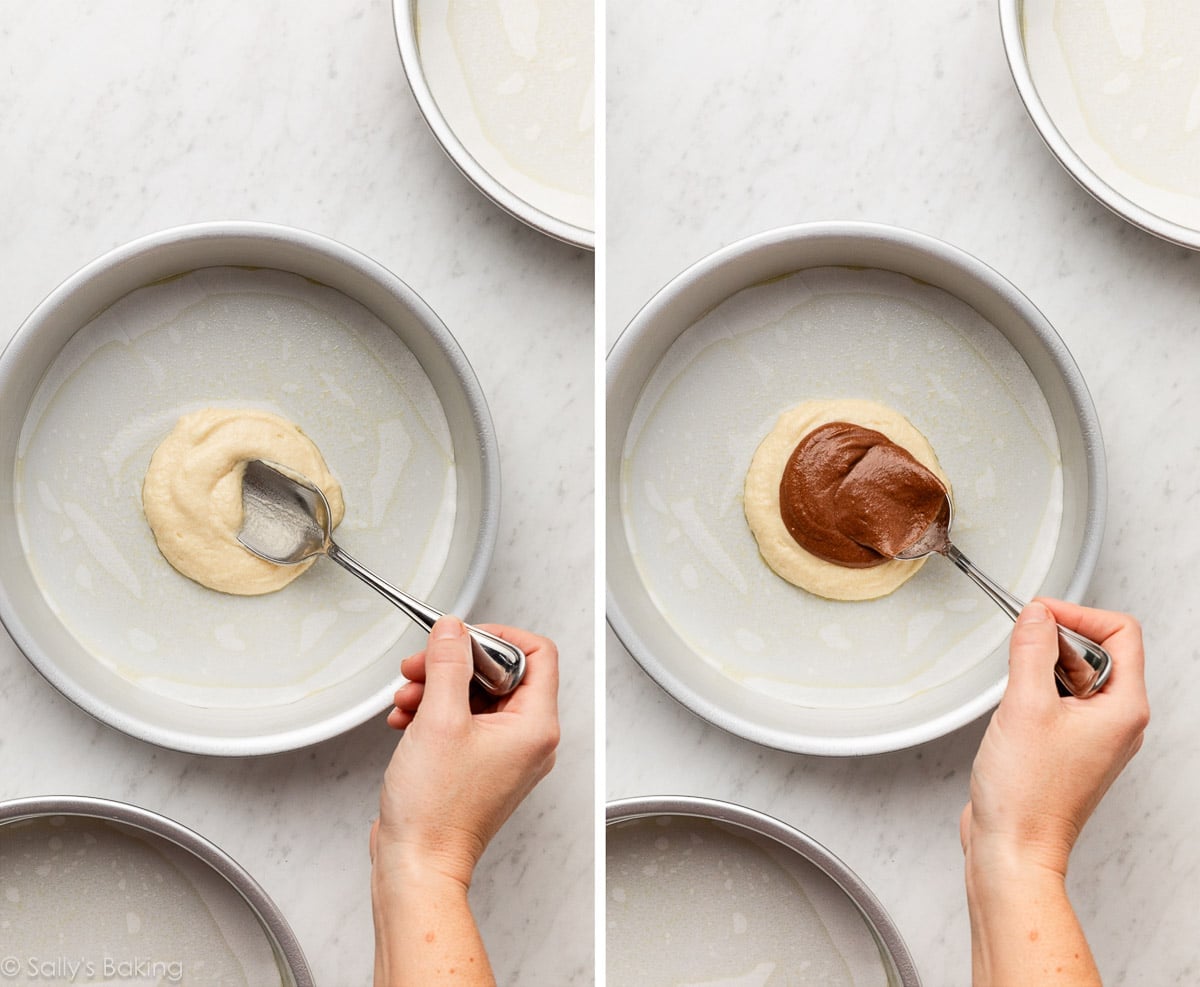
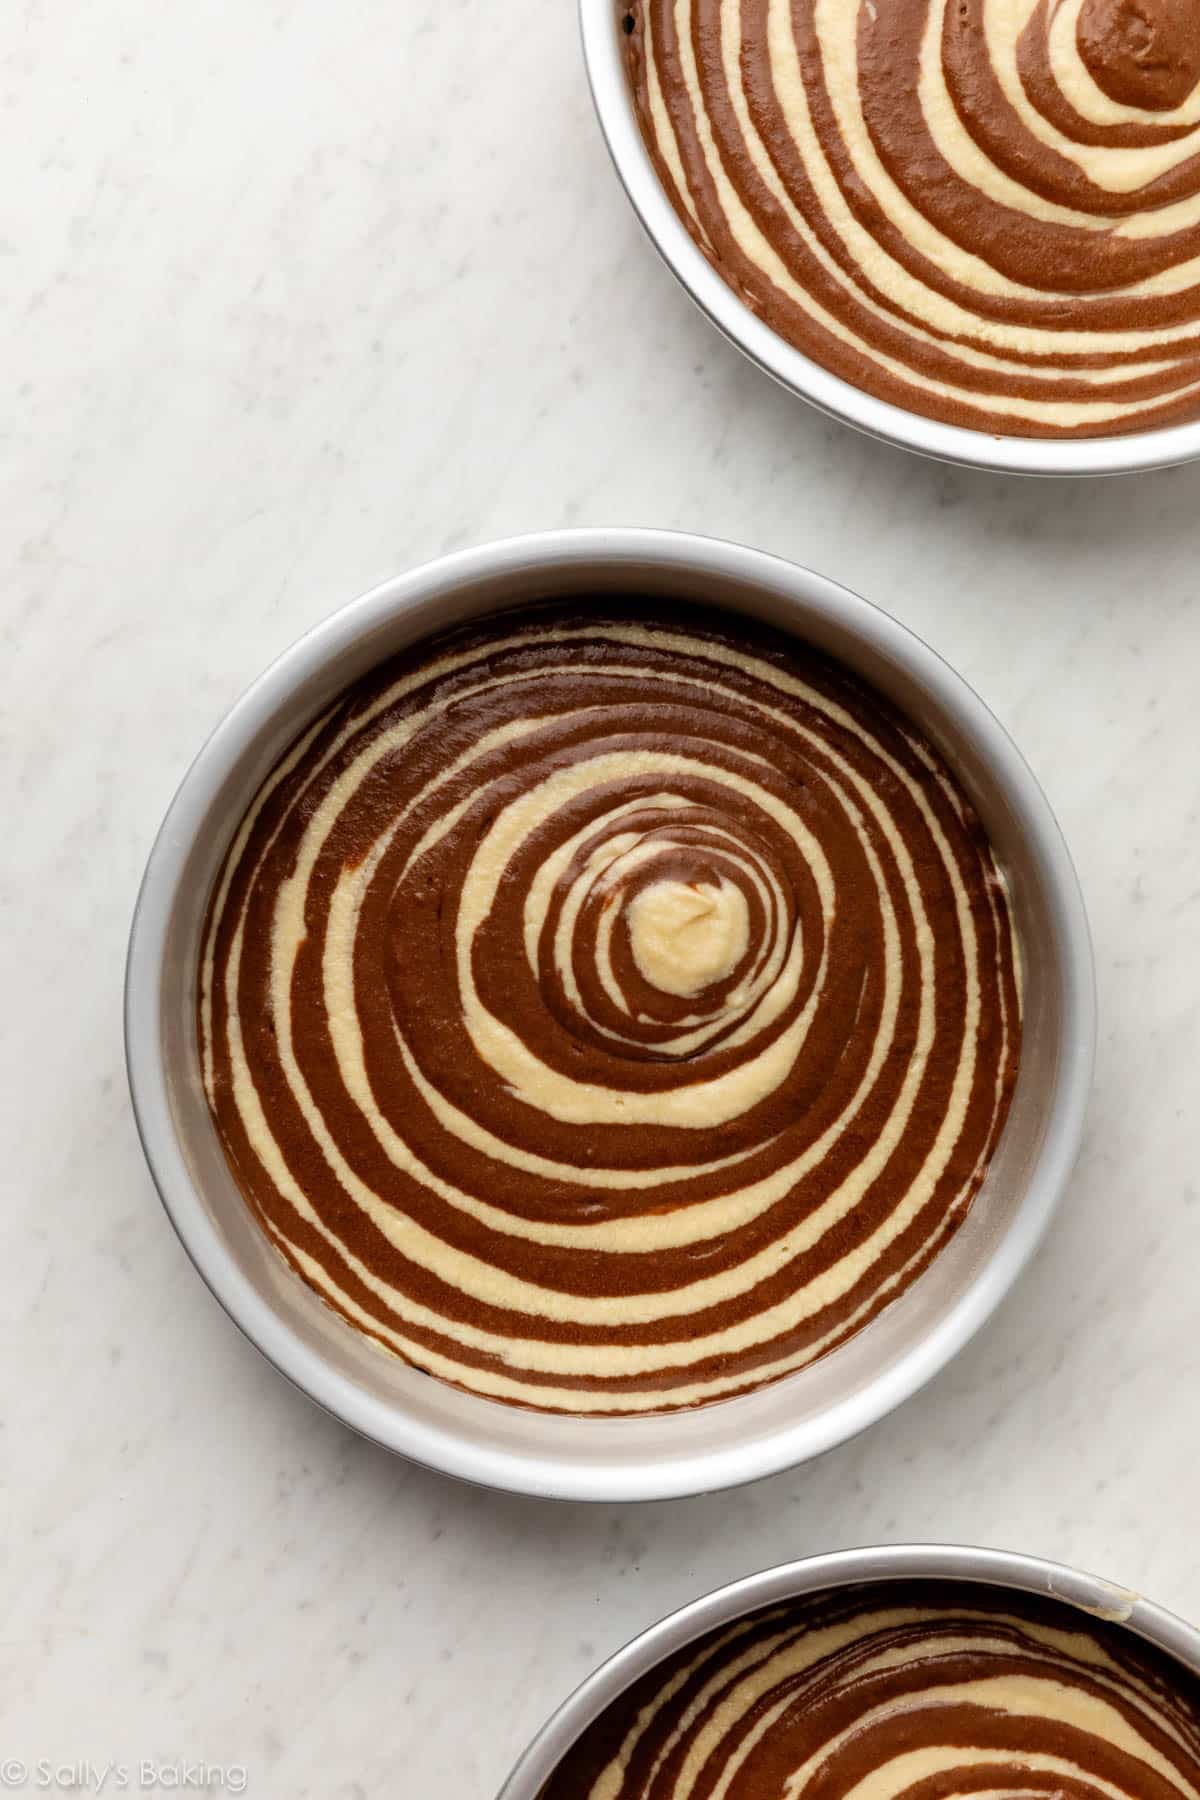
Now here’s where the zebra shows up! You create the beautiful zebra stripe pattern by layering the batters on top of each other. Before baking, the cakes look like a bullseye.
Start with a spoonful of 1 batter in the center of each of the pans, then place a spoonful of the other batter on top. Alternate between the 2 batters until you’ve filled the pans.
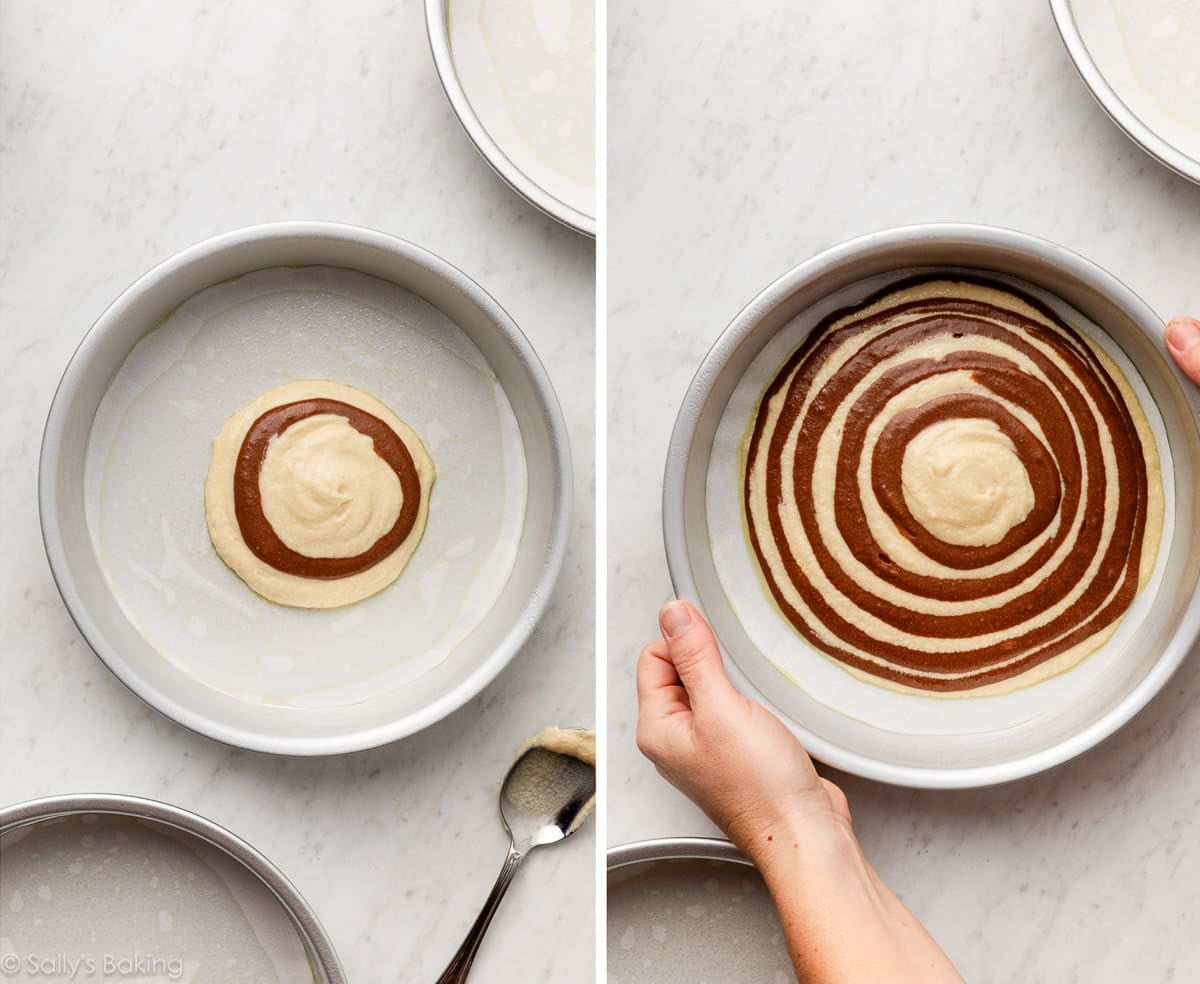
Every now and then, tap the pans on the counter and give them a little shake, to level the batter off and help it spread toward the edges of the pan.
Don’t worry about making this look perfect. The layers of the finished cake are going to look swirly and stripey—we aren’t trying to achieve perfectly straight lines here.
Bake the cakes and then let them cool completely before you make the…
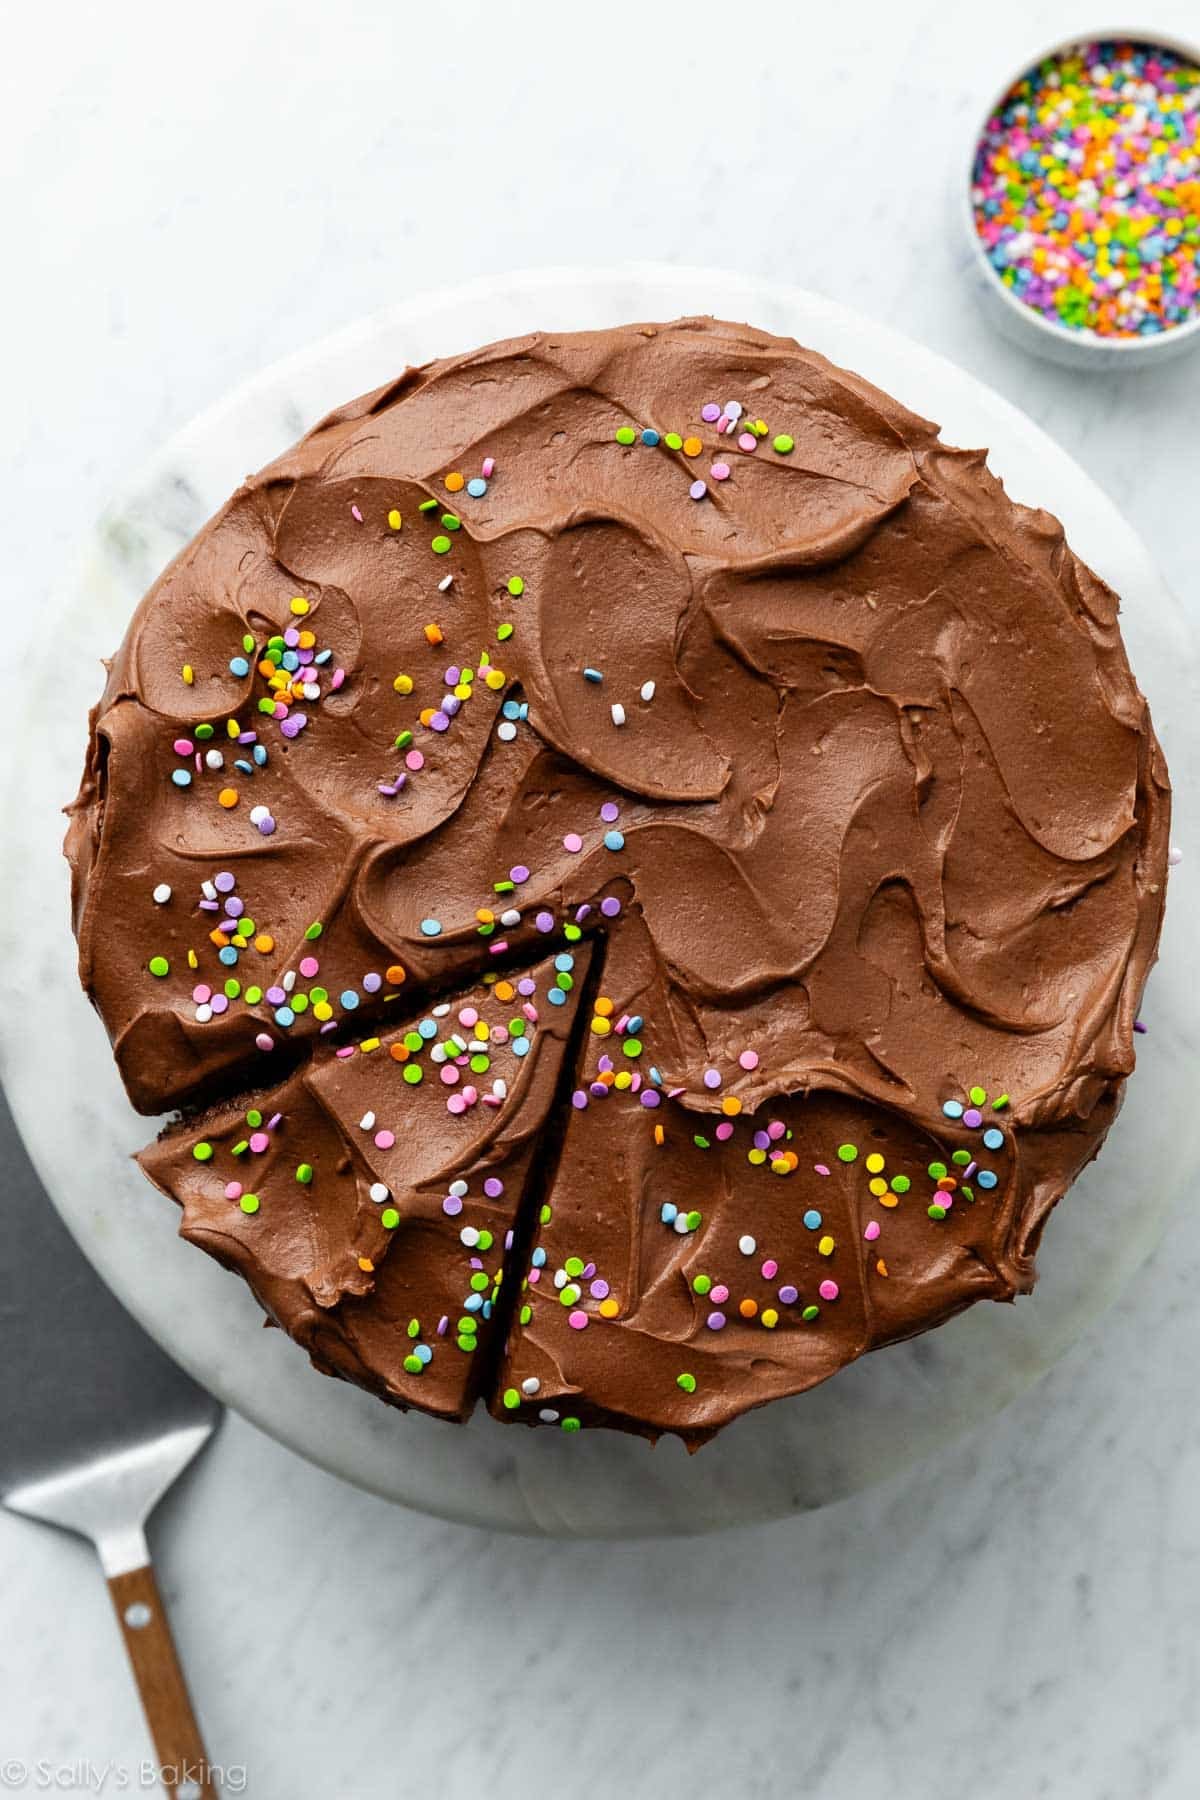
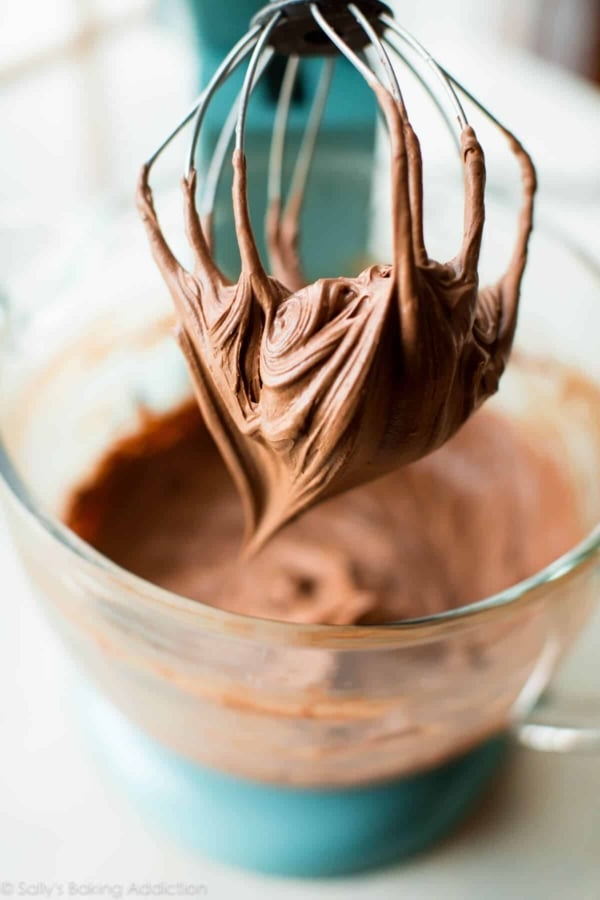
Chocolate Cream Cheese Frosting
Regular cream cheese frosting is one of my all-time favorites because it’s not as cloyingly sweet as American-style buttercream and it’s easier than, say, making Swiss meringue buttercream. It’s the creamiest of frostings with a silky smooth and velvety mouthfeel. With carrot cake, red velvet cake, banana cake, and pumpkin cake… it’s just the best!
But could we possibly improve on the perfection that is cream cheese frosting? By adding… chocolate?? Oh yes… we could indeed.
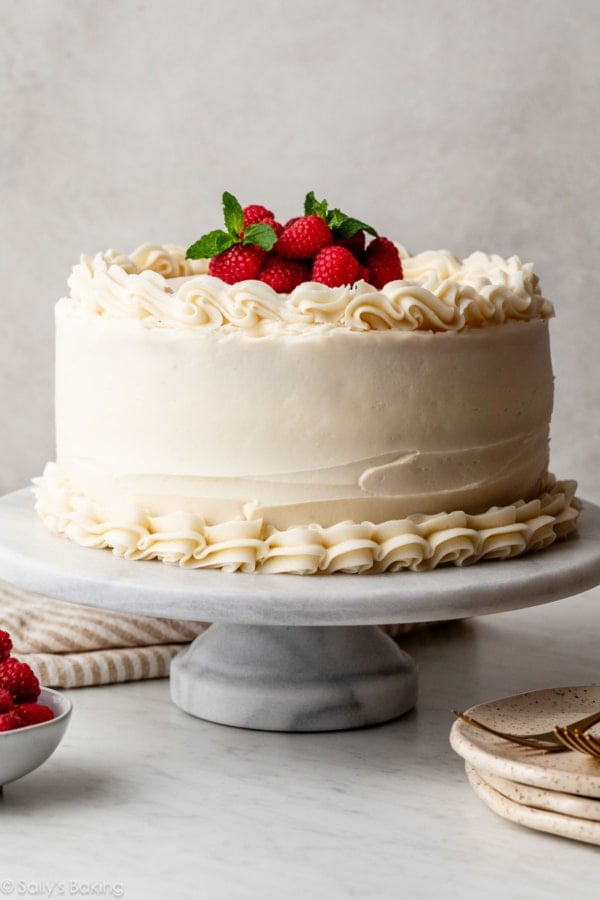
Not in the mood for cream cheese frosting? Chocolate buttercream, Nutella frosting, vanilla buttercream, or Swiss meringue buttercream would also taste fantastic on this zebra cake.
Yes! Instead of turning half of the batter into chocolate batter, simply tint half of the batter your desired color using a couple drops of gel food coloring.
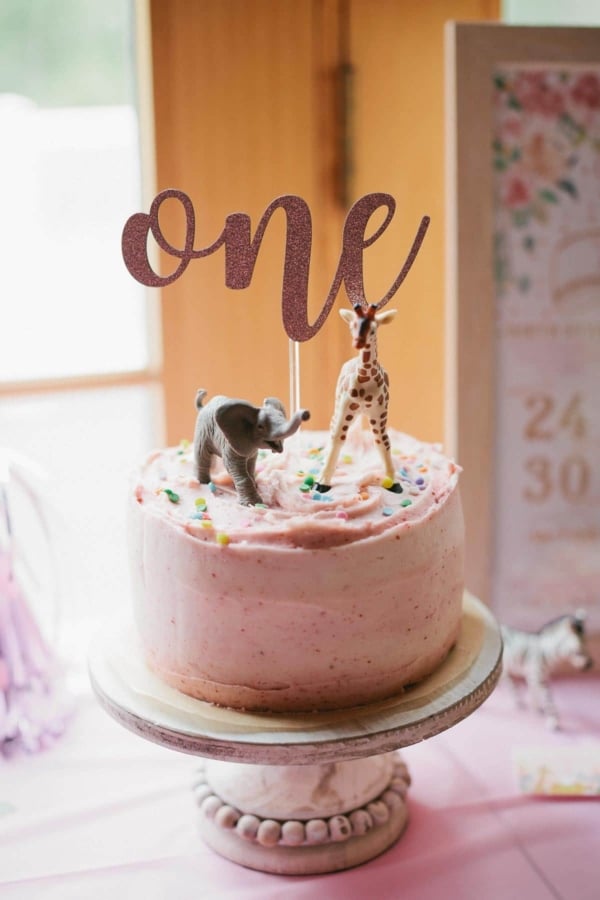
Yes! See how I turned this into a 6-inch layer cake for a safari-themed 1st birthday cake.
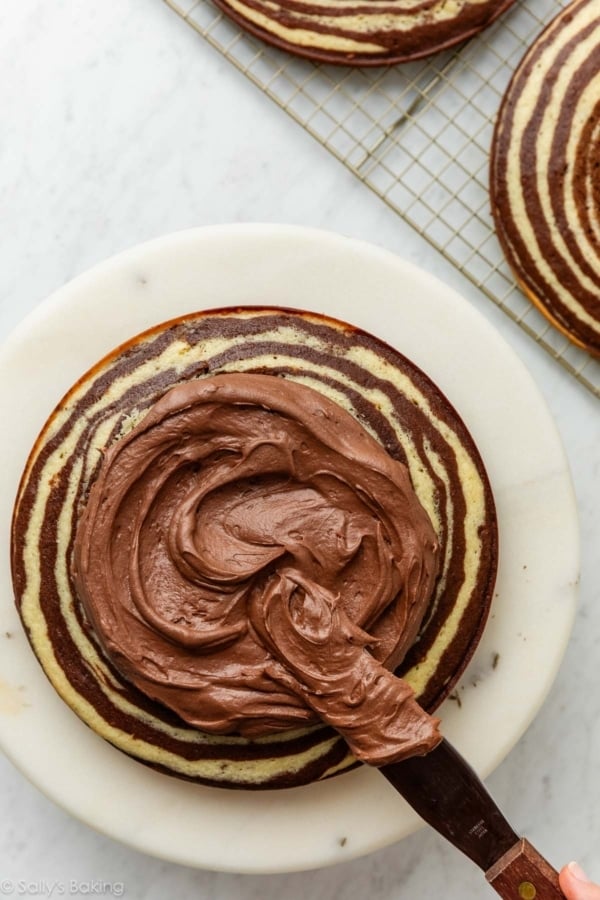
Assembling This Zebra Cake
Once the cakes have baked and cooled, trim the tops using a cake leveler or a large serrated knife to create an even surface. A flat top ensures a sturdier and more stable layered cake.
If you’d like a little assistance with this part, I have a full post and video tutorial on how to assemble a layer cake.
Now the moment of truth. Cutting into the cake to see how those zebra stripes look!

One reader, Amy, commented: “Sally, thank you for this cool and easy technique! I omitted the cocoa & used pink & green food coloring to make an Easter cake. My 11-year-old son helped & said ‘I like that this is a cool, not boring, way to make a cake.’ ★★★★★“
Cool and not boring? I’ll take that as a major compliment, coming from an 11-year-old!
Print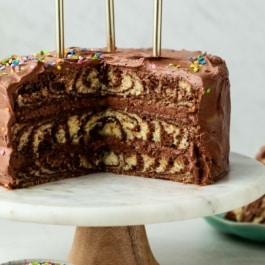
Zebra Cake
- Prep Time: 30 minutes
- Cook Time: 27 minutes
- Total Time: 4 hours, 30 minutes
- Yield: serves 12
- Category: Cake
- Method: Baking
- Cuisine: American
Description
This 3-layer zebra cake features mesmerizing swirls of chocolate and vanilla, plus a silky chocolate cream cheese frosting. This marbled cake is easier than it looks because it starts with just 1 batter!
Ingredients
- 3 and 1/2 cups (413g) sifted all-purpose flour* (spooned & leveled)
- 1 teaspoon salt
- 2 teaspoons baking powder
- 3/4 teaspoon baking soda
- 1 and 1/2 cups (340g) unsalted butter, softened to room temperature
- 2 cups (400g) granulated sugar
- 5 large eggs, at room temperature
- 1/3 cup (75g) sour cream, at room temperature
- 1 Tablespoon pure vanilla extract (yes, Tbsp!)
- 1 and 3/4 cups (420ml) buttermilk, at room temperature
Chocolate Batter
- 2 Tablespoons milk or buttermilk, warmed
- 1 teaspoon espresso powder (optional)
- 1/3 cup (27g) unsweetened natural or dutch-process cocoa powder
- 2 Tablespoons granulated sugar
Chocolate Cream Cheese Frosting
- 12 ounces (339g) full-fat brick cream cheese, softened to room temperature*
- 3/4 cup (12 Tbsp; 170g) unsalted butter, softened to room temperature
- 3 and 1/2 cups (420g) confectioners’ sugar
- 2/3 cup (55g) unsweetened natural or dutch-process cocoa powder
- 1 teaspoon pure vanilla extract
- 1–2 Tablespoons milk or heavy cream
- pinch salt
- sprinkles for decorating, if desired
Instructions
- Preheat oven to 350°F (177°C).
- Make the vanilla batter: Whisk the flour, salt, baking powder, and baking soda together in a large bowl. Set aside. Using a handheld or stand mixer fitted with a paddle attachment, beat the butter and sugar together on high speed until smooth and creamy, about 3 minutes. Scrape down the sides and bottom of the bowl with a silicone spatula as needed. Add the eggs and mix on medium speed until combined. Scrape down the bowl again, and then beat in the sour cream and vanilla extract. The batter will look lumpy and curdled; that’s normal at this point.
- Add about 1/3 of the dry ingredients and 1/3 of the buttermilk, then beat on low speed until combined. Add another 1/3 of the dry ingredients and 1/3 of the buttermilk, then beat again on low speed until combined. Add the remaining of each, and beat just until incorporated. Do not over-mix this batter. The batter will be smooth, velvety, and slightly thick.
- Make the chocolate batter: There will be around 8 cups of batter total. Divide it in half (you can just eyeball it) and transfer half of the batter into another bowl. Whisk espresso powder into the warmed milk and then add it to one of the batters, along with the cocoa powder and sugar. Whisk until combined; a few small lumps are OK.
- Grease three 9-inch round cake pans, line with parchment paper rounds, then grease the parchment paper. Parchment paper helps the cakes seamlessly release from the pans. (If it’s helpful, see this parchment paper rounds for cakes video & post.)
- Drop a large spoonful of 1 batter in the center of each pan. You can use the back of the spoon to spread it around a bit to make a circle. Top each circle with a spoonful of the other batter. Rotating the pans as you add the batters will help you get that circle shape. Alternate spoonfuls of the batters on top of each other in each pan and repeat until all the batter is used. After every few spoonfuls, give the pans a little shake to level out the batters.
- Bake for 25–27 minutes, or until the cakes are baked through. To test for doneness, insert a toothpick into the center of the cake. If it comes out clean, it is done. Allow the cakes to cool in the pans set on a cooling rack for 1 hour, then remove them from the pans and let the cakes finish cooling directly on the rack. The cakes must be completely cool before frosting and assembling.
- Make the frosting: In a large bowl using a handheld or stand mixer fitted with a paddle or whisk attachment, beat the cream cheese on high speed until completely smooth and creamy, about 1 minute. Scrape down the sides of the bowl. Add the butter and beat until combined. Scrape down the sides and bottom of the bowl with a silicone spatula as needed. Add the confectioners’ sugar, cocoa powder, vanilla extract, 1 Tablespoon milk, and salt and beat on low speed; gradually increase the speed to medium-high and beat until combined and creamy. Add 1 more Tablespoon of milk to slightly thin out, if needed. Taste, then add another pinch of salt if desired.
- Assemble and frost: First, using a large serrated knife, slice a thin layer off the tops of the cakes to create a flat surface. Discard (or crumble over ice cream!). Place 1 cake layer on your cake stand, cake turntable, or serving plate. Evenly cover the top with about 1 cup of frosting (about 240g). Top with the 2nd cake layer, upside down, and evenly cover the top with the same amount of frosting. Top with the 3rd cake layer. Spread the remaining frosting in a thick layer all over the top and around the sides. Garnish with sprinkles, if desired. Refrigerate for at least 45 minutes before slicing. This helps the cake keep its shape when cutting—it could slightly fall apart without this time in the fridge.
- Cover leftover cake tightly and store in the refrigerator for up to 5 days. I like to use a cake carrier for storing and transporting.
Notes
- Make Ahead & Freezing Instructions: Prepare cakes and frosting 1 day in advance. Keep cakes at room temperature, covered tightly. Refrigerate prepared frosting in an airtight container until ready to use. Bring frosting to room temperature before spreading as it will be quite stiff after refrigerating. (Add a splash of cream or milk to thin out, if needed.) Frosted or unfrosted cakes may be frozen for up to 3 months; thaw overnight in the refrigerator and bring to room temperature, if desired, before serving.
- Special Tools (affiliate links): 9-inch Round Cake Pans | Glass Mixing Bowl | Whisk | Electric Mixer (Handheld or Stand) | Silicone Spatula | Cooling Rack | Cake Turntable | Straight Spatula (for frosting) | Round Cake Carrier (for storage)
- Flour: Sift flour before measuring.
- Buttermilk: If you don’t have buttermilk, you can make a DIY buttermilk substitute. Add 1 Tablespoon of white vinegar or lemon juice to a liquid measuring cup. Then add enough whole milk to the same measuring cup until it reaches 1 and 3/4 cups. (In a pinch, lower fat or nondairy milks work for this soured milk, but the cake won’t taste as moist or rich.) Stir it around and let sit for 5 minutes. The homemade “buttermilk” will be somewhat curdled and ready to use in the recipe.
- Cream Cheese: Make sure you’re using the bricks of cream cheese, not cream cheese spread. They’re typically sold in 8-ounce bricks, so you’ll need 1 and 1/2 bricks.
- Room Temperature Ingredients: All refrigerated items should be at room temperature so the batter mixes together easily and evenly. Read more about the importance of room-temperature ingredients.
- Tint Half of the Batter: Instead of turning half of the batter into chocolate batter, simply tint half of the batter your desired color using a couple drops of gel food coloring.
- Smaller 6-Inch Cake: I scaled down this recipe to make a 6-inch version, and served it as a 1st birthday cake for my daughter’s “safari”-themed birthday.


Reader Comments and Reviews
Sally, thank you for this cool and easy technique! I omitted the cocoa & used pink & green food coloring to make an Easter cake. My 11 year old son helped & said “I like that this is a cool, not boring, way to make a cake.” This same son has also made 2 batches of your soft pretzel recipe during the coronavirus shut down. 🙂 The cake is in the oven right now.
Measured the sifted flour with a food scale and was cautious about trying not to over mix the batter and it still turned out way too dense. This was not light and fluffy like I had hoped.
Dear Sally,
First of all: I am deeply in love with your recipes. Your blog is my one and only go-to place when looking for inspiration or just wanting to enjoy some beautiful food pics.
I wanted to bake your zebra cake for my colleagues a few days ago. Although I exactly sticked to your measurements and instructions it turned out totally moist and greasy and with no zebra stripes left at all. And with me left a bit helpless.
The only thing I can imagine that would have possibly been able to make a difference to your exact ingredients is the buttermilk – IF it is the case that buttermilk is something different in the US than in Austria where I live. Do you know if there are any differences like that between the products that could have caused my cake fail?
Or maybe you have another idea why it didn’t work out?
I would be really grateful for some tips because I want to try again. I can never ever accept a cake fail without trying again. 😉 And furthermore I do absolutely want to eat this cake. 😀
Thank you Sally and best wishes,
Sarah
Hi Sarah! You are so sweet, thank you so much! Something must be up– the only way this batter would be greasy and not bake up into those beautiful stripes is if the batter was too thin. I wonder if there simply wasn’t enough flour? Did you spoon and level and/or weigh it for measuring? Buttermilk should be the same where you live, so that wouldn’t be the issue. I’m concerned about the flour. You can even try adding another 1/4 cup to help bulk up the batter. Was it a thin batter? Thank you again!
Hi Sally,
If we can exclude the buttermilk it must have been the flour that caused the problem. I weighed it for measuring and the batter was not enormously thin but still thin. I will definitely try it again with about 1/4 cup additional flour.
Thank you so much for your advice!
All the best,
Sarah
I was disappointed in this cake because the texture was too moist and buttery – borderline mushy – and there wasn’t much flavor other than butter. I couldn’t add espresso powder due to someone’s food sensitivities, but still I could hardly taste the chocolate. All I could taste was butter, and the dense crumb made this cake resemble pound cake. I was meticulous in measuring the flour and in following all the other steps, and I’m not a novice baker. Also I made ahead of time and froze the cake, but I followed the instructions for freezing and thawing to the T. The stripes looked awesome and I love the zebra idea. I wonder if the recipe would be more to my taste if made with 2 or 2.5 sticks of butter and/or without the sour cream?
I wanted this to work out SO bad – I did a trial run and it was INCREDIBLY dense so I followed each and every step to a tee the second time (with my husband double checking all my work haha) but it was also quite dense (although not quite as dense). It came out with almost a pound cake consistency. I’m not sure what I did wrong! That said, the zebra stripes came out perfectly – love the technique! I do want to try your tuxedo cake next but worry that you mention that the sour cream makes it a bit dense; based on my track record here maybe I should go for a lighter texture?
Hi Shoneth, it sounds like something went wrong. This cake shouldn’t taste like pound cake at all. Did you spoon and level the flour or change anything in particular? I know you’ll find my How to Avoid Dry or Dense Cakes post very helpful here. The Tuxedo Cake is lighter than this, you shouldn’t have a problem if you follow the recipe closely.
Thanks for this recipe! I made it in a 9×13 inch pan for my mother- in- laws’ s 70 th this summer and it was delish! I’ve just mad every it again adding orange zest and orange food colouring to the vanilla batter to make a tiger striped cat cake for my daughter’s birthday. Can’t wait to try it!
Hi Sally,
This is my first time leaving a comment on your site – shameful considering I have been using it regularly. I did the funfetti cake for my daughters first bday last year and it was a dream! Thank you 🙂 Its already time for her 2nd bday and she is currently obsessed with bday videos that show tiered cakes. Would there be a problem translating this recipe to a tiered one, 8 – 6- 4 inches or 10-8-6? Thank you again!
Happy almost second birthday to your daughter! And I love that she’s watching cake videos 🙂 This cake should hold up as long as each tier is properly supported with cake rounds and dowels. To figure out how much batter you will need this is a helpful chart from Wilton: https://www.wilton.com/cake-serving-guide/cms-baking-serving-guide.html
I hope she loves it!
I made this cake for my son’s 2nd birthday. The party was Okapi-themed, so I did this cake filled with the Nutella buttercream recipe from this site and covered in chocolate buttercream. The brown on the outside and zebra striped on the inside was perfect for the theme. It was a huge success! I used this exact recipe to fill 2x 10″ rounds and it worked great. When I was first spooning it in it didn’t seem like the batter would fill the pans, but with some tapping and slight wiggle of the pans, it went to the sides and evened out. When it baked, each round ended up being about 1″ – 1 1/4″ tall which was perfect. Ended up doing 2 batches to make a 4-layer cake. In one of the batches the white cake did curdle slightly and I wonder if I should have mixed it more because the chocolate came out perfect. But the other batch was great.
Dear Sally,
I see it says to put in the refrigerator for 45 minutes before serving, and also store in the refrigerator, instead of at room temperature, but is this because doc the cream cheese frosting?
If I make the same recipe but use your chocolate fudge frosting, is refrigeration (the 45 minutes as well as storage) still necessary, or should I leave it at room temperature? I’m worried about it drying out as I’ve always left cakes at room temperature. Thanks a lot!!
Hi Isadora, I recommend refrigerating before slicing so the slices are nice and neat. I also recommend refrigerating leftovers because of the cream cheese in the frosting. If using regular chocolate buttercream, you could leave the cake out (covered) for a couple days.
The flavor is great and it’s very moist. But, like another reviewer mentioned, there is not enough batter for three 9-inch pans. My layers ended up only an inch high. I will probably use 8-inch pans next time. Otherwise, thanks for a great recipe.
This cake is delicious! It’s fun to make, and the final product looks astounding. The cake has a wonderfully soft and fluffy texture. And the frosting!! That chocolate cream cheese frosting has to be the best kind of frosting I have ever had. It’s creamy, smooth, chocolate-y, and downright perfect. Even my dad, who hates frosting, loved it. It’s nice because it’s not as tooth-decayingly sweet as normal buttercream. And the cream cheese adds a fabulous tang! This is definitely my new favourite chocolate frosting recipe 🙂
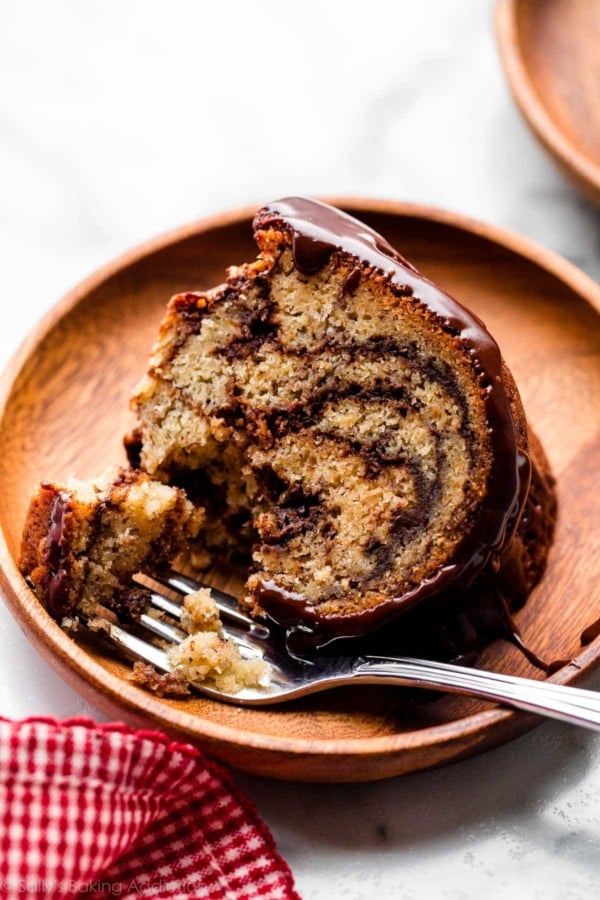
Can this be made in a bundt pan? Like marbled/zebra stripe?
This cake recipe will fit nicely into a Bundt pan. I’m unsure of the exact bake time for the Bundt, but it should be close to (or over!) 1 hour at 350F. F
Instead of putting the chocolate cream cheese frosting in between the layers, is there a filling recipe you might recommend that would work instead? Like a whipped cream type filling maybe? I’m thinking of how great your lemon blueberry cake turned out – with the blueberry whipped cream in the layers, then cream cheese frosting on the outside. Great balance! Thanks for the help – as always!
Hi Donna, Anything could work as a filling! You can do whipped cream, a whipped chocolate buttercream, chocolate or white chocolate ganache, strawberry buttercream – really it just depends on the flavor you are going for 🙂
Made this birthday cake for my family and it turned out absolutely perfect and delicious! I used three 8” pans and it worked just fine.
To the folks whose cakes are turning out too dense, I had a tip given to me when I took a baking class last year that has proven to be pretty fail-proof….If making cakes or cupcakes, when you go to mix the flour mixture with the wet mixture, turn off the electric mixers and do it by hand. Anytime you use any kind of electronic mixer for this part of the process, you risk over mixing 90% of the time.
Thanks so much for another great recipe!
Hey Sally let me first say I love your recipes. I tried this zebra cake recipe and I had no good luck with it. The taste was on point but it was dry and hard especially the chocolate areas. I would love to make this cake again. Any suggestions?
Hi Kathyann! Did you change anything about the recipe at all? I’ve made this particular cake a handful of times and have never experienced a dry texture. Sorry it didn’t turn out as expected for you. First thing that comes to mind is to make sure that you are spooning and leveling your flour, not scooping or packing it in the measuring cup.
Hi Sally! I was wondering whether there is any way I could convert this into zebra cupcakes? I thought this effect would look really cool as cupcakes! I think I would half the recipe to yield less, and would I simply layer the batter with alternate chocolate and vanilla layers? Thanks!
Hi! Could I skip the chocolate batter part and just have a yellow cake? Or would you recommend a different recipe of yours for a yellow layer cake? Thabk you!
Hi Jacenta! I suggest following my yellow sheet cake recipe or my piñata cake recipe (but skip the piñata assembly).
My son loves chocolate vanilla “squirrel” so I would like to make this but I need to make it in a large sheet pan for his first communion. Do you have any recommendations for cook time since I will be doubling this recipe to fit the 12×18 pan. Any advice is greatly appreciated.
Hi Jill! This cake batter, as written, will fit into a 12×18 inch pan. You could 1.5x the recipe for a slightly thicker sheet cake, but doubling the batter would be too much. The bake time varies, but should be between 20 and 30 minutes. Use a toothpick to test for doneness.
I’ve made this cake twice now, both times for grandkids birthdays. While the flavor is awesome and kids loved, the texture was very dense, both times. I LOVE your recipes, have made many of them, many times with great success, can’t figure out what I did wrong. Any ideas?
Usually a dense cake is the result of over-mixing the batter. If you notice the cakes rise in the oven and then fall (either in the oven or right after you remove them) this is likely the culprit.
I made this recipe for my family the other day…..they loved it and were so surprised when I cut it open and they saw the zebra stripes!!! They couldn’t work out how I had managed it…..love a cake that looks incredibly tricky but is deceivingly simple ❤
Delicious. I made this yesterday, cake and frosting both, and just served it. It’s a wonderfully moist cake, sturdy and tender at the same time, with a softer sort of chocolate milkshake flavor instead of a death by chocolate blast. The frosting is great too – fast, simple, great texture to work with, delicious (I may up the cocoa powder next time but again, delicious as is) – definitely going to be a go-to frosting. And the amount it made was just right for the cake – I appreciate that so much!
The one issue I ran into was that the batter didn’t seem to be enough for three 9″ pans. I was about halfway through filling the pans when I noticed, and since I had parchment rounds in the bottom I was able to lift those out and transfer them. Three 8″ pans worked perfectly, with each layer coming out about an inch and a quarter tall.
To anyone considering this cake, make it! Fairly simple, impressive, delicious, perfect. I would recommend three 8″ pans but other than that wouldn’t change a thing.
I’ve had a complete nightmare with your recipe…never before has this happened to me but its all curdled – I’m on my second batch and it’s happened again after adding the eggs – it’s too late now for my son’s 1st birthday cake but any thoughts on why it will have curdled?!!
Hi E! It’s totally normal, even if all the ingredients are room temperature. (Make sure they are!) It’s just the varying textures of ingredients. Everything comes together when you add the flour.
Hi Sally,
Thank you for all your delicious, varied, and beautiful recipes, and the very clear insructions. My kids say that I have an addiction to Sallys baking addiction! What would you think about making the zebra cake into a Bundt pan, as I am not planning to make the frosting, just a simple glaze ( no dairy in our baking)?
Also, how much melted coconut oil would you recommend instead of the butter in this recipe?
Hi Brindy! Happy to help. This cake recipe will fit nicely into a Bundt pan. I’m unsure of the exact bake time for the Bundt, but it should be close to (or over!) 1 hour at 350F. For the coconut oil, I don’t recommend melting it first. Cream it with the sugar.
Hi Sally,
My son had very specific cake requests for his 8th birthday cake, and he pretty much described this cake. I’m not a huge marble fan so I was dreading this one a bit, but it turned out delicious! The whole family raved. My five year old helped bake it, and we substituted plain yogurt for sour cream. We even copied the off-set sprinkles, and threw a few mini chocolate chips on top to fulfill his wish list. Thank you, it was moist, delicious. and such a cool design!
YAY! I’m so glad you tried something new and that it was such a hit with your family! And I hope he had a great 8th birthday 🙂
Great recipe, Sally! The chocolate cream cheese frosting is amazing and the cake was moist and tasted even better the next day.
You mentioned that this type of cake is often made as a bundt cake. Can your recipe be used to make a bundt instead of a layer cake? Top it is with chocolate glaze or something? Thank you!
Hi Carrie, yes, this batter will fit into a large Bundt pan. Bake at the same oven temperature. I’m unsure of the bake time. A chocolate glaze or ganache on top would be great.
Hi Sally, I made the Zebra Cake yesterday and it seems to have turned out a little dense. I was careful not to overmix. Maybe this has something to do with it but after I added the eggs and sour cream to the white batter it seemed curdled. It did smooth out when I added the flour. After it came out of the oven it looked like there were little, tiny hole in the layers. It tasted good but I just knew I wish were I went wrong. I would appreciate any help! Thank you!
Hi Kim! Did you sift the flour? And spoon and level it? These two steps make a huge difference in the outcome of the cake. So sorry yours was a little dense.
Made this cake yesterday for my son’s 34th birthday. Came out perfect right down to the stripes and sprinkles! Everyone was “Oh Wow how did you do that?” It is really a delicious cake and frosting.
Hi Sally! I’m wondering if this recipe will fit in a 9 x 13 or is it still too much batter?
Hi Trina! You’re right, it’s too much batter.