Description
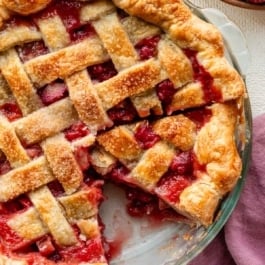
This strawberry rhubarb pie combines sweet strawberries, tart rhubarb, and a flaky buttery pie crust with a thick, jammy filling that slices beautifully. Includes plenty of success tips to help prevent a runny pie filling.
Ingredients
- All Butter Pie Crust or Homemade Pie Crust (both recipes make 2 crusts, 1 for bottom and 1 for top)
- 3 cups (about 300g) sliced rhubarb (1/2-inch pieces)
- 2 and 1/2 cups (about 380g) chopped fresh strawberries
- 1/3 cup (67g) packed light brown sugar
- 1/3 cup (67g) granulated sugar
- 1/4 cup (32g) cornstarch
- 1/4 teaspoon salt
- 1 Tablespoon (15g/ml) orange juice
- 1/2 teaspoon pure vanilla extract
- 1 Tablespoon (14g) cold unsalted butter, cut into small cubes
- egg wash: 1 large egg beaten with 1 Tablespoon (15g/ml) milk
- optional: coarse sparkling sugar, for topping
Instructions
- The crust: Prepare either pie crust recipe through step 5. The pie dough needs to chill in the refrigerator for at least 2 hours before using.
- Make the filling: In a large bowl, stir the rhubarb, strawberries, brown sugar, granulated sugar, cornstarch, salt, orange juice, and vanilla together until thoroughly combined. Set aside.
- Roll out the chilled pie dough: On a floured work surface, roll out 1 disc of chilled dough (keep the other one in the refrigerator). Turn the dough about a quarter turn after every few rolls until you have a circle 12 inches in diameter. Carefully place the dough into a 9-inch pie dish. Tuck it in with your fingers, making sure it is smooth. Use a slotted spoon to transfer the filling into the crust. If you have leftover juices in the bottom of the bowl, reserve them for the next step. Refrigerate the pie, uncovered, as you reduce the juice in the next step.
- Optional—reduce the juices: If your pie filling sat for awhile or if your strawberries are particularly juicy, a lot of liquid may pool at the bottom of the bowl. Pour the leftover liquid into a small saucepan. Cook over medium-low heat, stirring constantly, until the juice has slightly reduced and thickened, about 3–4 minutes. Cool for 5 minutes, then pour over the filling in the pie crust. Do your best to gently toss together with the fruit. Dot the pieces of cold butter on top of the filling. Place the pie in the refrigerator while you roll out the top crust.
- Arrange the lattice: Remove the other disc of pie dough from the refrigerator. Roll the dough into a circle 12 inches in diameter. Using a pastry wheel, sharp knife, or pizza cutter, cut the dough into strips about 1-inch wide. Carefully thread the strips over and under one another, pulling back strips as necessary to weave. See this post on How to Lattice Pie Crust for help with this step. Press the edges of the strips into the bottom pie crust edges to seal. Use kitchen shears or a small paring knife to trim off excess dough. Flute or crimp the pie crust edges.
- Using a pastry brush, lightly brush the top and edges of the pie crust with egg wash. Sprinkle the top with coarse sugar, if using. Place the pie in the refrigerator for 20–30 minutes while your oven preheats.
- Preheat oven to 400°F (204°C).
- Place the pie on the center oven rack, and place a baking sheet (lined with parchment paper for easy cleanup) on the rack beneath it, to catch any bubbling-over juices. Bake for 20 minutes. Keeping the pie in the oven, reduce the temperature to 350°F (177°C), add a pie crust shield, and bake for an additional 50 minutes or until the top crust is golden brown and the filling juices are bubbling around the edges and/or through the lattice. For a more accurate test of doneness, check the internal temperature with an instant-read thermometer; it should reach at least 200–212°F (around 100°C).
- Remove pie from the oven and place on a cooling rack. Cool for at least 5-6 hours before slicing and serving. The filling will be too juicy if the pie is still warm when you slice it.
- Cover leftovers tightly and store at room temperature for up to 2 days or in the refrigerator for up to 5 days.
Notes
- Make Ahead & Freezing Instructions: There are a couple ways to make this pie ahead of time. Prepare the pie in full 1 day in advance. After the pie cools, cover tightly and keep at room temperature. The pie crust dough can also be prepared ahead of time and stored in the refrigerator for up to 5 days or in the freezer for up to 3 months. Baked pie also freezes well for up to 3 months. Thaw overnight in the refrigerator and allow to come to room temperature before serving.
- Special Tools (affiliate links): Glass Mixing Bowl | Rolling Pin | 9-inch Pie Dish | Small Saucepan | Pastry Wheel or Pizza Cutter | Pastry Brush | Coarse Sparkling Sugar | Baking Sheet | Pie Crust Shield | Instant-Read Thermometer | Cooling Rack
- DIY Pie Crust Shield: You can make your own disposable pie crust shield from a piece of aluminum foil. Fold a 12-inch square of foil in half, and cut a half-circle in the center of the folded edge. When unfolded, you’ll have a foil square with a circle cut out of the center. Place it over the pie and carefully tuck the edges down around the crust.
- Pie Dish: I strongly recommend baking this pie in a glass pie dish so you can easily monitor the bottom crust’s browning. Glass pie dishes also bake pie crusts more evenly than ceramic dishes.
- Use Fresh, Not Frozen: I strongly recommend fresh strawberries and fresh rhubarb in this pie. Frozen fruit releases too much excess liquid and can lead to a soupy filling.
- Why Are We Reducing the Liquid on the Stove? If your fruit is especially ripe or juicy, don’t skip the optional stovetop reduction step (step 4). It helps activate the cornstarch and guarantees a thicker filling.