

Using a simple fruit filling and homemade flaky pie crust, you can create adorable mini fruit galettes. These small free-form pies are easy to assemble, perfectly portioned, and can be made with a variety of delicious fillings. The recipe is easy to halve if needed and they’re fun to serve as an alternative to larger pies and galettes!
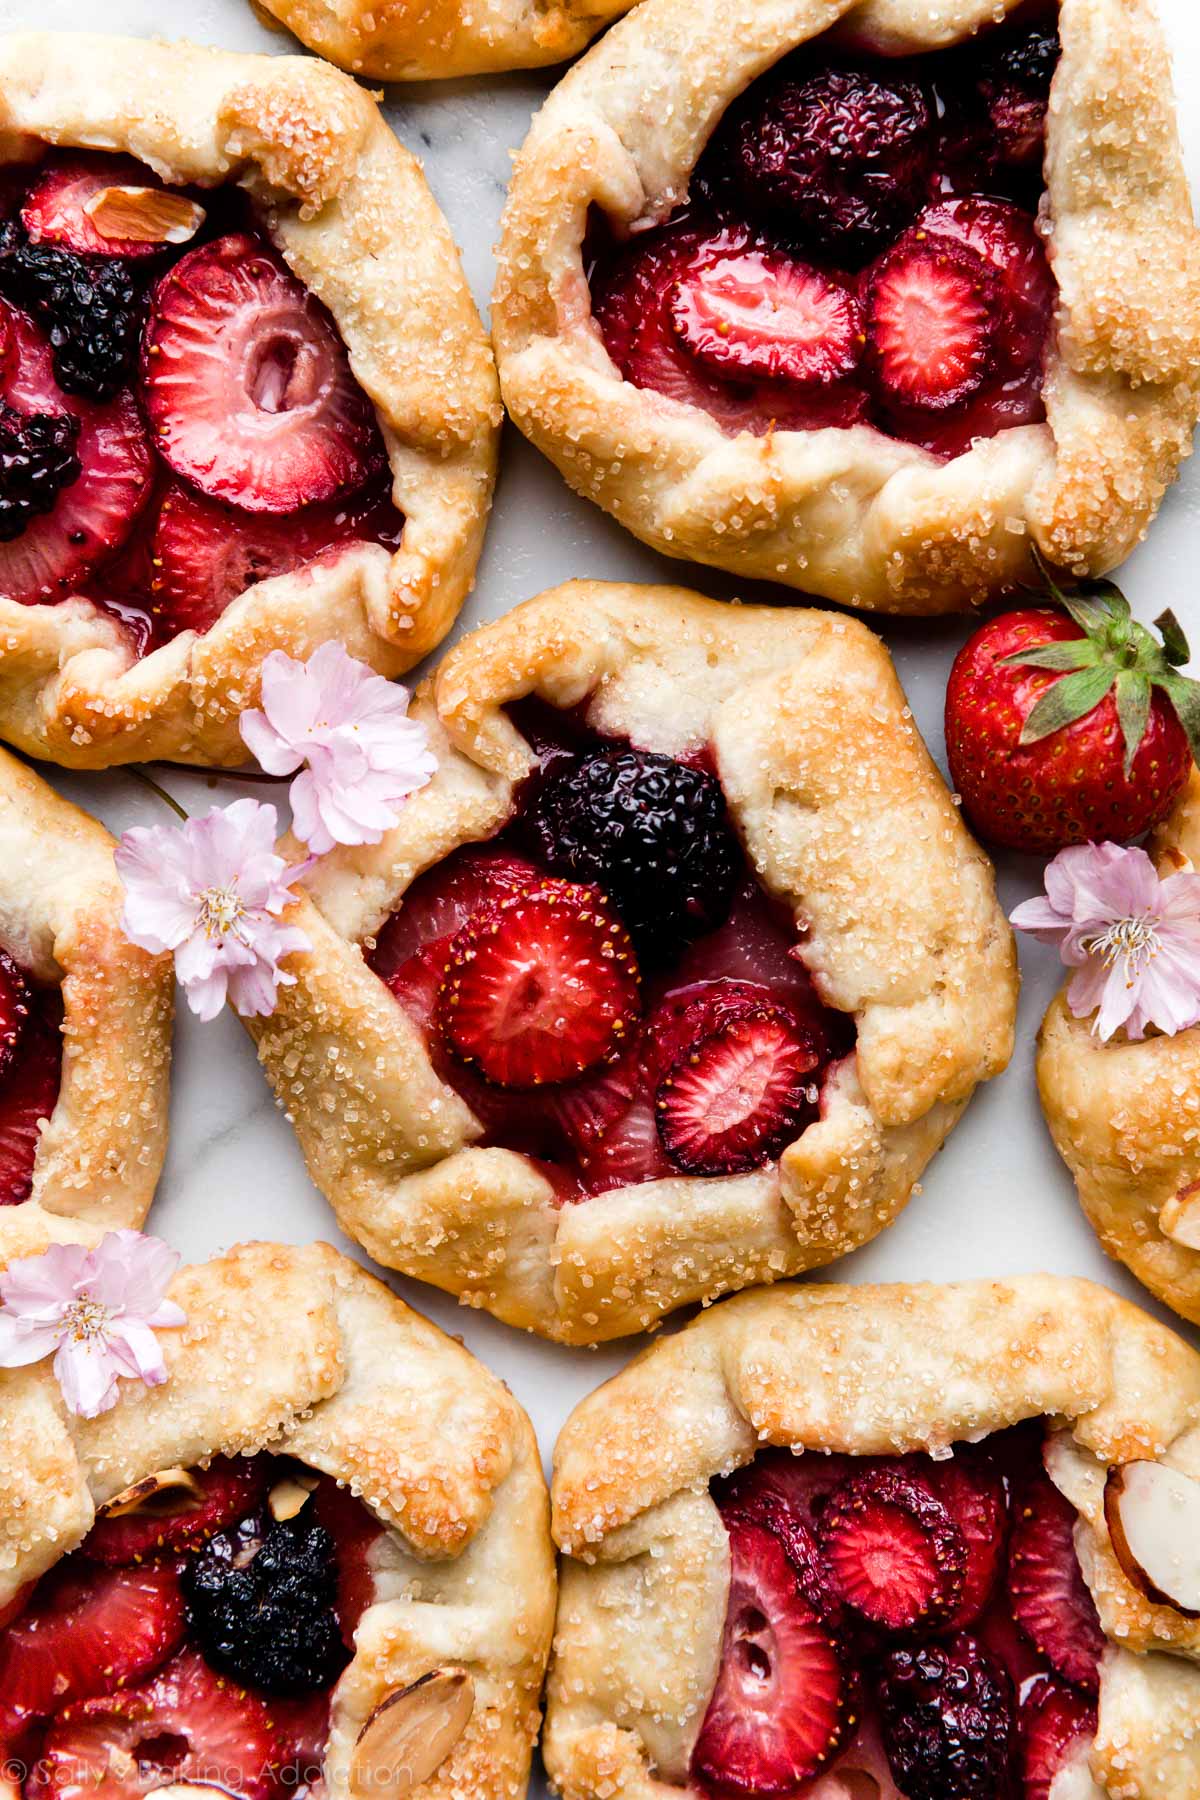
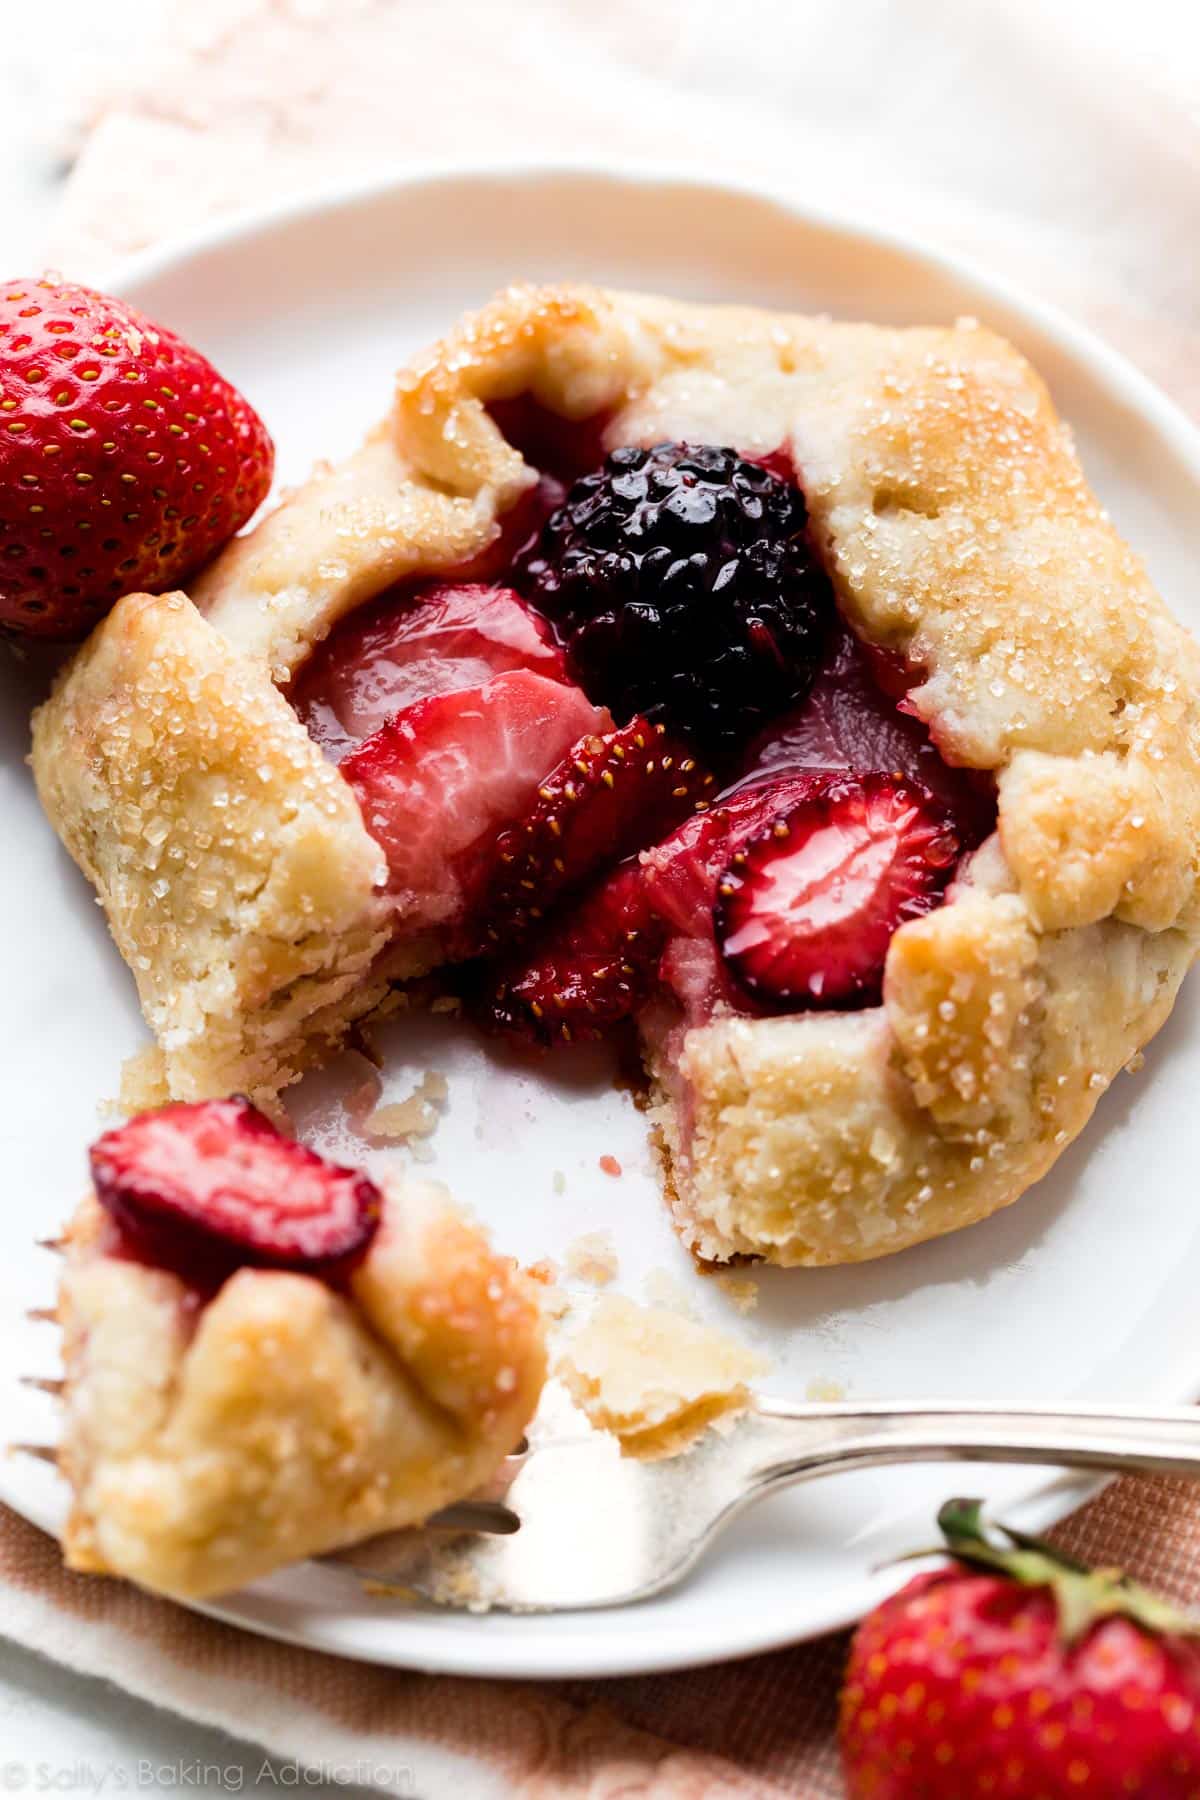
Complete with a flaky golden brown pie crust, juicy berry filling, and crunchy coarse sugar on top (optional but so good!!), these mini fruit galettes are a treat any time of year. But I especially love them as the weather heats up and we can take advantage of the season’s freshest flavors.
Galettes are free-form pies. I like to call them “lazy pies” because there’s no complicated shaping involved. Just as delicious + awesome as pie, but there’s no weaving, crimping, trimming, or any of that meticulous business. (I know that’s appreciated. Galettes are easy!) I usually stick to full size galettes—like my Blueberry Peach Frangipane Galette, Lemony Blueberry Galette, Strawberry Peach Galette, or Apple Galette—but smaller tarts have their benefits. I know you’ll happily agree!
Why Make Mini Fruit Galettes?
- Easier than a full pie or galette
- No complicated shaping
- Fun dessert to make
- Customizable fruit fillings
- Quicker than a full pie or galette
- Recipe is easy to halve
One reader, CeeCee, commented: “It was my first time making pie dough, so I wanted to bake a dessert that was relatively easy. Making a whole pie seemed too intimidating so I decided on mini fruit galettes! The crust was perfectly buttery and flaky and the fruit filling was superb. I only wish I had a little vanilla ice cream to go with it! ★★★★★“
Mini Fruit Galettes Recipe Ingredients
A quick overview of the ingredients you need:
- Pie Crust: Don’t skimp on flavor and texture—make homemade pie crust. My favorite pie crust recipe is straightforward and you can make it ahead of time and freeze. You need flour, salt, butter, shortening, and water. Unlike a full size galette where you only use 1 pie crust (half of the recipe since it yields 2 crusts), you use both crusts here. Very convenient! You could also use my all butter pie crust or the buttermilk cornmeal crust I use for my mixed berry galette. (Double it so you have 2 crusts.) If you can’t make your own, store-bought pie crust works in a pinch.
- Fruit: I recommend using berries or at least some berries in the fruit filling. Fresh fruit is best, though you can use frozen in a pinch. See my recipe note as well as the alternate fruit fillings listed below.
- Cornstarch: Cornstarch helps thicken the filling.
- Granulated Sugar: A little sugar sweetens the filling.
- Lemon Juice or Vanilla Extract: Use either!
- Milk (for brushing): For golden crusts, brush them with a little milk before baking.
Overview: How to Make Mini Fruit Galettes
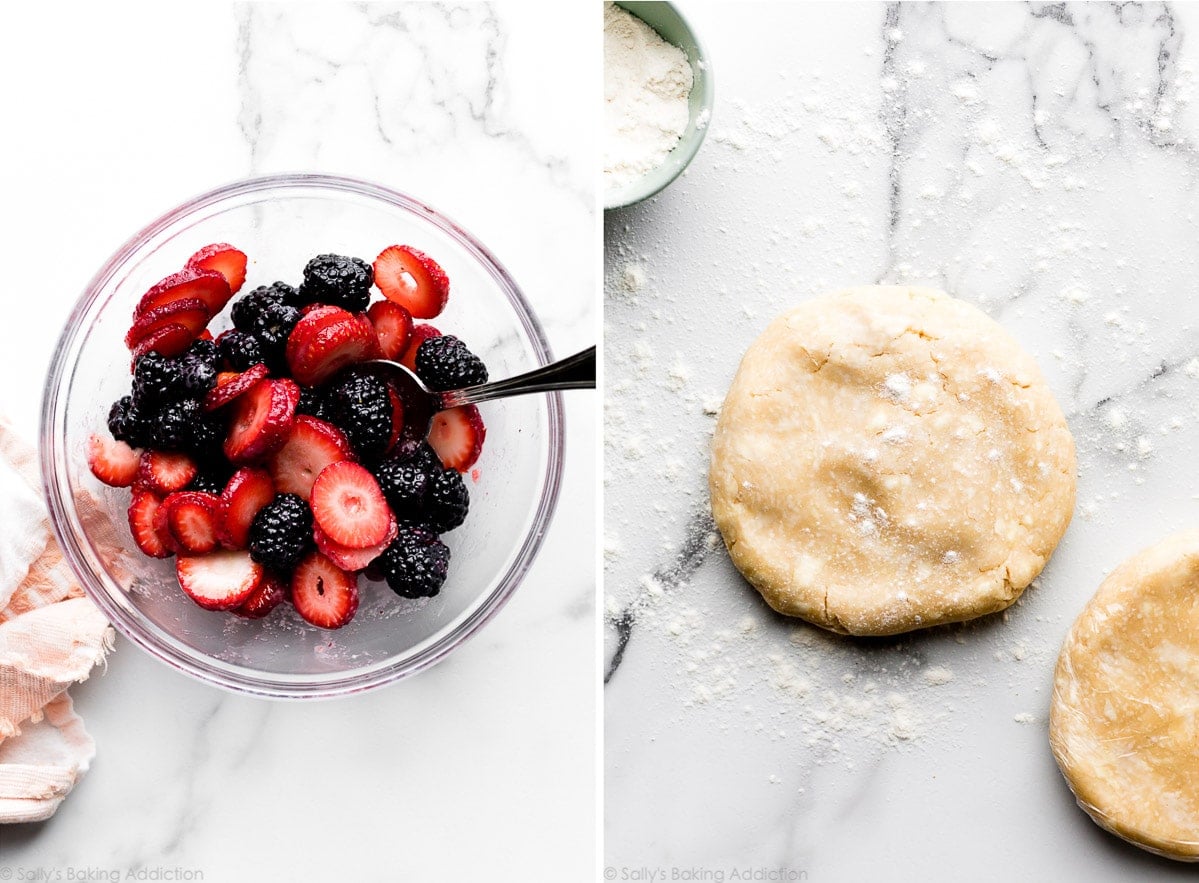
- Make pie dough: Pie dough needs to chill for 2 hours before it’s useable, so I always recommend making it the night before.
- Make the filling: I like to mix the filling ingredients together before I start shaping the crusts. That way it’s ready and the shaped dough isn’t just sitting there—remember, pie dough loves being cold. Chill the filling in the refrigerator as you work on the dough.
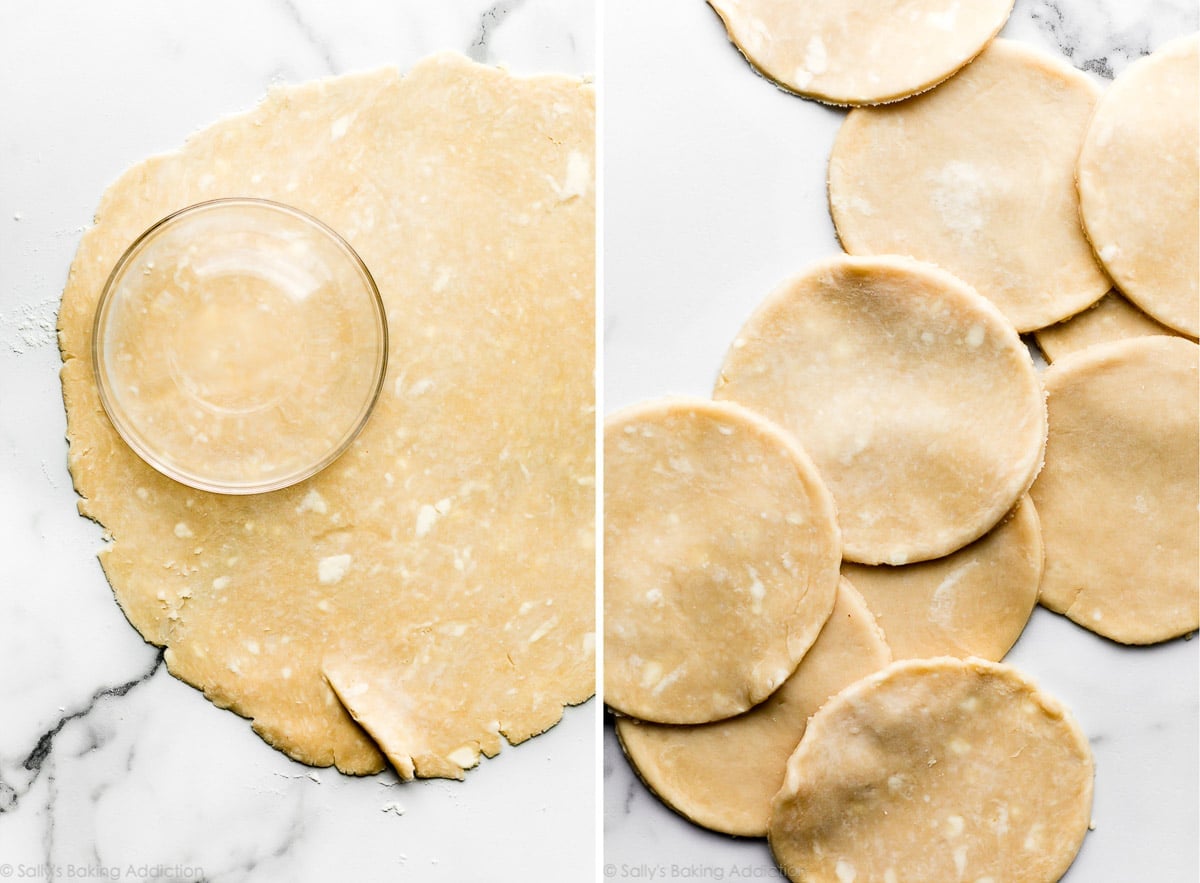
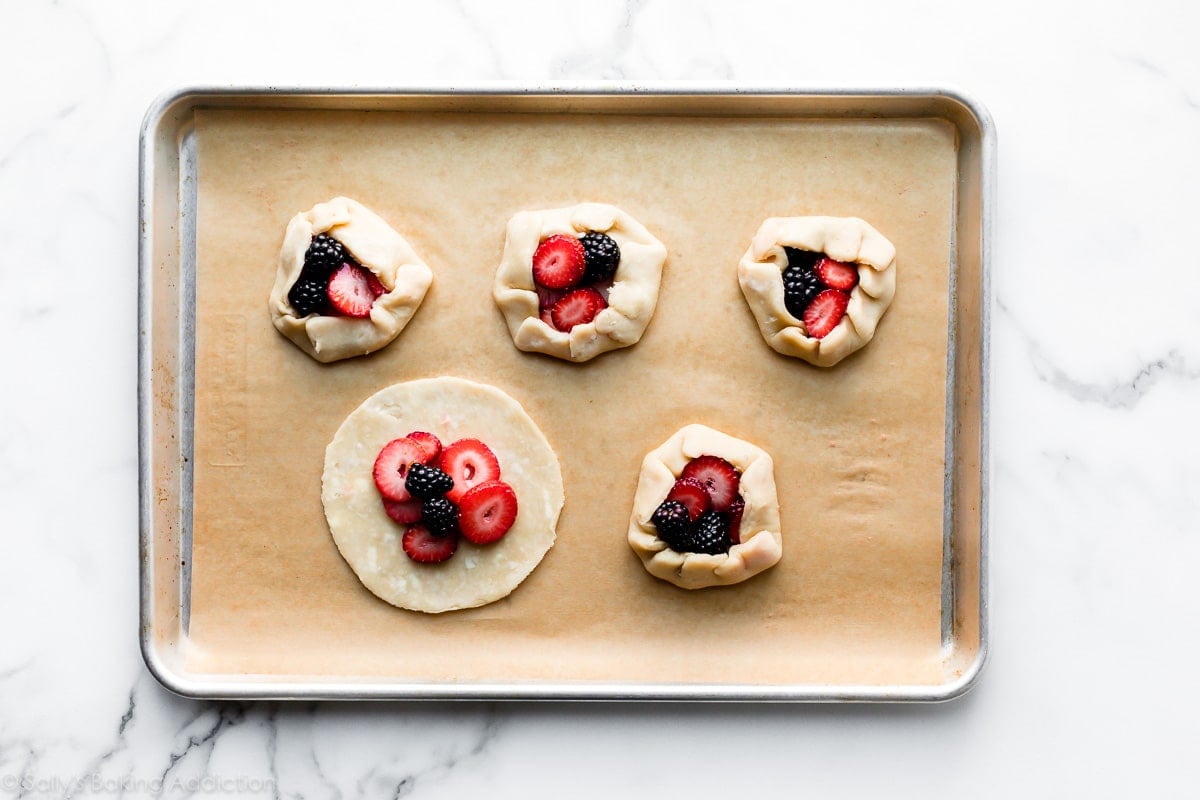
- Roll out pie dough & cut into small circles: Use a 5.5- to 6-inch round cookie cutter. This is a pretty big and unusual size, so if you don’t have one, use the the same size rim of a mixing bowl instead. That’s what I do! Or use a ruler and cut circles with a sharp knife. Re-roll the dough scraps until all the pie dough is used. You’ll have about 5 from each crust (10 total). Work quickly because the dough becomes delicate the longer it sits at room temperature. Arrange rounds on lined baking sheets.
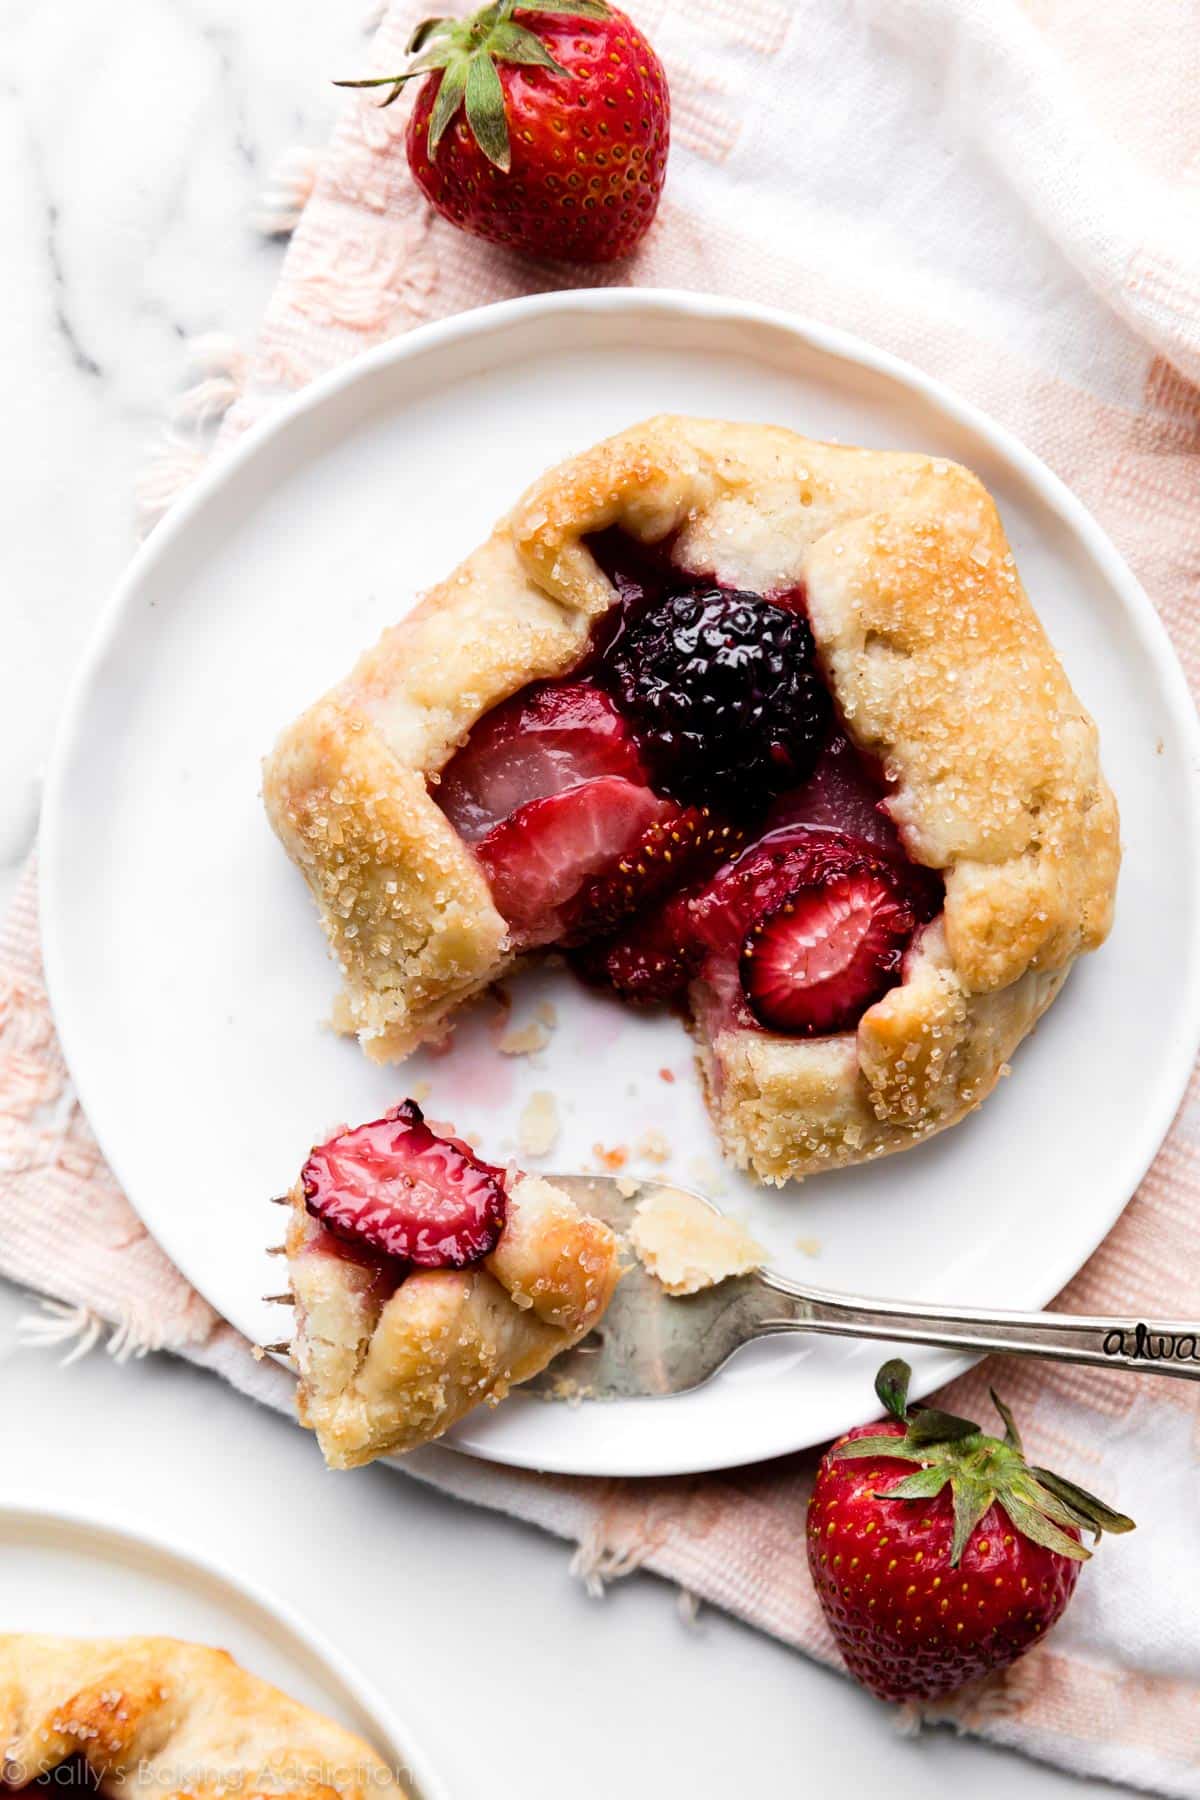
- Fill & assemble: Spoon about 1/4 cup of filling into the center of each dough round. Gently and tightly fold the edges up over the filling, leaving the very center exposed. Make sure the mini galettes are tight and compact so they don’t unfold themselves or lose shape while baking.
- Chill: The most important step in this recipe is to chill the assembled galettes before baking. Brush the dough edges with a little milk, top with coarse sugar and/or sliced nuts if desired, then chill in the refrigerator for at least 20 minutes and up to 4 hours. Without chilling, the mini galettes will lose their shape.
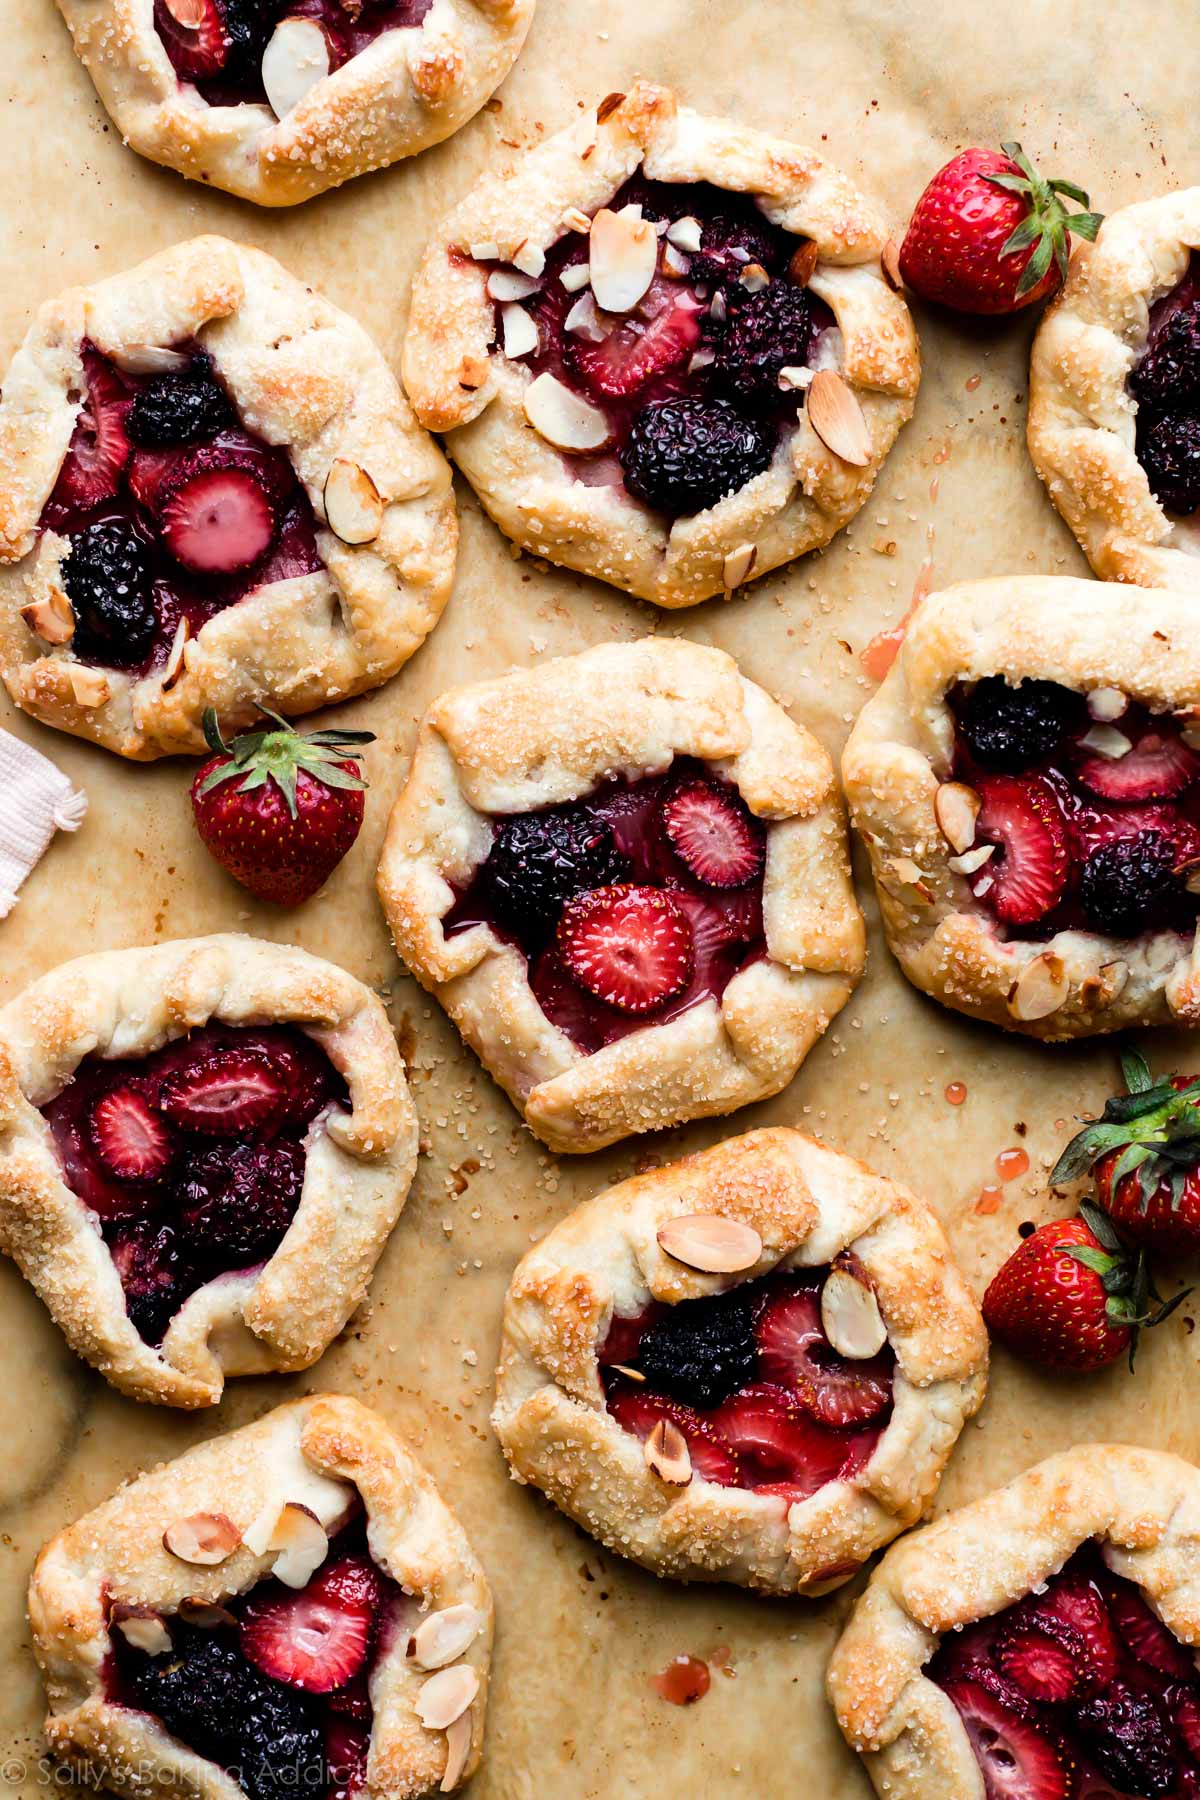
- Bake until the crust is browned: These are so much quicker to bake and cool than a full pie or galette.
Some step-by-step photos:
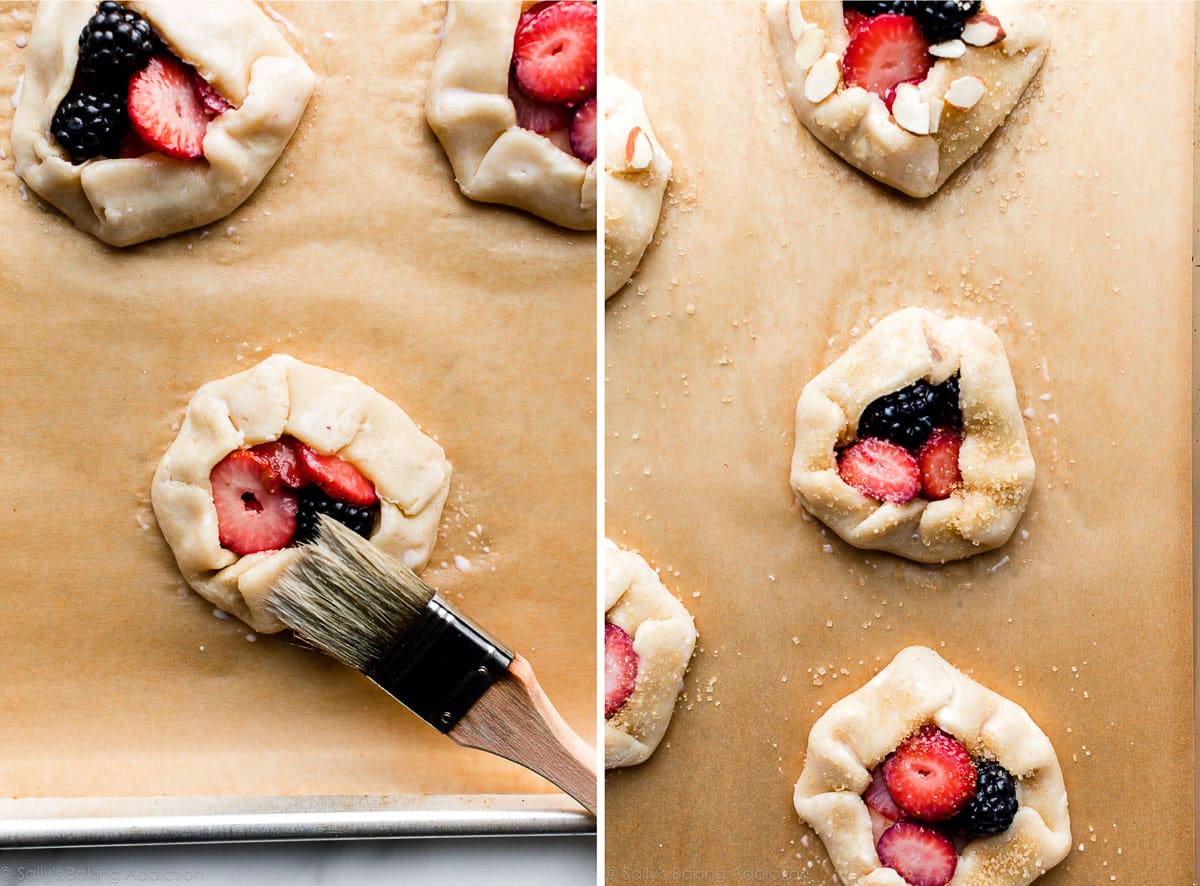
Optional: Before chilling and baking, dress up your galettes! Sprinkle the assembled crusts with coarse sugar. I used Sugar in the Raw. The sugar adds a lovely crunch, but you can skip it if desired. I also sprinkled some of the galettes with sliced almonds. Any nut works, but this is also optional.
Fruit Filling Ideas
Use 2 and 1/2 cups of fruit in the filling. You can pretty much use any fruit. Fresh fruit is best, but you can use frozen if needed. For best results, thaw the fruit first. Blot dry as much as you can before using. Here are my favorites:
- Mixed Berries: Use any combination of mixed berries for a total of 2 and 1/2 cups. I used 1 and 1/2 cups strawberries and 1 cup blackberries. I recommend slicing strawberries as I did in these photos so they’re flatter slices and you can layer more into each.
- Single Berry or Dark/Sour Cherries: Use 2 and 1/2 cups of one berry such as strawberries, blackberries, or blueberries. Or use dark or sour cherries. Avoid using all raspberries. Instead, combine them with other berries. They’re particularly juicy on their own.
- Apple, Peach, Pear, Plum (or combination): Use 2 and 1/2 cups of 1/8 – 1/4 inch thick slices. If the slices are particularly long, cut them in half. Feel free to use brown sugar in the filling and/or add a little cinnamon or other spice you enjoy.
- Banana: I’ve tried this! Use 2 and 1/2 cups of sliced banana. No need to mix with cornstarch unless you are using banana and another fruit listed above. Add a dash of cinnamon, the lemon juice (to prevent browning), and use brown sugar instead of granulated sugar.
Serve the mini galettes plain or with ice cream, whipped cream, or even salted caramel drizzled on top. Have fun customizing your own!
See Your Mini Fruit Galettes!
Many readers tried this recipe as part of a baking challenge! Feel free to email or share your recipe photos with us on social media. 🙂
Print
Mini Fruit Galettes
- Prep Time: 1 hour
- Cook Time: 28 minutes
- Total Time: 1 hour, 30 minutes
- Yield: 10 mini galettes
- Category: Dessert
- Method: Baking
- Cuisine: American
Description
Using pie dough and a simple fruit filling, you can create mini galettes that are perfectly portioned and fun to serve as an alternative to a full pie or galette. Review the recipe notes below and the helpful video tutorial before beginning.
Ingredients
- Flaky Pie Crust or All Butter Pie Crust dough (either recipe makes enough dough for this)
- 2 and 1/2 cups (about 350-400g) mixed berries or other fruit (see note)
- 1 Tablespoon (8g) cornstarch
- 2 Tablespoons (25g) granulated sugar
- 1 teaspoon lemon juice or vanilla extract
- 2 Tablespoons (30ml) whole milk, for brushing*
- optional for topping: coarse sugar and/or chopped/sliced nuts
Instructions
- Pie crust: I like to make sure my pie dough is prepared before I begin. Make pie dough the night before because it needs to chill in the refrigerator for at least 2 hours before using. (See note.)
- Line two large baking sheets with parchment paper or silicone baking mats. Make sure you have enough room in your refrigerator for these baking sheets because the shaped galettes must chill in step 7.
- Prep the filling: Gently stir the berries, cornstarch, sugar, and lemon juice/vanilla together in a medium bowl until combined. Place in the refrigerator, covered or uncovered, until step 5.
- Shape the crusts: Working with 1 chilled pie dough at a time, place the dough onto a floured work surface. Roll into a large 12-inch circle. Use your warm hands to mold any cracking edges back together as you see me doing in the video tutorial below. From the circle, cut rounds using a 5.5 or 6 inch cookie cutter. I simply use the rim of a bowl that’s about that size. Or you can use a ruler and cut circles with a sharp knife. You’ll have to re-roll the dough scraps a few times. Work quickly because the dough becomes much more delicate the longer it’s at room temperature. You’ll get about 5 rounds per pie crust. Repeat with 2nd chilled pie dough for a total of about 10.
- Fill galettes: Arrange dough rounds on prepared baking sheets. Remove filling from the refrigerator and spoon about 1/4 cup into the center of each dough round, leaving any excess juice behind in the bowl. Gently and tightly fold the edges over the filling leaving the very center exposed, as you see in the photos and video tutorial. Make sure the mini galettes are tight and compact so they don’t unfold themselves or lose shape while baking.
- Brush the edges of the pie dough with milk, which helps guarantee the dough will brown. If desired, sprinkle with coarse sugar and/or sliced almonds/nuts.
- Chill the shaped galettes in the refrigerator, covered or uncovered, for at least 20 minutes and up to 4 hours. The galettes will lose shape if they’re not chilled. You can preheat the oven as they finish up chilling.
- Preheat oven to 375°F (191°C).
- Bake chilled galettes for 25-28 minutes or until the edges are lightly browned.
- Remove from the oven and cool for at least 5 minutes before enjoying. You can enjoy warm or at room temperature. Serve plain or with ice cream or whipped cream.
- Cover leftover mini galettes and store in the refrigerator for up to 5 days.
Notes
- Make Ahead & Freezing Instructions: Pie dough, whichever you use, can be made ahead of time and chilled in the refrigerator for up to 5 days or frozen for up to 3 months, too. Allow to thaw overnight in the refrigerator before rolling out and filling. You can assemble the mini galettes in steps 5 and 6, then chill in the refrigerator in step 7 for up to 4 hours. I don’t recommend longer than this because the crust could become soggy. Baked and cooled galettes can be frozen for up to 3 months. Thaw in the refrigerator then bring to room temperature, if desired, before enjoying.
- Special Tools (affiliate links): Baking Sheets | Silicone Baking Mats or Parchment Paper | Glass Mixing Bowl | Rolling Pin | Pastry Brush
- Fruit: You can pretty much use any fruit here. Rinse, peel, slice/chop, and pat dry as necessary. Make sure the fruit is in thin slices (apples, peaches, pears, plums) about 1/8 or 1/4 inch thick or bite-size pieces. I suggest using berries or at least some berries in the filling. I used 1 and 1/2 cups strawberries and 1 cup blackberries. I recommend slicing strawberries as I did in these photos so they’re flatter slices and you can layer more into each. See my blog post above for different fruit filling ideas. Fresh fruit is best, but you can use frozen if needed. For best results, thaw the fruit first. Blot dry as much as you can before using in the filling.
- Lemon Juice or Vanilla Extract: You can use either. Think about which will pair best with the fruits you’re using. I like using lemon juice with berries.
- Milk: I recommend whole milk for brushing on the crusts, but you can use lower fat, nonfat, buttermilk, half-and-half, or even heavy cream (which will be very thick, thin with a bit of water). You can also use nondairy milk.
- Half Batch: For about 5 mini fruit galettes, use 1 pie dough disc and save the other for another time. (See pie dough recipes linked above for freezing instructions.) Halve each of the filling ingredients. All assembly, chilling, and baking instructions remain the same.
- Chilling the Baking Pans in the Refrigerator: If you’re nervous to chill the baking sheets in the refrigerator then bake them (which can cause warping), you have two other options. You can simply assemble the galettes on parchment paper or silicone baking mats, lift the parchment/baking mat as a whole and place on another baking sheet or directly onto a shelf in the refrigerator. After chilling, carefully lift up and place the entire parchment/baking mat onto the baking sheets for baking. Or you can use a thin spatula and very carefully transfer the assembled unbaked galettes to a large plate to chill.


Reader Comments and Reviews
Love this recipe! I used my favorite Blueberry Lemon pie filling and it turned out wonderfully. It’s also great for the extra filling and dough when I make pies. Can’t wait to make them with different fruit combos!
Simple and delicious way to work with pie dough in an easier way!! Also perfect to customize flavors if you have a crowd with specific tastes. A lot of dough compared to filling, which makes them easy to eat with your hands!
These were so much fun to make!! I was so afraid they would melt apart in the oven, but they came out beautifully (never skip the chilling – I’m a believer!!) Your instructions and video are SO perfect in educating and instilling confidence!! And the crust is amazing!!
Delicious! I used your all butter pie crust and added lemon zest and mint to the filling. So so good! Thank you for an easy and impressive recipe.
This was so versatile to fill with whatever berries we desired (or what’s available for grocery pickup!). Halving it resulted in 4 for me, but I did have thicker crusts than likely intended. Delicious!
Another winner recipe! I made these with half blueberries and half sliced strawberries. I love how almost all the sweetness comes from the fruit. It pairs wonderfully with your super flaky pie crust!
I made these with the flaky pie crust and a mix of strawberries, blueberries and raspberries. So easy and absolutely delicious!
I made the Mini Fruit Galettes yesterday with my 7 year old granddaughter, we had so much fun making them, they were so good! This recipe is definitely a keeper, I can’t wait to try them with different fillings. You’re recipes are always so good. Thanks for sharing, you rock!
These galettes were delicious and your flaky pie crust was tender and flaky, wonderful!
I did have trouble rolling the dough, it stuck to the silicon mat and tore. I thought I just rolled it too thin? Is there anything else I may have done to cause this? It’s delicious and I will definitely use it again! Thank you for keeping us engaged during this crazy time!
I have always had a terrible time making pie crust from scratch and decided this was the time to try it again. I am so glad I did! I used your all butter pie crust pulsing it carefully in my food processor and the galettes turned out perfect. My family couldn’t wait to try them and were quickly declared a favorite dessert by my youngest food critic.
As always, your clear and thorough directions make for wonderful bakes even on the first try! I made these little cuties on Mothers Day for my future Mother in Law (thanks for helping me impress!) and they were a hit. Strawberry, Blueberry, and Blackberry with vanilla and a layer of whipped creamed cheese on the bottom. I used your fail safe Flakey Pie Crust with fresh Raspberries and a sprinkle of Sugar in the Raw on top to tie it all together. Looking forward to making these again soon!
This was such a fun and easy recipe to make, your pie crust is so good and I mixed vanilla and lemon to the fruits, I also added pineapple to the berries mix.
In five of them I added a homemade cream, and it was like a mini fruit tarte. This was definitely a family favorite!! Thank you so much for this fun little dessert!
Thanks for a fun baking challenge! I enjoyed making these “mini pies” (using your homemade pie dough) and my family enjoyed eating them! I paired the apple cinnamon galette with your salted caramel and it was so delicious! They were the perfect little dessert!
I made the mini galettes with your flaky pie crust recipe, mixed berry and lemon juice. They are delicious. This is now my favorite dough recipe. I’m also looking forward to trying different combinations. Tangerine and cranberry? Thank you!
Hi Beth! That sounds delicious. I haven’t tried tangerine and cranberry, but let me know if you do!
Hi Sally, hope you’re doing well! I want to make the pie crust tomorrow and make the galettes later. I chose your recipe for all-butter pie crust. The thing is, I’m making HALF of the mini galette recipe. Based on your all-butter pie crust recipe, how much crust do I have to make? The whole recipe or half of the pie crust recipe?
Hi Sunny! For best success, I recommend making the full butter pie crust recipe and only using one of the dough dics. Keep the other in the freezer for up to 3 months.
I made a mixed berry (raspberry, blackberry and blueberry) ones along with some apple ones. Both came out very yummy and delicious. The kiddo absolutely loved the apple one. Very easy to make. The hardest part was waitng for them to bake. They looked so yummy before i even put them in the oven. I will definitely be making these again.
Galettes are such a great dessert and I love the mini version! I used this recipe and made a video to teach my students virtually how to make these free form pies!
These are amazing! I made mine with the filling from Sally’s “Sweet Cherry Pie with Toasted Almonds” recipe. My definition of “mini” is a little off, because one mini galette was the perfect size to split in half and share. My #1 reason for loving pie is the crust. I rolled it extra thick, and it came out so soft and flaky and melted in my mouth. 10/10 will make again!
I made these yesterday for my family. They loved them! I used mangos and strawberries as my filling, and they turned out great! Thanks a lot!
Also, I made an egg-wash with half-and-half. It gave a great shiny color. 🙂
I’ve never made pie crust before, but your instructions made it so easy and approachable! I made a half batch of blackberry galettes, but I’ll do a full batch next time to try different fillings! Rave reviews and happy mamas (my wife and my mom) on Mother’s Day!
I used Sally’s pie crust with the mix of butter and shortening and it was the best pie crust I’ve ever made. The bottom was perfectly crisp! These were delicious and pretty easy to make. 28 minutes in my oven was perfect, I turned my baking sheets around at 20 minutes and they all came out even. I will definitely make these again!
This is really delicious and easy. Used strawberries and blueberries.
Made with tart cherries, since they are my favorite pie filling. Yum! I think I’d make them again, if I ever get to have another dinner party.
If you love adorable desserts that taste just as good as they look, you have to try this recipe! The pie crust was easy to make and perfectly flaky. For my filling I used apples with brown sugar and cinnamon. I then sprinkled sugar and chopped pecans around the edge for a pretty and delicious galette. Served with a scoop of vanilla ice cream, this dessert was a hit at my Mother’s Day celebration!
What a flavorful, flaky crust! Made filling with strawberries and rhubarb. A beautiful and delicious dessert! This recipe is incredible.
These turned out delicious! First time making pie dough and it was much easier than expected with the flaky recipe. So flaky and buttery. It was a crowd pleaser among some picky pastry family members. The galettes are super easy to form and make perfect portions with so many options for fillings. I ended up filling mine with peach, raspberry and mint. So tasty! Definitely will make again.
This was great tasing- the perfect amount of sweet and tart. The flaky crusts were buttery and delightful.
Hi Sally! I recently found your blog and cannot wait to try multiple recipes! (i have become a pandemic baker!) I’ve recently been making individual savory pies, with a butter and lard dough, after I fell in love with them in New Zealand, and I have a question regarding rerolling pie crust. I’ve heard / read overworking the dough can make the crust tough, so I’ve been very hesitant to reroll more than once. Then I end up with a fair amount of dough that I make into little cheesy pinwheels. They’re yummy and all, but I’d rather make another pie. I see this mini galette recipe says to reroll several times…do you not find this idea about tough crust to be true?
Hi Tracy, thank you so much! As long as you avoid over-working the dough as you make it and don’t roll the dough out with too much force, re-rolling scraps shouldn’t be a problem. I’ve never found the re-rolled mini galette crusts to taste dense.
Sally- any recipe that starts with your flaky pie crust is sure to be amazing! These were the perfect dessert for Mother’s Day! They reminded me of homemade pop tarts when I tasted one fresh out of the oven. I did half blueberry and half strawberry, drizzled them with a simple lemon glaze (I used the one from your gingerbread muffin recipe!) and served with fresh whipped cream that I flavored with almond. SO delicious- and definitely the perfect challenge for May!
I have been looking for a new recipe and technique to try and this recipe provided the perfect opportunity! A few of them I did not cinch tight enough so they opened while baking but otherwise my strawberry and raspberry galettes with sliced almonds turned out wonderfully! The name galette makes them sound difficult to make but your recipe made it easy and enjoyable to tackle! I look forward to trying other flavours like strawberry rhubarb and banana!
I couldn’t believe how easy this recipe was! I’ve always admired these types of baked goods in coffee shops but had no idea I could easily make one too! So fun to see the finished product and taste it! My family gobbled it down!
May Baking Challenge complete!!. I made apple caramel and peach galettes. I don’t work with pastry often- rolling the dough to even thickness has always been an issue for me. This pastry recipe is EXCELLENT and yielded a perfect pie crust -MUCH better than store bought and so easy to make!! Great recipe!!