

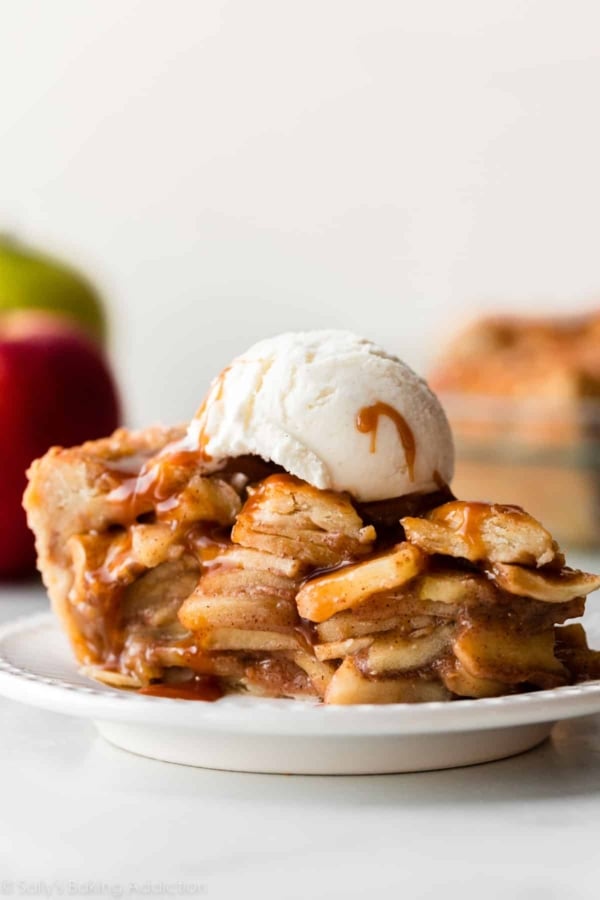
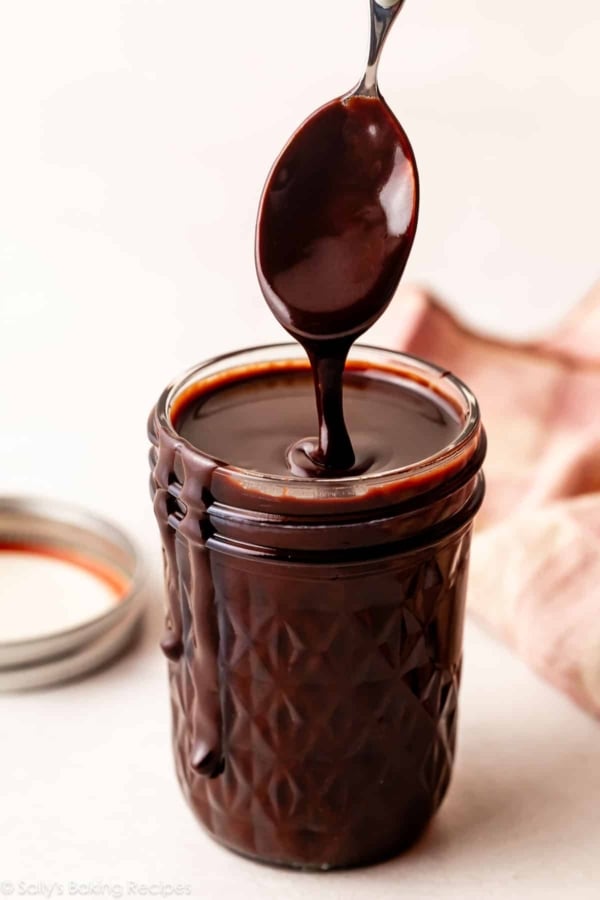
Make this simple 4-ingredient sweet salted caramel sauce at home with ease—no candy thermometer required! Ready in just 10 minutes, this rich homemade caramel is perfect for drizzling over cakes, cupcakes, cookies, pound cake, ice cream, cheesecake, scones, salted caramel apple pie, and more!
I originally published this recipe in 2013 and have since added new photos, a video tutorial, and additional success tips. This recipe is such a fan favorite, that it deserved a spot in print! You’ll also find this recipe in my cookbook, Sally’s Baking 101.
What once intimidated me became the subject of my 2nd cookbook: Sally’s Candy Addiction. As it turns out, homemade candy isn’t all that difficult. And salted caramel sauce is one of the easiest. There’s only 4 ingredients required: sugar, butter, heavy cream, and salt.
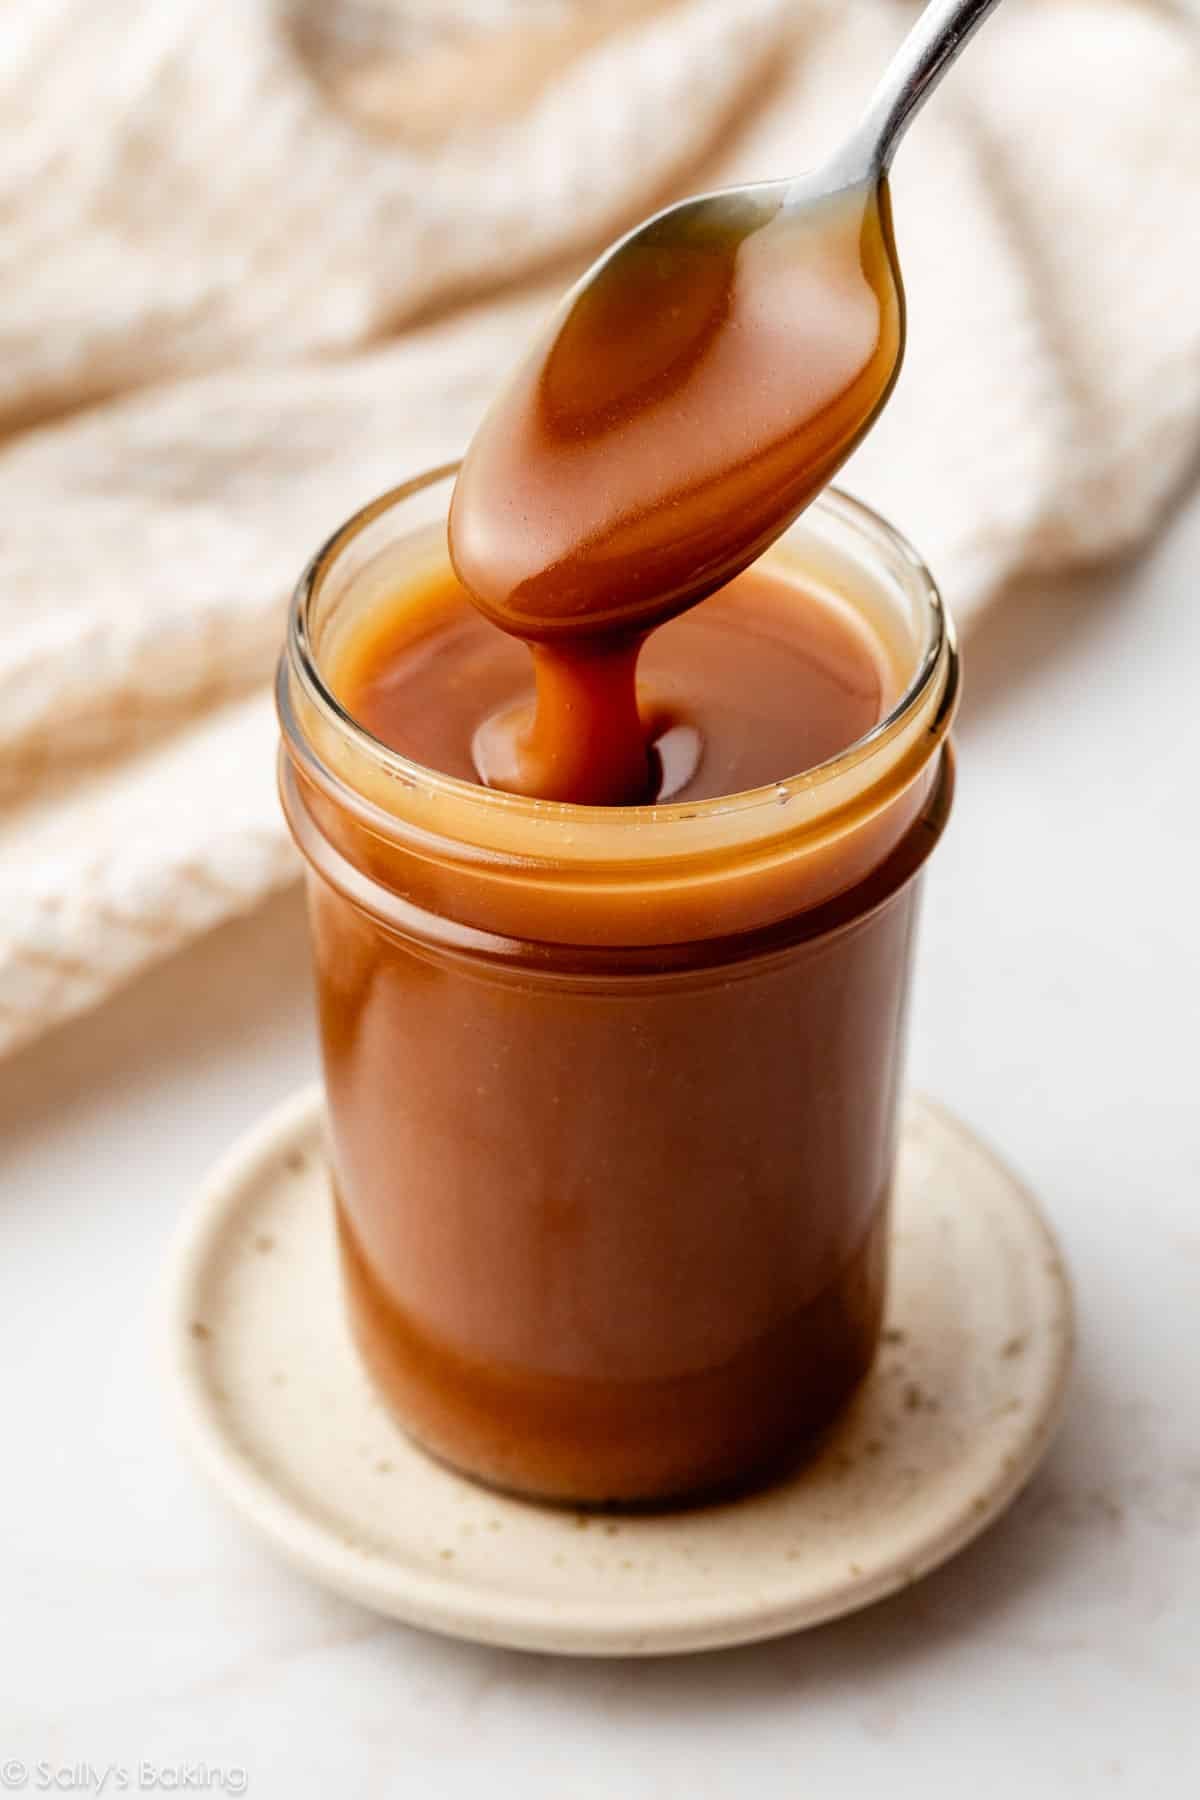
This salted caramel is a reader favorite recipe, consistently marking its spot in the top 10 most popular recipes on my website and published in 2 of my cookbooks. It’s sweet, buttery, and tastes phenomenal on anything it touches. (Though you really only need a spoon to enjoy.)
Trust me, after trying this 1 time, you’ll be hooked like the rest of us!

How to Make Salted Caramel
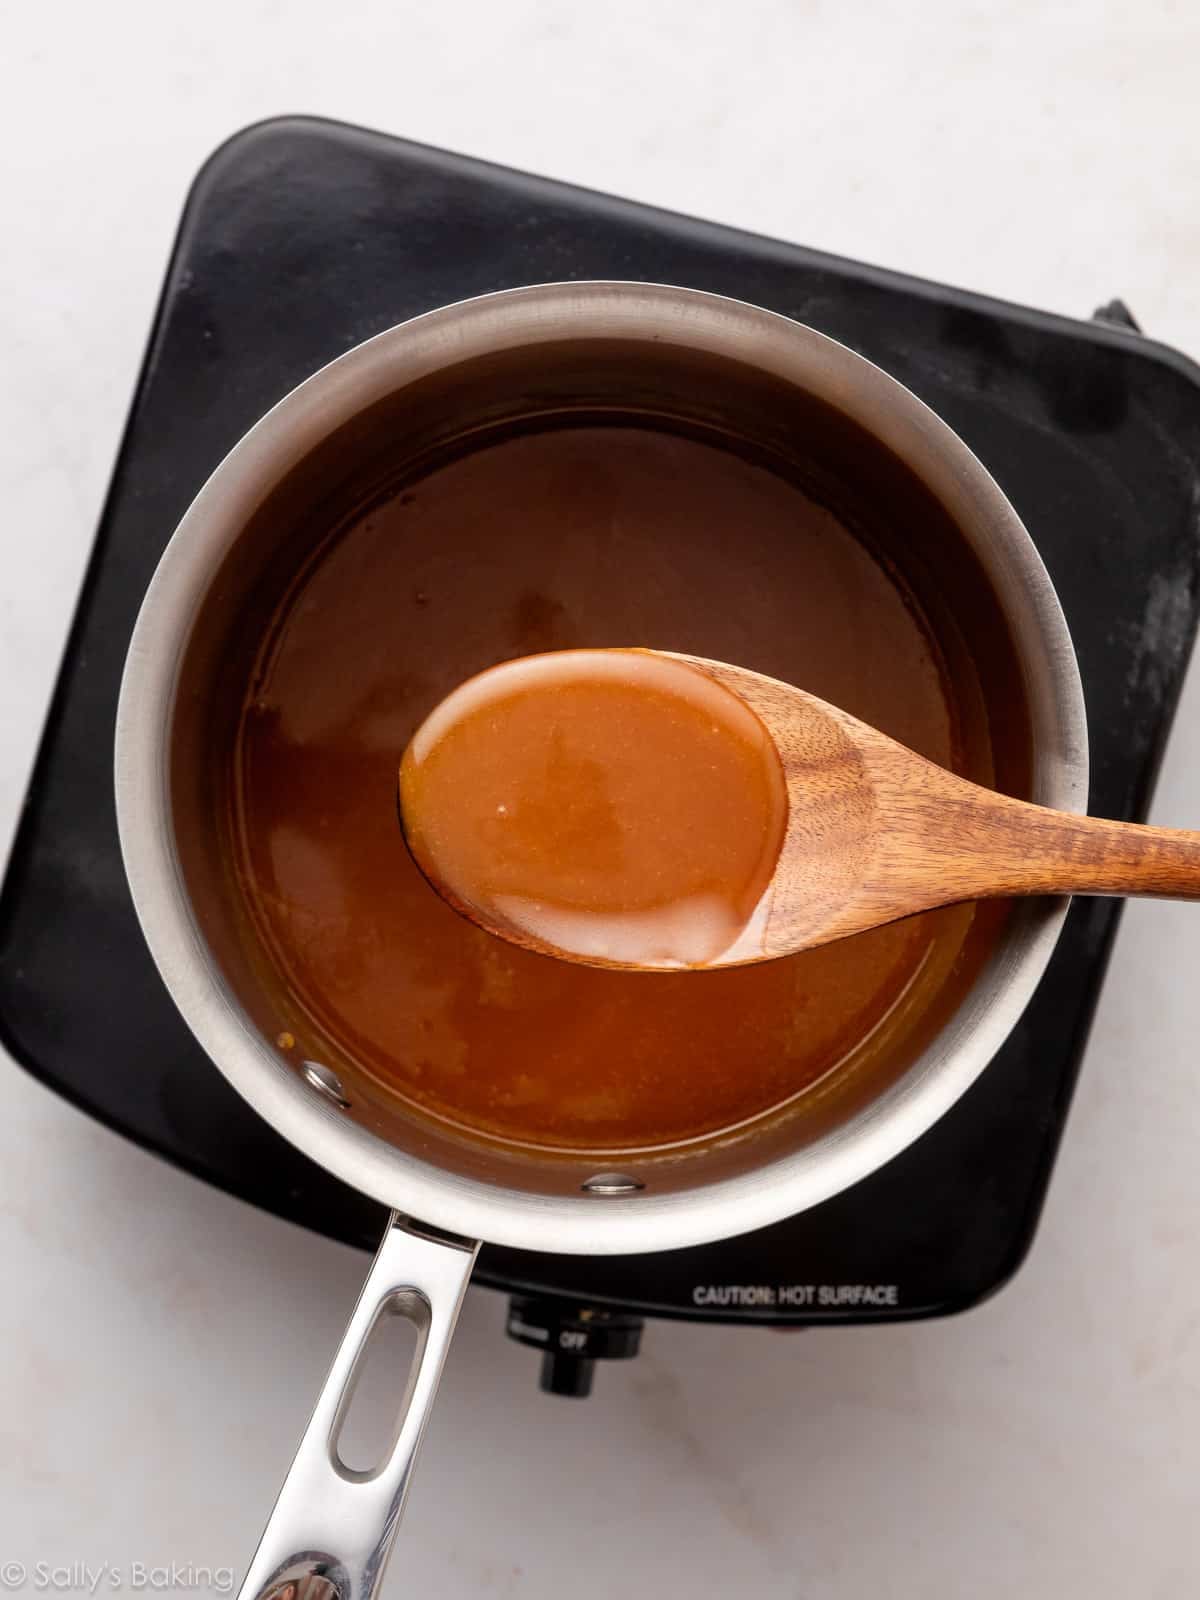
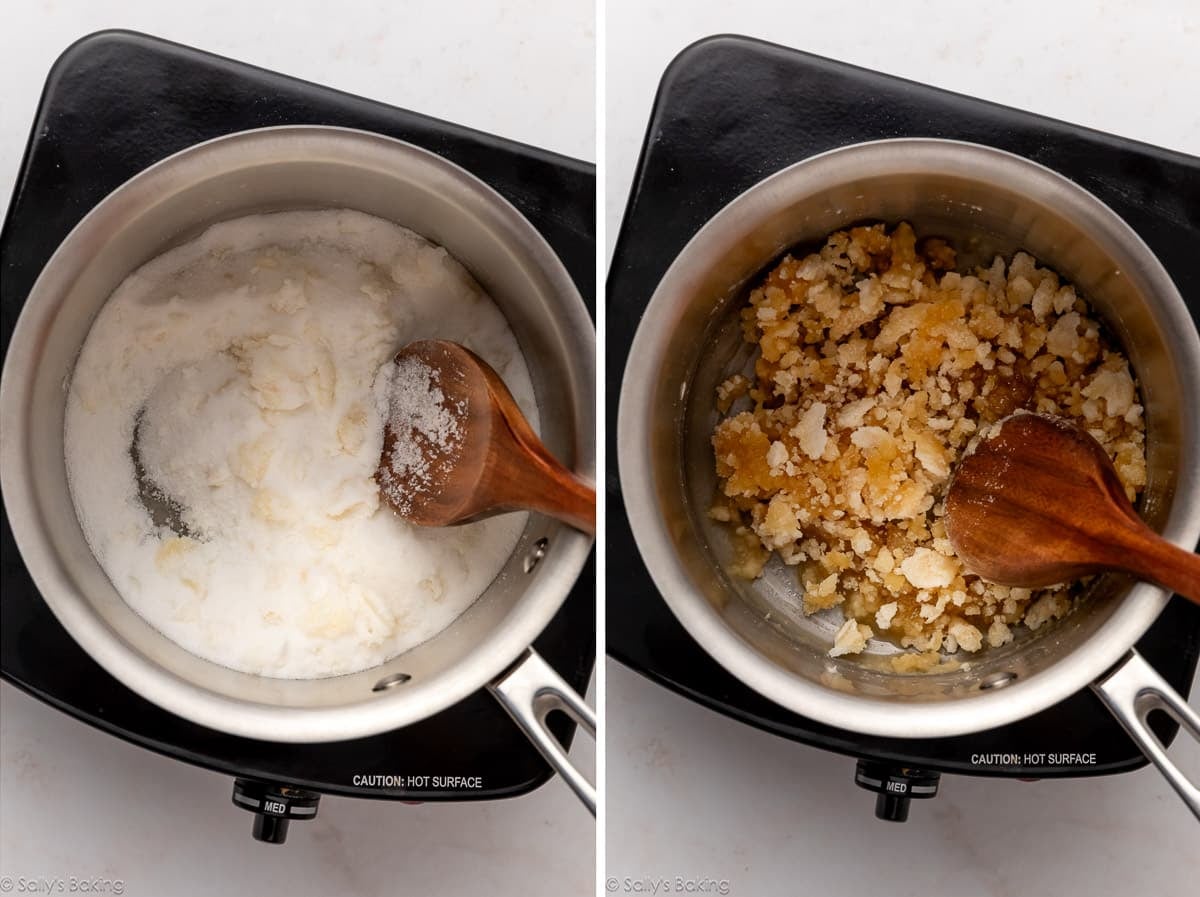
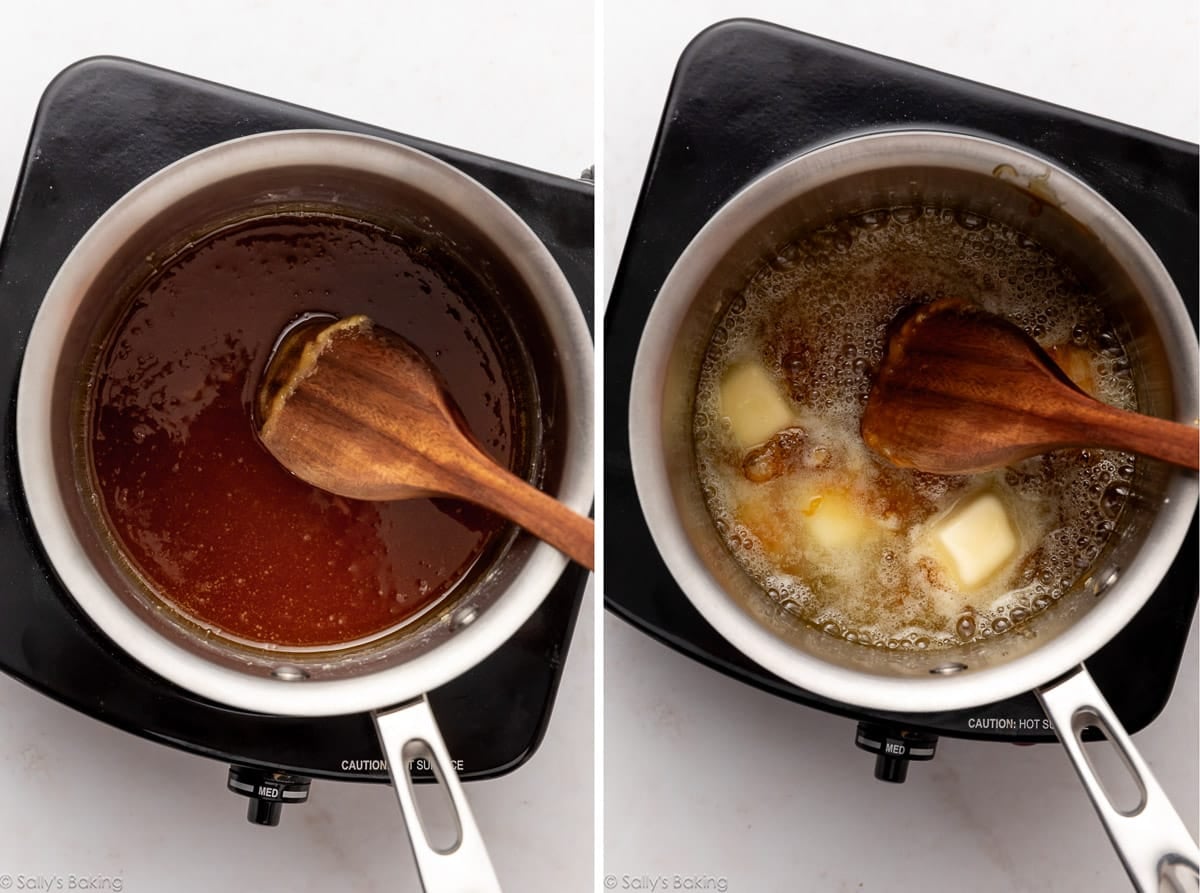
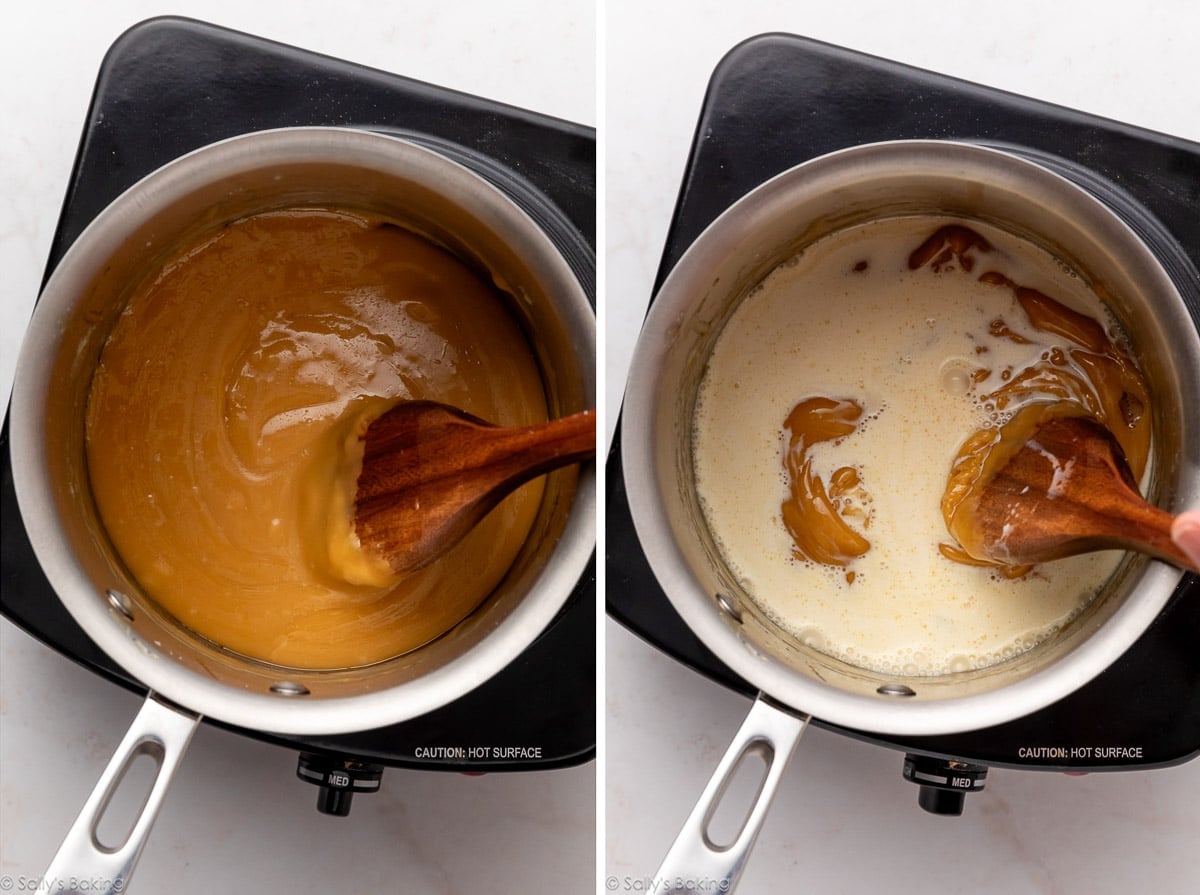
Use the written out instructions below, but here’s the basic process: The first step is to melt sugar, which is called caramelization. This requires 1 small (stainless steel, not nonstick) pot/saucepan and a wooden spoon. Stir until melted and caramelized. Stir in butter, then stir in heavy cream and let it boil for 1 minute. Finally, add the salt.
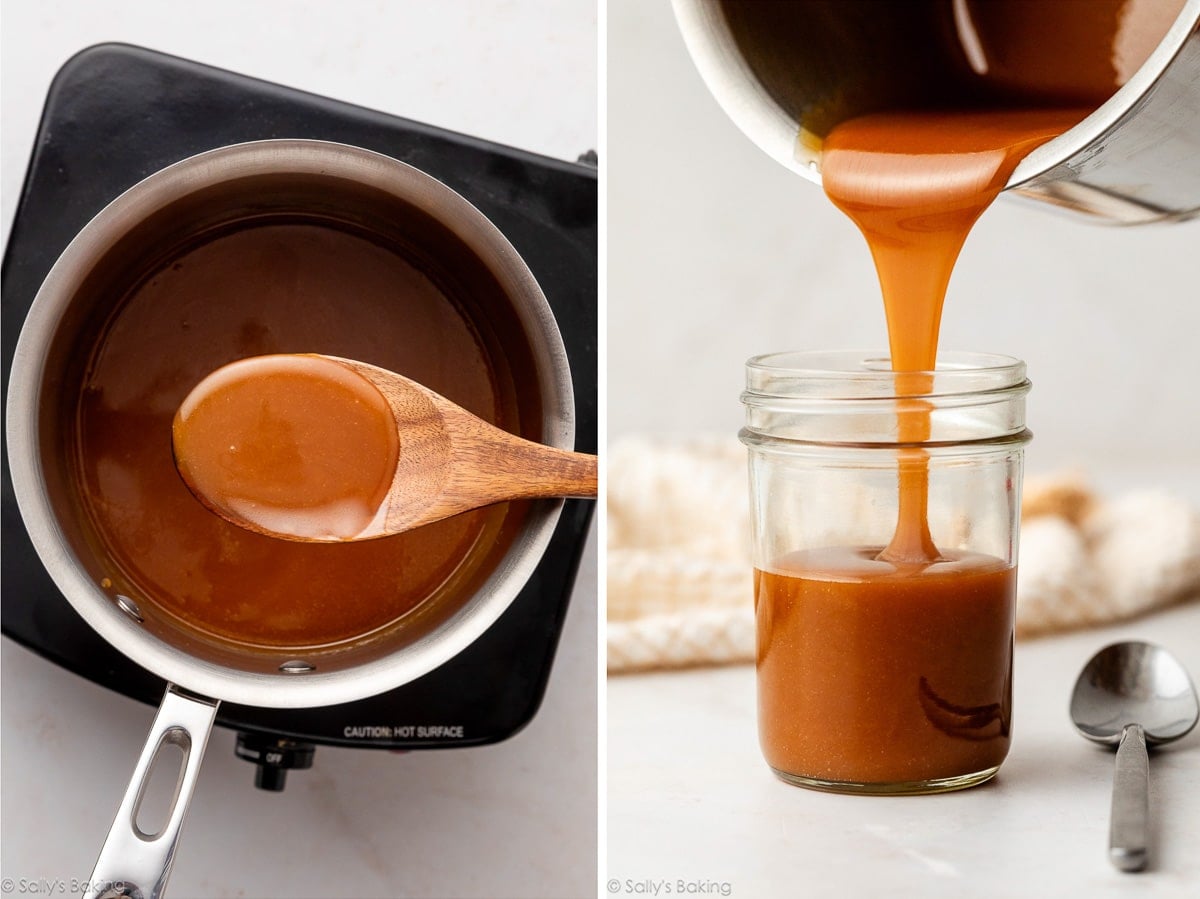
That’s it, the caramel is done.
As always, use caution when cooking over the stove because the hot liquid, butter, and cream may splatter. If needed, kitchen gloves come in handy.
No Candy Thermometer Required
Unlike most caramel recipes, this salted caramel doesn’t require a candy thermometer. Instead, I encourage you to follow the recipe and use your eyes to determine when to add the next ingredient. If you’d like to be precise and use a candy thermometer, the temperature will rise to about 220°F (104°C), and that’s when the caramel is done on the stove.
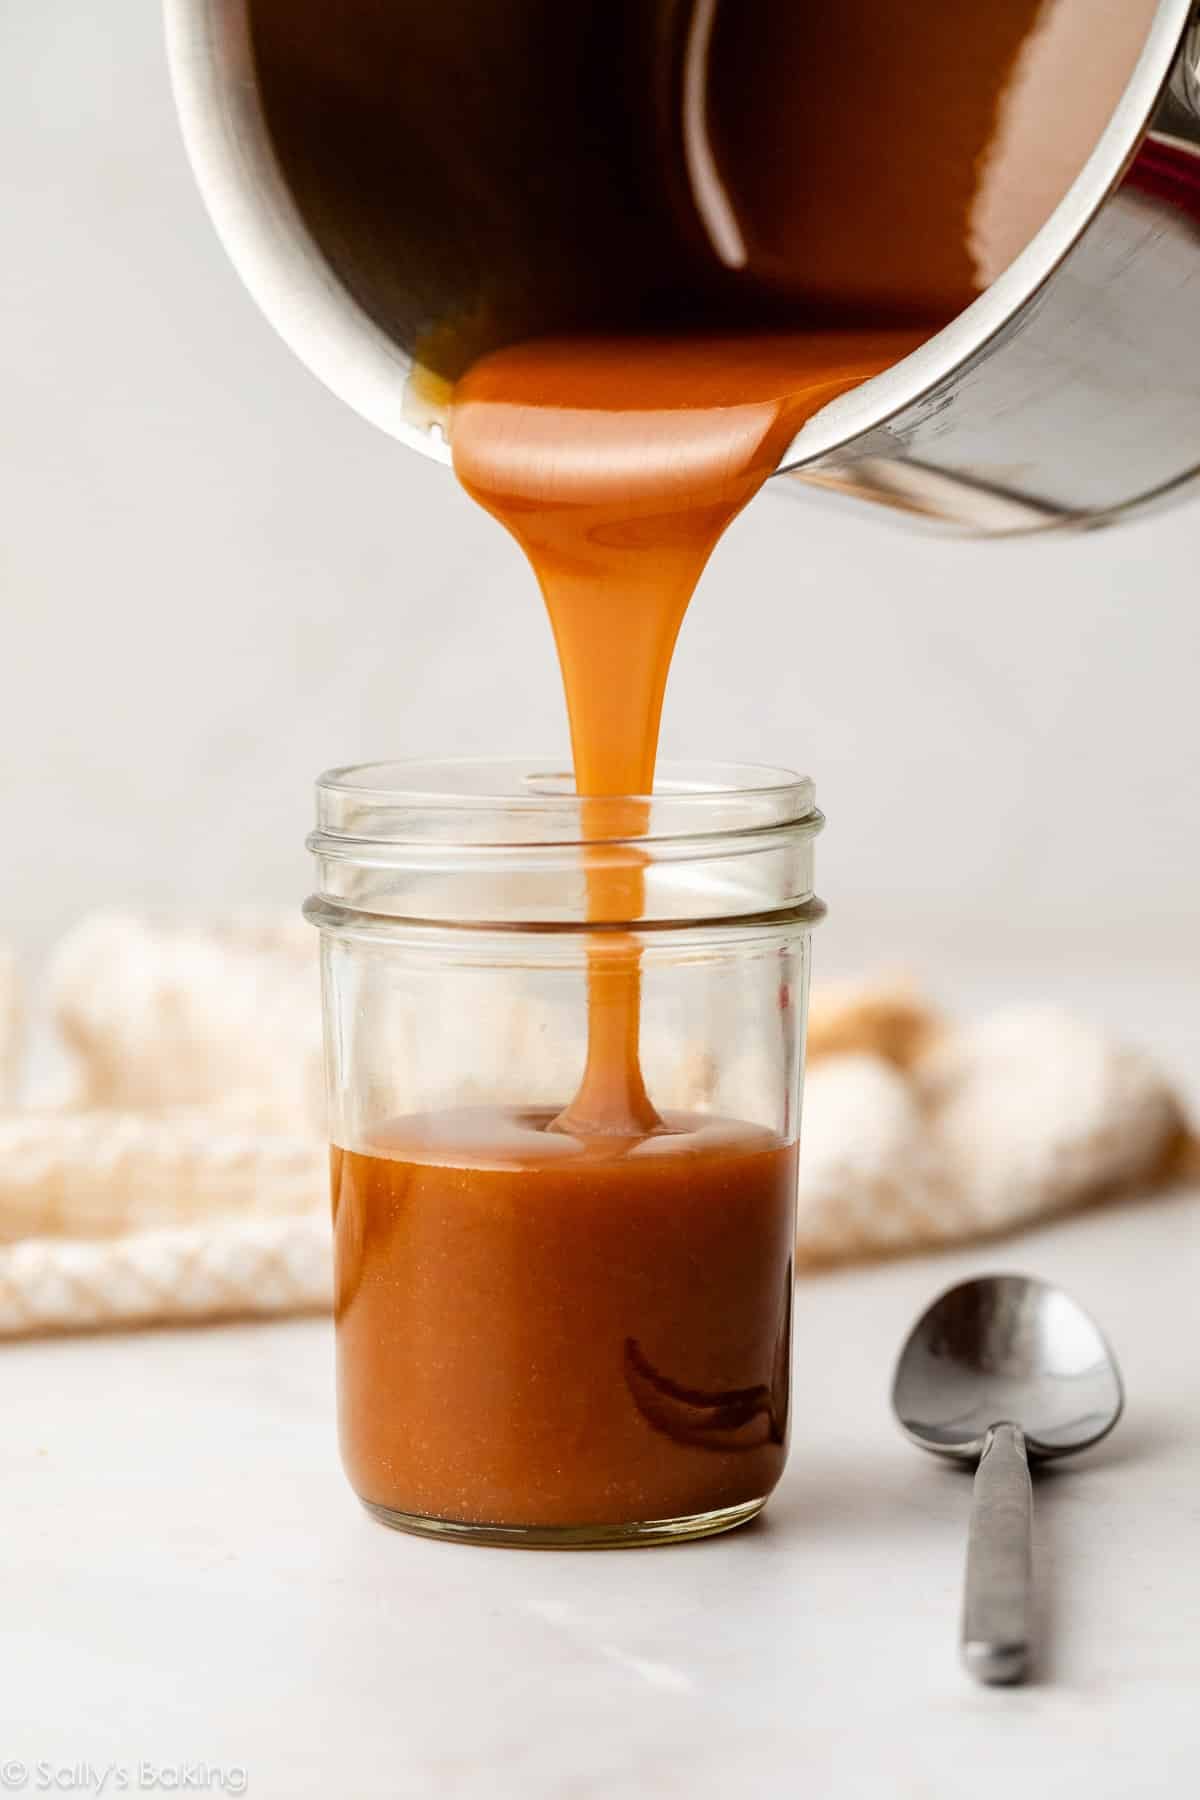
The caramel thickens as it cools.


What to Eat With Salted Caramel?
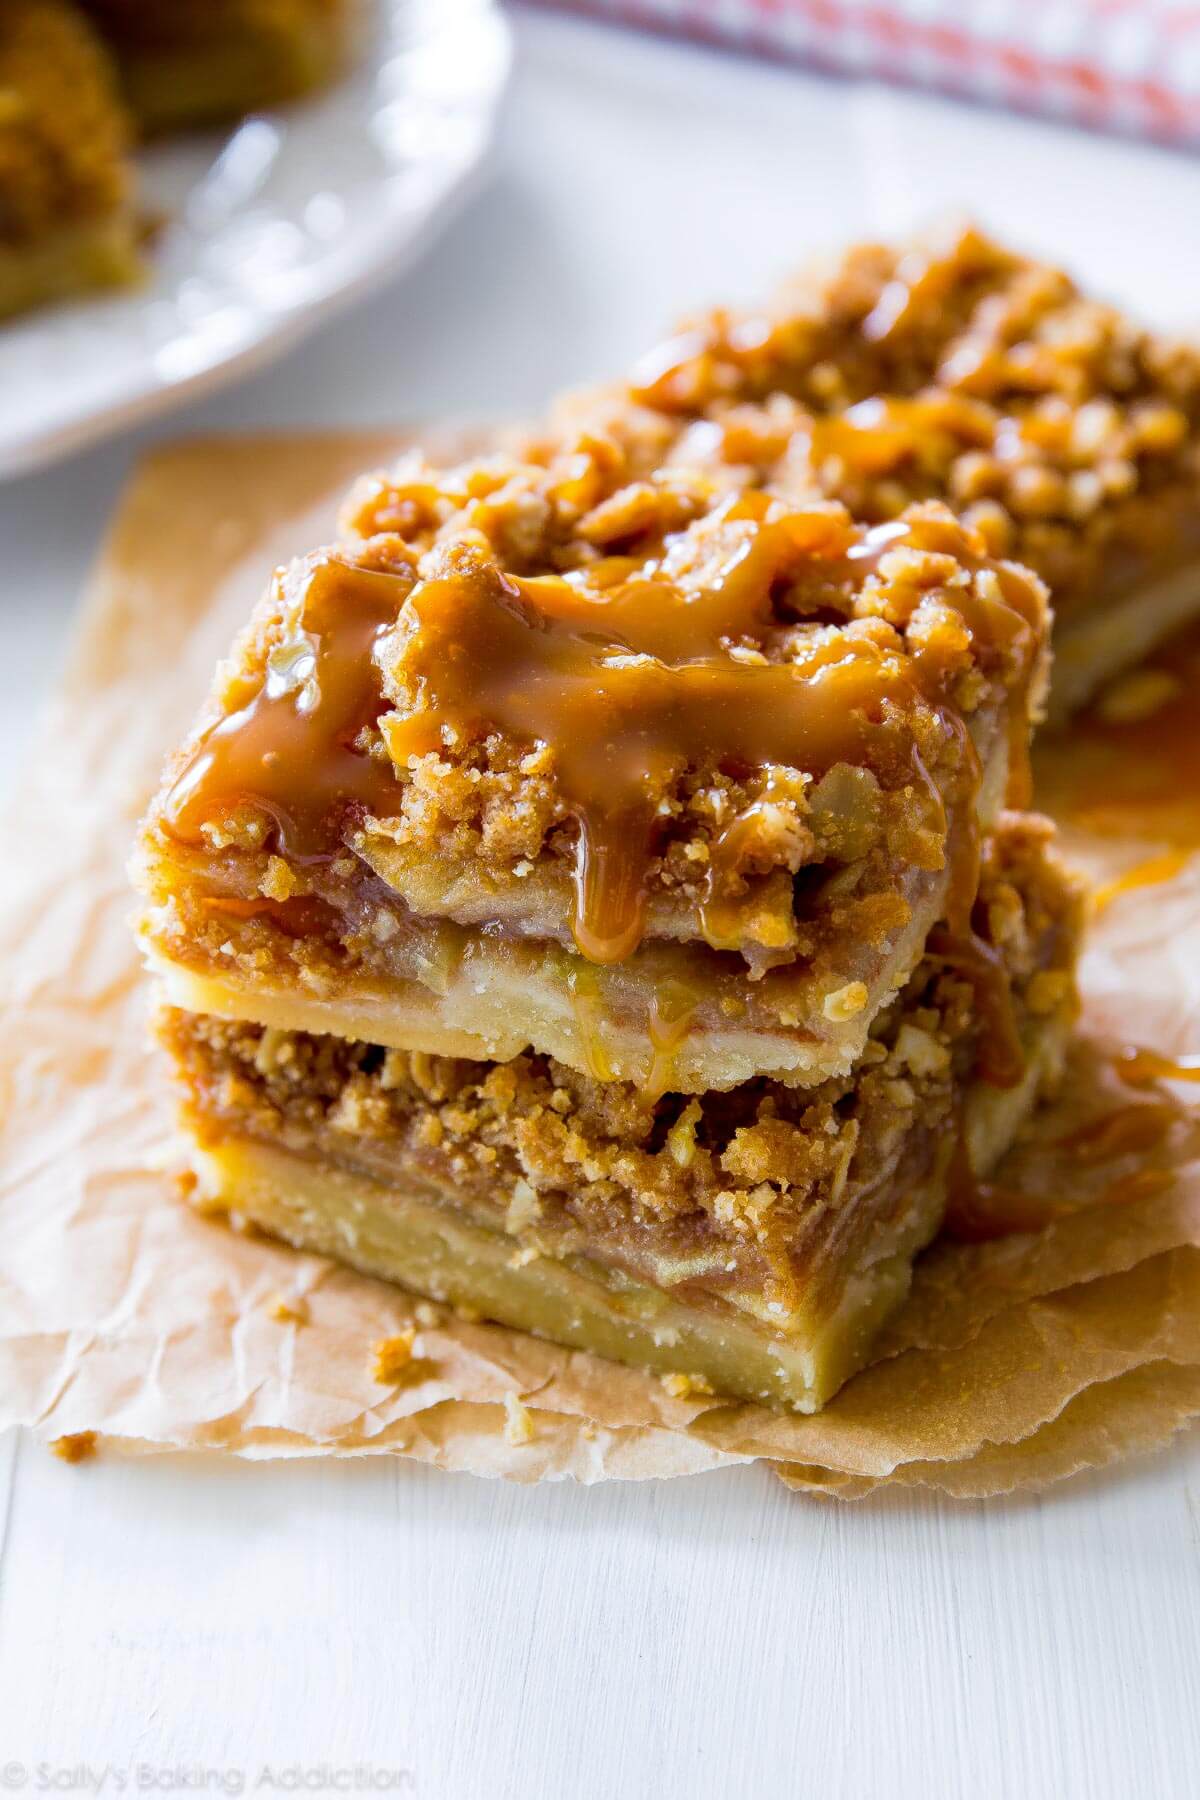
You will love homemade salted caramel with sweets like cinnamon rolls, cheesecake, and apple pie bars. Use it as a dip for apples, spoon over ice cream, or pour into decorated jars and gift it for the holidays.
The possibilities for salted caramel are endless:
- Turtle Brownies
- Burnt Sugar Caramel Cake
- Caramel Apple Cheesecake Pie
- Caramel Coconut Macaroon Thumbprints
- Chocolate Caramel Toffee Icebox Slice & Bake Cookies
- Butterscotch Pudding
- Snickers Caramel Tart
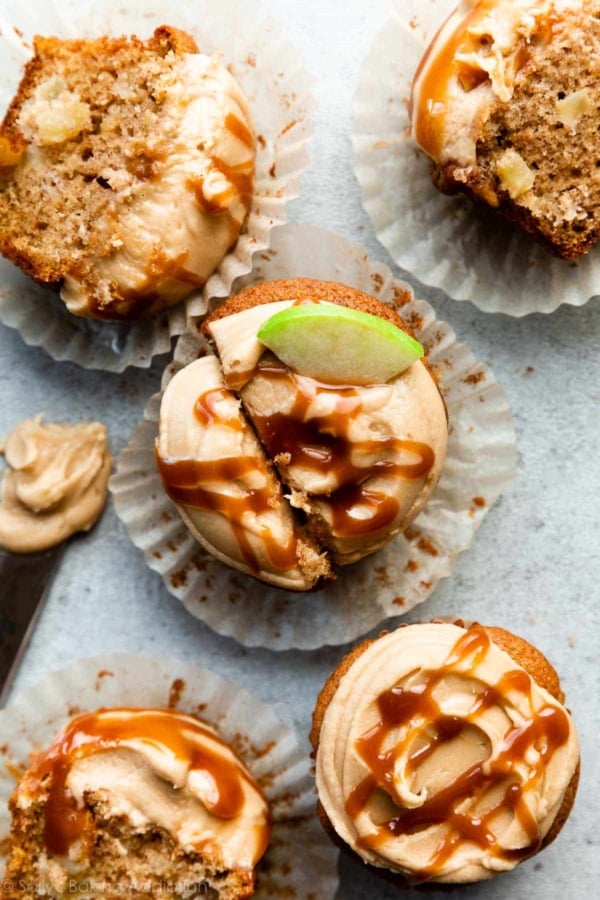
- Apple Cupcakes (pictured above)
- Caramel Dipped Pretzels
- Pumpkin Swirl Cheesecake
- Salted Caramel Apple Pie & Apple Cake
- Cheesecake Pie
- Chocolate Bread Pudding
- Apple Turnovers
- Caramel Turtle Cheesecake
- Apple Cider French Toast
- Dutch Baby Pancake
- Cake Mix Chocolate Cupcakes
- Skillet Brownie
- Apple Cobbler
- Apple Cinnamon Scones
- Topping for Homemade Eclairs
- Drizzled on cookies like Shortbread, Brownie Cookies, and Snickerdoodles
- As a filling for your favorite cupcake recipe (see my How to Fill Cupcakes post for all the details)
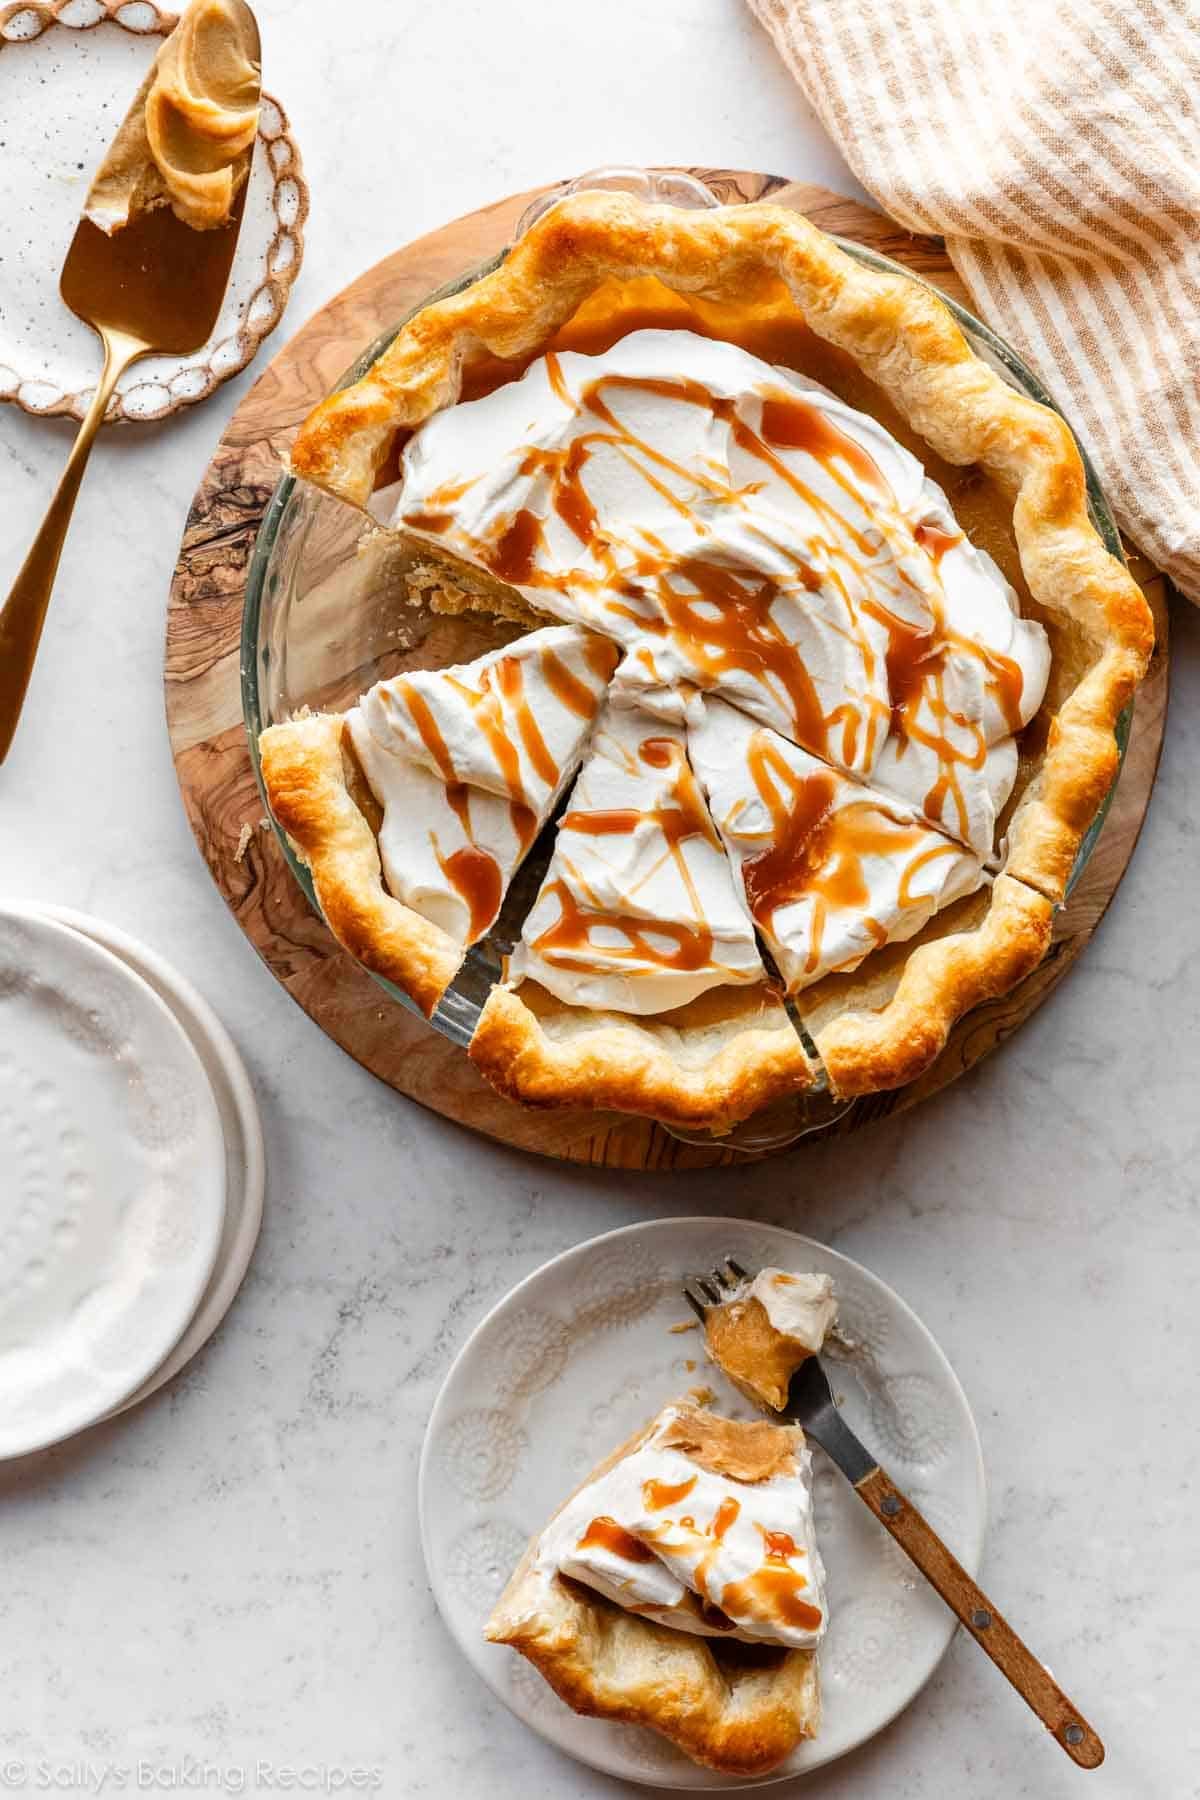
- Butterscotch Pie & Apple Pie Bars (both pictured below)
What Is the Consistency Like?
The caramel is liquid as it comes off heat. As the caramel cools, it solidifies into a chewy texture. After refrigerating, the caramel is hard and you must heat it up to bring it back to a liquid consistency. Do you need a thinner caramel? Feel free to add 2 more Tablespoons of heavy cream to the recipe.
Can I Skip the Salt to Make Regular Caramel?
If you’re looking for a sweet caramel, rather than a salted caramel, you can still use this recipe. Do not cut out the salt completely because the caramel’s sweetness will be overpowering. Instead, reduce the salt to 1/2 teaspoon.
No. You can’t really turn this sauce into a homemade wrapped candy. Instead, try my soft caramel candies recipe which is a little different.
This caramel is not thick enough to coat apples for caramel apples. Instead, I recommend my homemade caramel apples recipe.
Yes. When the caramel is done, it’s thin and liquid. As the caramel cools, it thickens. After refrigerating, it thickens even more and must be reheated to thin out and use as a topping or dip.
This caramel isn’t ideal to layer between cake layers because it will just spill out the sides under the weight of top layers. However, it’s great as a filling for cupcakes, such as these chocolate caramel coconut cupcakes. See How To Fill Cupcakes for more info!
How to Store Salted Caramel
After the caramel cools down, pour it into a glass jar or container. Refrigerate for up to 1 month. The caramel solidifies as it cools, but you can reheat in the microwave or on the stove so it’s liquid again. You can freeze the salted caramel, too. Freeze in an airtight container for up to 3 months. Thaw in the refrigerator or at room temperature, then warm up before using.
Print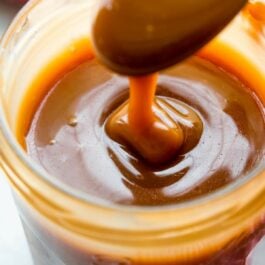
Homemade Salted Caramel Recipe
- Prep Time: 5 minutes
- Cook Time: 15 minutes
- Total Time: 20 minutes
- Yield: 1 cup (290g)
- Category: Dessert
- Method: Cooking
- Cuisine: American
Description
Made from only 4 simple ingredients, this homemade caramel is salty, sweet, and irresistibly buttery. No candy thermometer required and the possibilities for serving are endless. (Though just a spoon is acceptable!) Use caution as the cooking caramel may splatter. Stand back and wear kitchen gloves if desired. Review recipe notes prior to beginning. This recipe is also in my cookbook, Sally’s Baking 101.
Ingredients
- 1 cup (200g) granulated sugar (make sure it’s labeled “pure cane”)*
- 6 Tablespoons (85g) unsalted butter, at room temperature and cut into 6 pieces
- 1/2 cup (120g/ml) heavy cream, at room temperature
- 1 teaspoon salt
Instructions
- In a medium heavy-duty stainless steel saucepan (do not use nonstick) over medium heat, cook the sugar, stirring constantly with a wooden spoon or heat-safe silicone spatula. Sugar will form clumps and eventually melt into a thick brown, amber-colored liquid as you continue to stir. On my stove, this takes about 6 minutes. Stir constantly, especially around the bottom edges, and be careful not to let it burn.

- Once the sugar is completely melted, reduce the heat to low and stir in the butter. Be careful in this step because the caramel will bubble rapidly when the butter is added. (If you’re nervous for splatter, wear kitchen gloves.) Cook and stir constantly until the butter is melted and well combined. If you notice the butter separating or if the sugar clumps up, remove the pan from heat and vigorously whisk to combine it again. Keep whisking until it comes back together, even if it takes 3–4 minutes. It will eventually—just keep whisking. Return to heat when it’s combined again.

- Very slowly and carefully pour in the heavy cream, stirring constantly. Since the heavy cream is colder than the hot caramel, the mixture will rapidly bubble and steam when added. When all of the heavy cream has been added, stop stirring, increase the heat to medium, and let it boil for 1 minute. It will rise in the pan as it boils. If you’d like to be precise and use a candy thermometer, the temperature should reach 220°F (104°C).

- Remove from heat and stir in the salt. The caramel will be a thin liquid at this point. Allow to slightly cool and thicken before using. Caramel thickens considerably as it cools.

- Cover tightly and store in the refrigerator for up to 1 month. Caramel solidifies in the refrigerator. Reheat in the microwave or on the stove to desired consistency.
Notes
- Make Ahead & Freezing Instructions: You can make this caramel in advance. Make sure it is covered tightly and store it for up to 1 month in the refrigerator. Warm the caramel up for a few seconds before using in a recipe. See “What Is the Texture of This Salted Caramel?” in the post above. This caramel is OK at room temperature for a day if you’re traveling or gifting it. You can freeze the salted caramel, too. Freeze in an airtight container for up to 3 months. Thaw in the refrigerator or at room temperature, then warm up before using.
- Special Tools (affiliate links): Medium Heavy-Duty Saucepan (do not use nonstick) | Wooden Spoon | Candy Thermometer (like this one or this one)—optional
- Sugar: This recipe is most successful using granulated sugar that’s labeled “pure cane” on the packaging. I usually use and recommend Domino brand regular granulated sugar which says “pure cane granulated” on the packaging.
- Heavy Cream: Heavy cream (approximately 36% milk fat) may also be sold as whipping cream. Light whipping cream (30% milk fat), or double cream (48% milk fat) may be substituted. Do not use half-and-half or milk. Room-temperature cream is best.
- Salt: Use regular table salt or kosher salt. If using larger flaky salt, add 1 teaspoon, taste, then add more if desired. This recipe works with 1 teaspoon of any variety of salt. You can always add 3/4 teaspoon, taste, then add more if desired.
- Caramel Candies: This caramel is great as a sauce, topping, or filling, but won’t set up properly to make soft caramel candies. Here is my soft caramels recipe.
- Regular Caramel Sauce: If you want to make regular caramel, reduce salt to 1/2 teaspoon. Do not leave it out completely.
- Larger Batches: Avoid doubling or tripling this recipe. The added volume could prevent the sugar from melting evenly and properly. Make multiple batches instead.


Reader Comments and Reviews
Hi there, I’m getting ready to make this right now, but I want to infuse it with rosemary. Are there any tips you might have to get the best result?
We’ve never tested a rosemary version of this salted caramel, but let us know what you try! Sounds delicious.
I added dried rosemary in with the sugar as it melted and strained it all out at the very end. This recipe was the perfect base for what I was intending to make, which was a rosemary salted caramel sauce for my morning lattes. So so good!
Can I put the glass jar of caramel in water on the stove and heat up that way? Also, does this stay thick as a drizzle on a cupcake that will be served at the end of a party?
Can’t see why not! And yes, this works great to drizzle.
Have tried to make caramel a handful of times and always failed. Finally, success! Your extra tips and tricks really helped me nail it this time. Can’t wait to serve with your apple galette recipe at thanksgiving!
This recipe was SO delicious! So quick and easy and came out perfectly, amazing! Heading home for the holidays and I’d love to make it, but my mom can’t have dairy. The amount in the butter will be okay, but the heavy cream would cause some problems. Any ideas on non dairy substitutes for the heavy cream, or is it a lost cause? Thank so much!
I’ve used a few of your recipes in the past and have loved all of them! I am still a beginner baker and this was my first time trying to make caramel so it did not come out exactly how I had hoped. Mine came out darker in comparison to yours and tasted more bitter, do you have any idea where I could have went wrong based on that? I used all the correct measurements so I’m assuming it was an issue with the cook time. Thank you for sharing this recipe I’m excited to try it again soon!
Hi Gracie! Yes, it could have cooked too long, or at too hot of a temperature. Try turning the heat down a bit next time.
Hi Sally, I just finished making this for your apple pie to be one tomorrow by my grandkids.. Everything worked exactly..Tastes wonderful! Will go over your apple pie being made tomorrow by my grandkids. My only complaint, and it’s just me is that the sugar does take a long time to melt down Otherwise perfect! Thanks again.M
I was so nervous to make this because it seemed so intimidating, but I really didn’t want to use store bought. So I figured I would give it a try.. it turned out to be so easy. Can’t wait to use it for my cheesecake!
Can this recipe be used for brownies?
Hi Captain, yes, we have a recipe like that here: salted caramel turtle brownies. Enjoy!
I’ve made this recipe several times and it works perfectly every time. I follow the process exactly as described. Definitely the key is taking it off the heat after adding the butter and whisking it, as it does always separate. But a couple minutes of vigorous whisking and it comes together every time. I like to add a teaspoon of pure Mexican vanilla along with the salt, which makes it even more delicious! It doesn’t overly harden for me – it thickens up in the fridge, but then I can warm it in the microwave and it becomes pourable. It’s a great recipe!
Can I use this to make caramel cheesecake?
Hi Shannon, yes! This is what we use with our caramel turtle cheesecake recipe.
Recipe was fairly simple & tastes wonderful. This is definitely not a “sauce” recipe, my mistake. It hardened almost completely on ice cream, a sort of chewy “Magic Shell” for ice cream! Only it’ll stick and harden onto your spoon. Would be great for caramel apples though! Making candy out of the remaining batch of mine, sooo good!
Hi, I was just wondering how many ml worth of sauce this makes as I need 500ml worth for my 2 cheesecakes. Would I need to multiply the recipe at all and if so by how much?
Hi Emma, this recipe makes 1 cup, which is about 236ml. We recommend you make more than one batch instead of doubling this recipe. The added volume could prevent the sugar from melting evenly and properly.
My first time making caramel had me nervous but this recipe was a breeze to follow and turned out perfectly. I had to stir mine for about 15 minutes so definitely depends on your stovetop. Thanks for another great recipe!
My go to for embellishing, cakes, pies, ice cream!
This recipe was a bit time consuming as it took me nearly 3x as long to make… But, it came out perfect!! I used 1/2 cup of the pumpkin spice coffee cream recipe, found here. Wow! Delicious!
Hi! Would this recipe work with brown sugar instead of regular granulated sugar?
Hi WW, brown sugar has too much moisture to cook and caramelize properly in this recipe. We recommend sticking with white granulated sugar.
What is the reason for using a stainless steel pan instead of a non stick? I don’t have stainless steel so trying to determine if I should go out and grab one or not
Hi Sarah, sometimes nonstick works, but we have much better and more consistent luck (and others do as well) when using a stainless steel pot. Using a nonstick pan can often cause the caramel to burn and/or crystallize, and generally just make it harder to cook properly. Hope this helps!
I have made this a number of times, and while it is slightly tricky to get the sugar clumps to melt without burning (and this is the point at which it happens), I have found that straining the finished sauce takes care of that. Watching the color of the sugar also helps—a medium dark amber is right. Too dark, and it will taste burned. I prefer max 1/2 tsp kosher to finish. Absolutely delicious recipe.
used organic whole milk as subdtitute but uswd original measurements (1/2 cup). Made the best caramel ive ever tasted. had maybe five tiny milk curds smaller than a peppercorn that i had to fish out (reason you dont use milk) but once cooled its the perfect consistency and smooth as silk. used laser thermometer and took off a min after hitting 220. STIR THE ENTIRE TIME! great recipe!
Hello! I’m struggling a bit and would love your help in troubleshooting – I’m determined to make the right caramel sauce!
First time my butter separated and it wasn’t getting better, even after whisking for ages, so after googling a bit I added water, which helped eventually but because I had to add quite a lot it diluted the flavor a lot. I suspect the butter was maybe a bit too cold and I didn’t realize quickly enough what was happening.
The second time I was better prepared (the butter was much softer and i didnt add all of it at once), but the butter still separated. This time I added only a bit of water, the color is much better (darker) but annoyingly there’s a slight burnt aftertaste.
What am I doing wrong? What can cause the butter separation and at what point would I have burnt it most likely? Thank youu!
Hi Maria, whisking is key to getting the salted caramel to come together. It can help to take the pan off the stove while whisking if you start to notice some separation. You can next time you can also try turning your stove top down just a bit and that should help prevent any burning, too. Thank you for giving this a try!
The first time I made this recipe, it came together perfectly and easily. It was divine! But the last two or three times I’ve tried to make it, some of the sugar has stuck to the sides of the bowl, and the sugar never fully liquefied. There were still hardened bits in it. I didn’t want it to burn, so I went ahead and added the butter. But then the but stayed separated and never incorporated. I tried whisking off the heat, but it got to hard to stir and stuck inside the whisk, do I put it back on and off the heat, to no avail. I finally let it cook one minute without stirring and added the heavy cream, whisking constantly. Now there are still hard bits in the caramel. It doesn’t have the thick, luscious consistency of my first successful batch. I’m SO frustrated and disappointed! What on earth am I doing wrong??
Hi Andrea! You do want to wait for the sugar to fully melt before continuing, you can try turning the heat down a bit and continuing to cook it a little lower and slower.
Hi Sally- Can this recipe be used in a fountain to cover apple wedges?
Hi Sabrina, we’d recommend trying the caramel from our caramel apples instead, although we haven’t tried it specifically in a fountain. It does stay warm nicely in a slow cooker, though.
Hi, can this be used as a topping for a no bake cheesecake?
Hi Alynna, absolutely!
Is this okay to be used for cake filling
Hi Laura, this caramel isn’t ideal to layer between cake layers– it will just spill out the sides under the weight of top layers. It’s great as a filling for cupcakes, though.
I’m shocked it worked! My first time making caramel, and I did it with the assistance of a 5-year-old too. I was super worried when I was adding ingredients that it was just going to be a mess, but it came out perfectly. A little too salty to eat plain, but when drizzled over apple scones it was perfect. Now I’m hooked and going to make caramel for everything!
Used this recipe to make homemade caramel sauce for my first time ever. Turned out delicious, with the perfect amount of salt to offset the sweetness. My sugar and butter did end up separating, and I couldn’t get them to combine again after minutes of whisking. Decided to keep moving forward and add the heavy cream – still ended up smooth and worked in the end!
I just made this and it came out fantastic. I used 1/2 tsp salt and it was plenty salty, so buttery and simply divine. It was a lot of stirring – but worth the effort for sure. I came across this recipe because I was making something from a new cookbook that required dulce de leche. I made some of that first by baking sweetened condensed milk (for hourssss) and the taste was just ….off and underwhelming and I really wanted something more caramel-y tasting. So I googled caramel sauce recipes and had everything on hand and OMGGGGG this is so good, it will work for what I needed it for (and so much more!). Recipe is a keeper! I did get a bit stuck on the butter and sugar combining part, as someone else recently said, but I keep going and just added the cream and it was fine. I did have a few clumps of sugar that stuck to the sides of my saucepan that never melted back in, so I just strained the caramel as I poured into a jar to ensure my sauce is smooth. 11/10! Sally’s recipes are always so so good!
This salted caramel was a huge hit with my family. I will be making several batches for gifts this holiday season by popular demand.
I made this to top an apple crumble cheesecake for my mom’s birthday and she was in love. I appreciate the troubleshooting tips because I definitely needed it.
This recipe was perfection! Thank you Sally for the explicit directions and visuals!
Hi Sally, this recipe worked out great. Thank you.
Just a heads up, it does double up well. It is also very good in a n9nstick pot, that is all I have.
Cheers!