

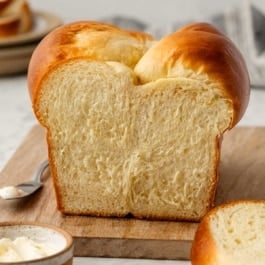
Learn how to make homemade brioche, an irresistibly rich, buttery bread with a soft, tender crumb. This recipe is a 2-day baking project, since the dough rests in the refrigerator overnight to lower its temperature, as well as develop proper flavor and texture. A stand mixer fitted with a dough hook is essential for best success.
Reference my Baking with Yeast Guide for answers to common yeast FAQs.
What Is Brioche?
Brioche originated in France and stands out from other breads because it’s enriched with butter, eggs, and milk. The result is a bread that bakes up puffy, fluffy, flaky, and oh-so-soft. It’s a treat all on its own, and makes for truly indulgent grilled cheese, French Toast, or a next-level French toast casserole!
Technically, brioche is a viennoiserie, which is a category of rich, sweet baked goods made with yeasted dough that falls somewhere between breads and pastries. Croissants, pain au chocolat, and croissant bread are also in this category. But unlike those, there are no lamination steps today.
One reader, Stanley, commented: “I’m very happy with this recipe. I’ve always wanted to make brioche but struggled with the texture and lightness. Thanks to the crucial instructions and tips, I’m pleased to say this recipe was my first success and I see it as a popular go-to for the future. Thank you so much, Sally and team! ★★★★★“
One reader, Patti, commented: “This brioche is amazing! It is soft, buttery, and tender. This recipe is a keeper! ★★★★★“
One reader, Lolly, commented: “Delicious brioche! I have made many loaves (retired pastry chef) and this one doesn’t disappoint. The technique for preparing the butter is especially helpful. It’s a good idea to have extra loaves on hand because brioche makes the best French toast. ★★★★★“
Ingredients You Need
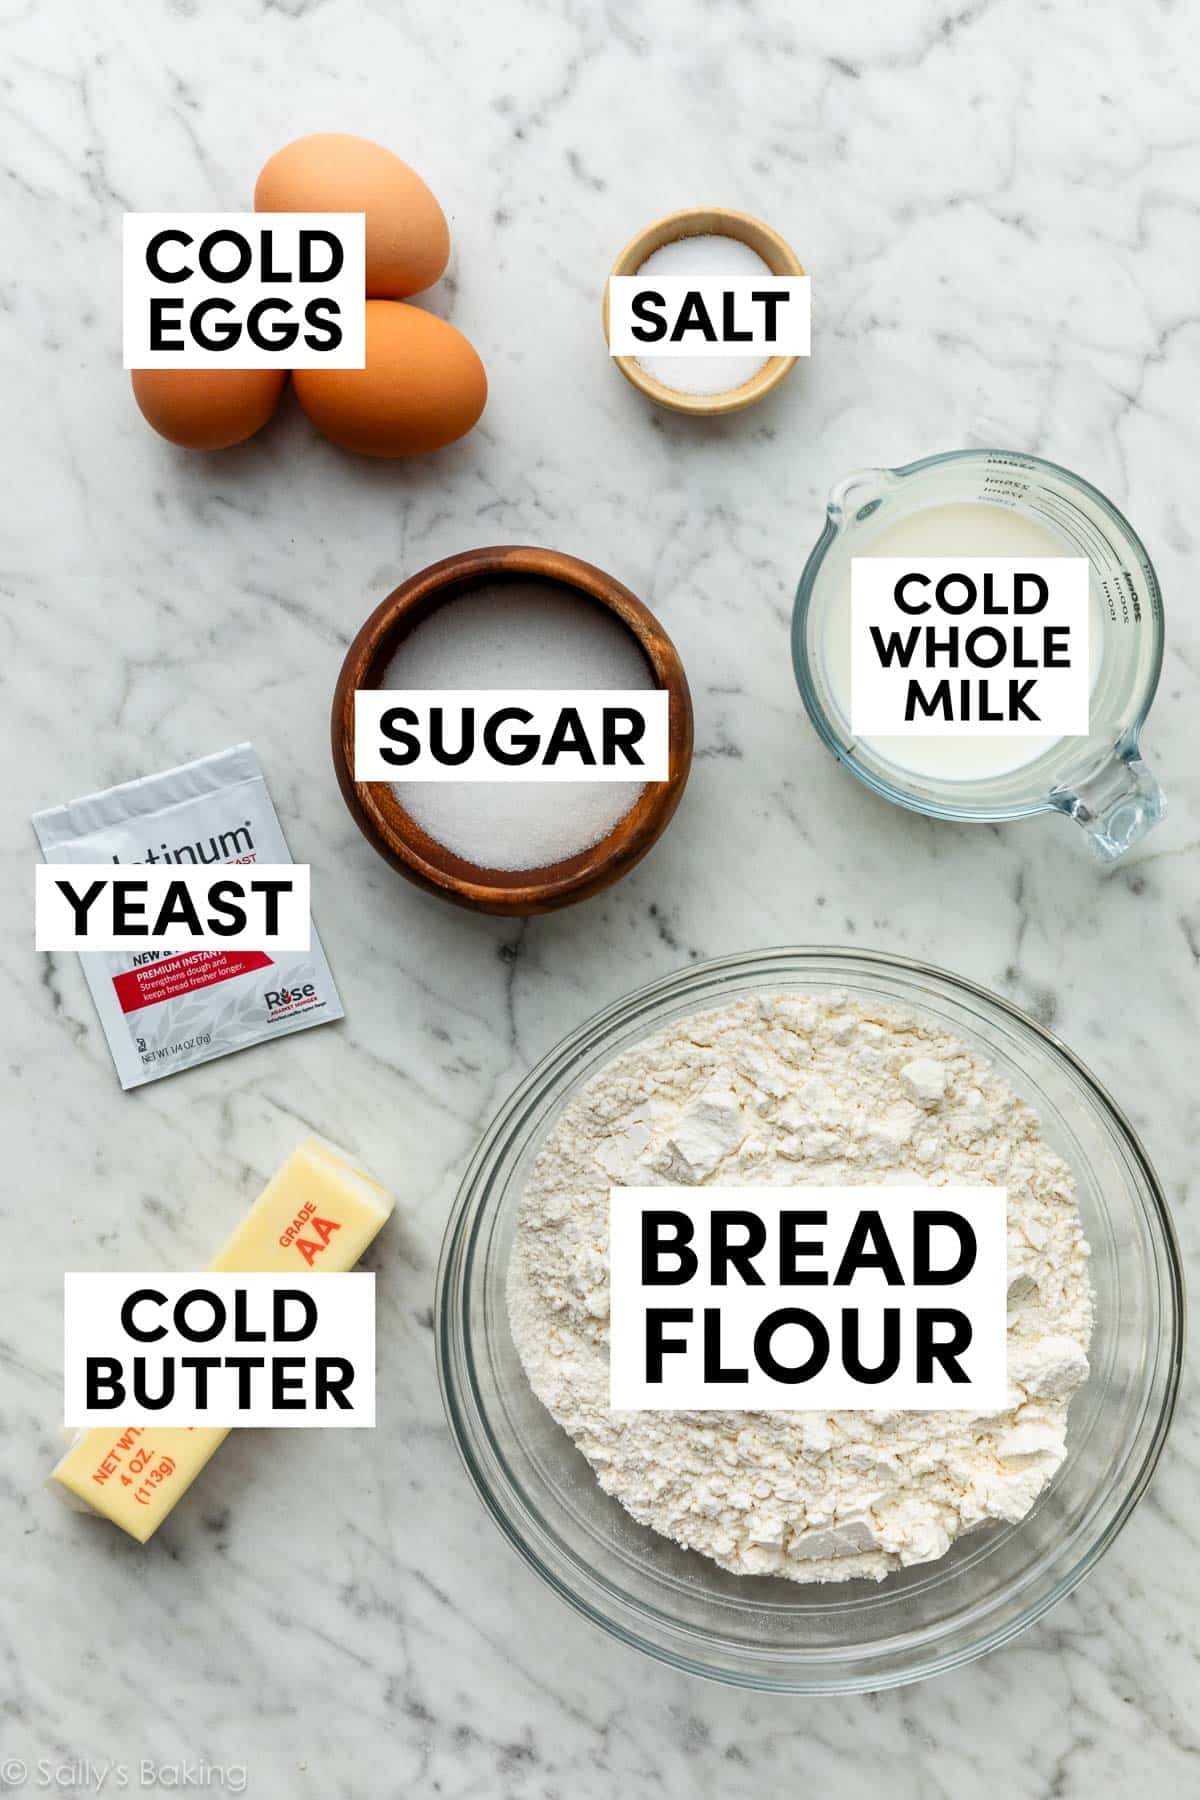
You need 7 ingredients altogether. They’re the same ingredients in my soft dinner rolls, which is also a rich dough. However, brioche requires more butter, sugar, eggs… and a bit more time!
The other main difference you’ll see between this recipe for brioche compared with many of my yeast bread recipes is the temperature of the milk, eggs, and butter. We’ll get into that below, when I walk you through the steps.
- Flour: You need bread flour for this recipe. All-purpose flour is convenient for most, but bread flour produces the best structure here. There are no other changes to the recipe if you use all-purpose flour.
- Yeast: You need 2 and 1/4 teaspoons active dry yeast or instant yeast, which is 1 standard packet (7g).
- Sugar: Sugar feeds the yeast, increases its activity, and tenderizes the dough. Plus it gives this brioche its characteristic mildly sweet flavor.
- Salt: You can’t make flavorful bread without salt!
- Milk: For the softest brioche, use whole milk.
- Eggs: 3 eggs provides structure and richness.
- Butter: Butter promises a flavorful, soft, tender brioche. You’ll add it in later, a little at a time.
To learn how to make homemade brioche, I turned to the king. King Arthur Baking, that is; specifically, their Big Book of Bread, which is one of my favorite cookbooks for discovering the hows and whys of bread-making. The recipe you see below was adapted from the basic brioche in that book.
How to Make Homemade Brioche
Start by whisking all the dry ingredients together in the bowl of your stand mixer, then add in the milk and eggs.

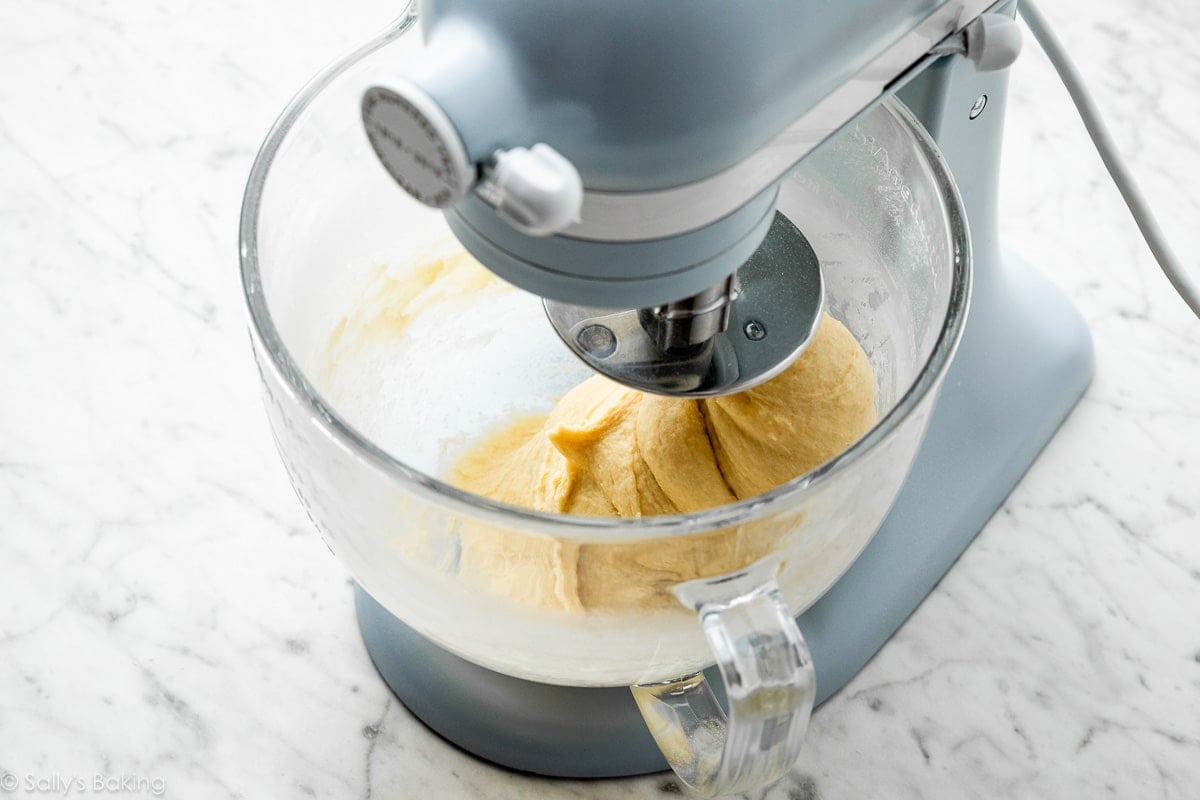
Start the mixer on medium-low speed and let the dough hook mix it all together. The dough will come together slowly. Stop the mixer periodically to scrape down the sides of the bowl. The dough will look very shaggy at first, but just keep mixing, and eventually it should form a mass around the dough hook.
Trust the process.
Increase the mixer speed to medium, and let it run for 8–10 minutes. After 8 minutes, if the dough isn’t wrapped around the dough hook and slapping the sides of the bowl, add a little more flour—just a Tablespoon at a time—until it is. This long kneading time is developing the gluten network, creating strength and elasticity.
Again, trust the process.
A Key Step: Plasticizing the Butter
While the mixer is running, it’s time to take all your frustrations out on some innocent pats of butter. Isn’t baking fun??
Place a piece of parchment paper on top of a sturdy cutting board. Cut a cold stick of butter (113g/8 Tbsp) into 8 equal pieces, and lay them out on the parchment. Place another piece of parchment on top. Now use a rolling pin to pound the butter until it’s very thin, about 1/16th of an inch (about 1.6mm); you don’t want it any thicker than 1/8th inch (3mm), or it will be too difficult to incorporate into the dough.
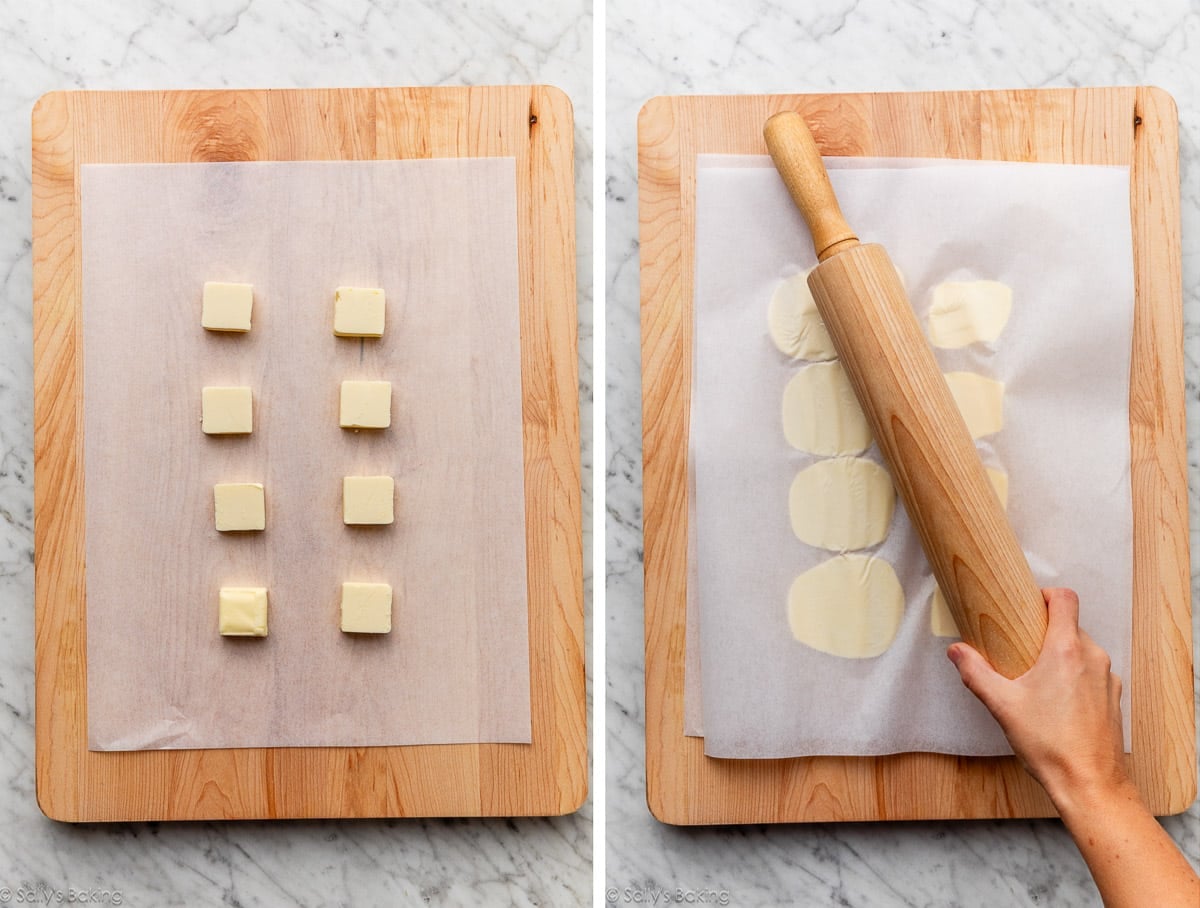
Why do we pound the butter? Because we want the butter to be pliable enough to incorporate into the dough, but still cold so that it doesn’t raise the temperature of the dough when we add it in. This technique is known as plasticizing the butter, and it’s often used for pastry lamination.
When your dough has been kneaded for long enough and the butter has been thoroughly plasticized, it’s time to put it all together.
Add the Butter to the Dough
With the mixer running on medium-low speed, add the pieces of cold butter into the bowl, 2 pieces at a time. Wait for the butter to be completely incorporated into the dough before you add the next 2 pieces—this can take up to 2 minutes. If it’s not incorporating and sticking to the bowl, stop the mixer and scrape down the sides of the bowl, then try again.

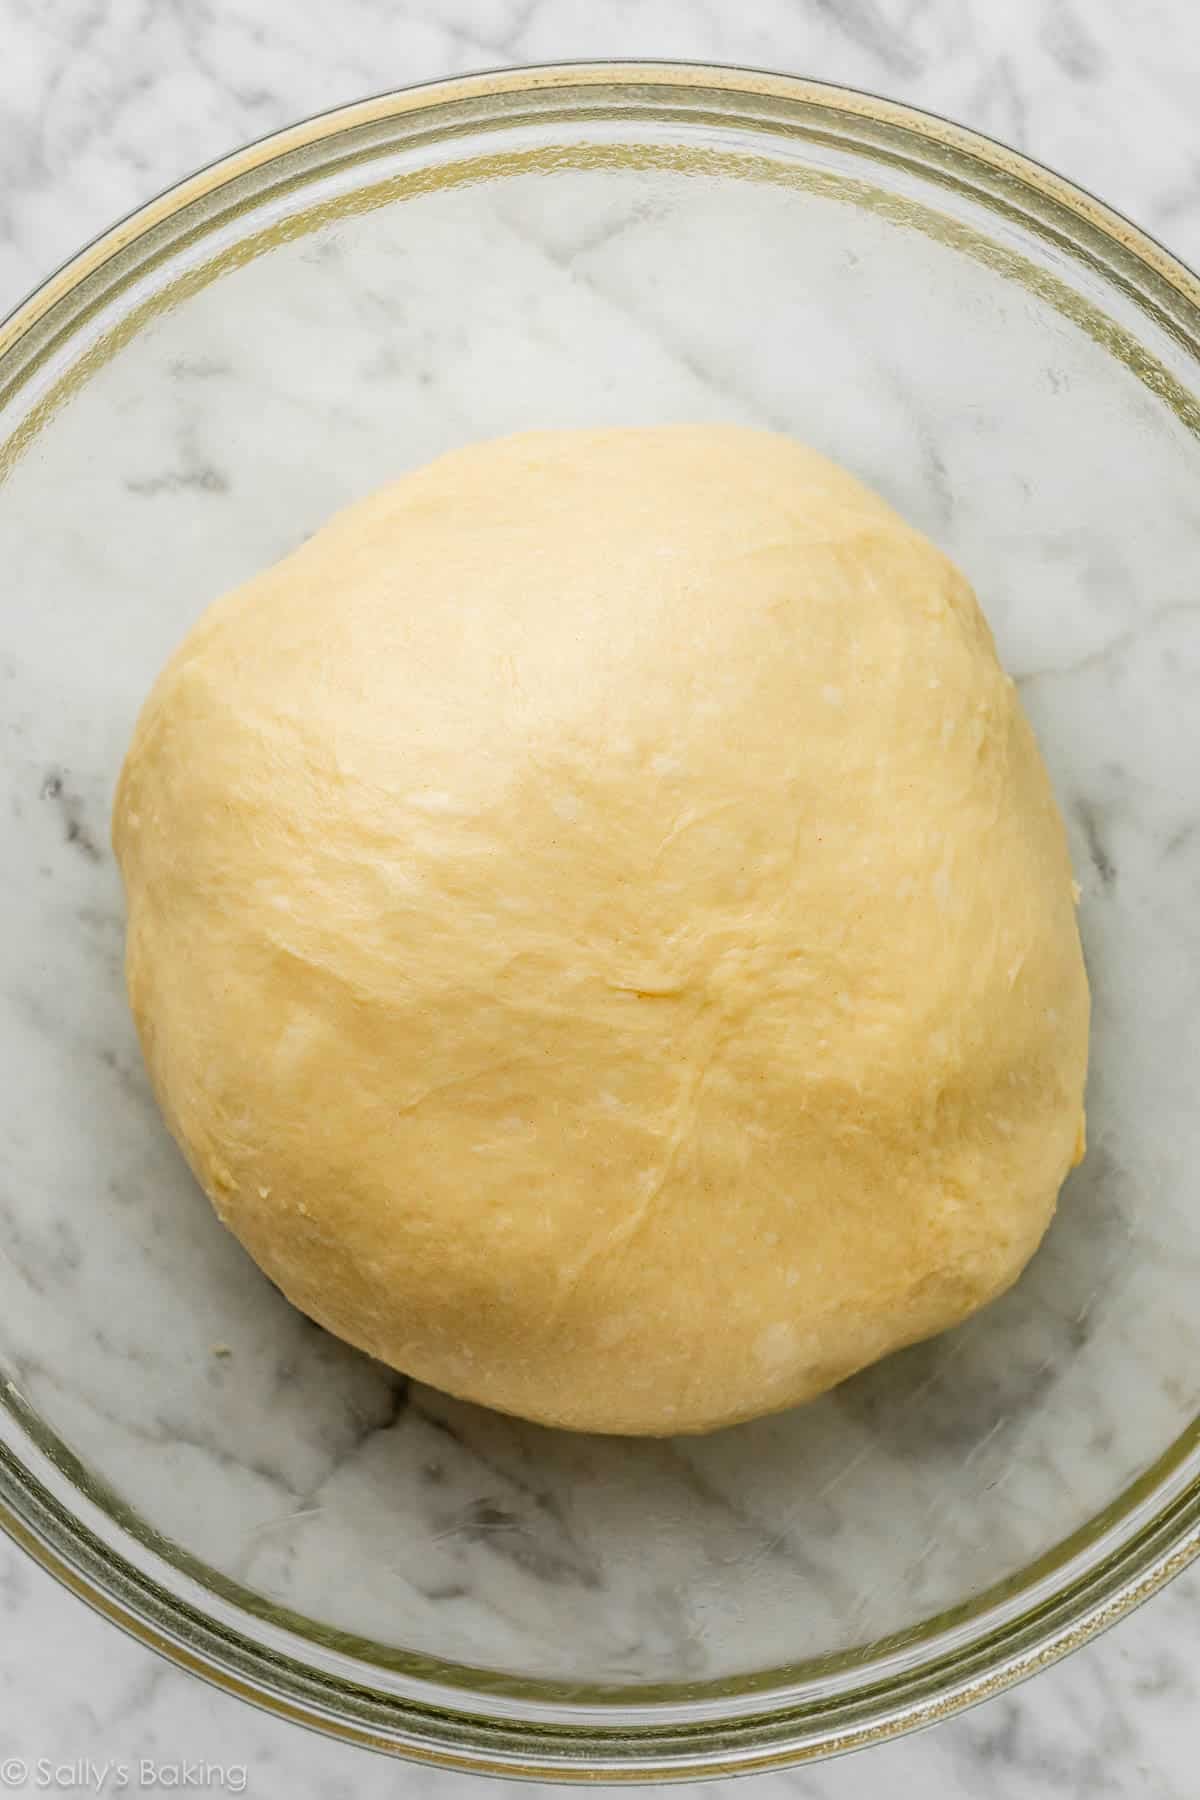
Once all the butter has been incorporated, let the mixer run for another couple of minutes. The dough should be slapping the sides of the bowl, and it should look very smooth, shiny, and elastic.
When your brioche dough has reached this point, shape it into a ball and place it in a greased bowl:
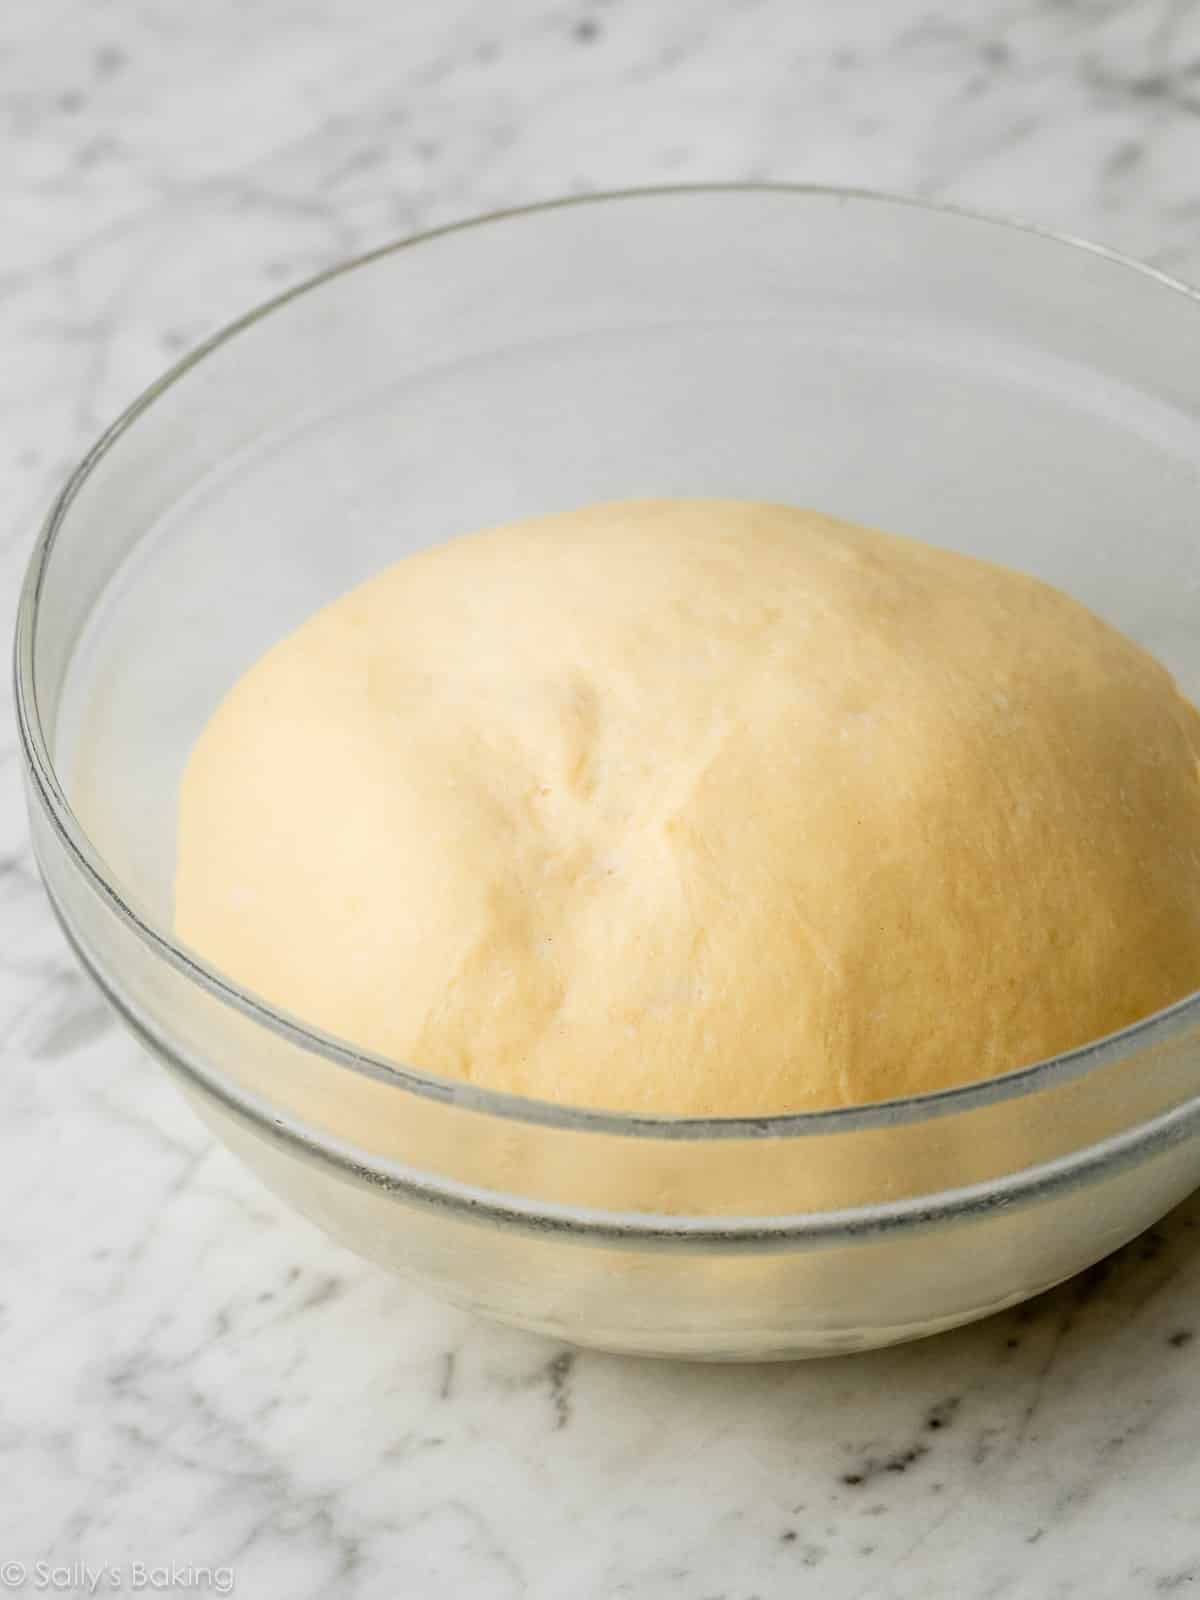
Cover the bowl tightly and refrigerate it overnight, for at least 12 hours. This dough can fit into any schedule, because refrigerating for up to 48 hours is fine!
Shape the Brioche Loaf
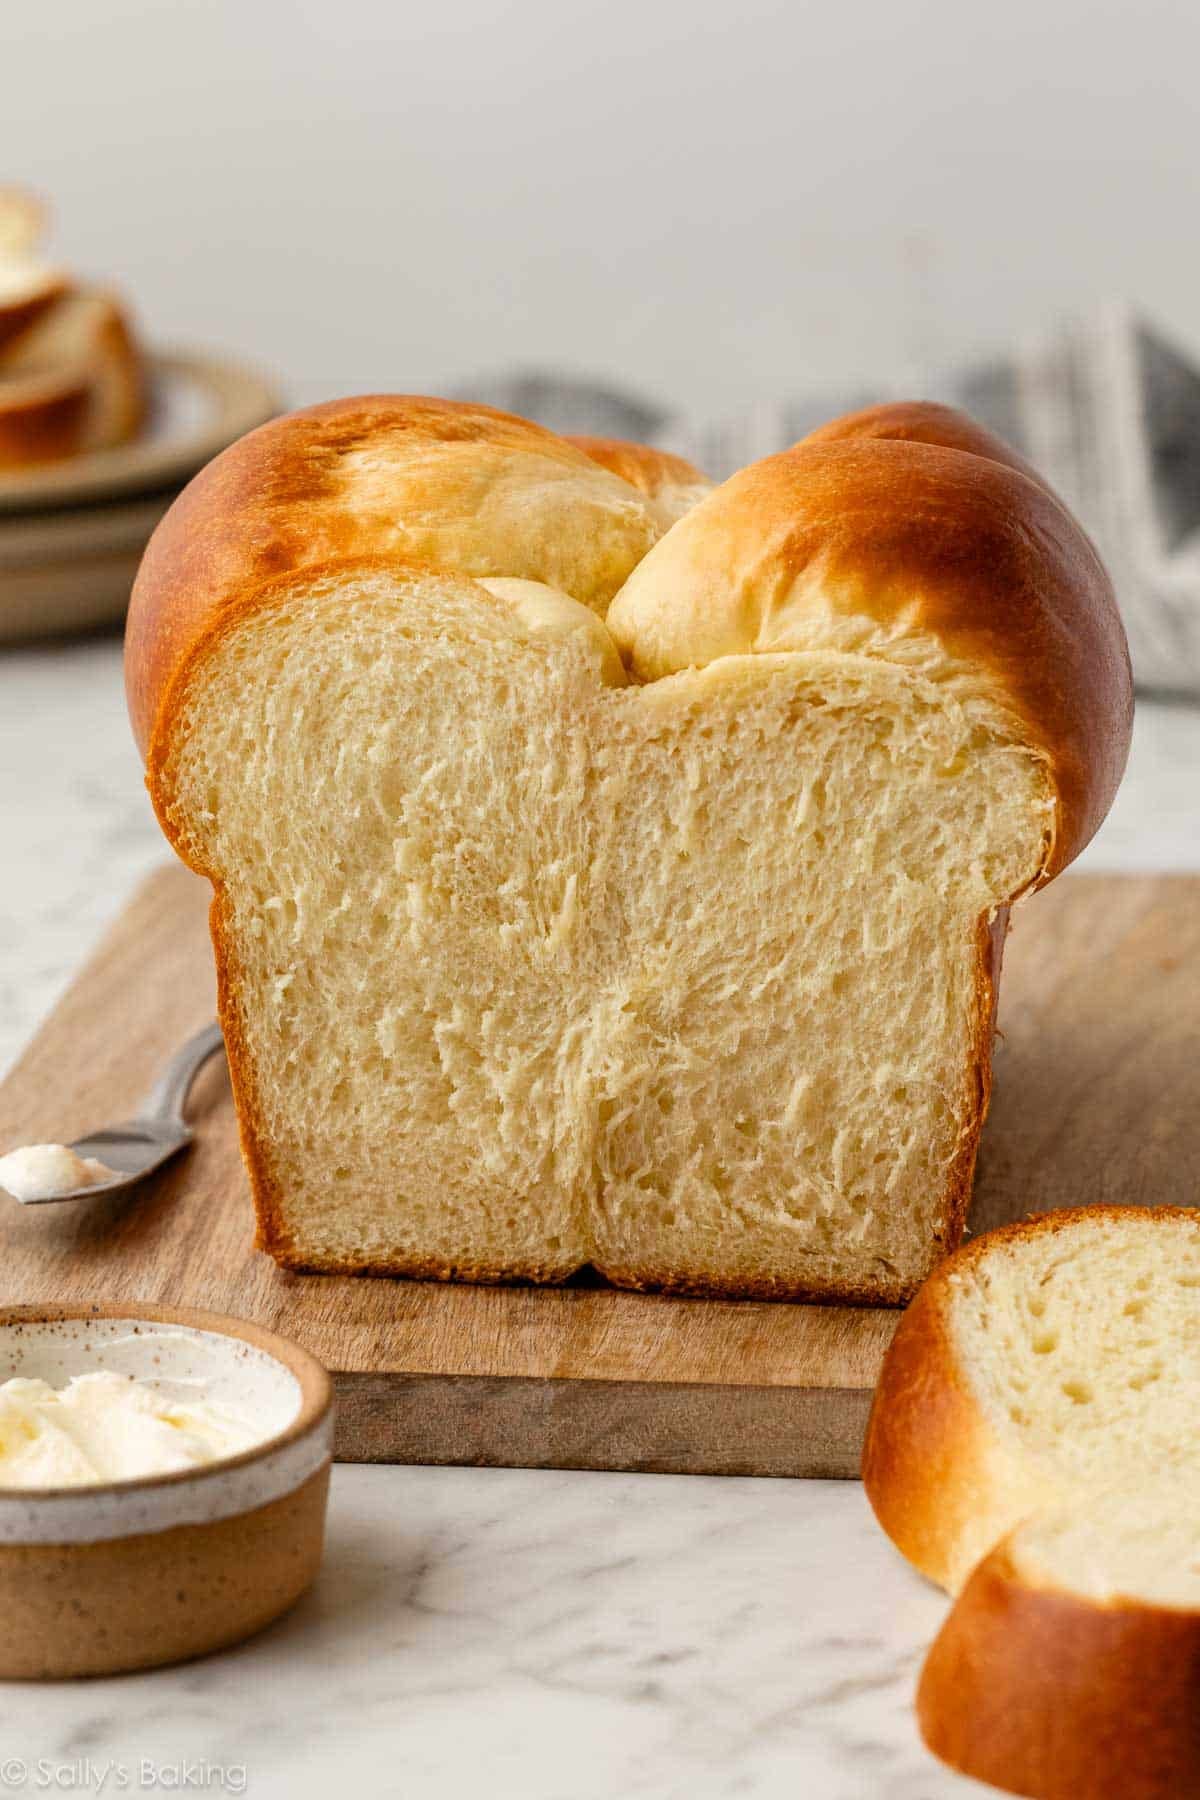
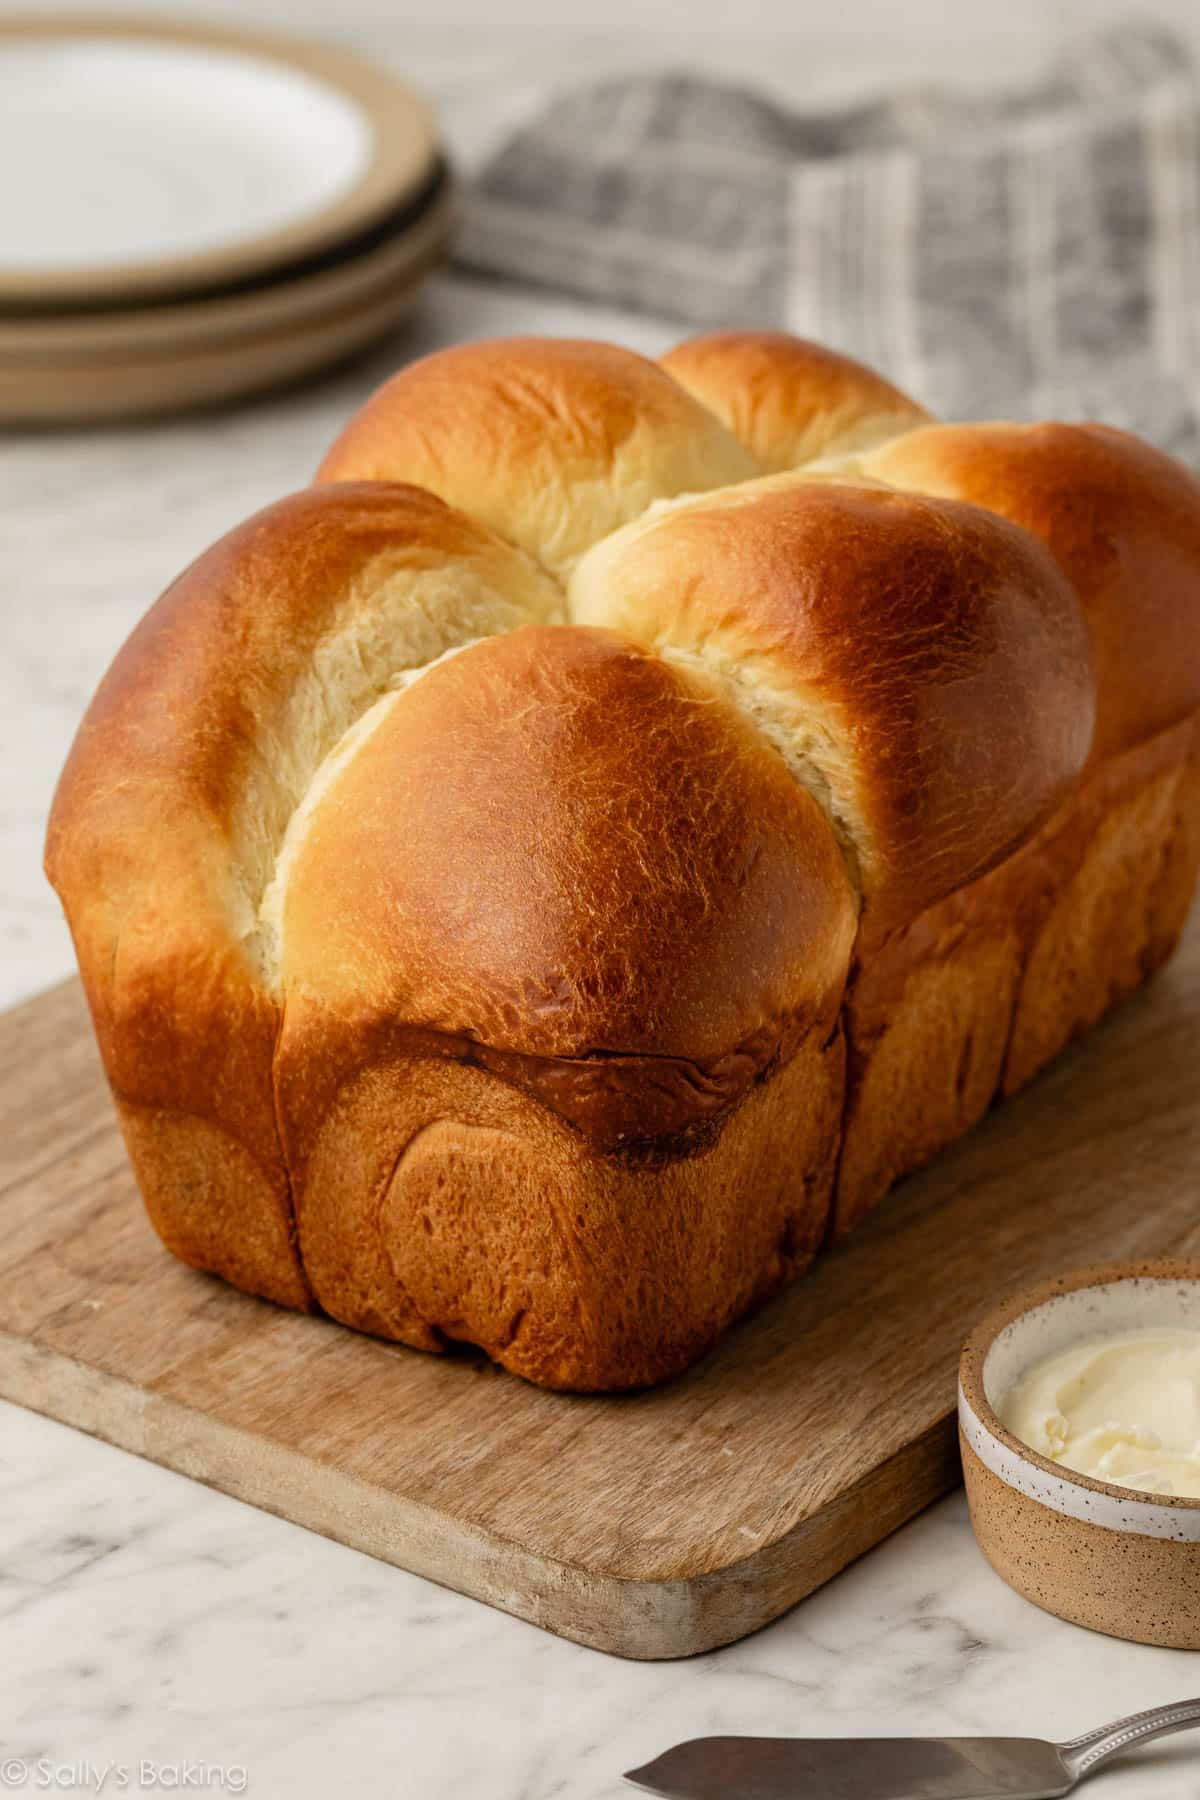
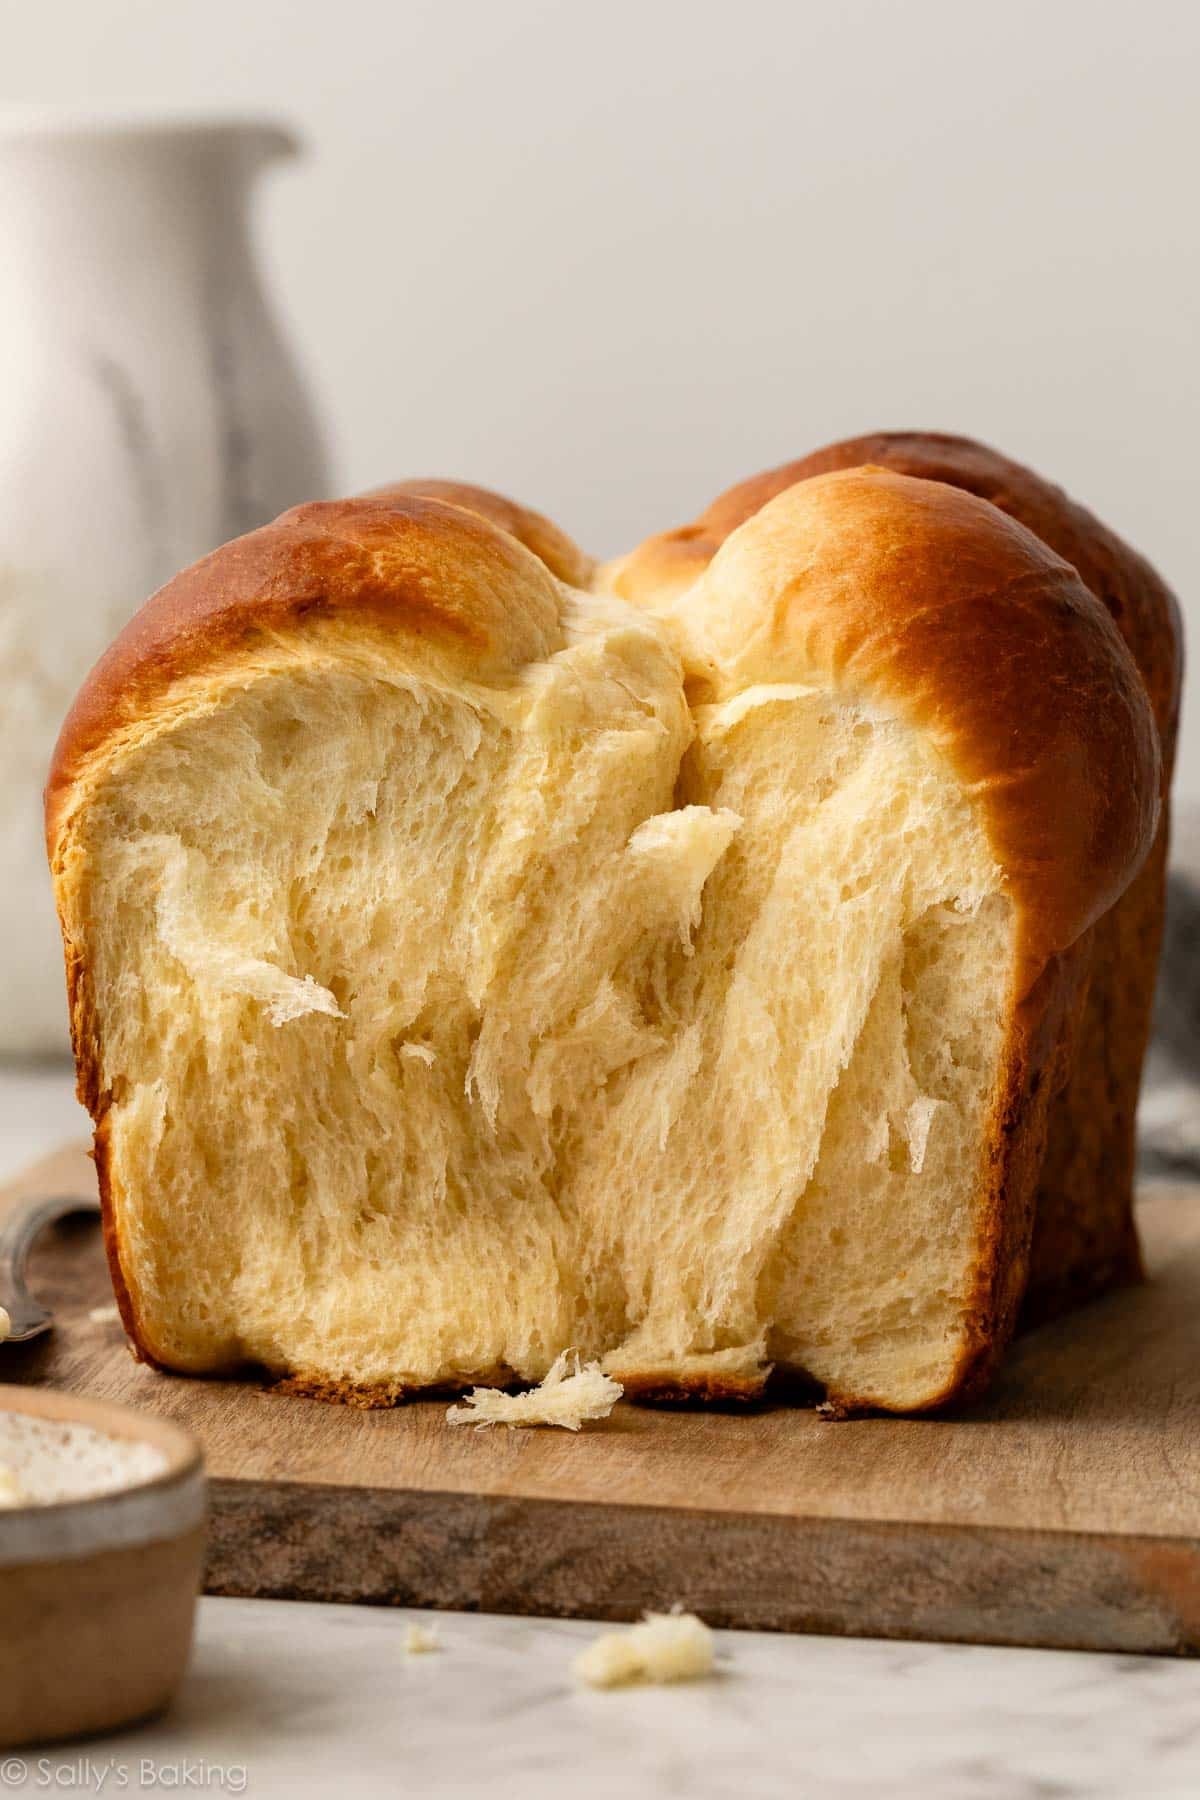
There are many, many ways to shape brioche, but the one I’m showing you is the one that gave my team the best result: super tall, super fluffy, super flaky bread!
It is called Brioche Nanterre.
When you take the dough out of the refrigerator, you’ll notice it slightly rose and expanded. That’s expected. Also, the butter will have re-solidified and the dough will feel a lot more manageable to work with. It’s cold and easy to shape:
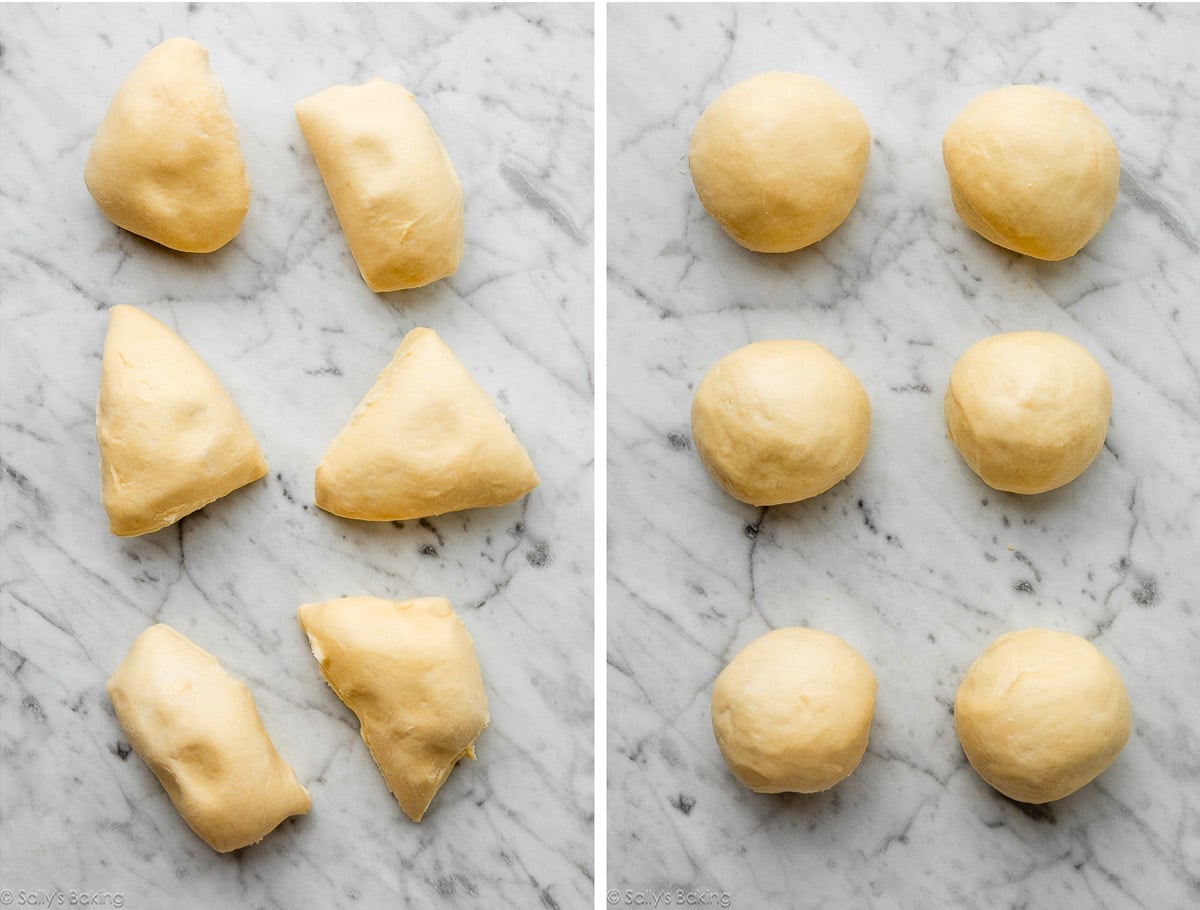
Divide the dough into 6 equal pieces and shape them into balls, the same way we shape sweet potato dinner rolls and oatmeal molasses dinner rolls. Take a piece and stretch the top of the dough while pinching and sealing the bottom. Make sure the dough balls are smooth on top and sealed on the bottom.
Place each dough ball into a greased loaf pan, staggering them a bit. See next photo.
Cover and let the dough rise at room temperature until it just reaches the top of the loaf pan. Depending on the temperature of your kitchen, this takes about 1 and 1/2 to 2 hours. Don’t get nervous if it takes a bit longer than 2 hours. The dough rises a little slower and not as high because it’s cold. But don’t worry—this brioche puffs up nice and tall in the oven!
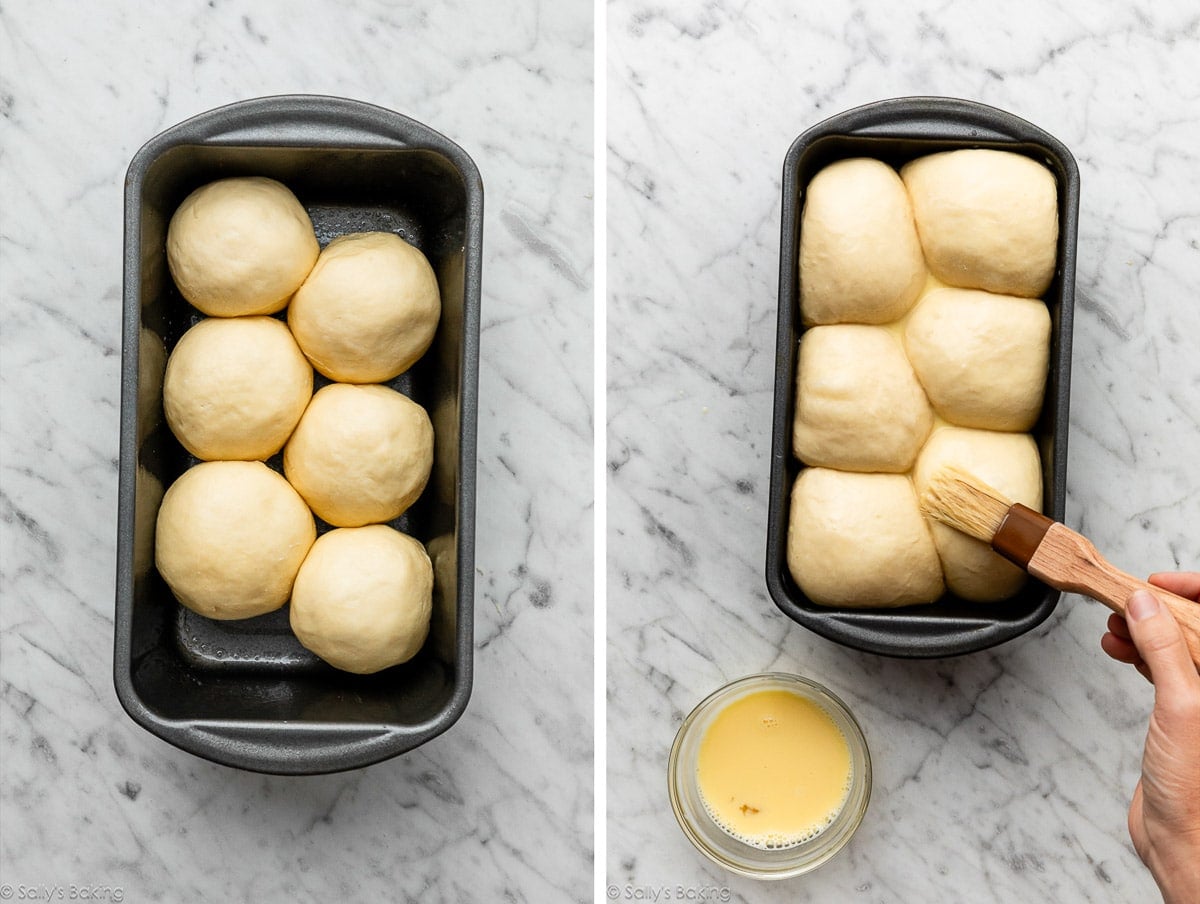
When you’re ready to bake the brioche, brush the top of the loaf with egg wash, to get that beautiful golden sheen.
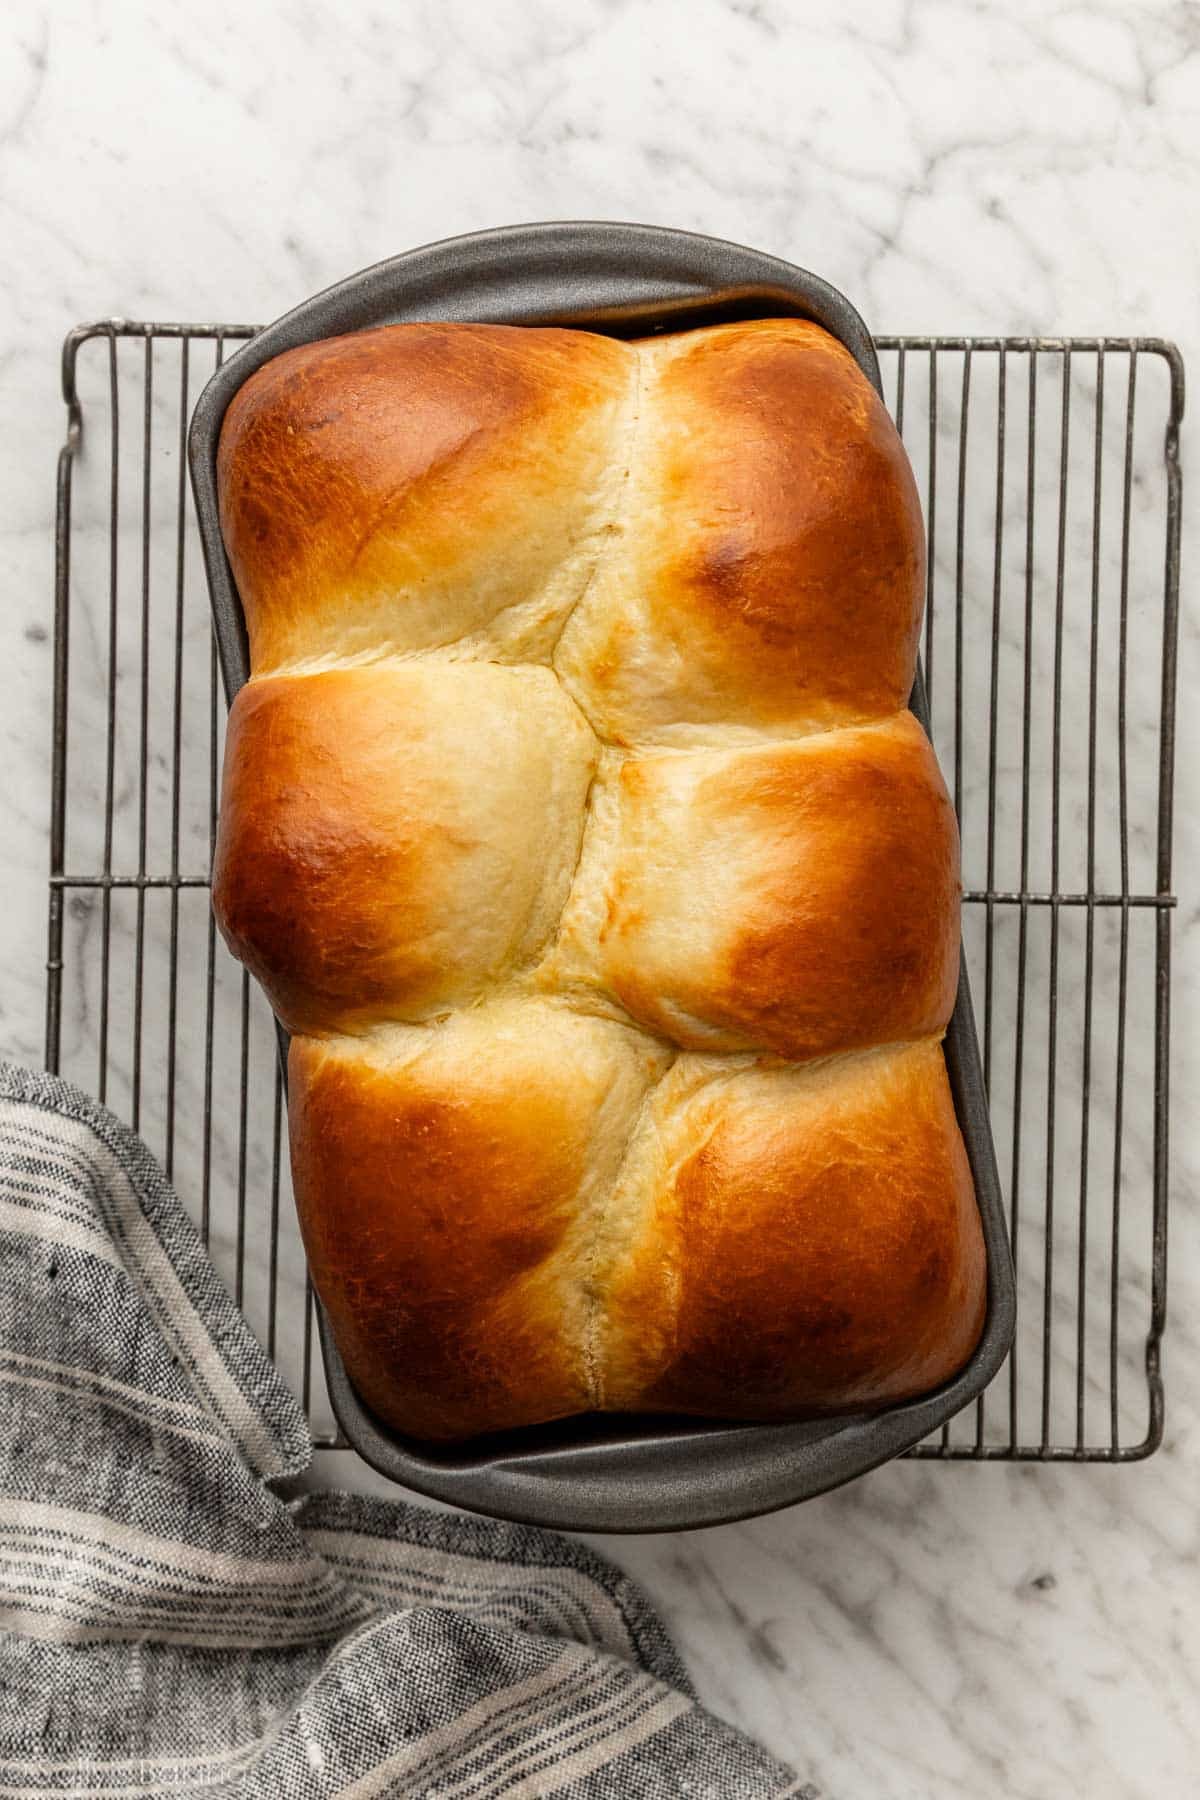
Baking & Cooling Homemade Brioche
Expect this brioche loaf to bake for around 35–40 minutes; most of our test loaves needed the full 40 minutes.
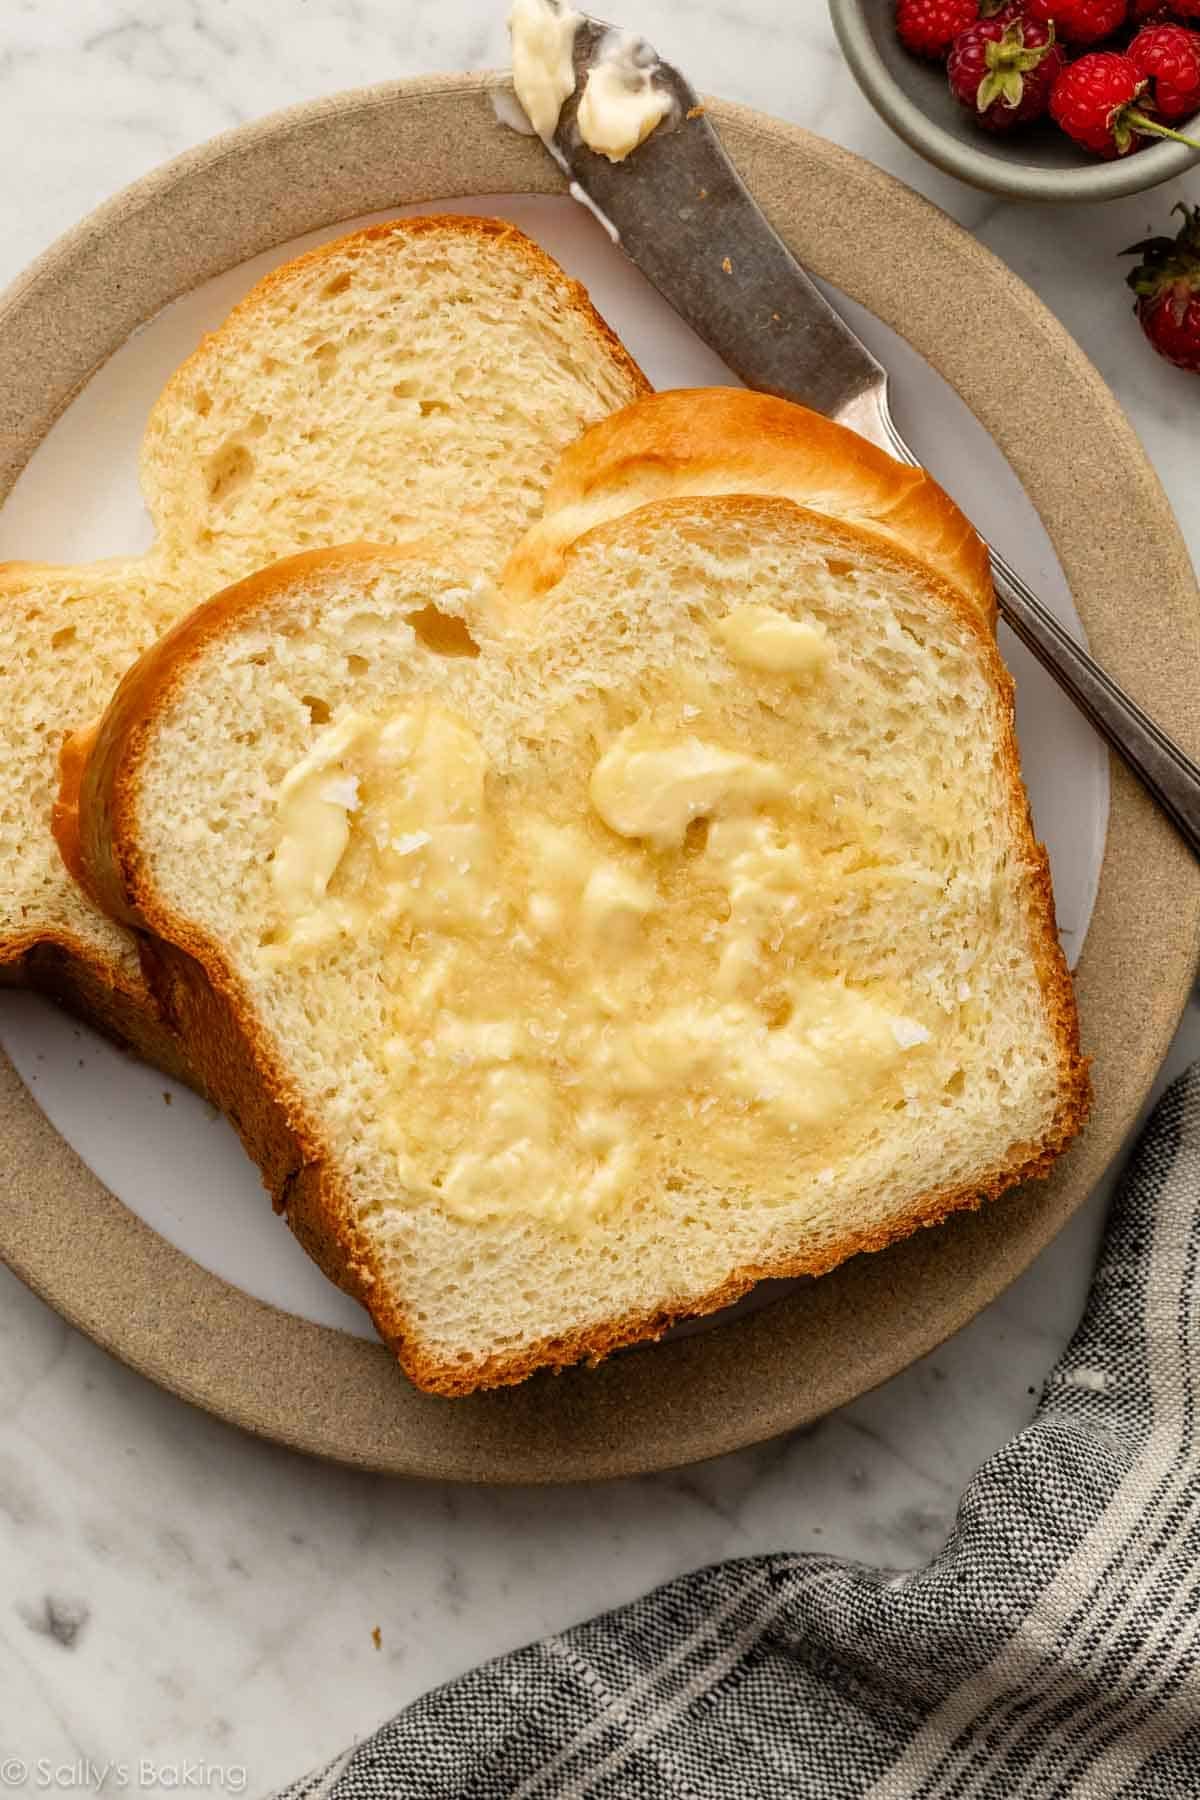
Let the loaf rest in the pan for about 10 minutes, then transfer it to a wire rack to cool for at least an hour. Patience pays off here because as the loaf cools, the crumb sets, and you’ll get neat, fluffy slices. That said, if you just can’t resist sneaking a warm slice, go for it. Just know the texture will be a little softer than when it’s fully cooled. And have some butter, homemade honey butter, or cinnamon butter at the ready!!
Success Tips for Making Brioche
After many rounds of testing, here are the most important things my team and I learned:
- Use a stand mixer: Brioche requires a really long mixing time, so I strongly recommend using a stand mixer (fitted with a dough hook) to make it. It is very difficult (and a lengthy process!) to make brioche without one.
- Keep things cold: The milk, eggs, and butter should all be cold when you begin. The long mixing time means the dough will gradually warm up. Keep the butter in the refrigerator until you’re ready to add it to the dough, and pound it with a rolling pin between sheets of parchment paper to make it pliable (but still cool).
- Give it a rest: Once the dough is kneaded and ready to rise, cover it tightly and refrigerate it for at least 12–16 hours. The buttery dough will be very soft and difficult to handle, and you need to allow the butter time to re-solidify, so the dough will be workable and easy to shape. (You can actually leave it in there for up to 48 hours, so that allows for flexibility for when you bake it.) The cold air also slows down the yeast activity and fermentation, which enhances the bread’s flavor.
- Use a kitchen scale: In addition to using a food scale to weigh the ingredients for the most precise measurements, it really comes in handy for dividing the dough into 6 evenly sized pieces. Simply weigh the entire ball of dough, then divide that number by 6 to determine how much each dough ball should weigh.
- Tent with foil: Loosely tent the loaf with aluminum foil halfway through baking. This prevents the top of the loaf from burning before the center has fully baked.
- Let it cool: As tempting as it is to slice into warm, freshly baked brioche, it’s best to wait. Cutting too soon can make the inside seem dense or gummy because the steam hasn’t had time to escape. This is true for most breads, including yeast bread and quick bread.
You can use either American or European butter in brioche. European butter has a touch more butterfat (about 82–85% compared to 80% in American), so the flavor is a little richer and creamier. That extra bit can really shine in a bread like brioche, which is already loaded with butter, eggs, and milk. That said, the difference isn’t huge. If European butter is what you have, go for it! Otherwise, American butter will bake up a perfectly soft, fluffy loaf. It’s what we used in many test loaves.
Yes, absolutely. You can divide the dough into 12 smaller rolls, rather than 6 larger pieces. Arrange the shaped rolls in a greased 9×13-inch pan. Proceed with step 8 below. Shorten the bake time to around 25–28 minutes. You can also bake the rolls separated on a lined baking sheet; this style produces excellent hamburger and sandwich buns. See recipe Note below.
My team and I tested this dough in a braided design in the loaf pan. The finished bread was considerably dense, due to the tight braiding technique. For the tallest, fluffiest brioche, I recommend the brioche nanterre shape instructed in the recipe below.
Homemade Brioche
- Prep Time: 15 hours (includes rises)
- Cook Time: 40 minutes
- Total Time: 15 hours, 40 minutes
- Yield: 1 loaf; 8-10 slices
- Category: Bread
- Method: Baking
- Cuisine: French
Description
Learn how to make homemade brioche, an irresistibly rich, buttery bread with a soft, tender crumb. This recipe is a 2-day baking project, since the dough rests in the refrigerator overnight to lower its temperature, as well as develop proper flavor and texture. A stand mixer fitted with a dough hook is essential for best success. Be sure to use cold milk, eggs, and butter. Reference my Baking with Yeast Guide for answers to common yeast FAQs.
Ingredients
- 3 and 1/4 cups (423g) bread flour (spooned & leveled), plus more as needed
- 2 and 1/4 teaspoons (7g) active dry or instant yeast (1 standard packet)
- 1/4 cup (50g) granulated sugar
- 1 and 1/2 teaspoons salt
- 1/2 cup (120ml) whole milk, cold
- 3 large eggs, cold
- 1/2 cup (113g; 8 Tbsp) unsalted butter, cold
- egg wash: 1 large egg beaten with 1 Tablespoon (15ml) milk
Instructions
- Make the dough: In the bowl of a stand mixer fitted with a dough hook attachment, whisk together the flour, yeast, sugar, and salt. Add the milk and eggs, and mix on medium-low speed for 3 full minutes, until the dough comes together and forms a rough mass around the dough hook. It will be shaggy at first, but just keep mixing until it comes together. Stop the mixer and scrape down the sides of the bowl as needed.
- Increase the speed to medium and let the mixer run for 8–10 minutes. Do not shorten this time. The dough should wrap itself around the dough hook and be slapping the sides of the bowl. If that isn’t the case after about 8 minutes, add a little more flour, 1 Tbsp at a time, and keep mixing.
- Plasticize the butter: Place a sheet of parchment paper on a sturdy cutting board. Cut the cold butter into 8 equal pieces. Lay the pieces out on the parchment. Place a second sheet of parchment paper on top of the butter. Using a rolling pin, pound the butter to flatten it to about 1/16th of an inch thickness, or about 2mm. If the dough is not yet ready for the next step, transfer the butter, still between the sheets of parchment, to the refrigerator. The butter must be cold.
- With the mixer running on medium-low speed, add the butter, 2 pieces at a time. Use a knife or offset spatula to scrape the pieces of butter off the parchment paper and add them to the mixing bowl. Wait until the butter has completely incorporated into the dough before you add the next 2 pieces—this can take about 2 minutes. If the butter gets stuck to the side of the bowl, stop the mixer and scrape it down with a spatula. Once all 8 pieces of butter have been added, increase the speed to medium and let the mixer run for another 2 minutes (again, the dough should be slapping the sides of the bowl), until the dough is smooth, shiny, and elastic. It will be very soft.
- Refrigerate the dough: Grease a large bowl with butter, oil, or nonstick spray. Shape the dough into a ball and place it in the bowl, turning it to coat the dough in the butter/oil. Cover tightly and refrigerate for at least 12–16 hours, or up to 48 hours.
- Grease a 9×5-inch loaf pan.
- Shape the brioche: Remove the dough from the refrigerator and turn it out onto a lightly floured surface. Divide the dough into 6 equal pieces. A bench scraper is always helpful for cutting dough. (Tip: If you have a kitchen scale, weigh the dough, then divide that number by 6 so you know how much each piece of dough should weigh. For example, if the dough weighs 850g, aim for each piece of dough to weigh around 140–145g.) Shape each piece into a smooth ball, and place in the prepared loaf pan, staggering the dough balls in a zigzag pattern.
- Cover the loaf lightly and let it rise at room temperature for 1.5 to 2 hours until it’s puffy and just reaches the rim of the pan.
- Adjust an oven rack to a lower position and preheat the oven to 350°F (177°C).
- When the brioche has risen to the rim of the pan, brush the top of the loaf with egg wash. Bake for 35–40 minutes, until golden brown on top. For a more accurate test, insert an instant-read thermometer into the brioche; it’s done when the internal temperature reaches 195°F (91°C). If you notice the top browning too quickly, loosely tent the pan with aluminum foil. (I always tent aluminum foil over the loaf around the 20-minute mark.)
- Let the brioche cool in the pan set on a cooling rack for at least 10 minutes, then carefully flip the bread out of the pan and onto the rack to continue cooling. Cool for at least 1 hour before slicing. (The crumb sets as it cools, giving you neat, fluffy slices—but if you sneak a warm piece, just know it’ll be extra soft!)
- Cover leftover brioche tightly and store at room temperature for up to 5 days or in the refrigerator for up to 1 week.
Notes
- Make Ahead Instructions – Overnight: See step 5. The dough must rest in the refrigerator for at least 12–16 hours, or up to 48 hours.
- Make Ahead Instructions – Freezing: It is best to freeze the brioche dough after it has had its bulk fermentation, which is the refrigeration step (step 5). To freeze, shape the dough as indicated in step 7. Wrap each ball of dough in plastic wrap and place them all in a freezer-safe container or bag. Freeze for up to 3 months. Thaw the dough in the refrigerator overnight, then let the dough balls come to room temperature, place in the greased loaf pan, and proceed with step 8.
- Special Tools (affiliate links): Electric Stand Mixer | Silicone Spatula | Rolling Pin | 9×5-inch Loaf Pan
- Flour: I recommend using bread flour. All-purpose flour is convenient for most, but bread flour produces a chewier loaf of bread and I highly recommend it. If you can’t pick up a bag of bread flour, all-purpose is great in a pinch. The bread is still soft no matter which you use. I don’t recommend whole wheat flour because it doesn’t have the same baking properties as white flour or bread flour (the gluten levels are different). If you wish to use whole wheat flour, try my recipe for whole wheat bread instead.
- Yeast: You can use active dry or instant yeast in this recipe. Follow all of the same instructions. Reference my Baking with Yeast Guide for answers to common yeast FAQs.
- Milk: I recommend using whole milk for the best, richest-tasting bread. Lower-fat or nondairy milks work in a pinch. Do not use nonfat milk.
- Doubling this recipe: For best results, I recommend making two separate batches of dough.
- Can I make this dough into smaller brioche rolls? Yes, absolutely. You can divide the dough into 12 smaller rolls, rather than 6 larger pieces. Arrange the shaped rolls in a greased 9×13-inch pan. Proceed with step 8. Shorten the bake time to around 25–28 minutes. You can also bake the rolls separated on a lined baking sheet; this style produces excellent hamburger and sandwich buns. Bake time is around 25 minutes.
- Can I braid this dough instead? My team and I tested this dough in a braided design in the loaf pan. The finished bread was considerably dense, due to the tight braiding technique. For the tallest, fluffiest brioche, I recommend the shape instructed (2 staggered rows of the dough balls in the loaf pan), which is called Brioche Nanterre.
Recipe adapted from Basic Brioche Dough in Big Book of Bread by King Arthur Baking Company


Reader Comments and Reviews
Sally! You angel of angels! I can’t tell you how proud I am of myself for making this recipe. It was so straightforward and easy to follow! I’ve never felt more like a pro baker than I have today, haha.
Thank you for the recipe!
I’m so excited to try this recipe…wondering though if can use salted butter instead of unsalted???
Hi Jen! You can read more about salted vs. unsalted butter in baking here.
I just made this recipe. Bread is in the fridge resting overnight. But I have a problem I’m wondering if you can help. My kitchenaid bowl will not come loose from the machine. This often happens when I make bread dough. Do you have any tricks for getting it loose?
The same thing happened to me with this lol!!
I read to try using a hot towel on the base to loosen it. Hope yours eventually came out
I’m very happy with this recipe. I’ve always wanted to make brioche but struggled with the texture and lightness. Thanks to the crucial instructions and tips, I’m pleased to say this recipe was my first success and I see it as a popular go-to for the future. Thank you so much, Sally and team!
I’ve been WAITING for your brioche recipe, thank you! I tried another a while back and was underwhelmed to the extreme. Just finished up your version and the taste is way better! Must be the long chill/rest time for developing the flavor.
I am not the greatest baker, however, the brioche bread was fabulous! My husband had me make a second because he ate the first loaf himself! The directions made it easy to make and everything I make is delicious and the directions are wonderful
Great recipe! The dough is beautiful, and smells wonderful while baking. End result is delicious! I do not have a stand mixer. I used my daughter-in-law’s while watching three grandchildren at their home. (With the help of my husband, and permission from their mom!) The dough came together easily. I refrigerated it, and brought it home to continue the process. I can’t imagine making this without a stand mixer! Thank you, Sally!
Tried this but it didn’t work for me on the rising part. I made buns instead of a loaf, but even after 3 hours on top of the fridge, the bread didn’t rise at all. They puffed up nicely when baked, but were extremely dense. Does anyone have an idea on how to remedy this?
Hi Margaret! Sounds like your dough needs a warmer spot to rice to encourage the yeast. Here’s a simple trick we like to use! Preheat the oven to 150°F (65°C), then immediately turn the oven off. Wait a few minutes, then place the dough in the bowl inside the oven with the oven door cracked open. This will be a warm environment for your dough to rise. After about 30 minutes, close the oven door to trap the air inside with the rising dough.
Everything on mine looked great (rose like it should have) but mine too came out very dense. What could have caused this?
I usually preheat the oven 2hrs before baking to help with rising in the cold seasons and I leave the dough on the stove, I’m constantly checking it so it doesn’t over heat. It works perfectly everytime.
The brioche is absolute perfection. It tastes like it was made in a pâtisserie. I struggle with Brötchen. I’d love a recipe for that too.
Hi Christine,
For the first time I’m having the same issue. What was your resolution to this odd dilemma? Thank you.
John
My dough is in the fridge now but not sure how it’ll turn out. I read that it should be smooth, shiny and elastic but mine was sticky too and I wasn’t sure if it should be sticky or if I should put more flour. I did have to put extra tablespoons but was afraid of adding more. Could you please clarify on that? Thank you!
Hi Elie! Is it particularly humid where you live? There are a lot of variables that go into the consistency of dough, even down to the weather and humidity in the air. There’s nothing wrong with adding just a little more flour to make them a little less wet. Try adding flour a little at a time and keeping both your hands and your work surface dusted with flour helps also. Hope this helps!
This brioche is amazing! It is soft, buttery and tender. This recipe is a keeper!
I had so much fun making the brioche bread. I always have trouble using yeast. But I didn’t have any problems with this. I made the dough into small rolls. Everyone loved them. Thanks again for another great recipe.
Hi Erica, we’re happy to help troubleshoot. The dough won’t rise a ton when in the refrigerator—just slightly. Then once the shaped dough is placed in the pan, it will rise until just puffy. Is it possible that your yeast is expired? Or is your kitchen particularly cold? This Baking with Yeast Guide may also be helpful for troubleshooting. Let us know if we can help further!
Hi Erica, we’re happy to help troubleshoot. The dough won’t rise a ton when in the refrigerator—just slightly. Then once the shaped dough is placed in the pan, it will rise until just puffy. Is it possible that your yeast is expired? Or is your kitchen particularly cold? This Baking with Yeast Guide may also be helpful for troubleshooting. Let us know if we can help further!
I checked the yeast expiration date before using it and it’s not expired. It’s rising slowly, so ill give it some more time and then do a poke test. Thank you.
Delicious brioche! I have made many loaves (retired pastry chef) and this one doesn’t disappoint. The technique for preparing the butter is especially helpful. It’s a good idea to have extra loaves on hand because brioche makes the best French toast.
This turned out good but I had a few issues. First, it took about 3 hours to rise in the pan in my 75 degree kitchen (used fast rise yeast). Then, I mis-read “a” lower rack for “the” lower rack and the bottom got too brown. Will definitely try again.
Made this bread! It was awesome! Directions were easy to follow, and everything went according to the directions! I love that the internal bread temperature was given; that really helped, because I needed to cook my loaf a bit longer than what the recipe said. And I really like that it can stay in the refrigerator up to 48 hours before baking – allows for great flexibility with your schedule!
Thank you bread looks delicious
Turned out delicious and was so much fun to make
The stand mixer I have is the Ankarsrum brand. Will this work as well as a Kitchen Aid mixer most people have?
Any stand mixer should be fine!
Mary Kay – I have an Ank, too (❤️). It’s been fabulous for everything I’ve used it for (bagels, sourdough, cookies, cakes, meringues) so I don’t anticipate any issues (mix the eggs & milk first, then add the other ingredients, per recipe). I vaguely remember coming across a YouTube showing butter being added to a brioche dough using an Ank, & IIIRC it was fairly straightforward – the person just let the roller/dough knife do its thing. l might have seen it on the Ank USA FB page…
i dont have a kitchen scale. can i still make it properly?
Hi Ylisse, absolutely. We recommend reviewing our How to Measure Baking Ingredients post – measuring the flour properly is most tricky!
How difficult would it be to make the brioche bread / rolls without a stand mixer or any mixer? Thank you
It’s definitely possible, but quite a workout! Brioche dough is very rich with butter and eggs, which makes it sticky and much more difficult to knead by hand. Without a stand mixer, you’ll need a lot of patience and elbow grease. Kneading, while working in the cold butter, will likely take 20+ minutes to properly develop the gluten. If you’re up for the challenge, go for it, but I really recommend a stand mixer for best results.
I used to make brioche bread without a stand mixer. It is possible (this is how people used to make it in the past, right? 🙂 ), but it was a labor of love I must say :)) though the recipe I have uses softened butter, maybe it’s a bit easier to incorporate than cold, or maybe it is much messier. It was a messy process, but rewarding and it was fun to see how this sticky buttery mess turns into a nice ball of dough. The method of incorporating butter into the dough called “stretch and slap” if I remember it correctly. You can find tutorials on Youtube. Also later I realised I can use dough hooks with a hand mixer to incorporate butter (only took me several years :)) ). It worked pretty well. I would finish by kneading by hand after all butter was incorporated, but it saved it me from the messy process. So you can try that if you have a hand mixer that came with additional spiral dough hooks.
Hey! I am making this bread tomorrow i have tried many brioche bread but i struggle with the texture.
I am in france and we dont have bread flour here can you tell me how much protein should be there we have diff flours like t45, t55 etc
Also 1 egg is 50gram its the same size as yours?
Also can we bake the bread same day is it possible?
Hi Dunu! Bread flour usually has 12-14% protein. A large egg here is usually about 50 grams, yes! This recipe is a 2-day baking project, since the dough rests in the refrigerator overnight to lower its temperature, as well as develop proper flavor and texture.
YAY !!!! Brioche! I’ve been wanting to try my hand at Brioche!
Thank you, Sally! Will let you know how my first attempts turn out!
Based on the comment about the gluten stretching and working during the mixing process, would I be able to make this with gluten free flour?
I would hesitate to try this recipe with gluten free flour. It is likely best to search for a gluten free brioche recipe, one that has been formulated to be gluten free.
Would this work for hamburger buns??
Absolutely! I also have a recipe for brioche buns in my new cookbook Sally’s Baking 101. 🙂
Is it possible to use a sourdough starter instead of dry yeast with this recipe?
I wanted to ask the same! Can we swap yeast for sourdough discard?
Will you have a video available for this bread?
Hi Dawn, yes, we will! Check back again soon.
Could I make this in my bread machine –just the mixing up of the dough?
I do not own a stand mixer….just wondering as it looks SO GOOD:)))
Hi Julie! I’m sure you can, but I have not tested it. If you try it, when the dough cycle is done, you’ll have to refrigerate the dough as instructed.
Thank you so much for all your recipes. I’ve made brioche before but had an issue adding the pats of butter so I’m excited to try the plasticizing method.
I have a Bosch mixer that I love, would I mix it on speed 1 the entire time?
Would it be better to mix on my old Kitchen Aid and risk overheating it, lol?
Since I retired baking is my passion!
Hi Nancy, unfortunately we don’t have a Bosch mixer to test with, so are unsure how to answer about mixing speed! If you try it, please report back so other Bosch users can benefit from your experience!
has anyone used gluten free flour for this?
I’m looking forward to trying this!
Can you use a “classic” brioche pan?
I’ve owned one for years, and I’ve never used it. I think you’ve given me the push I need to finally make brioche. Thank you!
Hi Judie, we haven’t tried baking this brioche in a classic brioche pan, but we don’t see why it wouldn’t work! Just be sure to keep an eye on it and tent with foil if it’s browning a lot on top, and we recommend using an instant-read thermometer to test the internal temperature for doneness. Let us know how it turns out!
Could you make the dough in a bread maker?
Hi Ashleigh, I’m sure you can, but I have not tested it. If you try it, when the dough cycle is done, you’ll have to refrigerate the dough as instructed.