

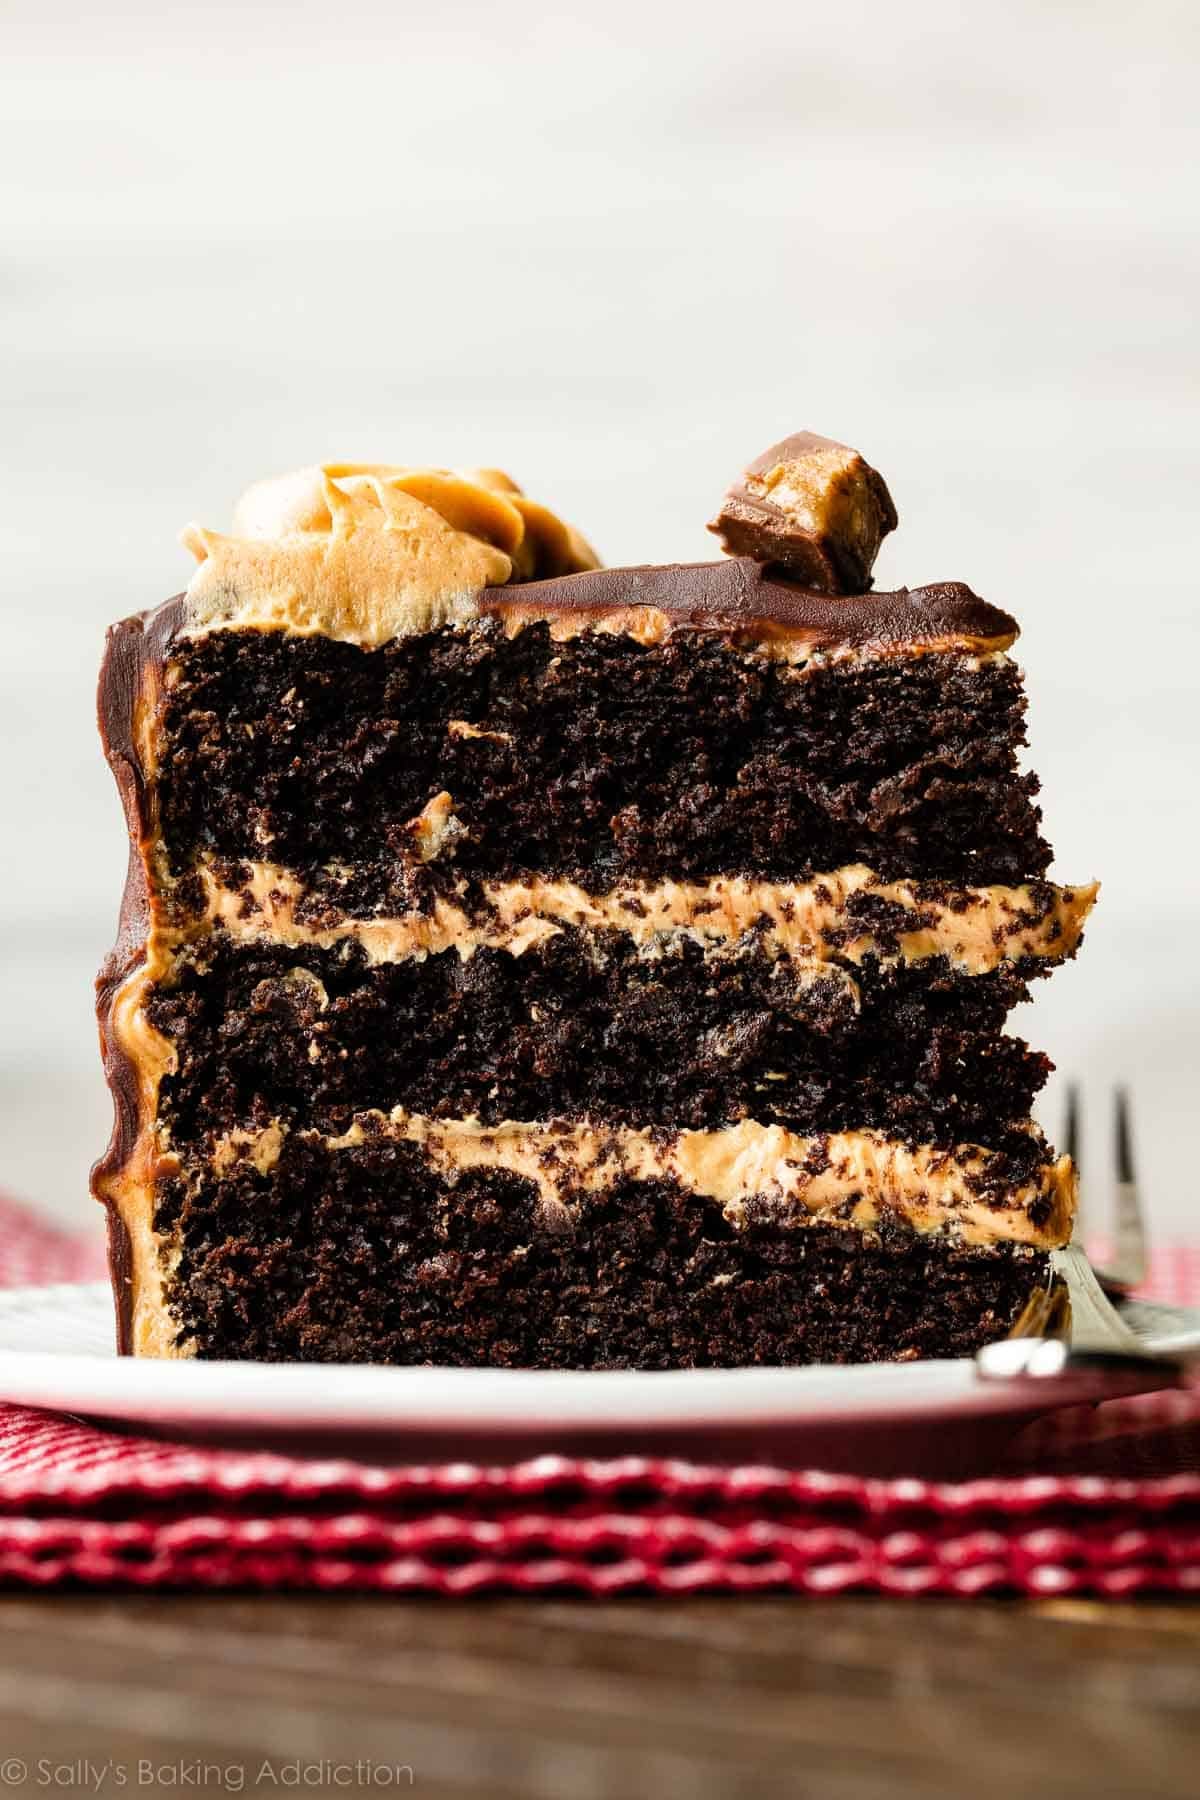
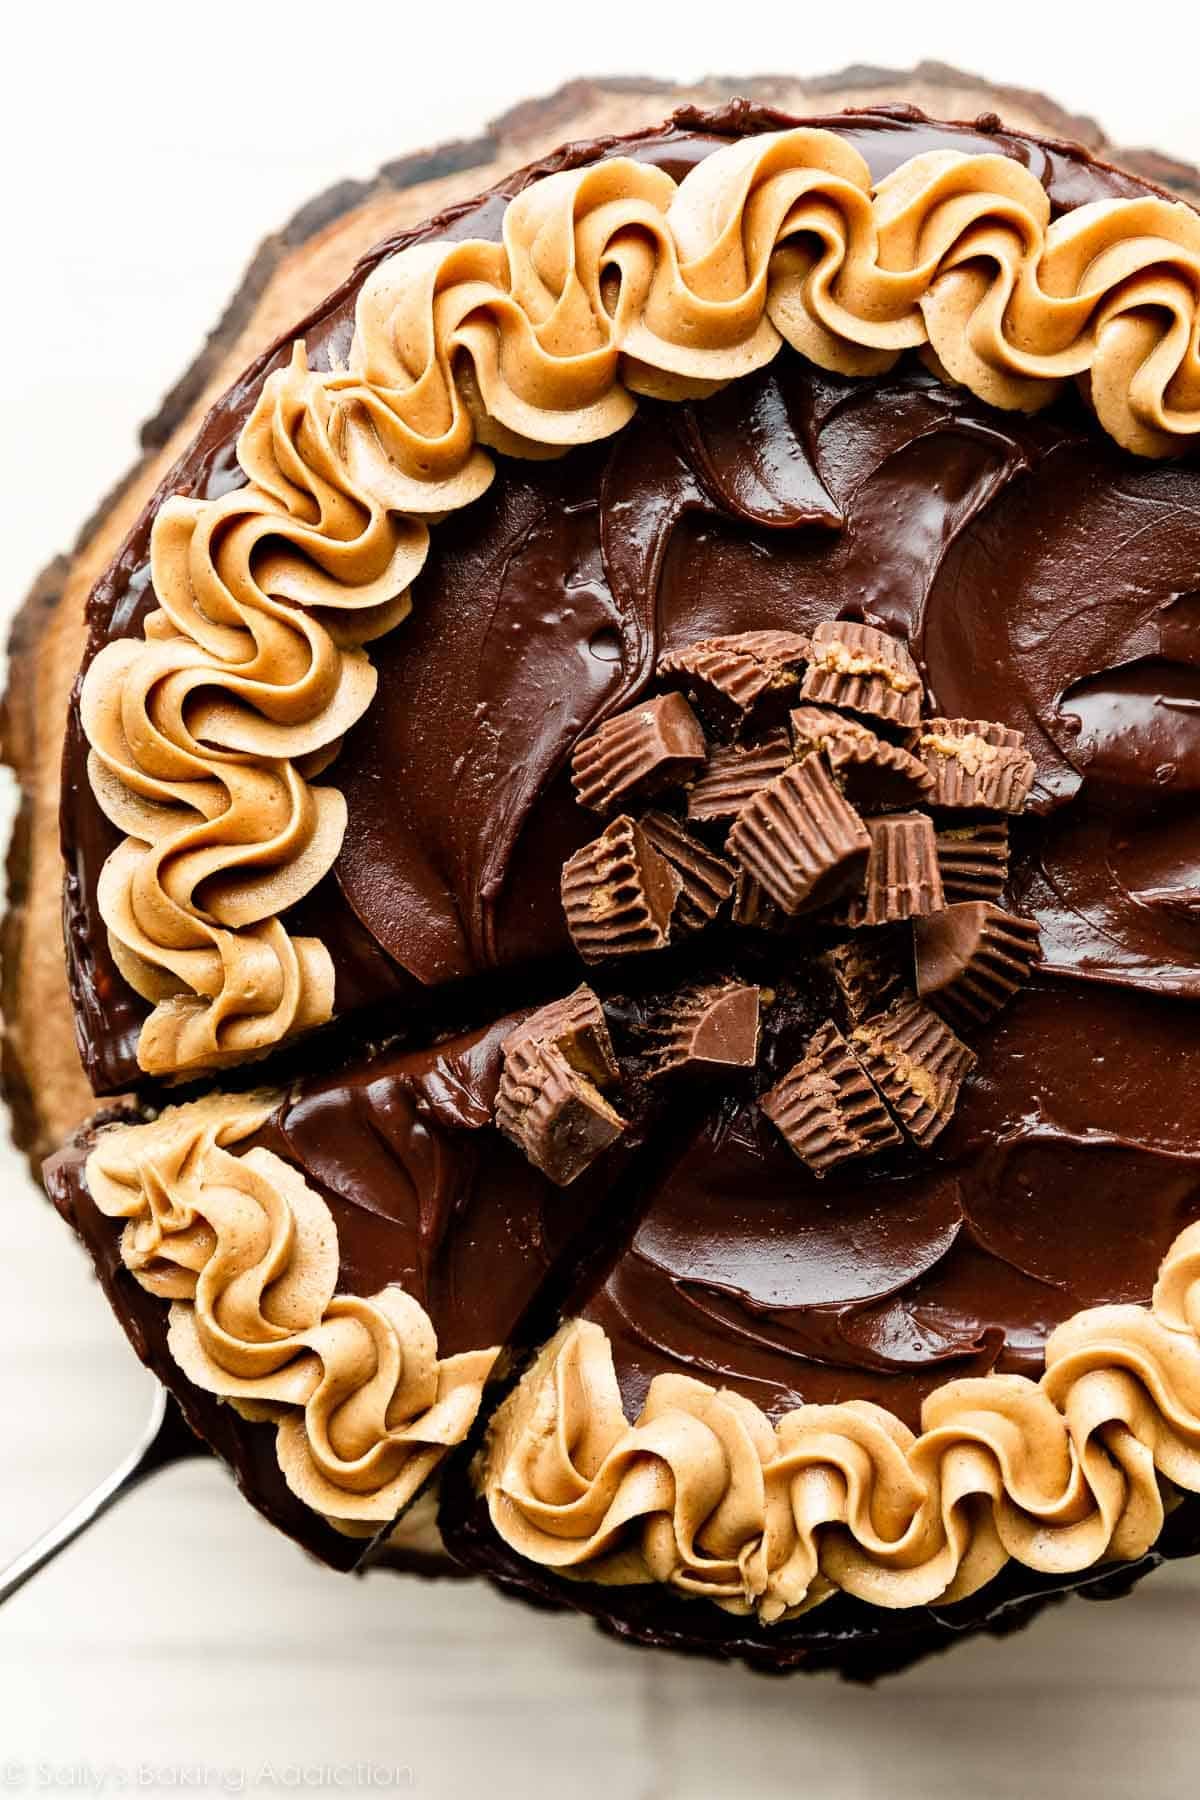
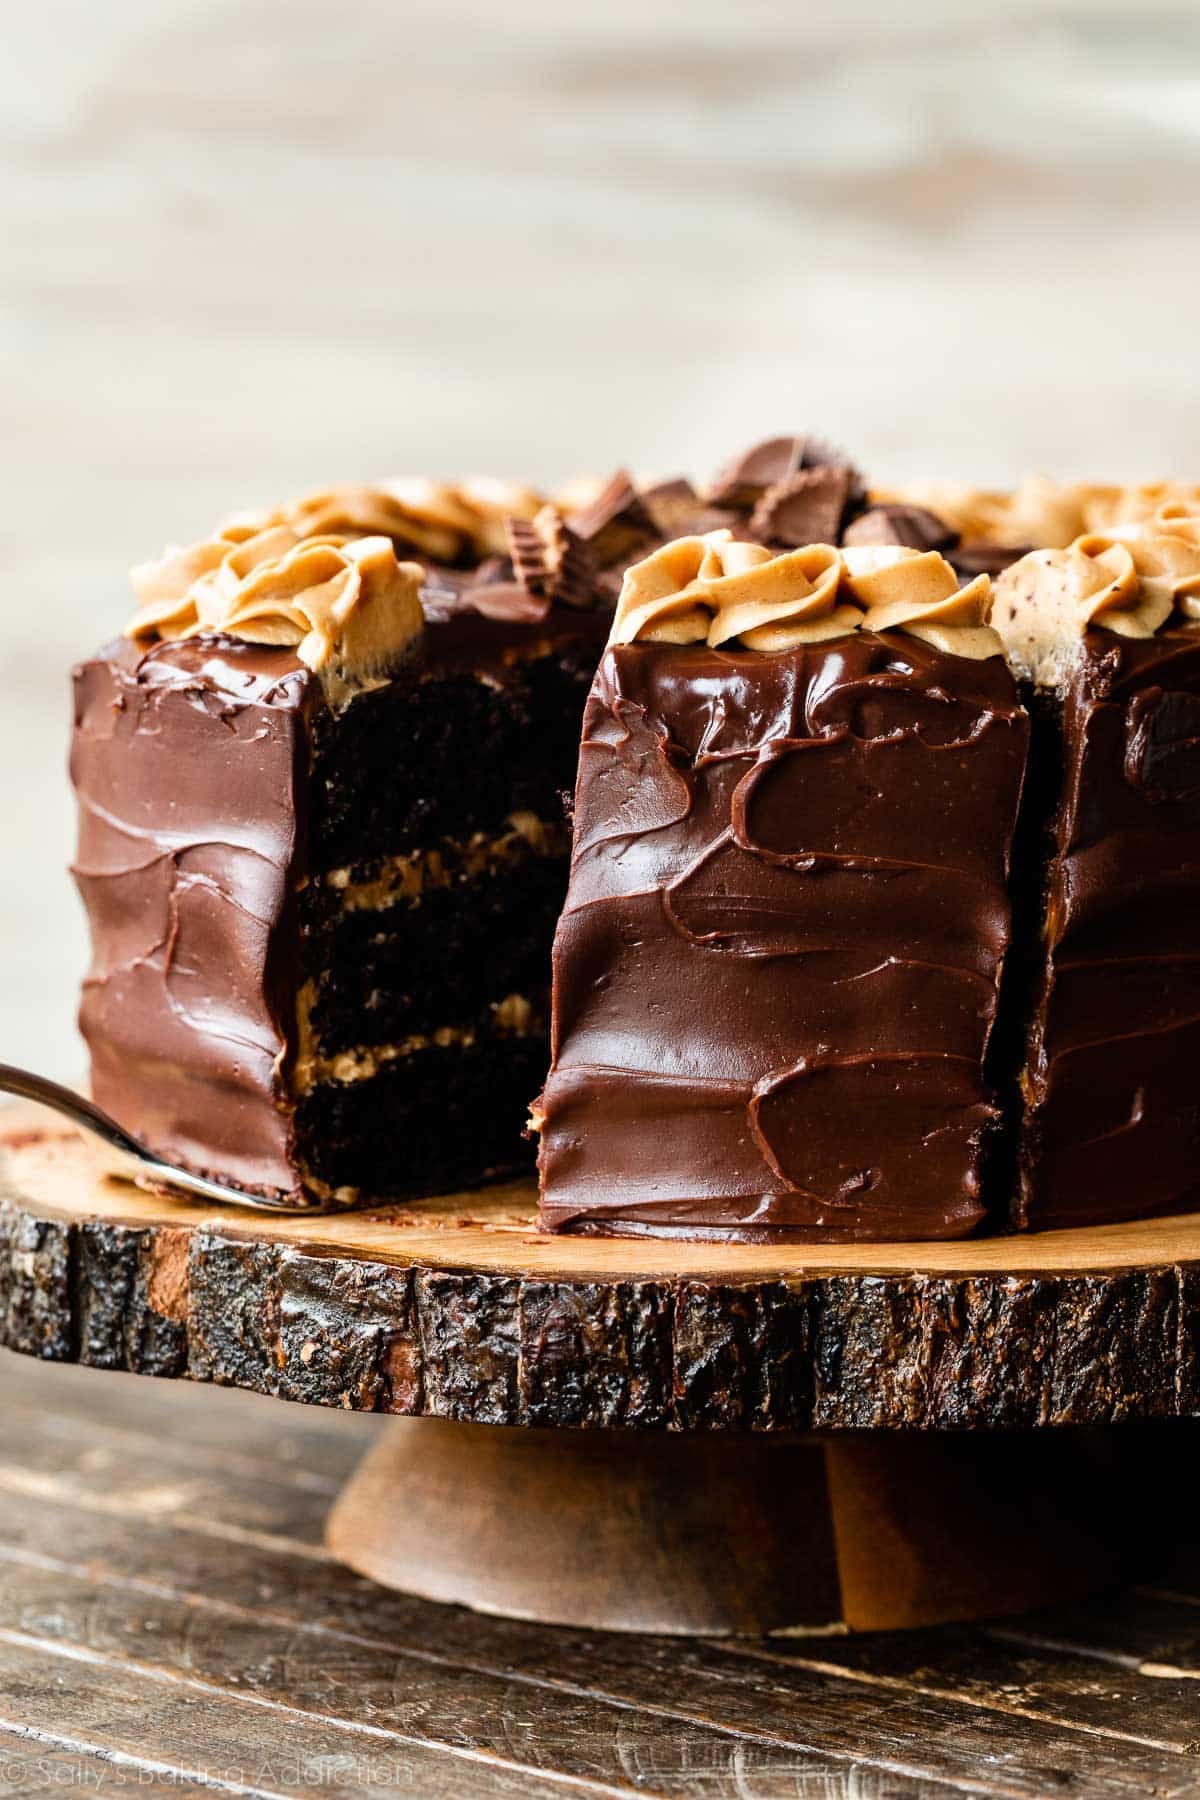
This super moist dark chocolate peanut butter cake marries the flavors of rich dark chocolate and sweet creamy peanut butter—a match made in heaven if ever there was one. Fill and coat the cake with peanut butter frosting, then cover the whole dessert with semi-sweet chocolate ganache, pipe more peanut butter frosting on top… and get ready to swoon, because this is love at first bite.
One reader, Julia, commented: “This recipe is incredible! The cake texture and crumb is moist and delicately fluffy. The peanut butter frosting is perfect—not too sweet or strong. It was a hit at our little after graduation party. And it was gorgeous! Thank you for such an amazing recipe with simple ingredients! ★★★★★“
Meet our newest most eligible bachelor: the dark chocolate peanut butter cake. This cake is rich. Like, ultra-rich. I think the term “filthy rich” might even apply here.
Here’s Why You’ll Swoon Over This Cake
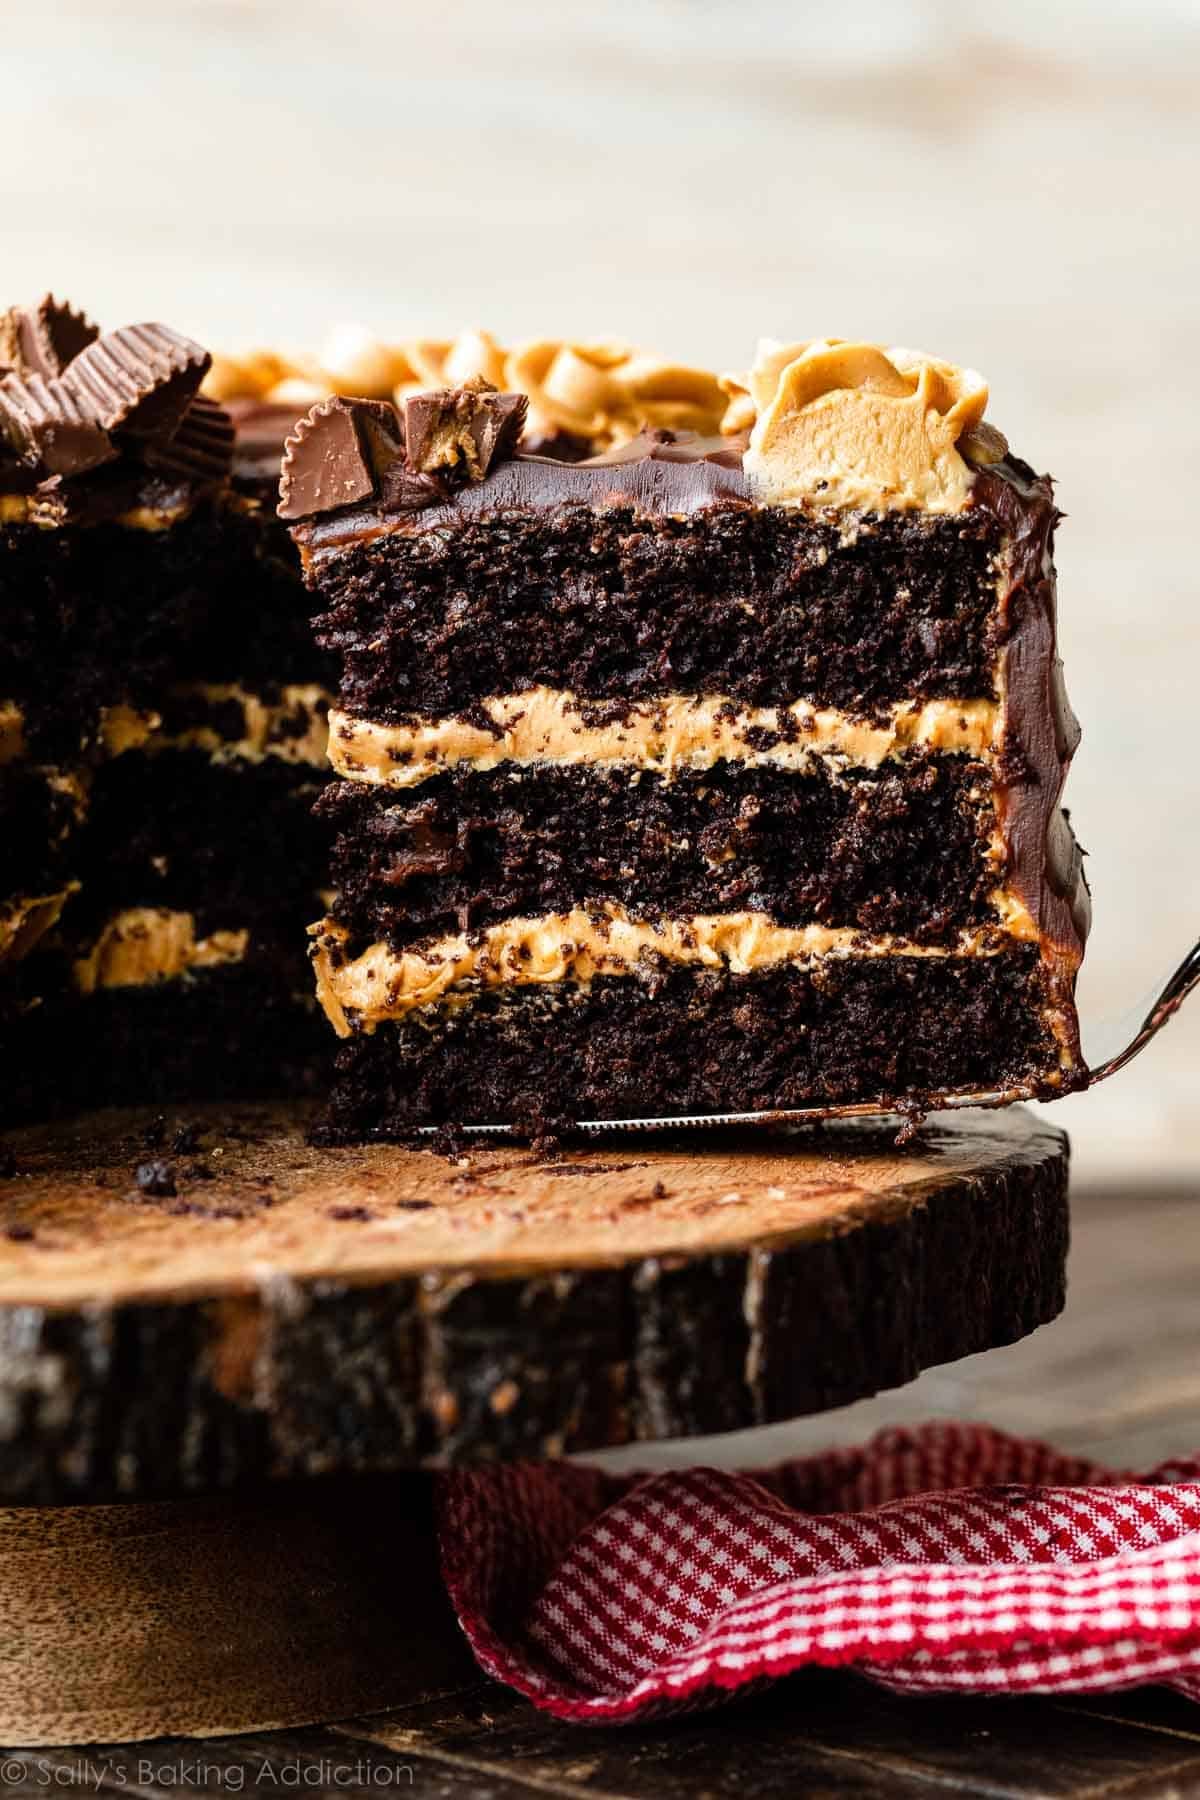
- Cake crumb is fudge-like and moist, yet a little light and spongey.
- Enjoy extra texture from the chocolate chips. (I insist you don’t leave these out! Taste testers said the chocolate chips are a welcome contrast to the smooth frosting and cake… and I agree.)
- Peanut butter frosting packs BIG flavor.
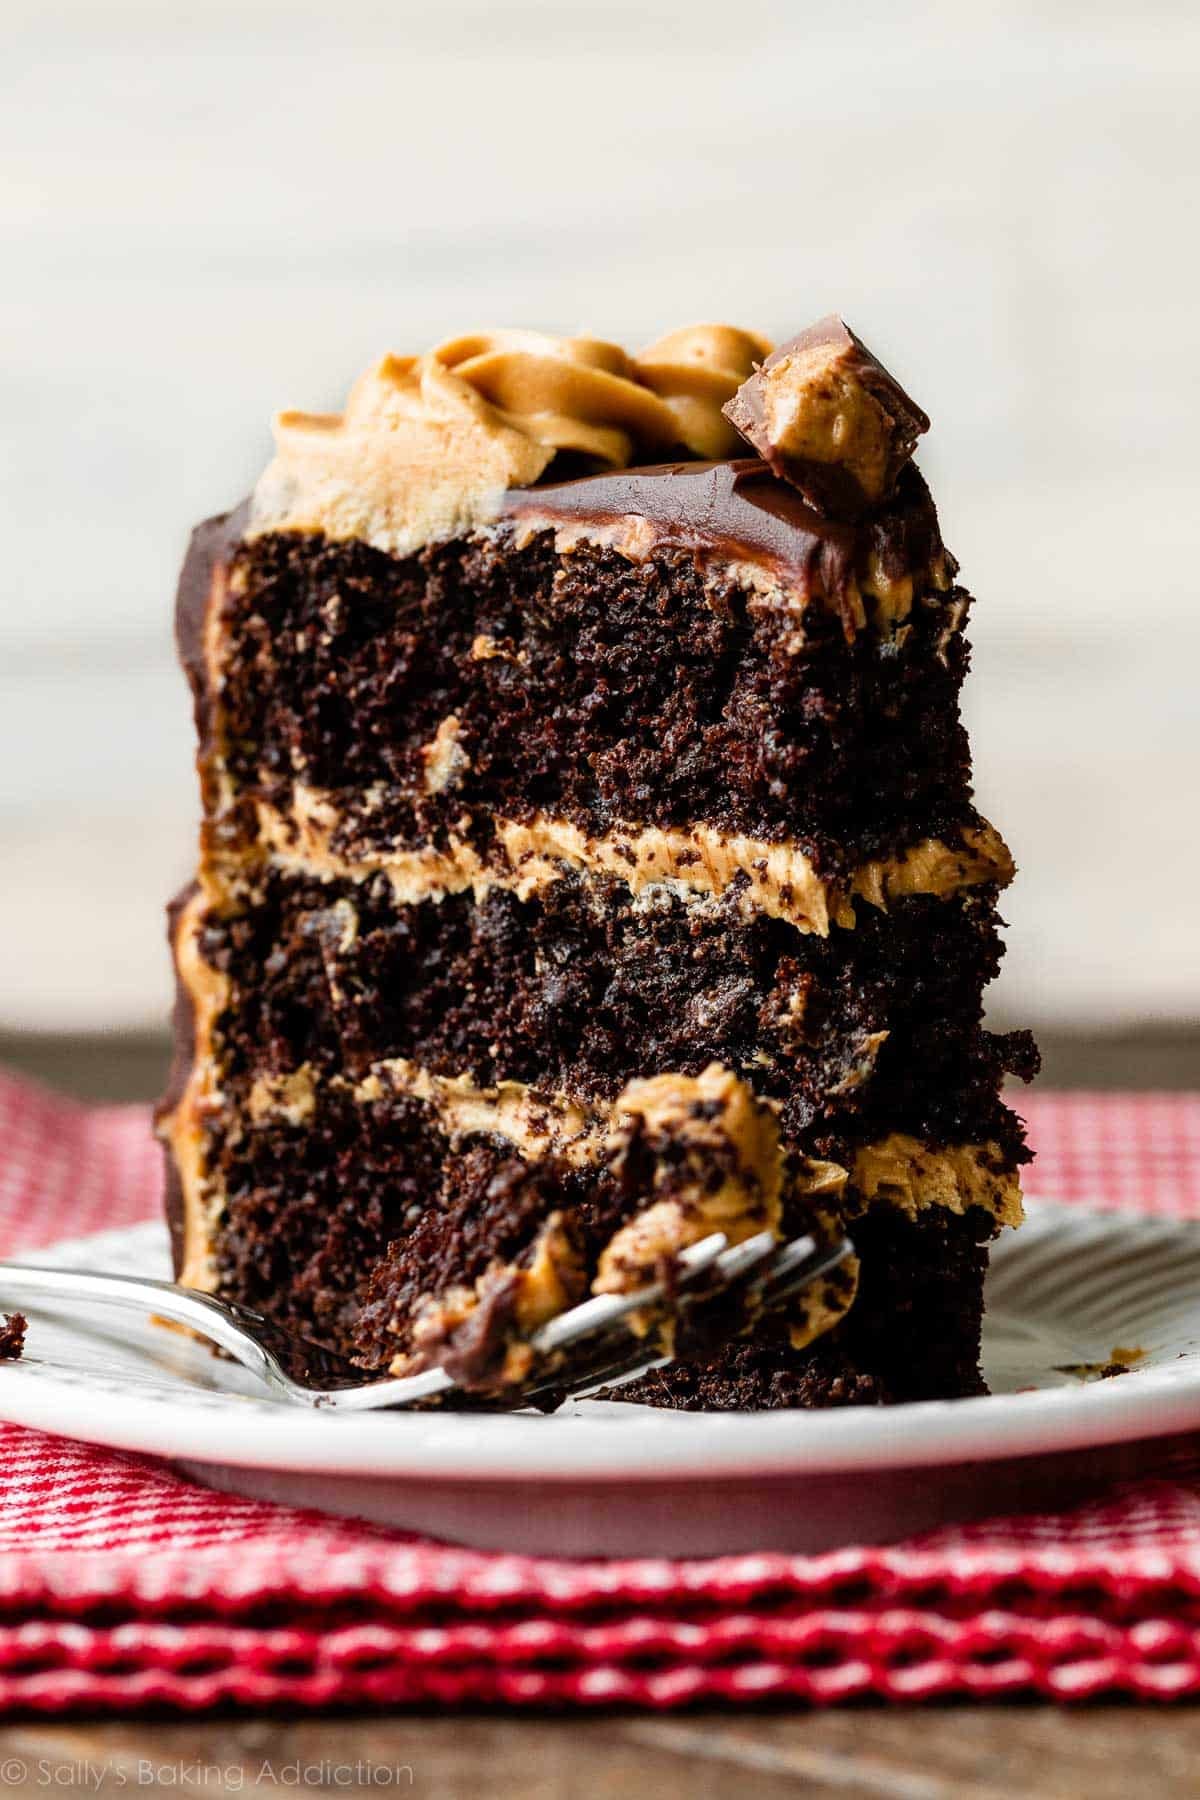
- It’s sweet, but not overly so; the lightly sweetened peanut butter frosting and dark chocolate ganache is a nice break from cloyingly sweet buttercream.
- Very rich! If you’re going to indulge in dessert, put this layer cake on the menu.

This spectacularly rich chocolate ganache-enrobed cake is such a personal and reader favorite that I knew I had to include it in my cookbook, Sally’s Baking 101 (which has become a New York Times Best Seller!). The cakes chapter just would not have been complete without it!
It’s actually the first recipe in that chapter, and in the book it’s titled “Chocolate Ganache Cake: 2 Ways,” because I include a second filling option—chocolate mousse, just like this recipe for dark chocolate mousse cake. Both versions of ganache-topped chocolate layer cakes have received such glowing reviews on my website, I simply couldn’t choose between them… so I found a way to include them both!
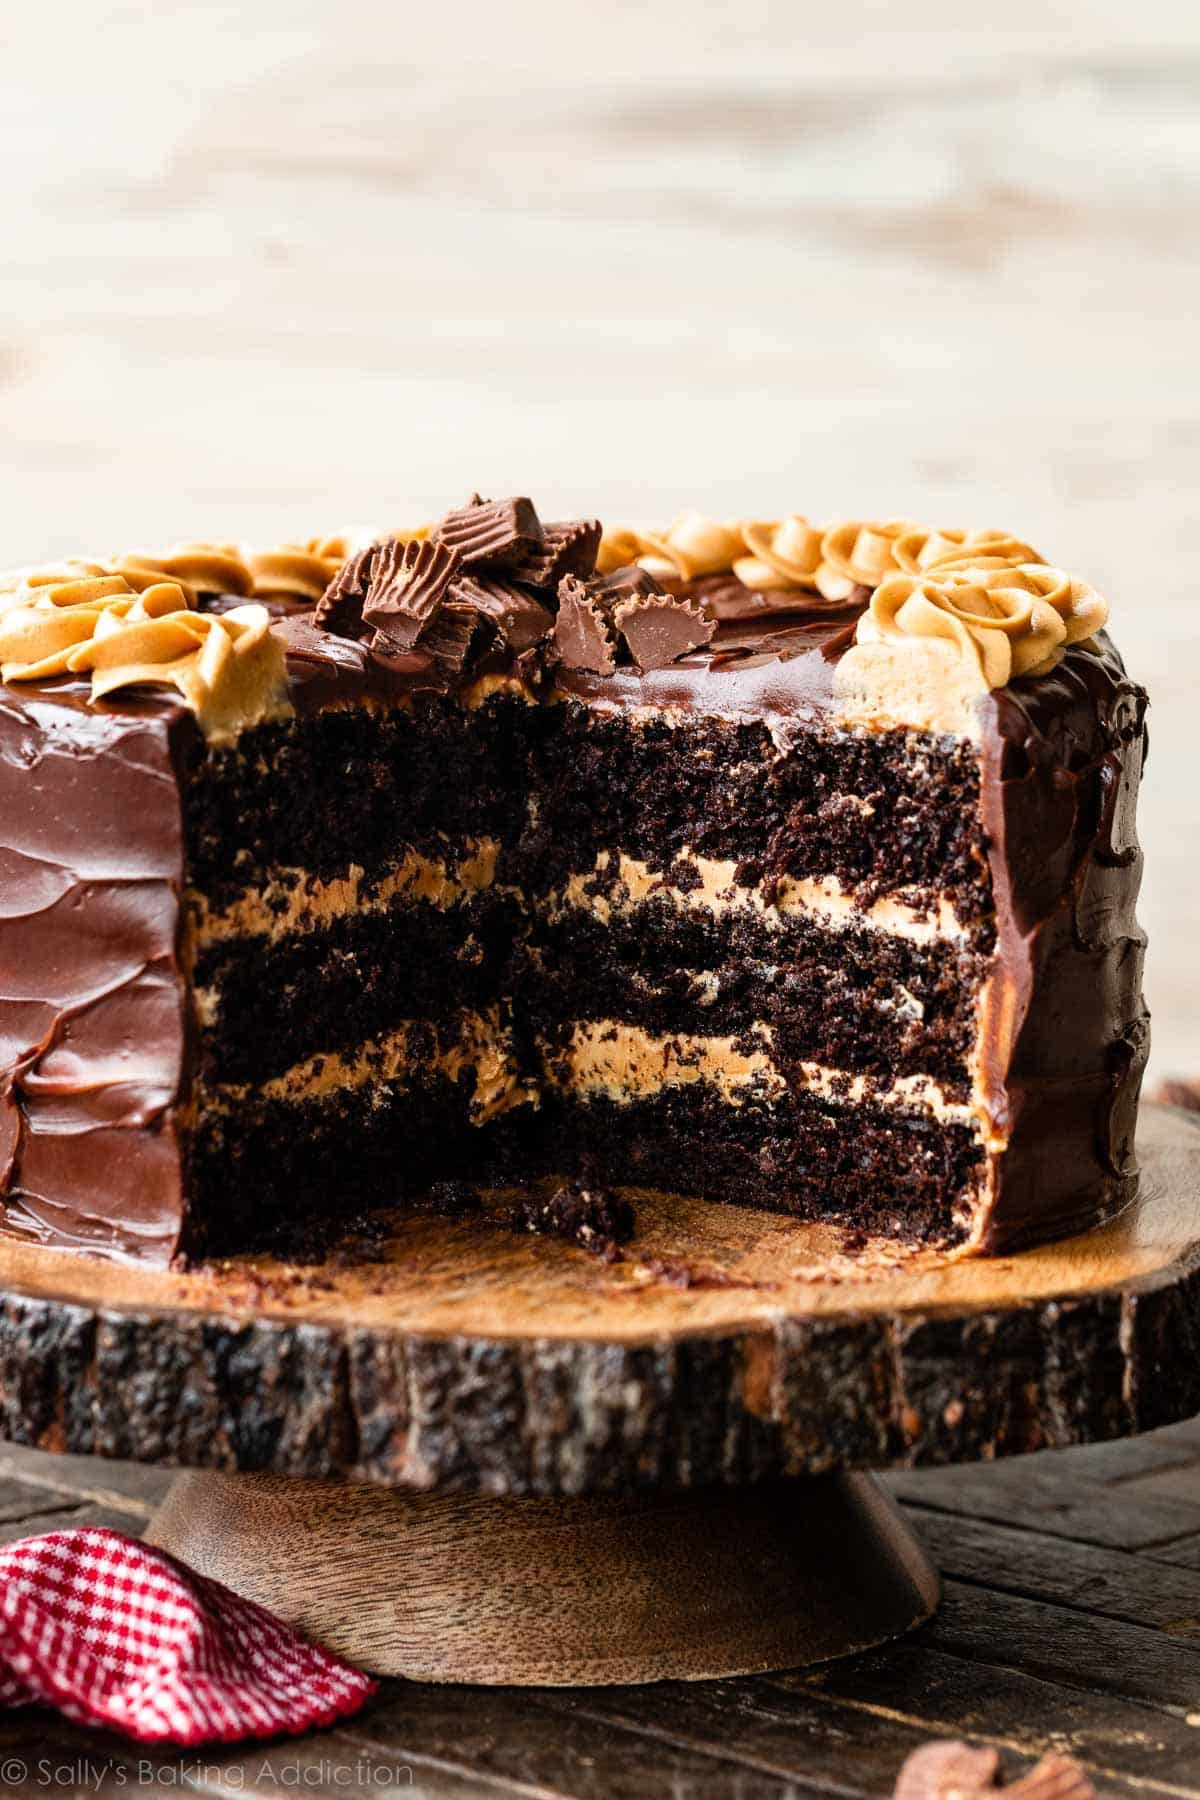
3 Parts to Chocolate Peanut Butter Cake
Let’s break down each component of this unapologetically indulgent cake:
- Dark Chocolate Cake: We’re starting with the same cake batter from dark chocolate mousse cake and chocolate raspberry cake, both reader favorites. The cake batter is essentially the same as this chocolate cake, but we’re using the sour cream variation because it produces a sturdier cake—certainly beneficial for tall and towering layers.
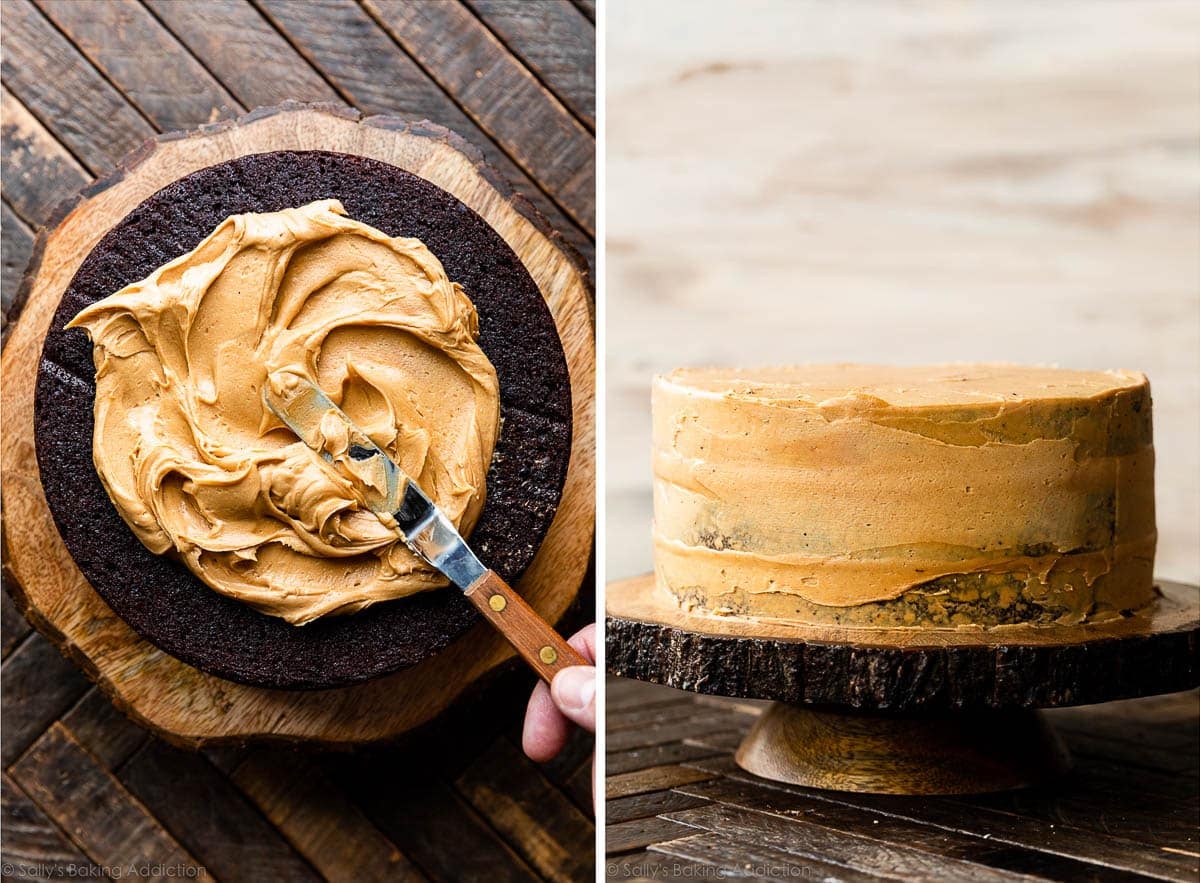
- Peanut Butter Frosting: Slather on a layer of creamy peanut butter frosting between each cake layer, and use it to apply a crumb coat to the exterior of the cake. It’s a scaled-up version of my original peanut butter frosting recipe.
- Chocolate Ganache: Top the whole cake with 2-ingredient semi-sweet chocolate ganache. I originally frosted this cake with a chocolate buttercream, but all of my taste testers said it was simply too rich and too sweet. “Hard to finish a slice,” most said. With chocolate ganache, one taster distinctly said, “I cannot stop eating this.”
My team and I made at least 6 of these cakes during the testing phase and we had some VERY happy neighbors and friends.
A Cake With Serious Chocolate Flavor
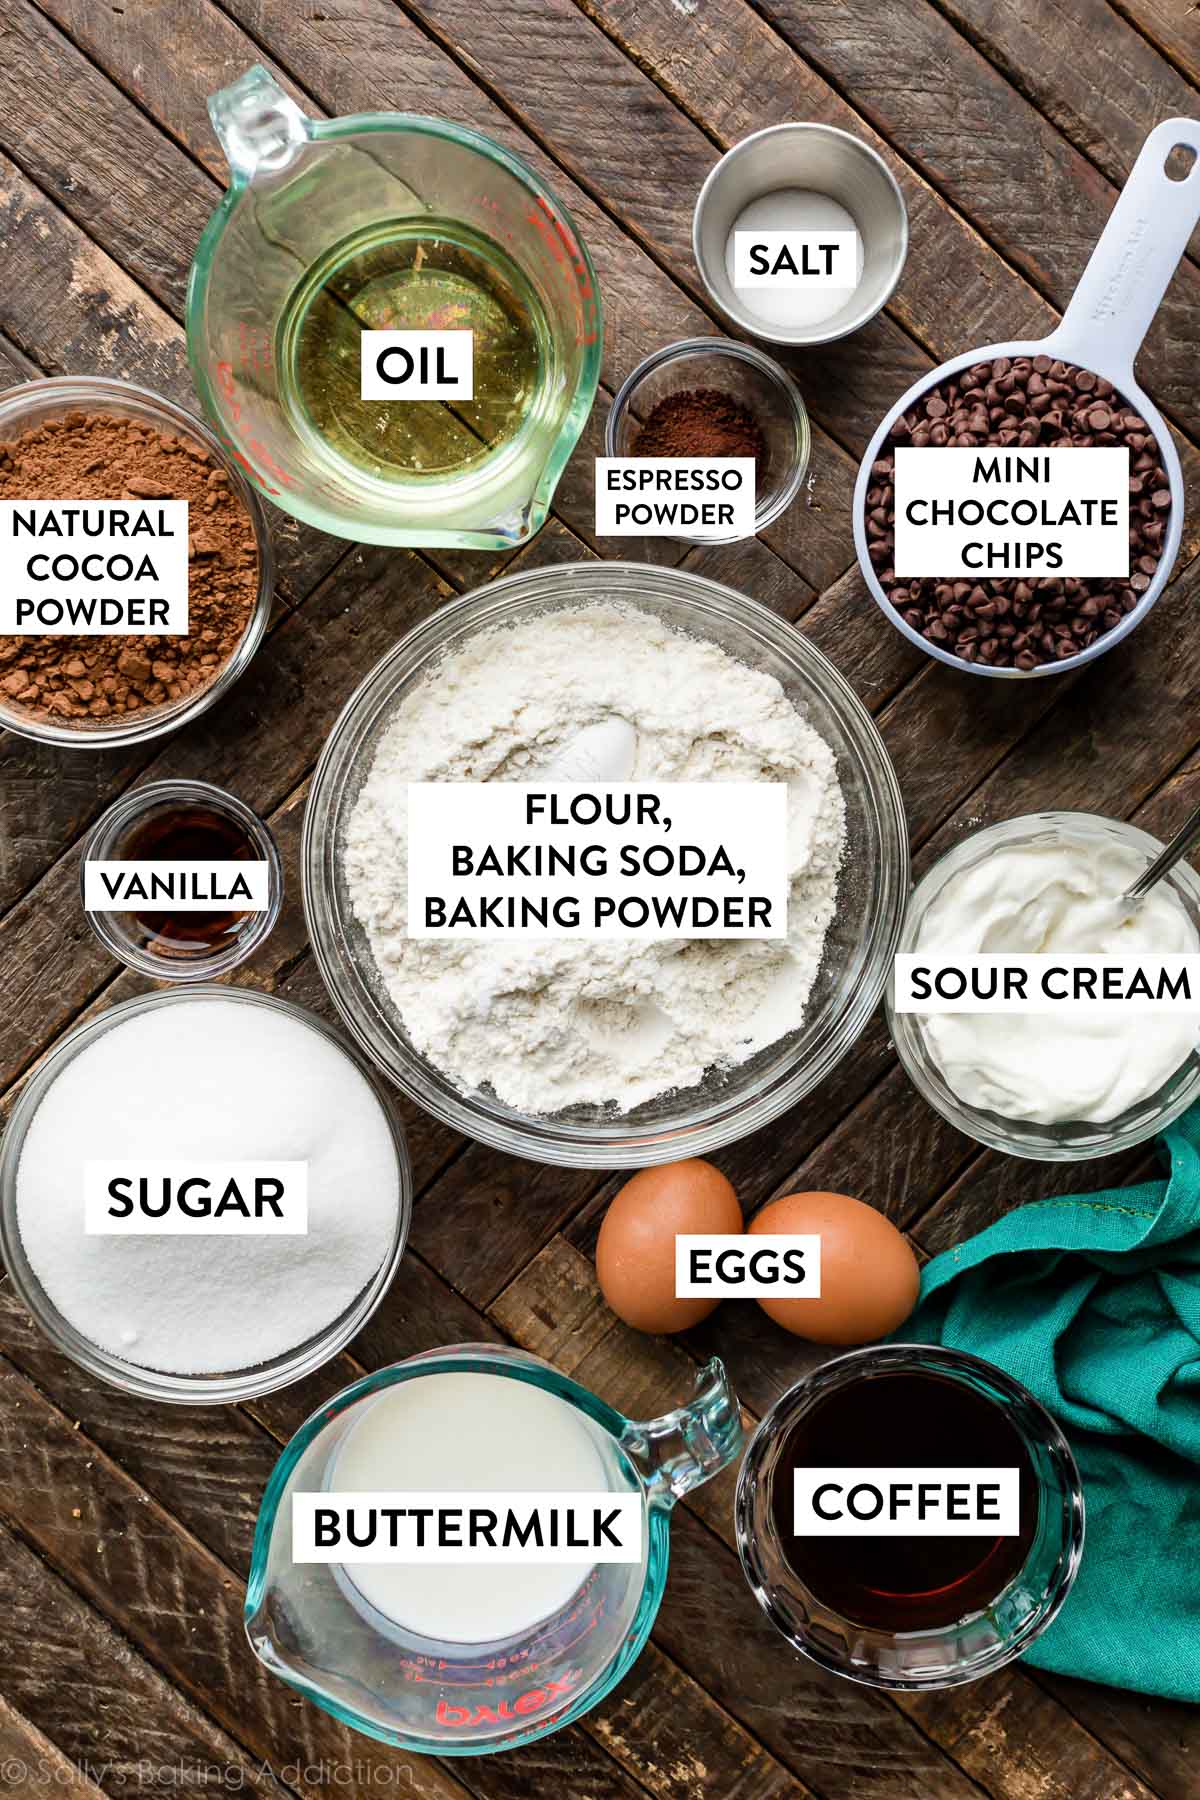
You need a handful of basic baking ingredients for the cake batter. The acidity in both sour cream and buttermilk is a must to provide proper leavening. (If desired, see my Baking Powder vs Baking Soda and Baking with Buttermilk posts for more information.) A touch of espresso powder and hot coffee further enhances the chocolate flavor. The cake will not taste like coffee—rather, the two add depth to the cake’s dark chocolate flavor. Feel free to skip the espresso powder and replace hot coffee with hot water.
- Why hot liquid? The hot liquid encourages the cocoa powder to bloom and dissolve.
Chocolate chips take the chocolate flavor to the next level, and, as I mentioned above, they also supply phenomenal texture. Toss them in a little flour before folding into the batter.
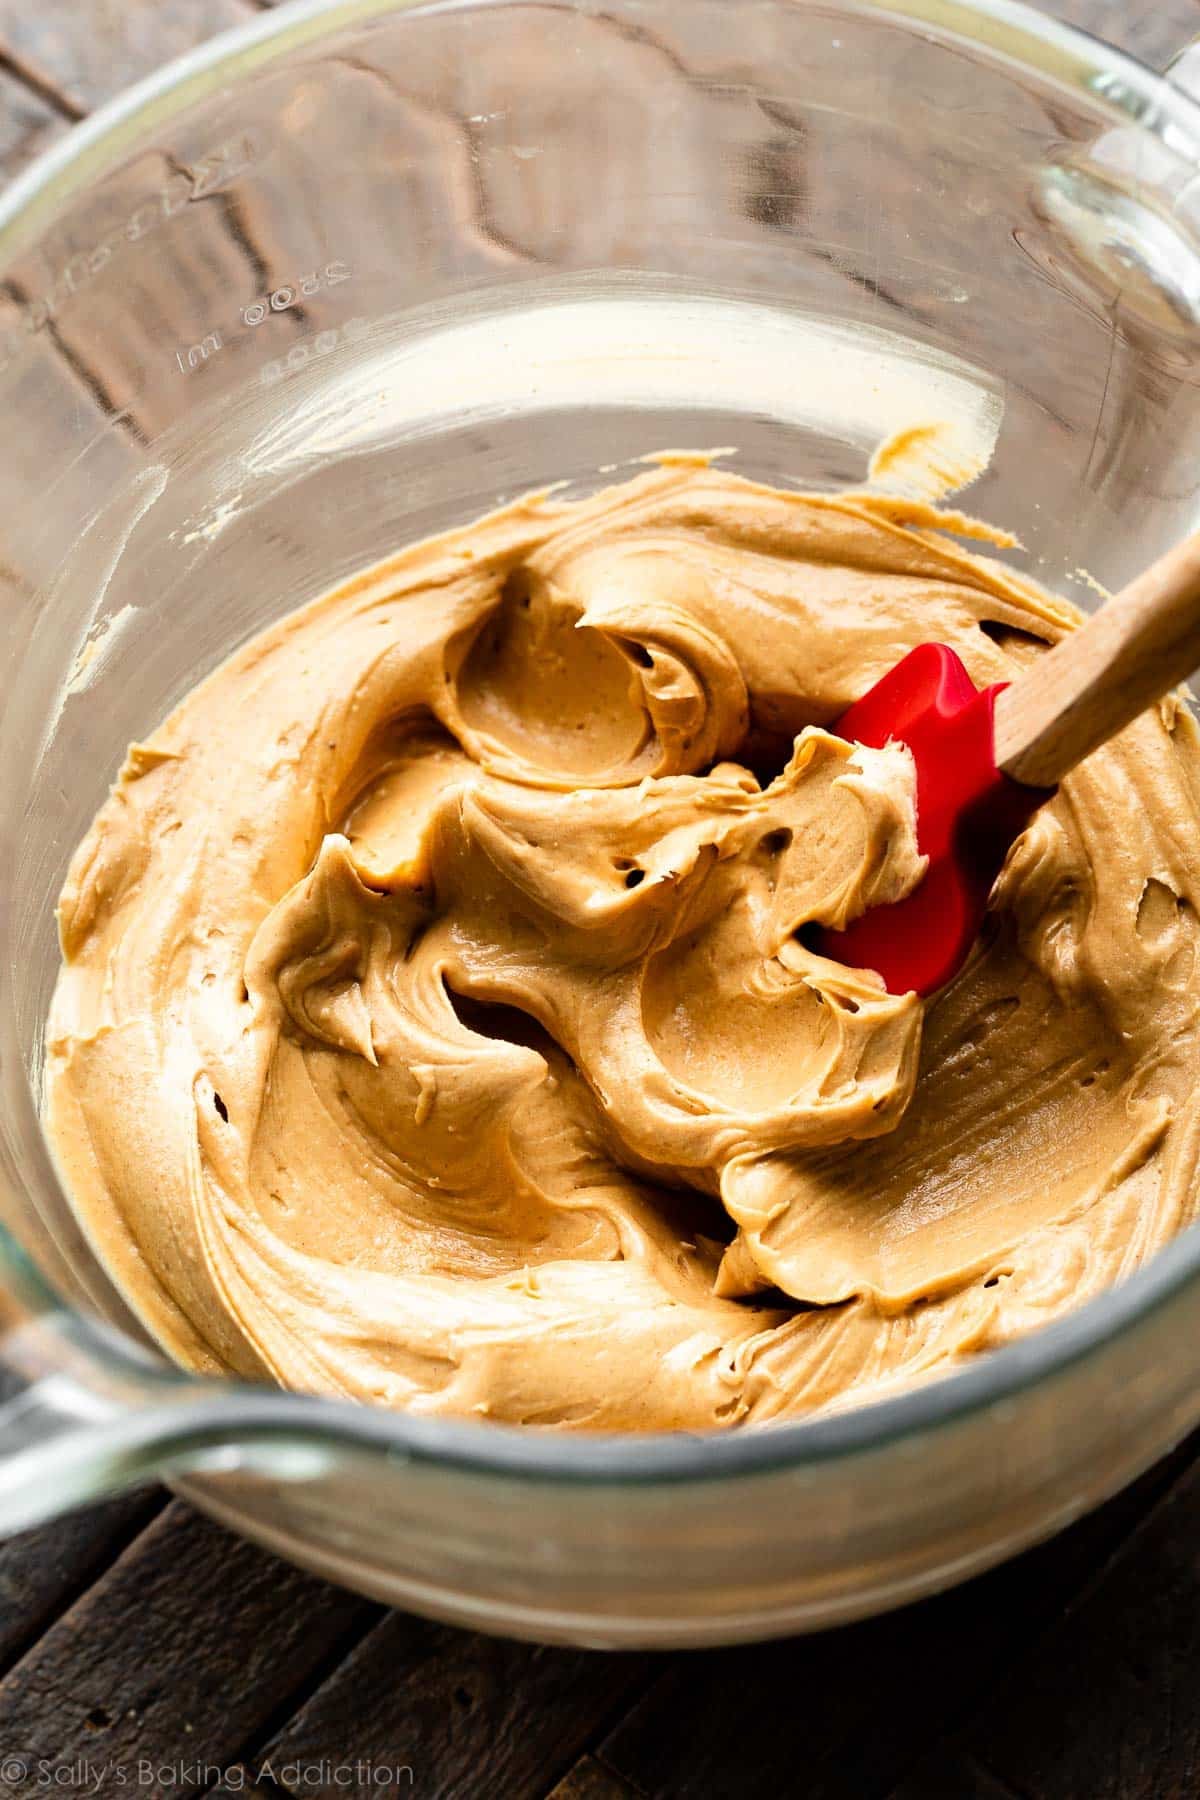
Creamy Peanut Butter Frosting
I played around with the ingredients in my usual creamy peanut butter frosting recipe, and made some adjustments in order to yield just the right amount for this cake. You need 5 ingredients:
- Butter
- Peanut Butter: Use the conventional kind, like Jif or Skippy, rather than natural.
- Confectioners’ Sugar: I know you’ll appreciate that there’s less than 2 cups of confectioners’ sugar, a far cry from the usual 6 or 7 cups required for buttercream on a tall layer cake.
- Heavy Cream: You also need this for the chocolate ganache.
- Vanilla Extract
You’ll end up with 3.5–4 cups (about 850g), which is enough frosting for filling, crumb-coating, and some basic piping on the exterior. This frosting has incredible peanut butter flavor because it’s packed with nearly 2 cups of it! There’s no other way to make it. 😉
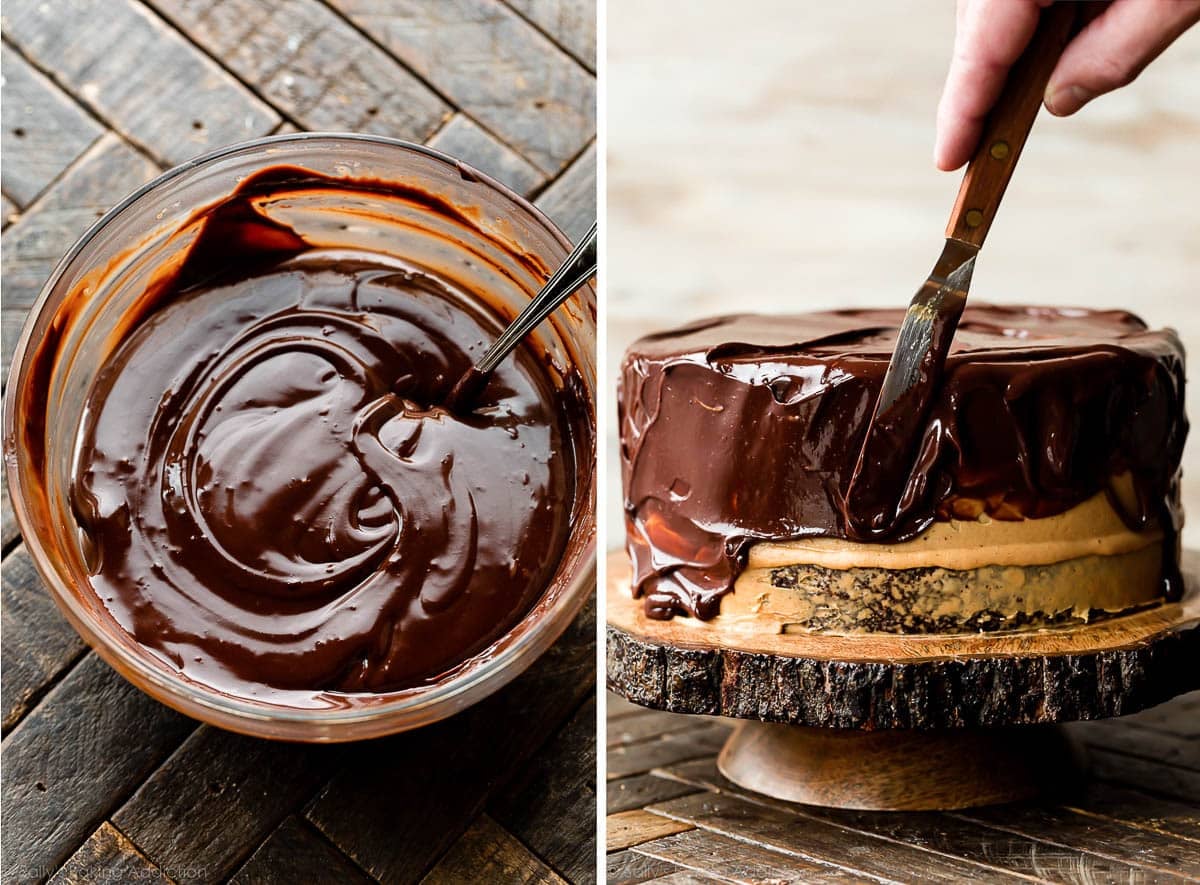
2-Ingredient Chocolate Ganache
I won’t go into a lot of detail about how to make the ganache because I have a complete chocolate ganache tutorial for you. You need just 2 ingredients: chopped semi-sweet baking chocolate (about 56–60% cacao) and warm heavy cream.
#1 Success Tip: Wait 20–30 minutes for the ganache to thicken before pouring or spooning onto the cake, which is convenient because you also have to wait for the crumb-coated cake to chill.
As you can watch in the video tutorial below, a chilled cake helps set or solidify the ganache as you’re applying it, which helps prevent major drips/big messes.
How to Assemble & Decorate This Chocolate Peanut Butter Cake
I’m NOT a professional cake decorator and with all of my layer cakes, I prefer simplicity. This detailed how to assemble and decorate a layer cake post is a great guide. Let me share how I stack and decorate this beauty:
Assemble: Place the bottom cooled cake layer on your cake stand or serving plate. Using a large icing spatula or small offset spatula, evenly cover the top with about 1 cup of peanut butter frosting. Top with 2nd cake layer and another 1 cup of frosting. Top with the third cake and then spread a thin layer of the peanut butter frosting on top and around the sides as a crumb coat. Run a bench scraper around the cake to smooth it out. Refrigerate the cake for at least 30 minutes and up to 3 hours to set the crumb coat.
Decorate: Pour slightly cooled chocolate ganache on top, then, once again, run a bench scraper around the sides to smooth it out. Finally, fill a piping bag (reusable or disposable) with the remaining peanut butter frosting and pipe around the edges of the cake. I use Wilton 1M for the piped detail. If desired, you can finish off this chocolate peanut butter bombshell with peanut butter cups.
If you’re just learning how to use piping tips, my piping tips guide is a helpful resource, and don’t miss these complete lists of cake success tips and cake decorating tools.
Now it’s your turn! Swoooon.
Recommended Tools
- Stand Mixer or Handheld Mixer
- 3 9-inch Cake Pans (8-inch also works, but I recommend 9-inch for this cake)
- Parchment Paper Rounds
- Large Icing Spatula and/or Small Offset Spatula
- Cake Turntable (optional, I don’t use one for this)
- Bench Scraper
- Piping Bag (disposable or reusable) & Wilton 1M Piping Tip
- Cake Carrier for storing and transporting
Chocolate Peanut Butter Cake
- Prep Time: 1 hour, 30 minutes (includes chilling)
- Cook Time: 25 minutes
- Total Time: 4 hours (includes cooling)
- Yield: serves 12-14
- Category: Cake
- Method: Baking
- Cuisine: American
Description
This super rich chocolate peanut butter cake combines moist chocolate cake with creamy peanut butter frosting and smooth chocolate ganache. Crumb-coated cake and ganache must chill before assembling and decorating the cake. See recipe Notes for further information about some ingredients. This recipe is also in my New York Times best-selling cookbook, Sally’s Baking 101.
Ingredients
- 1 and 3/4 cups (219g) all-purpose flour (spooned & leveled)
- 3/4 cup (64g) unsweetened natural cocoa powder*
- 1 and 3/4 cups (350g) granulated sugar
- 2 teaspoons baking soda
- 1 teaspoon baking powder
- 1 teaspoon salt
- 2 teaspoons instant espresso powder (optional)*
- 1/2 cup (113g/120ml) canola or vegetable oil
- 2 large eggs, at room temperature
- 3/4 cup (180g) full-fat sour cream, at room temperature
- 1/2 cup (120g/ml) buttermilk, at room temperature*
- 2 teaspoons pure vanilla extract
- 1/2 cup (120g/ml) hot water or black coffee*
- 1 cup (170g) mini semi-sweet chocolate chips, tossed in 1 Tablespoon flour
Peanut Butter Frosting
- 3/4 cup (12 Tbsp; 170g) unsalted butter, softened to room temperature
- 1 and 3/4 cups (440g) creamy peanut butter*
- 1 and 3/4 cups (210g) confectioners’ sugar
- 1 teaspoon pure vanilla extract
- pinch of salt
- 3 Tablespoons (45g/ml) heavy cream, at room temperature
Chocolate Ganache
- 8 ounces (226g) quality semi-sweet chocolate, finely chopped*
- 1 cup (240g/ml) heavy cream
- optional garnish: chopped or mini peanut butter cups
Instructions
- Preheat oven to 350°F (177°C). Grease three 9-inch cake pans, line with parchment paper rounds, then grease the parchment paper. Parchment paper helps the cakes seamlessly release from the pans. (If it’s helpful, see this parchment paper rounds for cakes video & post.)
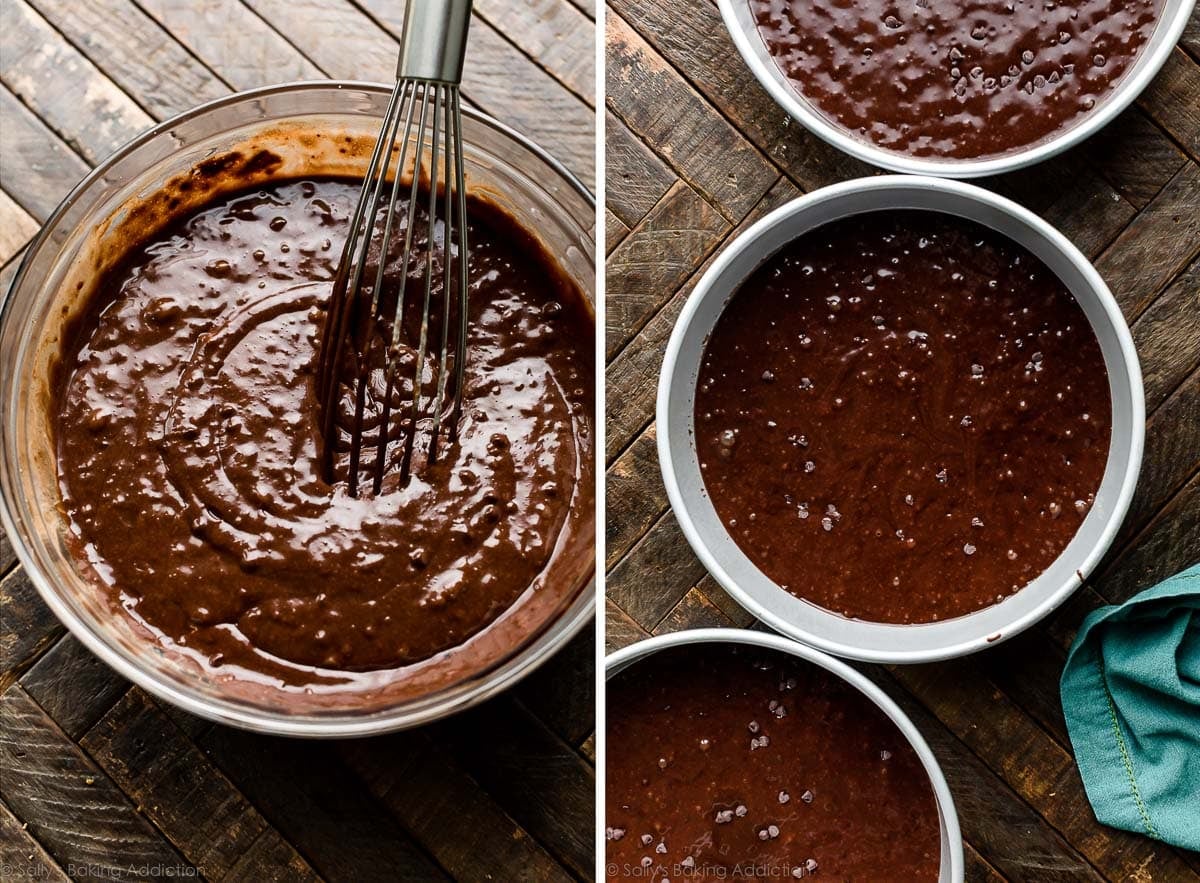
- Make the cake: Whisk the flour, cocoa powder, sugar, baking soda, baking powder, salt, and espresso powder (if using) together in a large bowl. Set aside. Using a handheld or stand mixer fitted with a whisk attachment (or you can use a whisk), mix the oil, eggs, and sour cream together on medium-high speed until combined. Add the buttermilk and vanilla and beat until combined. Pour the wet ingredients into the dry ingredients, add the hot water/coffee, and whisk or beat on low speed until the batter is completely combined. Fold in the flour-coated chocolate chips. Batter is thin and you may see some air bubbles on the surface—that’s normal. You should have about 6–6.5 cups of batter, or around 1400g. Divide batter evenly between 3 pans.
- Bake for 24–26 minutes or until a toothpick inserted in the center comes out clean. Cool the cakes in the pans set on a cooling rack for 1 hour. Run a knife around the edges to help loosen the sides, remove the cakes from the pans, peel off the parchment, and place on the rack to finish cooling. The cakes may slightly sink in the middle as they cool—that’s expected.
- As the cakes cool, make the peanut butter frosting: With a handheld or stand mixer fitted with a paddle attachment, beat the butter on medium high speed until creamy and smooth, about 2 minutes. With a spatula, scrape down the sides and bottom of the bowl as needed. Add the peanut butter and beat until completely combined, about 1–2 minutes. Scrape down the sides and bottom of the bowl as needed to help combine. Mixture will be thin. Add confectioners’ sugar, vanilla extract, and salt and then pour in the heavy cream with the mixer running on low speed. After all of the cream has been added, turn the mixer up to medium-high speed and beat for 1–2 minutes, or until fully combined and creamy. Add up to 1/4 cup more confectioners’ sugar if frosting seems quite thin. You should end up with about 3.5–4 cups (850g) of peanut butter frosting. This amount makes enough for the filling, crumb coat, and for a little piping on top.
- Assemble cake + apply crumb coat: (For extra help with this step, see this video & post on how to assemble a layer cake.) Place 1 cake layer on your cake stand, cake turntable, or serving plate. Using a large icing spatula or small offset spatula, evenly cover the top with about 1 cup (240g) peanut butter frosting. Repeat with 2nd and 3rd cake layers, spreading about 1 cup of peanut butter frosting in between each layer. Spread a thin layer of frosting on the top and around the sides as a crumb coat. Run a bench scraper around the cake to smooth out the sides. Chill uncovered in the refrigerator for at least 30 minutes and up to 3 hours to set the crumb coat.
- As your crumb coat sets, make the chocolate ganache: Place finely chopped chocolate in a medium heat-proof bowl. Heat the cream in a small saucepan over medium heat until it begins to gently simmer. (Do not let it come to a rapid boil—that’s too hot!) Pour over chocolate, then let it sit for 2–3 minutes to gently soften the chocolate. With a metal spoon or small rubber spatula, very slowly stir until chocolate has melted and mixture is smooth. Ganache is thin. The finer you chopped the chocolate, the quicker it will melt with the cream. If it’s not melting, do not microwave it. If needed, see Troubleshooting Chocolate Ganache. Once the ganache is smooth, refrigerate for at least 30 minutes or up to 1 hour to thicken before spreading on the crumb-coated cake.
- Pour/spoon thickened ganache on chilled cake. Smooth the top with an icing spatula and the sides with a bench scraper. If desired, pipe remaining peanut butter frosting around the edge of the cake. I used Wilton 1M piping tip on the pictured cake. Garnish with peanut butter cups, if desired. Serve cake immediately or chill, uncovered, for up to 4–6 hours before serving. Cake can be served at room temperature or chilled.
- Cover leftover cake tightly and store in the refrigerator for up to 5 days. I always use a cake carrier for storing and transporting.
Notes
- Make Ahead & Freezing Instructions: Prepare cake through step 3. Wrap the individual baked and cooled cake layers tightly and refrigerate for up to 2 days or freeze for up to 3 months. Bring to room temperature, then continue with step 4. You can prepare the peanut butter frosting in advance. Cover and refrigerate for up to 3 days. Bring to room temperature before using and beat in a little more room-temperature heavy cream to thin out if necessary. You can also prepare the chocolate ganache ahead of time. Refrigerate prepared ganache for up to 3 days. Bring to room temperature before spreading onto cake. Frosted cake freezes well, up to 3 months. Thaw overnight in the refrigerator, then bring to room temperature or serve cold. See this post on how to freeze cakes.
- Special Tools (affiliate links): 9-inch Cake Pans | Glass Mixing Bowl | Whisk | Electric Mixer (Handheld or Stand) | Large Icing Spatula and/or Small Offset Spatula | Cake Turntable, Cake Stand, or Serving Platter | Bench Scraper | Piping Bag (Disposable or Reusable) | Wilton 1M Piping Tip | Cake Carrier (for storing)
- Cocoa Powder: This recipe requires natural cocoa powder for its acidity, so do not use Dutch-process. Learn about the difference in this post on Dutch-process vs. natural cocoa powder.
- Espresso Powder/Coffee: Espresso powder and coffee will not make the cake taste like coffee. Rather, they deepen the chocolate flavor. I highly recommend them both. If coffee isn’t your thing, you can leave out the espresso powder and use extra hot water instead of the hot coffee.
- Sour Cream: Instead of sour cream, you can use plain Greek yogurt. The cake won’t taste as rich, but it’s a fine substitute.
- Buttermilk: Buttermilk is required for this recipe. You can make your own DIY buttermilk substitute if needed. Add 1 teaspoon of white vinegar or lemon juice to a liquid measuring cup. Then add enough whole milk to the same measuring cup until it reaches 1/2 cup. (In a pinch, lower-fat or nondairy milks work for this soured milk, but the cake won’t taste as moist or rich.) Stir it around and let sit for 5 minutes. The homemade “buttermilk” will be somewhat curdled and ready to use in the recipe.
- Peanut Butter: To prevent the frosting from separating or coming out too thin or oily, use processed creamy peanut butter such as Jif or Skippy.
- Why Room Temperature? All refrigerated items should be at room temperature so the batter and frosting mix together easily and evenly. Read more about why room-temperature ingredients are important.
- Chocolate Ganache: You can use high-quality dark or semi-sweet chocolate chips if needed, but when melting chocolate, I recommend using pure chocolate baking bars (chocolate chips have stabilizers). You can find them right next to the chocolate chips in the baking aisle. I like Baker’s or Ghirardelli brands, the ones labeled semi-sweet (56% cacao), which come in 4-ounce (113g) bars.
- Cupcakes: Here’s a very similar recipe for dark chocolate cupcakes with peanut butter frosting. Feel free to fill them with the peanut butter frosting (instead of frosting them with it) and top each with chocolate ganache. Or use this recipe for ganache-topped cream-filled chocolate cupcakes, and replace the cream filling with peanut butter frosting.


Reader Comments and Reviews
Wow! This recipe did not disappoint! I used my favorite chocolate cake recipe which is very similar to this one, but I did swap out the milk in my recipe for the buttermilk in this one and it was a welcome adjustment. The Peanut Butter Frosting is out of this world and the addition of the ganache really made the cake. I used the tutorial for whipping ganache and whipped the remaining portion after I drizzled it and ended up piping it on top when I decorated it. It turned out amazing! I made a 12 in. round 3 tier and a 12 in single tier. I ended up tripling the cake and frosting recipe and doubled the ganache (and have quite a bit leftover to enjoy later). This recipe is a keeper!
First of all- I love your site! Thank you for sharing your expertise!
I’d like to make this for my husband’s birthday. I want to try making it a pinata cake with reeses pieces in the middle. Any reason this cake would not be a good candidate for a pinata cake? Any suggestions as to the best way to make a chocolate peanut butter pinata cake? Thanks again!
Hi Mallory, that sounds fantastic! This cake should work well as a pinata cake. Please do let us know how it goes!
Test drove this recipe recently and everyone who tried it loved it. I was even looking for faults in the cake since I’d never made it before, but no one had anything negative to say about the finished product! I mainly wanted to leave a review on the recipe itself, though: IT REALLY WORKED. I massed out the ingredients when possible, baked for recommended minimum, etc. and was shocked that I pulled it off even though it’s been over ten years since I’ve baked a multilayer cake. Thank you so much. My boyfriend’s gonna lose his mind when he eats it!
i made it for my mom’s birthday
My son requested chocolate/peanut butter cake for his 40th birthday. I have many years of baking experience and I followed the directions to the letter. It was a beautiful cake. However, the cake itself was not the advertised “super moist”. In fact, the cake part was disappointingly dry. I wouldn’t put all the time and energy required to make it again.
Thank you for giving this recipe a try! Often dry cakes are caused by simply over-baking. Even a minute or two too long can dry out your cakes. Also be careful when measuring dry ingredients to use a food scale or use the spoon and level method to avoid adding too much cocoa powder or flour to the cake.
This was so delicious!!! My family devoured it!! The instructions were clear and easy to follow. The cake is super rich and flavorful! My husband kept stealing frosting as I was preparing the cake, because it’s so delicious! Will definitely be making this again and again and again!
Do you think I could substitute an espresso shot for the espresso powder? I live at high altitude, so the cake will need the extra liquid anyway. Your thoughts are much appreciated.
Hi Mandie, we normally wouldn’t recommend using liquid espresso because of the added moisture it will bring to the cake. However, we don’t have any experience baking at high altitude so if you decide to experiment by adding additional liquid, please do let us know how it goes!
Baked this cake for a friend. Wow. It was amazing. Worth all the time and effort put into it.
The cake and frosting were good. But that is the first and last time I will prep my pans like that. I bake cakes weekly and have never struggled to get them out of my pans. And the edges were hard. Plus this recipe would work better in 8″ pans. And you need more peanut butter frosting. I skimped alot on the crumb coat and barely used what you suggested for the layer and did not have any left over for the little bit of decorating
Made this recipe today, using Cup for Cup, gluten free flour. It was amazing. No gluten free aftertaste like you normally have. Everyone loved this cake, it was well worth the effort.
Do I have to have mini chocolate chips? I did not see mini there or on the Reeses
Hi Diane! Regular sized chocolate chips may be too heavy for the batter to suspend while baking and they could fall to the bottoms of the cakes.
I need to make this cake the night before my husband’s birthday. How would you suggest I store it please? Should I leave it at room temperature in a cake container? I’m worried that wrapping it in clingfilm will mess up the ganache! Thank you!
Hi Amy, if you have a cake carrier or cake box, that’s the best way to store a cake without covering it directly with plastic wrap. We’d recommend storing it in the refrigerator and then if you’d like to, take it out of the refrigerator a while before serving to bring it to room temperature. Hope it’s a hit!
This cake is fantastic. My new go to.
What a delicious cake! You weren’t kidding when you said it was rich. Everyone was a huge fan. I do prefer to have it served at room temperature over chilled as the peanut butter frosting melts in your mouth. It’s already been requested to make again.
Hi Sally, I followed all the instructions on the recipe, but my cakes sank in the middle, any idea what went wrong?
Hi Levi, a little sinking is normal for chocolate cakes, but it can also mean that they were slightly under baked. An additional minute or two in the oven will help for next time! Be sure your baking powder and baking soda are fresh, too. Hope you enjoy the cake!
Do you think I could make the cake part of this recipe and then use your espresso frosting recipe instead of pb? I’ve made this pb choc cake recipe and LOvE it! The cake part is so good just wondering if I could play around with different frostings (would probably leave off the ganache)
Hi Marisa, absolutely! Sounds like a delicious combination. Let us know how it goes!
Hello!! Would this cake bake well in a 12×17″ pan at a reduced bake time of appr 10 – 12minutes?
Hi Del, here is everything you need to know about cake pan sizes and conversions. This recipe makes about 6–6.5 cups of batter, or around 1400g. We’re unsure of the exact bake time for that pan, but keep a close eye on it and use a toothpick to test for doneness.
Hi. I know you suggest using the linked cupcake recipe if we wanna make cupcakes but could I just halve this recipe instead?
Hi Elly, yes, that should work just fine. You should get around a dozen and a half cupcakes.
This recipe was amazing! The cake was moist and delicious and the peanut butter frosting was absolutely divine.
I made this for a dinner with friends, and everyone loved it! I usually offer to send dessert home with them…but not this time.
Nice but this is Zoe François own recipe!!!
Hi Anies, I’m a huge fan of Zoë François, and respect her greatly. I take this seriously, as I would never intentionally use someone else’s recipe as my own without proper credit. I don’t see anywhere on her website where she has this exact recipe. Her smaller chocolate peanut butter cakelettes, published in 2021, are similar, but the cake batter is different and she uses a chocolate peanut butter buttercream. Is that the recipe you are referring to? I don’t see anything exactly like this in her Cakes cookbook either. Could you let me know which recipe, so I can look into it further?
I made this cake as the second layer cake I’ve ever made, and it came out both beautiful, and delicious. I followed the instructions pretty much exactly except for substituting a half cup of espresso to replace the optional espresso powder, and the half cup coffee/hot water. The only negative I had was that most of my mini chocolate chips ended up being in the last cake I poured because they had sunk to the bottom of my mixing bowl. Next time I’m going to just add a third of a cup to each cake pan after I get them poured, and mix them in there.
Approx how many cups of batter does this make? I’m making cakes for my twins bday and was going to do you funfetti which is 8cuos and was looki mg for a chocolate cake that will be about the same size.
Hi Abby, this recipe makes about 6–6.5 cups of batter, or around 1400g.
I’m a huge fan of all of Sally’s recipes and I bake a lot. I’ve made many of her recipes and make them exactly as the recipe states. I was super excited about this one, but it was just okay in the end. I mean, it’s good, but I guess after making Sally’s Dark Chocolate Mousse Cake (DCMC), this one just pales in comparison. If you’ve made the DCMC, just know this one doesn’t come close. The DCMC, out of all the many desserts I’ve made, is THE NUMBER ONE of our family. So if you’re considering a chocolate cake, I would just do the DCMC instead of this one.
I followed your recipe precisely and I’m wondering why your layers are at least twice what mine are. Looks almost as if you used 8 inch pans. What could have caused this?
Hi Katy, you can use 8 inch pans for thicker layers, the bake time will be longer. We use 9 inch pans!
Is there a way to make this with gluten free flour
Hi Gina, We have not tested this recipe with gluten free flour but let us know if you try it!
I made this for New Year’s Eve and it was a huge hit (my first time making a “fancy” cake). If I wanted to make with a different buttercream (say strawberry or vanilla or peppermint) how much should I scale one of Sally’s standard frosting recipe? I assume I need more frosting than the normal recipes for frosting (which are usually enough for a two layer cake).
Hi Julie! You could make a double batch of our strawberry frosting for this three layer cake, or follow these ratios for enough vanilla frosting. So glad you enjoyed this cake!
I want to make this so badly, but small, like in 4″ pans, as a personal birthday cake. Do you think halving the recipe would work well for that scenario?
Hi Mollie! Here is everything you need to know about converting recipes to different Cake Pan Sizes.
I made this cake and it was excellent. I got so many compliments
This looks amazing. I am making it as I type and realized I’m unsure whether to use salted or unsalted butter in the frosting. Please clarify. Thank you!
Unsalted!