

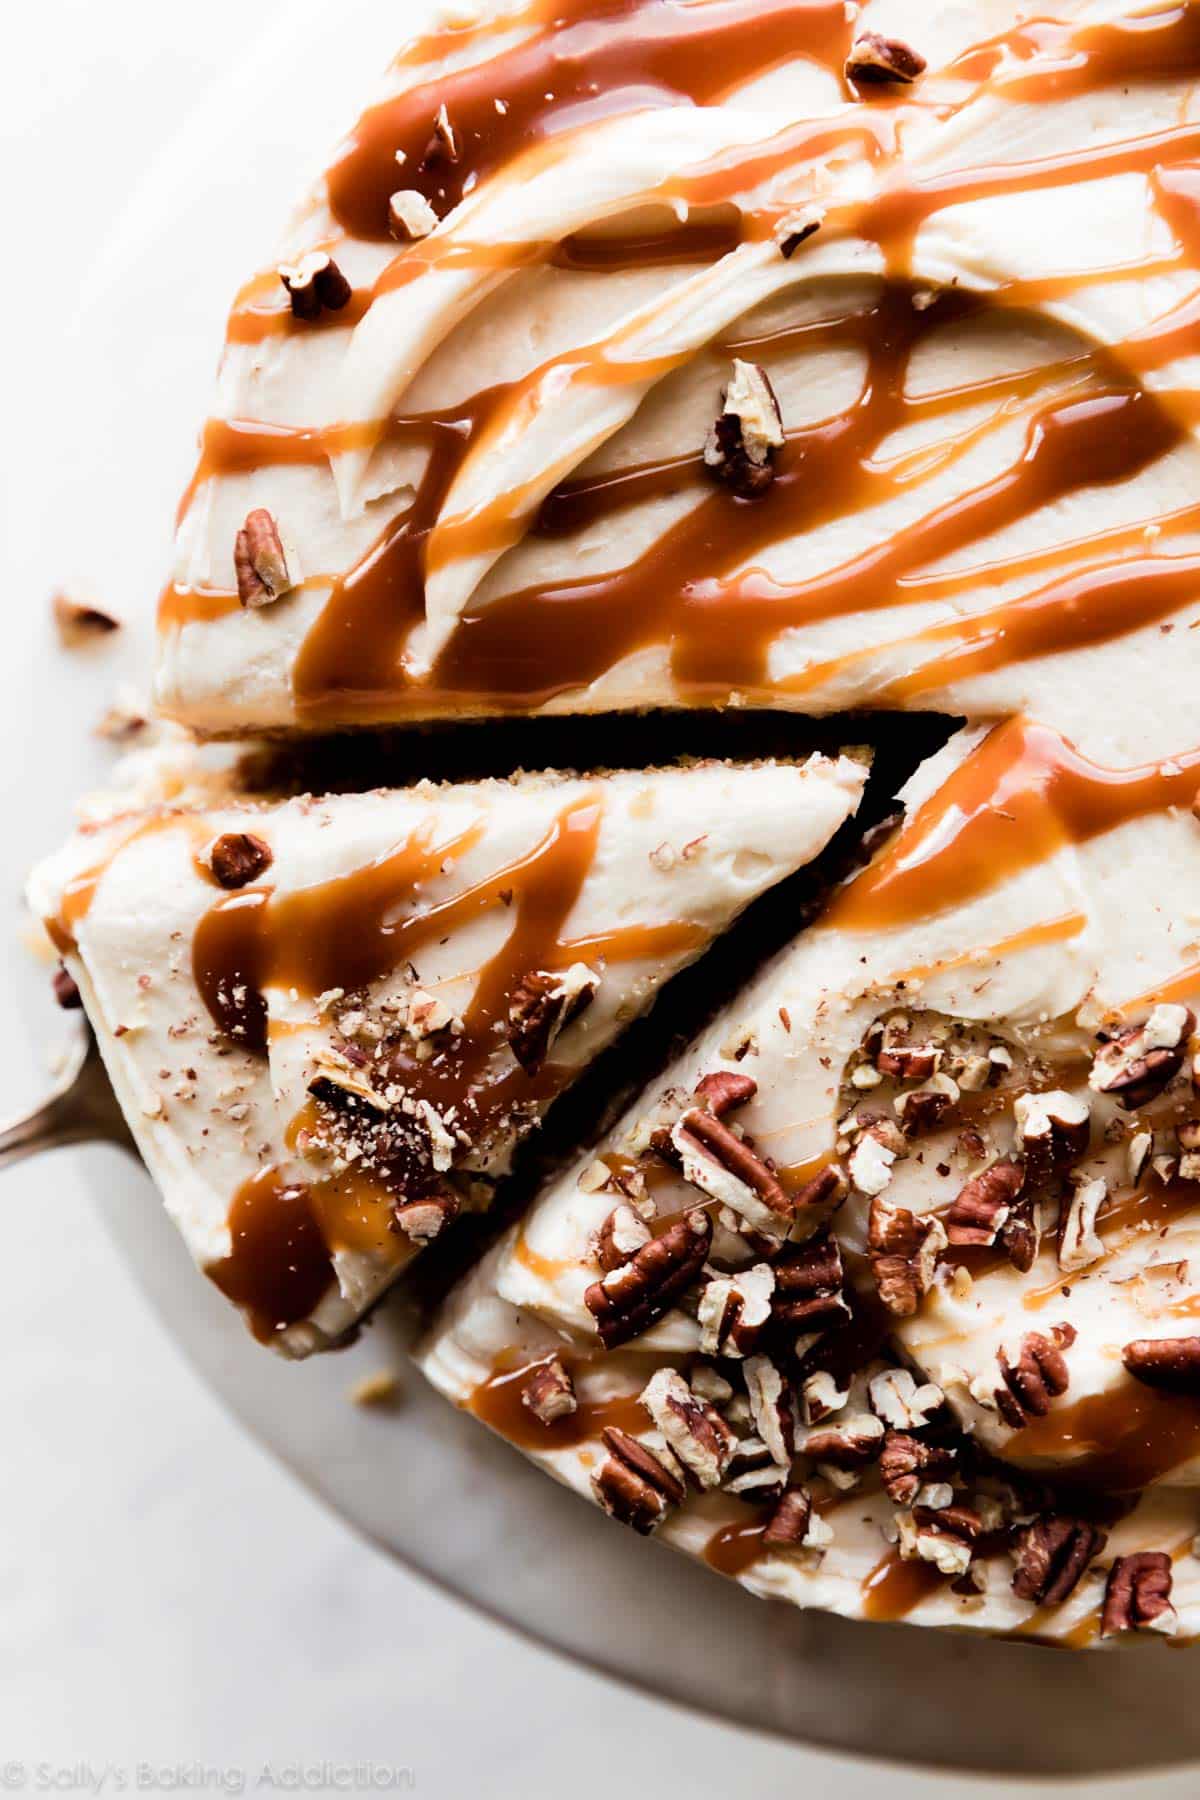
This unique and absolutely divine burnt sugar caramel cake gets its flavor from burnt sugar syrup. Cook sugar until caramelized, then add boiling water. We’ll use the syrup in both the cake and frosting. Add salted caramel for extra flavor and toasted pecans for a lovely garnish. It’s soft, buttery, and totally worth every minute of prep time.

It’s been a year in the making. I’m proud to finally share my version of caramel cake, a new cake recipe inspired by a favorite that my mother-in-law enjoyed when she was younger.
What is Burnt Sugar Caramel Cake?
This burnt sugar caramel cake is a wonderfully sweet and buttery cake flavored with homemade burnt sugar syrup. The syrup combines caramelized sugar and water, a mixture you cook on the stove until it’s dark amber in color. The cake does not taste burnt, bitter, or charred. Rather, it tastes like caramel and caramelized sugar, the same topping used for creme brûlée! We’ll flavor the frosting with burnt sugar syrup as well. Inside the cake and frosting, the syrup tastes like caramel. In my experience, this is the only from-scratch caramel flavored addition that (1) provides flavor and (2) doesn’t ruin the cake’s texture.
Behind the Recipe
This is not the exact recipe that my mother-in-law used to enjoy. Sadly, she was unable to find her original. She tried a few online recipes for burnt sugar cake, but none of them lived up to her memories. I researched a few recipes and after testing them myself, I was pretty disappointed at the dense texture and lack of flavor. I tried adding brown sugar and more vanilla for extra flavor, but nothing proved successful. So I turned to my white cake recipe, a cake that’s consistently soft and flavorful. My white cake is the starting point for strawberry cake, espresso chocolate chip cake, cookies & cream cake, pistachio cake, and coconut cake because it’s ALWAYS a winner.
My MIL said it’s the only burnt sugar cake most resembling what she enjoyed growing up!
How to Make Burnt Sugar Caramel Cake
- Make Burnt Sugar Syrup: After cooking it, cool the syrup before using in the recipe. Use half in the cake batter and half in the burnt sugar frosting.
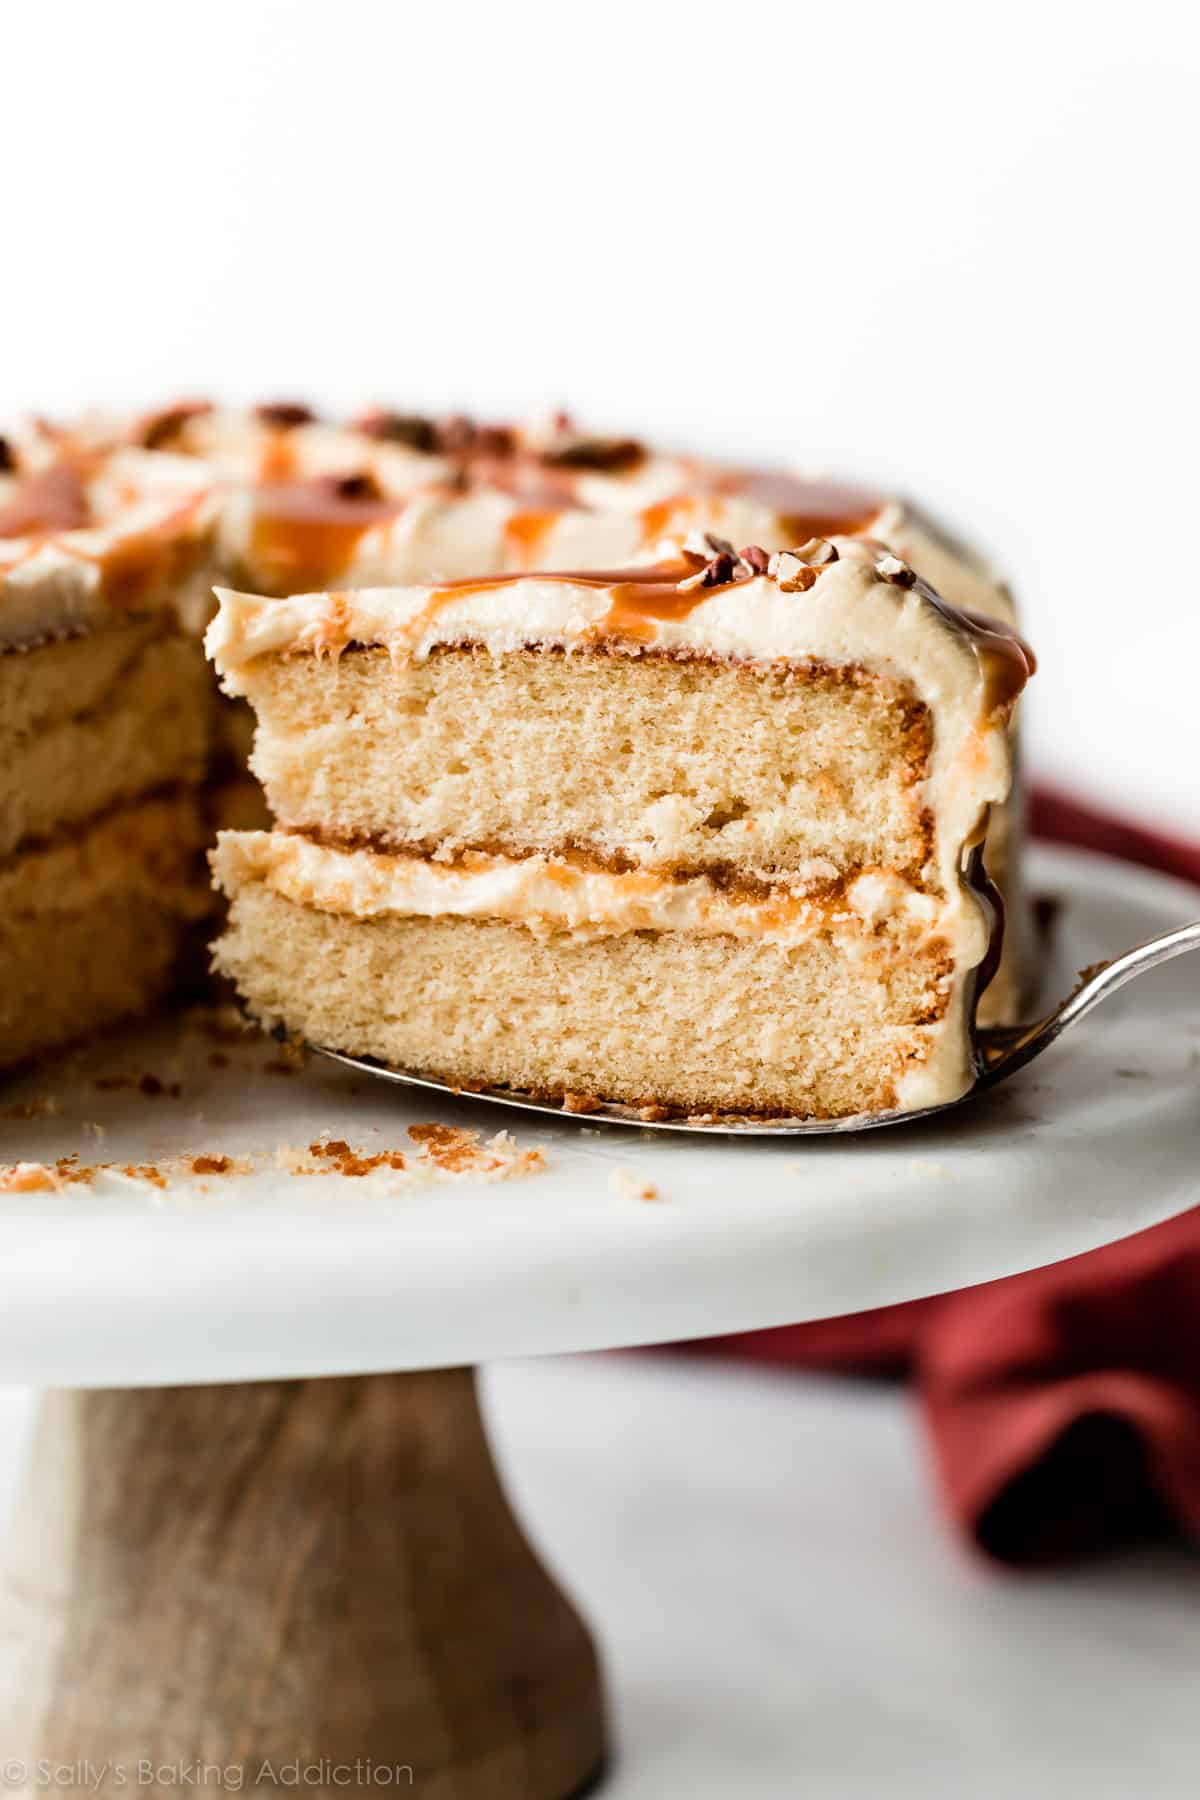
- Prepare Cake Batter: Since we’re adding a liquid (the sugar syrup), reduce the sugar and milk in my white cake recipe. We’ll also leave out 1 egg white to really ensure that this cake isn’t too wet. Cake flour promises a soft crumb, egg whites (no yolks) promise a fluffy crumb, and sour cream promises a moist crumb. For best results, do not make any ingredient substitutions.
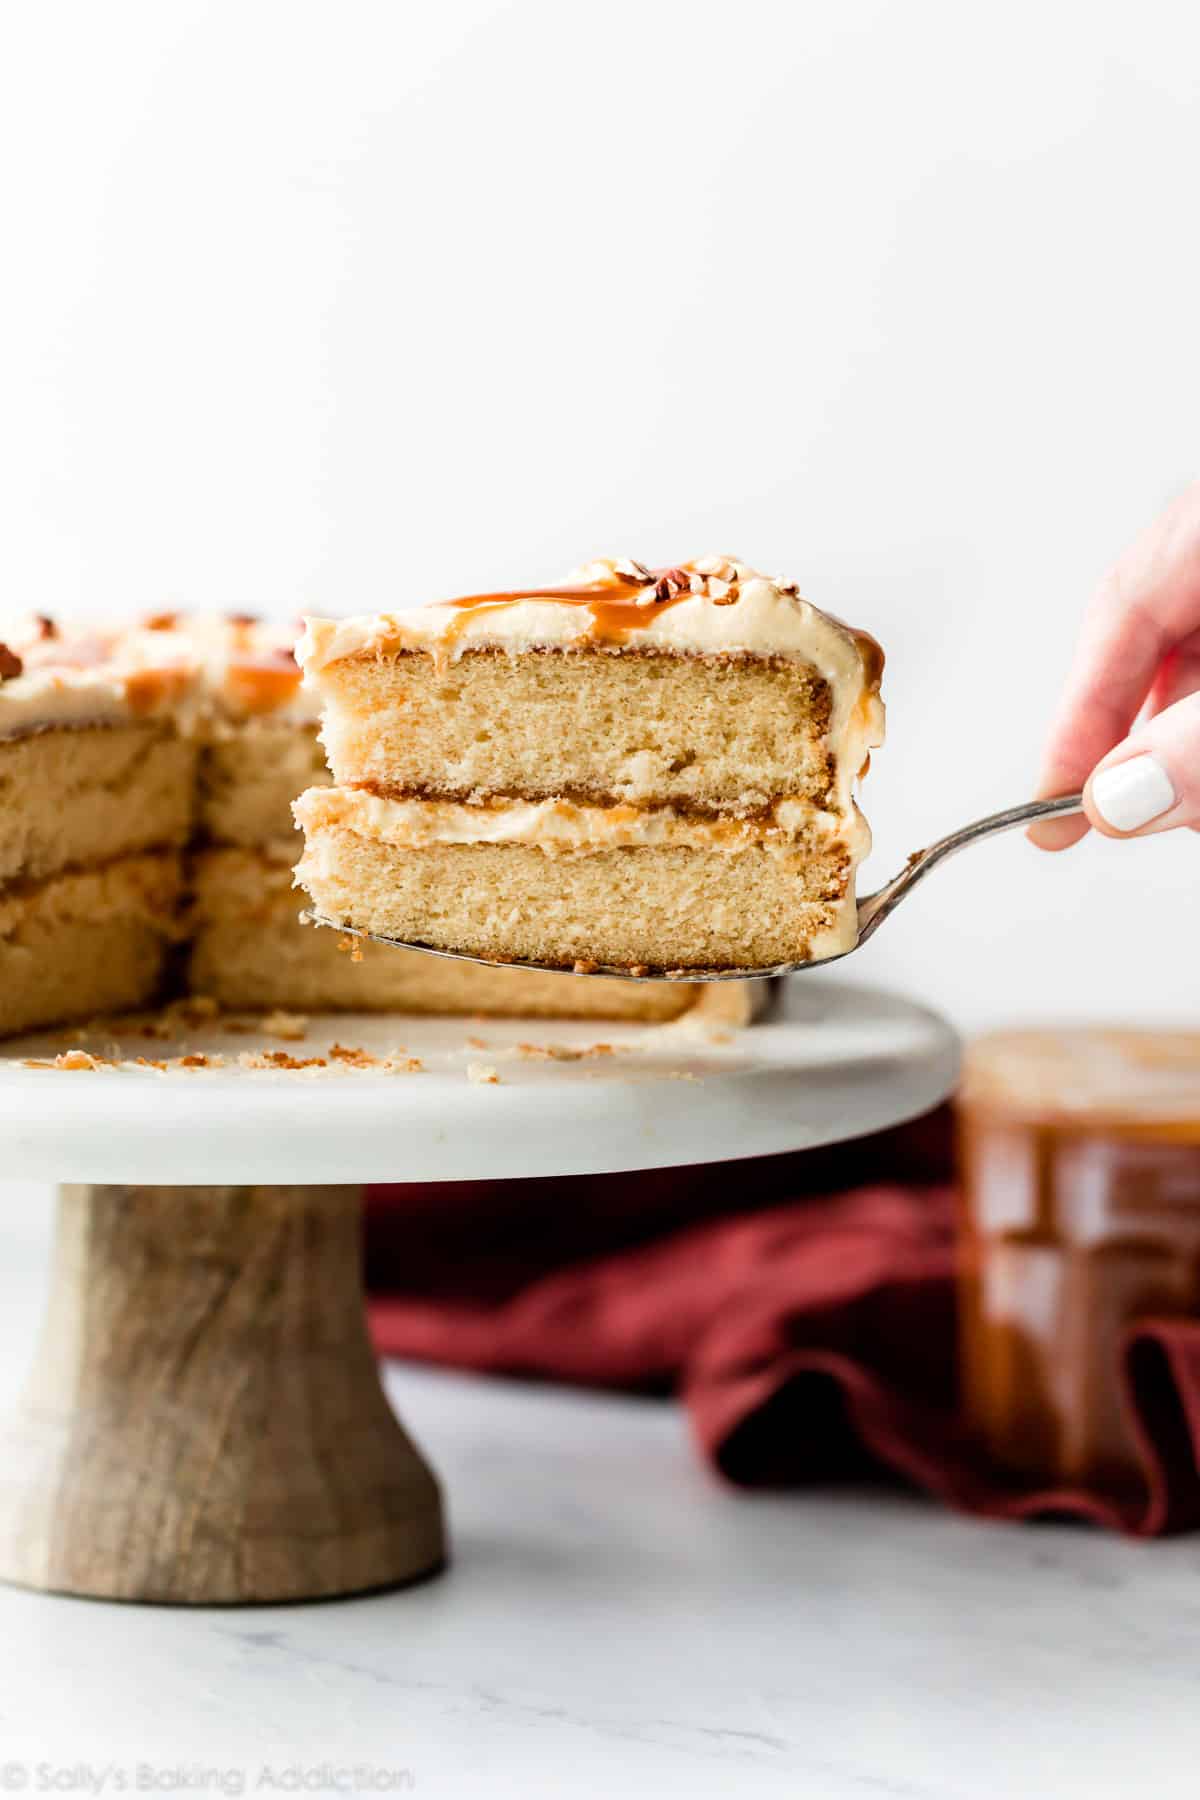
- Bake the Cakes: As a result of the burnt sugar syrup cooking, the cakes develop a golden crust around the edges. For a 3 layer or 9×13 inch cake, see recipe notes.
- Prepare Salted Caramel: To boost the caramel flavor in this cake, I highly recommend filling and garnishing the cake with my 4 ingredient salted caramel. You can even prepare the salted caramel a few days ahead of time.
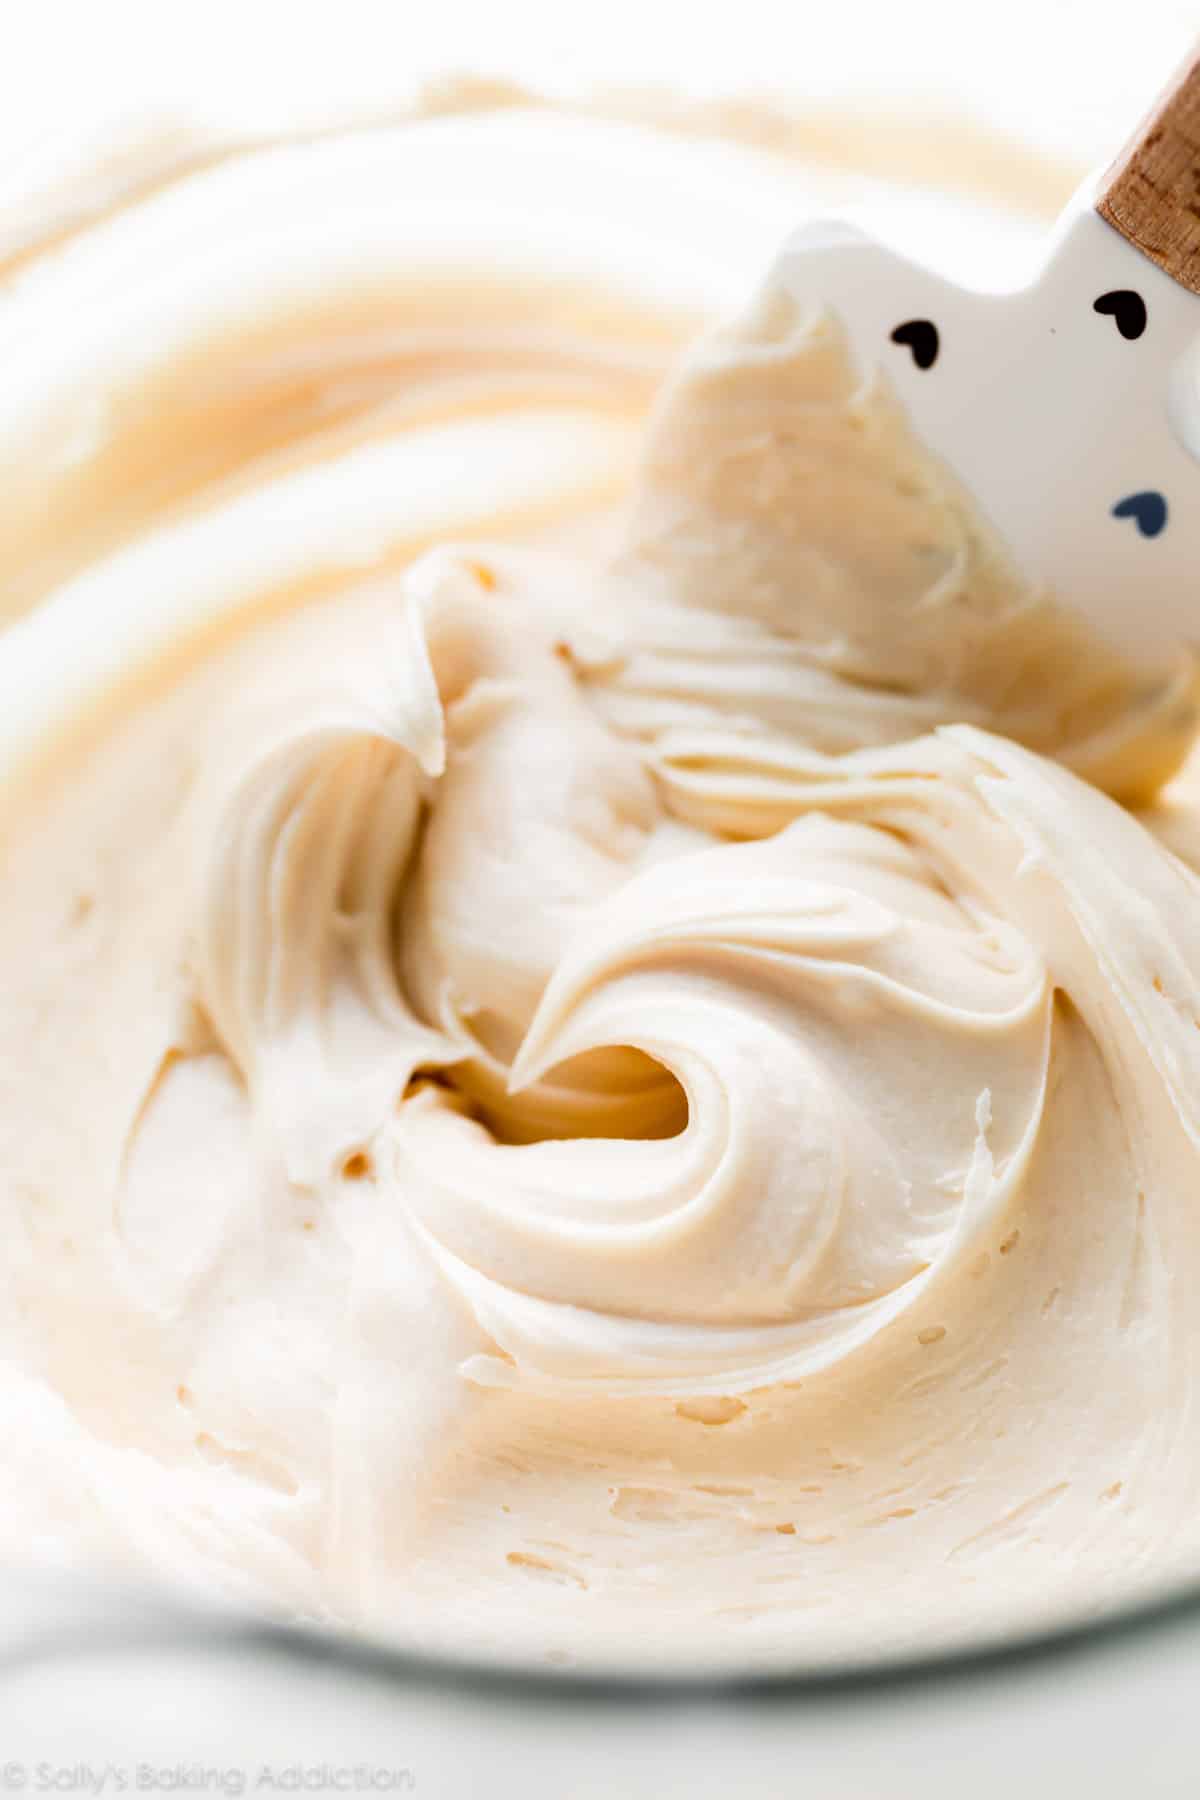
- Make the Frosting: The burnt sugar frosting is just like my vanilla buttercream, but we’ll add burnt sugar syrup for flavor. To complement the flavor, use extra salt. If you love salty sweet, this is the frosting for you!
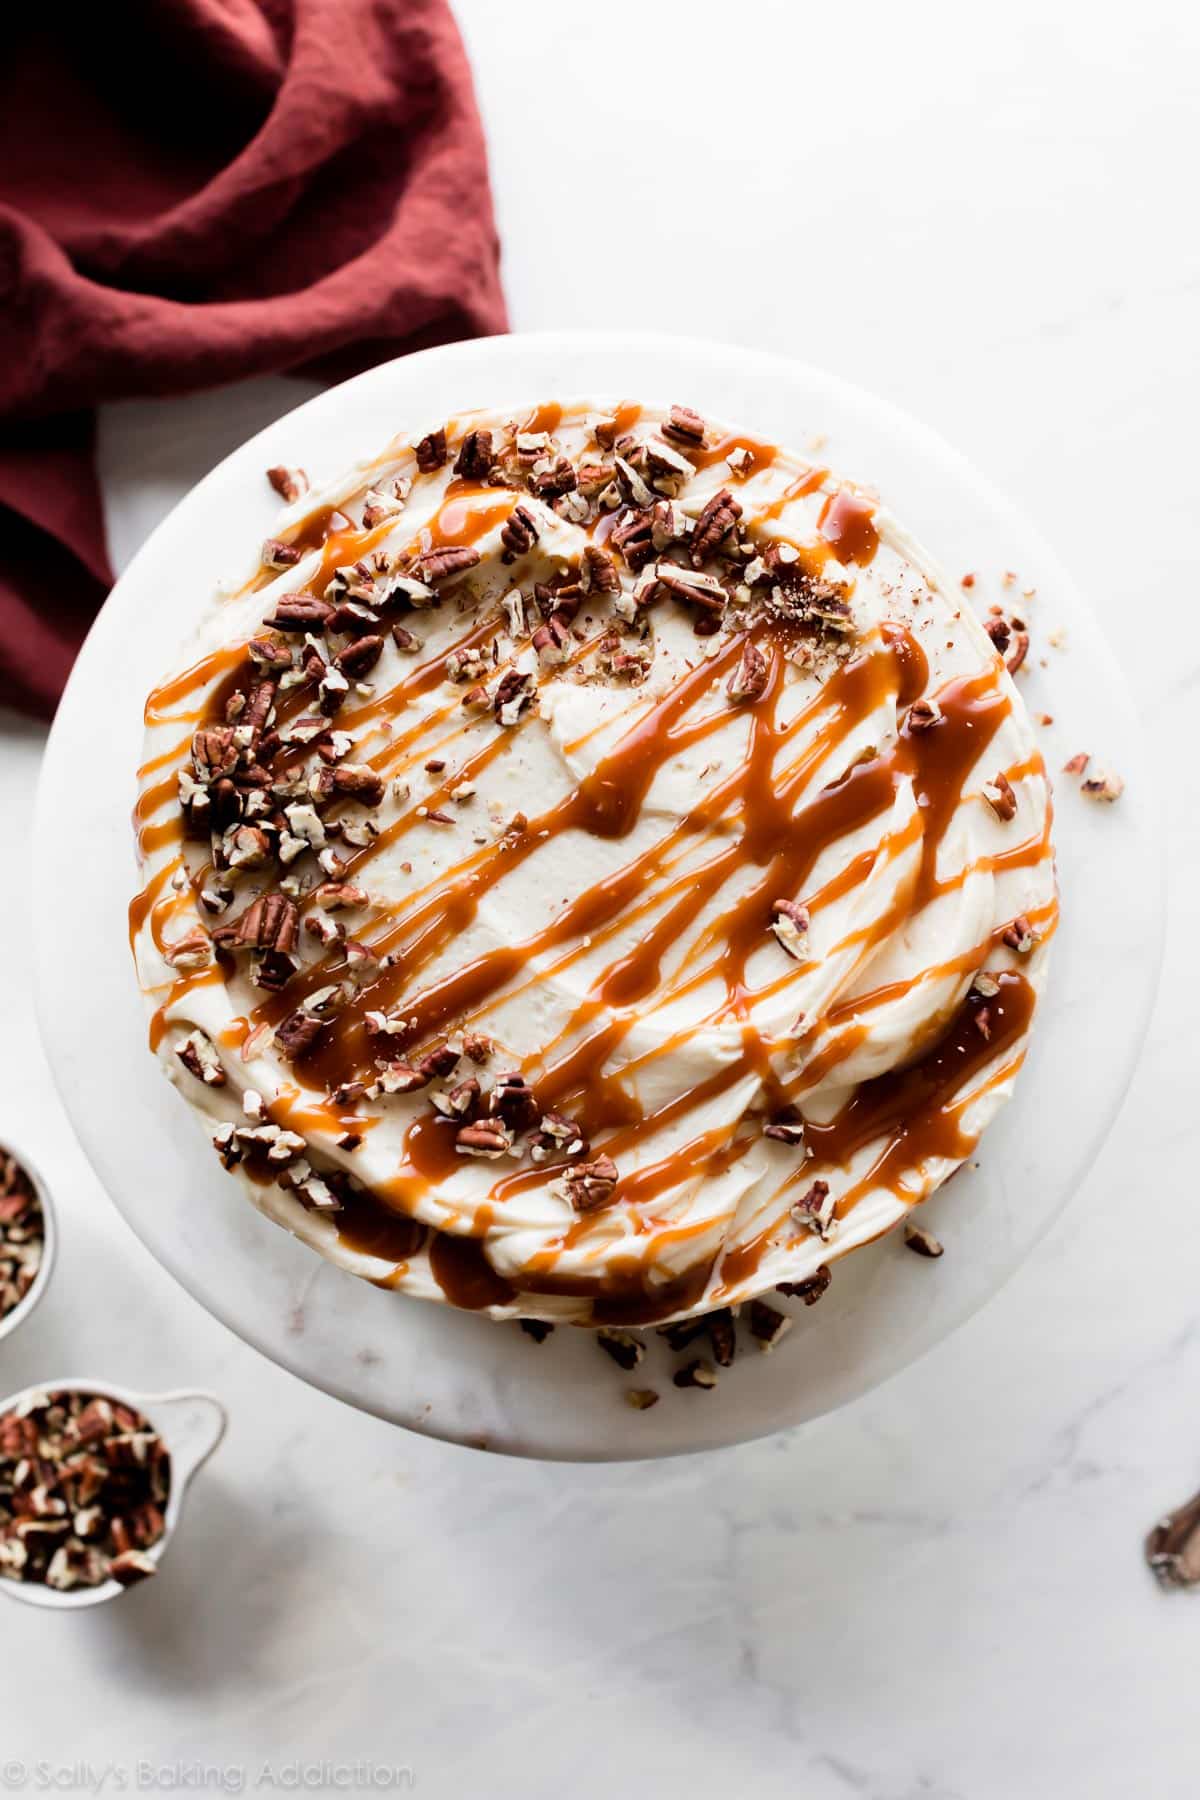
- Assemble & Frost the Cake: 2 layer cakes are pretty easy to decorate. For a little garnish, I love topping the cake with toasted pecans. See recipe note for instruction.
Video Tutorial: Burnt Sugar Caramel Cake
Prepare the Burnt Sugar Syrup First
The most important step in this cake recipe is preparing the burnt sugar syrup. You need a sturdy 3 quart pan to ensure the cooking sugar doesn’t crystalize. (This pan is great quality for its price.) Cook 1 cup granulated sugar over medium heat, stirring constantly with a wooden spoon. Wooden spoons do not conduct heat and are ideal for candy-making. After chipping a few of my old wooden spoons, I just bought this set and LOVE them!
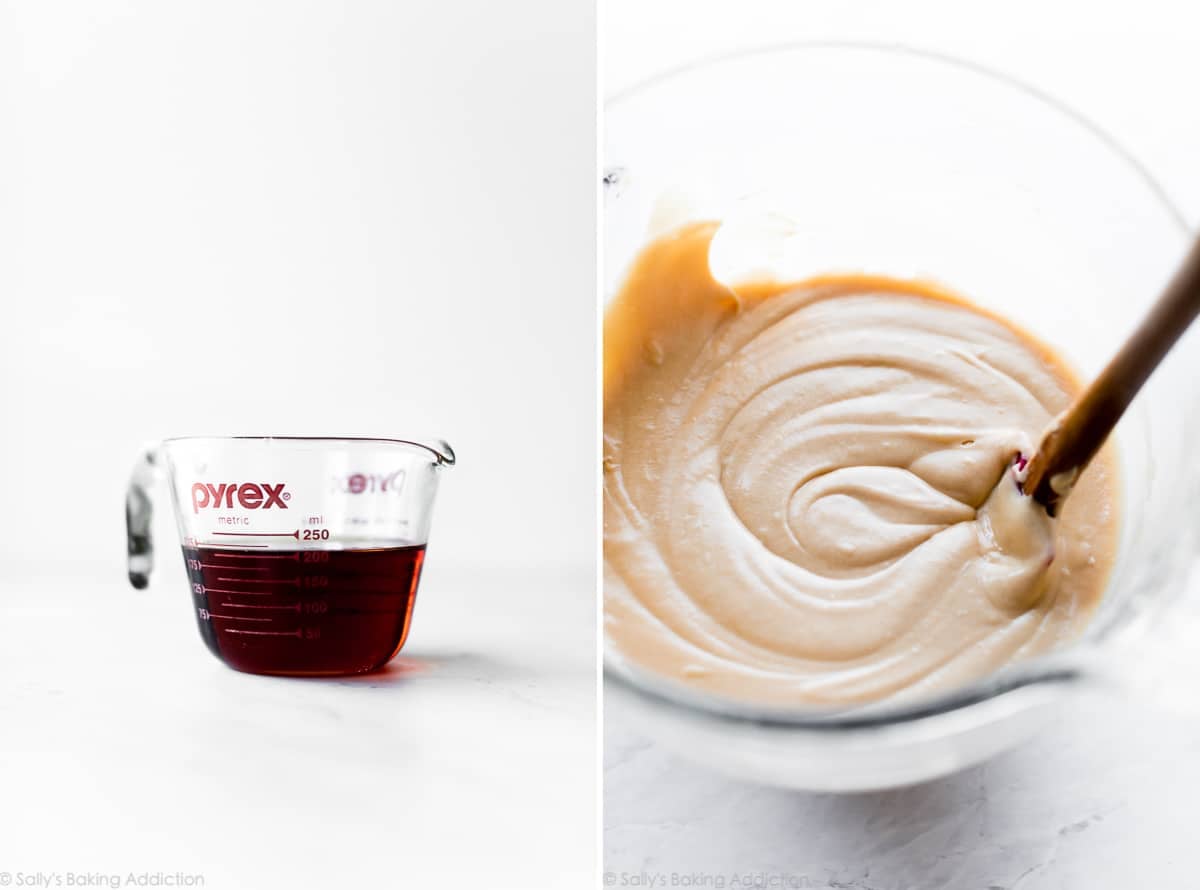
After about 5 minutes, the sugar begins to melt. If you notice any clumps, try to break them up with your spoon. So far in the process, this is the same exact way we start salted caramel. Once there are no lumps and the sugar is golden brown, about 8-10 minutes total, very slowly drizzle in 3/4 cup of boiling water. Have boiling water at the ready for this step because in the world of candy-making, timing and temperature are key. Wear an oven mitt because the water will rapidly sizzle and steam.
You don’t need a candy thermometer for this, but you can use it if you have one.
After you add all of the water, cook the syrup for an extra 3 minutes over low heat then cool the syrup completely. It will thicken as it cools. Once cool, you can use it in the cake batter and frosting. The cake batter is light beige and smells incredible. Steal a taste!
Buttercream
Same goes for the burnt sugar frosting—make sure you steal a few tastes! You need:
- Unsalted Butter: Make sure you’re using room temperature butter.
- Confectioners’ Sugar
- Burnt Sugar Syrup
- Milk
- Vanilla Extract
- Salt
I love this salty sweet frosting. It’s similar to my salted caramel frosting, but has a much creamier consistency. The burnt sugar cake and burnt sugar frosting are definitely worthwhile on their own, but this entire cake is greater than the sum of its parts. Together, they’re the perfect match.
Don’t Forget the Salted Caramel!
This burnt sugar caramel cake wouldn’t be as impressive without salted caramel. Drizzle salted caramel in between the cakes and on top. If the salted caramel is too warm, however, it will melt the frosting. See my recipe instructions below.
Toasted nuts add a flavorful and textural flair!
3 Success Tips
Leaving you with 3 success tips so you can enjoy this old-fashioned favorite:
- Watch the video tutorial and read the recipe in full before beginning. Follow the recipe closely and make no ingredient substitutions. I tested several different options and nothing lived up to the careful recipe below.
- Since it must be cool, I recommend preparing the burnt sugar syrup 1 day ahead of time.
- Don’t leave out the salted caramel.
Beginner Baker? Let Me Help:
- How to Prevent a Dry or Dense Cake
- Top 10 Cake Baking Tips
- How to Freeze Cake
- Homemade Cake Flour Substitute
- Here’s What Room Temperature Butter Means
And if you are looking for more cozy fall flavors, here is a list of 30+ fall cake ideas.
Print
Burnt Sugar Cake
- Prep Time: 1 hour
- Cook Time: 24 minutes
- Total Time: 4 hours, 30 minutes
- Yield: serves 10-12
- Category: Dessert
- Method: Baking
- Cuisine: American
Description
The trick to burnt sugar cake is to use burnt sugar syrup as its main flavor. Make sure you prepare the burnt sugar syrup ahead of time so that it can properly cool and thicken. While you’re at it, prepare the salted caramel ahead of time too.
Ingredients
Burnt Sugar Syrup
- 1 cup (200g) granulated sugar
- 3/4 cup (180ml) boiling water
Cake
- 2 and 1/2 cups (285g) cake flour (spooned & leveled)
- 2 teaspoons baking powder
- 1/2 teaspoon baking soda
- 1 teaspoon salt
- 3/4 cup (12 Tbsp; 170g) unsalted butter, softened to room temperature
- 1 cup (200g) granulated sugar
- 1/2 cup (120ml) cooled burnt sugar syrup
- 4 egg whites, at room temperature
- 1/2 cup (120g) sour cream, at room temperature
- 2 teaspoons pure vanilla extract
- 1/2 cup (120ml) whole milk, at room temperature
Burnt Sugar Frosting
- 1 cup (16 Tbsp; 226g) unsalted butter, softened to room temperature
- 4 cups (480g) confectioners’ sugar
- 1/2 cup (120ml) cooled burnt sugar syrup
- 1 teaspoon pure vanilla extract
- 2 Tablespoons (30ml) whole milk or heavy cream
- 1/4 teaspoon salt
For Assembly
- Homemade Salted Caramel, cooled
- 1/2 cup (50g) chopped pecans*
Instructions
- For best success, read the recipe in full and watch the video tutorial in the post above before starting.
- Prepare the burnt sugar syrup first so it has time to cool. Make sure you have boiling water at the ready. For the burnt sugar syrup, place sugar in a medium saucepan over medium heat. Best to use a 3 quart heavy-bottomed quality saucepan. Stirring constantly with a wooden spoon, cook until the sugar has completely melted and is amber brown, about 8-10 minutes. If the sugar is clumpy, break up the lumps with your wooden spoon. A candy thermometer is not necessary, but if you’re using one, the sugar temperature should reach about 300°F (149°C) when it’s ready. Turn the heat to low and very carefully and slowly drizzle in the boiling water, a little at a time. Stir after each addition and stand back, as the mixture will rapidly sizzle and bubble. After all of the boiling water is stirred in, stir and cook the sugar syrup for 3 more minutes on low. Turn off the heat and let it cool completely, overnight preferred. It’s imperative that the sugar syrup is completely cool. You will have about 1 cup of syrup.
- Preheat oven to 350°F (177°C). Grease two 9-inch cake pans, line with parchment paper rounds, then grease the parchment paper. Parchment paper helps the cakes seamlessly release from the pans. (If it’s helpful, see this parchment paper rounds for cakes video & post.)
- Whisk the cake flour, baking powder, baking soda, and salt together. Set aside.
- Using a handheld or stand mixer fitted with a whisk attachment, beat the butter and sugar together on high speed until creamed, about 2 minutes. Scrape down the sides and up the bottom of the bowl with a rubber spatula as needed. With the mixer running on medium speed, pour in 1/2 cup of the cooled burnt sugar syrup. Beat until combined. Scrape down the sides and up the bottom of the bowl as needed. Beat in the egg whites, sour cream, and vanilla extract. With the mixer on low speed, add the dry ingredients just until combined. With the mixer still running on low, slowly pour in the milk until combined. Do not over-mix. The batter will be slightly thick.
- Pour batter evenly into prepared cake pans. Bake for 23-25 minutes or until the cakes are baked through. As a result of the burnt sugar syrup cooking inside the cake batter, the cakes brown nicely on top and on the sides. To test for doneness, insert a toothpick into the center of the cake. If it comes out clean, it is done. Allow cakes to cool completely in the pans set on a wire rack.
- As the cakes cool, I suggest making the salted caramel. The salted caramel adds necessary flavor. We’ll use it as a filling and garnish. When ready to use in step 9, make sure the salted caramel isn’t too hot anymore. If it’s too hot, it will melt the frosting. If it’s too cool, it won’t drizzle. Let it cool for at least 30 minutes before using. If you prepared the salted caramel ahead of time and it became too cool or too thick, microwave it for 5-10 seconds or JUST until it’s drizzle-able again. (It won’t be too hot at this point.) You can also toast the pecans during this time, too. See recipe note.
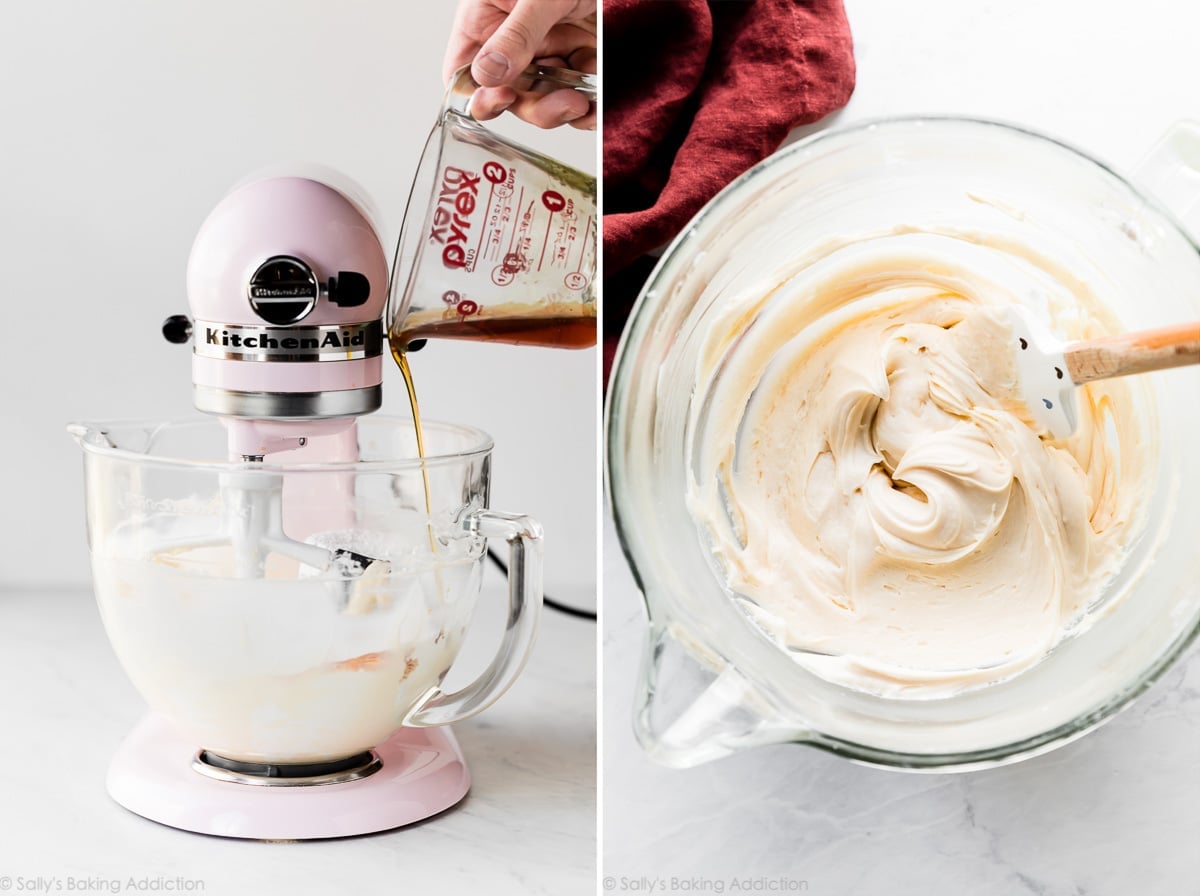
- Make the frosting: In a large bowl using a handheld mixer or stand mixer fitted with a paddle attachment, beat the butter on medium speed until creamy, about 1-2 minutes. Add confectioners’ sugar, remaining 1/2 cup of cooled burnt sugar syrup, vanilla extract, milk/cream, and salt. Beat on low speed for 30 seconds, then increase to high speed and beat until completely combined, about 2 minutes. Add more confectioners’ sugar if frosting is too thin or more milk/cream if frosting is too thick. Taste. Add more salt if desired. (I usually use 1/2 teaspoon of salt total. I like this frosting salty/sweet.)
- Assemble and frost: First, using a large serrated knife or cake leveler, slice a thin layer off the tops of the cakes to create a flat surface. Discard (or crumble over ice cream!). If you have any leftover burnt sugar syrup, drizzle over leveled cakes. I usually don’t have any leftover, but this is a great place to use any last drops if you have some. Place 1 cake layer on your cake stand, cake turntable, or serving plate. Using a large icing spatula, evenly cover the top with frosting. Drizzle 1/4 cup (73g) of salted caramel on top of the frosting. Top with 2nd cake layer. Refrigerate the cake for at least 30-45 minutes before finishing the frosting and garnish. The caramel inside the cake must “set.” After chilling in the refrigerator, spread the remaining frosting all over the top and sides. Run a bench scraper around the cake to smooth out the sides, if desired. Garnish with toasted pecans and more salted caramel. Slice and serve.
- Cover leftover cake tightly and store in the refrigerator for up to 5 days.
Notes
- Make Ahead & Freezing Instructions: Prepare burnt sugar syrup up to 3 days ahead of time. Cover and store at room temperature until ready to use. Prepare the salted caramel up to 1 week ahead of time. Cover and store in the refrigerator until ready to use. You can prepare the cake layers ahead of time too. Wrap the individual baked and cooled cake layers tightly and refrigerate for up to 2 days or freeze up to 3 months. (See How to Freeze Cake for instructions.) Bring cake layers to room temperature, then continue with step 7. Frosted cake freezes well, up to 3 months. Thaw overnight in the refrigerator, then bring to room temperature before garnishing with caramel and pecans and serving.
- Special Tools (affiliate links): Heavy-Bottomed Saucepan | Wooden Spoon | Candy Thermometer (optional) | 9-inch Round Cake Pans | Glass Mixing Bowl | Whisk | Electric Mixer (Handheld or Stand) | Rubber Spatula | Cooling Rack | Cake Turntable | Large Icing Spatula | Bench Scraper | Cake Carrier (for storage)
- 3 Layer Cake or 9×13-Inch Cake: You can also prepare this cake as a 3 layer cake or 9×13-inch sheet cake, but the texture tastes best at the thickness of a 2 layer cake. I highly recommend sticking to a 2 layer cake. For a 3 layer cake, though, divide batter between three 8-inch or 9-inch cake pans in step 3 and bake for 20-22 minutes or until a toothpick inserted in the center comes out clean. For a 9×13-inch cake, pour the batter into a greased and lightly floured 9×13-inch pan and bake for 40 minutes or until a toothpick inserted in the center comes out clean. Top with a thick layer of frosting and drizzle salted caramel all over the top.
- Cupcakes: Recipe yields 30-36 cupcakes. Fill cupcake liners 2/3 full with batter. Bake for 20-22 minutes or until a toothpick inserted in the center comes out clean.
- Egg Whites: Egg whites (no yolks) are KEY to the cake’s fluffy texture. Here are recipes using leftover egg yolks.
- Why Room Temperature? All refrigerated items should be at room temperature so the batter mixes together easily and evenly. Read here for more information. Instead of sour cream, you can use plain yogurt. The cake won’t taste as rich, but it’s a fine substitute.
- Salted Caramel: No matter which size cake you make, or if you make cupcakes, you’ll have salted caramel leftover. Here are 50 ways to use salted caramel if you need inspiration for the leftovers. I don’t recommend halving the salted caramel recipe—make the whole recipe (1 cup).
- Toasted Pecans: Toasting the pecans is optional, but adds incredible flavor to the garnish. To toast, preheat the oven to 300°F (149°C). Spread chopped pecans onto a parchment paper or silicone baking mat lined baking sheet. Toast until slightly darkened, about 5-7 minutes. Cool before using as garnish.


Reader Comments and Reviews
The recipe says use a whisk attachment, but the video shows a paddle. Which would you recommend?
Hi Dan, you can use either for this cake batter.
This cake was absolutely delicious and looked stunning despite my lack of decorating skills. Will definitely make again.
I’m planning to make this recipe in 8-inch cake pans (I don’t own 9-inch). I’d like to do three layers, and I know the recipe notes say that it is fine to divide the regular amount of batter this way, but I’m wondering if I should 1.5x the recipe to get nice thick layers like pictured?
Hi Sarah! Your layers will be a bit thicker using 8 inch pans instead of 9 inch for a three layer cake. You can certainly make more batter if you would like extra thick layers if you prefer – let us know what you try!
Thanks!! I ended up just using one regular batch. On the slightly thinner side but definitely still useable for layering. The cake is delicious too. I could not stop eating all the pieces I leveled off the tops haha. I frosted it with the browned butter cream cheese icing from Sally’s banana cake recipe and it was incredible.
Can I use this same recipe for a 3 tiered 6 inch cake? Thanks for all of your amazing recipes, Sally!
Hi Eleni, you sure can. There will be a bit too much batter, but fill your pans about half way and then use the leftovers for a few cupcakes (see recipe notes for cupcakes details). Enjoy!
I’m looking forward to making this cake this weekend. What would recommend i do for a double barrel 9-in cake. My plan is to make two 3 layer, 9-inch cakes. Should I triple this recipe to get 6 decent sized 9 inch layers??
Thanks!!
Hi Yas, for 6 layers, you’ll need 3x this recipe. For best results, we recommend making three separate batches rather than tripling. Hope this helps!
Oh my goodness, this cake was an absolute win! Even though I didn’t follow directions exactly (my time management skills could use some work) it turned out AMAZING! The whole family loved and my sister thought it was absolute perfection. Thanks Sally for allowing me to bring joy to my family through this!
Sally, thank you so much for this wonderful recipe. I made it for my wife’s birthday and it was the best cake we’ve had in years. The kids were in heaven for three days. I came looking for a modernized recipe (older Burnt Sugar cake recipes called for Crisco and margarine, yuck), and your detailed recipe really came through. Eating the trimmed off parts of the sponge before we dressed the cake up was a real pleasure.
Notes:
Most of the time is in the cool down of the various components (burnt sugar syrup, caramel, etc). With diligent stirring, I was able to chill all these parts down to usable temperatures in the fridge and freezer. But this cake took several hours of fairly hard work; it was tough to pull it off in time for dinner starting mid afternoon. And the one stage you can’t easily speed up is the caramel layer ‘setting’ after you stack the layers. The caramel being set really makes the cake special.
It’s an incredible amount of sugar, but that’s I guess what cakes are about. The sponge itself is delectable even without the frosting and caramel, very soft and with a great crumb. Totally edible as a standalone treat.
Hi Jack, we’re so happy to read that you and your family enjoyed this cake. Thank you for your thoughtful notes and we wish your wife a happy birthday! Thank you for including this recipe in your celebration.
Hi! I’ve tried making this recipe FIVE times, and it never comes out right. The flavors are amazing (which is why I keep trying) but the cake never bakes correctly. If I leave it the recommended time it’s still batter in the middle, but when I leave it long enough to set, the outside gets dry. I’ve made sure I’m using the right pan size, checked my oven temp, and followed the recipe to a “T.” My husband’s birthday is tomorrow and I’d love to make him this cake because he adores the flavors, but really need some help with getting it to bake correctly. Please advise.
Hi Laura, it’s possible that your oven has some hot spots which is why the layers aren’t baking correctly. For next time, you can also tent the edges of our pans with foil to help prevent the sides of the layers from over baking while allowing the middle to continue baking. Hope this helps!
I left out the milk
Still came out great!
Do you think maple syrup would work as a substitute for the burnt sugar syrup if looking to get a maple flavoured cake, or are the consistencies too different? Thanks!
Hi Katie, maple syrup is much thicker than the burnt sugar syrup, so it would take some recipe testing in order to guarantee results. Perhaps you could search for a maple-flavored simple syrup and experiment with that. If you give anything a try, we’d love to know how it goes!
Hey, love these recipes!! Baking a cake for my sister’s birthday and she wants something with chocolate and caramel. Could I do a chocolate cake base for this recipe and if yes, how would I do that?
Hi Emily, we haven’t tested this burnt sugar method with our chocolate cake. We fear with all the chocolate flavor, the burnt sugar flavor won’t come through at all. You could however, make our chocolate cake with salted caramel frosting and salted caramel drizzled on top. If you test anything, let us know!
LOVE THIS RECIPE! Have you tried bringing the burnt sugar to a hard crack and then after it hardens crush it into sugar again in the food processor and using it in the cake that way? Figure that is a way to not change your original cake recipe.
We’ve never tested this recipe that way, Katie! We are thrilled you enjoyed the cake!
Hi Sally,
Tha for the wonderful recipes you keep churning out. They always come out fantastic whenever I try them. Would love to try this recipe but can’t get my hands on sour cream in my area , can I substitute with Greek yogurt just as I do for other recipes?
Hi Madiva, absolutely! The cake won’t taste as rich, but Greek yogurt is a fine substitute.
I made this cake (great) and it inspired me to try a mash-up of this recipe and the triple-chooclate cake to turn it into a “Turtles” cake :D. Chocolate cake base, the burnt sugar icing from this recipe with about 1/4 cocoa added, caramel in the filling and all over the top. Maple-glazed pecan halves over the top as well. It is just now assembled and in the fridge for dinner tonight. I almost want to sneak a piece now, and after all, it is Father’s Day!
The cake is absolutely incredible. The salted caramel, delicious! The one problem I have here is the icing. My family decided it was MUCH too sweet, even with added salt to try to balance the sweetness. I was concerned about this when I started to make the frosting, but went with it anyway. Unfortunately, the sweetness of the icing was so overpowering that it masked the amazing flavors of the cake and caramel. Subbing in a less sweet vanilla cream cheese frosting gave amazing flavor and offered better balance. Again, the cake was absolutely fantastic and the caramel has the potential to do some serious waistline damage. All around, a great recipe with that one sub!
I made this cake for my dad’s birthday and my whole family loved it, the caramel flavour was amazing without it being too sweet. I am definitely going to be making this again.
Cant wait to try this. Just one question, can I use the egg white from the carton instead? Thanks!!
You can use carton egg whites if needed. The carton should give instructions for replacement quantities.
After reading the glowing reviews, I was pretty disappointed in this cake. I served it at a family gathering and it received the same feedback from all of us. (Note: I followed the recipe exactly.) The cake (the actual baked cake part) is waaaaaay too salty and then when adding the salted caramel + the salted icing it just becomes a salt bomb. While it was still edible and the burnt sugar/Caramel flavor comes through, the immense about of salt in the cake and salted caramel is just too overpowering to actually enjoy it. I didn’t love the flavor profile enough to make it again, but if I did, I would definitely reduce the salt drastically in the cake and then by half in the salted caramel and eliminate the salt in the icing altogether.
I would guess that you somehow oversalted…I just made this cake and we found the salt barely noticeable overall. Not even noticeable at all in the sponge part, and barely in the icing.
Making your recipes has made fall in love with my kitchen an your recipes accommodates us beginners. Thank you all the way from South Africa
Hello, I was wondering if I could sub the egg whites for 2 eggs because two egg whites, or 1/4 cup of egg whites, is the equivalent of one whole egg and egg yolks are known to have a degree of fat that softens cake. Also can I sub the 3/4 cups of butter for 1/2 cup and 1 tablespoon of oil because oil is known to keep cakes moist since unlike butter it doesn’t solidify. Do these measurements make sense to you?
Hi Lilly! For best results we recommend sticking with the recipe. Egg whites provide a fluffy crumb and reducing the butter will change the structure of the cake. Happy baking!
Hi! Can the cake part of this recipe be halved? I’d like to make it as cupcakes, but don’t need 3 dozen! TIA!
Hi Kelly, you sure can. Simply halve the recipe for fewer cupcakes. Enjoy!
Hi Sally. I made this cake for my dad’s 82nd birthday. I followed the recipe to a “tee”. It was a huge hit. Delicious flavours and a beautiful crumb. Thank-you so much. It’s a beautiful recipe and you are my baking sensai.
We’re so glad this cake was a hit for your dad’s birthday — thank you for including our recipe in the celebrations!
Love this cake!!! Made it because my husband loves “old-fashioned” desserts and it seemed like something he would like. He loved it!!! Very tasty cake with that extra kick of the burnt sugar and of course, homemade caramel. Another wonderful recipe, Sally!
Hi, Sally! I absolutely LOVE your recipes and blog, and it’s always to first place I look when I need a specific recipe!
For this one, 285 g of cake flour is about 2 cups (I’ve even calibrated my scale and measured again). So would you recommend using the weight or the spoon and leveling method — in other words 286 g OR 2 1/2 c?
Thank you!
I should also note that many of the recipes I make are from the UK, so I generally work from weights, but this time I measured before weighing, which has led to my question. Thank you!
285g in this reply…263g in the recipe above. Which is it?
Hey Sally! This is an amazing cake, I tried it and everyone loved it. I was wondering if there is a way to make this vegan?
Hi Sally,
Could you use a cream cheese frosting in place of buttercream for this cake?
Thanks! I love your cream cheese frosting recipe so much.
Hi Megan, Sure can!
Hi Stephanie, when substituting the cream cheese frosting recipe, would I simply add the 1/2 cup of burnt sugar syrup to the standard cream cheese frosting recipe?
Hi Sally! I can’t wait to make this recipe! How should I adjust to bake the cake in two 8″ round cake pans? Just increase the bake time? Thank you so much!
Hi Laura, You can bake this recipe in 8 inch pans. The bake time may be a minute or two longer because the layers will be thicker, but it’s best to keep your eye on them. Enjoy!
My Grandmother made burnt sugar cake and used a wooden spoon my Grandfather carved by hand while cooking the syrup. I made one in memory of them; using the same spoon. It turned out AMAZING! Your directions made it “doable”. THANKS for the memories.
I followed this recipe to the letter and didn’t make any substitutions but my cakes did not rise at all. 🙁
Oh my goodness – this is the best!! While it is a little labor intensive, the instructions are very clear. I made the recipe over 2 days. My husband and I agree this could be our new most favorite cake.
I made the Upgraded German Cake just before this and everyone raved.
Love your recipes. Wish I could figure out how to avoid cooking meals and just bake!!
Beautiful cake! Moist and fragrant. Salted caramel was delicious and easy to prepare as well. I divided the layers into four so that I could add more frosting and salted caramel in between. Topped it with pretzels and cake scrap crumbles