

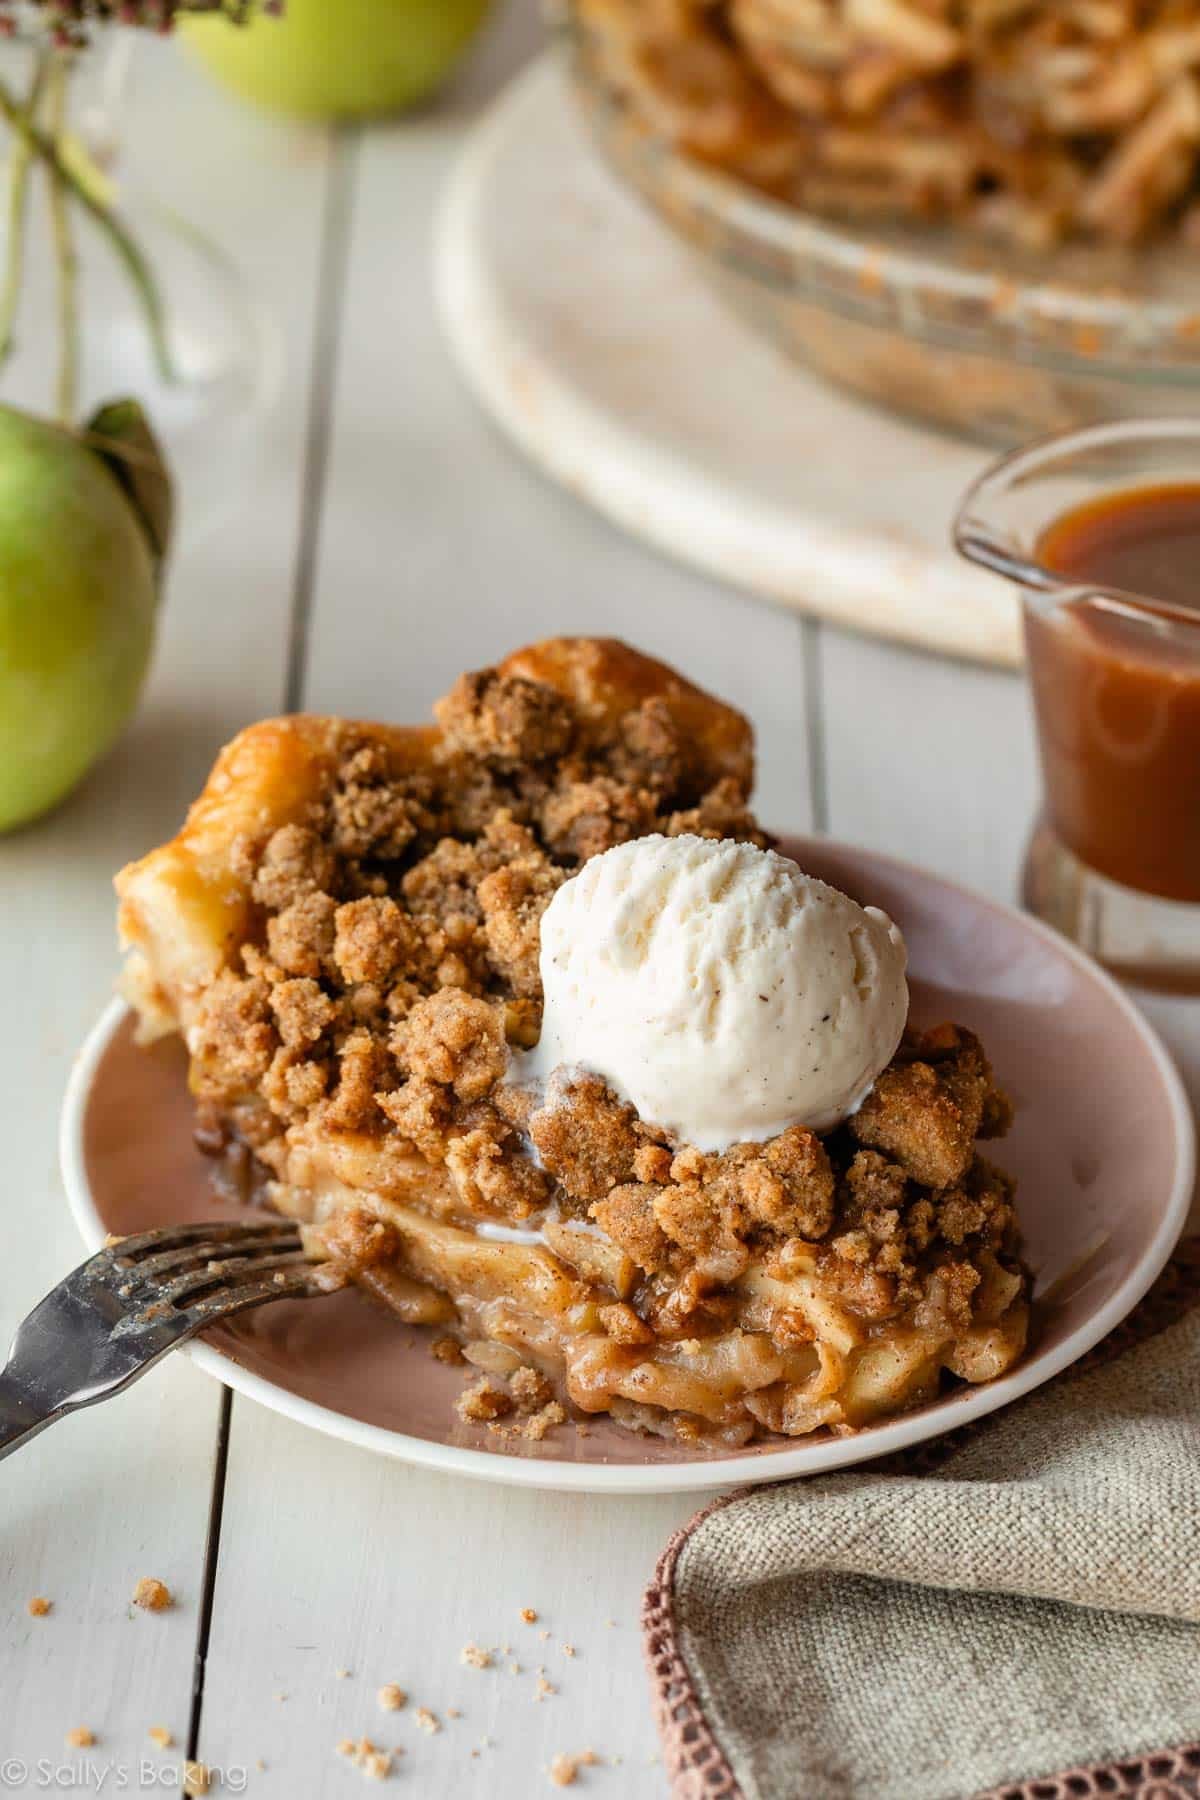
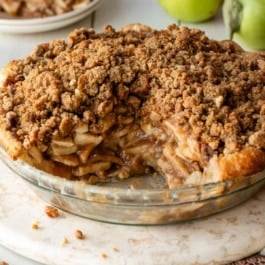
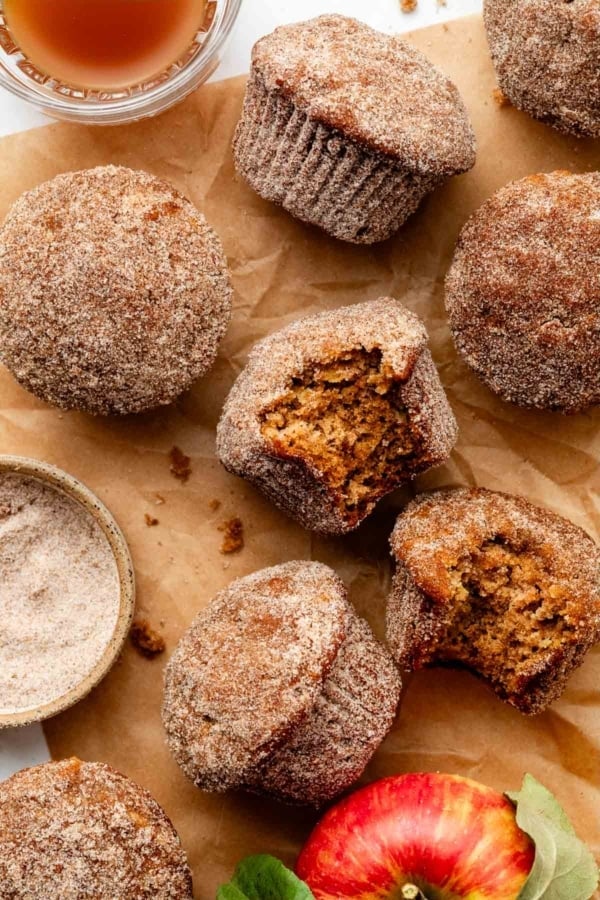
Today we’re making a variation of classic apple pie, but instead of a top crust, we’re piling on a thick, buttery brown sugar crumble. This apple crumble pie is the definition of fall comfort, and you don’t need to fuss with a decorative pie crust on top.

I originally published this recipe in 2015 and have since added new photos and a few more success tips.
Today we’re giving classic apple pie a twist—same cozy flavors, but instead of a top crust, we’re piling on a thick, buttery brown-sugar crumble. This apple crumble pie is pure fall comfort, and bonus: no need to fuss with a decorative top crust.
Homemade pie is my all-time favorite dessert, and if you’ve made my classic apple pie before, this one will feel very familiar: warm spices, a mountain of apples, and a buttery crust… just a little easier, thanks to that crumble topping.
This version captures everything you love about a traditional double-crust apple pie, but with a crunchy-tender walnut crumble topping that makes it especially perfect for your Thanksgiving spread.
Today’s Apple Crumble Pie:
- Has a buttery, flaky crust
- Has a rich apple filling that’s juicy, compact, sweet, and cinnamon-spiced
- Is topped with a brown-sugary, buttery, toasty walnut crumble
- Is the perfect spot for vanilla ice cream
…and most of all, it’s the best version I know!
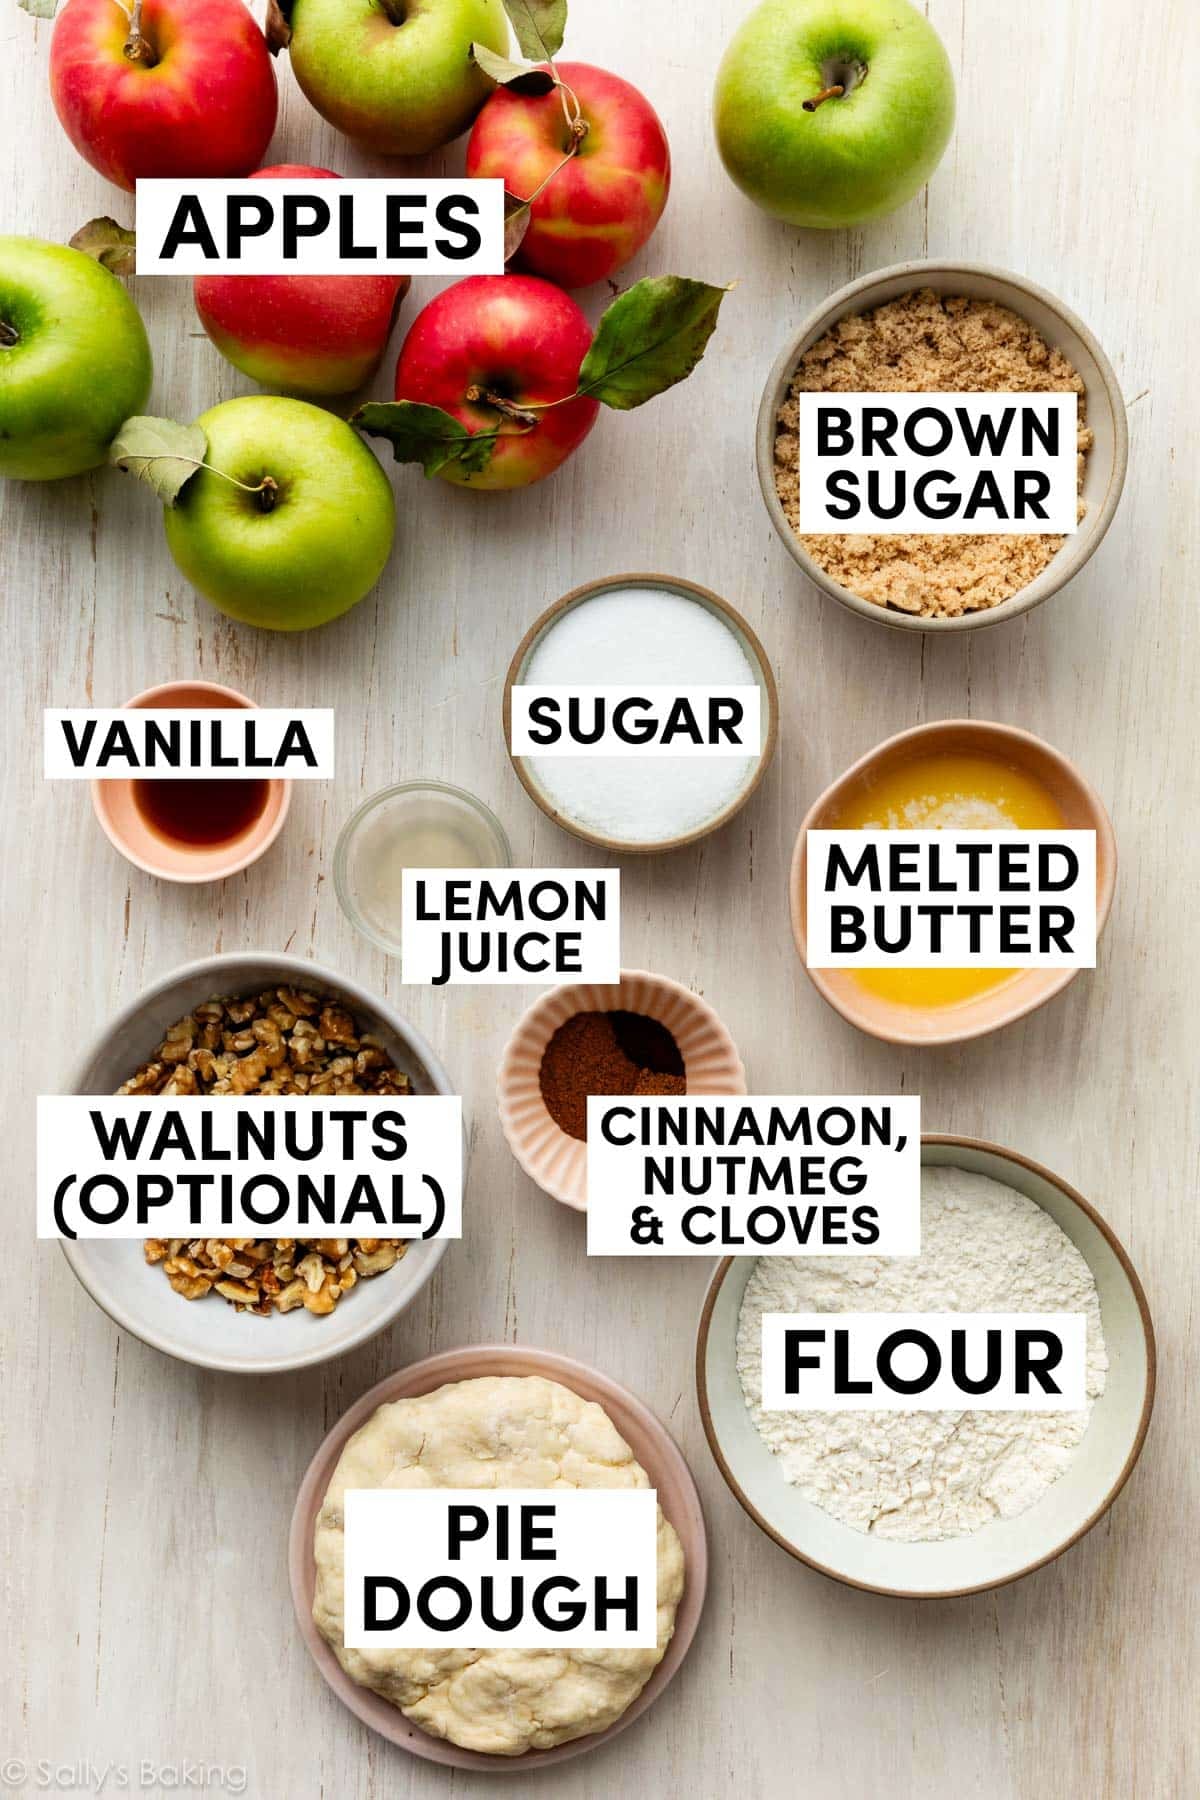
Here’s everything you need to get started:
Start by Making the Pie Dough
Start with the all-butter pie dough. The recipe below makes 1 single crust, so it’s perfect for today’s pie, when we are doing a crumble on top instead of latticing a second crust on top like we do with this salted caramel apple pie.
It’s buttery, flaky, and sturdy enough to hold all those juicy apples. You can also use 1 of the crusts from my flaky pie crust recipe instead (that recipe yields 2 crusts). I like the version below because it yields *slightly* more dough for a single-crust pie. Lots of dough to work with to flute that pretty edge. It’s actually what I use when I make an apple galette.
Make the dough, then chill it before rolling it out and adding the filling.
Crumble Topping
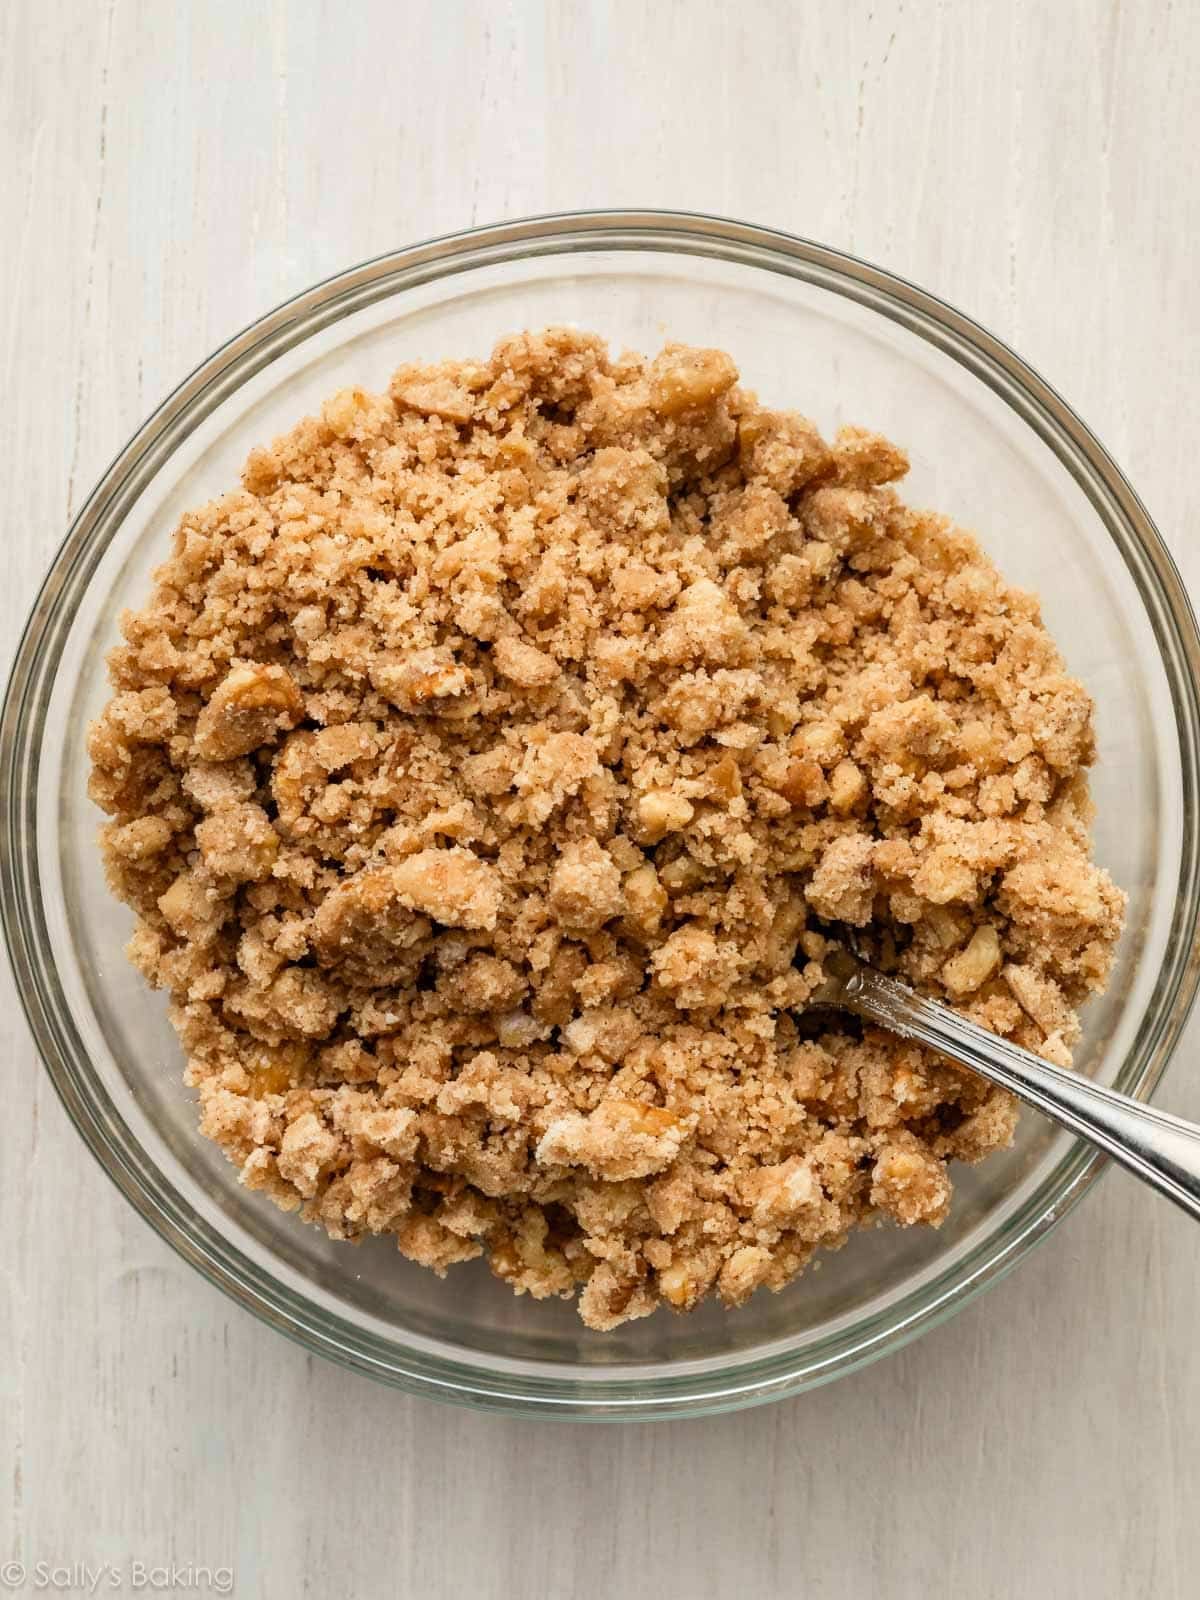
While the dough is chilling, make the crumble topping. You want the crumble topping to also chill in the refrigerator a bit to firm up, so the crumbs hold their shape in the oven.
The crumble may look humble, but it’s truly the star here. Brown sugar, flour, cinnamon, melted butter, and walnuts… simple pantry ingredients that bake into something extraordinary!
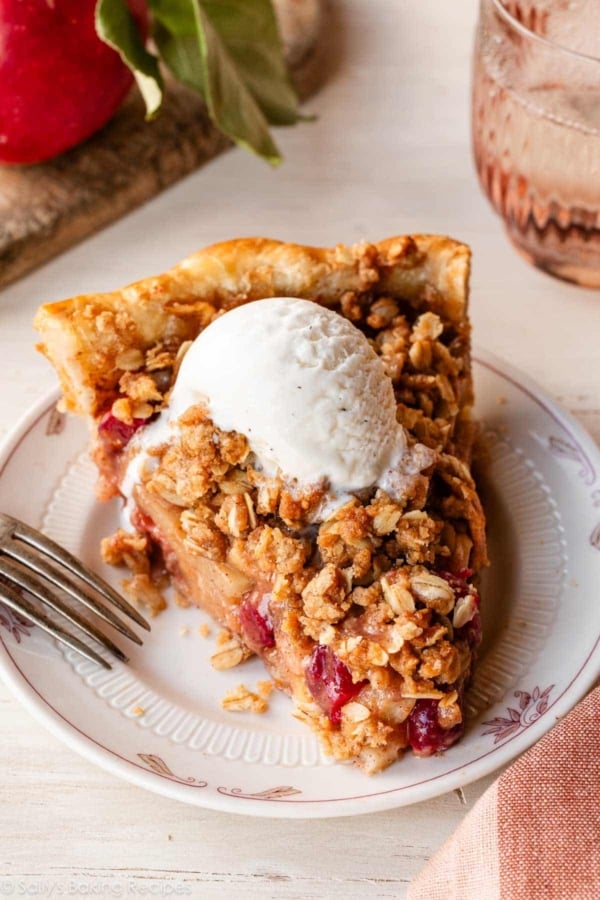
The walnuts toast in the oven as the pie bakes, adding a warm, nutty crunch that contrasts beautifully with the soft apple filling. If you prefer to skip nuts, use the crumble topping from my apple cranberry crumble pie instead.
Stir the dry ingredients together and then pour melted butter on top. Mix until it looks thick and crumbly—not wet, not sandy. Just like this:
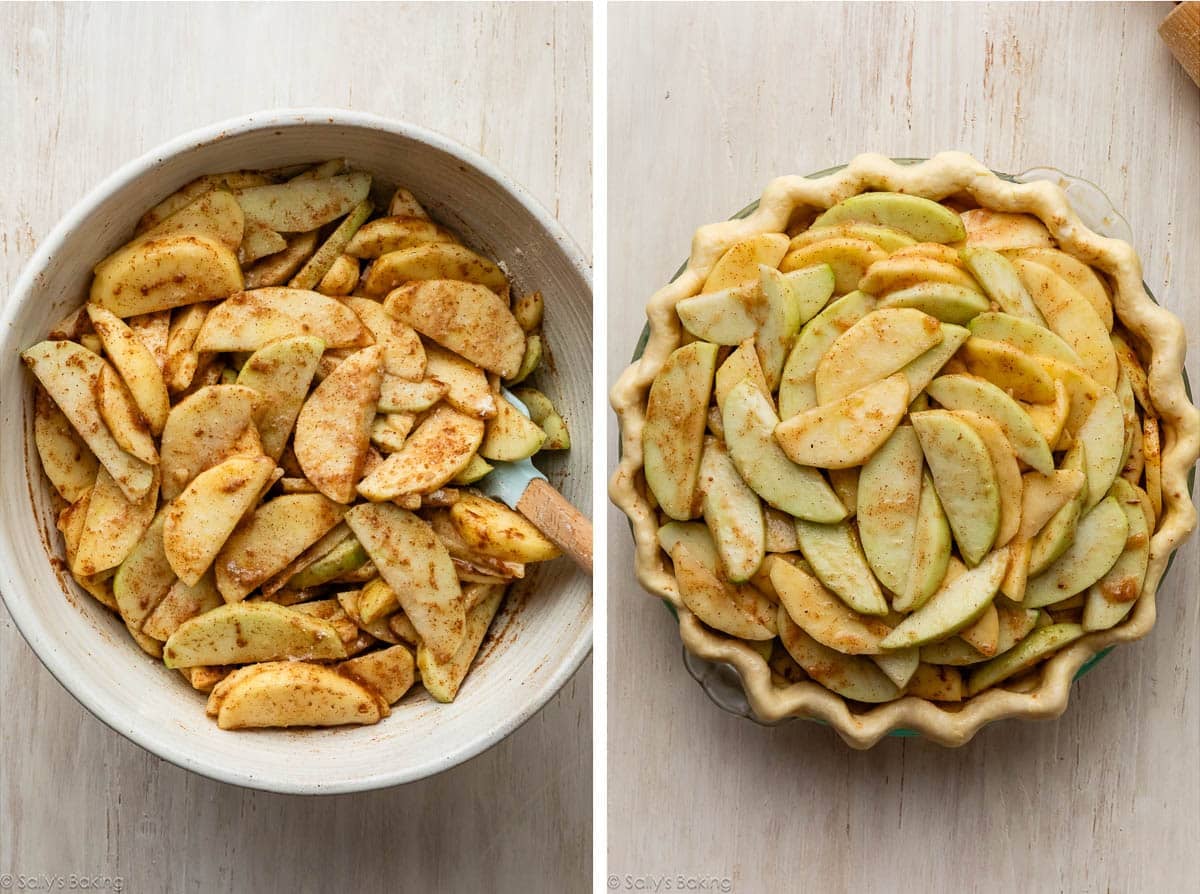
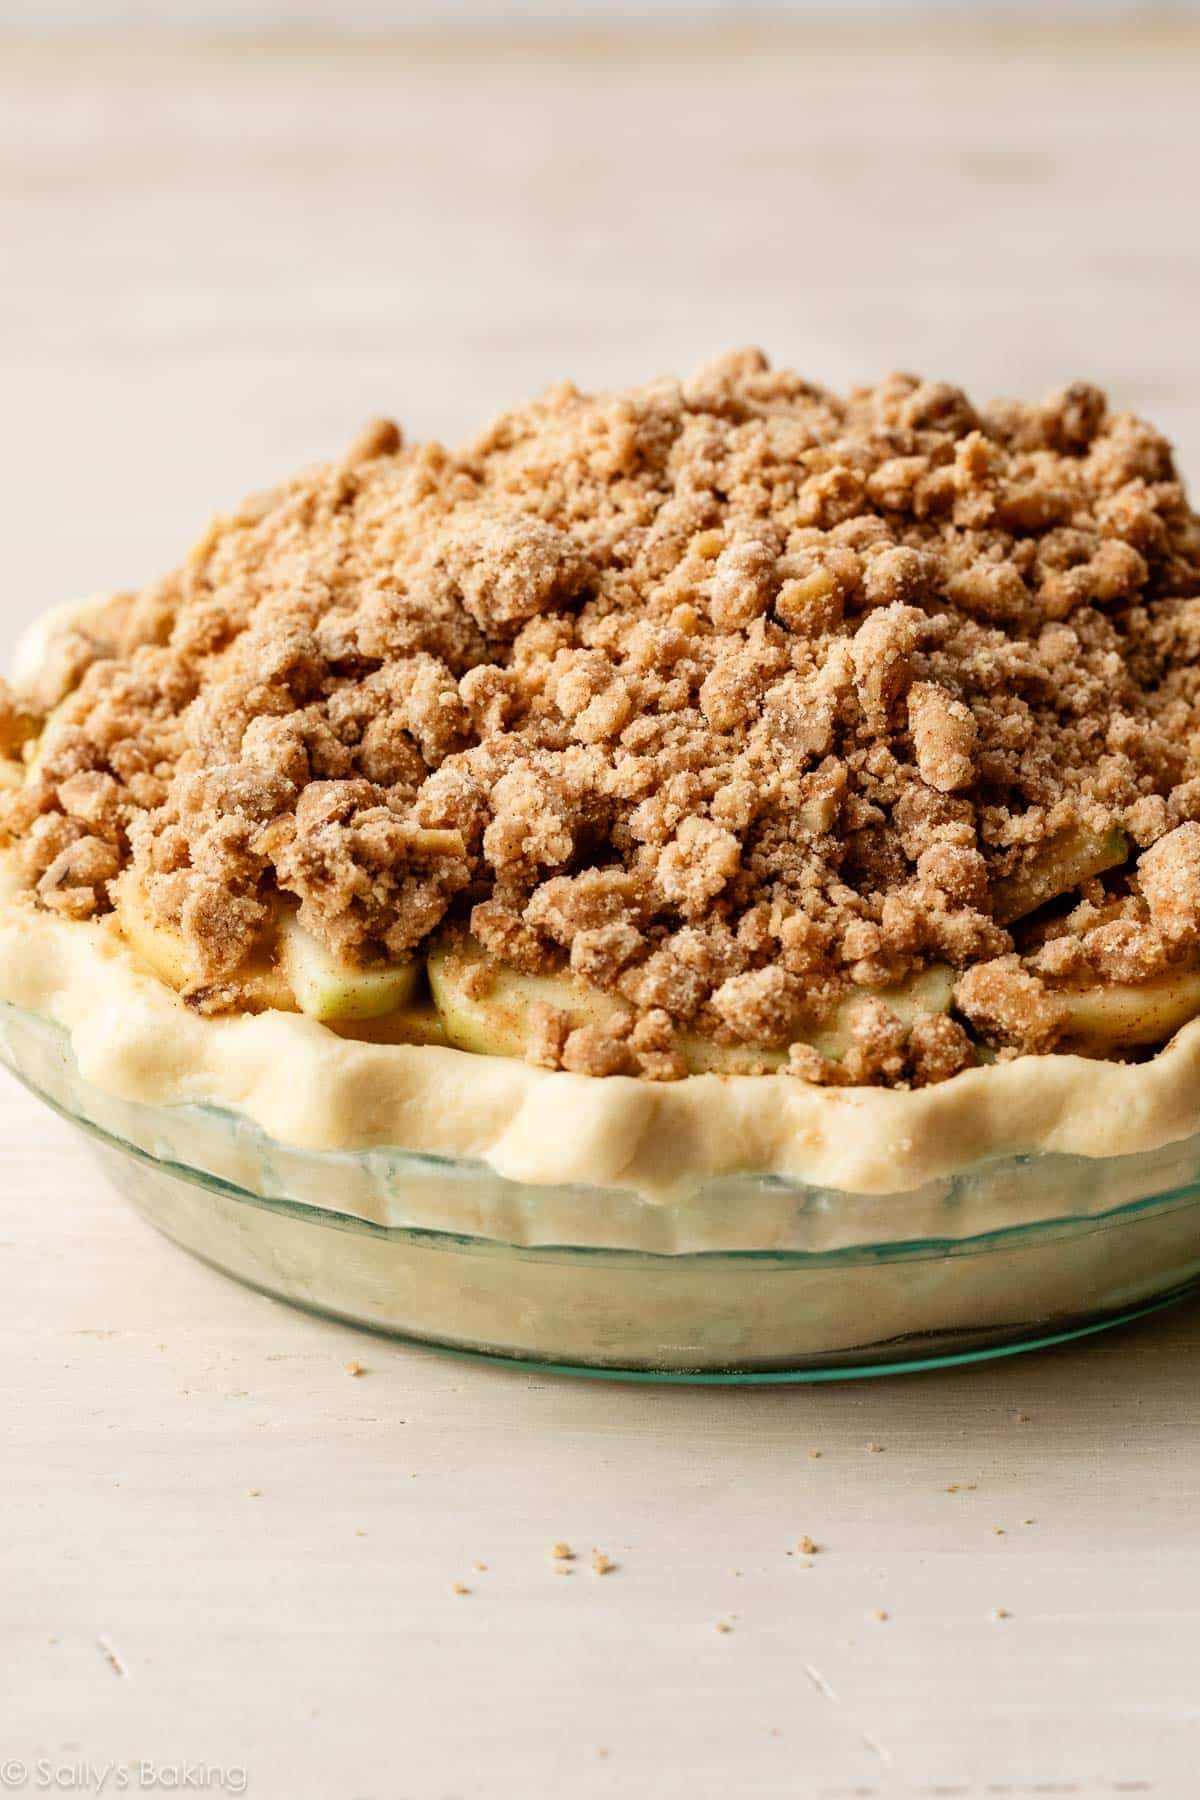
Once your pie dough has chilled for at least 2 hours, roll out the crust and tuck it into a 9-inch pie dish. Flute or crimp the pie dough edges. See my full how to flute pie crust tutorial for all the details.
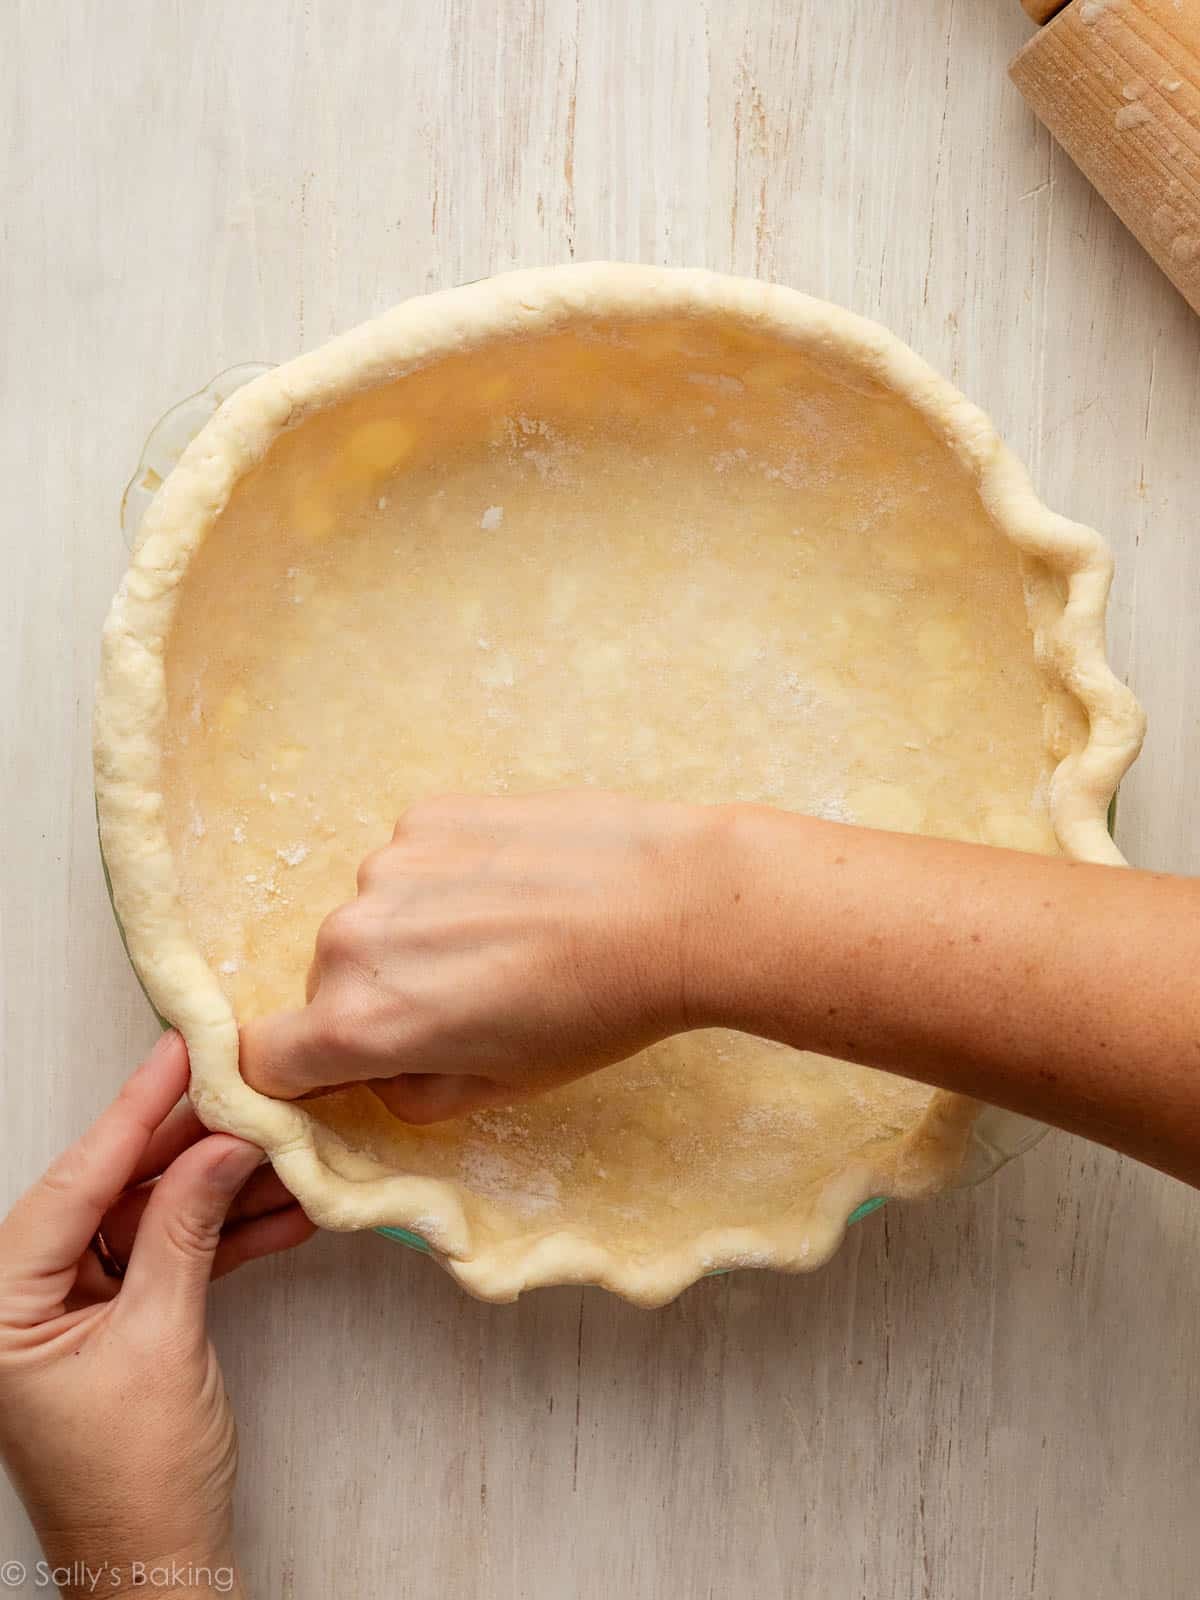
Brush the edges of the crust with egg wash (just an egg beaten together with a little milk), which is key for the crust to develop that beautiful golden sheen when it bakes. Refrigerate the shaped crust while you make the filling.
Apple Pie Filling
This is the easiest part. It’s such a simple, classic mix: apples, lemon juice, sugar, flour, spices, and a bit of vanilla for extra flavor.
I always use a variety of apples for the best flavor. A tart apple like Granny Smith mixed with a sweeter one like Honeycrisp, Fuji, or Pink Lady. That balance of tart and sweet delivers perfect apple pie flavor in every bite. Here is a complete list of the best apples for baking.
My #1 tip: Make sure your apple slices are around the same thickness. You don’t want some super thick apples (that won’t really cook) and some super thin apples (that will become mushy). Aim for around 1/4-inch thickness.
Even slices mean tender apples with just the right amount of bite.
Stir everything together, then spoon it into the crust, trying to make sure there are no big gaps between all the apple slices:
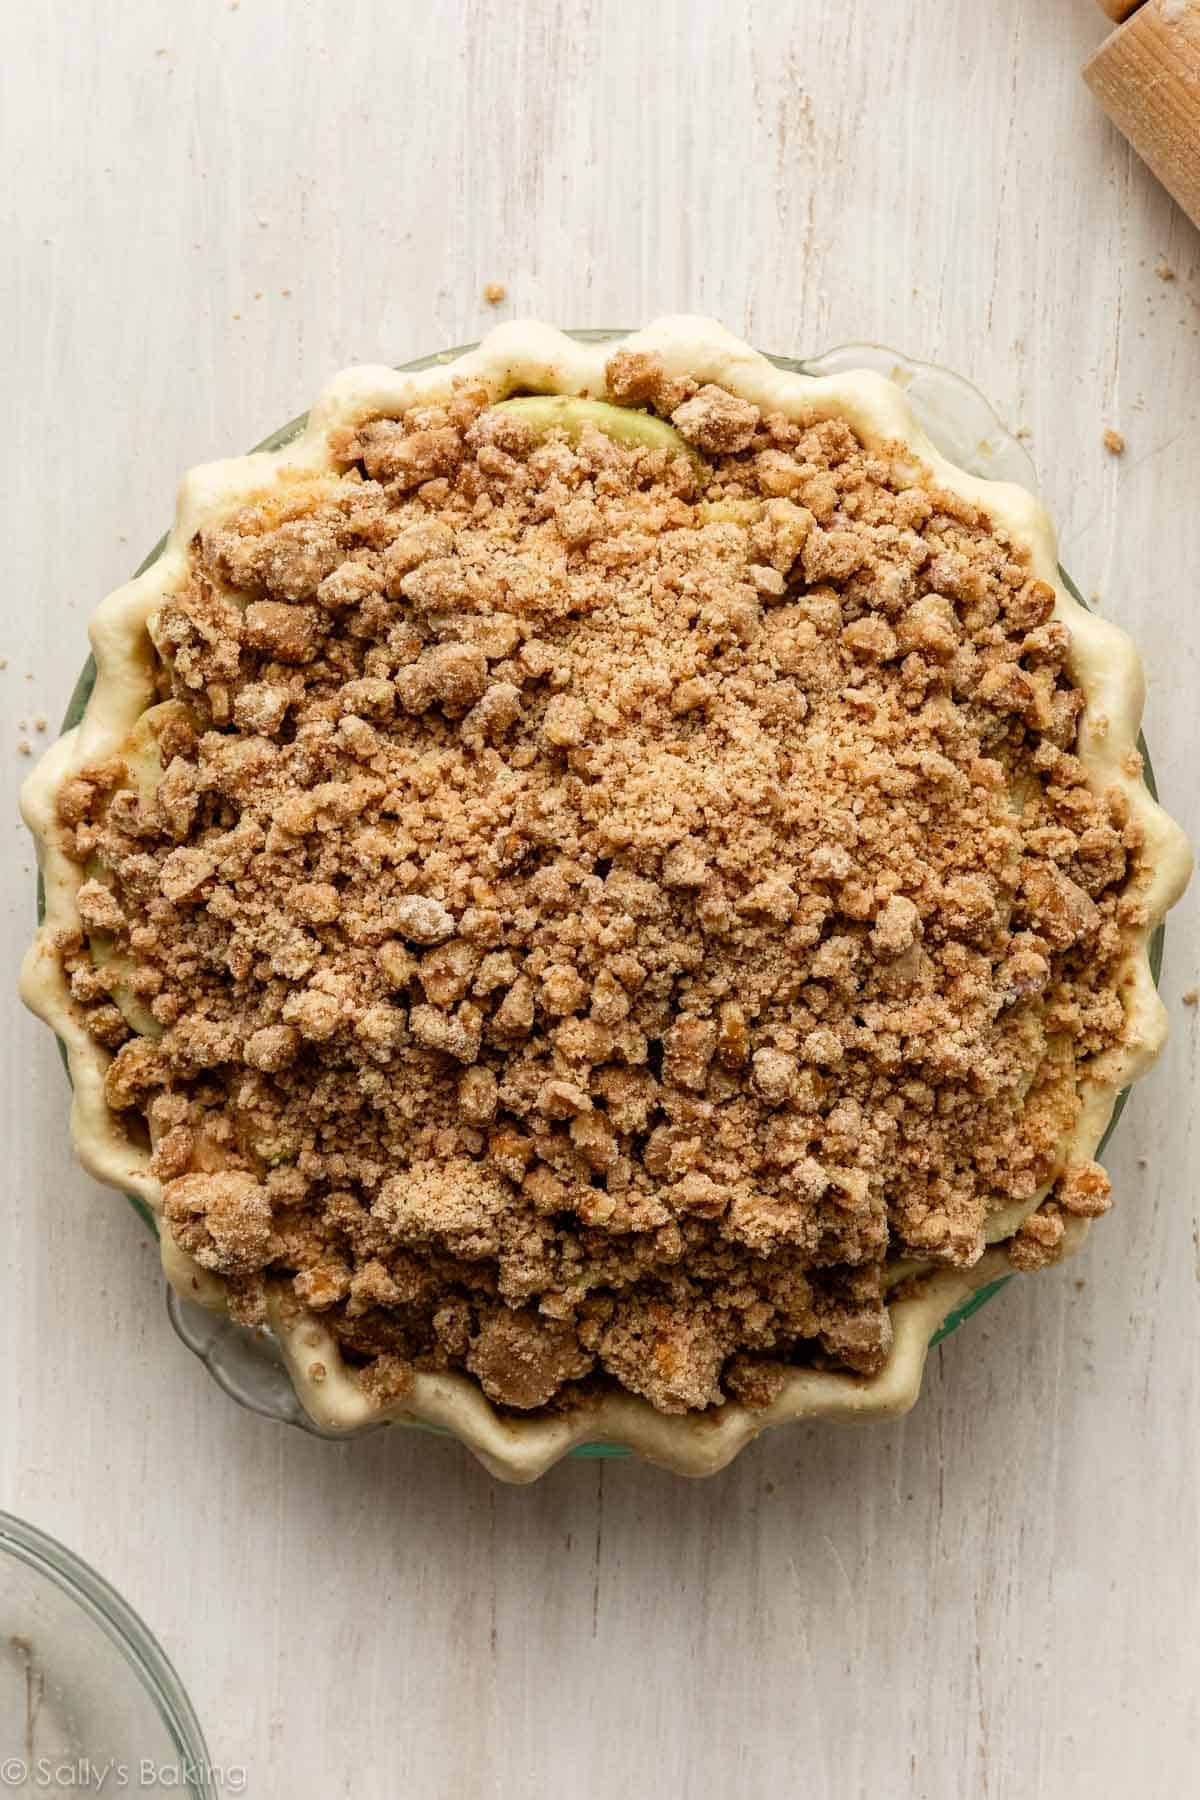
Add the cold crumble topping. It’ll seem like an absolute mountain of topping, but it bakes down perfectly:
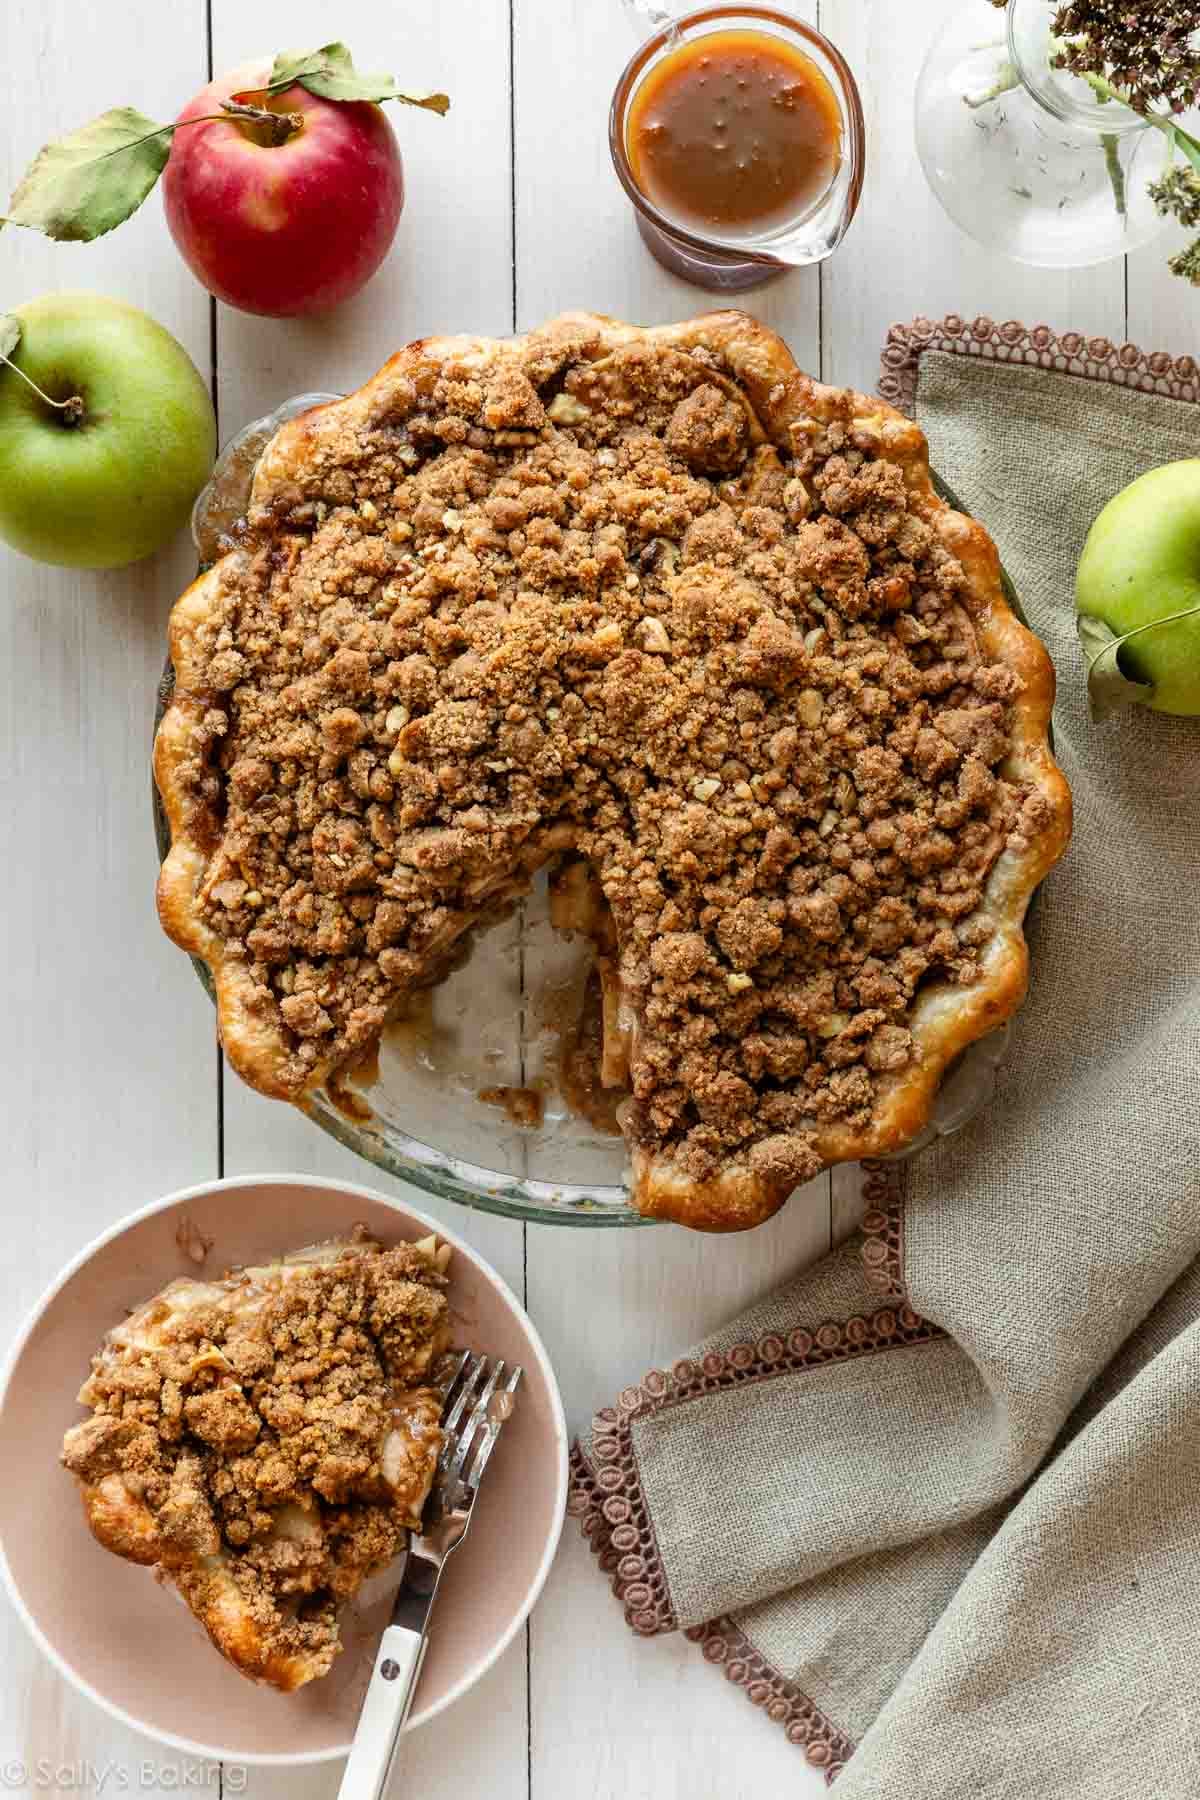
Something you’ll notice about the baking instructions for this apple crumble pie: begin baking at a higher oven temperature. Putting a pie into a very, very hot oven helps the crust brown. After 20 minutes or so, reduce the temperature. This allows the pie’s filling to cook thoroughly before the crust burns.
How Do I Know When Apple Crumble Pie Is Done?
A visual cue is helpful when determining the pie’s doneness. If the crust is golden, and the filling is bubbling up around the edges, the apple crumble pie is done. If you want to be precise, the internal temperature of the filling taken with an instant-read thermometer should be around 200°F (93°C) when done.
Before digging in, you’ll have to let the pie cool down. The longer you let apple pie cool, the more the filling will set. I recommend cooling for at least 3 full hours before slicing and serving. I know, it’s nearly impossible to wait!
Looking for an apple pie-like treat in a fraction of the time? Try my apple crisp, apple cobbler, or apple galette instead.
Apple Crumble Pie
- Prep Time: 3 hours (includes pie crust)
- Cook Time: 1 hour
- Total Time: 7 hours (includes cooling)
- Yield: one 9-inch pie
- Category: Pie
- Method: Baking
- Cuisine: American
Description
This is a variation of classic apple pie, but instead of a top crust, we’re piling on a thick, buttery brown sugar crumble. This apple crumble pie is the definition of fall comfort, and you don’t need to fuss with a decorative pie crust on top. Make sure to chill each component as directed. Cold pie dough and a cold crumble topping hold their shape much better during baking.
Ingredients
Crust
- 1 and 1/2 cups (188g) all-purpose flour (spooned & leveled), plus more for work surface
- 1 Tablespoon (12g) granulated sugar
- 1/4 teaspoon salt
- 1/2 cup (8 Tbsp; 113g) cold unsalted butter, cubed
- 1/4 cup (60g/ml) ice-cold water, plus more as needed
- egg wash: 1 large egg beaten with 1 Tablespoon (15g/ml) milk
Crumble Topping
- 1/2 cup (100g) packed light or dark brown sugar
- 1 teaspoon ground cinnamon
- 3/4 cup (94g) all-purpose flour (spooned & leveled)
- 3/4 cup (95g) chopped walnuts
- 5 Tablespoons (71g) unsalted butter, melted and slightly cooled
Filling
- 10 cups (1.25kg) 1/4-inch-thick apple slices (about 8 large peeled and cored apples)*
- 1/2 cup (100g) granulated sugar
- 1/4 cup (31g) all-purpose flour (spooned & leveled)
- 1 Tablespoon (15g/ml) fresh lemon juice
- 1 and 1/2 teaspoons ground cinnamon
- 1/4 teaspoon ground cloves
- 1/4 teaspoon ground nutmeg
- 1 teaspoon pure vanilla extract
Instructions
- Make the pie dough for the crust: In a medium bowl, whisk together the flour, sugar, and salt. Using a pastry cutter or 2 forks, cut in the butter until the mixture resembles coarse pea-sized crumbs. Add the water and stir until the flour is moistened. Add 1–2 more Tablespoons of water if the dough seems dry. Turn the dough out onto a lightly floured work surface and, using your hands, work the dough into a ball. Flatten it into a thick disc. Wrap the dough disc in plastic wrap or parchment paper and refrigerate it for at least 2 hours, and up to 3 days.
- Make the crumble topping: In a medium bowl, combine the brown sugar, cinnamon, flour, and walnuts. Using a silicone spatula, stir in the melted butter. The topping will be thick and crumbly. Place it in the refrigerator while you continue.
- Roll out the chilled pie dough: On a floured work surface, roll out the disc of chilled dough. Turn the dough about a quarter turn after every few rolls until you have a circle 12 inches in diameter. Carefully place the dough into a 9-inch pie dish. Tuck it in with your fingers, making sure it is smooth. Use a small paring knife to trim excess dough off the edges. Flute the pie crust edges and brush them with egg wash. Place the pie crust in the refrigerator.
- Make the filling: In a large bowl using a silicone spatula or wooden spoon, combine the apples, sugar, flour, lemon juice, cinnamon, cloves, nutmeg, and vanilla extract, stirring until the apples are all coated.
- Preheat the oven to 400°F (204°C). Place a baking sheet on the bottom oven rack to catch any juices that may bubble over.
- Spoon the apple filling into the crust, making sure there are no large gaps between the slices. It’s a lot of filling! Sprinkle the cold crumb topping evenly over the top of the apples.
- Bake for 20 minutes. Add a pie crust shield to prevent the edges from browning too quickly, and reduce the oven temperature to 375°F (191°C). Bake for an additional 35 to 45 minutes or until the crust is golden brown and juices are bubbling around the edges. If needed toward the end of bake time, remove the pie crust shield and tent a large piece of aluminum foil over the entire pie if the crumb topping is getting too brown.
- Allow the pie to cool for at least 3 full hours at room temperature before serving. This time allows the filling to thicken up. Serve with vanilla ice cream and salted caramel sauce, if desired. Cover leftover pie and store in the refrigerator for up to 5 days.
Notes
- Make Ahead & Freezing Instructions: This a great pie to make 1 day in advance—after it cools, cover tightly and keep at room temperature. The pie crust dough can also be prepared ahead of time and stored in the refrigerator for up to 5 days or in the freezer for up to 3 months. Baked and cooled pie freezes well for up to 3 months. Thaw overnight in the refrigerator and allow to come to room temperature before serving. Prepared filling can be frozen for up to 3 months; thaw overnight in the refrigerator before using.
- Special Tools (affiliate links): Glass Mixing Bowls | Silicone Spatula or Wooden Spoon | Pastry Cutter | Rolling Pin | 9-inch Pie Dish | Pastry Brush | Apple Peeler | Pie Crust Shield | Cooling Rack
- Apples: You need about 8 large apples. Peel then slice apples in a uniform thickness, about 1/4 inch thick. You don’t want some solid apples and some thin, mushy apples. For best flavor, use a variety of apples such as Granny Smith, Honeycrisp, Fuji, and/or Pink Lady. If you’re interested, check out this post: Here Are the Best Apples for Baking.
- Aluminum Foil Pie Crust Shield: You can purchase a pie crust shield or make one from aluminum foil. Cut a 14-inch square of aluminum foil. Fold in half. Cut out a 5-inch semi-circle on the folded edge. Unfold. Carefully fit the aluminum foil over the pie crust edges, securing down on the sides as best you can (careful, the pie is hot!), leaving the center of the pie exposed.
- Update in 2025: After a decade of baking this pie, we’ve made a few small improvements. The original version used half of a double-crust pie dough, fewer apples (8–10 cups), and 2 Tbsp lemon juice. The updated recipe now uses a single all-butter pie crust, slightly more apples, and less lemon juice. If you prefer the original method, make this pie crust recipe (saving the second half for another pie), reduce apples to 8–10 cups, and increase the lemon juice to 2 Tbsp.


Reader Comments and Reviews
I’ve made plenty of your cake and cookie recipes from this site, but this was my first from scratch pie. It was absolutely delicious! The crust was perfect and flaky and the apple filling was tender and so tasty. I used oats instead of walnuts for the crumble and topped with vanilla bean ice cream. Will definitely be making this again and again.
Decided to make this for my first-ever from-scratch pie, for Thanksgiving with my parents. (No pressure.) I used pecans in place of walnuts. I noticed, like many other commenters as I panic-searched, that the nuts darken very quickly- in my case, they were verging on burned after only the first stage of baking. So after I lowered the temp, I moved the pie to the lower oven rack and tented it with foil, and the nuts (plus the rest of the crumble topping) got darker still. (Didn’t have to worry about the crust because I didn’t quite have enough crust to form a proper edge, and it all got covered up with the filling.
Fortunately, my family all said it didn’t taste burned, and that the pie was overall great. Phew! Next time, I’ll have to try out the oat-based crumble topping I’ve seen suggested in the comments, and see if the oats don’t burn as fast. May also start tenting the pie even during the hotter baking stage, too.
I made the apple crumble pie for first time. I used the Oronoque pie crust. Followed the directions. Tasted delicious but when slicing the pie it crumbled. It wasn’t a perfect pie slice.
I really like this recipe. I have adopted it as my own, with a few changes. My favorite change up is using pecans instead of walnuts. Then I warm a slice in the microwave, top it with ice cream and caramel, and its out of this world! Thanks for publishing this.
Hi Sally! Super easy and great recipe. Question – Can you freeze an uncooked pie to then bake at a later date?
I always freeze unbaked and bake the next day. It works fine! I start at 425 for 20 min, then apply a crusty shield and continue at 375 as instructed. Keep checking the crumble topping, because it will stay turning brown faster because of the higher start temp. I place a pice of foil on top as soon as it looks nice and brown. (I do use gluten free flour, I’m not sure if that makes a difference). I hope this works for you too!
Were you supposed to take the baking sheet off after first 20 mins? The pie crust didn’t seem to bake all the way with this. Didn’t seem all the way done. I made the crust with another pie and it did bake without baking sheet though, and looked more done. Can I put the pie back in to bake more after it’s been out ?
Hi Angie! No, leave the baking sheet in under the pie the whole time. You can continue baking as needed!
Hi there! This will be my third time making this pie, but the first time using a store-bought crust (Pillsbury. Don’t kill me, my fellow bakers!) I think I know the answer but wanted to double-check—should I pre-bake the store-bought crust before adding the filling? Or should I bake all at once?
Hi Hannah! Follow the instructions above, even with a store bought crust. Enjoy!
Wonderful!! I’ll never need another apple pie recipe, although I recommend reducing the cloves to 1/8 tsp. They were a bit overpowering, but still delicious!!
I’ve made this pie twice now following the recipe exact and the baking temps and times seem off. It’s not a matter of the crust getting too brown, but the issue is with the crumble seeming practically burnt (very dark) with some of the walnuts for sure turning black. It definitely doesn’t look like the pictures on this post. I see others have commented on the issue of the crumble getting over baked, as well. Maybe this recipe needs another look and update?
Hi Julie, Thank you for trying this recipe. Did you turn your oven temperature down to 375 after the first 20 minutes? If you try again you can try using a lower rack of your oven, lower the oven temperature slightly, and cover loosely with foil. That will help!
Do you blind bake this pie crust first or just fill it and bake?
Hi Amy, we do not blind bake the pie crust first with this recipe.
Hi Sally,
I love this pie! Do you have any suggestions for a cinnamon substitute? Someone at my Thanksgiving is allergic.
Thanks!
Hi Julie, instead of cinnamon you could try nutmeg, ginger, cloves, or a similar warm spice.
Hi Sally, I was looking for a pie recipe for thanksgiving and found this recipe. I will have to bake a day before because of our travel plan. How can I keep the crumble topping crunchy the next day? I don’t want a soft crumble on my pie.
Hi Anna, This a great pie to make 1 day in advance– after it cools, cover tightly and keep at room temperature. We haven’t had issues with the crumble getting soft.
Made this today, it’s in the cooling stage….my crumble top got really dark, only cooked it for that additional 32 minutes after the initial 20 at 400 degrees. I did not leave any loose crumble it began a more solid crumble once the butter was added. Hopefully will taste okay but I’m unhappy with how dark the top is.
Hi Kris! If you try this apple crumble again, you can try tenting the pie with foil halfway through baking (or when you notice the crumble getting dark) to prevent it from browning. Hope you love it!
I apologize if this has already been asked but to avoid soggy bottom with this pie, should the bottom crust be par-baked in addition to leaving some of the liquid from the apple mixture out? Thank you in advance!
Hi Jona, there’s no need to par-bake this pie, the crust will cook with the apples. Hope you love it!
Thank you! One more question. If I want to make the filling in advance, how far in advance can I make it and also, will making in advance affect the texture of the apples since we aren’t cooking the apples a bit prior to baking?
Hi Sally, love all your recipes! I’ve made this pie a few times in the past, always in a glass pie dish and it comes out perfectly every time! I’m bringing this to a party and I want to bake it in a disposable foil tin so I don’t have to worry about getting my dish at the end of the night. I’ve read a few different articles saying that the foil tin bakes differently than the glass. do you think I can prepare the pie in the foil tin and then place it all into a glass dish to bake? Or do you think that would cause something weird to happen? I appreciate any guidance you can give!!
Hi Liana! We’d caution against baking it within two pans, as the pie may not bake evenly that way. Glass pie dishes usually take a bit longer, so keep an eye on your foil tin and know that it might take a bit less time than when you make it in a glass dish. Hope this helps!
This pie was a super hit. I usually make a double crust apple pie but this one is so much better. Now my go to apple pie! Thanks Sally
The perfect recipe!
Followed instructions precisely and apples were still crunchy. Also, the nutmeg, cloves and cinnamon were very overwhelming. Totally masked the apple flavor. I would cut back on those flavors if making pie again. Not sure what to do about the apples being undercooked. My slice of cut pie didn’t look like photo. Completely fell apart. I think I should have layer the apples instead of dumping them in the pie.
All I had was self rising flour, but it looks amazing & smells good too!!
Huge fan Sally! Your recipes are not only amazingly tasty but your step by step instructions fill me with confidence. For this recipe, would you be able to suggest a nut-free crumble topping? I’m making this for a coworker who has a pretty hefty nut allergy.
Hi Christiana, You can make a streusel topping which uses oats instead of nuts. Follow the instructions for the topping on our Apple Pie Bars.
Thank you so much! I love that Apple Pie Bar recipe!
Nice recipe. I didn’t like the walnuts in the crumble – probably would leave out next time. Just my preference.
thank you for the wonderful apple crumble pie recipe and pie crust. at 60 years old i made my first home made pie. i was allways scared to tackle because my mother in law was a great baker. i was afraid i couldn’t do it . so thank you for giving me the confidence. it was great and gonna be making many more pies
Yet another delicious recipe, thank you Sally! LOVE the crumb topping and your pie crust!
Used coconut sugar instead of granulated to ensure it wasn’t too sweet. The apples are slightly crunchier than I prefer and wondering if I can plop it back in the oven after refrigerating?
Hi Danica, you can pop the pie back into the oven to reheat, yes. That should help soften up the apples a bit too. Glad you enjoyed this pie!
Made this recipe from Sally for the 2nd time last night.
I added 2 extra apples and piled them higher towards the middle before adding the crumble (very carefully).
I did not adjust the measurements of the other ingredients, but made sure to tent the pie in foil 20 mins after baking to prevent burning.
Because I loaded this pie with extra apples, it took a little more time to get the filling to start bubbling.
Sally is definitely my first choice on baking recipes, and I can’t see myself looking elsewhere.
Thank you again Sally! ☺️
First time making an apple crumble pie. The crumb topping turned out very dry for me. Next time, I’ll use less of it. I also used only 1/8 tsp of cloves and nutmeg but still feel like the cloves are too dominant.
I just took the pie out after the first 20 minutes and the nuts were burnt on top. Not sure what I did wrong. I covered it loosely with foil and hope it won’t continue to burn.
Fabulous! Once I learnt the framework of this recipe, I made it with and without pie crust and even vegan using plant based butter twice in a ramekin. This is a wonderful recipe and tastes divine! Thank you for this recipe!
Butter crust is ridiculously yummy and the “guts” of this pie are just the right amount of sweet and spice!
Hi Sally,
Would pecans work as a substitute for walnuts for this recipe?
Absolutely! Same amount.
Hello! If I want to make the crumble in a casserole dish instead of a crust, do I need to alter the recipe to account for the lack of crust? Thank you!
Hi Sally,
I was wondering if I should change the cooking temps or instructions if I am using a pre made stovetop pie filling prepared ahead of time?
Hi Maranda, We haven’t tested this pie with pre-made filling but you can follow the directions on your package for the filling. You will likely need to pre-bake the pie crust as your whole pie won’t need to bake as long.