

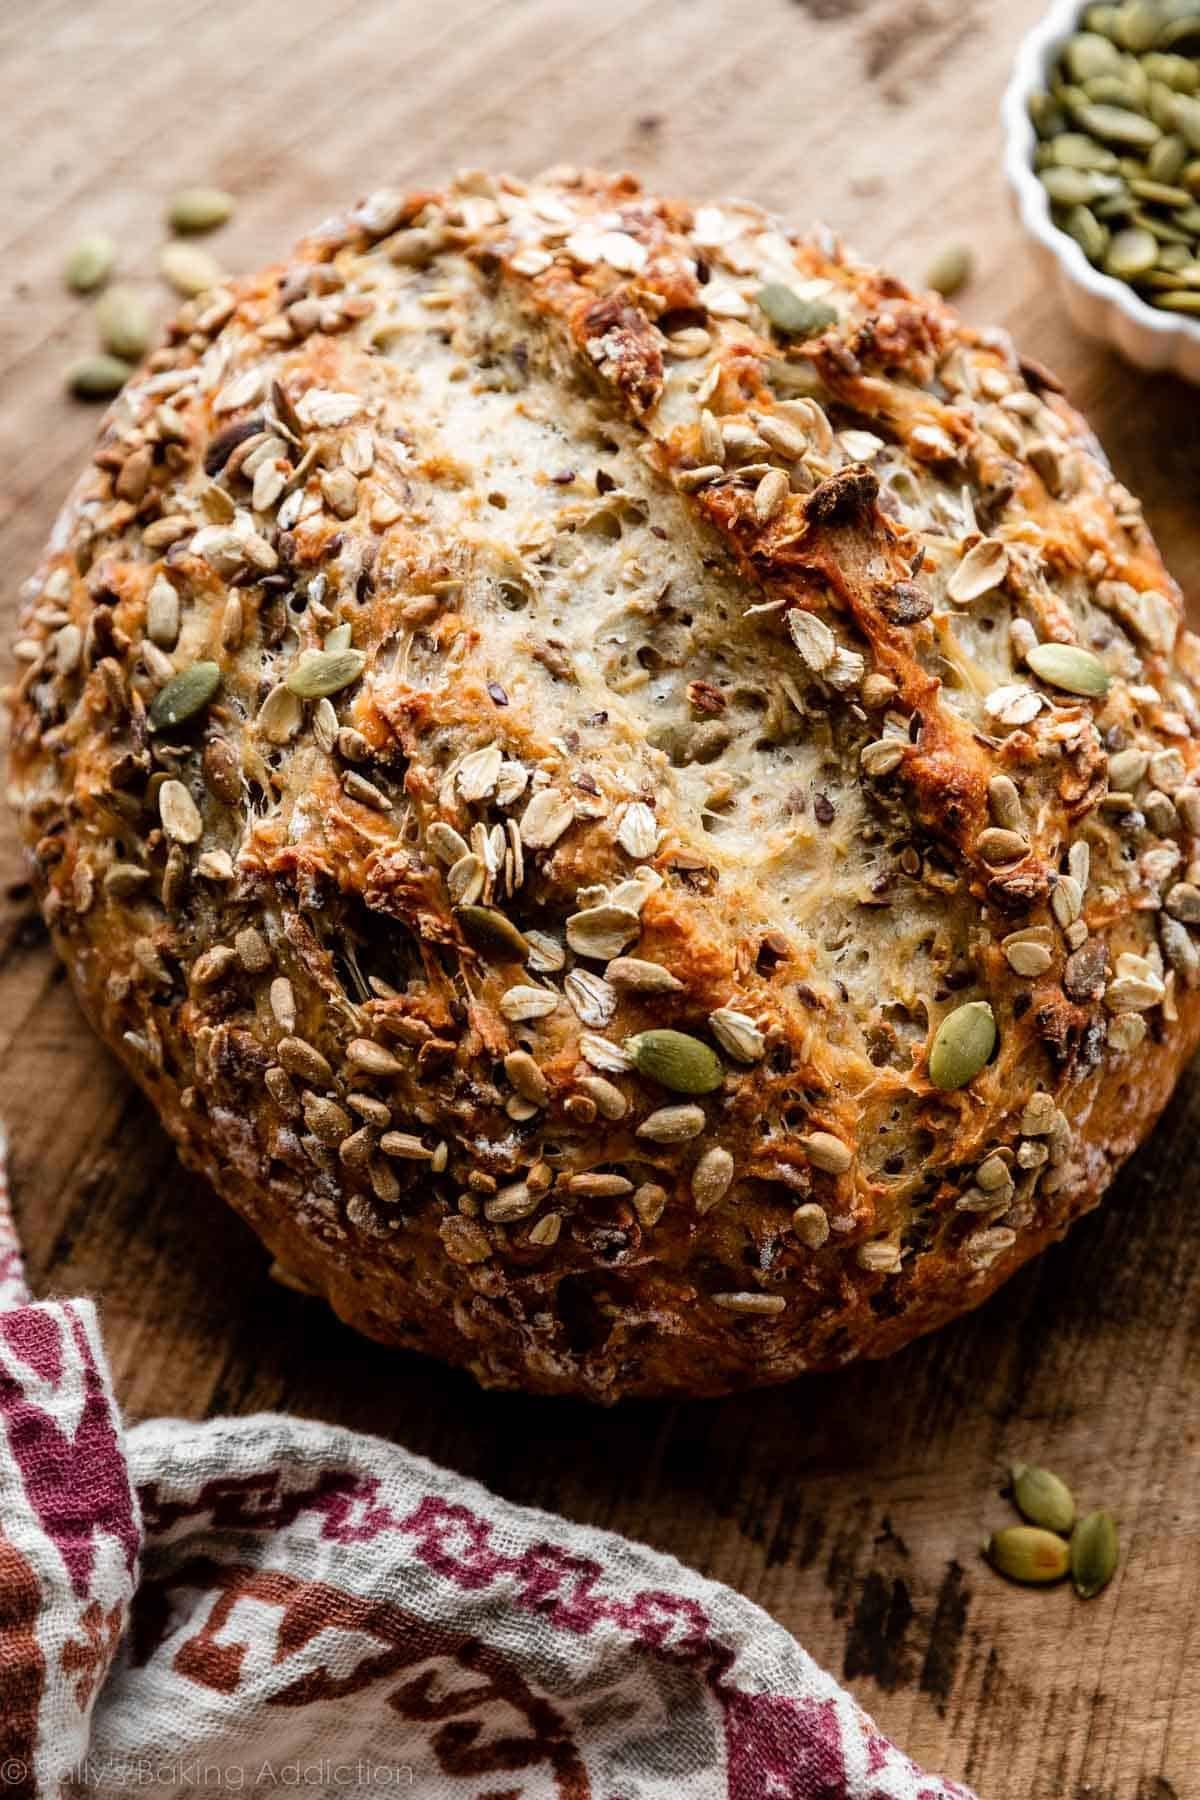
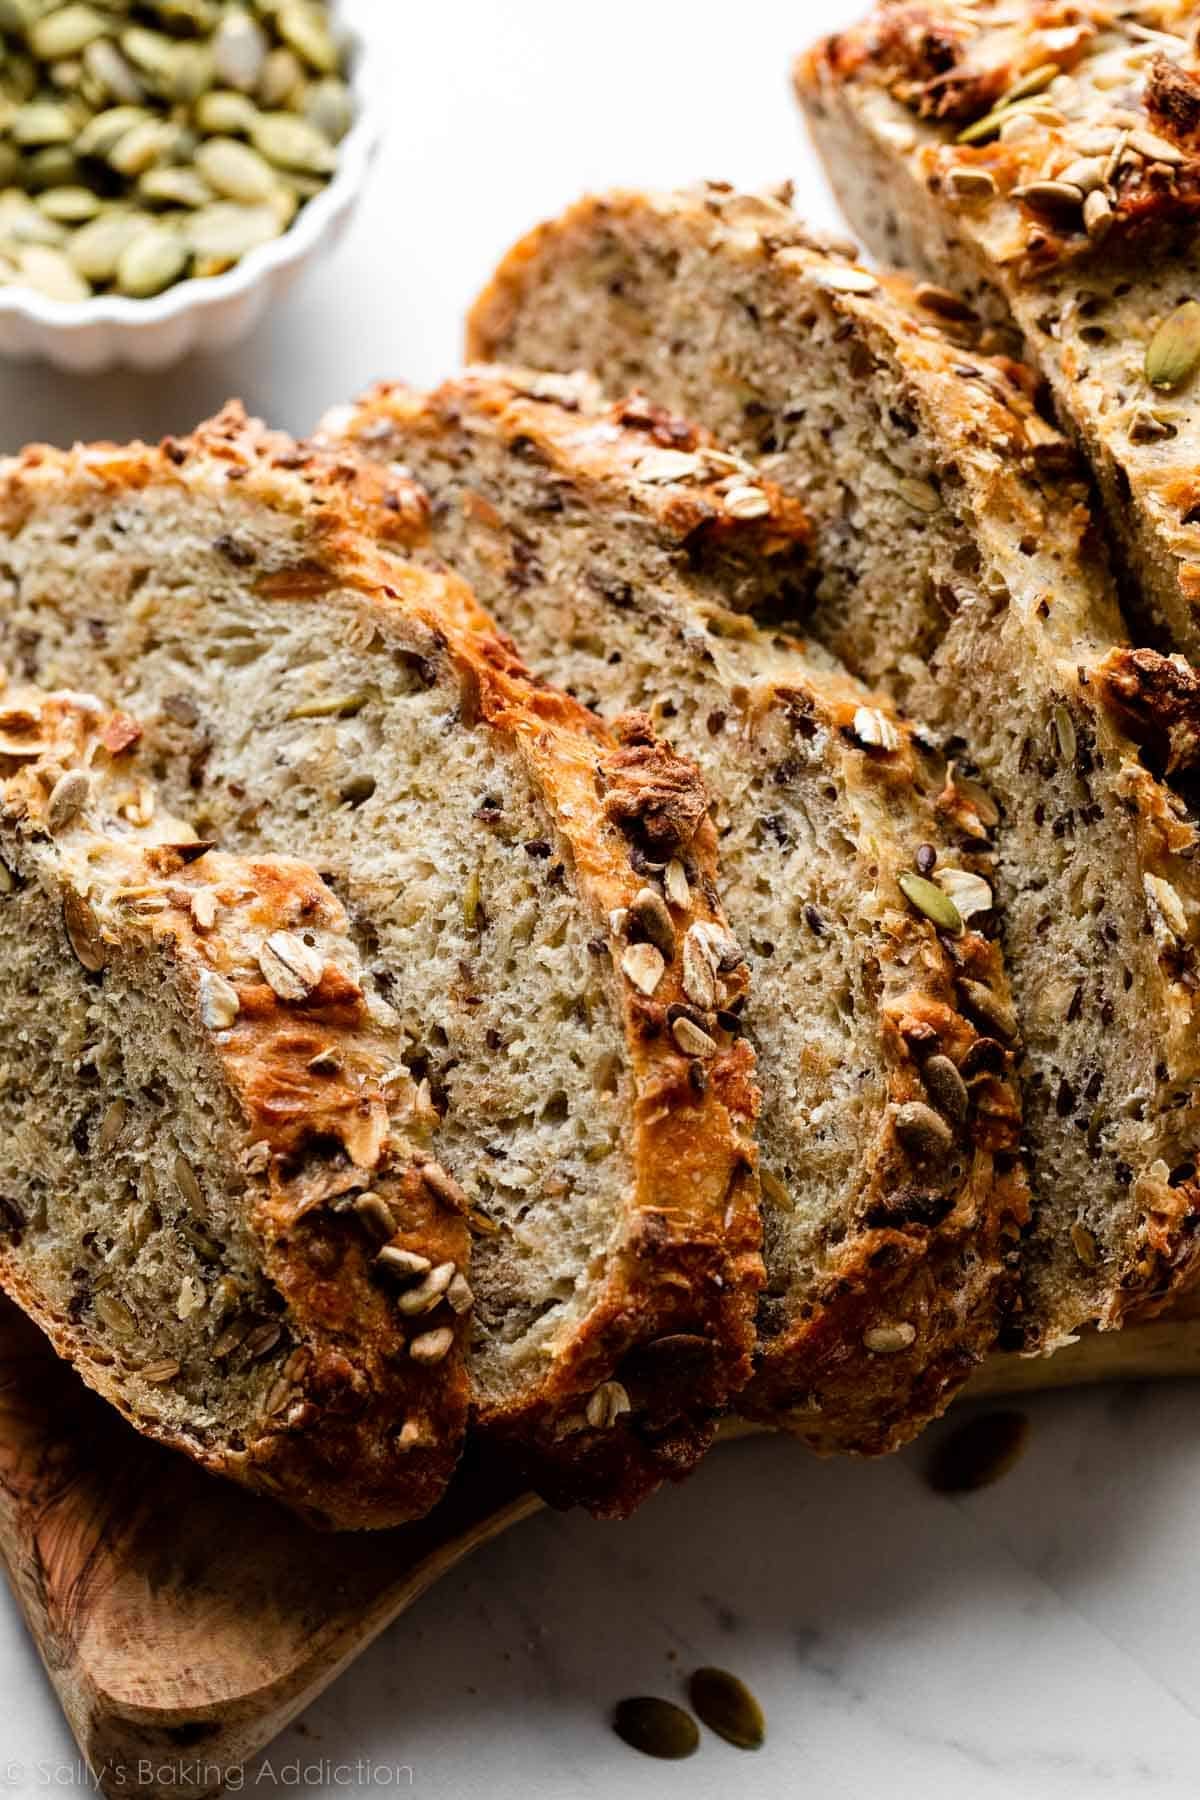
This seeded oat bread is crusty on the outside, chewy on the inside, and has the most delicious crunch in every bite, thanks to all the seeds. This is a hearty loaf that can stand up to any meal, from thick and chunky stews to delicate poached eggs. You’ll use an easy no-knead method to make this yeast bread, which produces a beautiful homemade loaf with minimal hands-on work.
This recipe is brought to you in partnership with Red Star Yeast.
One reader, Rob, commented: “Best bread we’ve had in a long time! Crusty, chewy, flavorful, nutty, and delicious with some good butter. Will definitely be making this again. Thank you. ★★★★★“
You know those gorgeous seed-encrusted loaves of bread you see in bakery windows?
The kind that look like they took ages to make, and you wonder how much kneading, shaping, and work went into just 1 loaf? Well, you can make those same beautiful seeded loaves right at home, with hardly any work involved. No kneading, no complex shaping, no mixer needed.
Yes, this crusty, chewy, golden-brown, seed-speckled oat bread doesn’t require any complicated work.
This bread, like my homemade cranberry nut no-knead bread, asiago-crusted skillet bread, pizza bread, and olive bread, will convince anyone that you either bought it from a bakery or spent all day in the kitchen making it—which, of course, you didn’t. Don’t feel like you have to let them in on our little secret. 😉
Hearty Homemade Bread for Beginners
This texture-lover’s seeded oat bread recipe is based off of my homemade artisan bread, a wonderfully easy and widely popular no-knead bread that’s used by both beginners and experts.
If you’re nervous to try homemade bread, this recipe is a great introduction. Even though the recipe is easy, the bread does NOT skimp on flavor. It’s just a simple way of baking homemade bread inspired by the no-knead technique originating from bread expert Jim Lahey.
Here’s why it’s so simple:
- Absolutely no kneading (just like homemade English muffins)
- Zero complicated shaping
- No mixer required
- 90% of the time is totally hands off
- Dough can rest in the refrigerator for up to 3 days—a great make-ahead recipe
- Can bake in a dutch oven or on a baking sheet
The trick is giving the risen dough a rest in the refrigerator. The cool air slows the fermentation process and helps develop better flavor.
Grab These Ingredients:
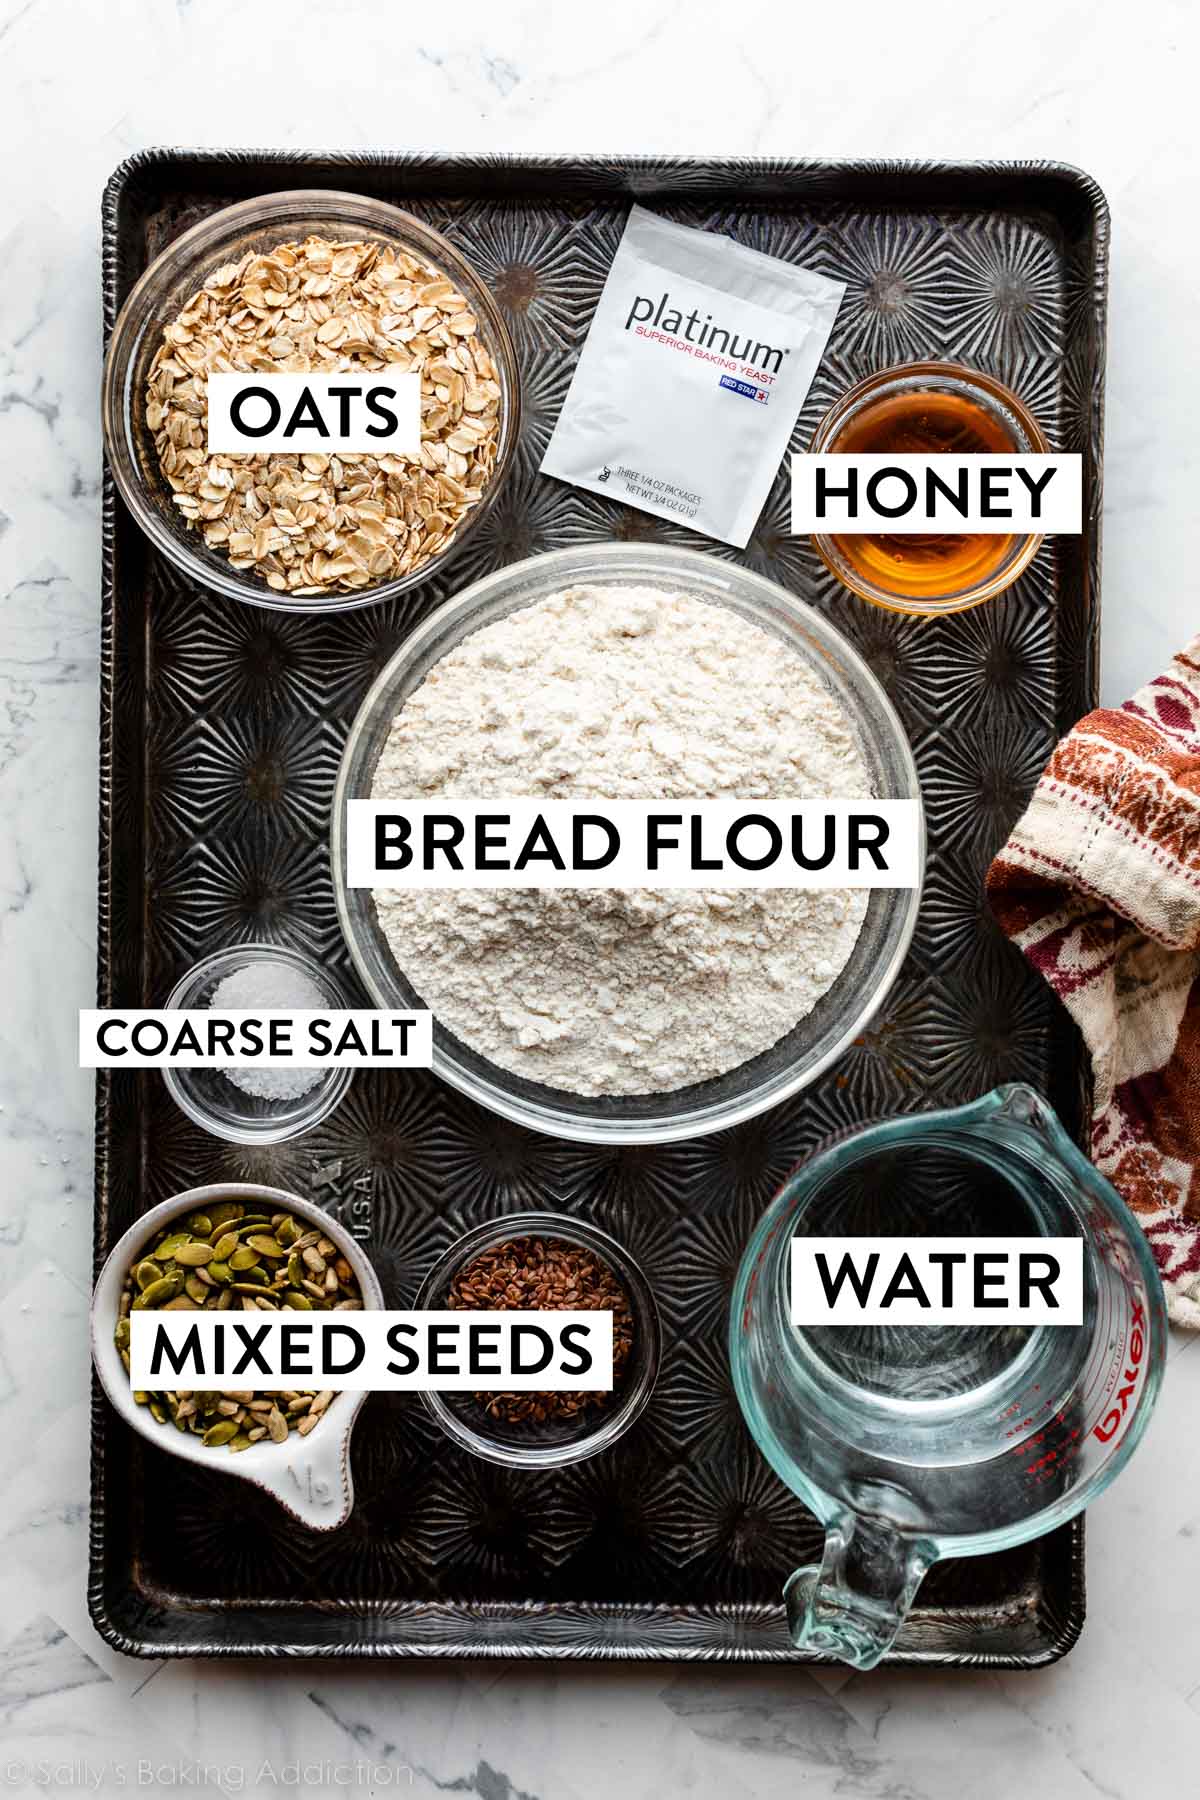
Here’s why each ingredient is so important:
- Bread Flour: While you could use all-purpose flour in this recipe, I strongly recommend using bread flour. Bread flour produces a stronger, chewier bread, and that makes a big difference in an artisan-style loaf like this oat bread.
- Oats: Oats provide a little wholesome texture. As the dough rises, the oats soak up some moisture and expand. Whole rolled oats are best, but you can use quick oats if needed.
- Salt: I recommend using coarse sea salt because I find the bread’s flavor lacking with regular table salt.
- Instant Yeast: I always use Platinum Yeast by Red Star, which is an instant yeast (aka “quick rise” yeast). 2 teaspoons is a little less than 1 standard packet. (If using active dry yeast, there are no changes needed to the recipe. The rise time may just take slightly longer.) I use more yeast in this recipe compared to my cranberry nut no-knead bread and jalapeño cheddar bread. Why? Those doughs rest and rise at room temperature. However, for more flavor and just as much rise, I use more yeast and let this dough rest in the refrigerator.
- Seeds: Pumpkin, sunflower, and flax seeds are all highly nutritious—they’re pretty much superfoods. I love that these 3 types of seeds vary so much in size and texture, but if you’d like to change up the types of seeds in this mixture, go for it. I use a medley of seeds in this multigrain bread, too. (And even these quinoa snack bars!)
- Honey: Honey helps give this bread a springy, spongey texture. It also adds a little sweetness, but we’re using half as much honey here than in my honey oat bread recipe, so the bread isn’t super sweet.
- Water: You’ll also need a little warm water to bring all the ingredients together. I use cool, room temperature water in olive bread and artisan homemade bread, two other no-knead doughs, but with the addition of oats today, the yeast has to work harder, and warm water helps it work quicker.
Let Me Show You How to Make This Seeded Bread
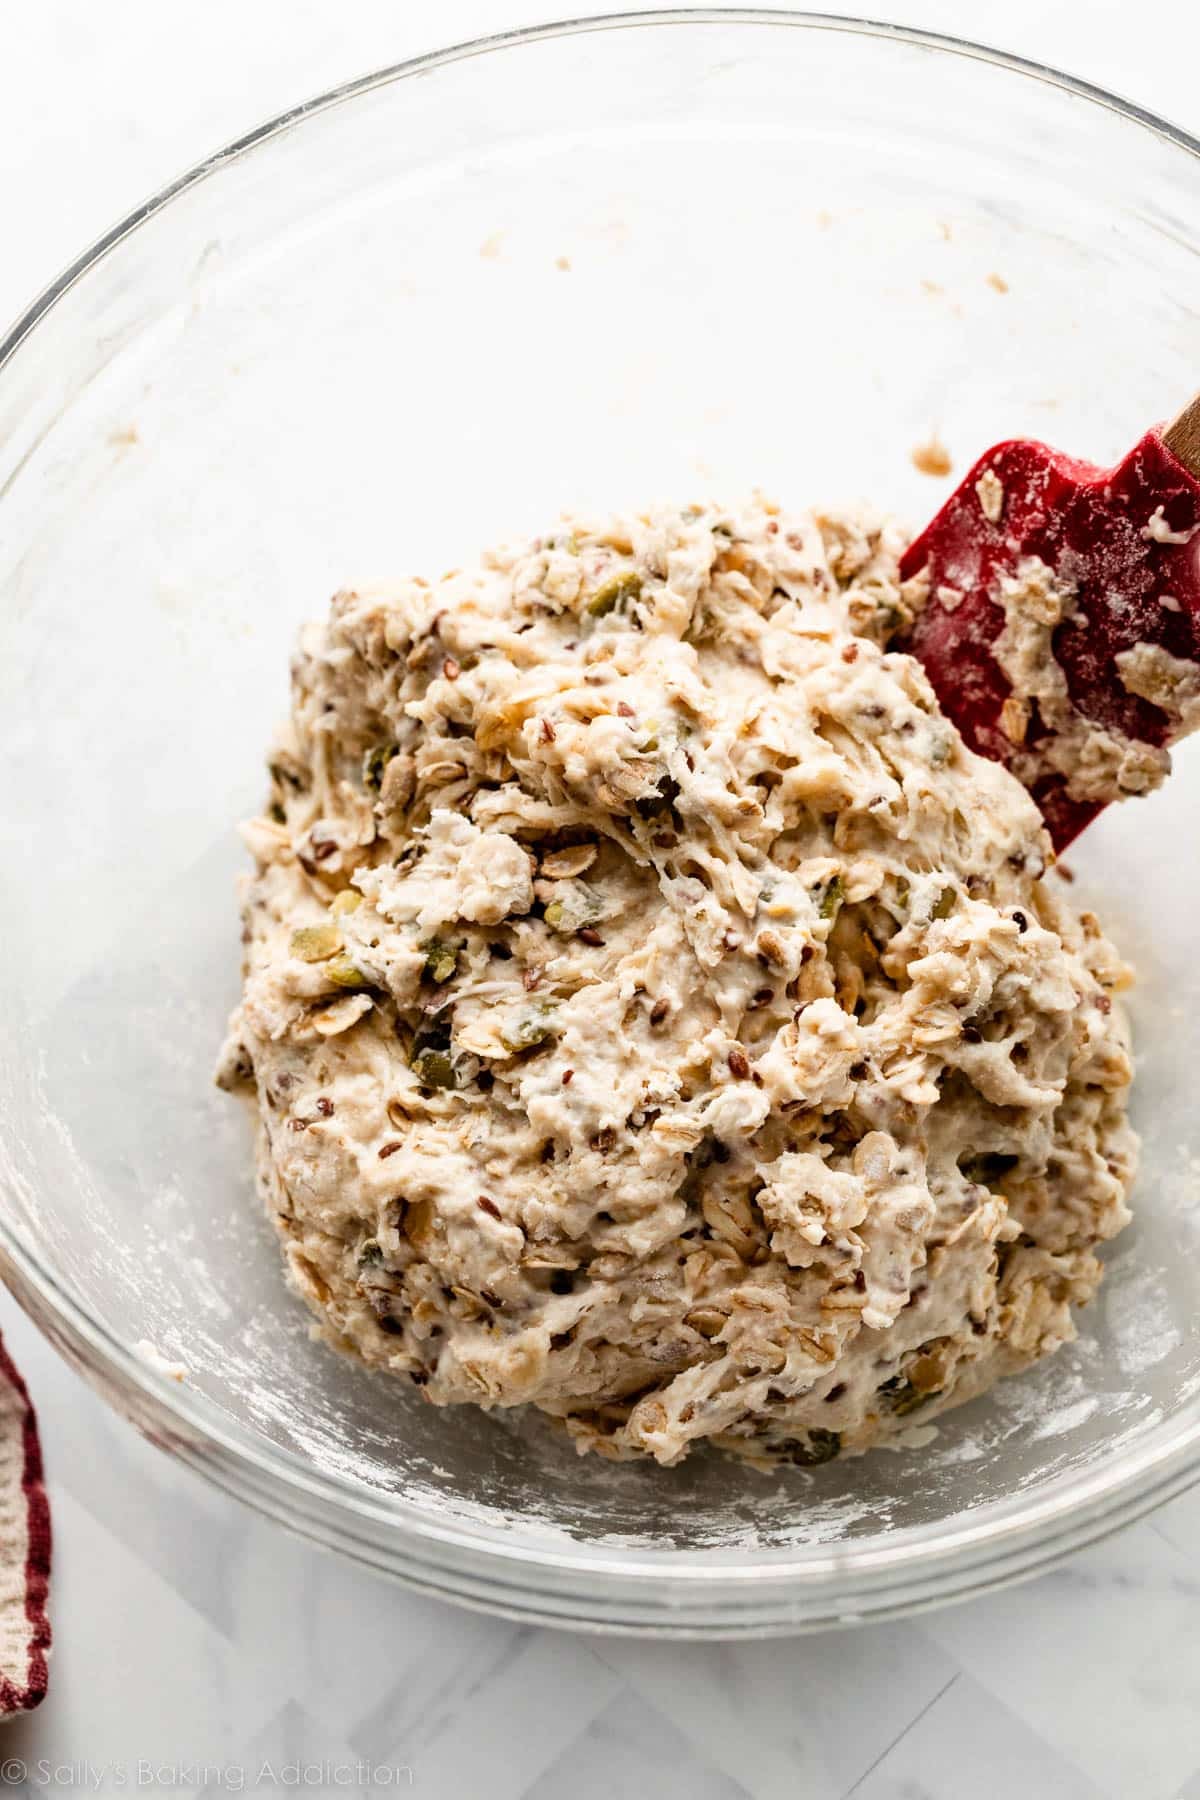
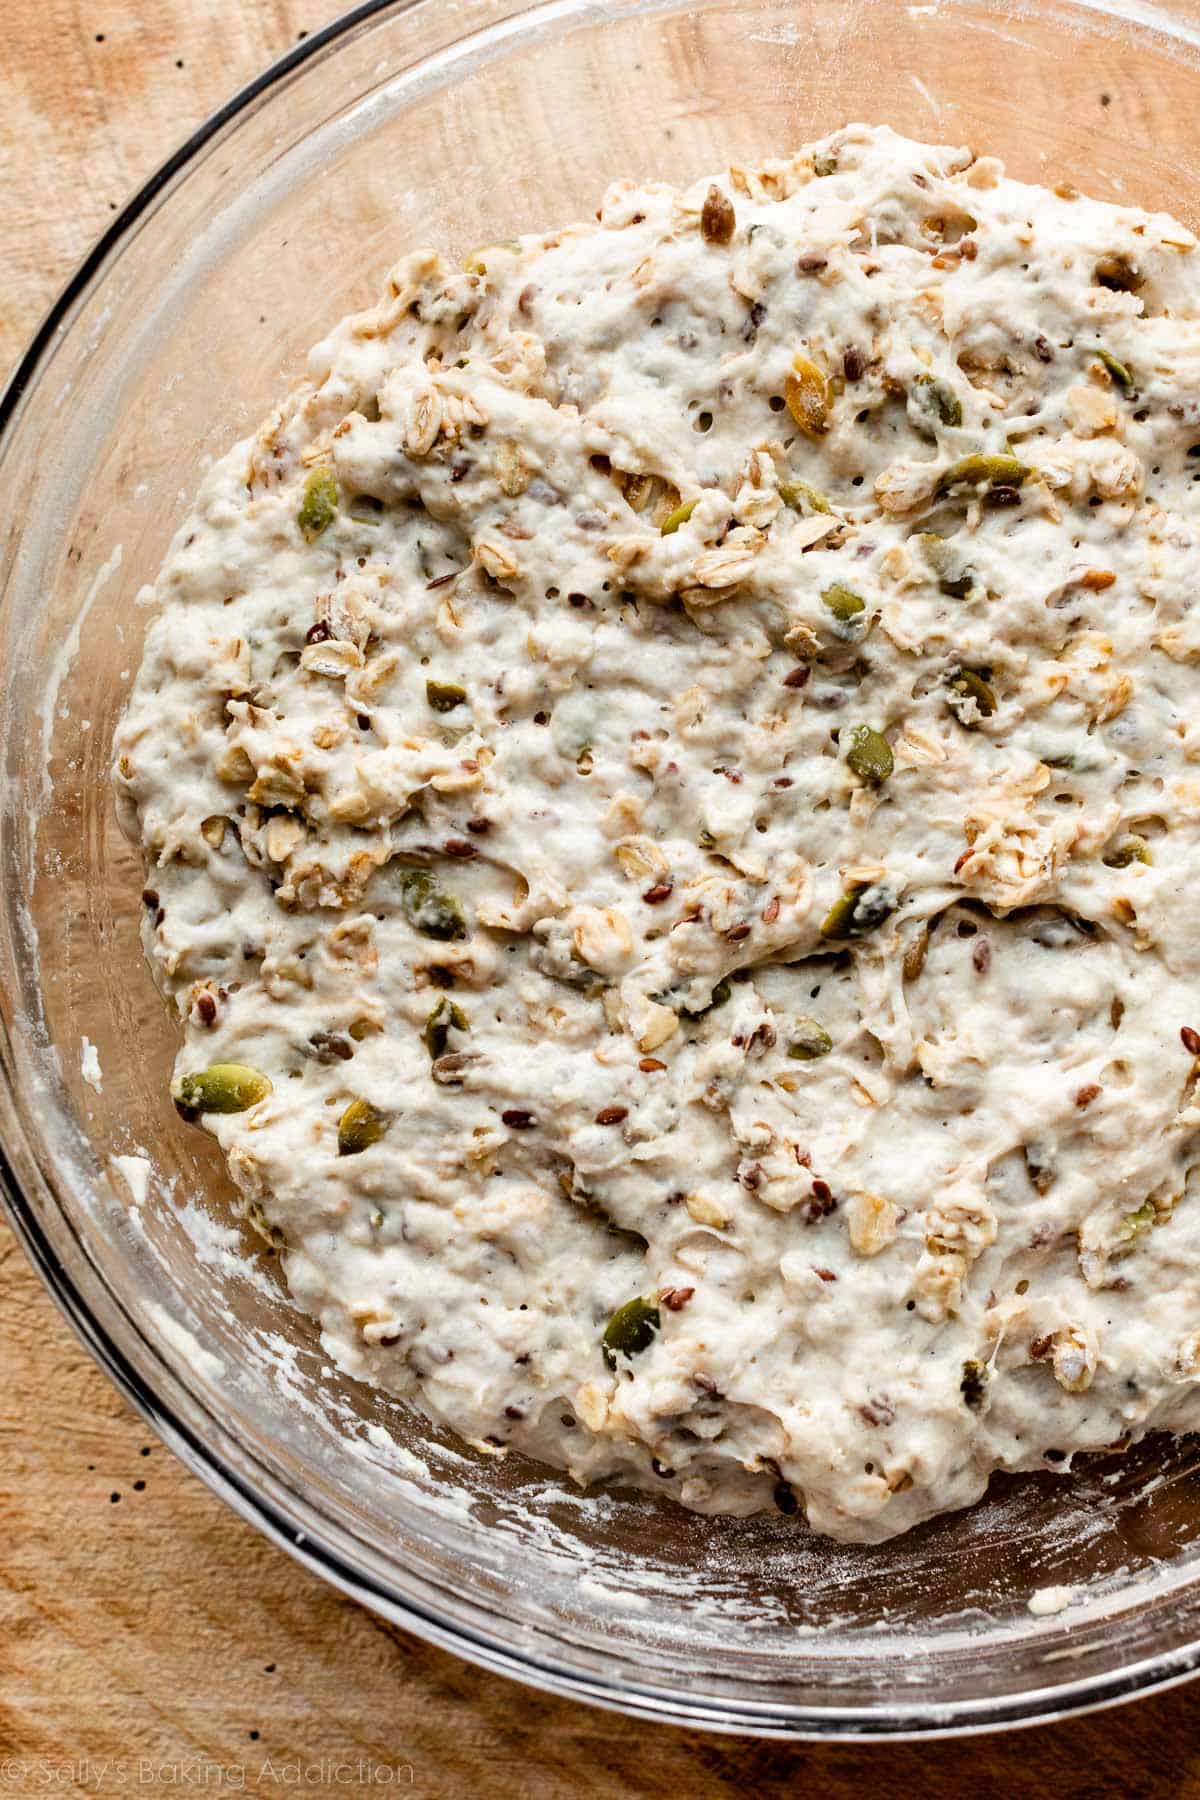
The full written recipe is below, but use the following explanations and step photos to help you get started. Bring the dough ingredients together as instructed in the recipe. At first the dough will seem very dry and shaggy and you’ll question if it will even come together. It will. In fact, the dough is a little sticky after it has been thoroughly mixed:
Let it rise. Cover the dough and let it rise at room temperature for about 3 hours. Notice that the dough rises OUT more than it rises UP. That’s ok.
You can move on to shaping and baking the dough, but for best flavor, I strongly recommend refrigerating the risen dough, even if it’s just for a couple hours. I usually refrigerate it for 12 hours.
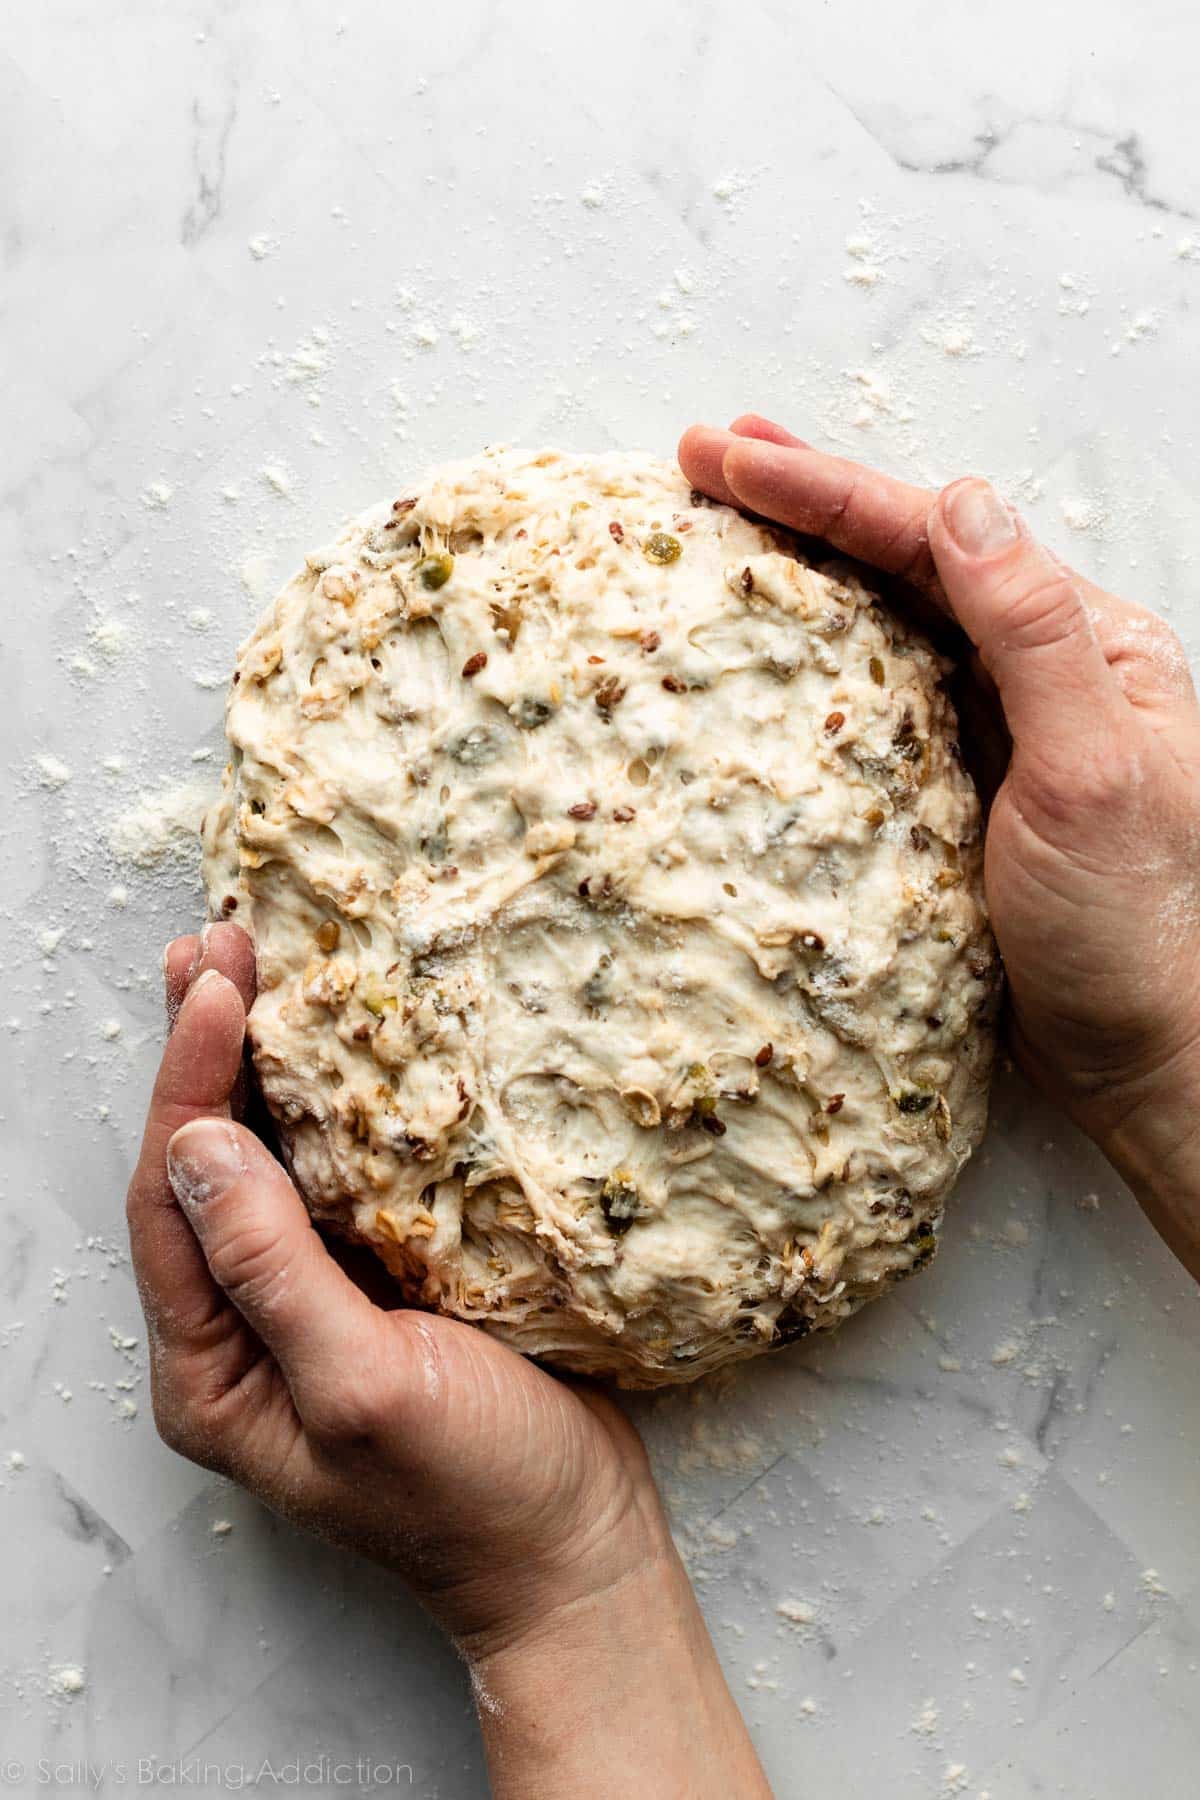
After the dough rises and rests in the refrigerator, use generously floured hands to shape the dough into a round boule or ball-like shape.
Use a Baking Sheet or Dutch Oven
Baking the seeded oat bread in a covered dutch oven traps steam inside the pot, creating that perfect crispy crust. If you plan to bake a lot of bread in the future, you won’t regret buying a dutch oven. If you don’t have a dutch oven, a nonstick baking sheet is best. (I use a baking sheet in the video tutorial below. And even have a trick for creating a steamy oven!)
- Baking Sheet: If you’re using a baking sheet, dust the pan with cornmeal and/or a little flour. Place the dough on top, cover it, and let it rest as the oven preheats. You will find these detailed instructions in the recipe below, along with my optional steamy oven trick for a crispy crust in step 10. (Adding boiled water to a pan beneath the baking bread. Works great!)
- Dutch Oven: Place the empty dutch oven with lid in the oven as it preheats. Place the ball of dough on high-heat-resistant parchment paper (I use this parchment paper), and then fit it inside a bowl. Cover and let the dough rest as the oven preheats, then place it (with the parchment) in the hot dutch oven before baking. You will find these detailed instructions in the recipe Note below.
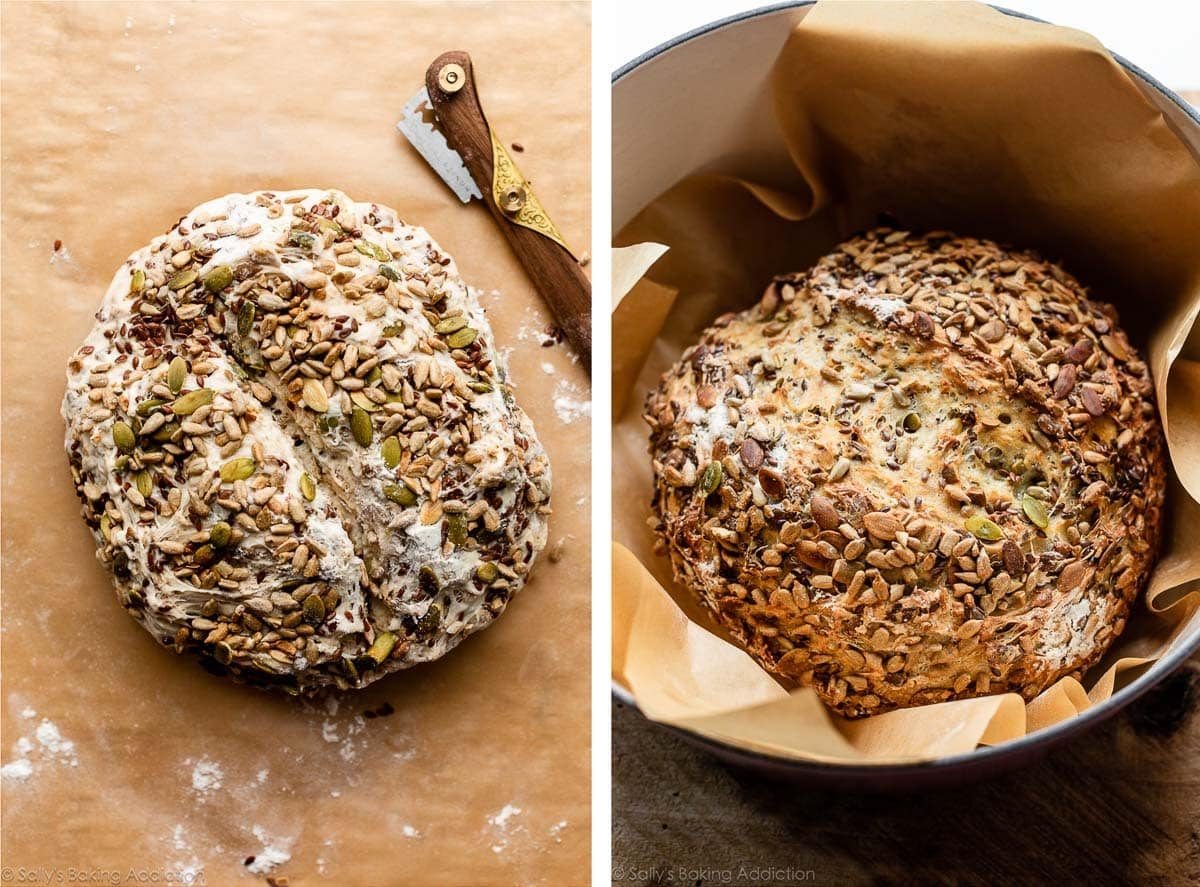
Whichever baking method you use, don’t forget to add seeds/oats to the exterior of the dough (I usually just press them on). And make sure you score the dough with a bread lame or sharp knife before baking. Scoring allows the wet, airy dough to “breathe” as it expands and bakes.
Baking sheet method:

Dutch oven method:
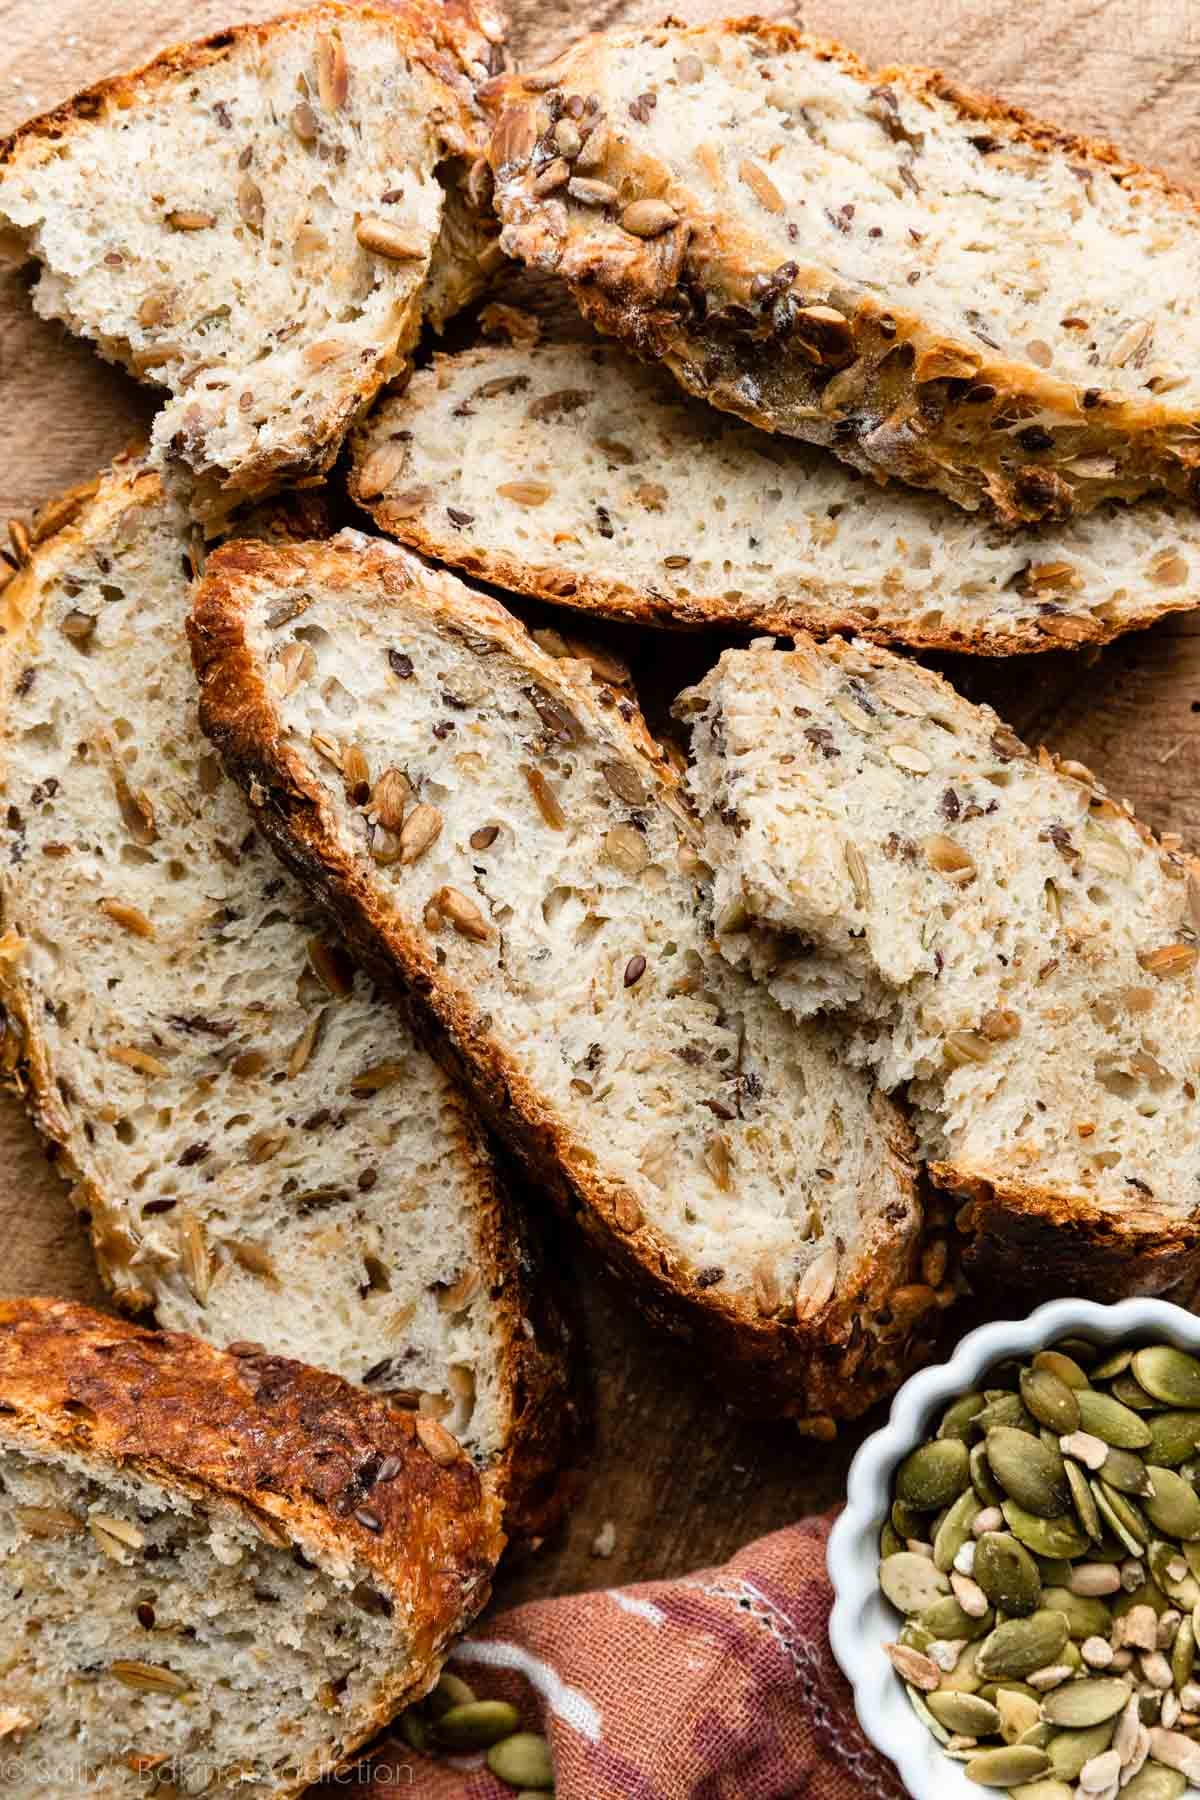
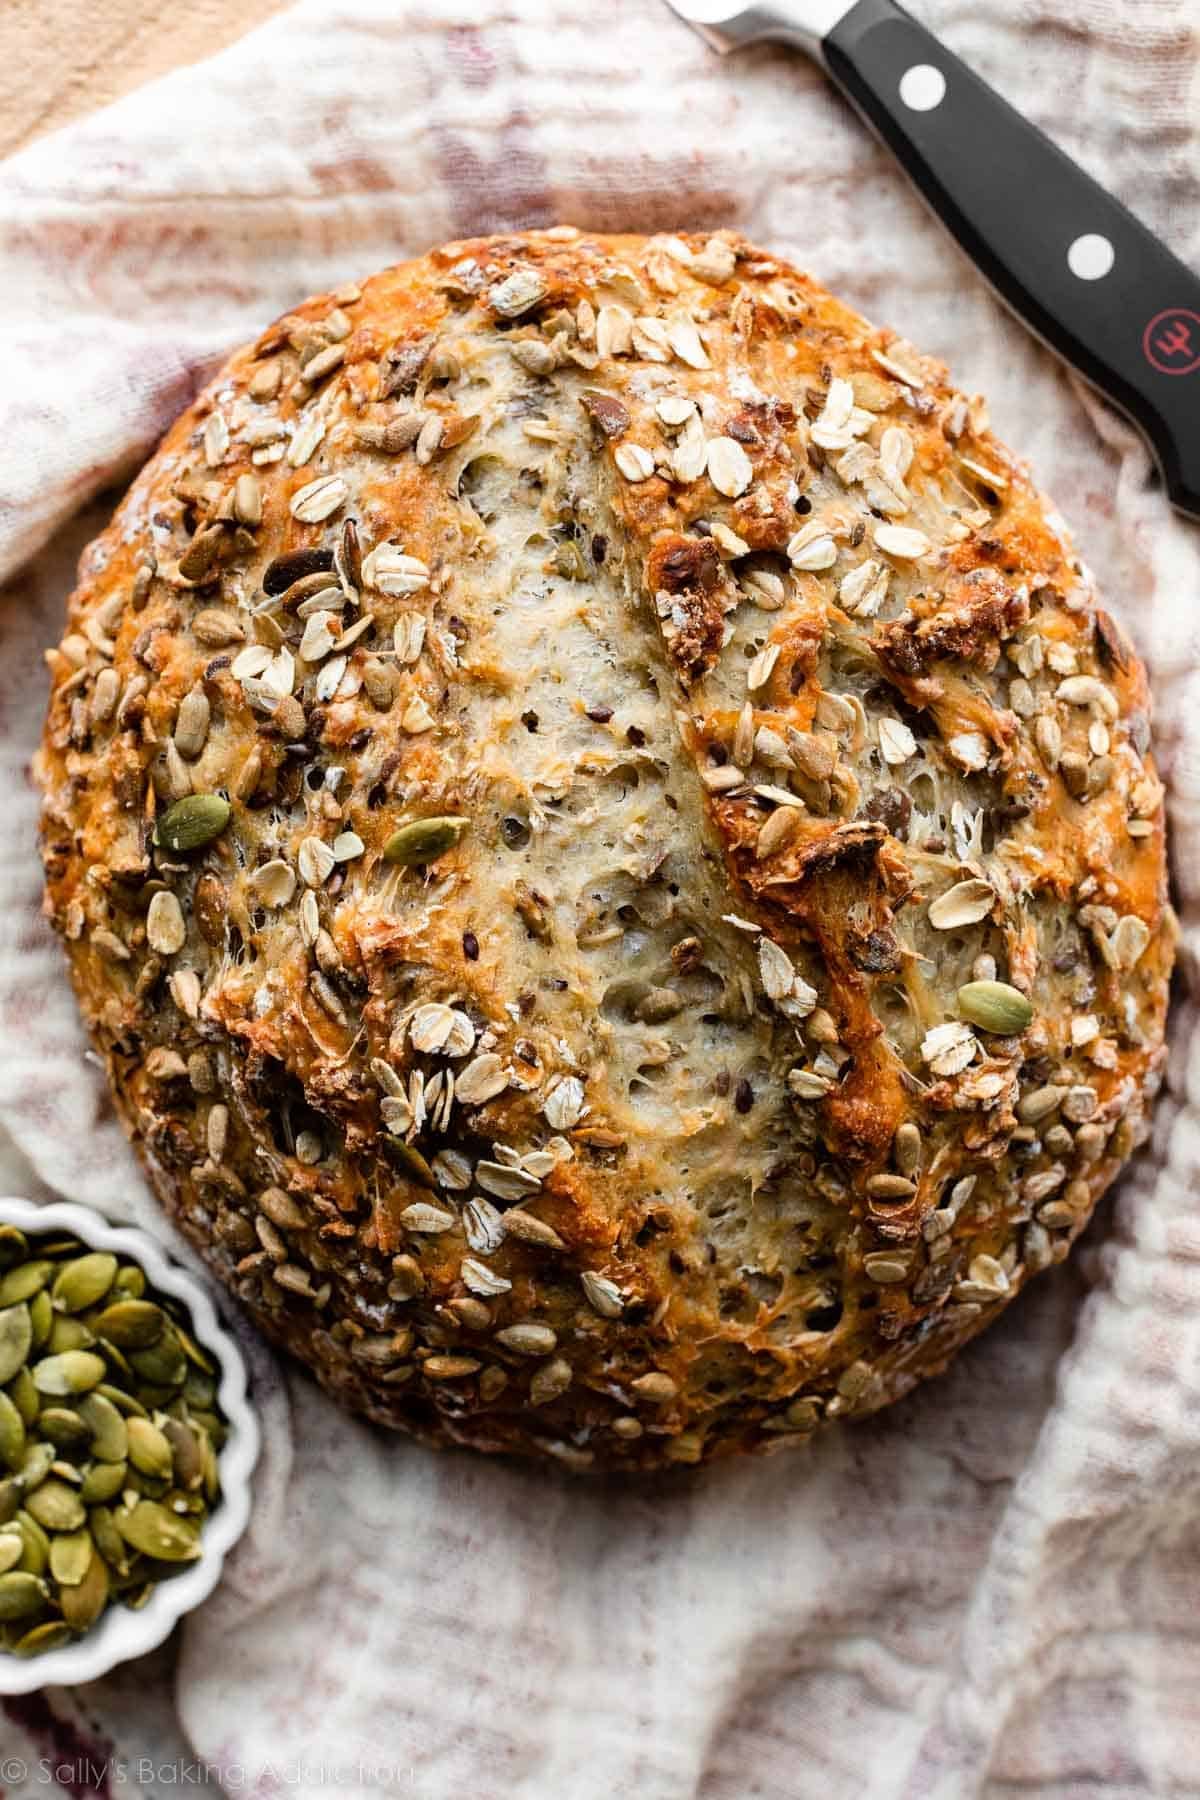
The bread is unbelievable when it’s fresh from the oven—warm, crispy, crusty, soft, and loaded with texture inside and out!
What Do I Serve With Seeded Bread?
Honestly, it’s fantastic plain, with a swipe of butter or a dip-dish of olive oil. The bread would also be delicious paired with homemade pesto or homemade honey butter.
But I especially love serving this seeded oat bread alongside a soup, like this creamy chicken noodle soup or homemade alphabet soup. It also gives phenomenal texture to grilled cheese sandwiches, and makes a hearty base for creamy smashed avocado and soft eggs.
If you manage to have any leftover, make use of the stale bread in this easy breakfast casserole!
Yeast Bread Success Tips
If you’re a bread beginner, reference this Baking with Yeast Guide for helpful, easy-to-understand answers to many yeast FAQs.

No Knead Seeded Oat Bread
- Prep Time: 4 hours
- Cook Time: 40 minutes
- Total Time: 5 hours (includes slight cooling)
- Yield: 1 loaf; 10-12 servings
- Category: Bread
- Method: Baking
- Cuisine: American
Description
Follow this easy no-knead recipe for a hearty loaf of homemade seeded oat bread. Review Notes before beginning. If you’re new to working with yeast, reference my Baking with Yeast Guide for answers to common yeast FAQs.
Ingredients
- 3 cups (390g) bread flour (spooned & leveled), plus more as needed for shaping and pan
- 2 teaspoons (about 6g) Platinum Yeast from Red Star instant yeast
- 1 cup (85g) old-fashioned whole rolled oats
- 1/4 cup (30g) unsalted pumpkin seeds (pepitas)
- 1/4 cup (30g) salted or unsalted sunflower seeds
- 2 Tablespoons (18g) flax seeds or sesame seeds
- 2 teaspoons coarse salt
- 2 Tablespoons (43g) honey
- 1 and 1/2 cups (360ml) warm water (about 95°F (35°C))
- optional: cornmeal for dusting pan
Topping
- 1 Tablespoon (5g) old-fashioned whole rolled oats
- 1 Tablespoon (8g) pumpkin seeds (pepitas)
- 1 Tablespoon (8g) sunflower seeds
- 1 teaspoon flax seeds or sesame seeds
Instructions
- Watch the video below before you begin, and let that be your visual guide for this recipe.
- In a large un-greased mixing bowl, whisk the flour and yeast together. Add the oats, pumpkin seeds, sunflower seeds, flax seeds, and salt and whisk to combine. Mix the honey and water together, and then pour over the dry ingredients. Using a silicone spatula or wooden spoon, gently mix together. The dough will seem dry and shaggy, but keep working it until all the flour is moistened. If needed, use your hands to work the dough ingredients together. The dough will be very sticky. Shape into a ball in the bowl as best you can. (Tip: Stir dough by hand. Dough is too sticky for a mixer.)
- Keeping the dough in the bowl, cover the dough tightly with plastic wrap or aluminum foil and set on the counter at room temperature (honestly any normal room temperature is fine). Allow to rise for 3 hours. The dough will just about double in size, stick to the sides of the bowl, and have a lot of air bubbles.
- You can continue with step 5 immediately, but for absolute best flavor and texture, I strongly recommend letting this risen dough rest in the refrigerator for at least 12 hours and up to 3 days. (Even just a couple hours is good!) Place covered dough in the refrigerator for up to 3 days. The dough will puff up during this time, but may begin to deflate after 2 days. That’s normal and nothing to worry about.
- Lightly dust a large nonstick baking sheet (with or without rims, and make sure it’s nonstick) with a little flour and/or cornmeal. Using generously floured hands and gentle pressure so as to not deflate the dough too much, shape the risen dough into a ball. (I just do this right inside the bowl it’s in, or you can do this on a lightly floured work surface.) Dough is very sticky.
- Transfer ball to prepared baking sheet. Mix topping ingredients together. Sprinkle on top of dough, and if the seeds aren’t sticking, press them into the dough as best you can. Loosely cover and allow dough to rest for 45 minutes. You will bake the dough on this prepared baking sheet. See recipe note if you want to use a pizza stone or dutch oven.
- During this 45 minutes, preheat the oven to 425°F (218°C).
- When ready to bake, using a very sharp knife or bread lame (you could even use kitchen shears), score the dough with a slash or X about 1/2 inch deep. (“Score” = shallow cut.) If the shaped loaf flattened out during the 45 minutes, use floured hands to reshape.
- Place the shaped and scored dough (on the flour/cornmeal-dusted pan) in the preheated oven on the center rack.
- Optional for a slightly crispier crust: Place a shallow metal or cast iron baking pan or skillet (I usually use a metal 9×13-inch baking pan) on the bottom oven rack. Carefully and quickly pour 3–4 cups of boiling water into the shallow pan. Quickly shut the oven to trap as much steam inside. The steam helps create a crispier crust.
- Bake for 40 minutes or until the crust is golden brown. If you notice the exterior browning too quickly, tent the bread with aluminum foil. How to test for doneness: Give the warm bread a light tap. If it sounds hollow, it’s done. For a more accurate test, the bread is done when an instant read thermometer reads the center of the loaf as 195°F (90°C).
- Remove the bread from the oven and allow to cool for at least 10–20 minutes before slicing and serving.
- Store leftovers loosely covered at room temperature for up to 3 days or in the refrigerator for up to 10 days.
Notes
- Make Ahead & Freezing Instructions: The dough can sit in the refrigerator for up to 3 days (step 4), so this is a wonderful recipe to begin ahead of time. You can also bake the bread, allow it to cool, and freeze for up to 3 months. Thaw in the refrigerator and allow to come to room temperature before serving. You can also freeze the dough. Complete the recipe through step 5. Wrap in plastic wrap and place in a freezer-friendly container. Freeze up to 3 months. To bake, allow dough to thaw overnight in the refrigerator, or for 2–3 hours at room temperature. Continue with step 6, including allowing dough to rest for 45 minutes before baking. Keep in mind that the bread tastes a little heavier after freezing/thawing the dough and then baking it.
- Special Tools (affiliate links): Glass Mixing Bowls | Silicone Spatula or Wooden Spoon | Baking Sheet | 2-cup Measuring Cup | Bread Lame | Instant-Read Thermometer | Coarse Salt
- Flour: For absolute best flavor and chewy texture, I strongly recommend using bread flour. You can use a 1:1 substitution of all-purpose flour in a pinch with no other changes to the recipe. I recommend avoiding whole wheat flour in this dough; however, if necessary, you can replace up to 1 cup (about 130g) of the bread flour with whole wheat flour. The bread will taste a bit heavy.
- Yeast: I always use Platinum Yeast from Red Star, an instant yeast. You can use any instant yeast in this dough. If using active dry yeast, the 1st rise time is usually slightly longer, about 3.5–4 hours. Reference my Baking with Yeast Guide for answers to common yeast FAQs.
- Salt: Use a coarse salt, such as coarse sea salt, in this bread. I find the flavor slightly lacking when using regular table salt. If you only have table or fine salt, reduce to 1 and 1/2 teaspoons.
- Seeds: Feel free to use more/less of a particular seed you love, or skip any seeds if you wish. Around 1/2 cup of larger seeds and 2 Tablespoons of smaller seeds is ideal. I usually use unsalted pepitas and salted sunflower seeds. Salted or unsalted are fine, but I don’t recommend 1/2 cup of salted seeds, so if you want to use salted, use 1/4 cup of salted and 1/4 cup unsalted. If you want to add poppy seeds, replace 1 Tablespoon of flax seeds/sesame seeds with poppy seeds. Or just use 1 Tablespoon poppy seeds and skip the flax/sesame.
- Using a Dutch Oven: You need a 6-quart or larger dutch oven or any large oven-safe pot with a lid. Prepare dough recipe above through step 4, including refrigerating the risen dough for at least 12 hours. After refrigerating, turn the dough out onto a lightly floured work surface and, using lightly floured hands, shape into a ball as best you can. Doesn’t have to be perfect. Transfer dough to a large piece of parchment paper. (Large enough to fit inside your pot and one that is safe under such high heat. I use this parchment and it’s never been an issue.) Lift the parchment paper and dough up and place it all into a large mixing bowl. Cover dough lightly with plastic wrap and leave alone for 30 minutes. During this 30 minutes, preheat the oven to 425°F (218°C). Place your dutch oven (with the lid) inside for 30 minutes so that it’s extremely hot before the dough is placed inside. After 30 minutes, sprinkle seed topping all over dough. Using a bread lame or sharp knife, gently score a 1/2-inch-deep slash or X into the top. Remove the dutch oven from the oven and carefully place the dough inside by lifting it up with the parchment paper and placing it all—parchment paper included—inside the pot. Cover with the lid. Bake for 30 minutes with the lid on. Carefully remove the lid and continue baking for 10 more minutes or until the bread is golden brown. You can test for doneness exactly how you would in step 11 above. Remove pot from the oven, carefully remove the bread from the pot, and allow to cool on a wire rack for 10–20 minutes before slicing/serving.
- Using a Pizza Stone: If you want to bake your bread on a pizza stone, place pizza stone in the preheating oven. Remove hot pizza stone, dust with cornmeal or a little flour, and then transfer shaped and scored dough to hot pizza stone and bake as directed.
- No Nonstick Pan? If you don’t have a nonstick baking sheet, line it with parchment paper instead. Coat with a dusting of flour and/or cornmeal before placing the dough on top. Parchment paper can burn, so it’s best to check the box to see how much heat yours can tolerate. Lower your oven heat if necessary, and bake the bread for longer until it’s golden brown and sounds hollow when tapped.


Reader Comments and Reviews
Is it best to cook this bread (convection bake) or regular (Bake) when putting in the oven or does it even make a difference?
Hi Tea, We always recommend conventional settings for baking (not convection/fan). The flow of air from convection heat can cause baked goods to rise and bake unevenly and it also pulls moisture out of the oven. If you do use convection/fan settings for baking, lower your temperature by 25 degrees F and keep in mind that things may still take less time to bake.
Hi! Can you replace the honey with molasses? Thx
Definitely; that should work very nicely.
Great. I’m baking it tomorrow morning. Will let you know how it worked out. Ps… thanks for the quick reply.
Love love love this. I’m making my third loaf. I follow your instructions exactly.
BUT
for this loaf I’m out of course sea salt. Is there any substitute? I don’t want to not make the bread. The only course ground salt I have is called” French Gray Salt. Do you think that might work?
Hi Dianne! You can certainly try your French Gray Salt. If you only have table or fine salt, reduce to 1 and 1/2 teaspoons.
Thank you so much! Good to know about the table salt too (just in case).
This bread has become a staple for me & my wife. We make it almost every week and really enjoy it. It’s quick and easy as long as we plan ahead for the night in the fridge.
I forgot to rate it.
Absolutely incredible bread! It is a forgiving recipe, too. I wasn’t able to give it much refrigerator time, and it was still amazing. The fam was asking for more.
So my question is can I double the recipe for 2 loaves?
Thank you!
Hi Bonnie, it’s best to make two batches of dough instead of doubling. Happy baking!
I’ve done double the recipe multiple times now. I bake one after letting it rise to double size and put the other half in the fridge and bake when the first loaf is gone, usually two days later. I personally don’t notice a difference between the loaves. I do mix all the dry ingredients first and let the yeast flower in the water since I don’t have instant yeast.
How would you differentiate the recipe if you used sourdough starter instead of yeast?
Hi Sarah, we haven’t tested this recipe using a sourdough starter, but several readers have reported using it with success. Let us know if you do any experimenting!
Do you have to use a glass bowl or is metal or plastic OK?
Hi Pat, you can use any mixing bowl.
What a great, easy recipe! I made this bread as written with pumpkin, sesame, and sunflower seeds, let it rest for 2 days in the fridge, and used the instructions for the Dutch oven. The only thing I did differently was I put the water and honey in my bowl, then added the dry ingredients to that to hopefully limit pockets of flour. I brought it to a dinner, and everyone kept commenting how surprisingly light the bread part was even with the seeds. I would definitely recommend this for folks who are new to bread!
Can this be made with gluten free bread flour?
Hi Meredith! We have not tested this with any gluten free flours but let us know if you give it a try!
Hi Sally – long time follower and rely on your recipes for everything. With these “no knead” recipes, is there a downside if you treat it like a traditional kneaded bread recipe if you don’t have the time to wait? Or do traditional kneaded bread recipes have a lower water content for kneading?
Any suggestions on how to alter the recipe to go back and forth between the two methods?
Hi Stephanie! No-knead recipes should not be kneaded, they are specifically formulated for this method.
I am eagerly awaiting my dough to rise (it’s been in the fridge about 20 hours and I won’t be able to make it until tomorrow, so another 18 hours or so). My question is: Do you need to let the dough rise at room temperature BEFORE you refrigerate the dough (for up to 3 days)? Yiikes, I am rereading the instructions and I believe I just found the answer to my question :(….
I put it in the fridge without any rising…
How can I fix this? Just let it rise a few hours before baking?
Hi Monique, we do recommend letting the bread rise at room temperature before placing in the refrigerator. You can still proceed with the recipe—has your dough about doubled? It will come back to room temperature during the 45 minute pre-heat time in step 7. Hope you enjoy the bread!
Made Dutch oven method. First time to try no knead technique. Didn’t have time for the refrigerator part, did proof 3 hrs and rest 30”, used lame for the top cut. Seeds were gently pushed onto the loaf and didn’t stay as well as I had hoped, but didn’t want to deflate the air bubbles. Loaf looks like the picture, tastes great. It is a dense hearty bread. Will be good for sandwiches and toast. Looks like the picture above for this method.
Hi Sally,
I love your recipes! Is there any chance you could include what the internal temperature of your bread recipes should be when they are completely baked?
Hi Donna! See step 11: For a more accurate test, the bread is done when an instant read thermometer reads the center of the loaf as 195°F (90°C).
I have a question about yeast measurement. 1 1/2 tsp on my scale weighs 6 gram not 4 gram. I normally use my scale for the dry ingredients. 6 gram seems more consistent with other things I’ve read. Which should I use? Scale or spoons?
Hi Melanie, This recipe calls for two teaspoons of yeast, which should be 6 grams. If there is a discrepancy in your measurements, use the weight.
Great flavour but very dense.
I should have watched the video 1st.
Your recipe states 360 ml water, but when the honey was added, fluid level raised 500 ml. My dough is so dry, but I followed with all other instructions
No air bubbles.
Made this for my daughter who loves seedy bread. The only change I’ll make next time is I’ll skip the topping seeds as they burned in the oven.
I hate to say it, but this is the worst bread I’ve ever made. Dense, doughy tasting and flavorless. I followed watched the video, followed the recipe exactly (I never change a recipe I am trying for the first time) and did allow overnight in the fridge. I covered and rested as instructed – everything looked exactly like your video. I feel like the recipe is missing something. Anyway – sorry for the bummer review, but for me… this is a miss.
Thank you for taking the time to leave feedback. Being a no-knead dough, it can certainly taste dense. Sorry you had so much trouble with it.
Mine came out the same. A flop. Did you ever try it again?
I’ve made several no knead breads and recipes. Sadly this did not come out well. I used bread flour and followed the recipe and instructions. The dough seemed very stiff as if it needed more water and after refrigerating overnight, it was very hard and was not bubbly and raised. I was unsure about the water temp of 95° but still followed the directions. I used the same yeast that worked well on my last loaf. So I think I should have used the warmer water temp of 115-120 and I think I should have used more water. Even at 195° internal temp and 45 min, the bread was heavy and doughy. But… this was good tasting bread! I love a good seeded bread and just need more experience with the whole bread process. Thank you!
Can the dough setting on a bread maker be used to make the dough?
Hi Monica, this particular dough wouldn’t work well in a bread machine, but it’s very simple and hand’s off to make!
Just love this recipe . Very easy to make and healthy. Your instructions are very thorough and extensive.
My only added note would to buy a Dutch dough whisk on Amazon that is priced at $8.48, I looked it up just now. It is a game changer if you make bread often, especially no knead recipes. Works well and you never get your fingers in the dough. Also, I use the hot Dutch oven method of baking this bread and need to be reminded that the pot is very hot when you go to put it back in the oven .
I love this bread and everyone I’ve ever shared it with does too!! After researching how to lower blood pressure & cholesterol I found that three ingredients in this oh so enjoyable bread I have even more reasons to make this often!
Today, when I got ready to place the dough in the fridge I shaped the dough into a ball first. I think this was supposed to be done afterwards.
I am concerned the bread will not rise now.
Is this fixable?
Very easy recipe, turned out beautifully. I haven’t had it toasted yet, but out of the oven (after resting), it was phenomenal. Could definitely diversify with the add ins – some finely chopped pecans or walnuts maybe. Looking forward to having a slice with breakfast tomorrow!
I added chopped apricots and a scatter of raisins.
It was glorious
Have you ever used a proofing bowl with this no knead seeded oat bread? I love, love the bread. I already have a proofing bowl and wondered if it is useful with this bread.
Hi Vickie, I wish we could help, but we have not tried using a proofing bowl, so are unable to offer advice. If you try it, please let us know how it goes!
I love this recipe! It’s so good & easy! Healthy! Texture is great- can’t say enough good things about it! And! It’s no Knead, whoop whoop!!
Hi Sally, I am looking forward to your loaf andmixed a barch yesterday and left it in the fridge overnight, covered with plastic, but the dough this morning is dry and quite hard. Ideas???
Thanks
Jo
Hi Jo! Was the plastic wrap completely air tight?
Hi, after taking out of refrigerator the top part was little hard and dry, is it normal?
I also flipped the dough,let’s see how it bakes.
I don’t see the video?
Hi Cheryl, the video can be found in the gray recipe card, immediately after the written recipe.
Delicious! And so easy. I didn’t have flax seed, so I replaced it with hemp seed. I skipped refrigerating the dough and used the Dutch oven method. After three hours of proofing, I prepared the dough with the topping and scouring and placed the dough in my HOT Dutch oven (I didn’t wait the extra 45 mins after shaping the dough on parchment paper). I cooked for the designated time, and the bread came out perfectly! It is so delicious and easy and makes an absolutely beautiful loaf!
This is so easy and absolutely delicious. Even my toddler likes it! I only had to add about 10 minutes to the bake time, probably due to my dough being so cold from the fridge. Will definitely be making it again and again!
Hi Sally. This looks yummy. Could it be baked in a standard loaf pan?
Hi Karen, you can certainly try a loaf pan. You may want to try this honey oat bread instead, and you can add seeds to that dough.
After proofing in refrigerator for a least 12 hours… does the dough should get warm up to room temperature and then rest for 45 minutes before being placed in the oven?
Or right from the refrigerator let the dough rest at room temperature for 45 minutes and it’s ready to bake?
My dough was cold to touch when I put it in the oven
Thank you
Hi Tatyana, let it rest for 45 minutes at room temperature, then bake it.
I had the same question. It’s unclear in the recipe unless you read past the parts about actually freezing the bread/dough. I suggest adding in a line about this to avoid similar confusion.