

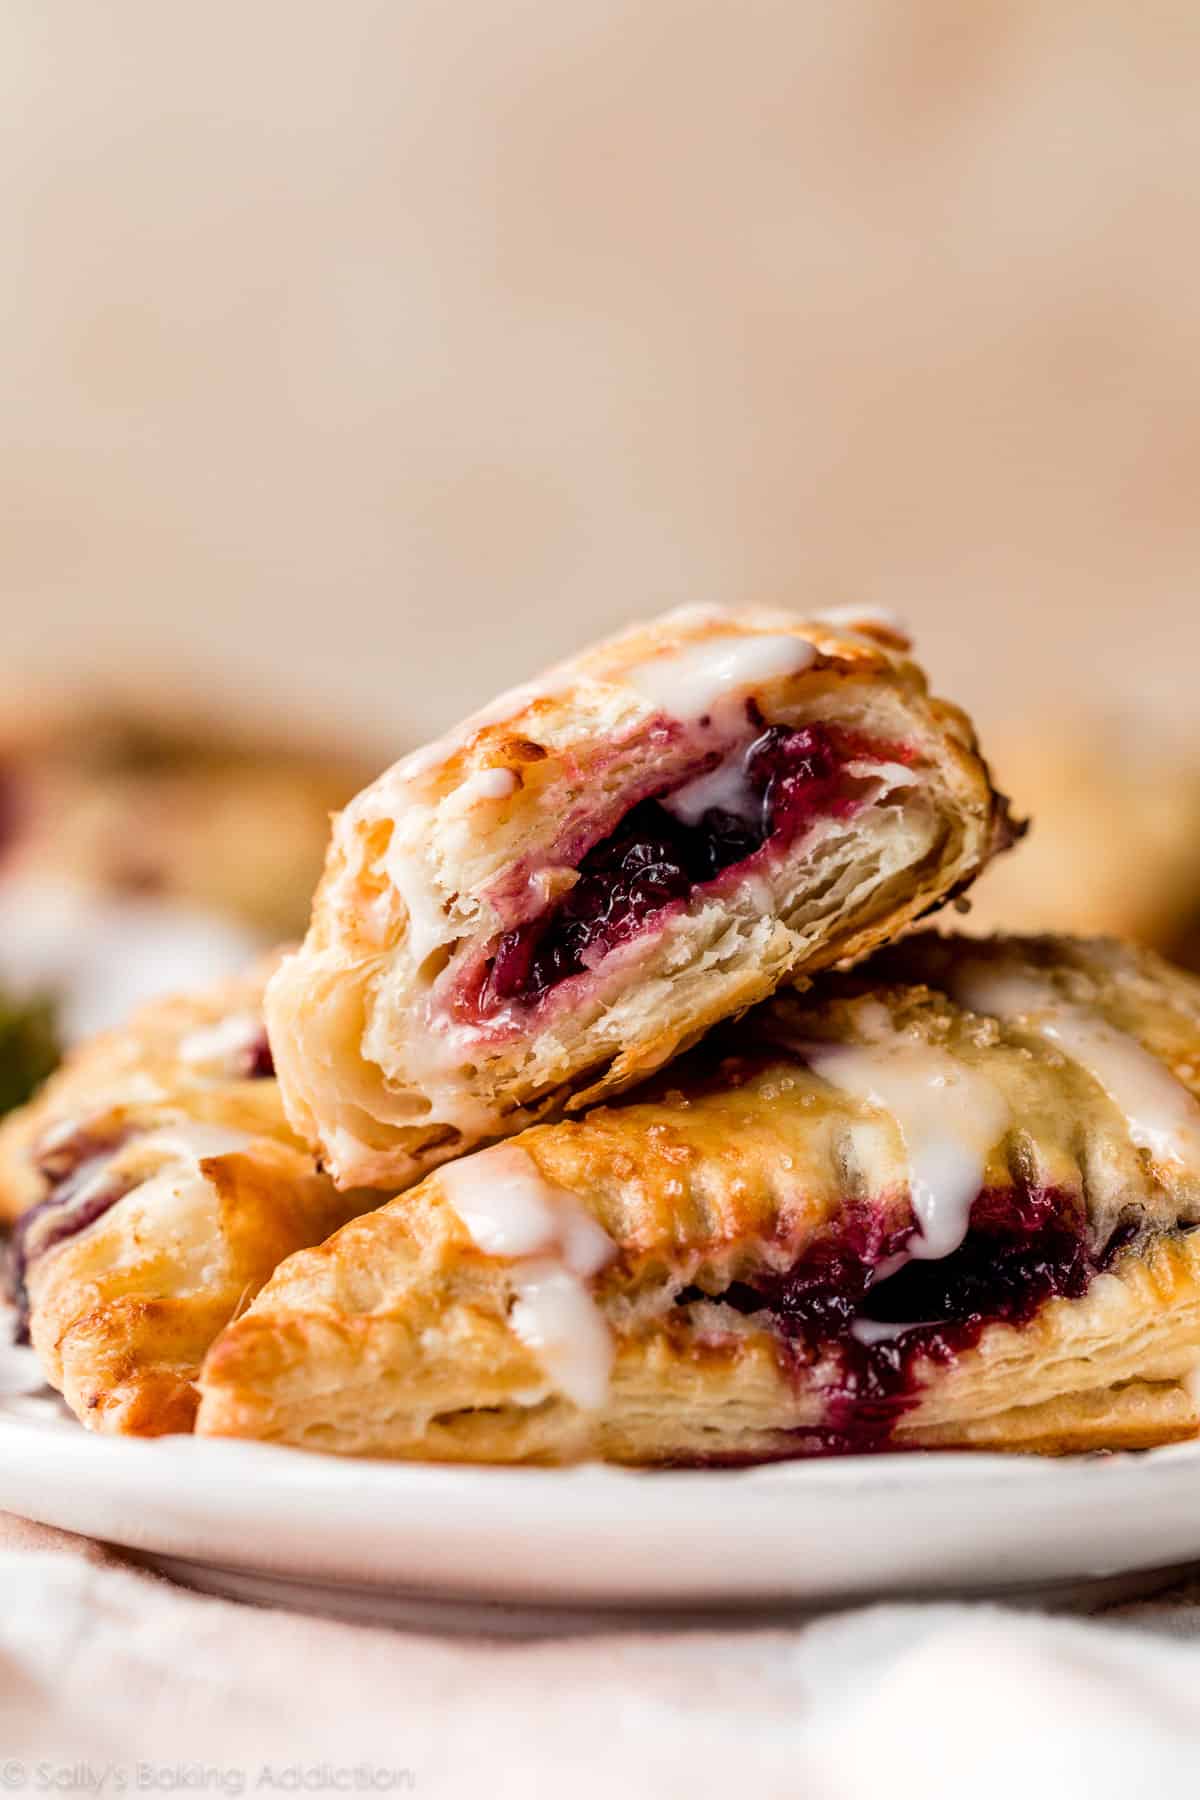
Use this in-depth tutorial to learn how to make a from-scratch puff pastry dough variation. The homemade dough comes together using a “rough puff” method where you carefully work butter into your dry ingredients and then fold and flatten the dough many times to create countless flaky layers. Unlike the breakfast pastries dough, this dough does not require any yeast and unlike croissants and traditional puff pastry, this dough does not require laminating with a layer of butter. Rather, the layers and crisp flakiness come from the particular mixing and folding methods.
One reader, Aimee, commented: “I have always wanted to try puff pastry. I always felt it was so ‘daunting.’ This recipe was so easy and my first ever puff pastry came out FANTASTIC! I do come to this site for new ideas. Thank you so much! ★★★★★“
Using this simplified method and a handful of basic ingredients, you’ll be amazed that you can make puff pastry from scratch within just a few hours. Whenever I make and bake this dough, I’m still stunned with the outcome! You’ll enjoy using this dough wherever you use a single pie crust or store-bought puff pastry.
This recipe is such a fan favorite, that it deserved a spot in print! You’ll also find this recipe in my cookbook, Sally’s Baking 101.
Next you’ll find some details, step-by-step photos, plus there’s a video tutorial in the recipe if that’s helpful too. All of this will help set you up for success when it’s your turn to try it!
What Is Rough Puff Pastry?
Rough puff pastry is also known as quick pastry and become really popular with professionals and home bakers because you get bakery-style puff pastry without precise shaping and laminating butter with dough. Cookbook author and chef Claire Saffitz has a wonderful recipe for it. The trick is to work large pieces of cold butter into dry ingredients and hydrate it all with ice cold water (as if you were making pie crust). Sometimes bakers grate butter into the mix or use a food processor. There’s lots of ways to make rough puff pastry.
With this recipe, I stick with cold cubes of butter and use my hands to rub the butter into the flour mixture. Your hands are your best tool and method here because it’s nearly impossible to over-mix the dough this way. If the dough is over-mixed and you break down the butter too much, you’ll lose layers.
- Can I use a food processor, pastry cutter, or other mixer? I do not recommend it. These tools slice down the butter too much and you’ll lose a lot of flaky layers. I tried and it’s not worth it because the result is closer to a greasy pie dough than a layered puff pastry. (Still good, but not the goal here.)
Rough Puff Pastry Details
- Taste: Buttery, hardly sweetened, a little salty.
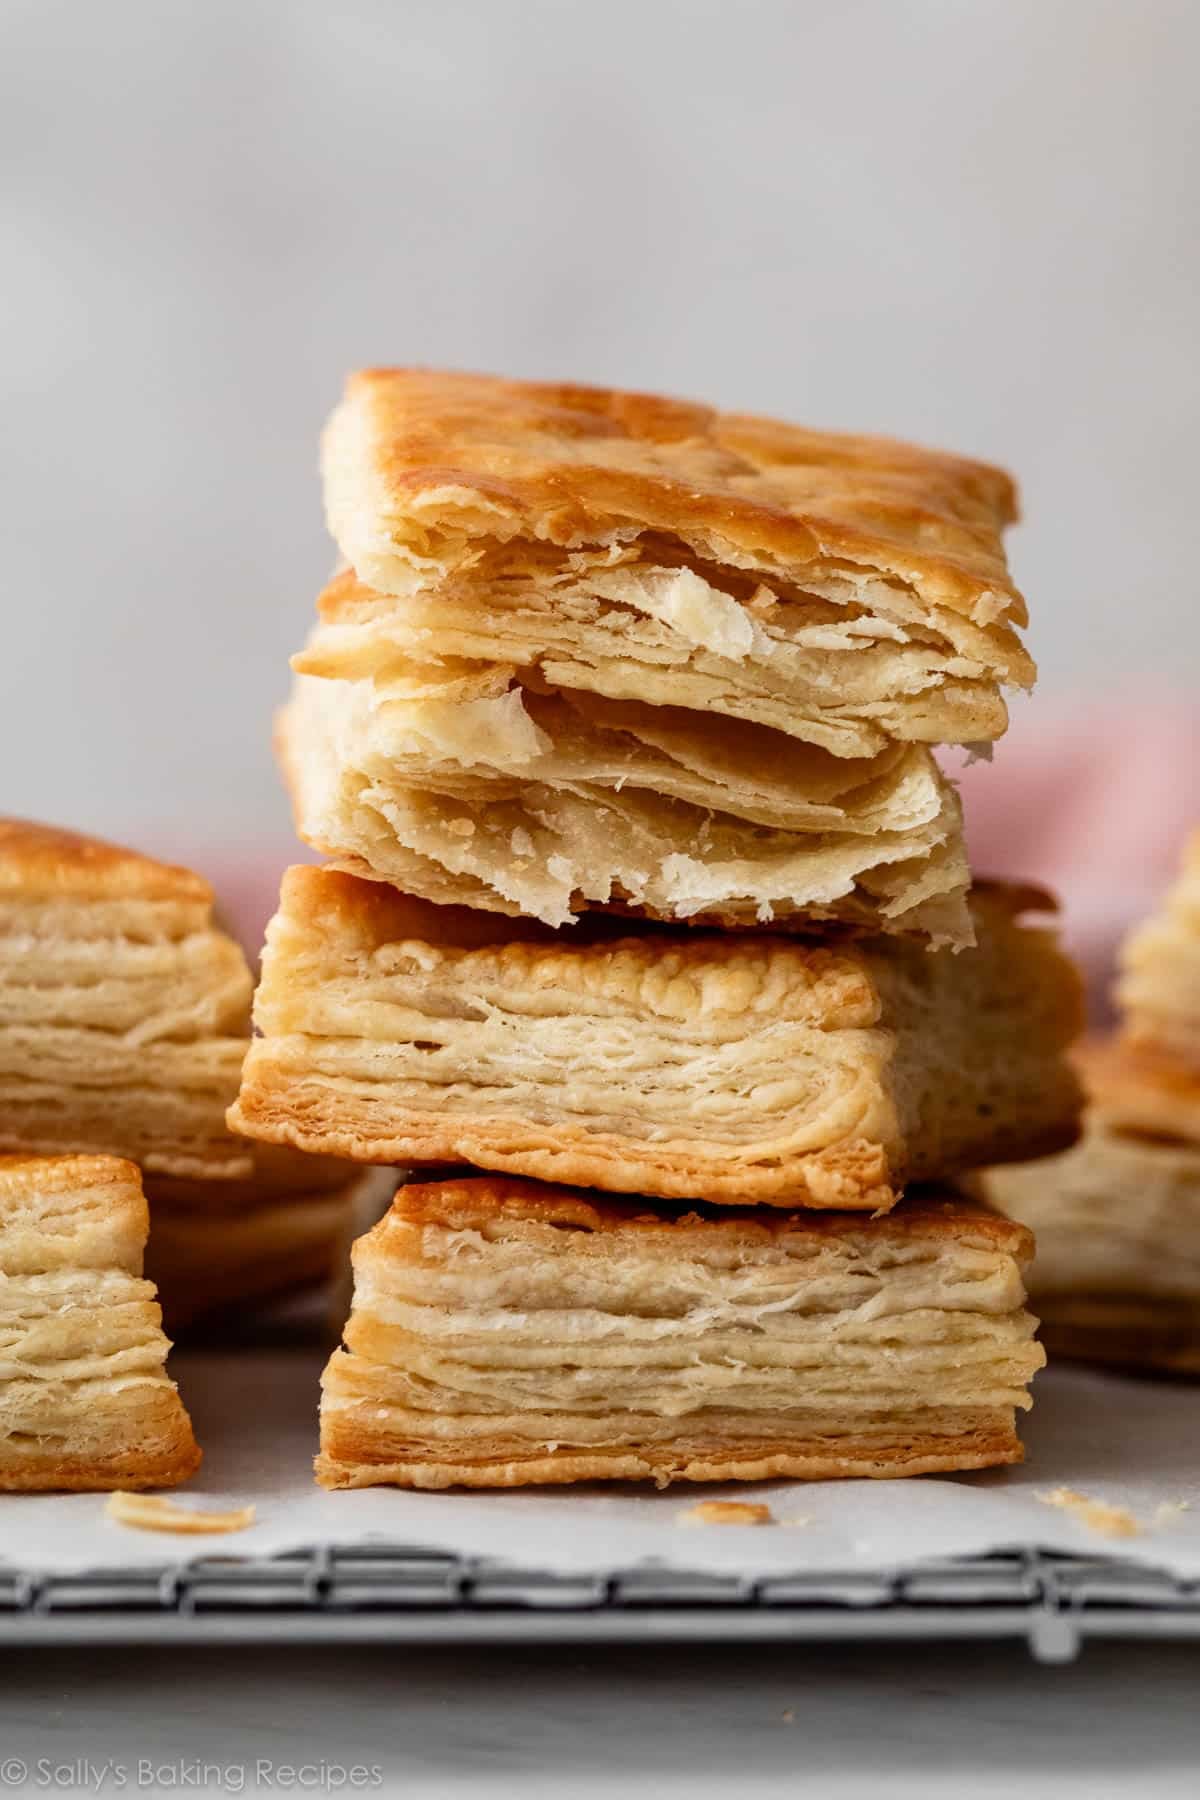
- Texture: Ahh, the best part. Each bite has oodles of crispy, crackly layers of light and buttery pastry. This pastry is one of the FLAKIEST doughs I’ve ever worked with and comes close to croissants territory. (But made in a fraction of the time!)
- Ease: I categorize this as an intermediate baking recipe. While it’s not nearly as involved as homemade croissants or homemade cruffins, it’s certainly not as easy as using store-bought frozen puff pastry. You need to flatten and fold the dough 6x, but there’s no chilling between each time so the recipe moves quicker than traditional homemade puff pastry.
- Time: The dough requires 2 separate refrigeration steps, but the 2nd one is only 15 minutes. You can easily make this dough in a few hours or over the course of 2 days. I always appreciate make-ahead dough where you have plenty of options in terms of timing. You can also freeze the dough, too.
How Is This Different From Pie Crust and Yeasted Pastry Dough?
Pie crust, while buttery and flaky, is not nearly as light, doughy, and crisp as this shortcut puff pastry. Yeasted pastry dough, such as something we can use for croissants, croissant bread, or a blueberry cream cheese pastry braid, contain yeast. This recipe simply relies on big chunks of cold butter (lots of it) and folding.
Just 5 Ingredients in the Rough Puff Dough
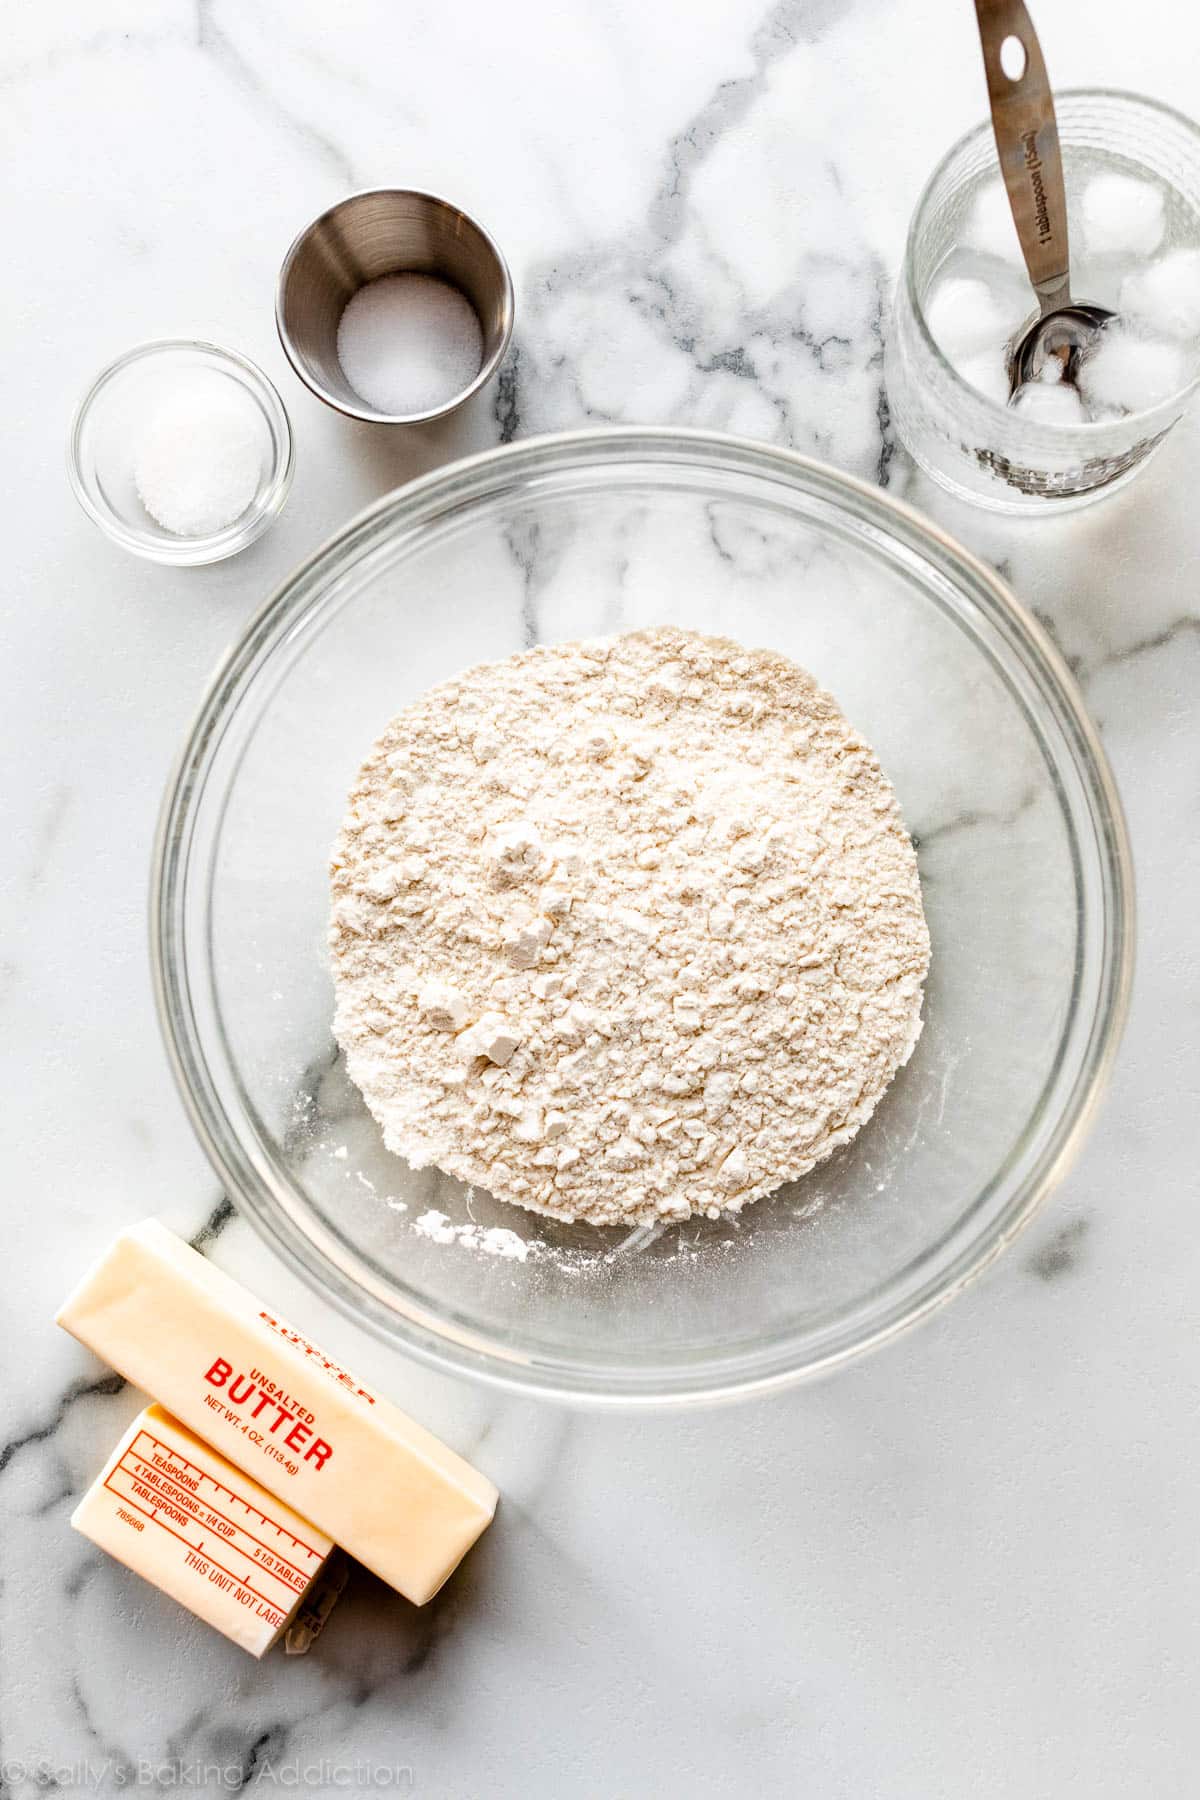
This shortcut pastry dough comes together with flour, sugar, salt, cold butter, and cold water.
- Why do the butter and water have to be cold? It’s important for the butter to stay cold so it doesn’t melt and soak up all the flour. We want the butter to stay solidified as we roll, shape, fold, and flatten this dough because if it melts before baking, you lose all the flakes. Game over. You see, when the butter melts in the oven, it creates steam and that steam separates the dough into multiple flaky layers. Cold butter is what makes cheddar biscuits and scones flakey too!
Rolling & Folding
Step by step photos of this process are below the recipe.
After you prepare the dough and chill it in the refrigerator for at least 2 hours (1st refrigeration), you will begin rolling it out with a rolling pin and folding it like a business letter, rolling it out again, folding again, and so on. You will roll + fold it a total of 6 times before refrigerating again for at least 15 minutes (2nd refrigeration).
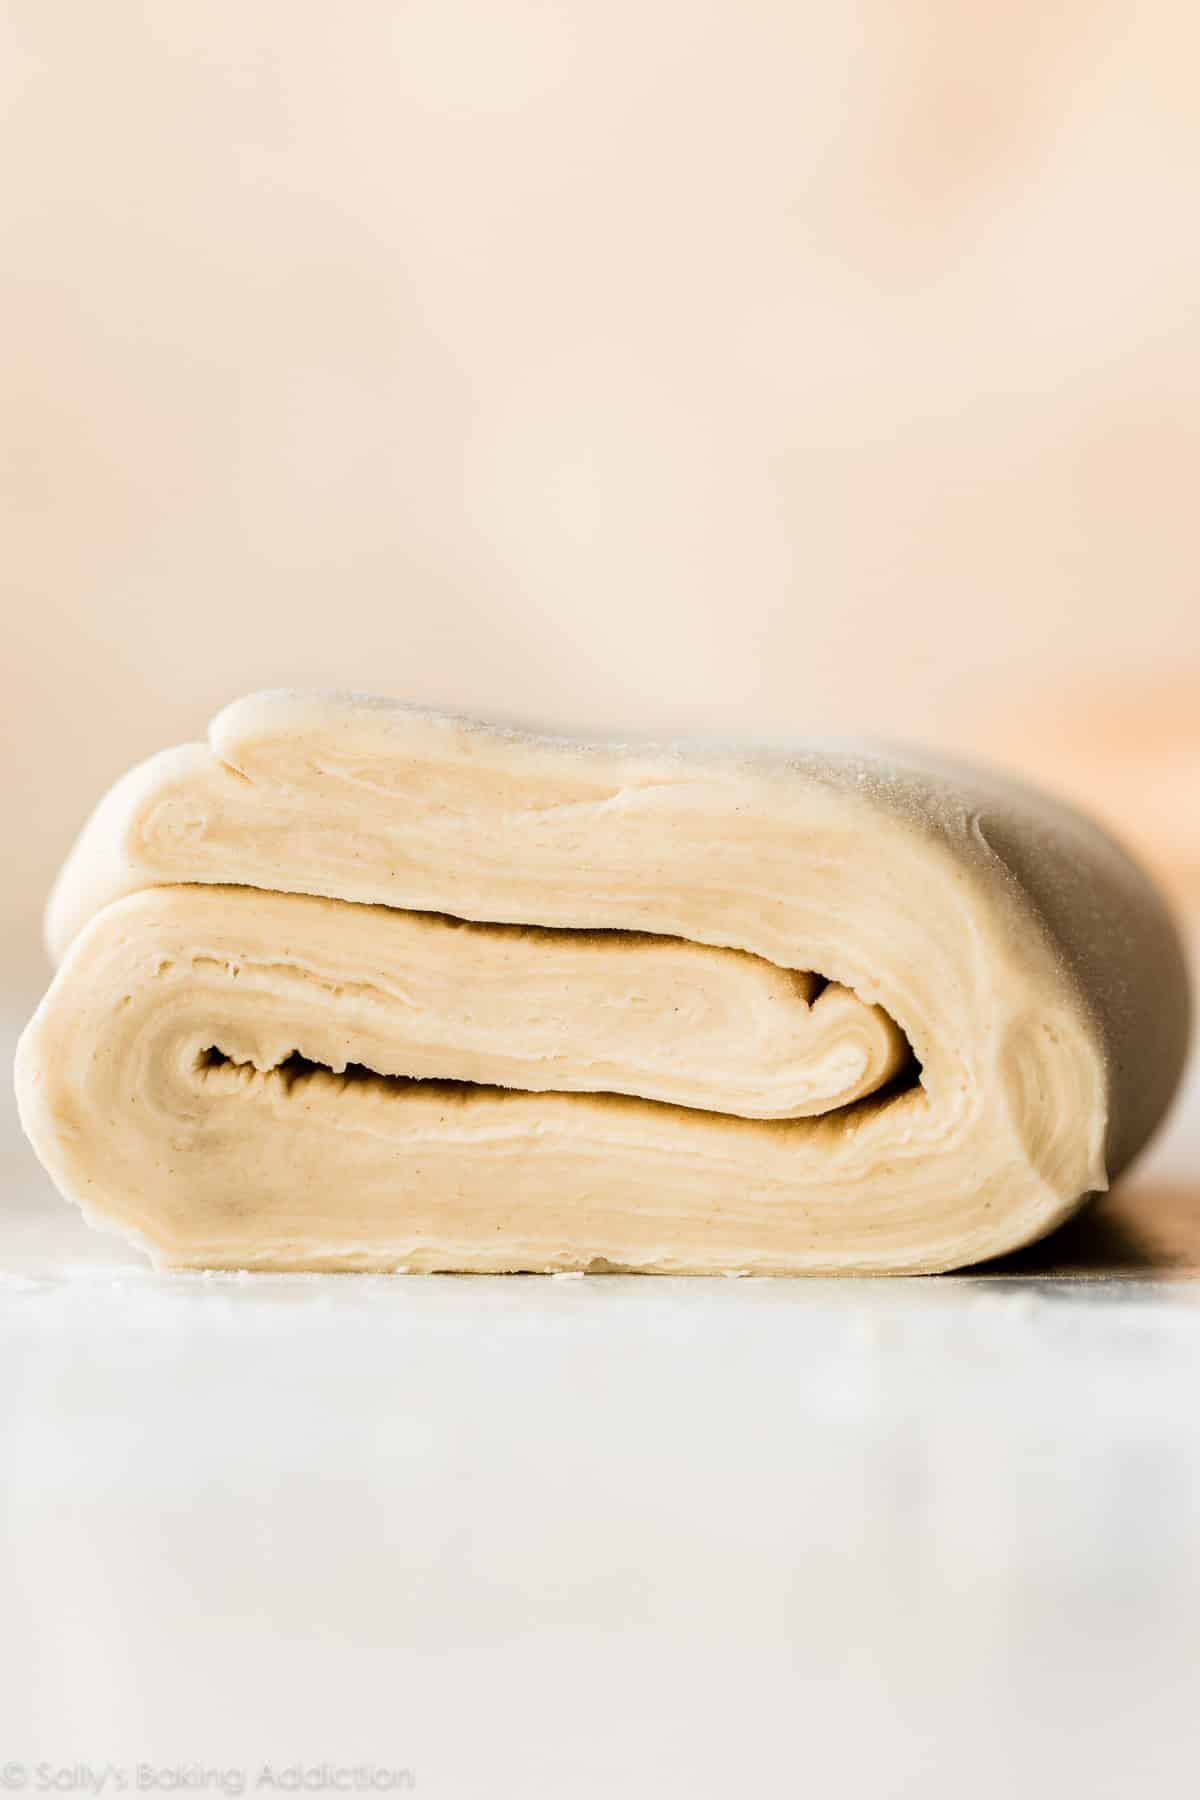
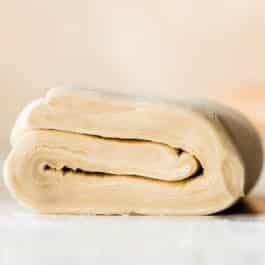
The photo below shows what the center of your dough looks like after all the rolling and folding. *Note that I sliced a sliver off the end so I could show you this!
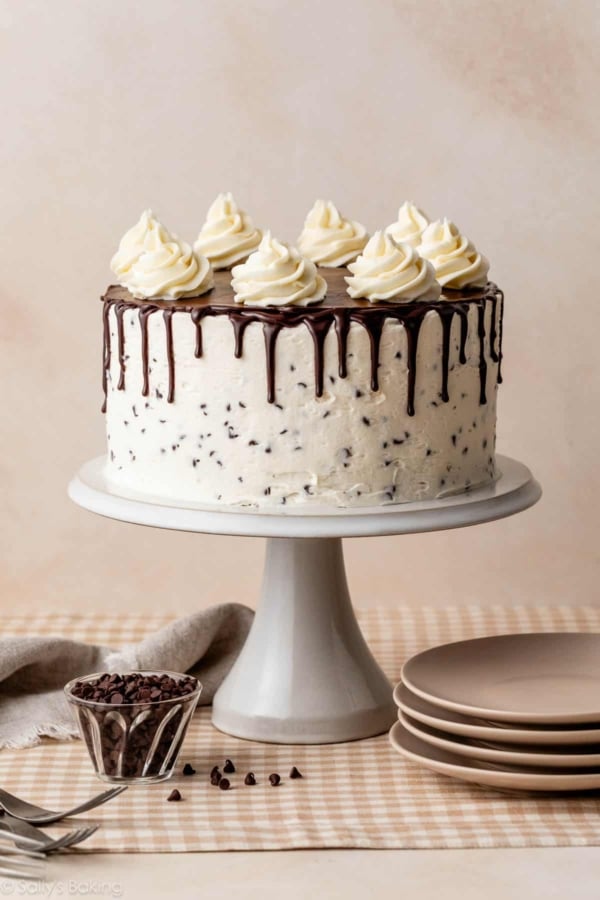
Uses for This Rough Puff Dough
After the 2nd refrigeration, you can use this dough for:
- Honey Pear Tart
- Cinnamon Spice Palmiers
- Any recipe calling for 1 box (1 pound; 2 sheets) store-bought puff pastry
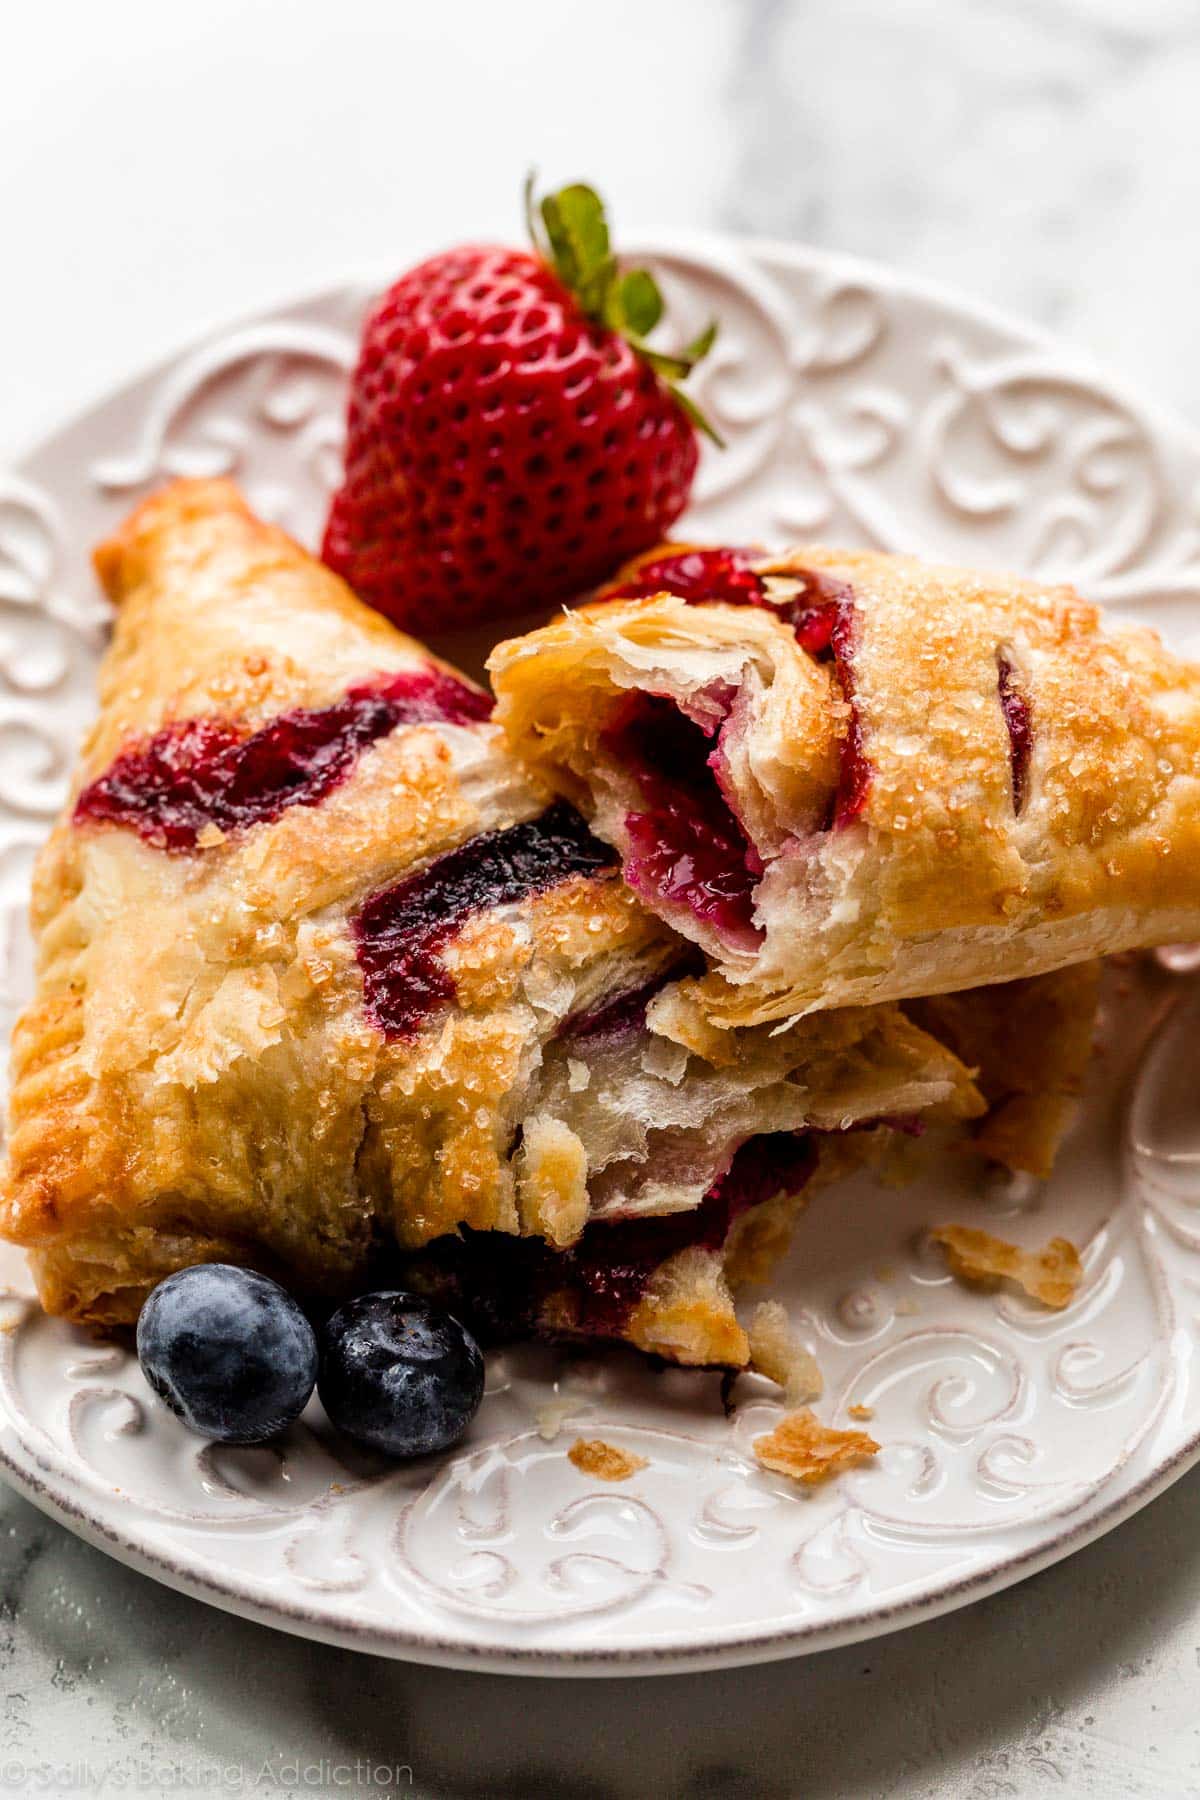
- Berry Turnovers (pictured above and below)
- Cranberry Brie Puff Pastry Tarts
- Caramel Apple Turnovers
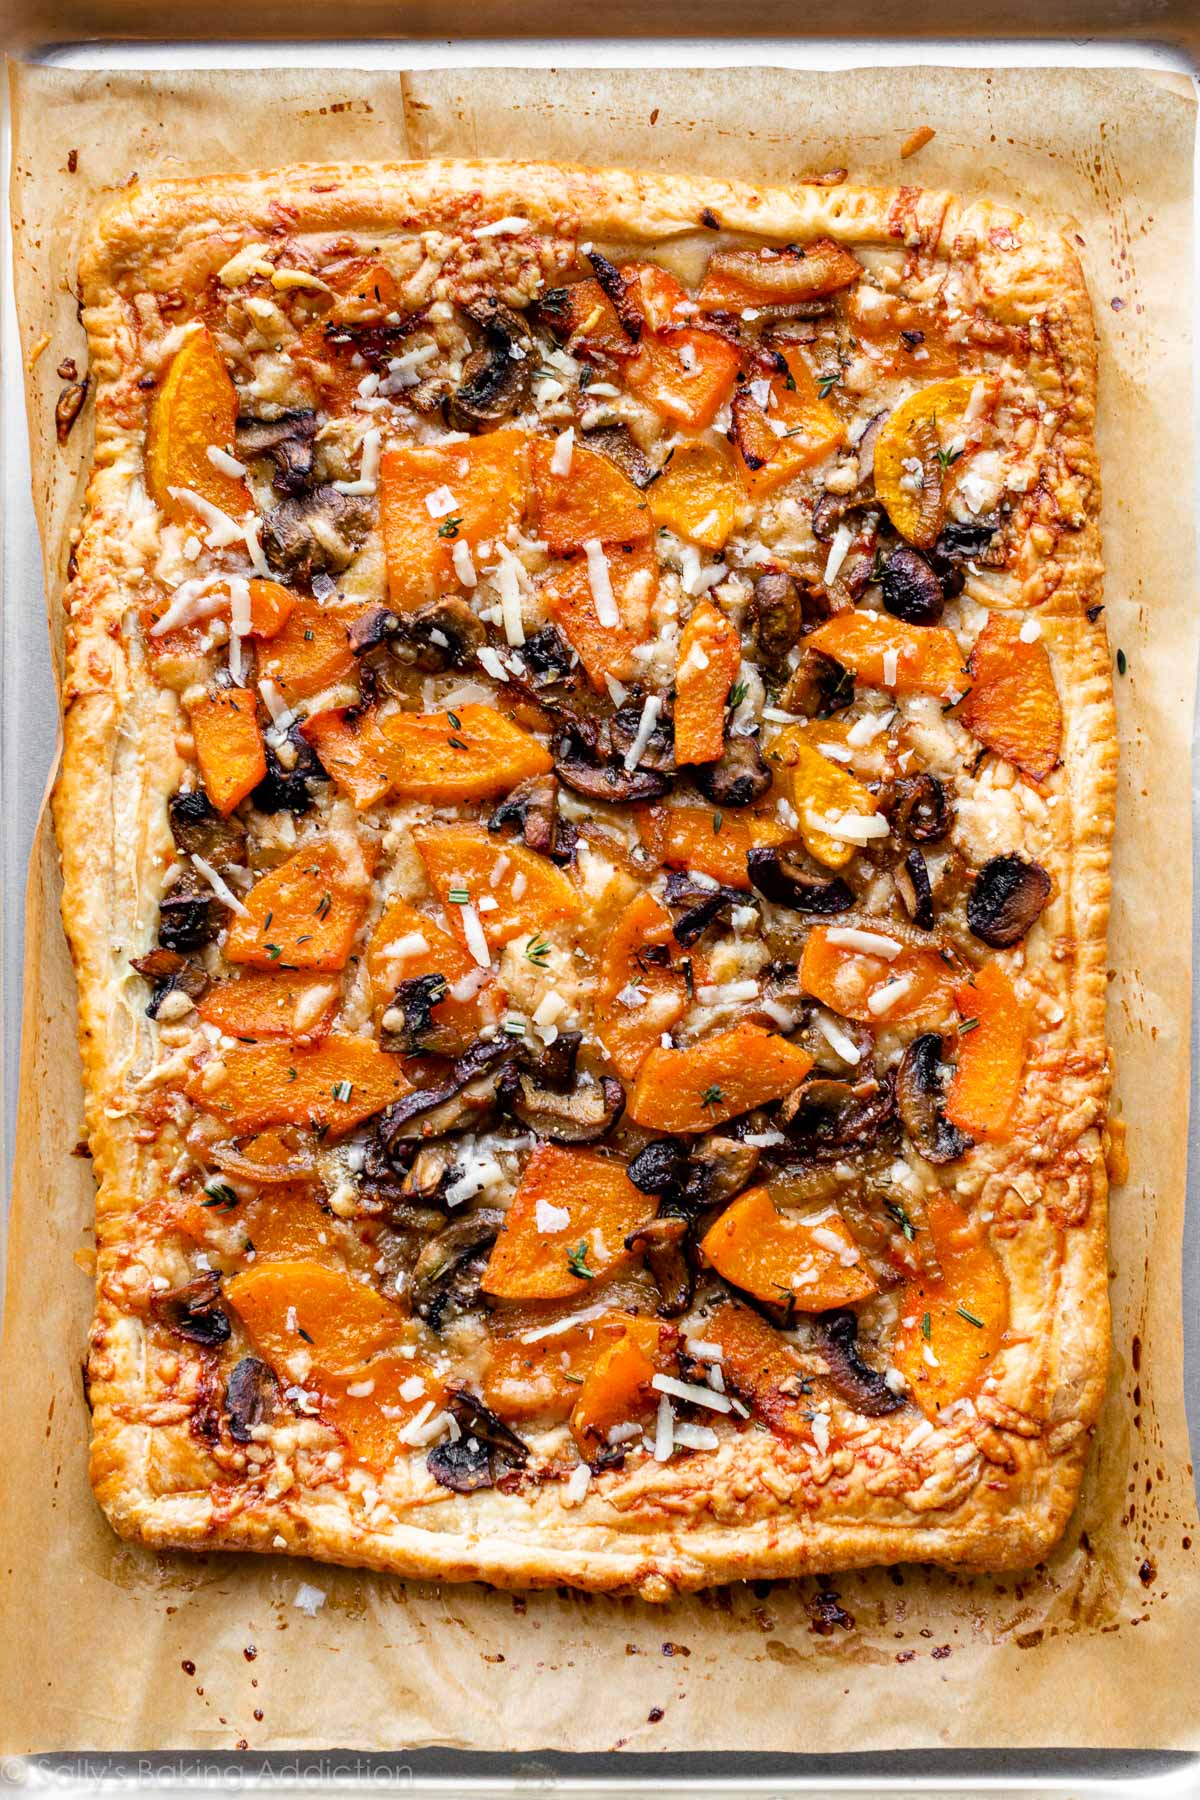
- Butternut Squash & Mushroom Tart
- Mushroom Puff Pastry Tarts
- Mille-feuille
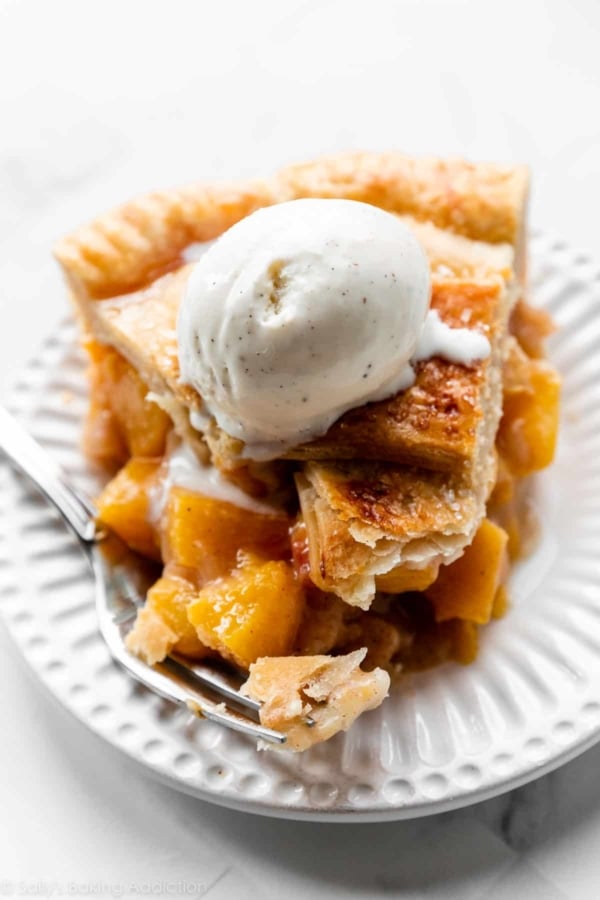
To use as pie crust: You can use this pastry dough as pie crust in a recipe that calls for a single crust 9-inch pie. Roll dough out into a 12-inch circle before fitting into your 9-inch pie. Though all pie recipes are different, it would definitely be best to blind bake this dough with pie weights before adding a filling. Choose pie recipes that already call for blind baking and have a thicker filling. This would be excellent as the crust for quiche.
Handmade Puff Pastry (Rough Puff Method)
- Prep Time: 3 hours
- Cook Time: 0 minutes
- Total Time: 3 hours
- Yield: about 1 lb. (454g) dough
- Category: Baking
- Method: Folding
- Cuisine: American
Description
Use this in-depth tutorial to learn how to make a from-scratch puff pastry dough variation. The homemade dough comes together using a “rough puff” method where you carefully work butter into your dry ingredients and then fold and flatten the dough many times to create countless flaky layers. Make sure you start with very cold butter. This recipe is also in my cookbook, Sally’s Baking 101.
Ingredients
- 1 and 1/3 cups (167g) all-purpose flour (spooned & leveled), plus more as needed
- 1 teaspoon granulated sugar
- 1/2 teaspoon salt
- 3/4 cup (12 Tbsp; 170g) unsalted butter, very cold and cubed
- 6–8 Tablespoons (90–120g/ml) ice-cold water
Instructions
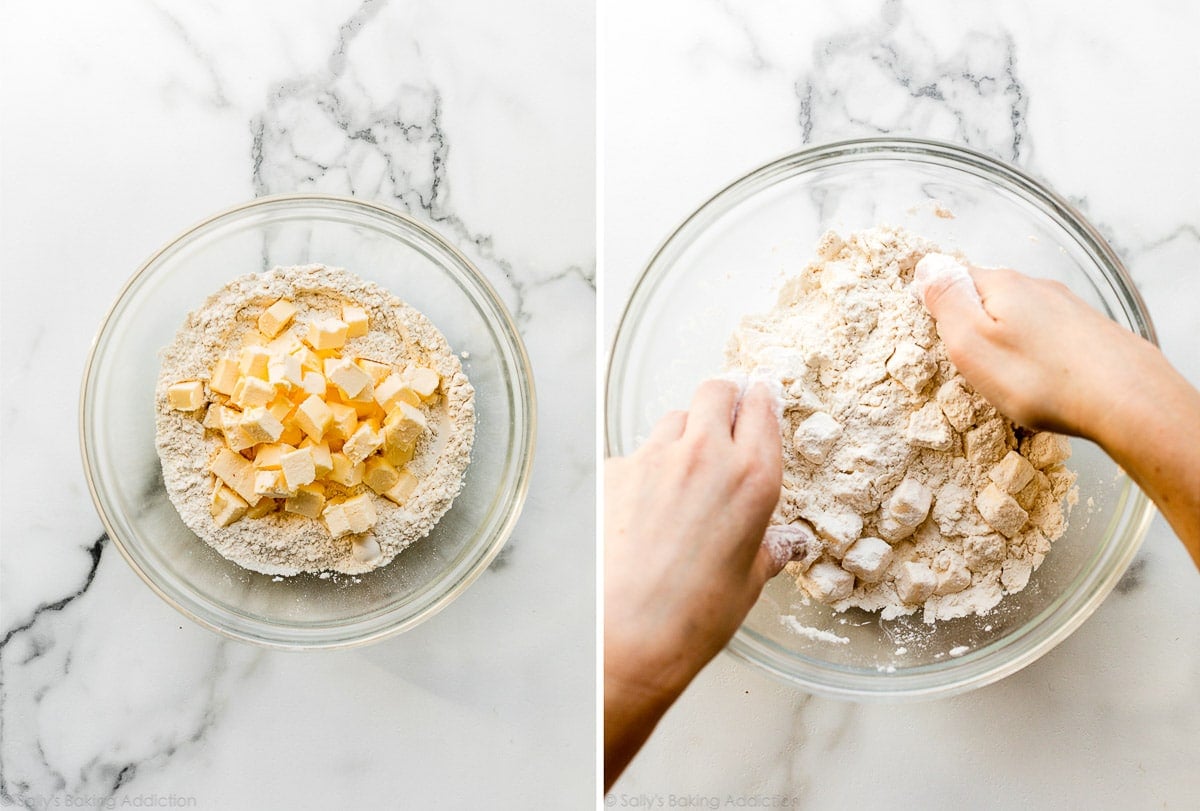
- Make the dough: In a large bowl, whisk the flour, sugar, and salt together. Place the cold and cubed butter on top. Gently toss the flour and butter together with your hands, and then briefly rub the butter into the flour to begin combining them, as you can see in the video tutorial. You do not want to break down the butter too much in this step. I do not recommend a food processor, pastry cutter, or mixer for this step because it will break down the butter too much.
- At this point, the butter is still in large cubes/chunks. Begin adding the ice-cold water, 1 Tablespoon (15g/ml) at a time, using your hands to toss the mixture together after each addition. (I usually start with 2 Tablespoons of water before I begin tossing together.) You can use a spatula or spoon for tossing, but I really do recommend your hands so you get a good feel of the dough. As the dough begins to hydrate after about 4 Tablespoons of water, you can start lightly squeezing or clumping the dough together with your hands to help bring it together. Mixture will still be very shaggy, as you can see in the video and photos. If your dough feels sticky and wet before adding 6 Tablespoons of water, mix in 1 Tablespoon of flour (your butter was likely too warm—you can continue with the recipe, but the dough may not be as flaky).
- Pour the shaggy clump of dough out onto a lightly floured work surface. There should still be large chunks of butter at this point. With lightly floured hands, begin patting the dough down until it’s 3/4–1 inch thick, about a 5×8-inch rectangle. Fold the dough into thirds as if you were folding a business letter. Use your hands to gently flatten and smooth out any cracks in your dough. Wrap it tightly in plastic wrap or parchment paper, or place into an airtight container.
- 1st refrigeration: Refrigerate the dough for at least 2 hours and up to 24 hours.
- Roll & Fold: Take the dough out of the refrigerator to begin the “rolling and folding” process. If the dough chilled for longer than about 3 hours, it’s likely very stiff, so let it rest for about 5 minutes before you begin rolling. Lightly flour a work surface. The dough gets sticky, so make sure you have more flour nearby as you roll and fold. Using lightly floured hands, gently flatten the dough into a small square. Using a rolling pin, roll the dough into a rectangle that’s 1/2 inch thick, about 6×12 inches. The exact dimensions are not important, but the thickness is. As you roll, it’s best to flip the dough over once or twice to make sure it’s not sticking to your work surface. Lightly flour your work surface as needed. Fold the rectangle into thirds as if it were a business letter. (See photos and video tutorial.) Turn it 90 degrees and roll it out into a 1/2-inch-thick rectangle again. Fold into thirds again. Turn it 90 degrees. You’ll repeat rolling and folding 4 more times for a total of 6 times.
- 2nd Refrigeration: Wrap the dough tightly and refrigerate for at least 15 minutes and up to 24 hours before using in your recipe. You can also freeze the dough at this point. See Notes.
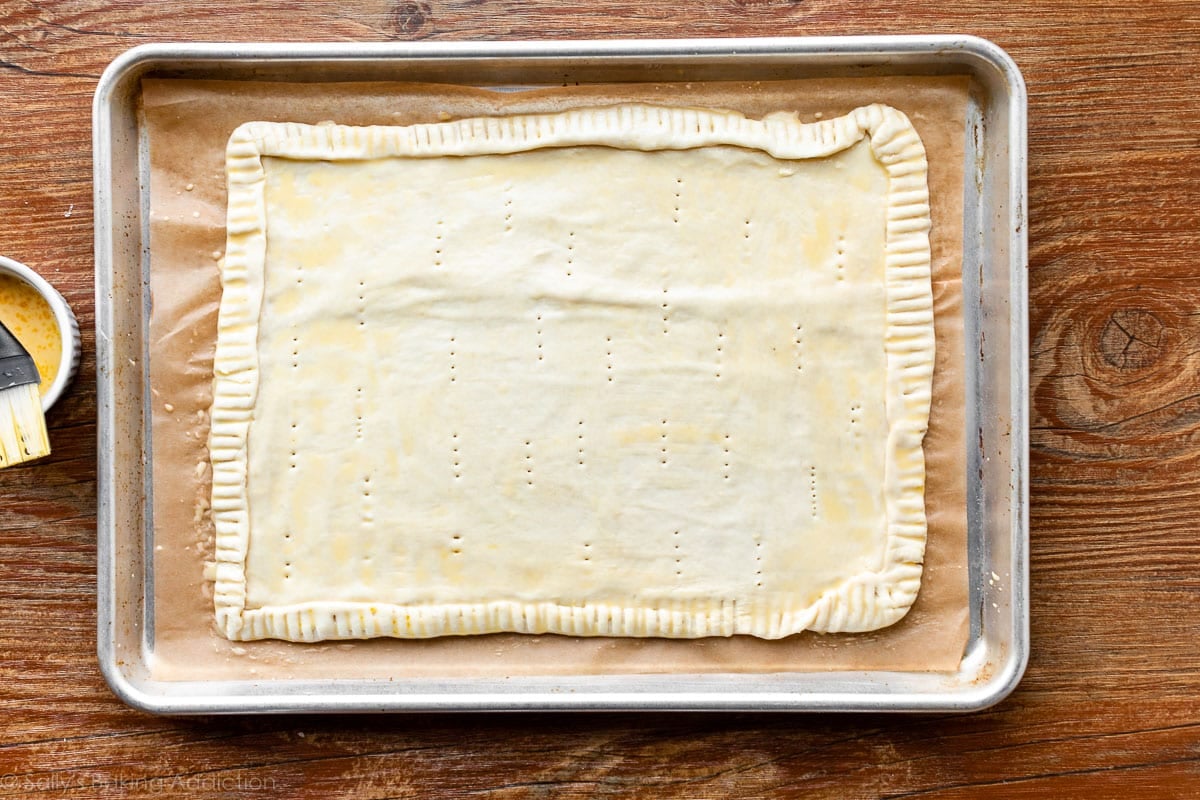
- Use wherever you would use frozen store-bought puff pastry. To bake plain, roll pastry dough into a 10×16-inch rectangle and place on a lined baking sheet. Brush all over with egg wash (1 large egg whisked with 1 Tbsp milk), and bake at 400°F (204°C) until golden brown and puffy, about 25–28 minutes.
Notes
- Make Ahead & Freezing Instructions: Prepare as instructed in steps 1–3. At this point the dough can be refrigerated up to 24 hours (see step 4). You can also prepare the dough through step 5. At this point the dough can be refrigerated for up to another 24 hours (see step 6). During or after this second chilling time, you could also freeze the dough for up to 1 month. (I don’t recommend freezing the dough before the rolling and folding step.) Thaw overnight in the refrigerator before using in a recipe that calls for 1 lb. puff pastry dough (or 1 store-bought package with 2 sheets puff pastry).
Step-by-Step Photos
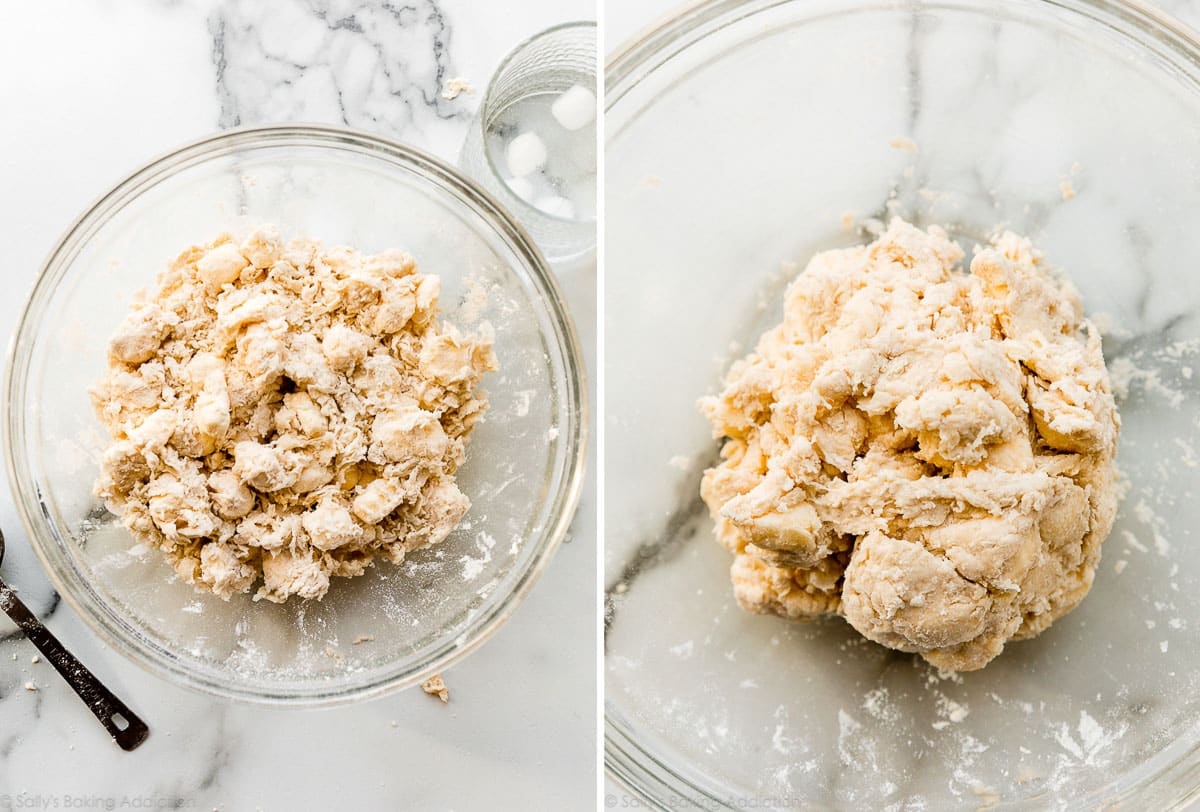
The following photos show the bowl of dry ingredients with the cold and cubed butter on top. In the right photo, you can see me gently tossing the flour and butter together. In this step, I’m briefly/barely rubbing the butter into the flour to start combining them. This step is only possible if the butter is very cold because if the butter is warm, you’ll end up with paste.
At this point, as you can see in the photo on the left below, the butter is still in large cubes/chunks. That’s great! Now let’s add the ice-cold water 1 Tablespoon at a time, using our hands to toss it all together. (Note that I usually start with 2 Tablespoons of water before I begin tossing together.) You can use a spatula or spoon for tossing, but I really do recommend your hands so you get a good feel of the dough.
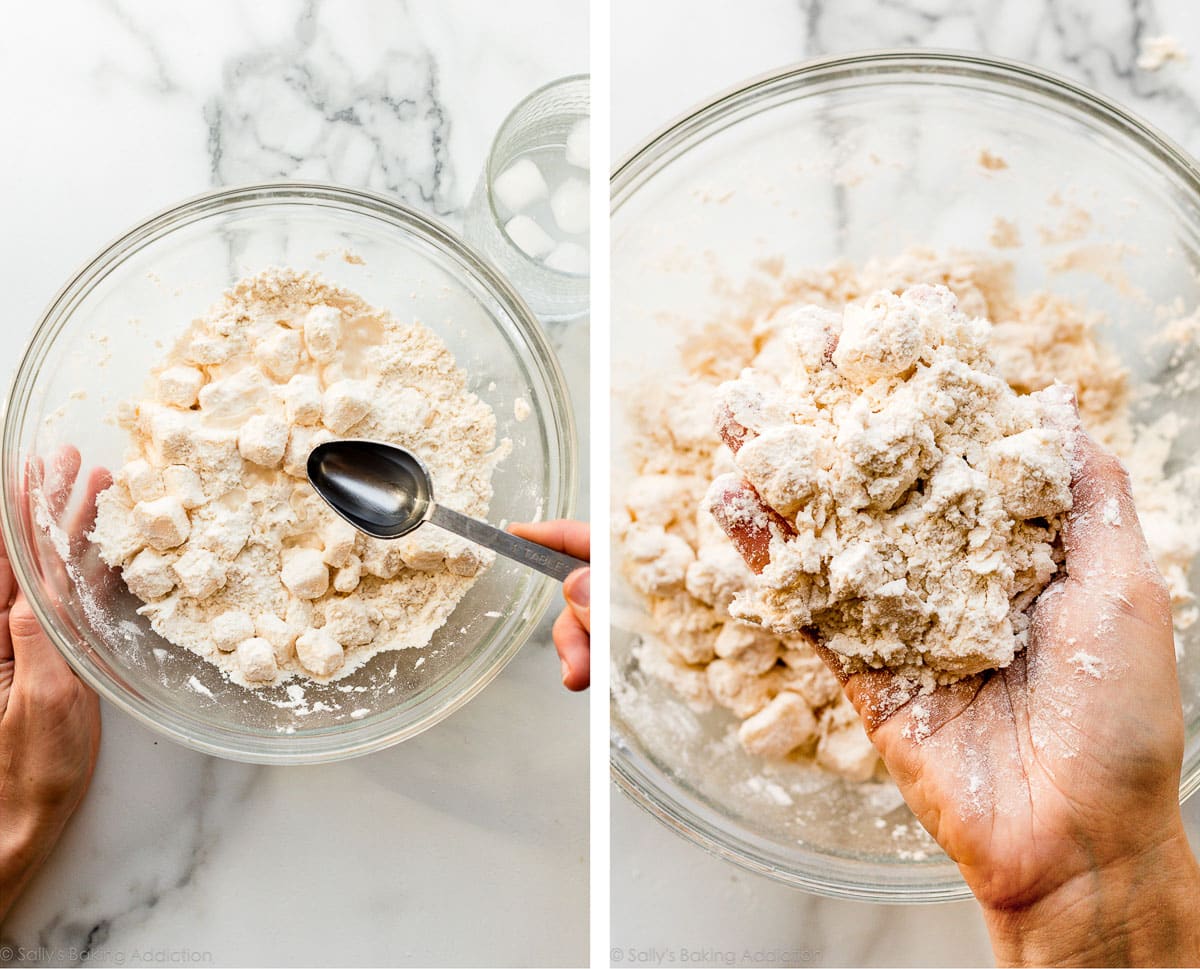
Photo below left: Continue adding the ice cold water and tossing the mixture together after each has been added. As the dough begins to hydrate after about 4 Tablespoons of water, you can start lightly squeezing or clumping the dough together with your hands to help bring it together. Mixture will still be very shaggy, as you can see.
See the photo below on the right? You only need 6–8 Tablespoons of ice-cold water to get to this point. Do not add any more or any less. If your dough reaches this point before adding 6 Tablespoons of water, your butter was likely too warm. You can continue with the recipe with less water, but the dough will not be as flaky.
Pour the shaggy clump of dough out onto a lightly floured work surface, as you can see in the photo on the left below. There will still be large chunks of butter. Begin patting it down with your hands until it’s about 3/4–1 inch thick, about a 5×8-inch rectangle:
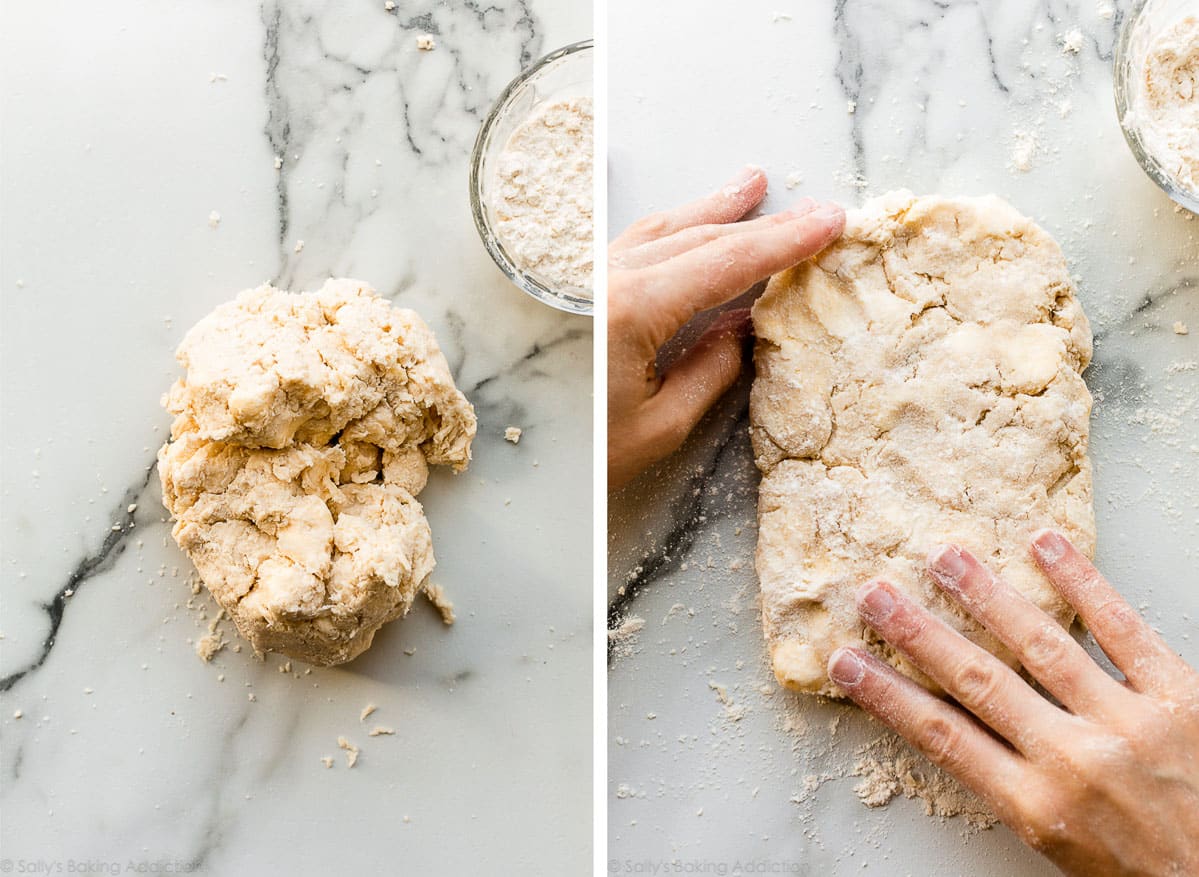
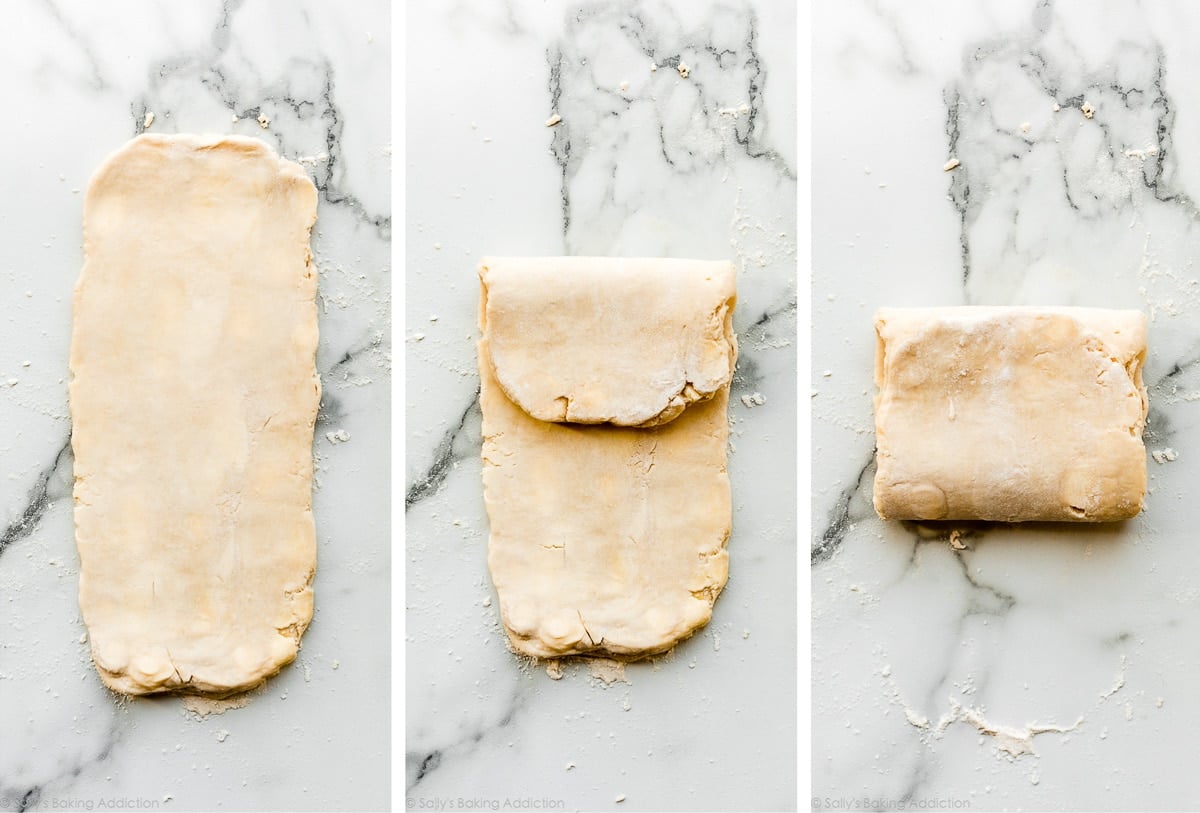
As shown in the photos below, fold the dough into thirds as if you were folding a business letter. This is exactly how we fold biscuits dough, too!
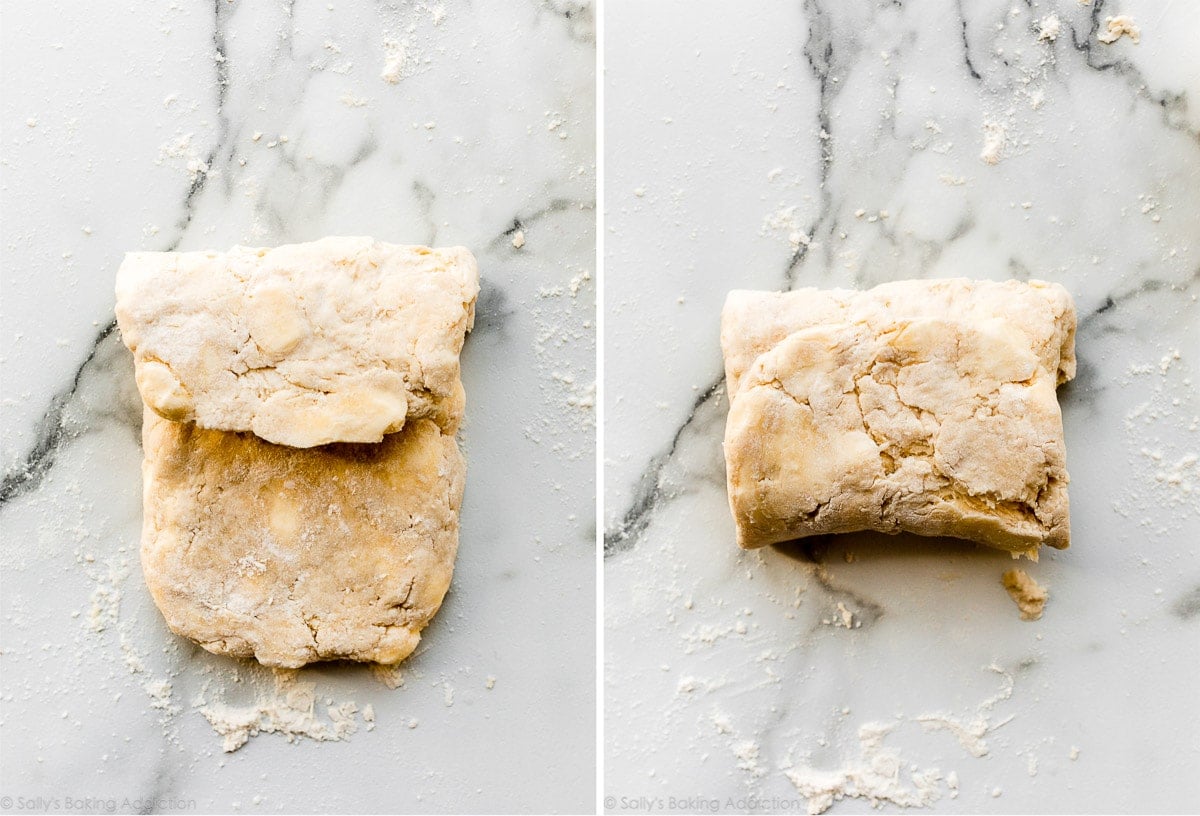
1st refrigeration: Now use your hands to gently flatten and smooth out any cracks in your dough “business letter” then wrap it in plastic wrap, aluminum foil, parchment paper, or place in a sealed container, and refrigerate for at least 2 hours and up to 24 hours.
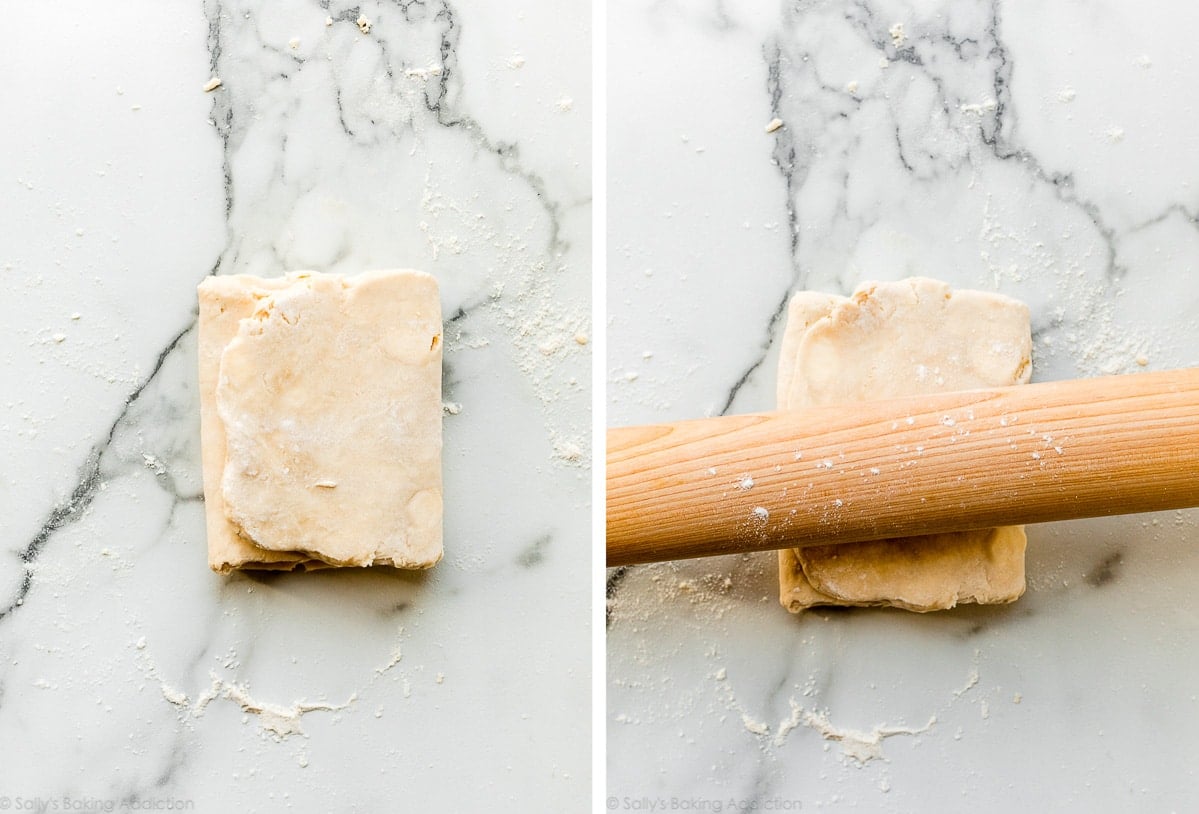
Now it’s time for the rolling pin. Remove dough from the refrigerator and begin rolling out.
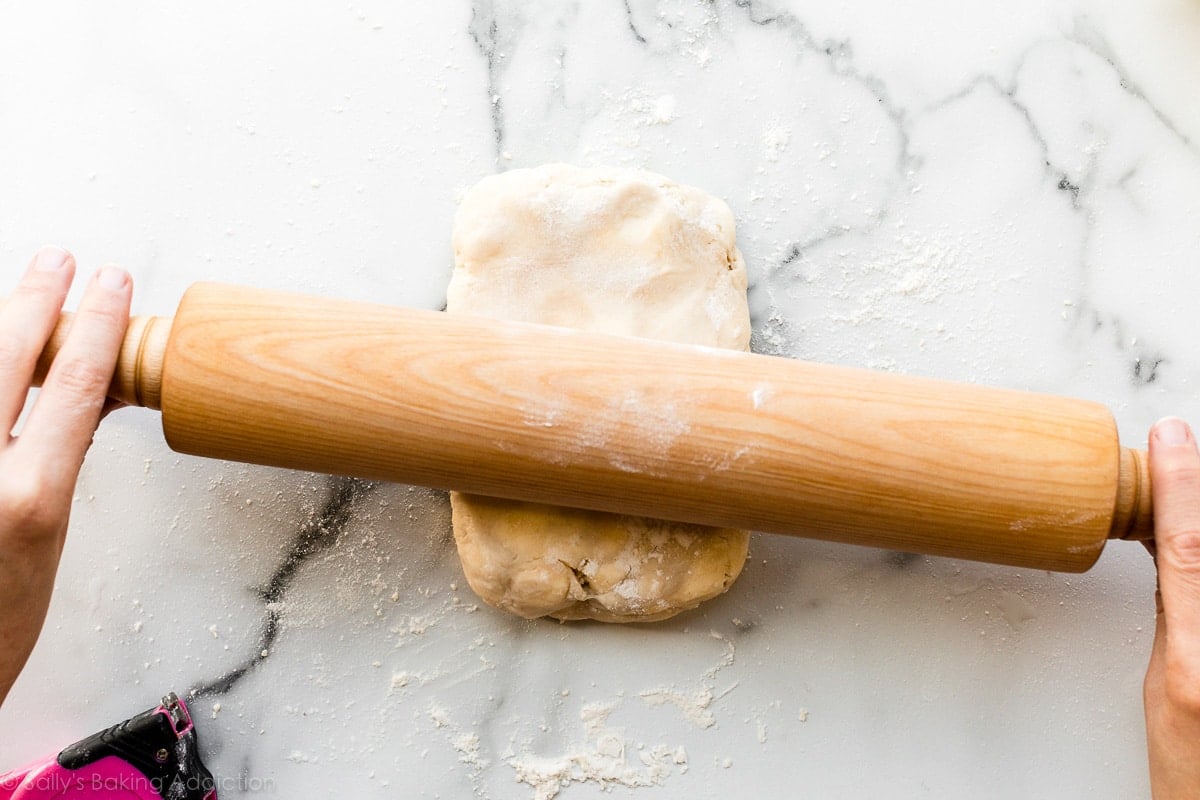
You’re going for a thickness of 1/2 inch, so the rectangle should be about 6 x 12 inches. The exact dimensions are not important, but the thickness is. Fold the rectangle into thirds like a business letter:
Turn it 90 degrees, then grab your rolling pin again:
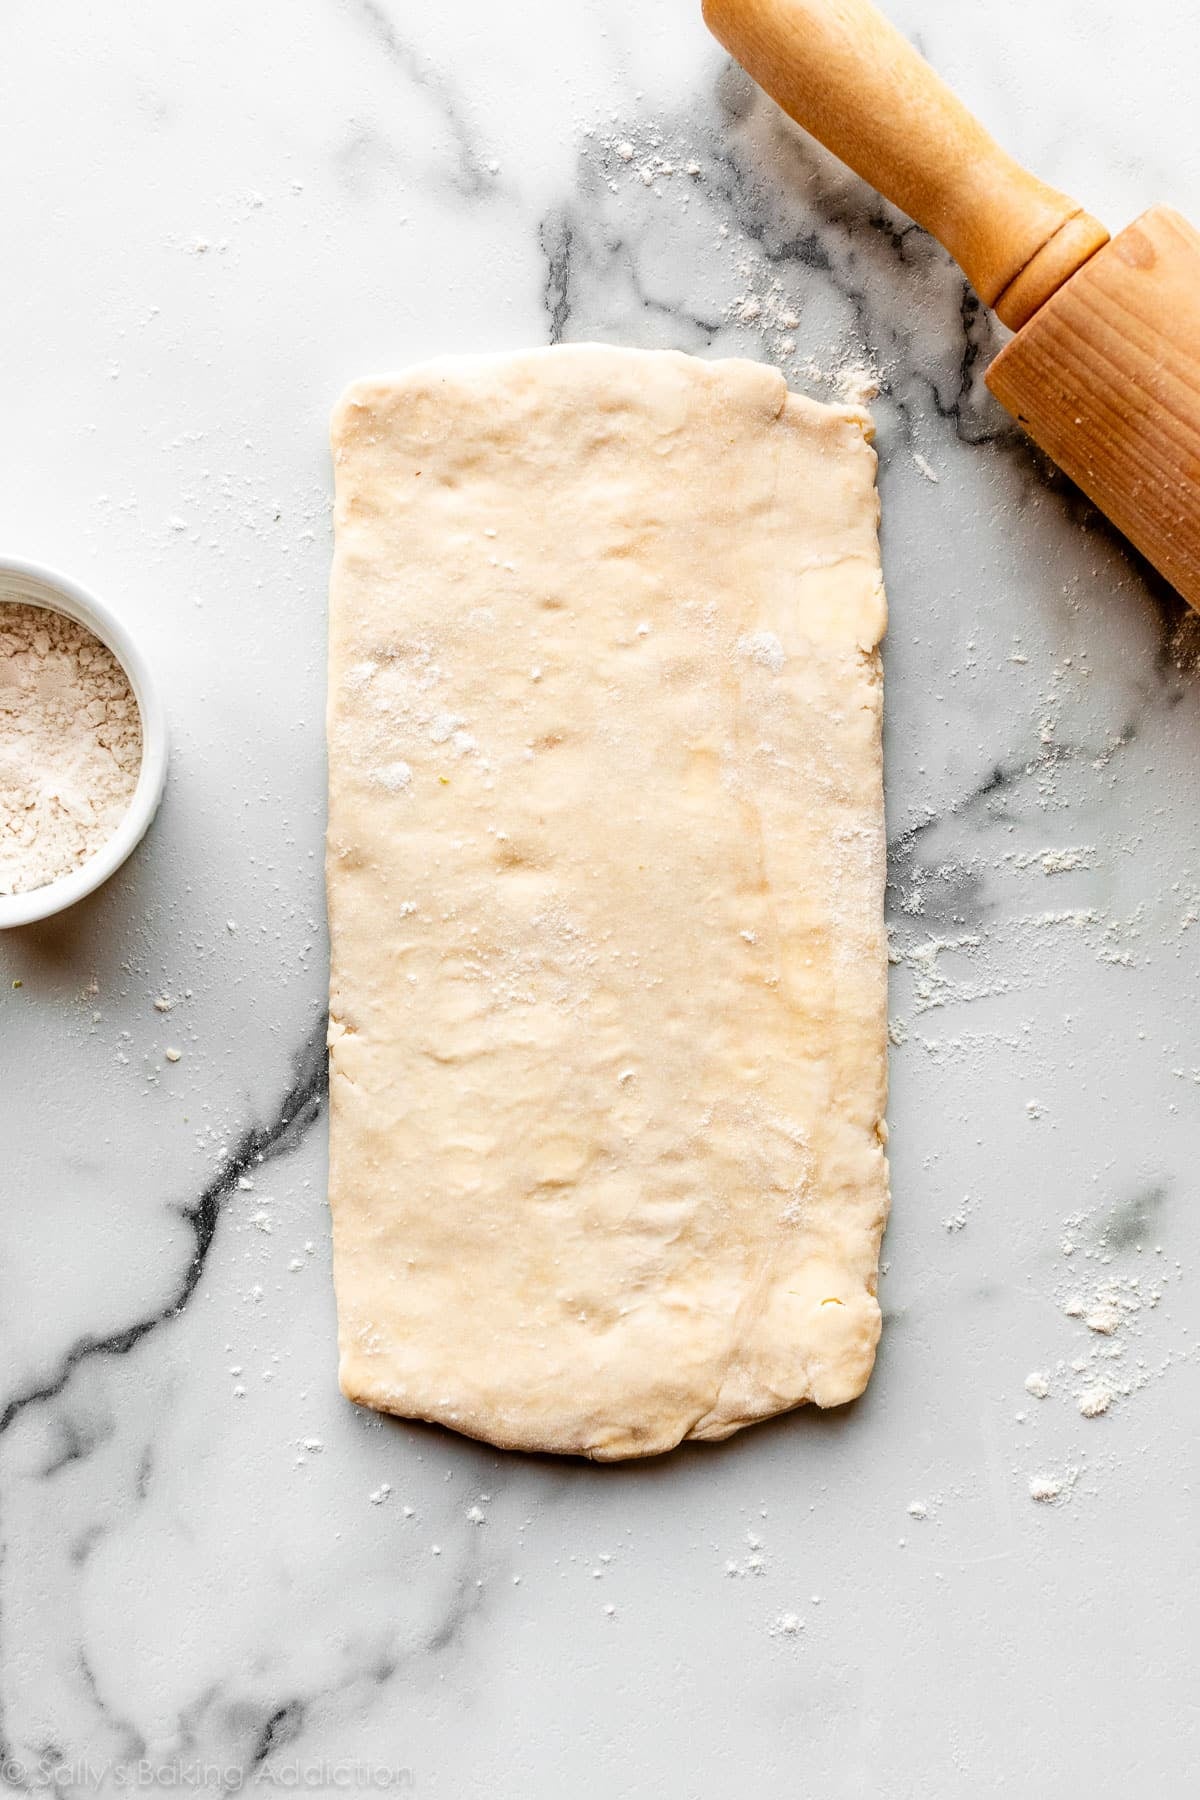
Repeat this 5 more times, for a total of 6 rolling out + folding sessions.
Success Tip: If the dough “business letter” is so thick or impossible to roll out, cover it with a clean kitchen towel and let it rest for 5 minutes before trying again. The butter just needs to slightly soften. Lightly flour your work surface whenever necessary.
After the 6th time, you may not be able to see visible chunks of butter anymore. (If you do, that’s fine. If you don’t, that’s also fine.)
2nd refrigeration: Fold the dough into a business letter, wrap tightly, and then chill for at least 15 minutes and up to 24 hours. Now you can use it in your recipe such as homemade palmiers or this butternut squash and mushroom tart.


Reader Comments and Reviews
Hey Sally, how thin should I roll out the pastry when it’s ready to use if I want to use it to line a quiche tin? I’m not sure if it’s half an inch or not? Thank you x
Hi Cesca, I would roll it out quite thin, such as a little thicker than 1/4-inch.
I cubed my cold butter, and then placed it in the freezer for about 10 minutes to make it extra cold. Worked great!
I have not made this recipe yet, but am excited to try it. One thing I have found VERY helpful when rolling out dough (especially butter rich dough) is to cover my rolling pin with a knee-high stocking. The dough does not stick to it and you can throw it in the laundry! Great way to use “straglers”.
i loved the taste of the recipe. However, I failed iin my initial attempts at a pie crust with it. The sides of the crust all shrunk down so it looked like a pancake. trying again with crimping over the top of the pie tin.
It’s a fair amount of work, but the instructions are excellent, and the results are Awesome !!! I used it for sausage rolls, and am blown away by how well they rose!! Usde my Ninja Flip, 400F bake for exactly the 25-28 minutes in the recipe. Fantastic!
Hi Sally. Firstly can I say how much I love your recipes! Secondly I’m going to make your rough puff for an apple tart tatin. Just a question, another recipe I’ve tried chilled the pastry for a short time between turns and folds but there were only 3 compared to your 6. Have you found better results with the larger number of folds as opposed to chilling between and a smaller number, if that makes sense?
Hi Anna! This is more of a shortcut method to making puff pastry. Unlike croissants and traditional puff pastry, this dough does not require laminating with a layer of butter and multiple chill times. Rather, the layers and crisp flakiness come from the particular mixing and folding methods. You need to flatten and fold the dough 6x, but there’s no chilling between each time so the recipe moves quicker than traditional homemade puff pastry. Hope this helps and that you enjoy it!
Can this puff pastry be used for a quiche, I realize it would have to be blind baked first, but do you recommend using it in this way?
Hi Sharon, yes, you can use this puff pastry for a quiche. Delicious!
I love this pastry puff. I followed the recipe but I put my butter in the freezer for a couple hours and then I grate half a stick and cube the other half then cube the cold butter from the fridge for the last half stick. I work the butter just a little then I add ice water a tablespoon at a time just until it comes together then I press it into a rectangle and fold and wrap it tightly then refrigerator for 3 hours. Then comes the roll and fold then back to square on the last fold and back to the refrigerator for an hour. Then it’s ready to use. Freezing the butter keeps it from getting warm and keeps the dough dry so you use just a little to do the rolling out. Thanks Sally. Love all your recipes.
My mom has Celiac disease, have you tried this with cup-for-cup gluten free flour?
Hi Bonnie, I have not tested it so I can’t be certain of the results. Let me know if you give it a try and which flour you use.
Outstanding way to make puff pastry, with clear instructions. Couldn’t be better! Make this and amaze your friends! I’ve made full-fat french puff pastry dough (what a pain in the a**), croissants, and mille-feuille, all with mild success and lackluster results. This was my first rough puff, and honestly, I’ll not be fiddling with any of those tedious fancy methods again. The results here were beyond my expectations. I did chill all the ingredients for a few minutes in the fridge before mixing them, and after four folds, returned the dough to the fridge for about 20 minutes to let it both cool and relax, but that’s my kitchen, and other than that, i didn’t change a thing. So good! Use quality butter!!
Thank you, Chris! So glad you loved it.
Do you use regular table salt or kosher salt in this recipe? Does it matter which I use?
Hi Melissa, we use regular table salt here.
I am so pleased. For the first time l had success with pastry. Buttery,flaky,tasty and not rock hard. Thank you.
Can I use salted butter and omit the salt?
Hi Kelly, You can absolutely use salted butter instead. You don’t have have to reduce the salt in the pastry, but if you wanted to– you can reduce to 1/8 teaspoon.
I found that it started getting “stretchy” while doing the six folds, almost as if I was overworking it and creating gluten. Is this normal? If not, what chin I do to prevent it (because I didn’t think I was handling it much at all!)
Thank you.
Hi Rachel, yes that’s completely normal and expected as the butter begins to work its way into the dough and as the dough comes to room temperature.
Do I need to use sugar? I was planning to use it for a savory recipe
This recipe was amazing! I made cherry turnovers with the dough. They turned awesome. So many flaky layers.
Can this recipe be made the same way if it’s doubled??
Hi Estelle, for best results, we recommend making separate batches rather than doubling.
Hi! I just completed the first fold and the dough is in the fridge. I notice other recipes do multiple refrigerations. Is that something you ever do/recommend? 15/20 minutes between each roll out and fold?
Hi Emma, this recipe is a “shortcut” version, and the layers and crisp flakiness come from the particular mixing and folding methods. We don’t find the extra refrigeration necessary, but feel free to play around with it if you wish. Hope you enjoy it!
If I’m gonna make an apple braid would this be enough puff pastry for 2 braids?
Hi Katelyn, this recipe yields about 1 pound of dough. The number of braids would depend on the size you choose. The homemade pastry dough used in our Blueberry Cream Cheese Pastry Braid yields 2 pounds of dough, which equals 2 braids.
Question on butter – The recipe mentions cold butter. For pie crust-type recipes I usually freeze the butter but then you pretty much need a food processor or pastry cutter to blend the dough because the butter is rock hard so I assume we shouldn’t actually freeze the butter? Just cold from the fridge would be best? Or do you do it frozen and just expect it to thaw just slightly while working with it so it blends with the flour?
Hi Jaguilar, cold butter straight from the fridge is fine. You could put the butter in the freezer for just a few minutes before cubing it to make it extra cold. We do not recommend a food processor, pastry cutter, or mixer for this step because it will break down the butter too much. The the step-by-step photos under the recipe card should be helpful!
Have you tried making a rough puff that uses sourdough discard? I would like to try that, trying to figure out how to convert the process.
Hi Paula, we haven’t tested it, but let us know if you do!
What is the average number of pastries produce on the recipe?
Hi Isagani, it makes about the same amount as you would get in a store-bought box of 2 sheets.
Hi I wondered about the refrigerator time? Is it better the longer you leave it or can you achieve same results if left or a few hours? I want the best results possible but will be happy if the results are good standard puff pastry. For example are the results similar if left only 6 or X amount of hours as opposed to 24 as you mention after 3 hrs on the second it needs 5 minutes before continuing.
Hi Baker, there isn’t any benefit to keeping the dough in the refrigerator for longer, as long as it’s within the time frames mentioned. Hope you enjoy this!
I used this recipe to make apple turnovers and my fiancé and I loved them! I have a question though, how long can this dough last in the freezer?
Hi Sydnie, you can freeze the dough for up to one month. See recipe Notes for more details!
I’m a beginning in the field of baking. I have a question about blind bake term.
Hi Monica, we’re happy to help. Blind baking is pre-baking a pie or pastry crust before adding a no-bake pie filling. You can also par-bake a pie or pastry crust, which is baking the crust part way before adding the filling and finishing the bake time with the assembled pie. This post on how to blind bake and par bake pie crust will be a helpful resource to review!
Loved this puff pastry recipe! I’ve tried others in the past without success but this turned out great. The video was very helpful too!
Great first try, but the dough was a little raw inside. I’ll try turning my oven down a bit since the outside cooked quicker than the inside
I love it
Question: The second refrigeration says “up to 24 hours.” I understand I can also freeze the dough, but I’m wondering if 2 – 3 days in the refrigerator is OK at this point? I’m making Portuguese custard tarts and would like to make half now and half in a couple days so they are fresh.
Hi Steve, We apologize we are just seeing your question. How did your pastry turn out? If you make it again, we don’t recommend much more than 24 hours in the refrigerator. For 2-3 days we would recommend following the freezing directions in the recipe notes.
I used this to make peach fried pies, and was very impressed with the wonderful croissant-y layers!! The video is SO helpful. It is so neat to try something new that seems difficult and fancy and have it turn out well and not be too hard after all.
Hello, Sally.
This has been the most challenging dough I’ve ever made. The thing was that the chunks of butter kept getting exposed to the rolling pin and it was a mess. Heving made pizza and bread doughs I was concerned with the amount of flour I was adding to fold it. Is that normal? The pastry did puff in the oven, but it was a real struggle to roll it out and use for the mushroom puff pastry tarts. If you have any tips please let me know, I’d really like to master this and have a result as smooth as you got.
Hi Jesus, there’s nothing wrong with adding some flour while rolling out to prevent sticking, but you don’t want to add too much. If it turned out well, you likely didn’t add too much. Make sure to keep the dough/butter cold while working with it – if the butter starts melting, it will make the dough more sticky. The video tutorial above should give you a good idea of what the dough should look/feel like as well!