

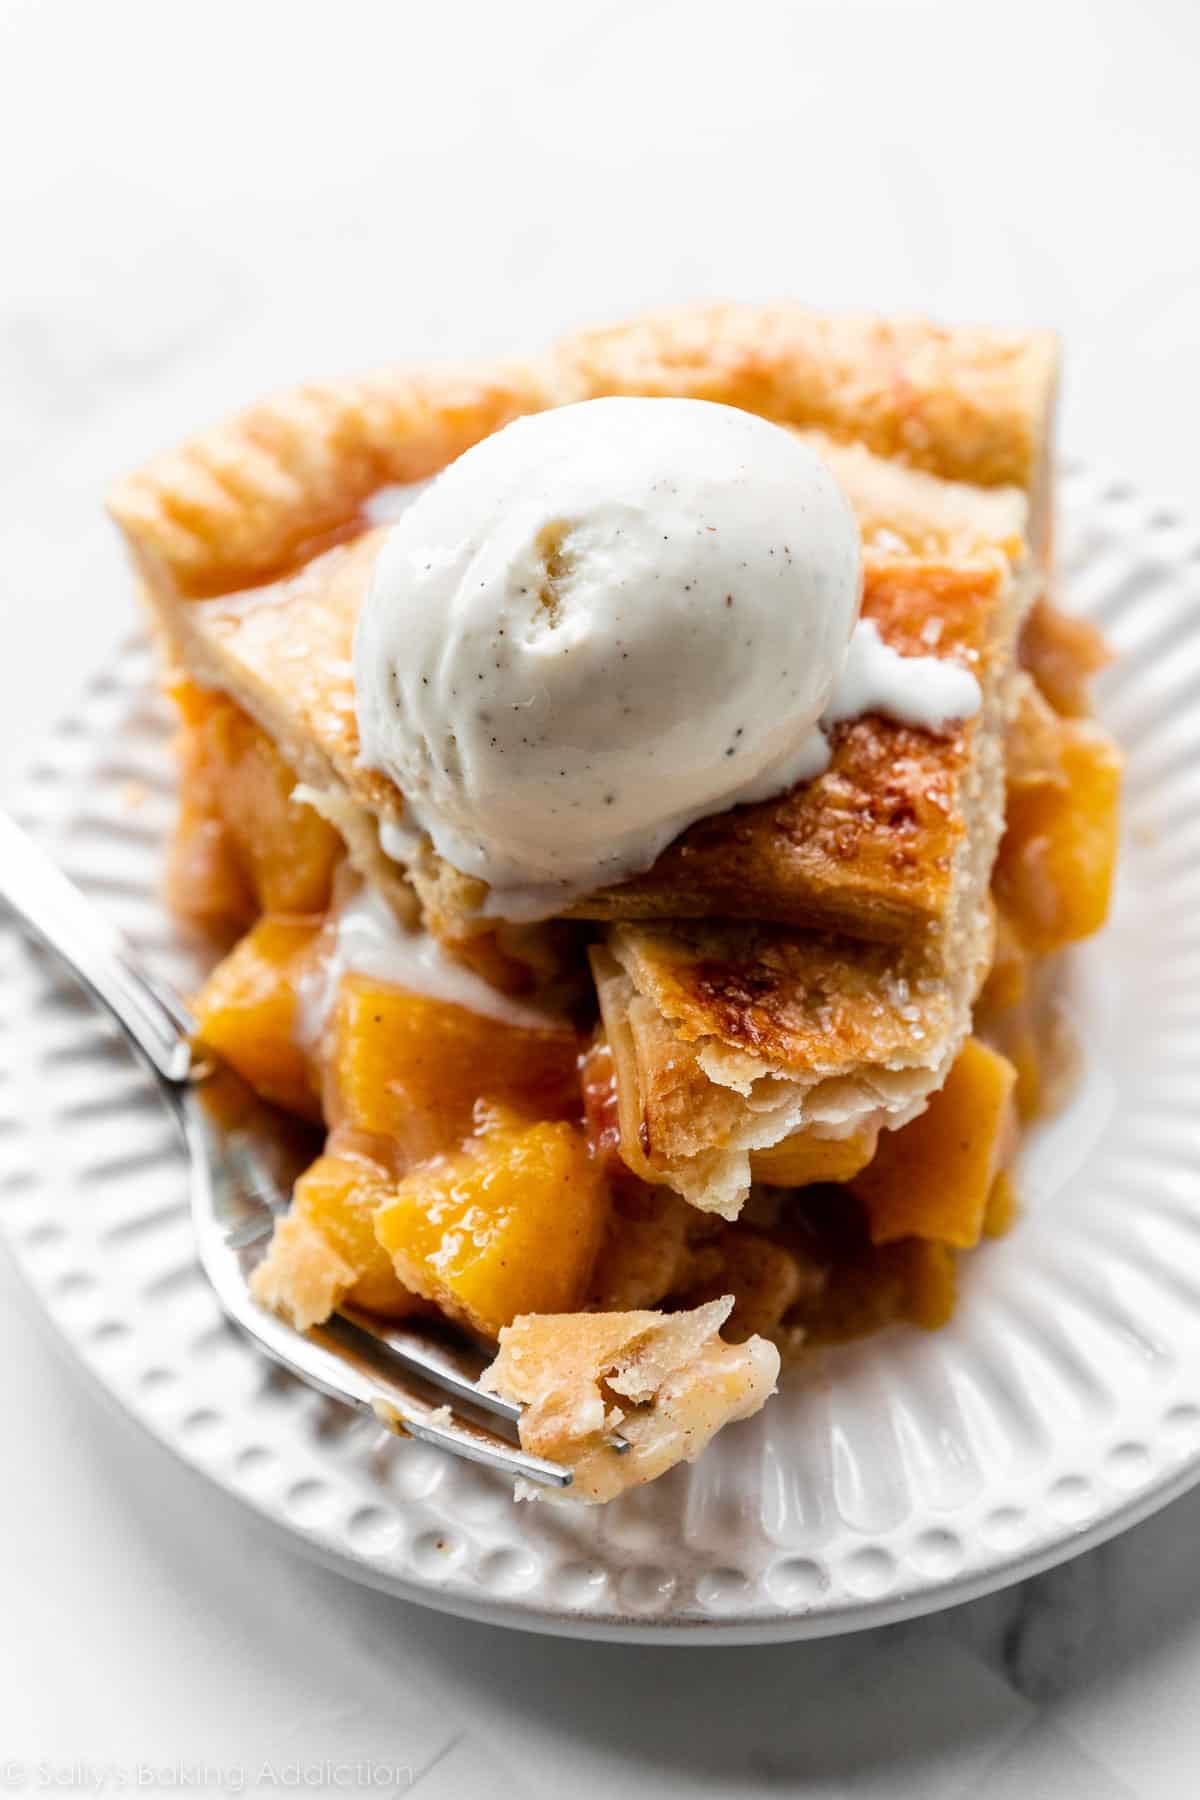
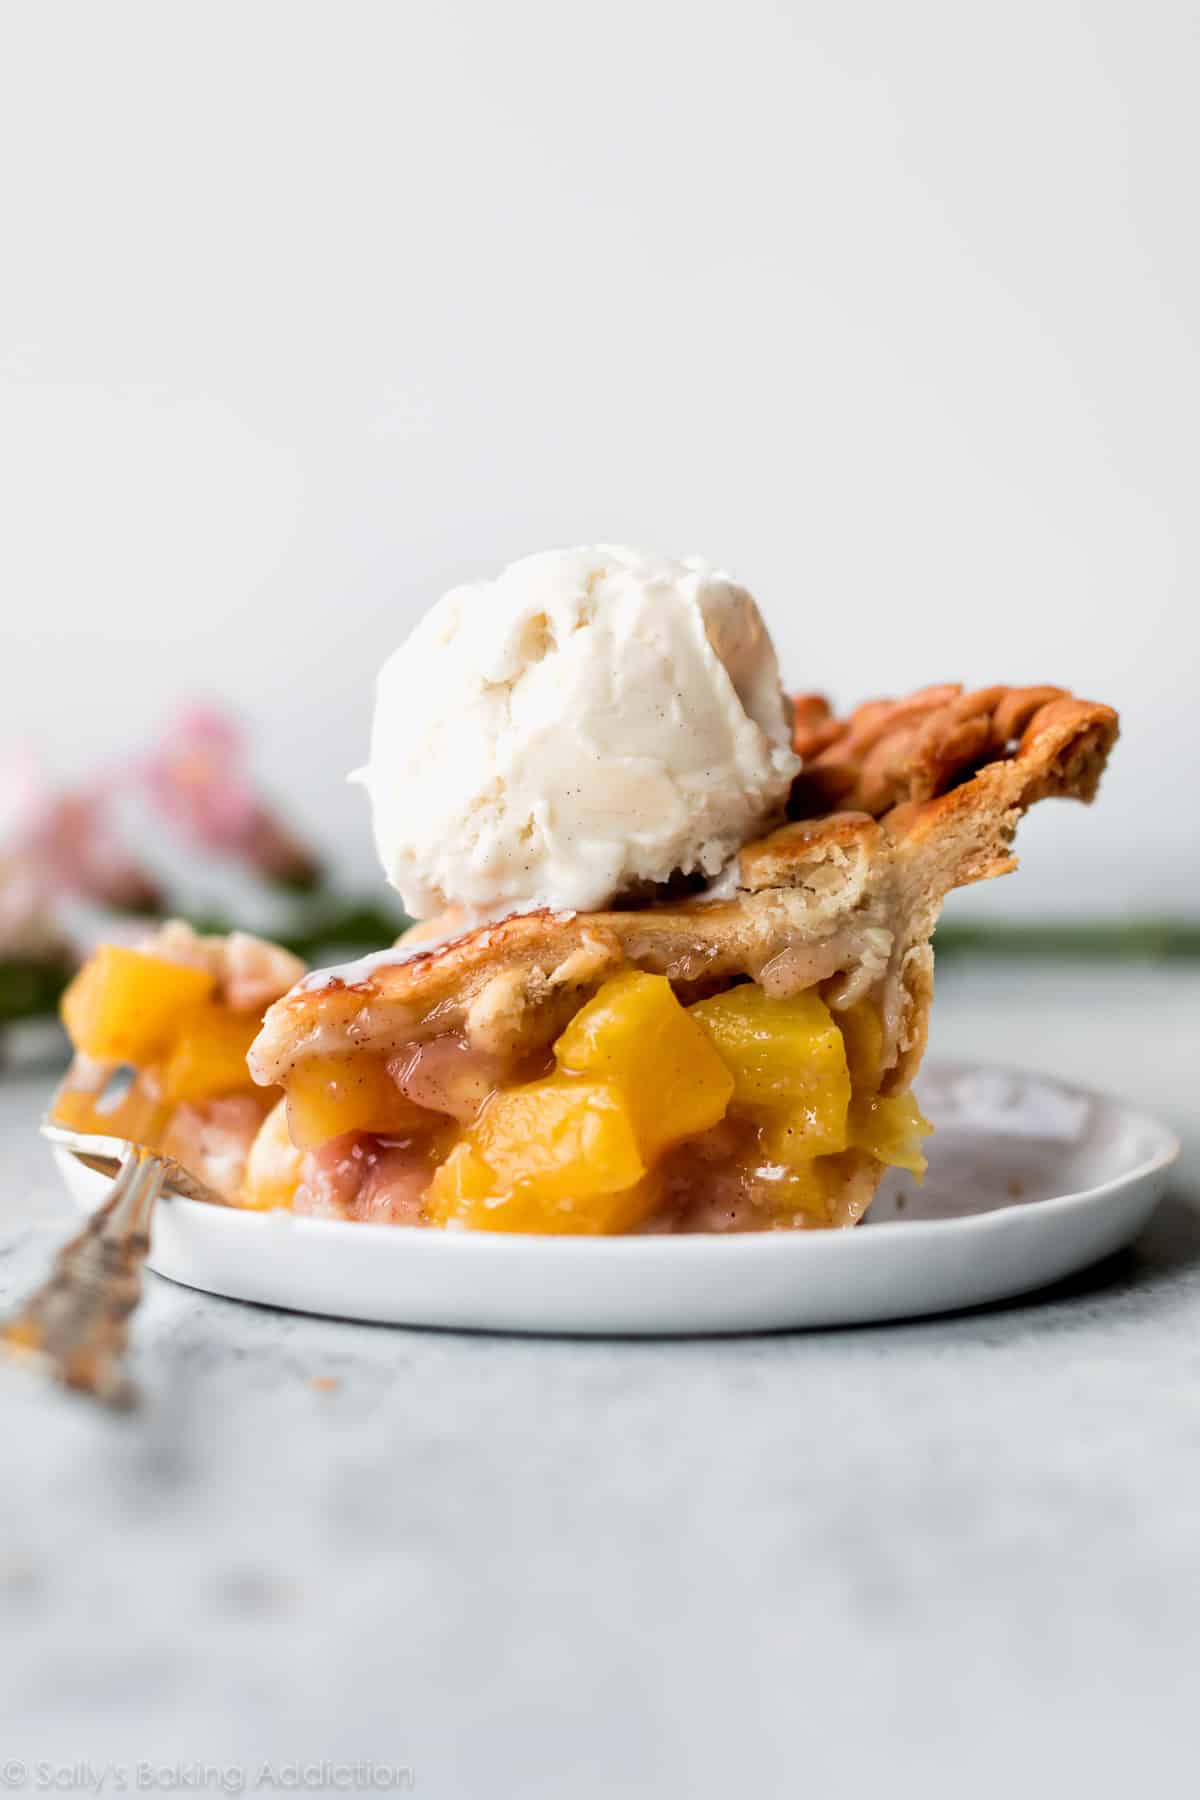
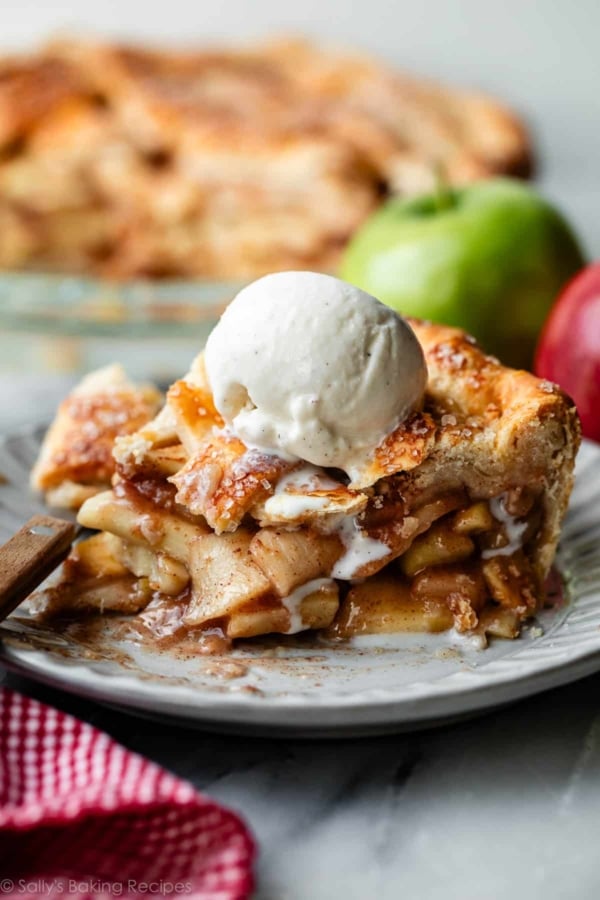
From the buttery flaky pie crust to the juicy cinnamon-spiced peach filling, there’s no doubt this will be the best peach pie you’ll ever eat. Taste testers and readers have loved this dessert recipe for years because each slice is bursting with peaches that hold their texture. I recommend a little fresh ginger for extra flavor, and don’t forget the vanilla ice cream!
I originally published this recipe in 2018 and have since added new photos and more helpful success tips, including changes to the baking instructions that are reflected in the printable recipe below.
If summertime were a pie, it would most certainly be this fresh peach pie. We’re taking advantage of the season’s abundant bounty of peaches and combining them with fresh ginger, warm cinnamon spice, and a hint of lemon to keep the flavor bright. After one taste, you’ll forget all other peach pies exist.
One reader, Val, commented: “This is the perfect peach pie. I had already mixed my pie dough and had it chilling, so I just made the pie filling. Wow. I’ve never had a peach pie that remained intact after cutting. Peach chunks! The half cup of flour! The fresh ginger! There were lots of little secrets resulting in a delicious peach pie! Will be making again, and I’ll use your pastry recipe for perfection! ★★★★★“
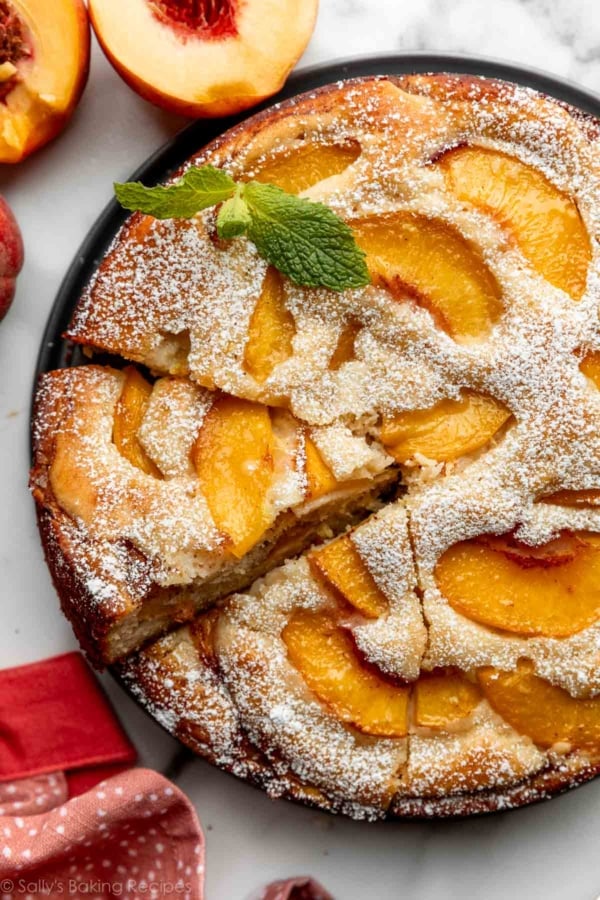
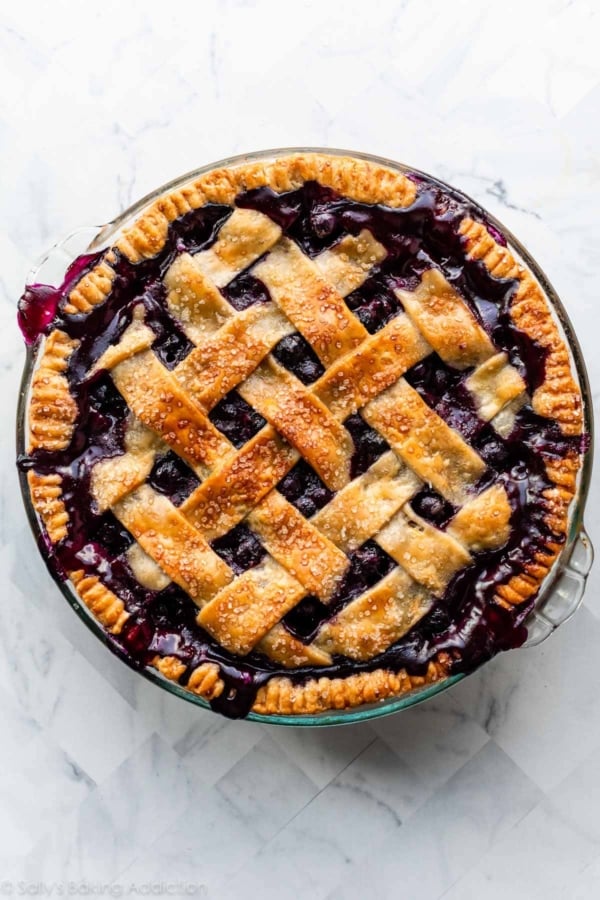
For more perfectly summery pies featuring ripe, in-season fruit, try my strawberry rhubarb pie, blueberry pie, blueberry peach pie, cherry pie, or triple berry pie next.
Here’s Exactly Why This Peach Pie Recipe Works
From-scratch pie can be hard work, so my team and I repeatedly tested this pie so the results are worth your time and effort. The recipe is exactly the same as the popular original a few years ago—flavorful and fresh—however, we updated the baking instructions so the filling sets even more. (Peaches are so juicy!) The baking instructions now resemble this blueberry pie.
In order for this recipe to work, you must (1) cut your peaches into chunks instead of slices, (2) avoid overly soft or bruised peaches, (3) embrace a bubbling-juicy-messy pie filling, and (4) let it cool completely in order for the filling to fully set up. This pie takes several hours, but I promise you: it’s worth it. Get ready for the most incredible, juicy-yet-sliceable peach pie experience:
Start With Pie Crust
You can use your favorite pie dough recipe, but I encourage you to try mine. To make perfect homemade pie crust, I use a mix of shortening and butter because the two ingredients work together to make an unbeatable texture. Butter adds flavor and flakiness, while shortening’s high melting point keeps the crust tender and workable. (Here’s my recipe for all butter pie crust if you’re interested in trying that one instead.)
Pie crust tips:
- Make the pie dough ahead of time because it needs to chill in the refrigerator for at least 2 hours before you can work with it.
- The recipe yields 2 crusts—one for the bottom and one for the top—which is what you need for this pie. If you don’t make pies often, you may want to review my tutorial for how to crimp and flute pie crust, too.
- You don’t need to par-bake the crust because this pie bakes for so long.
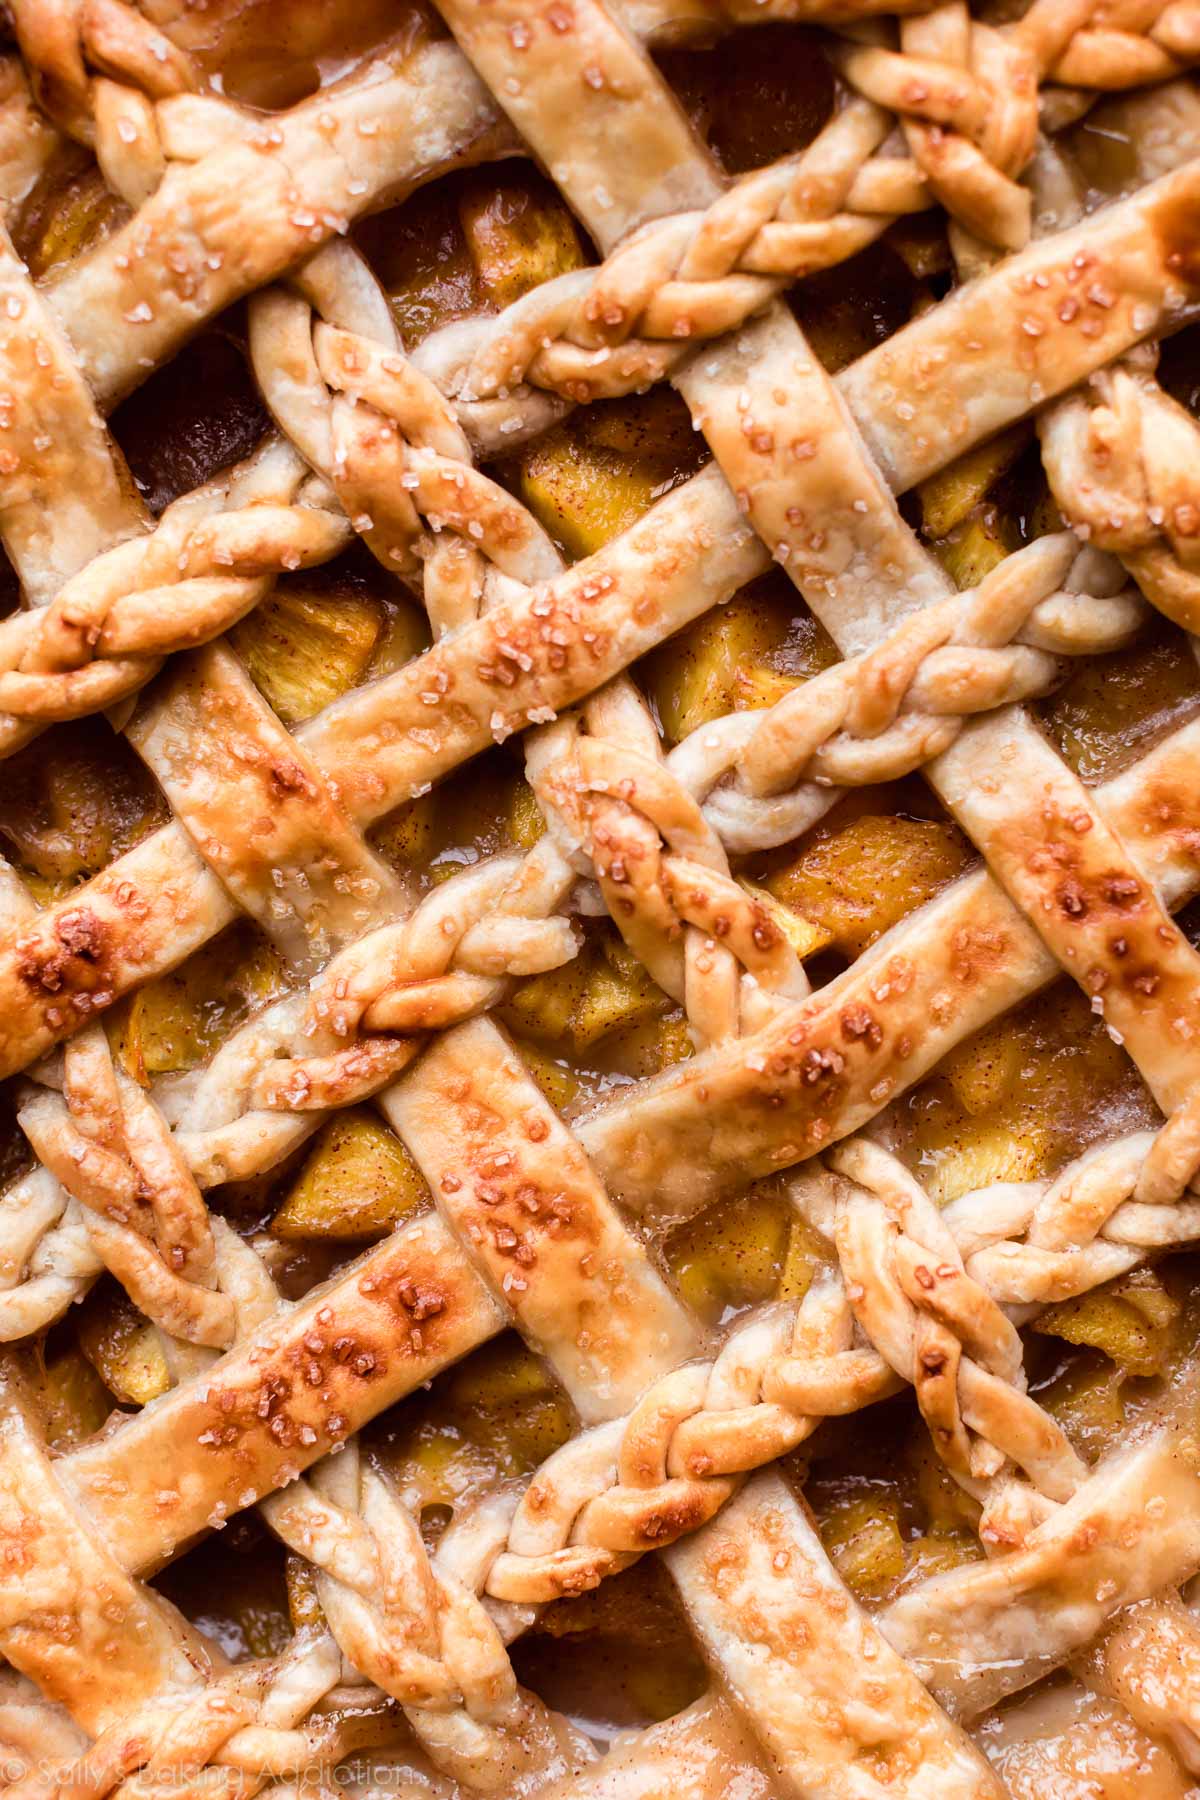
- Because there’s a little shortening in the dough, it holds shape well, and you can even braid it. See recipe Note below to replicate this design, and here’s my complete how to braid pie crust tutorial.
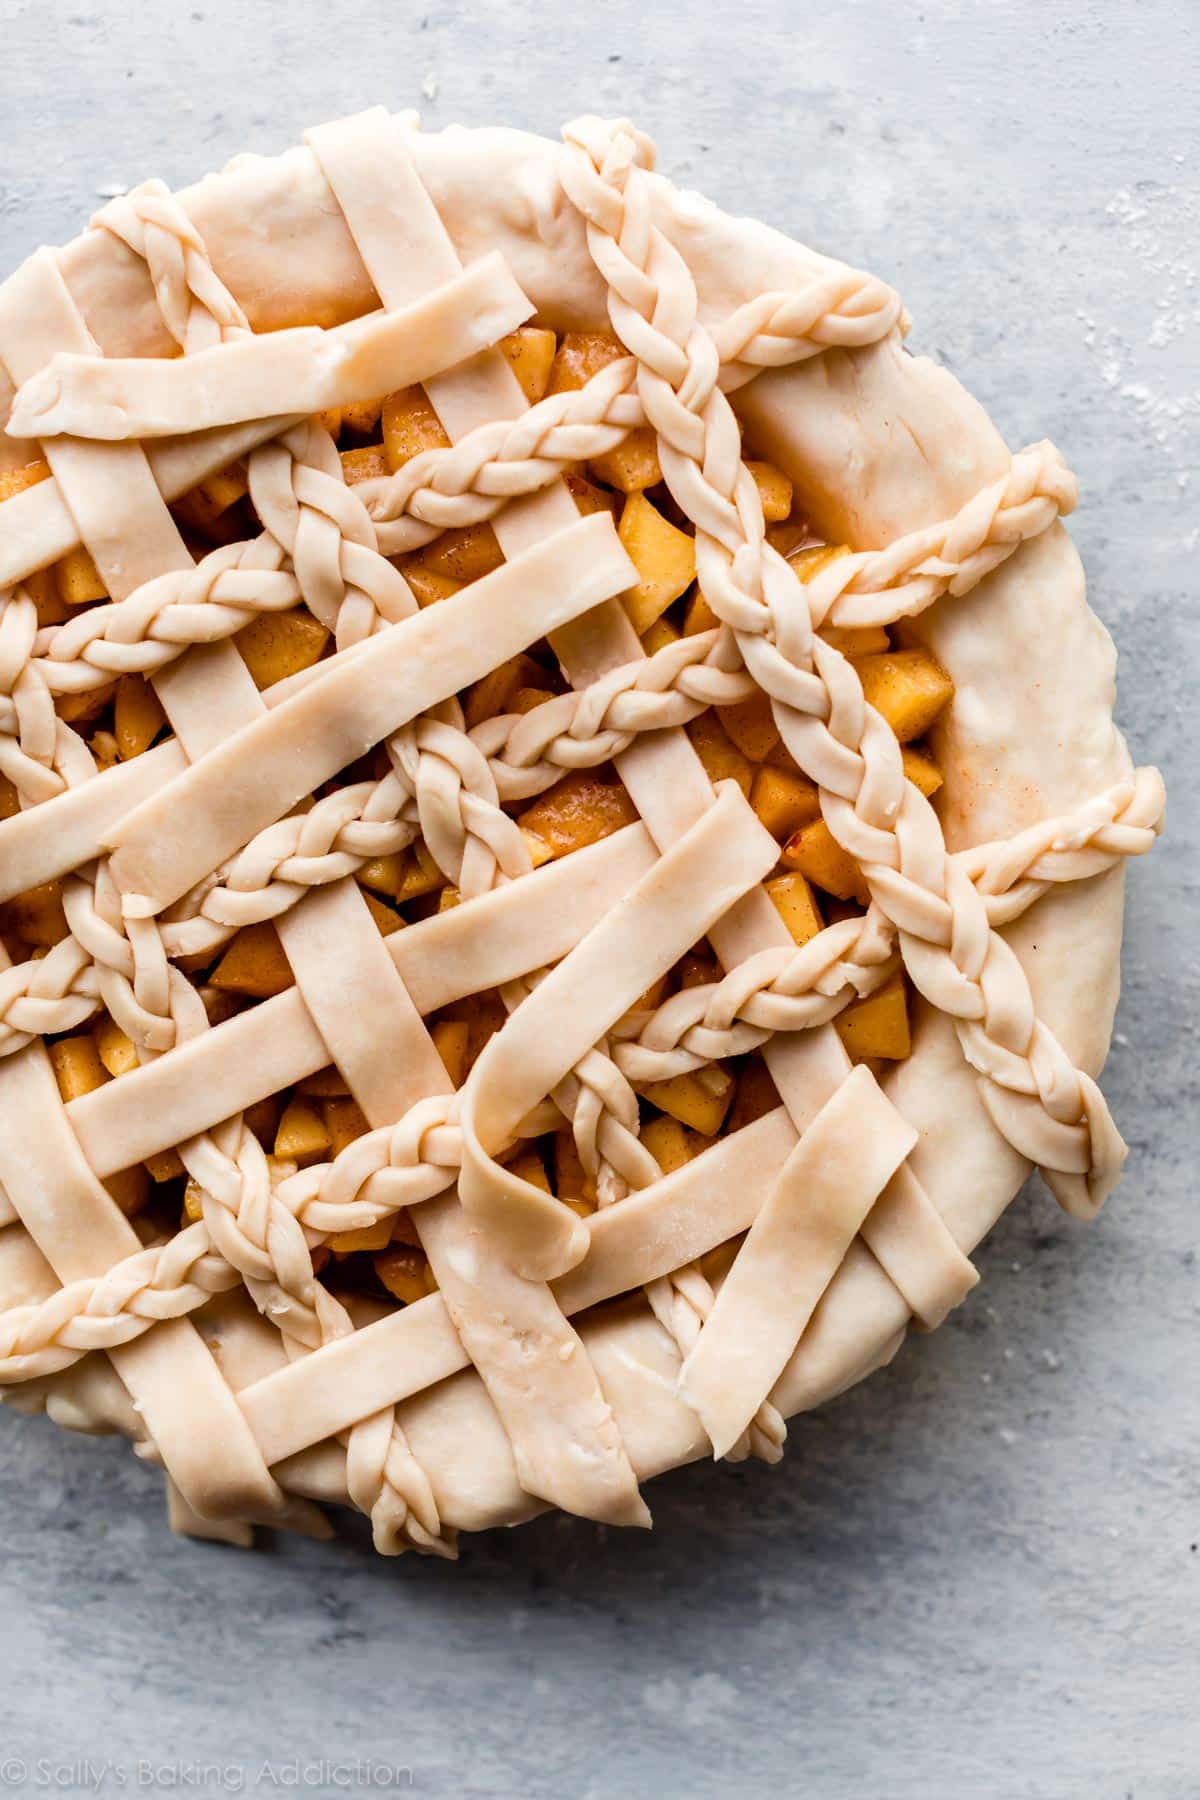
If you’re not up for the braiding challenge, you can simply lattice thick strips of pie dough. Now let’s talk about the peaches.
What Are the Best Peaches for Peach Pie?
The best fresh peaches for peach pie are the same I recommend for other peach recipes including peach cobbler, fresh peach cake, peach crisp, and peach bread. You want slightly firm (not hard) yellow peaches with zero bruises or soft spots. Your best bet is to purchase or pick about 10 firm peaches, then let them sit in a paper bag for 1–2 days to ripen. Some may have soft spots after this time, so that is why I suggest buying a couple more than you actually need.
If your peaches are soft, stringy, and mushy, your filling will taste soft, stringy, and mushy. Eat any overly soft peaches or save them for peach muffins. They are NOT ideal in pie.
Can I Use Frozen Peaches in Peach Pie?
Fresh peaches are best for peach pie, though you can get away with unsweetened frozen peaches. If using frozen peaches, thaw, chop, and blot them dry before using. Canned peaches are not ideal because they’re already too soft and mushy.
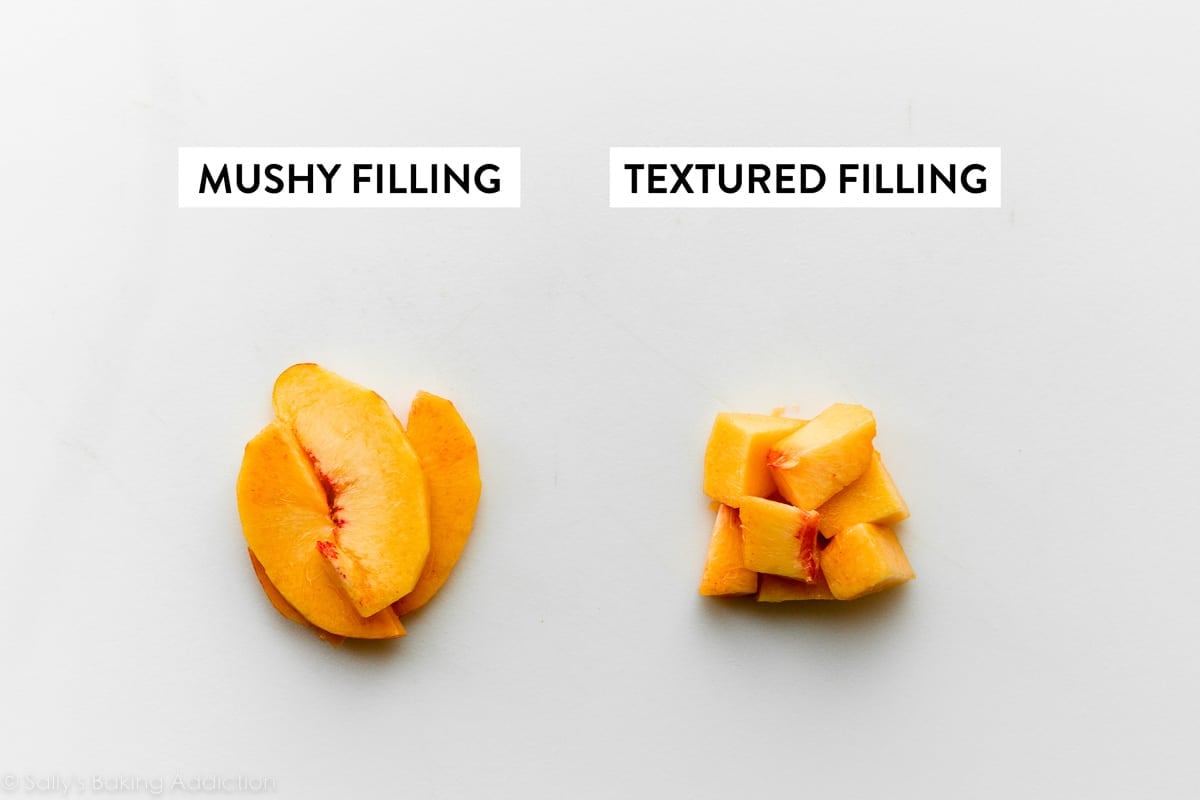
#1 Success Tip: Use Chunks, Not Slices
Unlike apple pie where you peel and cut apples into slices, cut your peeled peaches into small (approx. 1-inch) chunks here. Because peaches are so juicy, slices bake into mush, while chunks retain more of their deliciously soft texture. The same tip applies for peach cobbler.
Success Tips for Peeling & Cutting Peaches
- Have a trusty peeler on hand. I like this OXO peeler because it’s flexible and easy to hold.
- You can place the peaches in a pot of boiling water for a few seconds to loosen the skin. Use a slotted spoon to remove the peaches and place them on a plate or in a bowl. The peel should easily come off. I learned this trick from Taste of Home, so read more over there!
- When I don’t use the boiling water trick, I just use my peeler and make sure to rinse it and my hands often with water because everything starts to get a little slippery from the juicy peaches.
- To easily cut peaches, use a sharp knife and, again, rinse it and your hands often to reduce slippage.
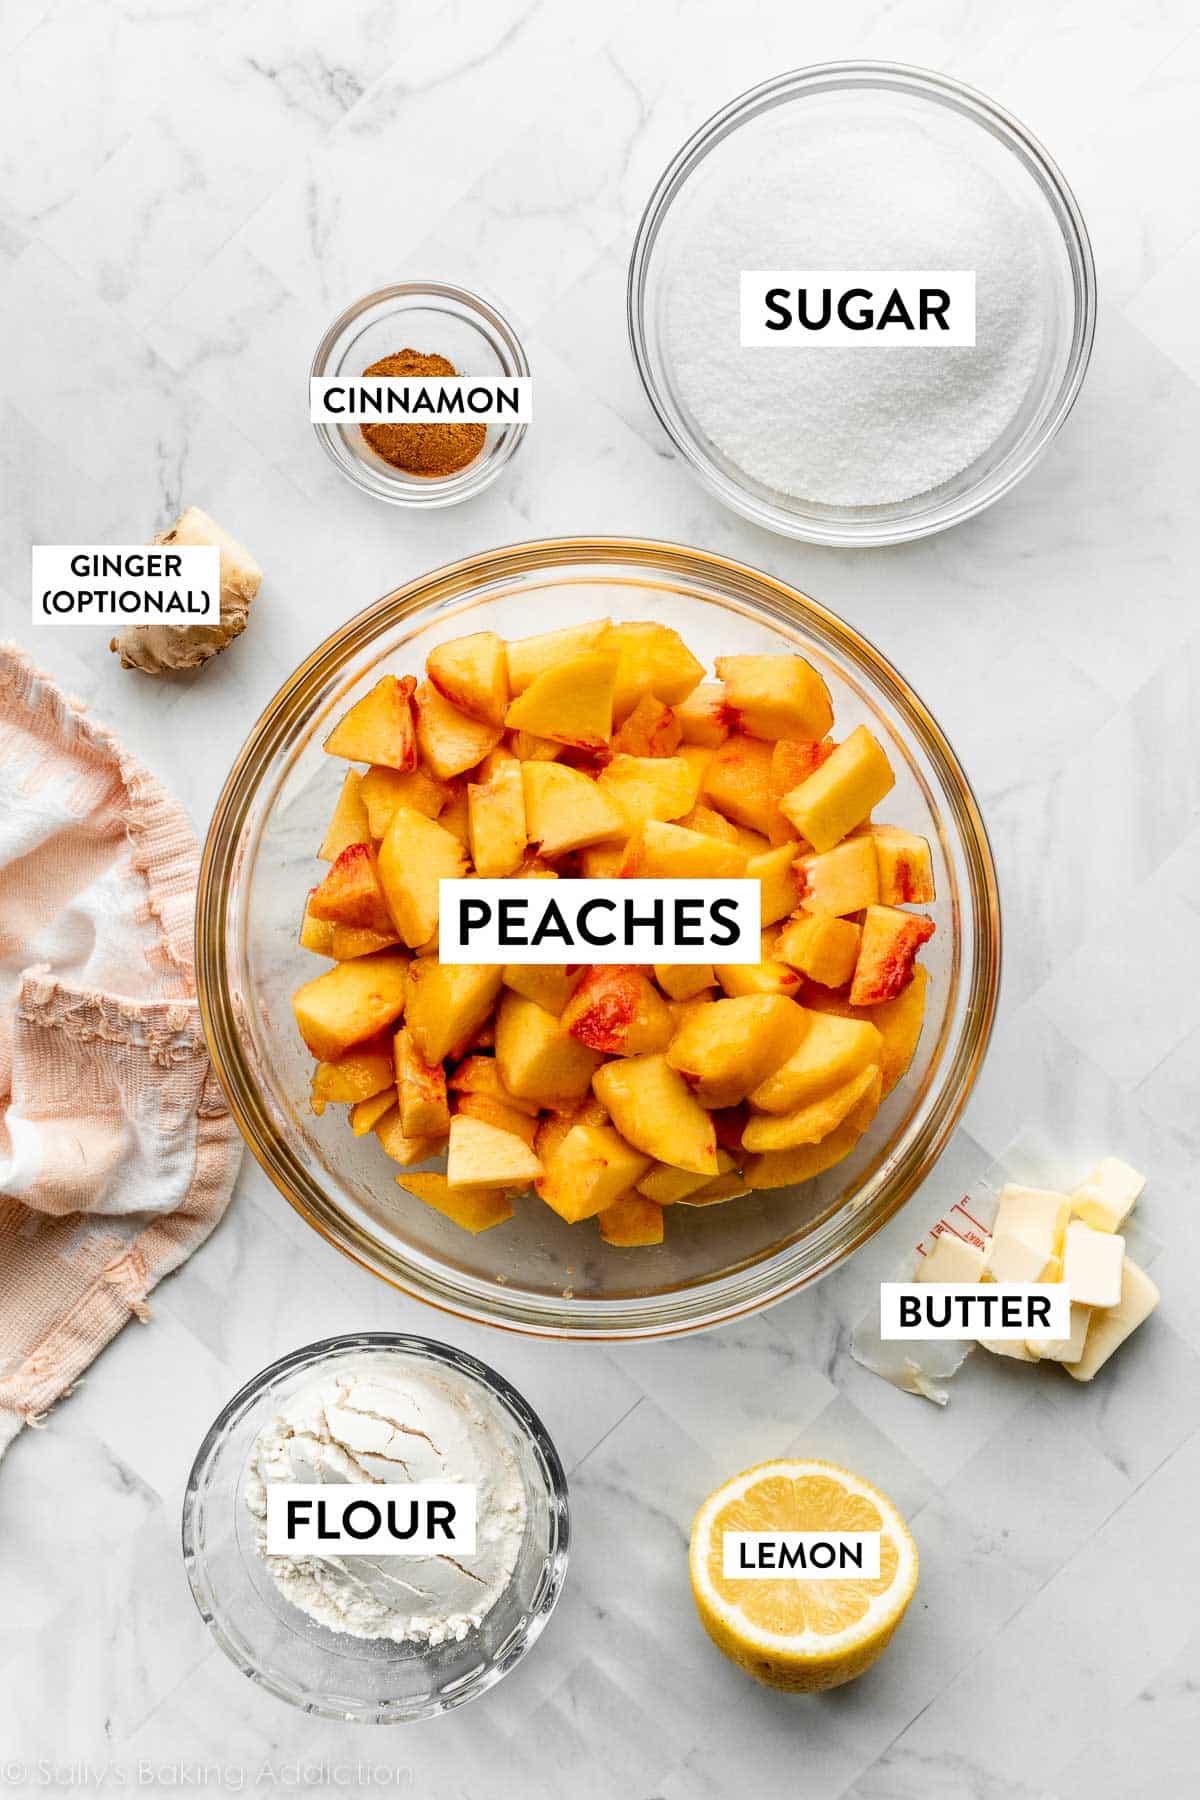
7-Ingredient Filling
- Peaches: Cut the peaches into chunks instead of slices for best results.
- Sugar: Granulated sugar sweetens the filling. Feel free to use brown sugar if desired. I like to use all brown sugar in this peach crumble pie recipe.
- Flour: This is my top choice for thickening non-berry pie fillings. Cornstarch is wonderful, but you’d need a lot for this pie, and using too much results in an undesirable paste-like texture.
- Lemon Juice: The pie filling tastes a little flat without it. Do not replace with lime.
- Fresh Ginger (Optional): I’ve said it before, but something that transforms a good peach pie into the BEST peach pie is a little zing from fresh ginger. You can leave it out if desired, or replace with 1/4 teaspoon of ground ginger. Once you try it, you’ll likely never make peach pie without it again!
- Cinnamon: Warm cinnamon spice and pie go hand-in-hand. You’ll love this addition.
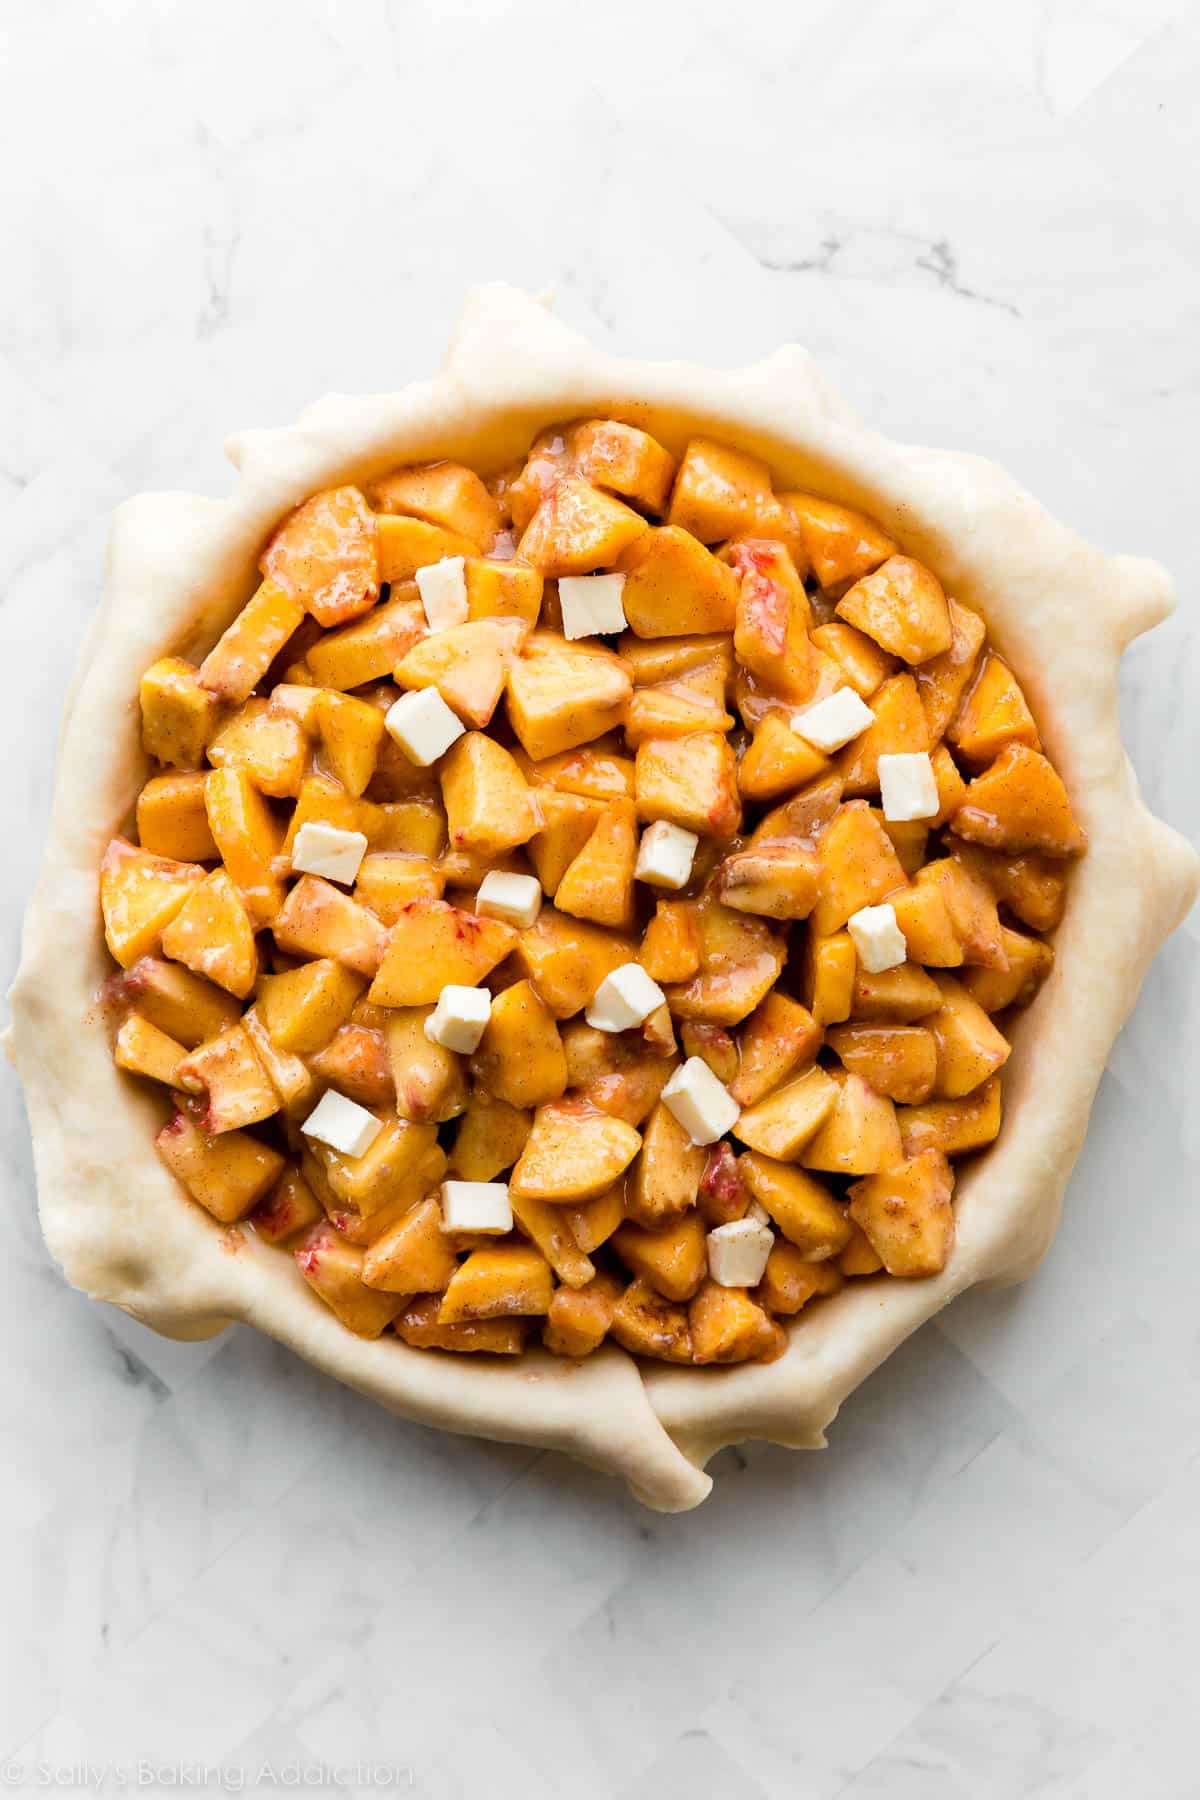
- Butter: Like cherry pie, dotting small cubes of butter on top of the filling helps create a richer filling. You need 2 Tablespoons of butter, which is convenient because you use 6 Tablespoons in the pie dough. So just grab 8 Tablespoons/1 stick of butter (113g) for the recipe.
Top Pie Crust
Add the top crust over your peach pie filling. You can fancily braid the dough as mentioned or:
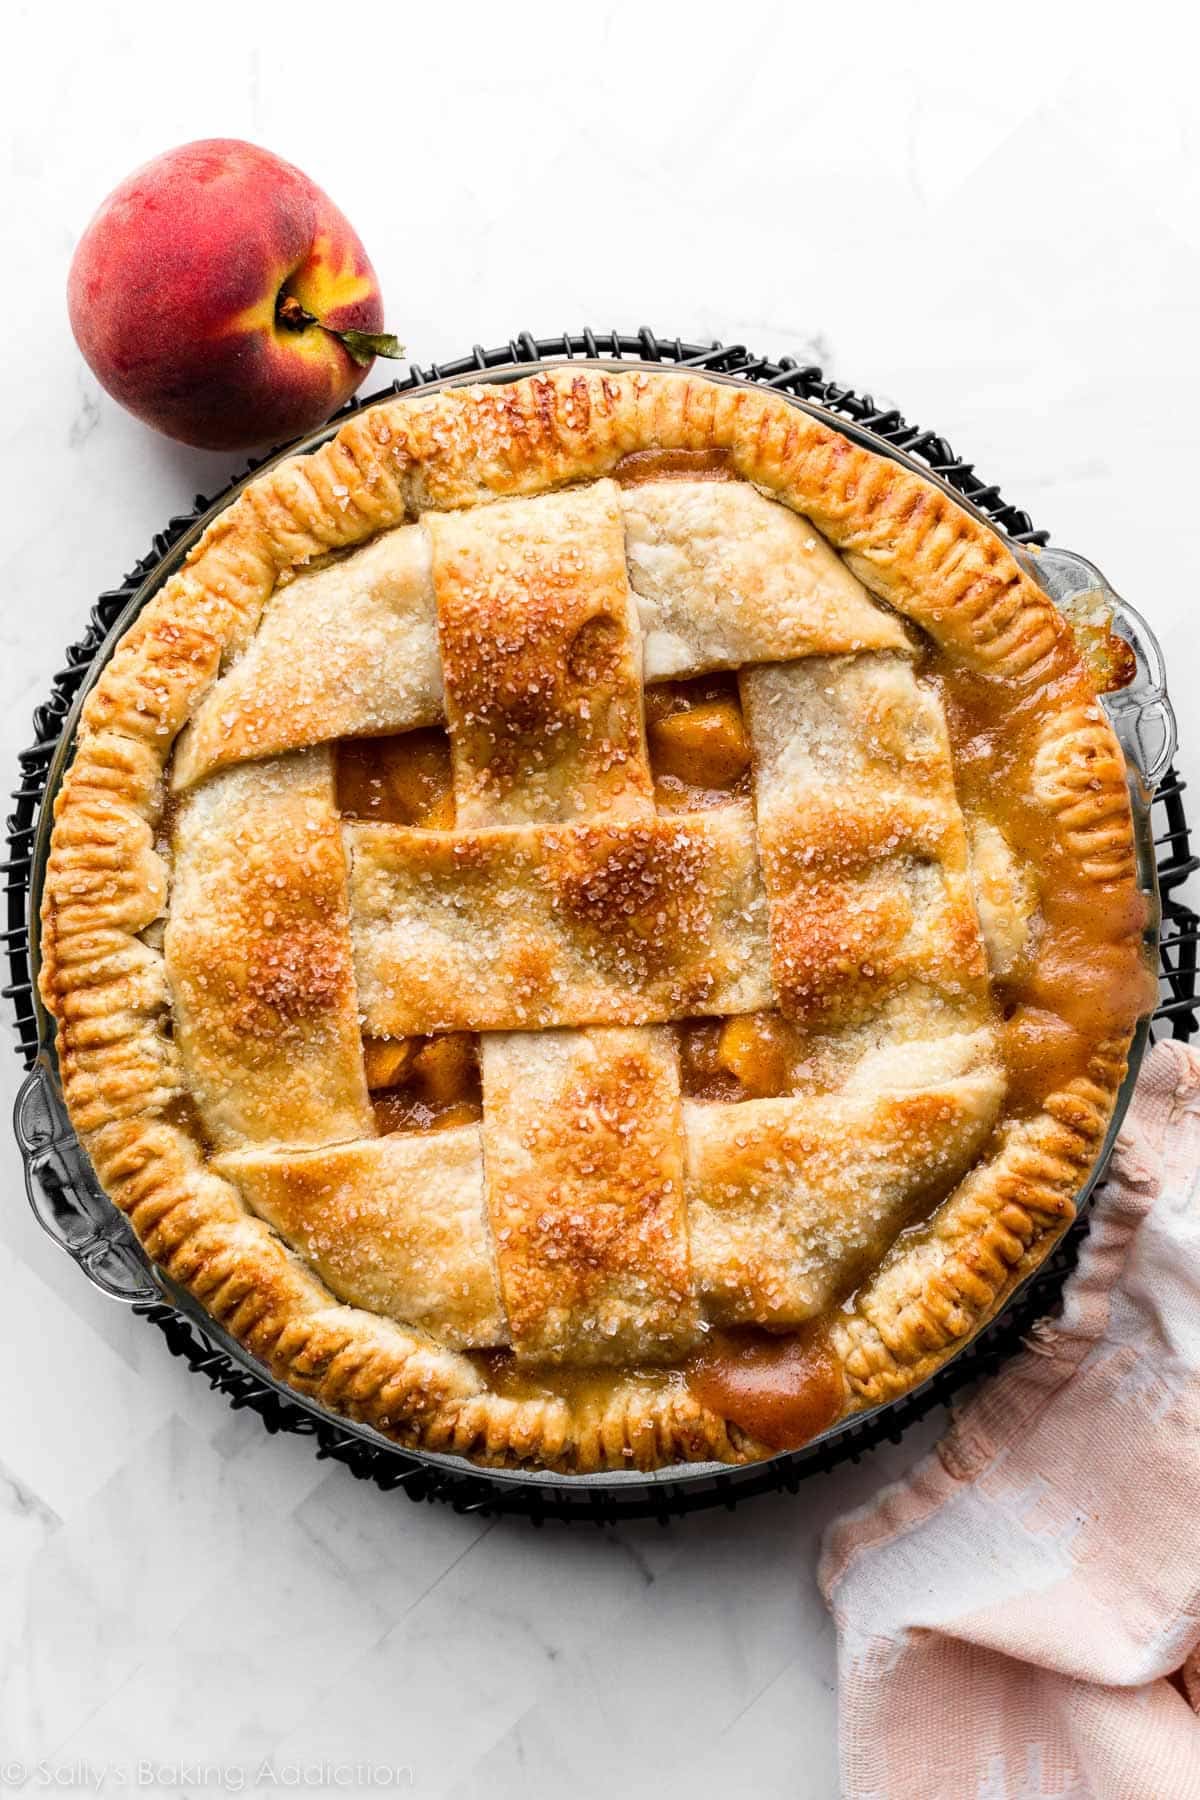
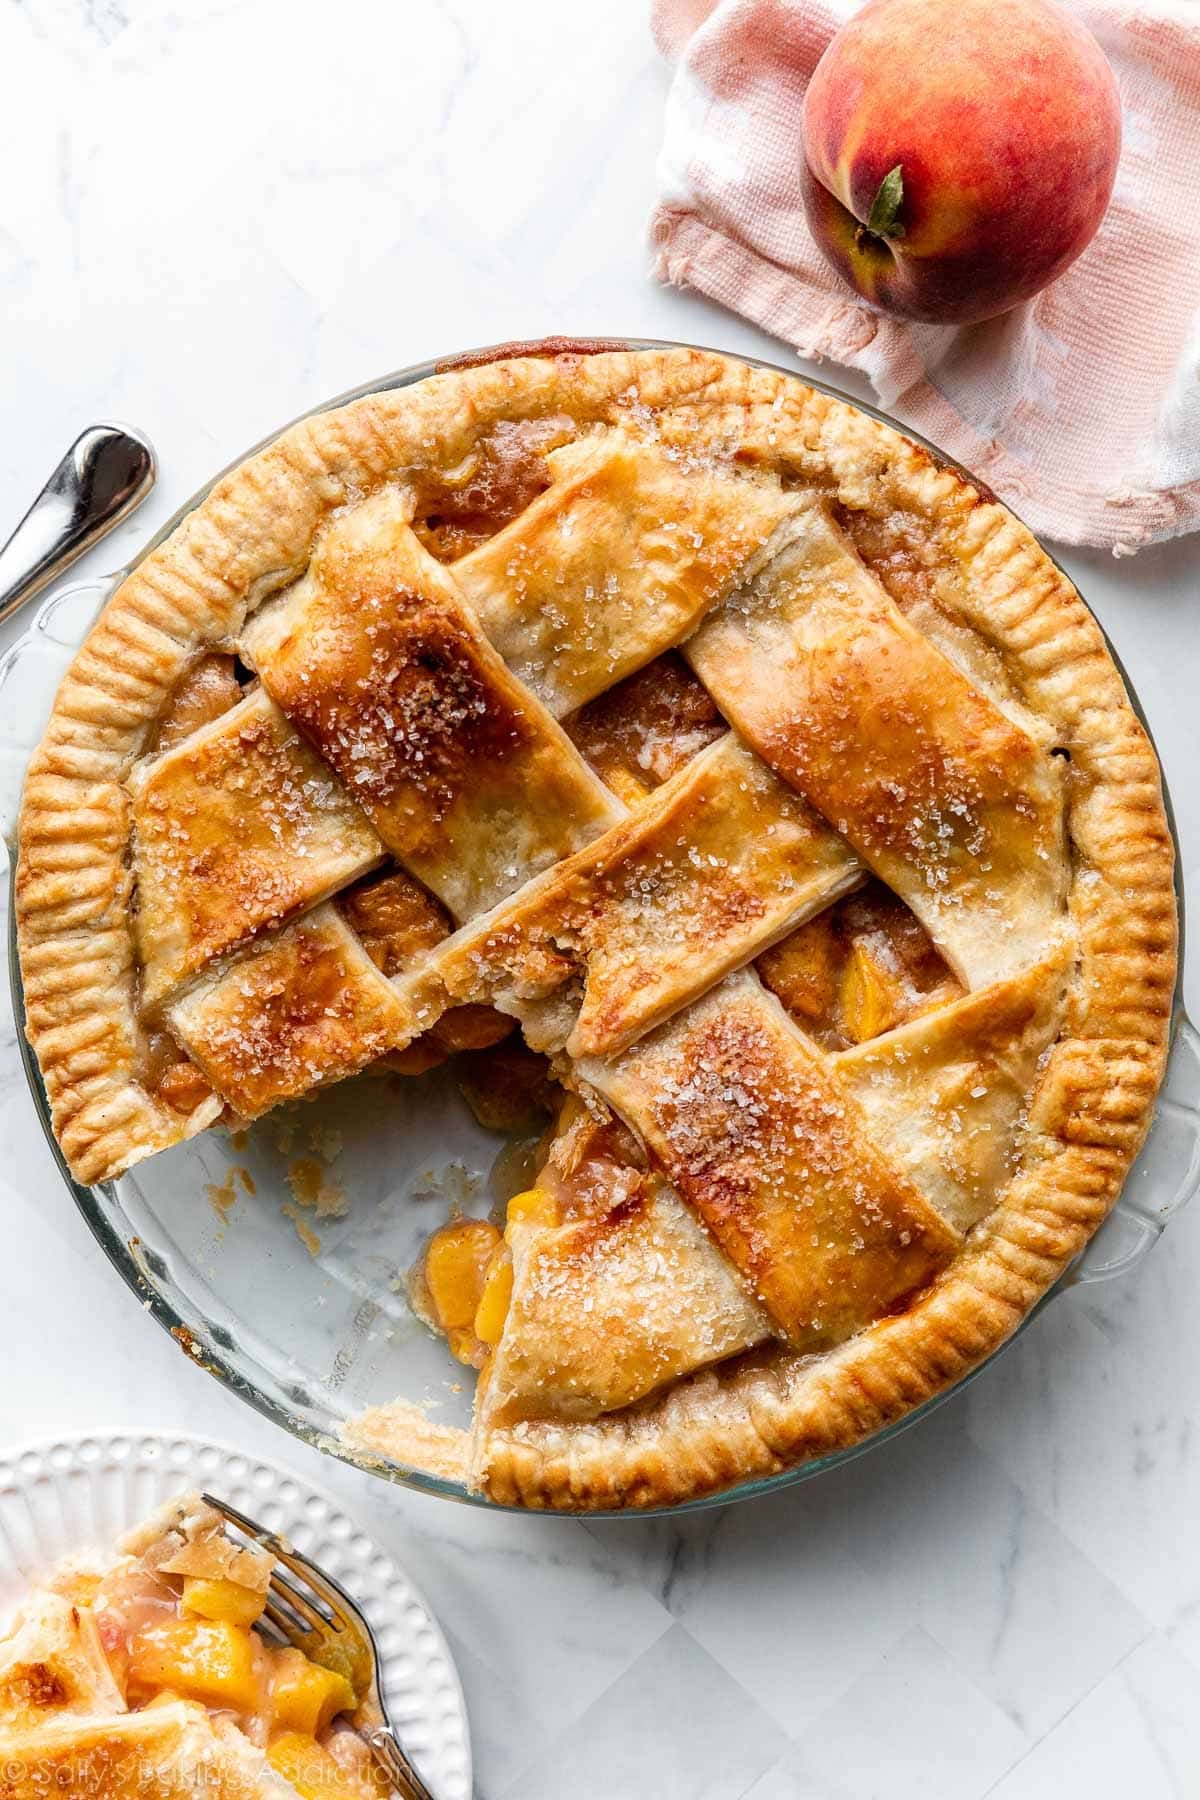
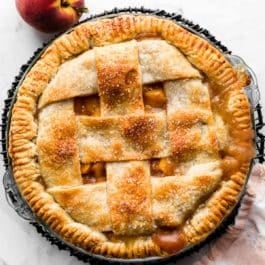
- Lattice: Lattice is a popular and classic design for the top of your pies. I know many bakers gravitate towards this look, myself included, so I put together a detailed How to Lattice Pie Crust tutorial that would work with any fruit pie filling. Lattice is also a convenient choice because you can see when the pie filling is bubbling all over the surface, noting that it’s done baking.
- Other Designs: Feel free to check out other pie crust designs.
- Crumble: Or you could try this peach crumble pie. Note the slight variation in the filling to make up for a buttery, sweet, cinnamon-spiced topping.
Regardless of the design, be sure to crimp or flute the pie crust, too. I simply crimped the edges with a fork in the photos here.
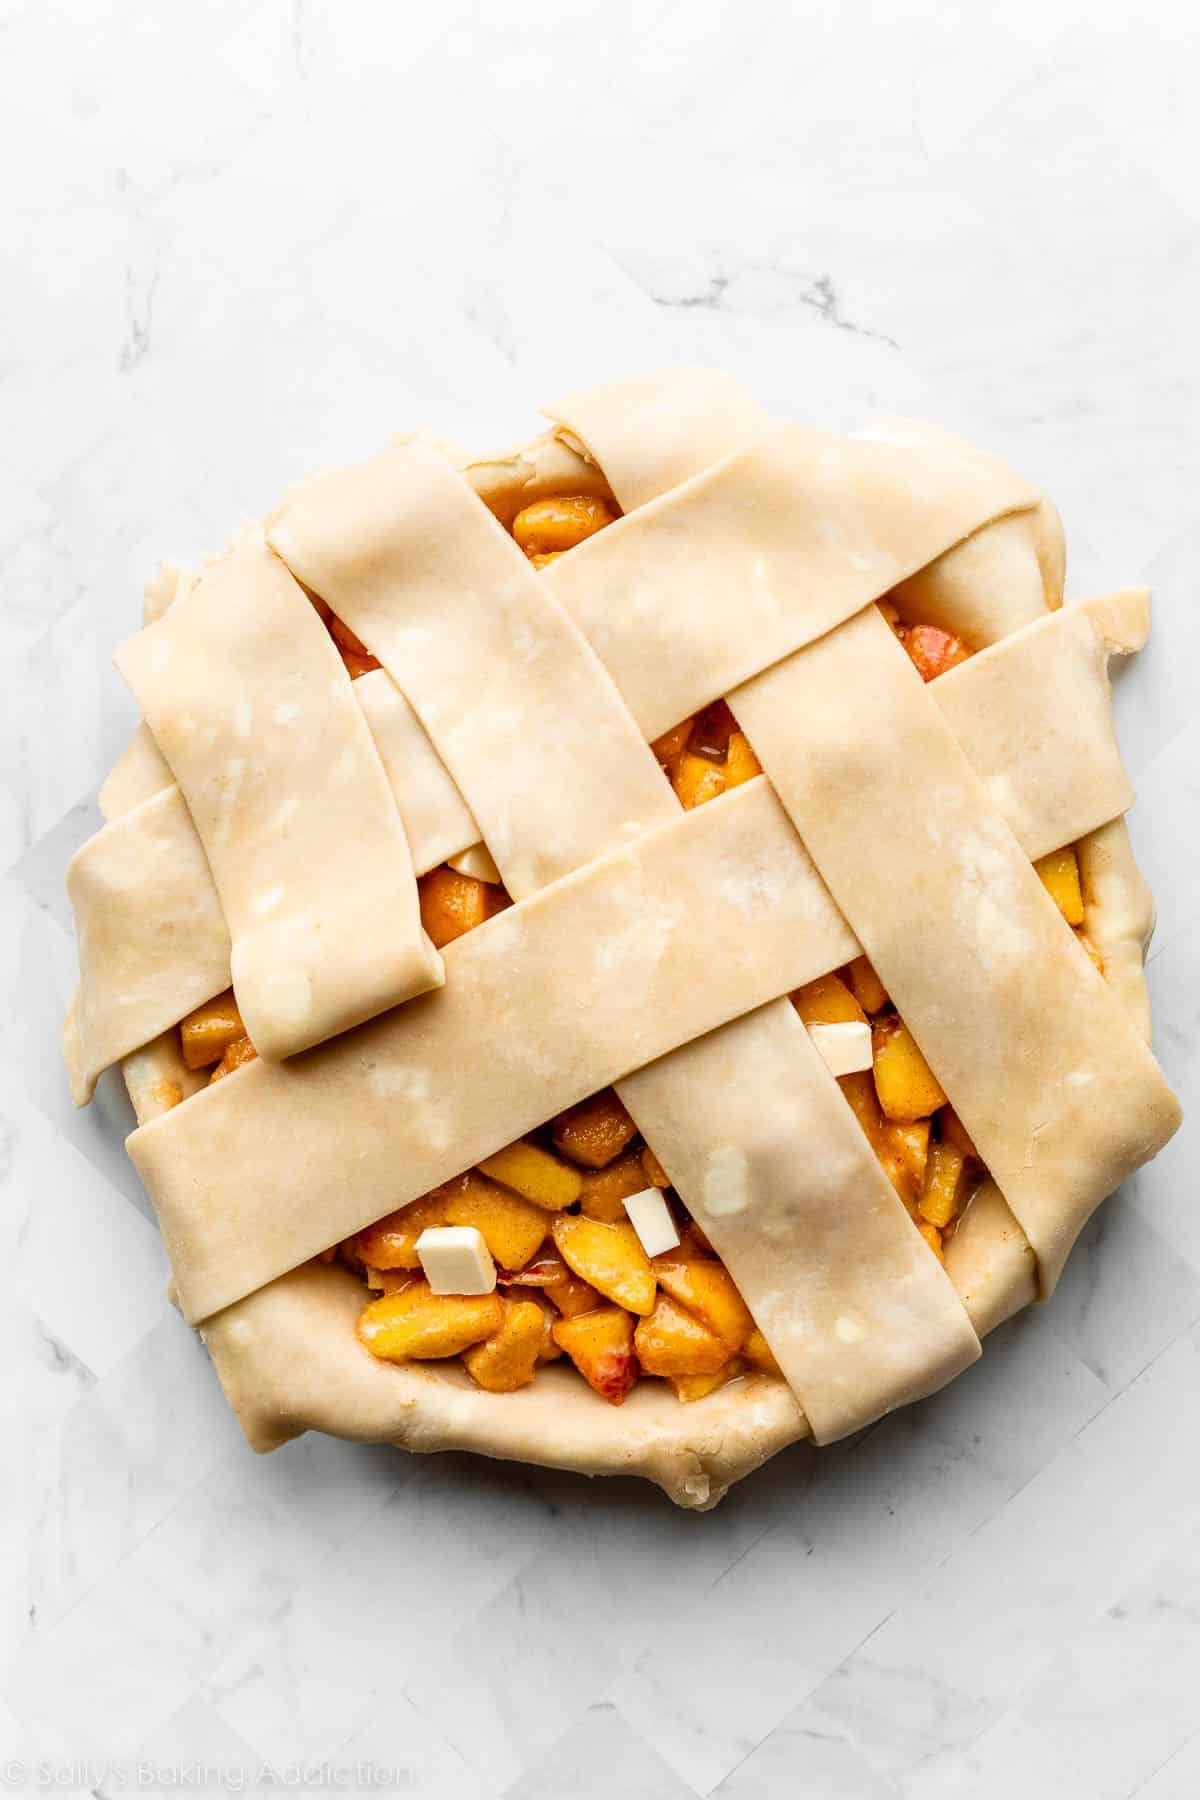

And don’t forget: An egg wash, made from 1 egg and a bit of milk, promises a crispier crust and helps develop that signature golden sheen. Without it, the pie top looks dull and lackluster. I also like topping the pie with coarse sugar for a sparkly crunch, but that’s completely optional.
Many More Peach Pie Success Tips & Tricks
- Make the Pie Crust Ahead of Time: It has to chill for at least 2 hours, but it keeps well in the refrigerator for up to 5 days and the freezer for up to 3 months, so make it in advance and it will save you time on the day you actually make this pie.
- Do Not Use Mushy, Bruised Peaches: Eat them instead of using in a pie.
- Do Not Make the Filling Ahead of Time: The peaches will release too much liquid, so it’s best to make the filling immediately before you pour/spread into the bottom crust. If you want to work ahead, you can peel and chop the peaches, then cover and refrigerate them for up to 1–2 days before mixing with the other ingredients.
- Bake for a Long Time: Peach pie takes a lot longer than pie recipes like pumpkin pie and pecan pie. The juicy filling should be bubbling at the surface nearly everywhere and this takes close to 75–80 minutes. The internal temperature in the test pies (easy to take with an instant-read thermometer because of the lattice top) was around 200°F (93°C) when done.
- Baking Sheet on Rack Below the Pie: The pie filling usually drips as it’s happily baking for over an hour. Place a baking sheet on the bottom oven rack to catch the bubbled-over juices. If you really want to save yourself cleanup time, line it with foil first.
- Start at an Initial High Temperature: 425°F (218°C) for 20 minutes, then the remainder at 375°F (190°C). The reason for the initial hot oven burst is to set the crust and encourage the filling to begin thickening quicker.
- Cool Completely: Slicing warm will give you a soupy slice of pie. Cool for at least 4 hours at room temperature because the pie filling continues to set up as it cools.
Follow all of my success tips, plus the precise baking and cooling instructions below for a peach pie filling that sets perfectly.
Juicy? Yes. Soupy? No.
Recommended Tools
- Pastry blender for making pie dough.
- This is my favorite pie dish. I prefer baking pies in a glass pan so I can see the crust browning on the sides and bottom. Want to skip the pie dish? This easy strawberry peach galette is an easy favorite.
- This rolling pin has held up well over several years with constant use.
- Pizza cutter for lattice pie dough strips.
- I like this OXO vegetable/fruit peeler because it’s flexible and easy to hold.
- Citrus juicer for lemon juice.
- Pastry brush for the egg wash.
Perfect Peach Pie
- Prep Time: 3 hours
- Cook Time: 75 minutes
- Total Time: 7 hours (includes cooling)
- Yield: 8-10 servings
- Category: Pie
- Method: Baking
- Cuisine: American
Description
After a few additional years of testing, this is now a perfected peach pie recipe. As the pie bakes, expect a messy, bubbly, and juicy filling. As the pie cools, the filling sets into a soft, yet sliceable filling. For best success, follow all of my tips above and watch the video tutorial below.
Ingredients
- Homemade Pie Crust or All Butter Pie Crust (both recipes make 2 crusts, 1 for bottom and 1 for top)
- 8 cups (about 1.4kg) peeled chopped peaches, cut into 1-inch chunks
- 2/3 cup (135g) granulated sugar
- 1/2 cup (63g) all-purpose flour OR 1/4 cup instant tapioca
- 1 Tablespoon (15ml) fresh lemon juice
- 1–2 teaspoons peeled minced fresh ginger, optional
- 1 teaspoon ground cinnamon
- 2 Tablespoons (28g) cold unsalted butter, cut into small cubes
- egg wash: 1 large egg beaten with 1 Tablespoon (15ml) milk
- optional: coarse sugar for sprinkling on crust
Instructions
- Make the crust: Prepare either pie crust recipe through step 5.
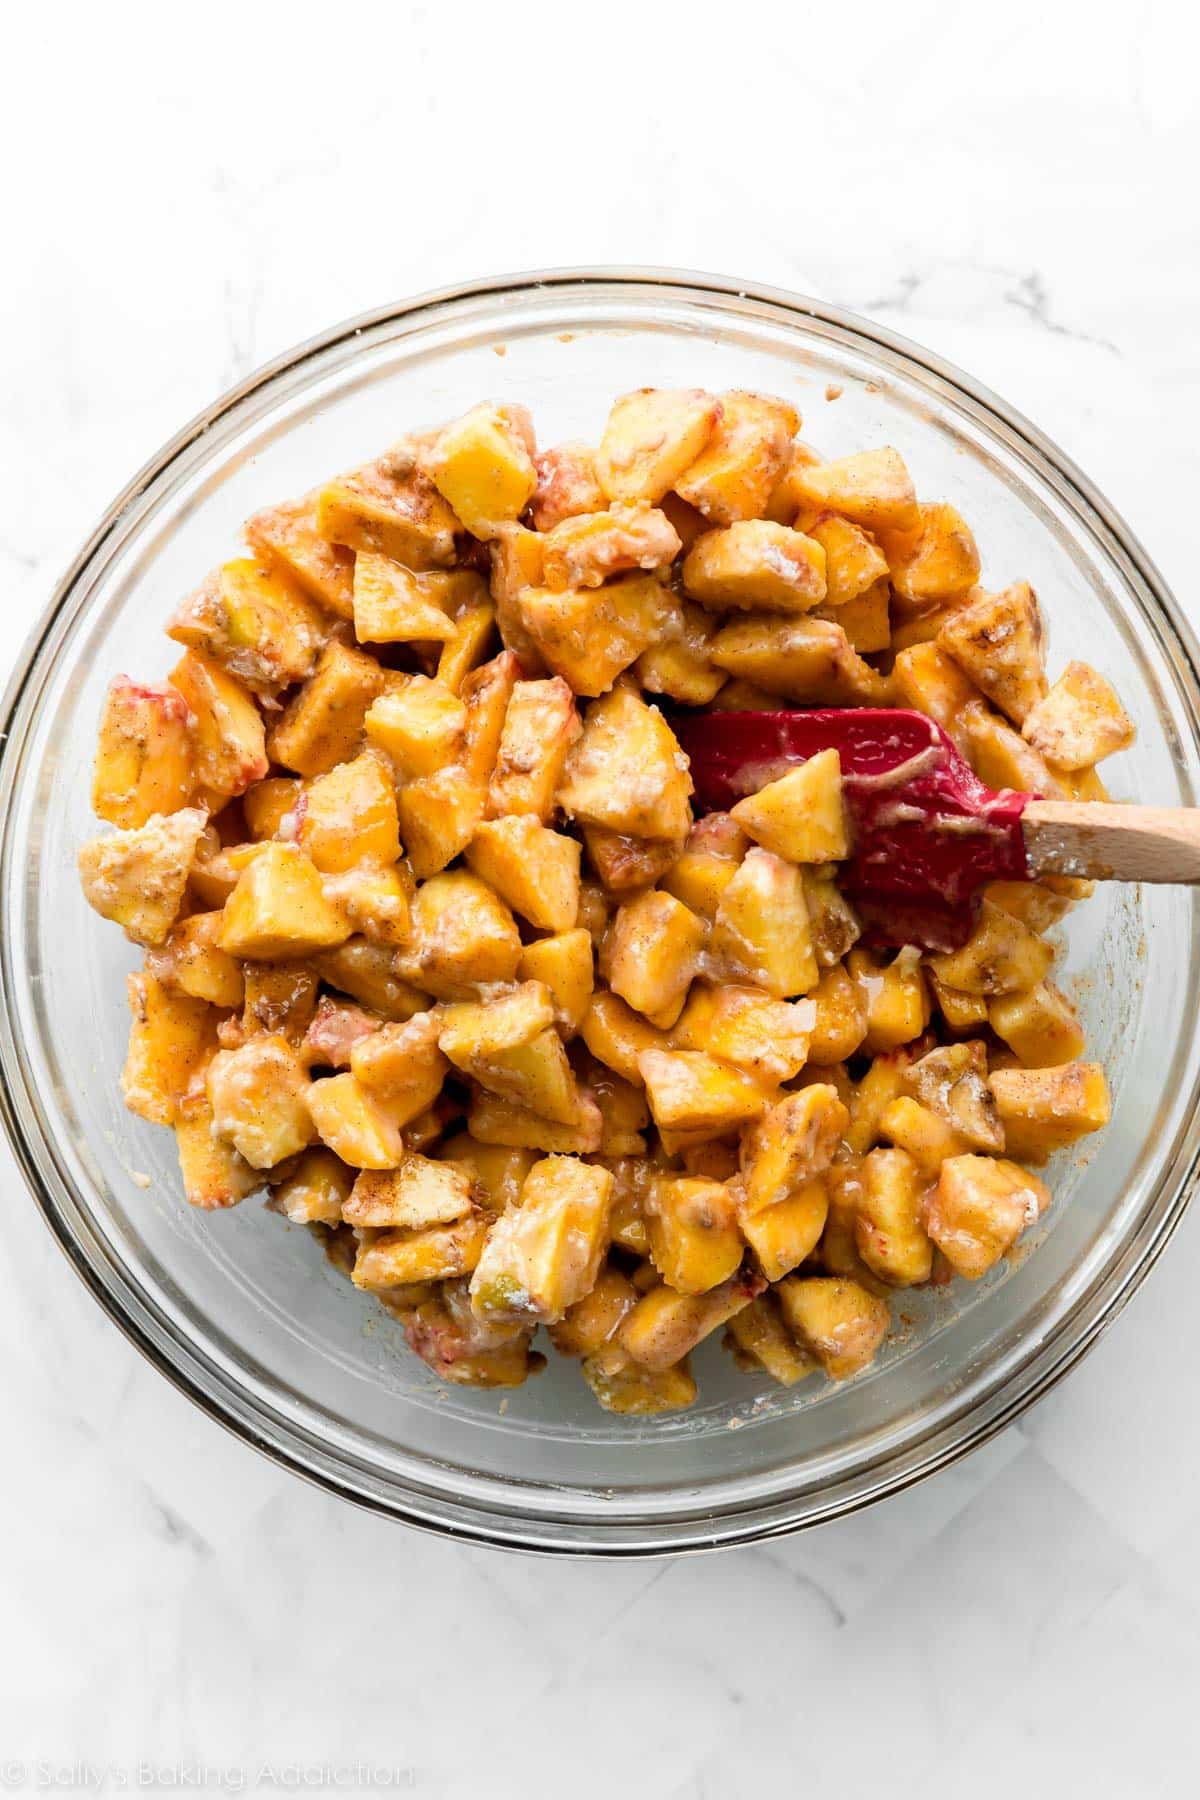
- Make the filling: In a large bowl, gently stir the chopped peaches, granulated sugar, flour, lemon juice, ginger, and cinnamon together until thoroughly combined. Set filling in the refrigerator while you roll out the dough. No need to cover it.
- Adjust the oven rack to the lower-third position and preheat to 425°F (218°C). Place a baking sheet on the bottom oven rack to catch any bubbling-over juices.
- Roll out the chilled pie dough: On a floured work surface, roll out one of the discs of chilled dough (keep the other one in the refrigerator). Turn the dough about a quarter turn after every few rolls until you have a circle 12 inches in diameter. Carefully place the dough into a 9-inch round pie dish. Tuck it in with your fingers, making sure it is smooth. Pour and spread filling evenly into pie dish. Dot the pieces of butter on top of the filling. Set aside at room temperature or in the refrigerator as you assemble the top pie crust.
- Arrange the lattice: Remove the other disc of chilled pie dough from the refrigerator. Roll the dough into a circle that is 12 inches diameter. Using a pastry wheel, sharp knife, or pizza cutter, cut strips of dough; in the pictured pie, I cut 6 2-inch-wide strips. Carefully thread the strips over and under one another, pulling back strips as necessary to weave. (Here’s a lattice pie crust tutorial if you need visuals.) To seal the edges, use a small paring knife or kitchen shears to trim excess dough that extends more than 1.5–2 inches over the edge. Fold bottom pie dough edges back over and press/meld into the lattice edges to form a smooth, neat rim. Flute or crimp the pie crust edges with a fork.
- Lightly brush the top of the pie crust with the egg wash. Sprinkle the top with coarse sugar, if using.
- Bake the pie at 425°F for 20 minutes; then, keeping the pie in the oven, reduce the oven temperature down to 375° (190°C). Place a pie crust shield (see Note for homemade shield) on the edges to prevent them from over-browning. Continue baking the pie until the filling’s juices are bubbling everywhere, including in the center, 45–50 more minutes. This sounds like a long time, but under-baking the pie means a soupy, paste-like filling. If you want to be precise, the internal temperature of the filling taken with an instant-read thermometer should be around 200°F (93°C) when done. Tip: If needed towards the end of bake time, remove the pie crust shield and tent an entire piece of foil on top of the pie if the top looks like it’s getting too brown.
- Remove pie from the oven, place on a cooling rack, and cool for at least 4 hours before slicing and serving. Filling will be too juicy and runny if the pie is warm when you slice it.
- Cover leftovers tightly and store in the refrigerator for up to 5 days.
Notes
- Make Ahead & Freezing Instructions: This a great pie to make 1 day in advance, because the filling will have time to set overnight. The pie crust dough can also be prepared ahead of time and stored in the refrigerator for up to 5 days or in the freezer for up to 3 months. Feel free to peel and chop peaches 1–2 days in advance, but do not mix with the other filling ingredients until you’re ready to bake the pie. The peaches will release too much liquid, so it’s best to make the filling immediately before you pour/spread into the bottom crust. Baked pie freezes well for up to 3 months. Thaw overnight in the refrigerator and allow to come to room temperature before serving.
- Special Tools (affiliate links): Pastry Blender | 9-inch Pie Dish | Rolling Pin | Pizza Cutter for lattice pie dough strips | Vegetable/Fruit Peeler | Citrus Juicer | Pastry Brush | Sparkling Sugar | Pie Crust Shield
- Peaches: You want slightly firm (not hard) peaches with zero bruises or soft spots. Your best bet is to purchase or pick about 9–10 firm peaches (about 3 pounds), then let them sit in a paper bag for 1–2 days to ripen. Some may have soft spots after this time, so that is why I suggest buying a couple more than you actually need. Fresh peaches are best for peach pie, though you can get away with unsweetened frozen peaches. If using frozen, thaw, chop, and blot them dry before using. Canned peaches are not ideal as they’re already too soft and mushy.
- Ginger: 1–2 teaspoons of fresh minced ginger adds exceptional flavor. If you love ginger, use 2 teaspoons. If you don’t have fresh, use 1/4–1/2 teaspoon of ground ginger instead. If you don’t love ginger, leave it out.
- Crumble Topping: Want to skip the top crust? Try this peach crumble pie recipe.
- Aluminum Foil Pie Crust Shield: You can purchase a pie crust shield or make one from aluminum foil. Cut a 14-inch square of aluminum foil. Fold in half. Cut out a 5-inch semi-circle on the folded edge. Unfold. Carefully fit the aluminum foil over the pie crust edges, lightly securing down on the sides as best you can (careful, the pie is hot!), leaving the center of the pie exposed.
- Braiding Pie Dough: Some photos in this post show a braided pie dough topping, which is an optional way to decorate your pie. To achieve the same look as the braided pie, you’ll need 3 pie crusts. 1 for the bottom crust and 2 for the strips/braiding. (You’ll have scraps leftover, simply mold into a disc, wrap in plastic wrap and freeze for another pie.) As you can see in the photos, I latticed with 6 braids and 7 strips total. The strips were about 1-inch thick. The braids were assembled with 3 1/2-inch strips. See my detailed How to Braid Pie Crust page for more tips.


Reader Comments and Reviews
Wow, this really was excellent. I cheated with the crust. Used the pre-rolled Pillsbury crust. But followed the filling recipe and baking instructions to a tee and the filling was perfectly firm and flavorful!
This is the best peach pie I have eaten. My favourite pie ever.
I made a coupla these pies with spelt and rendered goats butter instead of wheat flour and veg shortening.
I put my first pie in the oven at 218°C for 20 minutes with the crust hood. The top was burned in less than 10 minutes.
I baked the second pie for 10 minutes on 180°, then 20 minutes on 160, then turned it down to 130° for 80 minutes.
It’s very delicious!
Omigosh. I made this pie yesterday and it truly is the best peach pie I ever made. I didn’t have fresh ginger, so I had to use ginger juice (1 tbsp.). I used tapioca because I prefer it over flour in pie filling. I also added nutmeg, which I like on peaches, and a pinch of salt plus 1 tsp each of both vanilla and bitter almond flavoring to the filling. Awesome, awesome, awesome. Thank you Sally!
P.S. My husband just had his third slice this morning and declared, “This is the best pie I’ve ever eaten!” I have come to rely on Sally for my baking questions.
Should we drain the peach juice? My cut peaches are in a sieve and there is about 1 cup of juice. Thanks so much!
Hi Monika, that does seem like a lot of juice. I recommend reducing it by half, so only using 1/2 cup with the cut peaches and other filling ingredients.
My pie is not bubbling after about 50 mim
Zoe, just keep baking it! It will bubble eventually – all ovens are a little different.
I cut up my peaches and put them in the fridge overnight before baking, so they were pretty cold going into the oven. Because of this, I ended up adding 15-20 minutes to the baking time. I used Sally’s tip for covering the crust and my pie came out perfect! It was so helpful to have a temp to shoot for. At 170 degrees I had small bubbles in the center but at 195 I had big beautiful bubbles, and the filling was visibly thicker. Thanks so much for all the tips! I learned a lot!
My first attempt at fresh peach pie and this did NOT disappoint!! SO delicious and beautiful to look at. I love all your recipes, u are my go-to for all my baking needs. Thank u!!
Turned out awesome! I was just shy for the grams of peaches so I added a pint of blueberries. My pie dish is a little shallow so I ended up with a 9” and a 6” pie; I do roll the crust a little thin. I’m super glad that I baked these with a pie sheet underneath, butter and sugar overflow.
I bought my peaches from the farm stand while visiting my hometown. They are in the overhead compartment of the plane now. We have company coming in a week and I want to make a pie in advance. Can I make the whole thing and freeze it and then take it out of the freezer, bake, and serve?
Hi Sara, we don’t recommend freezing the whole unbaked pie, as it will get too soggy. See the recipe Notes for our recommended make-ahead instructions!
I am ready to make this and so excited, but is it possible to use a store bought crust with the same instructions for baking and the filling?
Hi Dani, absolutely!
I saw that a lady made her pie filling & froze it a slightly smaller pie pan. Once she was ready to bake, couple of months later, she made her crusts & assembled the pie for baking. Never gave baking instruction, ie: time, degrees etc. What do you think? I would like to do this
I made this recipe for my 98 year old mama last month and she said it was the best peach pie she had ever eaten. Sadly, she suffered a severe stroke the end of the month and passed away at home with family by her side last week. I am making this pie again tonight in her memory. Hug your mommas tight.
This was probably the best peach pie I’ve ever made! I always use this crust recipe and it was flaky and delicious. The peaches were perfect: I think chugging in chunks was the key. Also it was in the oven for about 75 minutes which seemed perfect! Hubby said it’s amazing and already heading in gif his second piece!
Do you think this peach pie will work with gluten free flour
Hi Sally Ann, you can use tapioca in place of the flour in the filling, but we haven’t tested the pie crust with gluten free flour. Let us know if you do give it a try.
This is the perfect peach pie. I had already mixed my pie dough and had it chilling, so I just made the pie filling. Wow. I’ve never had a peach pie that remained intact after cutting. Peach chunks! The half cup of flour! The fresh ginger! There were lots of little secrets resulting in a delicious peach pie! Will be making again, and I’ll use your pastry recipe for perfection!
I made this for the second time today. It is by far the best looking and best tasting pie I’ve ever made. And I’ve been baking for 50+ years! Following the directions exactly really works! The crust is so flaky and the peaches (which we picked) were delicious! Thank you.
For best results w/ pie crust (1) use lard exclusively and (2) mix with your hands!
I have peaches and nectarines. Is it OK to combine
Yes, absolutely!
If you like burnt sugar and top crust. The temp is too high for too long (yes i turned it down after 20 min). I should’ve known better than to sugar it before baking. Never using an online recipe again.
I typically keep an eye on a pie in the oven and tent with foil if it looks like it is browning too much. This recipe specifically calls that out in the instructions. Have never been disappointed with these recipes when followed exactly and if using common sense
Fantastic. I may have made the chunks smaller than 1″, probably more like 1/2″x3/4″ or so, starting with thick slices and just lopping them into larger pieces. Still had good texture and cooked a little faster, reaching 200 at about 1hr. Like other pie recipes, I put the lemon juice on the fruit before coating with the mixed, dry ingredients, where I reduced sugar to 1/2c and a scant cup of flour with 2tbs of cornstarch, and ground, dry ginger with a bit over 3 1/4lb of fresh peaches. Did not measure the diced outcome, but seemed just right. The pie was awesome!
Perfect! My first time making a peach pie and it was both delicious and beautiful. The blanching method for peeling the peaches is the way to go. I did use a Pillsbury crust to save time.
Having issues with rolling the pie dough. How do you get your pie to roll out perfect w out sticking. Because of the butter and shortening it sticks. I use enough flour but I can never roll it perfect and then end up piecing the rims if the pie dish, then it looks bad. Tastes amazing tho.
Hi Lisa, Make sure you are keeping your pie dough as cold as possible. The colder the ingredients, the easier your pie crust is to work with, and the better it will turn out. When rolling dough out, start from the center and work your way out in all directions, turning the dough with your hands as you go. Hope this helps!
Wonderful pie. It was beautiful as well as so tasty. Thanks, Sally.
Used this recipe for my crop of organic peaches, it was amazing. I added a little more cornstarch and omitted the flour. Just perfect. I had no where to post the picture though.
Can I use a combo of yellows and white peaches in pie.. what anout white nectarines?..btw…made your cherry pie with rainier and dark sweets…best cherry pie I ever made…absolutely perfection!!!
I’m a novice baker and ended up with little white spots throughout the dough. Everything was chilled. Some of the spots were soft and some a little hard. My flower might be old or are the spots from the cold butter? or something else?
Hi LuAnn, were the spots in the dough or in the baked crust? It sounds like they were small chunks of cold butter throughout the dough, which is fine! You can see the fats in the pie dough in the photos from our pie crust recipe.
is the 3lbs of peaches before or after prep?
Hi Jack, before.
I love all your recipes! Quick question on this one! If you do the crumb topping instead of a top crust, do you still need to dot the peach filling with butter before adding the topping? I just used your awesome blueberry pie recipe to crank out loads of mini pies and now am moving ont with our peach haul 🙂 Can’t wait to try! Thanks so much!
Hi Valerie! No need, since there’s butter in the crumb topping that will soak down. Here’s our brown sugar peach crumble pie recipe as well!
Not too sweet, used my own crust recipe, really liked the detailed directions. The pie was delicious! I’ll use it again.
My husband and his mother’s favorite pie is peach pie, but nobody else in the family liked it until I made this Peach pie from scratch. Now everyone loves Homemade Peach pie. Thank you for bringing our family together with this Perfect Peach Pie recipe! Side note-I made the pie with the crumble topping and served warm with vanilla ice cream. YUMMY~