

The process of making homemade yeasted bread can be fussy and complicated, but this no-knead honey oat bread recipe is straightforward and simple AND delivers delicious, flavorful results. Most of the “work” is completely hands off as the dough rises. If you’re new to working with yeast, reference my Baking with Yeast Guide for answers to common yeast FAQs.
This recipe is brought to you in partnership with Red Star Yeast.
Can you make a good thing… better? Originally published in 2013, this deliciously chewy no-knead bread is EASY to make. But over the years, I’ve added clearer instructions which are extremely useful for a bread beginner. I also made some small improvements to the recipe including reducing the honey and cinnamon, plus adding a little more yeast to achieve a better rise. I also updated the photos and added plenty of step photos, too.
So, to answer the question… when it comes to the original version of today’s bread recipe… yes!
Tell Me About This No-Knead Honey Oat Bread
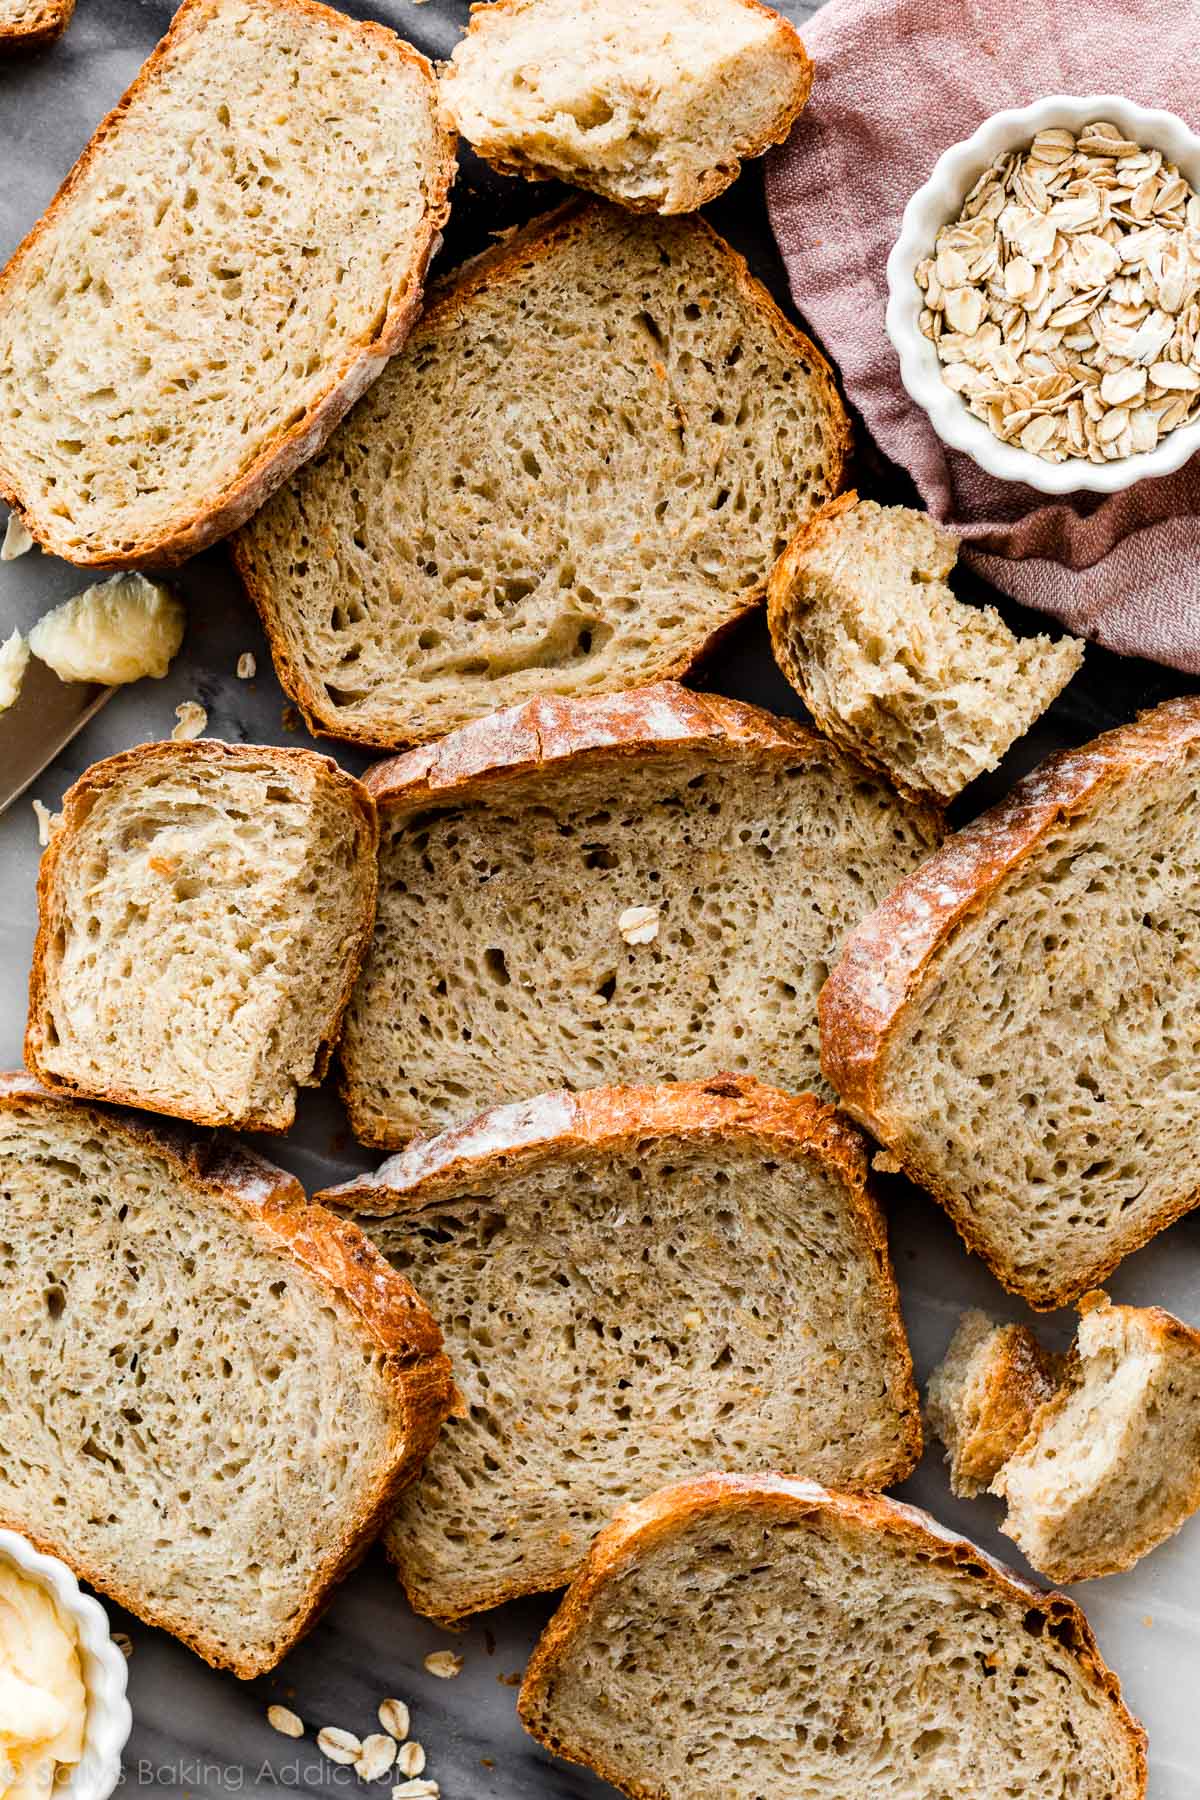
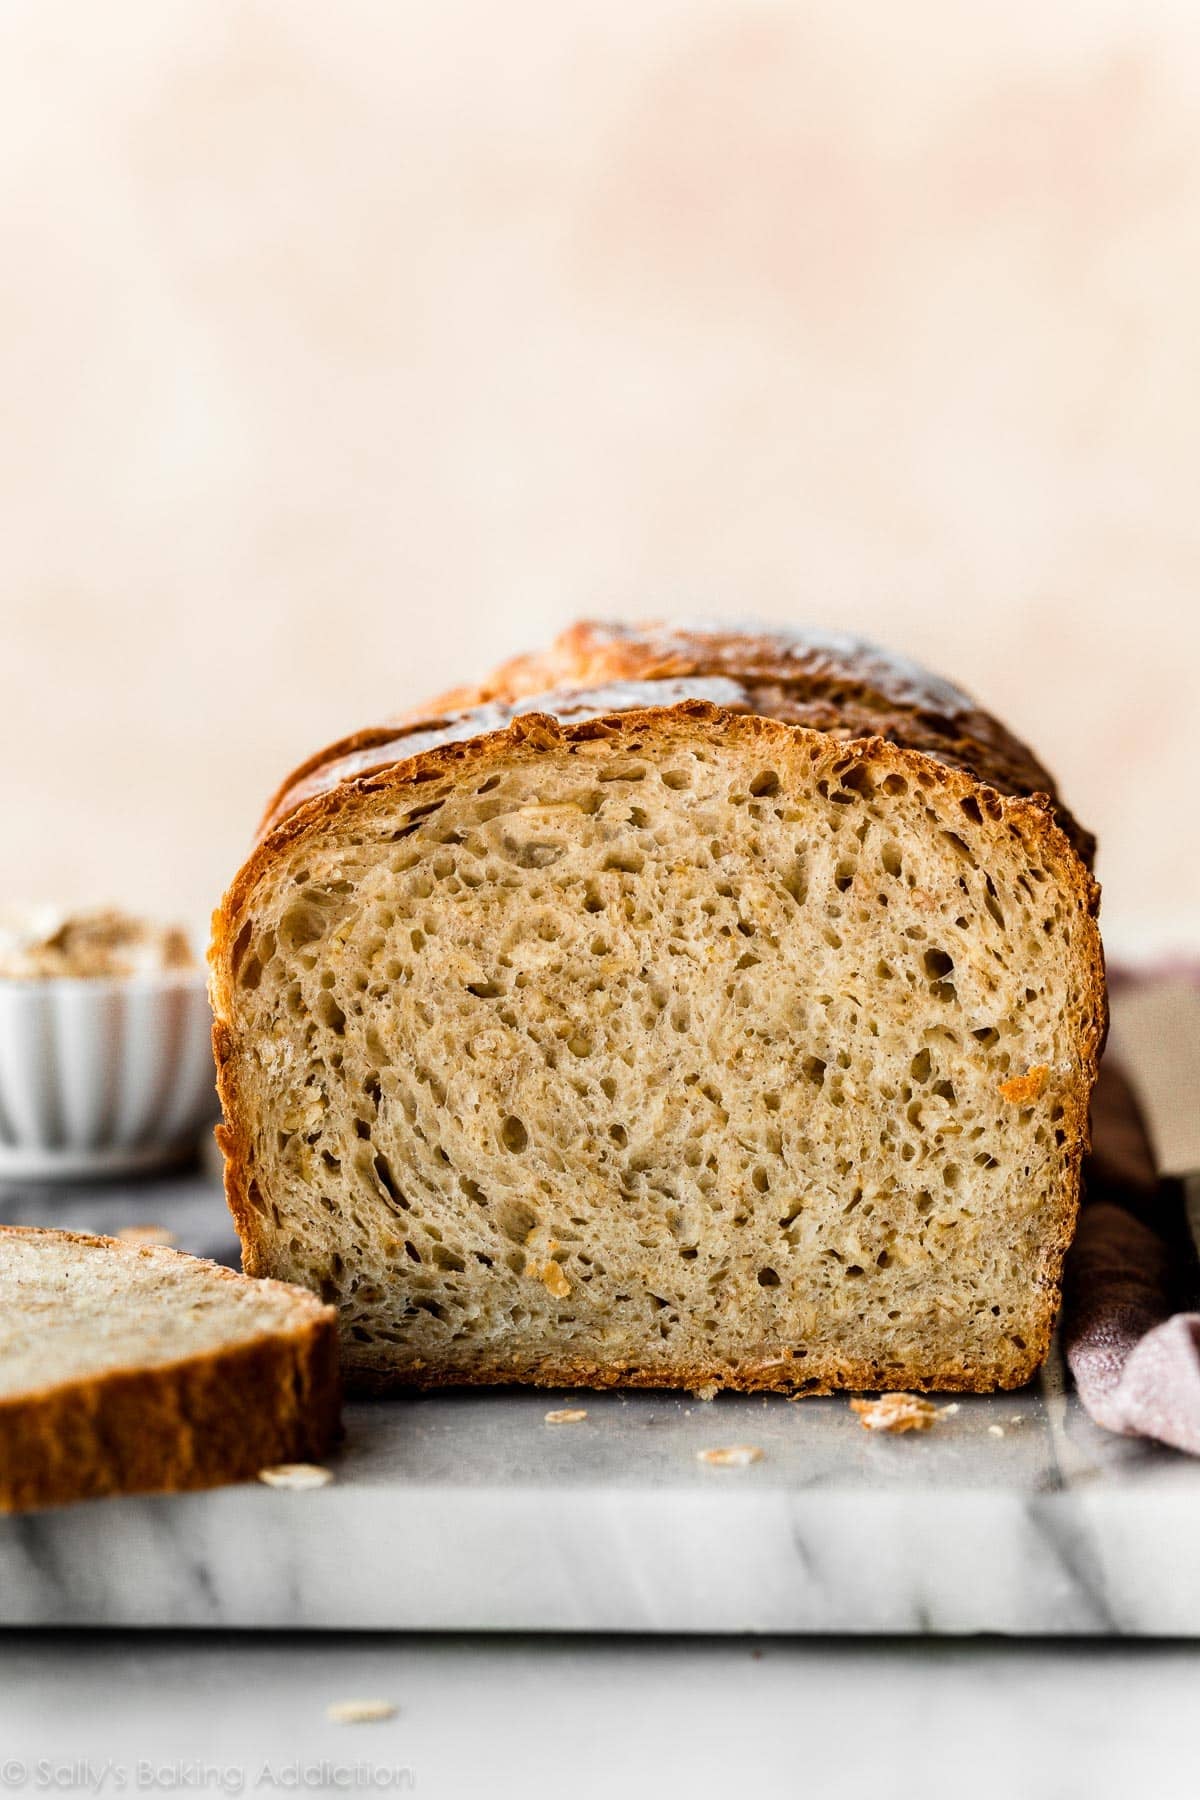
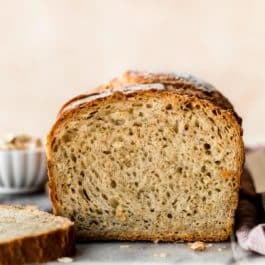
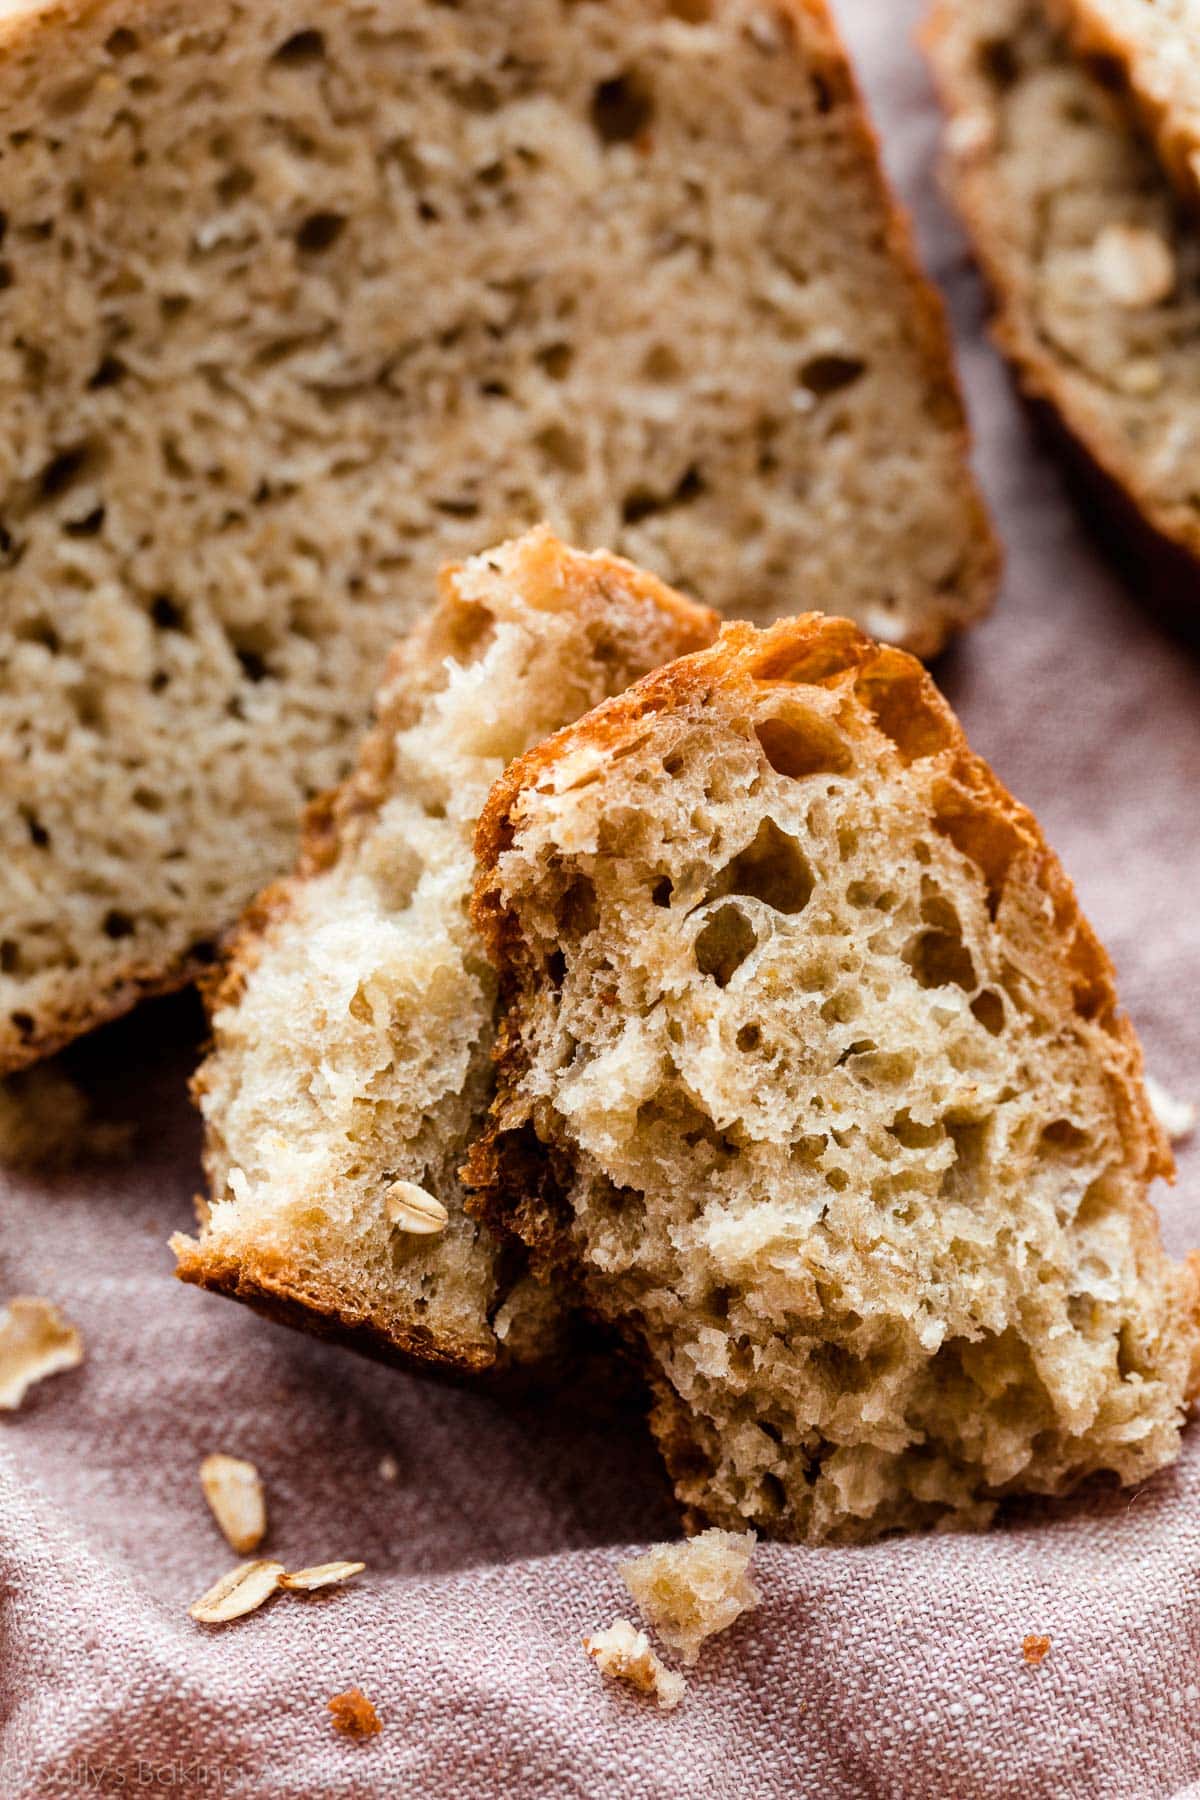
- Texture: This dough is very hydrated, so expect a chewy, soft, and spongey baked bread. And by spongey, I don’t mean damp nor gummy. Rather, if you squish a slice, it will mostly spring back into shape. The crust is a little crisp when the bread comes out of the oven, but it softens over time.
- Flavor: Honey and oats provide most of the flavor while cinnamon adds a little something extra. You’ll notice the cinnamon is there, but it doesn’t overpower the other delicate flavors. This is a sweeter bread, so I wouldn’t serve it to soak up your savory tomato sauce (but honestly, it would still probably taste great that way!).
- Ease: Like my artisan bread, this is a very easy bread recipe and perfect for bread beginners because there’s hardly any hands-on work required. You don’t need a mixer, there’s no dough starter, no complicated shaping, and the dough doesn’t require kneading. In fact, the less you handle the dough, the better—the bread wants you to do less work. Set aside enough time to let the dough rise, at least 12 hours (or overnight) for the 1st rise and 1 hour for the 2nd.
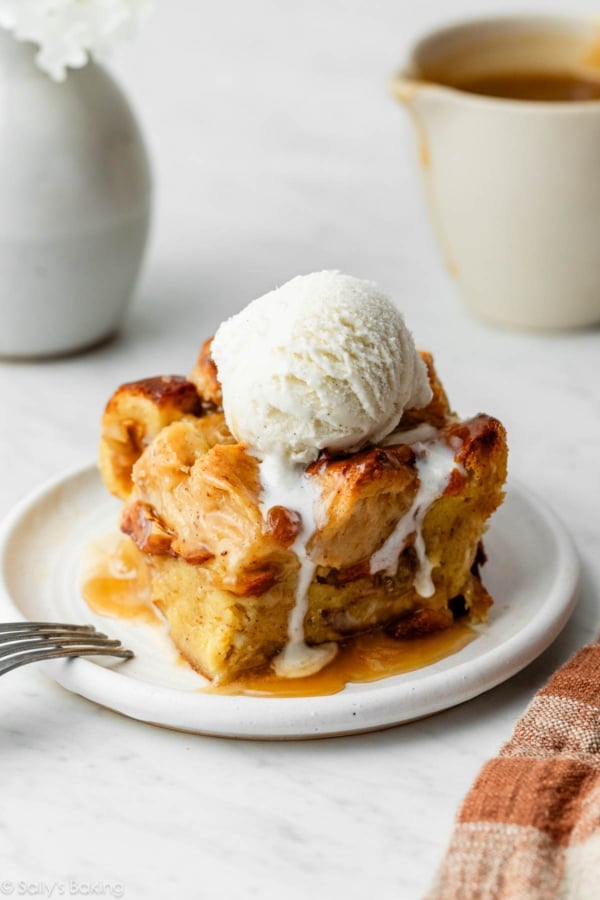
- Serving: There are many ways you can serve this bread and my favorite is toasted with honey butter and a sprinkle of coarse sea salt or flaky sea salt. It’s hearty, so it’s the perfect bed for your avocado toast or dipper for soft/runny eggs. It also makes one heck of a pb&j and tastes phenomenal as a slightly sweet grilled cheese sandwich.
In a rush to start? You can find the full printable recipe below. If you have more time, the following headnotes will help you grasp a better understanding of the recipe before you begin.
Best Ingredients to Use for Honey Oat Bread
This is an egg free baking recipe and dairy free recipe.
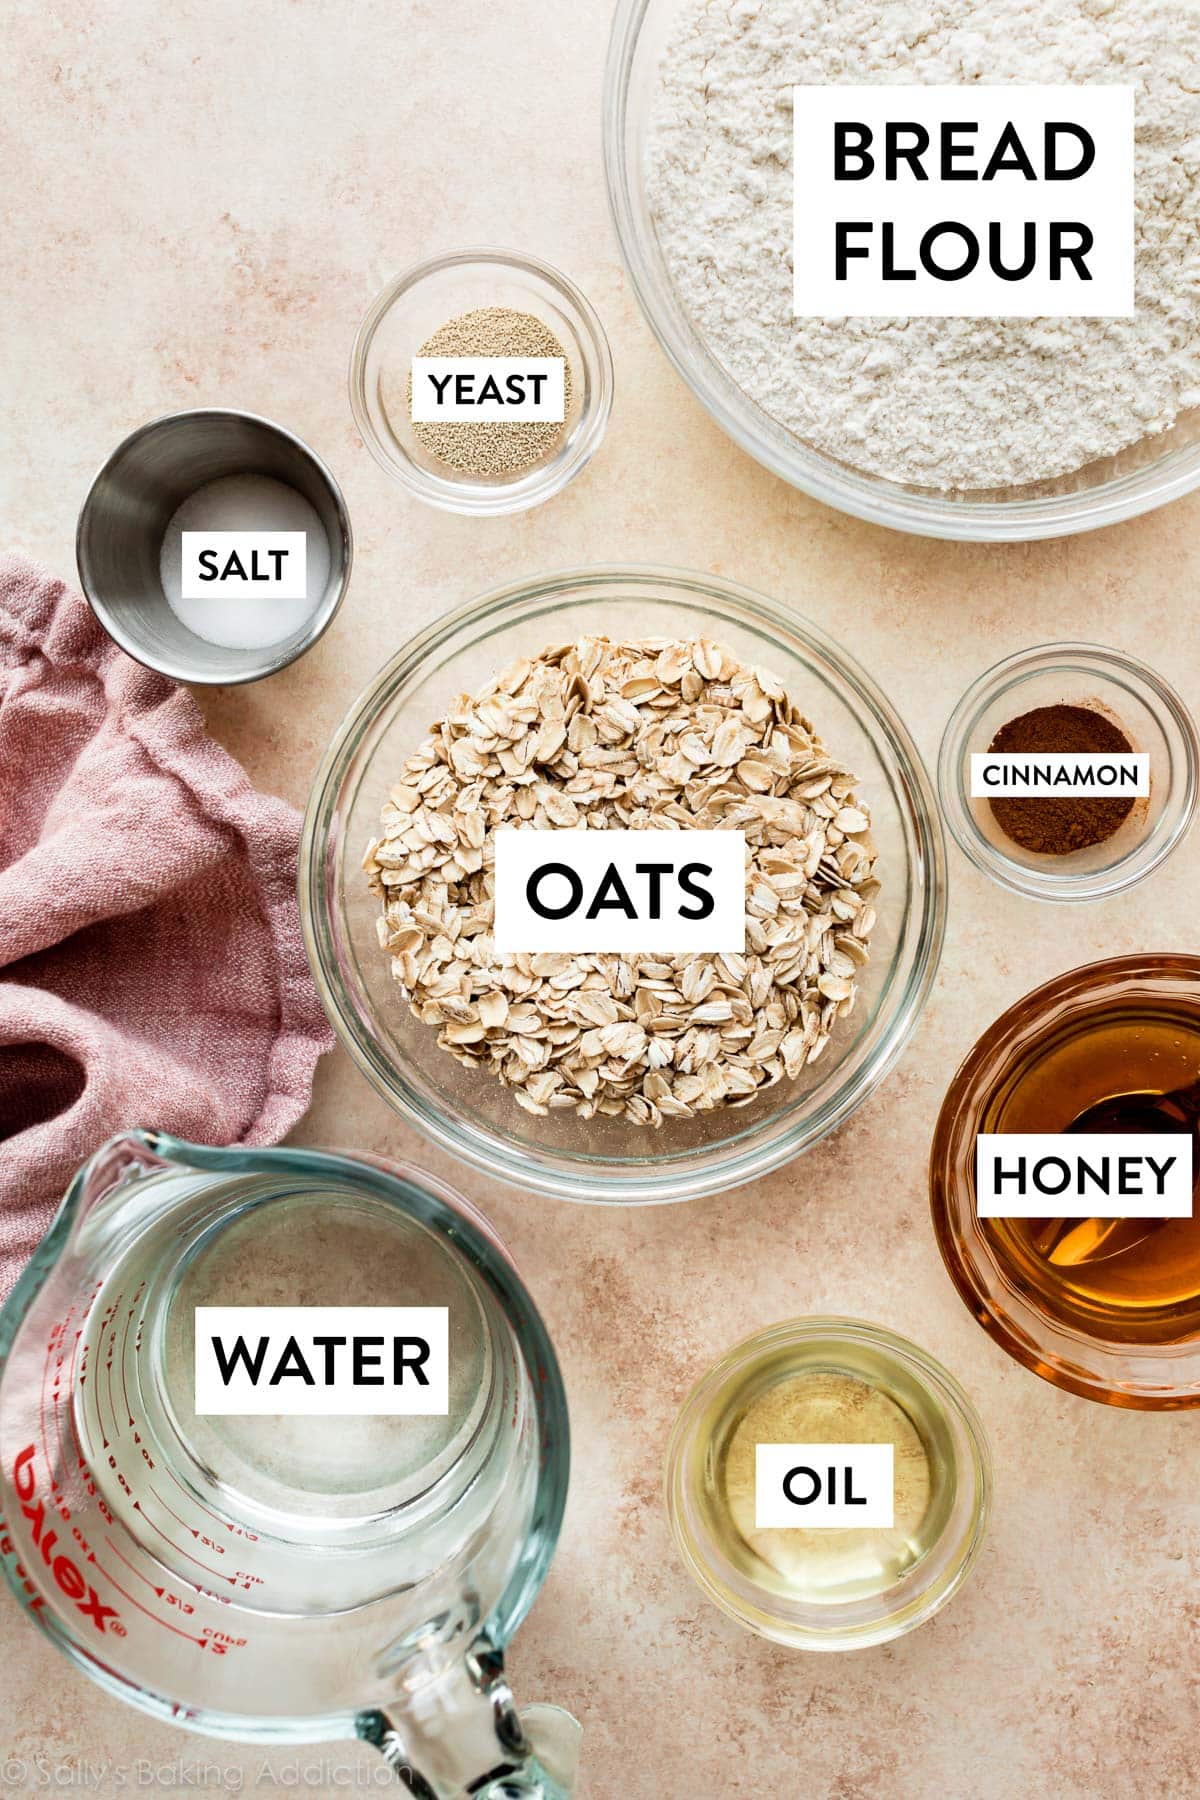
- Bread Flour: For the chewiest and sturdiest no-knead honey oat bread, I recommend bread flour and I love using King Arthur brand (not sponsored—just a genuine fan of their flours). All-purpose flour definitely works, but you get a sturdier and more bread-like texture from bread flour. I love using whole wheat flour when I can, but this dough is not fit for all whole wheat flour. Over the years, I’ve found that replacing up to 1 cup (around 130g) of the bread flour with whole wheat flour works very well. The bread is a bit more dense, but has great flavor.
- Oats: Oats make up some of the dry ingredients in this dough. As the dough rises, the oats soak up some moisture and expand. You’ll love the extra texture they bring to the finished loaf! Whole oats are best, but you can use quick oats if that’s all you have.
- Yeast: You can use instant or active dry yeast, but I highly recommend an instant (aka “rapid rise” or “quick rise” yeast). The bread will rise faster. I usually use Platinum Yeast by Red Star, which is an instant yeast. 1 and 1/2 teaspoons is a little less than 1 standard packet. If using active dry yeast, there are no changes needed to the recipe. The rise time in step 5 may take longer.
- Salt: You can use regular fine table salt in this dough. If using kosher salt, no need to switch the amount. If you want to use a coarse sea salt, I would increase the amount to 1 and 3/4 teaspoons.
- Cinnamon: I do not recommend skipping the cinnamon. Again, you’ll note that it’s there but the bread is not necessarily cinnamon flavored. Without it, the bread tastes like denser white sandwich bread.
- Water: I normally encourage you to use warm liquid with yeast because warm liquid helps the yeast work faster. However, use cool or room temperature water here because you want a longer rise to help establish better flavor. 70°F (21°C) is great, but the exact temperature doesn’t matter as long as it’s not hot or warm. The cooler the water, the longer the dough takes to rise and, usually, the better the bread’s flavor. We use the same cool-water method for no-knead pizza bread.
- Honey: Honey adds flavor and helps give the bread the springy, sponge-like texture. I do not recommend any substitutions, but if you’re looking for a less sweet bread, I recommend the following recipes: multigrain bread, sandwich bread, homemade bread, cranberry nut no-knead bread, no-knead jalapeño cheddar bread, no-knead seeded oat bread, asiago-crusted skillet bread, ciabatta bread, or olive bread.
- Oil: 2 Tablespoons of fat gives the bread flavor and richness. I recommend vegetable oil or a neutral-tasting olive oil. You can use melted butter if you’d like, but keep in mind this dough sits out for 12-18 hours. (Shouldn’t be an issue, but keep that in mind.) Melted and slightly cooled coconut oil works, but taste testers preferred the flavor and texture of the bread made with vegetable or olive oil instead.
Step-by-Step Photos: No Knead Honey Oat Bread
Though this is a very hands-off recipe, let me show you a few process photos so you have a solid understanding of the instructions below.
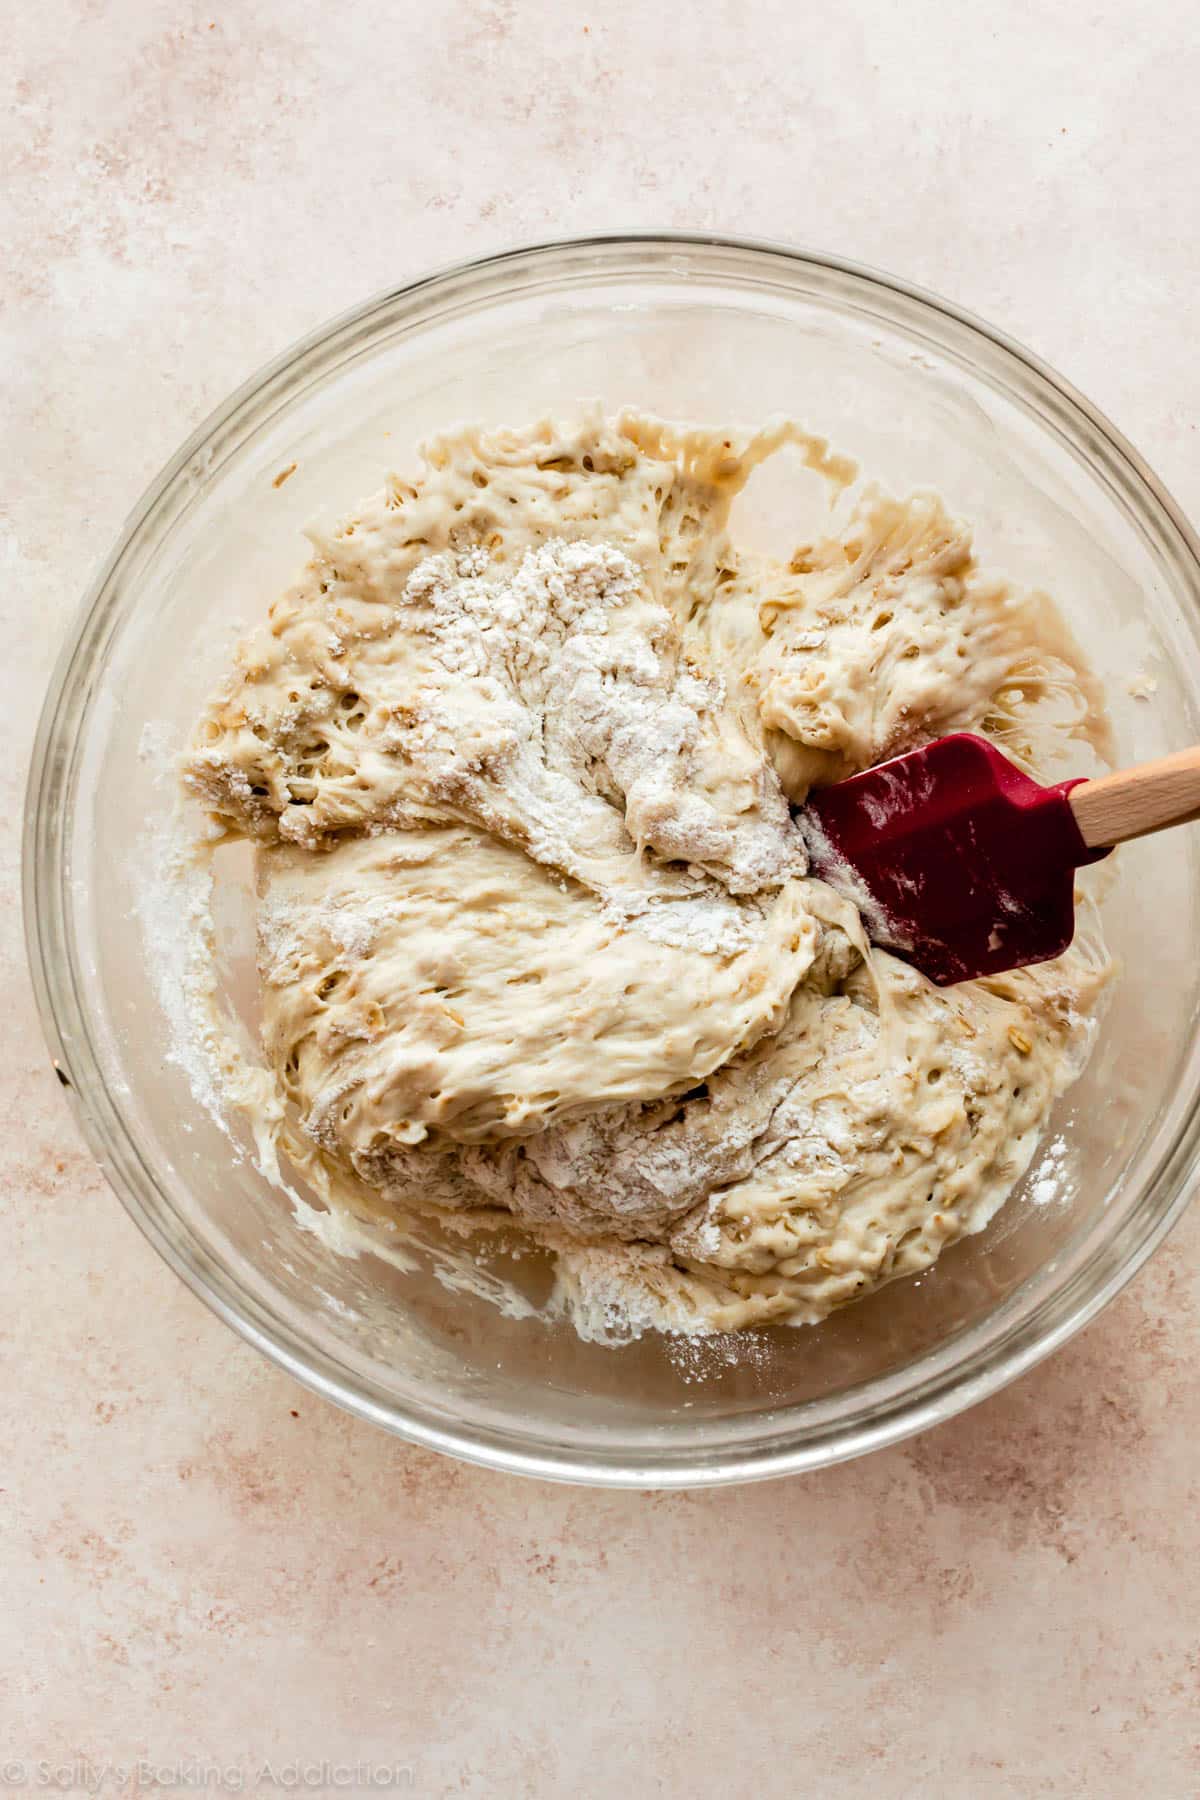
This is a sticky dough, so a mixer will not do you any favors. Mix it by hand with a wooden spoon or rubber spatula (photo below, left). The picture below on the right shows the dough after the 1st rise. Notice how the dough rises OUT more than it rises UP:
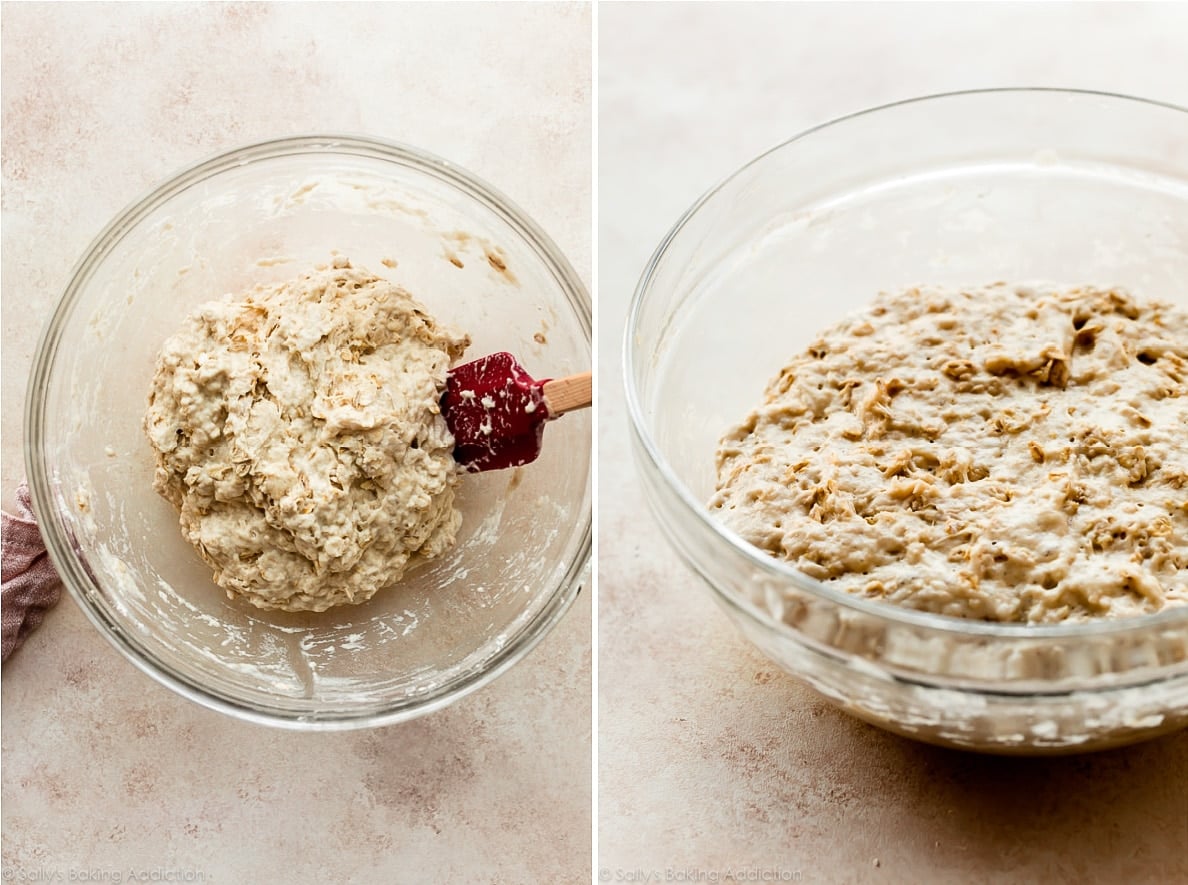
Pictured below is a close-up of the dough after rising—I pulled the dough inward so you can see the strands of dough. This dough is full of AIR and that’s exactly what you want:

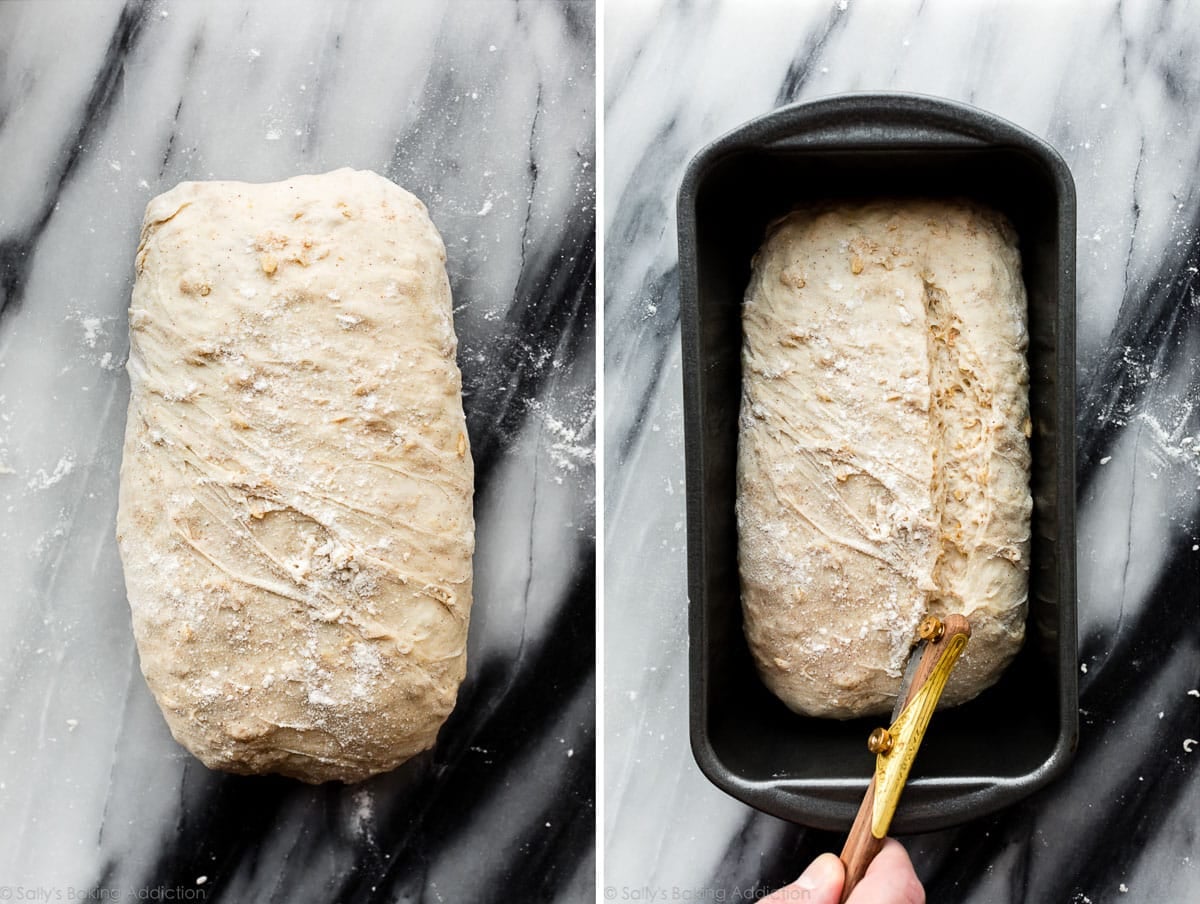
Next you will add a little flour to the sticky risen dough—just enough so that you can gently shape it into a loaf. Careful not to deflate the dough:
Shaping: The picture below on the left shows the loaf after you shape it. Do not overthink the shaping step because the less you handle and tinker with the dough, the better. As shown below on the right, place into a greased 9×5-inch loaf pan and use a sharp knife or bread lame to score it on top. Scoring allows the airy dough to “breathe” as it rises and bakes. (The pictured bread lame was a gift, but if you’re shopping for one, I also have and love this bread lame.)
Let the dough rise again in the loaf pan. This 2nd rise takes at least 1 hour.
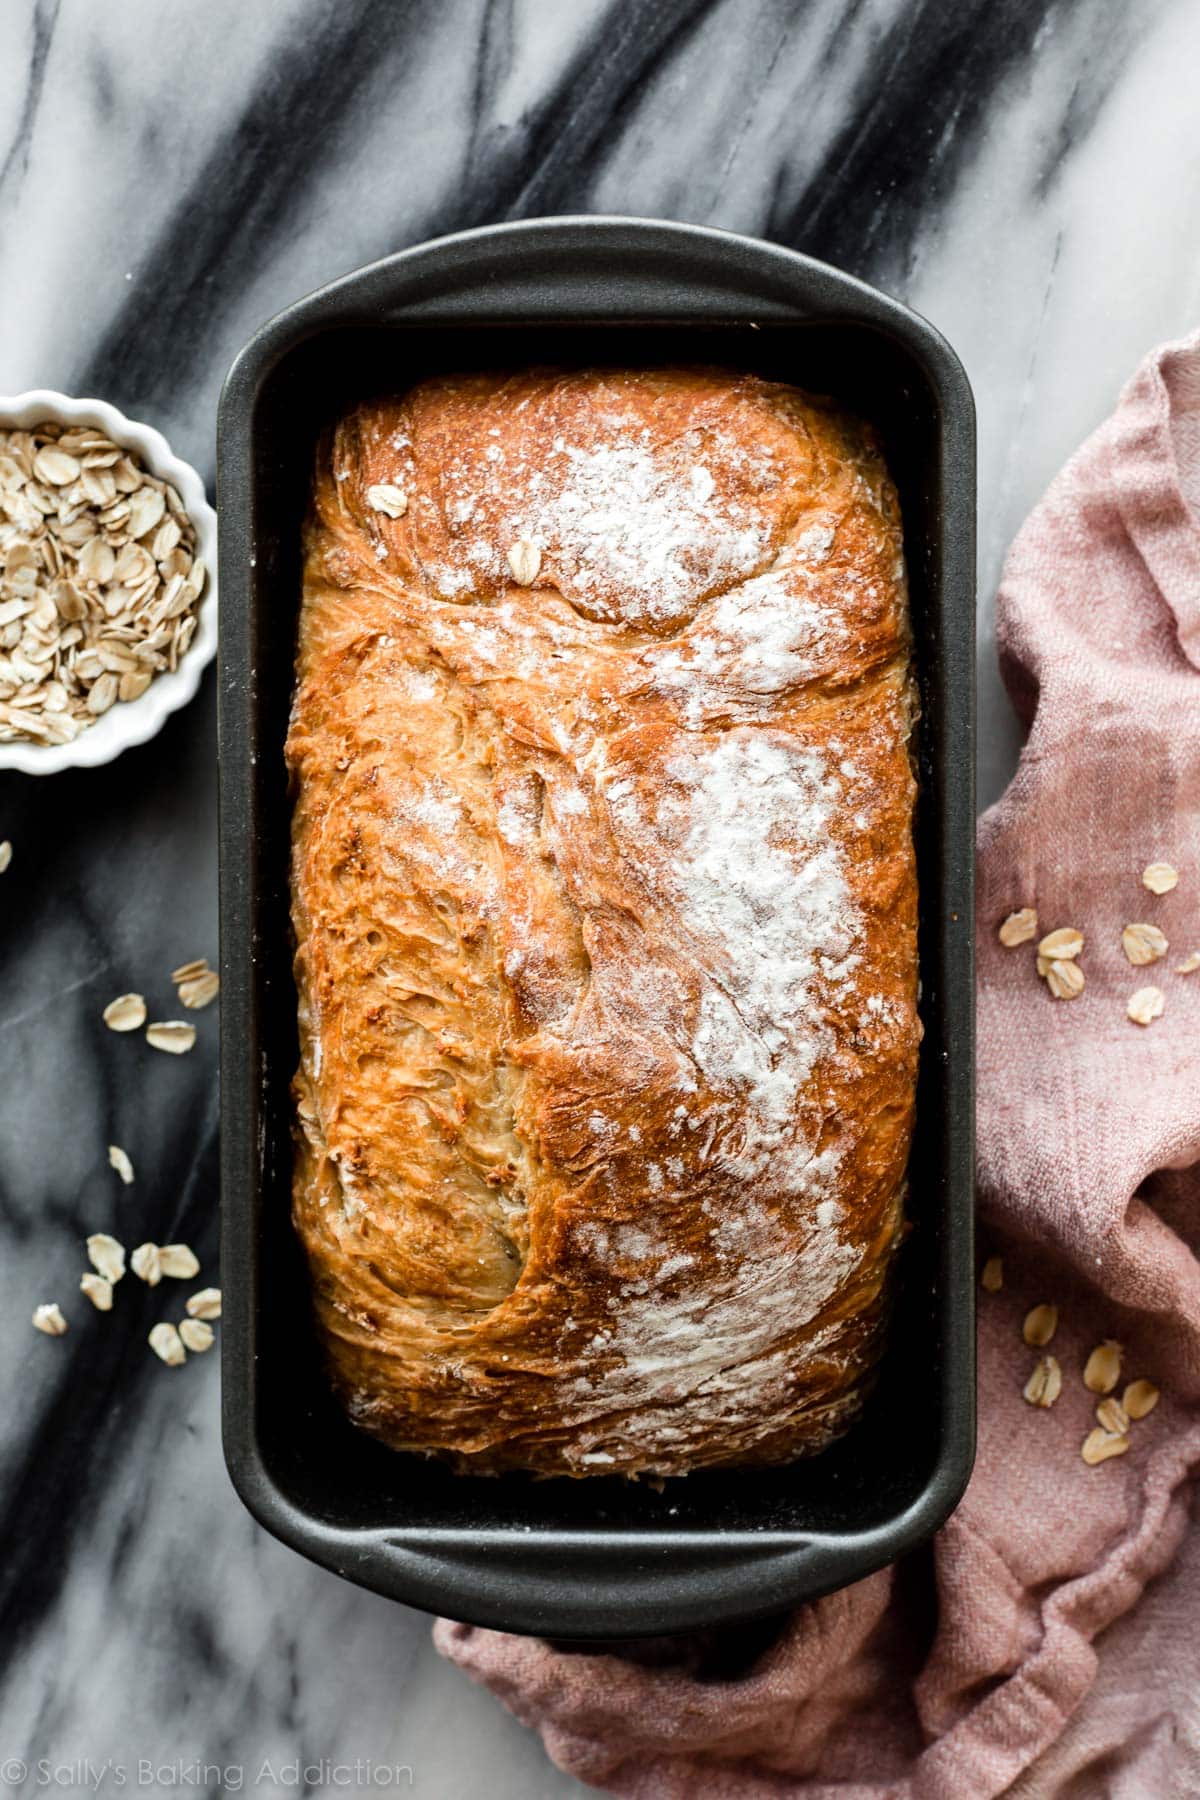
After that, it’s time to bake the bread. Before baking, you can sprinkle the top of the loaf with oats or add a cinnamon-sugar topping. See details for both optional toppings in the recipe notes below. Usually my loaf is just covered in baked flour leftover from the shaping step:
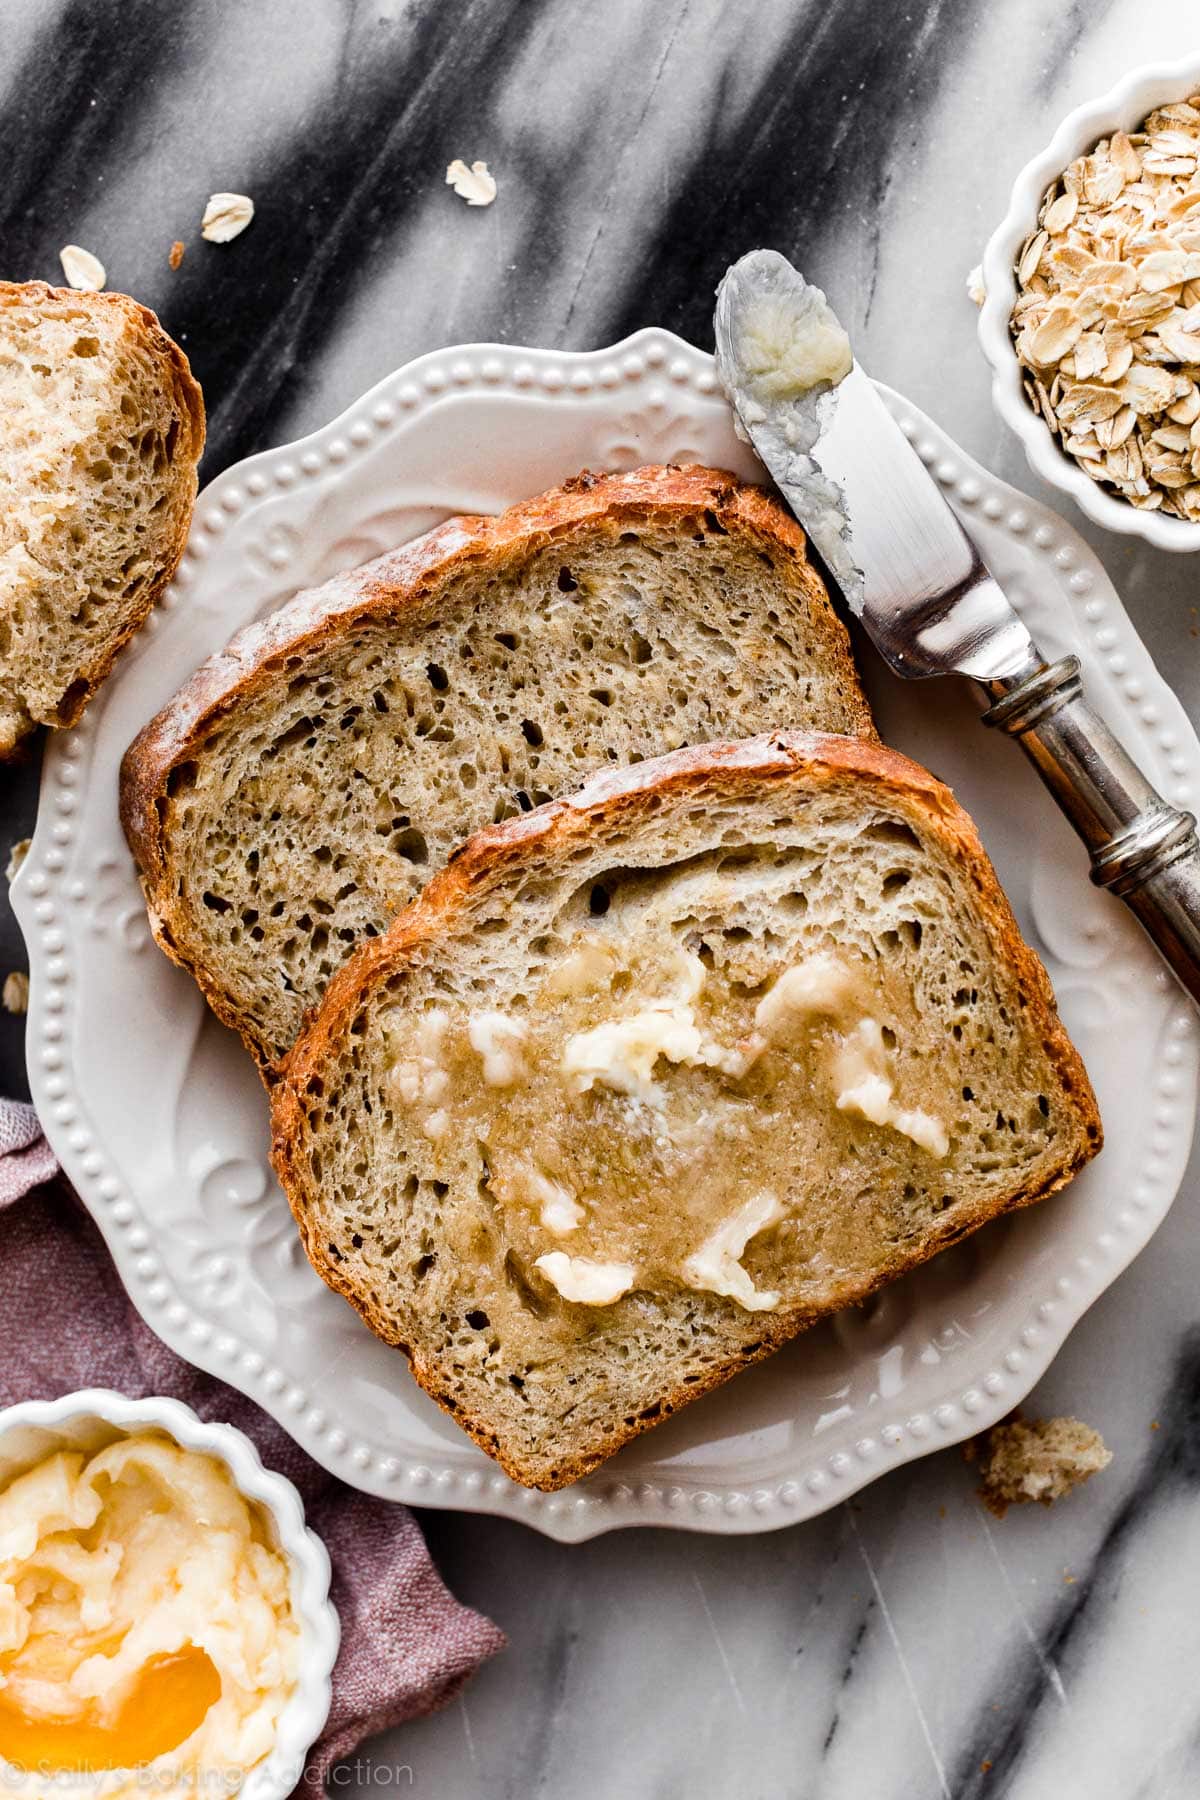
Cool for about 15 minutes before slicing and serving. Again, homemade honey butter is a fantastic finishing touch and you can quickly prep it as the bread cools. And if you love honey in your homemade breads, you’ll enjoy these honey butter rolls too.
Additional Easy Bread Recipes
Yeast Bread Success Tips
If you’re a bread beginner, reference this Baking with Yeast Guide for helpful, easy-to-understand answers to many yeast FAQs.
No-Knead Honey Oat Bread
- Prep Time: 13 hours, 20 minutes (includes rises)
- Cook Time: 55 minutes
- Total Time: 14 hours, 30 minutes
- Yield: 1 loaf
- Category: Bread
- Method: Baking
- Cuisine: American
Description
The process of making homemade yeasted bread has the reputation of being fussy and complicated, but this honey oat bread recipe is straightforward and simple AND delivers delicious, flavorful results. Most of the “work” is completely hands off as the dough rises. If you’re new to working with yeast, reference my Baking with Yeast Guide for answers to common yeast FAQs.
Ingredients
- 3 cups + 2 Tablespoons (410g) bread flour (spooned & leveled), divided
- 1 cup (85g) old-fashioned whole oats or quick oats (not instant)
- 1 and 1/2 teaspoons (4g) Platinum Yeast from Red Star or any instant or active dry yeast
- 1 and 1/2 teaspoons salt
- 1/2 teaspoon ground cinnamon
- 1 and 1/2 cups (360ml) water, close to room temperature at about 70°F (21°C)
- 6 Tablespoons (128g) honey
- 2 Tablespoons (30ml) vegetable oil (or other neutral tasting oil)
Instructions
- In a large ungreased bowl, whisk 3 cups (390g) bread flour, the oats, yeast, salt, and cinnamon together. Set aside. In a medium bowl or large liquid measuring cup, whisk the water, honey, and oil together. Pour water mixture into flour mixture and gently stir together with a silicone spatula or wooden spoon to combine. Dough will be heavy and very wet/sticky. Do not overwork dough. (Tip: Stir dough by hand. Dough is too sticky for a mixer.)
- 1st rise: Cover the dough tightly with plastic wrap or aluminum foil and set on the counter at room temperature—honestly any normal room temperature is fine. Allow to rise for 12-18 hours. (See note if you need to extend this time.) Depending on the size of your mixing bowl, the dough will mostly rise out to the sides of the bowl instead of rising up. Some upward rise is normal if your bowl is on the smaller side. The dough will stick to the sides of the bowl and have a lot of air bubbles. You want it to almost double in size during this time.
- Grease a 9×5-inch loaf pan.
- Gently shape: After rising, uncover dough and gently fold in remaining 2 Tablespoons (about 20g) of bread flour. Dough is very sticky, but the extra flour makes it more manageable. Pour dough (and any excess flour that is not mixing in) onto work surface. Using lightly floured hands, gently form into a loaf shape, about 8×4 inches. Does not have to be perfect, so don’t over-think the shape or overwork the dough. Place in greased pan and using a very sharp knife or bread lame (some even use kitchen shears), score the bread loaf with 1 slash down the center or off-center, about 1/2 inch deep. (“Score” = shallow cut.)
- 2nd rise: Loosely cover loaf with plastic wrap or aluminum foil and set on the counter at room temperature for 1 hour or until dough rises slightly above the rim of the pan.
- Meanwhile, towards the end of the 2nd rise, preheat oven to 375°F (191°C).
- After rising, remove plastic wrap/covering from bread and bake for 50-60 minutes. The loaf will begin to heavily brown on top, so tent it with aluminum foil after 30 minutes. How to test for doneness—give the loaf a light tap. If it sounds hollow, it’s done. For a more accurate test, the bread is done when an instant read thermometer reads the center of the loaf as 195°F (90°C). (Tip: Keep in mind that the bread will continue to cook for a few minutes as it cools.)
- Remove from the oven and allow bread to cool for at least 15 minutes in the pan set on a wire rack before slicing and serving. Feel free to let it cool completely before slicing, too.
- Cover leftover bread and store at room temperature for up to 3 days or in the refrigerator for up to 10 days.
Notes
- Make Ahead Instructions: This recipe is wonderful for making ahead because the 1st rise time (step 2) is so long. If needed, you can extend the 1st rise time by letting the dough rest in the refrigerator instead of at room temperature for up to 18 hours. Then, after refrigerating, let the dough sit at room temperature to warm and rise, about 4-6 hours. You want it to mostly double in size during this time. Do not extend these times further because the dough may begin to deflate.
- Freezing Instructions: Prepare recipe through step 4 and feel free to use a disposable loaf pan since it will be going into the freezer. Cover loaf tightly and freeze for up to 3 months. On the day you serve it, let the loaf thaw and rise for about 5 hours at room temperature. Bake as directed. You can also freeze the baked bread loaf. Allow the bread to cool completely and then freeze for up to 3 months. Thaw in the refrigerator or at room temperature and reheat if/as desired.
- Special Tools (affiliate links): Glass Mixing Bowl | Silicone Spatula or Wooden Spoon | 9×5-inch Loaf Pan | Bread Lame | Instant Read Thermometer | Cooling Rack
- Flour: For the chewiest and sturdiest bread, I recommend using bread flour. All-purpose flour definitely works, but you get a sturdier and more bread-like texture from bread flour. I love using whole wheat flour when I can, but this dough is not fit for all whole wheat flour. In my recipe testing, I found that replacing up to 1 cup (around 130g) of the bread flour with whole wheat flour worked just fine. The bread was a bit denser, but had great flavor.
- Yeast: You can use instant or active dry yeast, but I highly recommend an instant (aka “rapid rise” or “quick rise” yeast). The bread will rise faster. I usually use Platinum yeast by Red Star, which is an instant yeast. 1 and 1/2 teaspoons is a little less than 1 standard packet. If using active dry yeast, there are no changes needed to the recipe. The rise time in step 5 may take longer.
- Water: Use room temperature or cool water. Close to 70°F (21°C) is great, but the exact temperature doesn’t matter as long as it’s not warm.
- If You Want to Top with Oats or Cinnamon-Sugar: If you want to top the dough with oats prior to baking, carefully brush the dough after the 2nd rise (step 5) with 1 egg white beaten with 1 Tbsp water, and then sprinkle 2 Tbsp of oats on top. (The oats do not stick without the egg white and the bread will no longer be egg-free by doing this.) You can skip the egg white/oats and sprinkle cinnamon-sugar on top instead. Combine 1 Tablespoon granulated sugar and 1/8 teaspoon cinnamon. Sprinkle on top of the loaf right before baking.
- Recipe updated in 2022 with clearer instructions and less honey, cinnamon, and slightly more yeast. Older version of this recipe used 1/2 cup (170g) honey but over the years, I’ve reduced it down to 6 Tablespoons (128g) so the loaf isn’t as sweet and sticky. The recipe also had 1 and 1/4 teaspoons of yeast, but I slightly increased it for better rise and it also used to have 1 teaspoon of cinnamon in the dough. I find that much takes away from the honey and oat flavors so I cut the cinnamon amount in half.
- Can I make this in a dutch oven? Yes and the process is similar to Cranberry Nut No-Knead Bread. You need a 6-quart or larger dutch oven or any large oven-safe pot with a lid. Prepare dough recipe above through step 2. Turn the dough out onto a lightly floured work surface and, using lightly floured hands, shape into a ball as best you can. Doesn’t have to be perfect! Transfer dough to a large piece of parchment paper. (Large enough to fit inside your pot and one that is safe under such high heat. I use this parchment and it’s never been an issue.) Lift the parchment paper and dough up and place it all into a large mixing bowl. Using a very sharp knife or bread lame, gently score an X into the top. Cover dough lightly with plastic wrap and leave alone for 30 minutes. During this 30 minutes, preheat the oven to 425°F (218°C). Place your dutch oven (with the lid) or heavy duty pot inside for 30 minutes so that it’s extremely hot before the dough is placed inside. After 30 minutes, remove the dutch oven from the oven and carefully place the dough inside by lifting it up with the parchment paper and sticking it all–the parchment paper included–inside the pot. Cover with the lid. Bake for 30 minutes with the lid on. Carefully remove the lid and continue baking for 10-12 more minutes or until the bread is golden brown. You can test for doneness exactly how you would in step 7 above. Remove pot from the oven, carefully remove the bread from the pot, and allow to cool on the counter for 30 minutes before breaking/slicing/serving.
- Can I bake this free-form outside of the loaf pan or dutch oven? No, this bread needs a pan to help it hold shape.


Reader Comments and Reviews
My mom has pretty bad arthritis in her hands so she has trouble kneading. I found this recipe. No-kneading! We had a good time making and baking. It was absolutely delicious. We loved the subtle sweetness! It hit the spot with our Swiss steak! And it was a delicious toast in the morning! Thanks Sally!
I was wondering if I could use coconut oil when making this bread? I know if I use olive oil, it will flavor the bread.
Thank you.
Hi Brenna, You could try it with melted and cooled coconut oil, but that will obviously change the taste. Let us know if you give it a try.
I used the coconut oil and really didnt taste it.
The bread turned out wonderfully. Thanks for another great recipe!
This was SO easy and SO yummy! The results were perfect with NO work to make it.
I REMEMBER THIS RECIPE!! I made it a couple of years ago and I loved it so much! I always wondered why more people weren’t talking about it lol. This updated version looks good too! I’ll have to try it soon.❤
Wow! I can’t believe I made this. I’m very inexperienced with yeast, so when I saw we didn’t need to prep it or knead the dough, I had to try it. This is delicious! I can’t wait to eat more. And it really takes no time at all if you consider it’s proofing/rising for most of the time!
What about the room temp that the dough rises in? I keep my house at 68 degrees in the winter.
Hi Shelly, With the long rise time here (12-18 hours) that temperature should be just fine. You’ll want to look for the dough doubling in size with a lot of air bubbles. Enjoy!
Simply the best! It’s February in Minnesota and this bread gives us reason to live.
Hi sally, if i want to top the dough with oats butter but also kelp it’s egg- free, can I brush some butter? Or any thoughts? Thanks!!
Hi Lily, You can brush the top with melted butter or even milk to help the oats stick. Enjoy!
As a long time bread baker, farmers market seller and baking instructor, I would never tell people to tightly wrap a loaf of bread. Doing so will hold moisture in and encourage mold growth. Nor would I tell them to refrigerate bread as it dries the bread out. I would encourage them to freeze instead. Is there something special about this bread that has you give those directions? Curious about that. But it sounds easy and delish and I’m definitely going to try it.
Hi Sandy, your feedback is appreciated! This recipe doesn’t instruct bakers to wrap the bread tightly– simply cover it for storing. After it’s at room temperature for a few days, I recommend refrigerating it because the moisture will absolutely encourage mold growth. It does dry out eventually, as all baked goods do. Freezing is another great option. Thank you for sharing your thoughts!
Hi Sally. Can all the flour be added at the beginning? My end result was a very dense bread. I had great air bubbles after first rise but after adding the last bit of flour for the second rise the dough didn’t rise too well. I also substituted 1 cup of whole wheat flour for the bread flour, so don’t know if that was part of the issue. On a positive note it was very yummy in spite of the issues I had.
Hi Diane, You can sub 1 cup whole wheat flour for 1 cup of bread flour, but whole wheat flour will make the bread more dense. If you try it again, try all bread flour to see if you like that better. We’re so glad you tried this recipe and enjoyed the taste!
Can’t wait to try it! Wheat bread is usually to touchy to mess with so I’m hoping with your great pointers it will be just what I’m looking for on my cafe! Used to make a wonderful dark wheat bread , American Indian recipe I was told called Squaw bread( don’t shot the messenger) and everyone just Loved it!! But it was pretty involved so kinda moved away from it but thinking of bringing it back! Been open now for almost ten years so probably more relaxed with the bread situation! Love your recipes & advice! I’m making your white cake recipe right now for my grand-daughters baby shower which makes me a GREAT grandma!!! So excited!! It’s a girl
AMAAAAAAZING!!!!! I love making homemade bread, and don’t mind kneading (because my kitchenmaid does the work!)… but an easy no-knead bread is always welcome too! This was supremely easy and supremely delicious. Anyone can make it, even someone who has never made homemade bread before. Impress your family and friends with this bread; they will never believe how little effort you put in when they taste it!
Hi Sally, I plan to make this bread tomorrow. I have been making different breads for over 30 years; I was wondering if you ever use vital wheat gluten with AP flour instead of bread flour? I always use King Arthur flour and always have the AP and wheat however the grocery stores in my area rarely have the King Arthur bread flour. As a side note they never have the wheat gluten either; I order it on line and keep it in the freezer.
Thank you for your response.
Hi Sharon, I’ve never tried vital wheat gluten and regular flour in this recipe. I’ve used vital wheat gluten before in recipes using 100% whole wheat flour because it definitely needs the extra crutch of gluten– however, I don’t think that would be particularly necessary for this recipe. Still, you could certainly try it. Again, I haven’t tried/tested it. Let me know how you like the bread!
I have a question. I’ve noticed that your weight conversion is different than King Arthur’s chart. The recipe says 3 cups is 390 grams for bread flour and KA lists 360 grams for 3 cups of bread flour. I assume I should go with your weights since you’ve tested the recipe with these measurements, but just wonder why the difference. Thank you!
Hi Laurie, I measure 1 cup of spoon and leveled bread flour as 130g. I recommend going by the weights given in the recipe because that’s how we have tested it. Always good to double check though!
My bread came out denser than your picture. Dough had lots of air bubbles, but final bread didn’t. Do you what would cause that change?
Hi Naomi! You want to be as careful as possible with the dough after rising to prevent the air bubbles releasing. Handle it as little as possible and shape gently to preserve them!
Wow, Sally! This is amazing (I’m eating it right now)! So easy, and so delicious. I stirred it together last night and baked this afternoon. I’m a believer!
I thought I was going to have a no-go with this, but I figured I had it ready to go in the oven, so why not.
Everything was weighed out. Put together per instructions but after 16 hrs, it was really wet. The reserved 2TBS of flour wasn’t much help. It had doubled in size, so I knew my yeast was fresh. There was no way I could shape this for the loaf pan. So I ended up using my bench scraper to scoop it up and put it in the pan. Funny thing, it really didn’t stick to the counter.
Just had an end piece…..and YEP, I’m glad I went ahead and baked it. It was very good.
Any ideas how to not end up with such a wet dough for next time?
Thanks for another great recipe.
My loaf did the exact same thing! The second rise didn’t rise nearly enough tho, so it baked up quite dense. Not sure what went wrong…
Hi Sally! Wondering if I can use maple syrup instead of the honey?
Hi Katherine! We have not tested it, but that swap should be fine. The bread will undoubtedly have different flavor.
Can the bread by made gluten free?
We haven’t tested it, but let us know if you do. My team and I do not have a lot of experience baking gluten free breads.
Did you ever try making it gluten free? I’ve made it a few times with bread flour and loved it— would love to make it as a gift for a friend who is gluten free
I love this recipe thank you so much..
Haven’t tried yet because I was wondering if this could be made in a Dutch oven instead of loaf pan. Does it really matter what I bake it in?
Absolutely! See detailed recipe note– I have specific instructions for that option.
How much, if any, may I add seeds to this recipe? I was thinking about pumpkin seeds, sesame or one you recommend. Thanks!
Absolutely. I would add 1/2 cup (60g) pepitas (pumpkin) or sunflower seeds when you add the flour.
Can this be made in a bread machine?
Hi Brenda, my team and I have not tested that, but let us know if you do!
Hi Brenda, I was wondering if you tried it in a bread machine because I would like to try that too
Hi Sally! Do you think I could replace some of the bread flour with oat flour for a healthier bread? ❤
Hi Rica! We haven’t tested oat flour in this recipe. It may yield a drier texture. Let us know if you give it a try!
Delicious. Next day, still delicious. Slightly sweet so a breakfast or lunch treat without being sugary. I had a burnt edge on one top side, so not sure what to do about that for next time, but still delicious.
Thanks for this recipe, Sally! This bread has become an absolute staple in our house. It’s actually replace my Grammas old honey-oat bread recipe that I used to make.
My husband and kids absolutely love it and eat it as toast all the time. I do a mix of King Arthur all-purpose and whole-wheat flour. Also, my hubby asked me to try this recipe with raisins mixed in-and it was awesome!!
I added 1c raisins into the dry ingredients.
I just made this bread, and it was delicious! My husband even said it was one of the best breads he’s ever tasted — he ate a slice plain, and he’s not even normally a huge fan of bread.
For those wondering about instant vs. active dry (not instant) yeast, I used Fleischmann’s active dry yeast that comes in a packet. I didn’t realize until I had put the yeast in the batter that it actually says on the packet: “Not recommended for recipes that call for instant yeast,” so I was afraid it wouldn’t work. However, I carried on and did not change anything about the recipe. I did not activate the yeast as per package directions, either, and I didn’t modify the times to rise.
It did rise a little too much when I put it in the warmed oven, but I just took it out, trimmed the excess that had flowed over the edges, and stuck the loaf in the oven. No modifications to baking time (maybe slightly less than listed here) and it came out perfectly.
I didn’t use cinnamon sugar on top — instead, I sprinkled a bunch of the oats over the top of the bread. It looked really cute and tasted good.
Delicious!
I made a couple loaves of honey wheat bread from another site after we finished off our loaf of this delicious honey oat bread.
About the new loaves my husband said “yeah, it’s good but not like that other yummy bread you made” referring to this recipe from Sally.
I assured him that I would indeed be making another loaf of this one too.
This is my first time using yeast in a recipe, but this bread looked so delicious in your pictures that I had to try it! I didn’t realize until the second rise that my loaf pan is 8×4, not 9×5! By the time I checked on it, it was overflowing out of the pan. I cut off the dough hanging off the sides of the pan, and then I sprinkled it with the cinnamon sugar. The hard part was already done, so I figured I might as well try to bake it in the smaller pan and popped it in the oven. It’s baking right now! I hope the temperature settings and times aren’t going to be much different. My apartment is already smelling fabulous from the bread! No matter how this bread turns out this round, I can tell this recipe is a keeper. It was so easy to make, even with the yeast! Thanks for a fabulous recipe!
Hi Nancy! Yes, even that slight pan size difference will have a huge effect on the bread! I’m glad you fixed it before it was a huge issue, though. I love the way it makes my kitchen smell too – I can even smell it hours after its baked in our apartment hallway! Hope you enjoy. Thanks so much!
Thanks Sally! It still turned out fabulous! It’s cooling right now, and I’m impatiently trying to wait for it to finish cooling before i cut myself a slice. I’ve never met my neighbors in my apartment, but they knocked on my door to ask what I was making –> the power of baking bread.
Hi Sally! I wonder if you could use whole wheat flour instead? Beautiful bread 🙂
Hi Carolina! You must use bread flour. However, you could sub 1 cup whole wheat flour for 1 cup of bread flour.
Hey Sally
Any chance this would work with gluten free flour?
Thanks for all your great recipes by the way
Hi Carole, we haven’t tested it, but let us know if you do. Thank you so much!