

This is a full page dedicated to homemade individual no-bake cheesecake jars! Use this simple no-bake recipe when you need a quick and crowd-pleasing 30 minute dessert. Have fun with different flavors and toppings, too!
No bake cheesecake jars are a fun individual dessert to serve when you’re short on time and don’t feel like turning on the oven. There’s literally no baking involved and the entire dessert takes around 30 minutes. You only need a handful of familiar ingredients and some cute little jars. Individual desserts have been all the rage the past several years and this mason jar dessert trend isn’t disappearing any time soon.
I’ve published no-bake cheesecake, classic baked cheesecake recipe, and even an easy cheesecake pie on my blog, all of which take hours to either bake, cool, and/or chill. Shortcut cheesecake, here we come!
Why You’ll Love Individual No-Bake Cheesecake Jars
If you’ve ever enjoyed my no-bake cheesecake recipe or mini no-bake cheesecakes, you know you’re in for a real treat with this jar version. You see, no-bake cheesecake (either served as a whole or in jars) is a lot easier than baked cheesecake. Without eggs and baking, there’s no way to mess up this dessert. You can’t over-bake it, you can’t over-whip the eggs, and there’s no cheesecake water bath involved. It’s easier and quicker than strawberry cream cheese pie, with all of the flavor and texture. If summer was a dessert, it would be no-bake cheesecake jars.
Here’s what I appreciate and know you will too:
- Easy recipe
- Creamiest cheesecake filling
- Few tools required—just a mixer and a couple bowls
- Ready in 30 minutes
- Unlimited flavors & topping options
- Convenient to transport to parties, BBQs, baby showers, & other events
- Did I mention no baking?
Video Tutorial: No Bake Cheesecake Jars
Before we get to the written out recipe, let’s review each layer. Even though this is a simple dessert, it’s important you familiarize yourself with the process before starting.
3 Layers in No-Bake Cheesecake Jars
- Buttery Graham Cracker Crust
- No-Bake Cheesecake Filling
- Topping
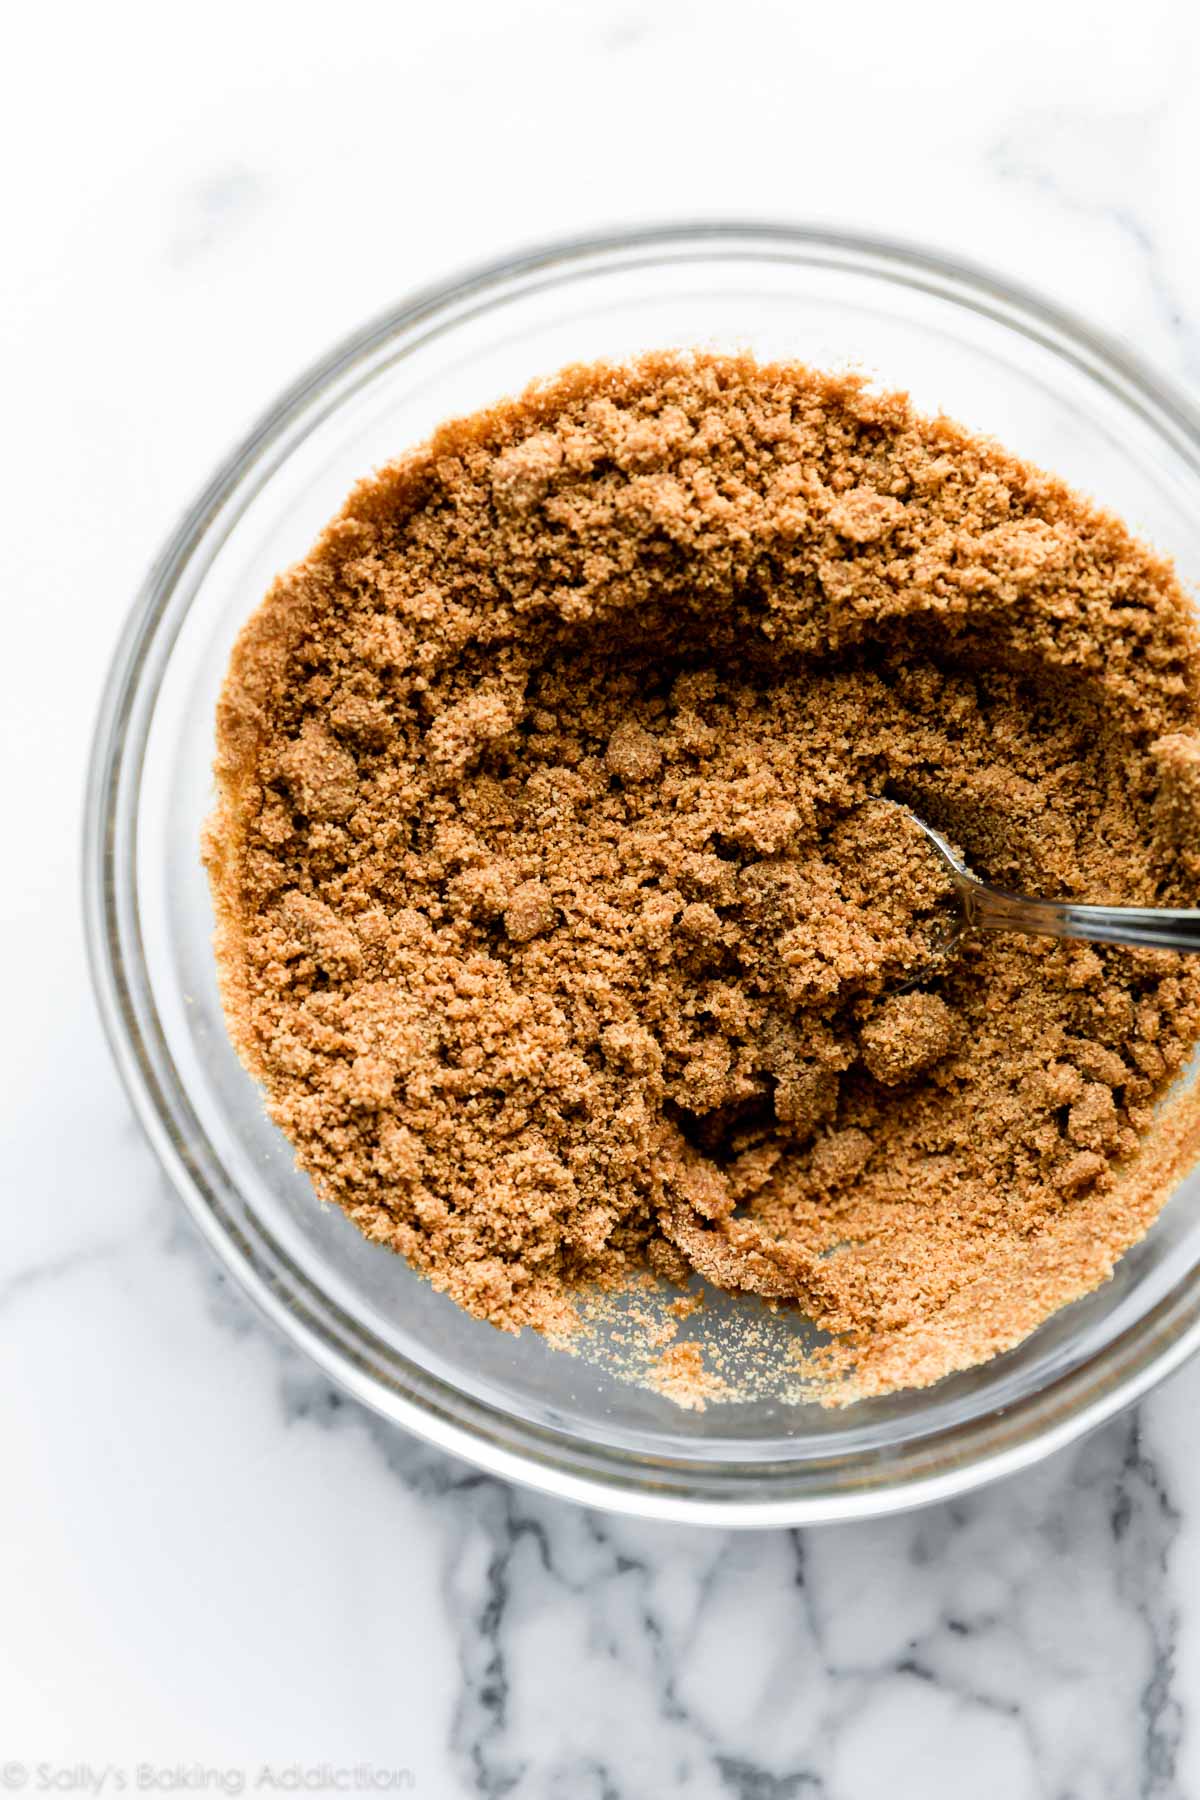
The graham cracker crust doesn’t need much explanation. You only need graham cracker crumbs and melted butter. Mix the two together, then layer into the individual jars. Again, there is NO BAKING so you do not need to pre-bake this graham cracker crust.
If you use certified gluten free graham crackers, you can add these cheesecake jars to your list of go-to gluten free dessert recipes, too.
2 Parts to Cheesecake Filling
There are 2 parts to the cheesecake filling. First, whip heavy cream into stiff peaks. You’re essentially making whipped cream without sugar or flavor. Set that aside. Then beat the remaining cheesecake filling ingredients together. Finally, fold in the whipped cream. Whipping the cream 1st is imperative because it supplies all the deliciously fluffy and creamy texture. This no-bake cheesecake jar filling almost tastes like cheesecake mousse—it’s so light—and we have the whipped cream to thank for that. 🙂
Cheesecake Jar Filling Ingredients
- Heavy Cream: Whip into stiff peaks. Set aside.
- Brick Cream Cheese: Use full-fat brick cream cheese, not cream cheese spread. I recommend this for all of my no-bake and baked cheesecake recipes, including mini cheesecakes and white chocolate raspberry cheesecake bars.
- Sugar: Sugar sweetens the cheesecake jars. This is a lightly sweetened dessert, so you only need 1/3 cup of sugar in the entire filling.
- Sour Cream: Sour cream is a must-have ingredient in this recipe. Even though you only need 2 Tablespoons, it promises a tangy cheesecake flavor and ultra creamy texture. In fact, I don’t make regular cheesecake without it.
- Vanilla Extract: Vanilla extract adds flavor.
- Fresh Lemon Juice: Lemon juice adds a little brightness and slight flavor.
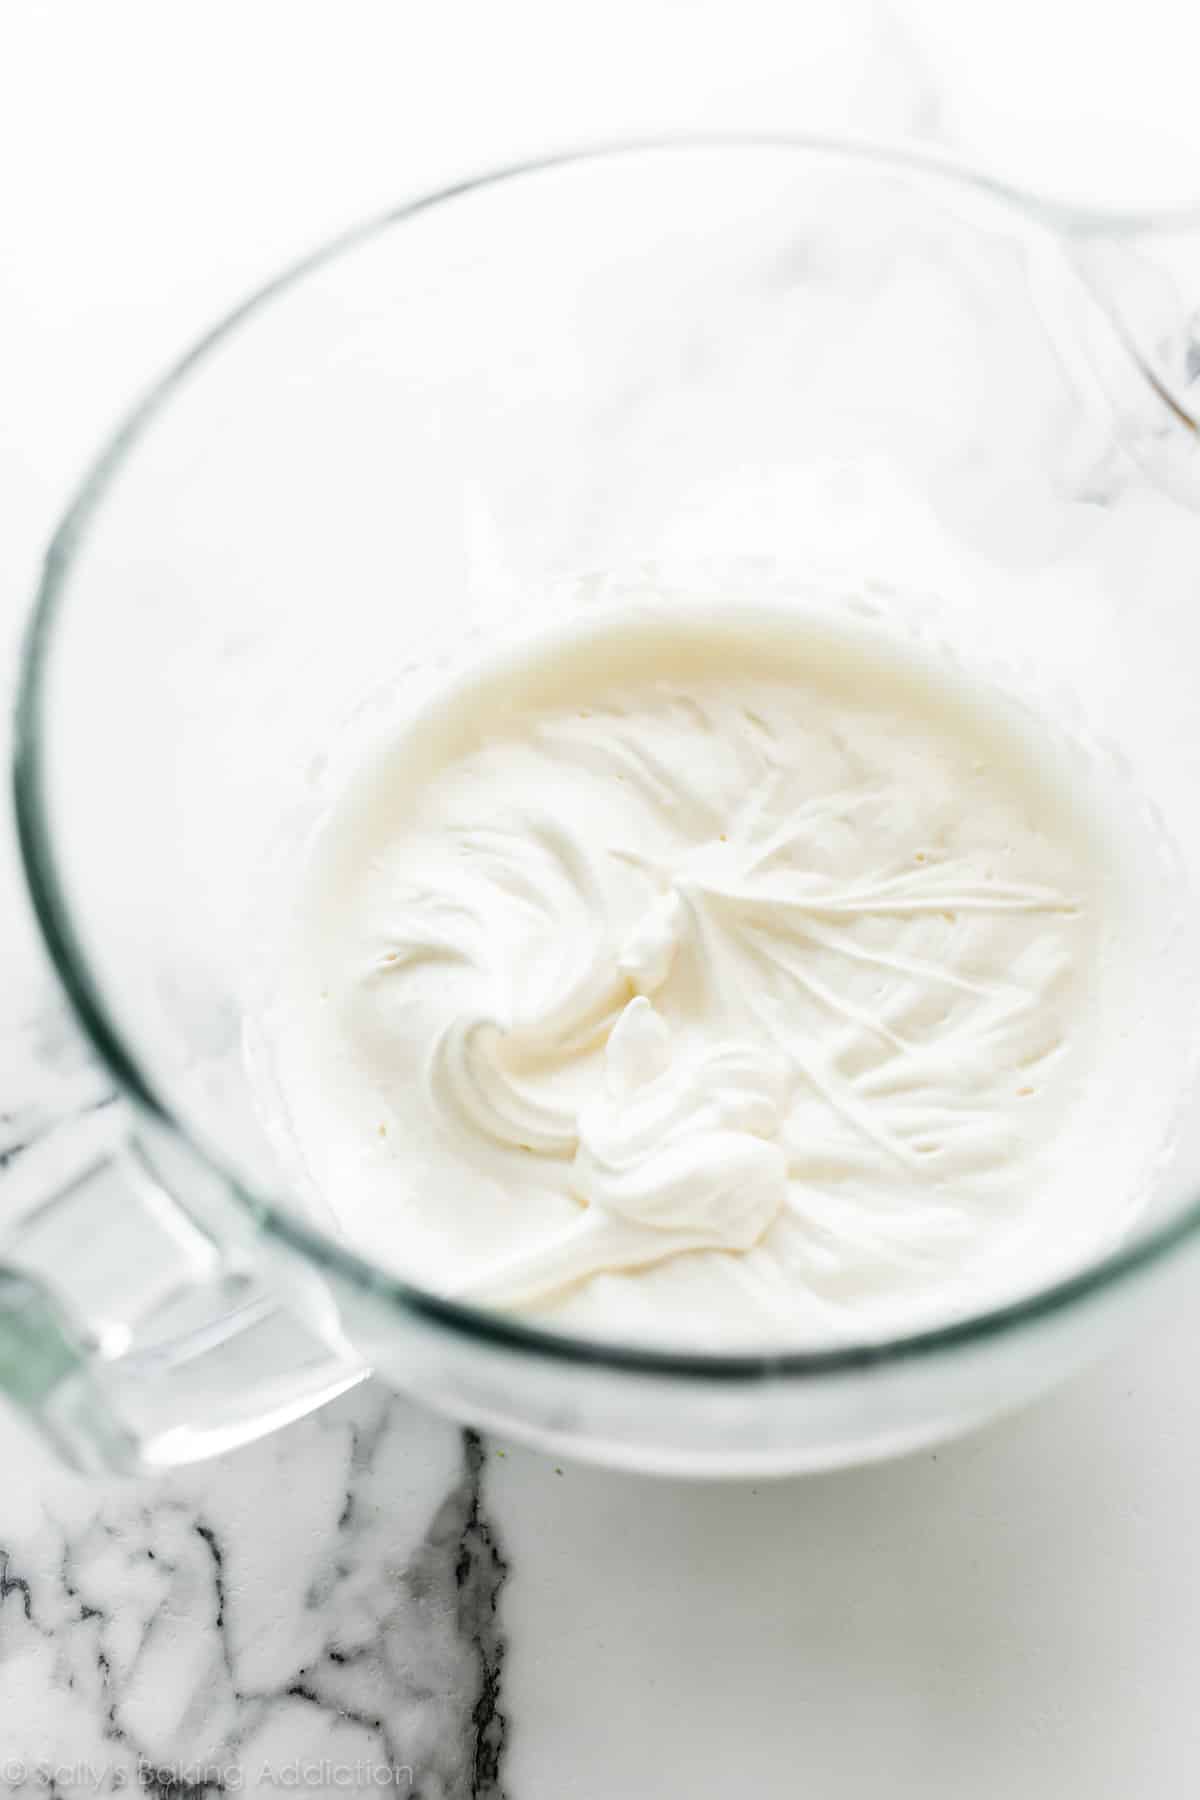
Here’s the heavy cream beaten into stiff peaks:
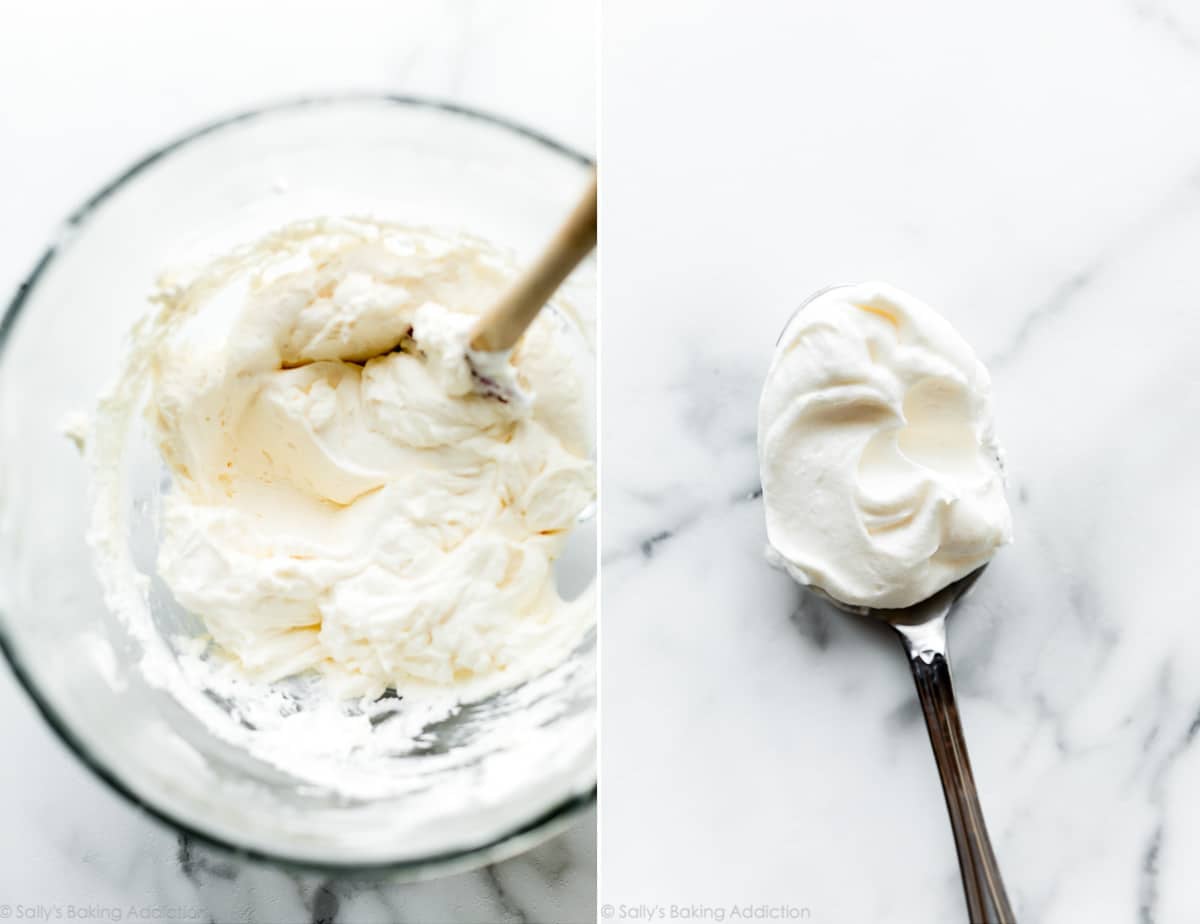
Here’s the cheesecake filling after you fold in the whipped cream. It’s airy, light, and fluffy:
Filling Flavors
The pictured no bake cheesecake jars are plain, but you can definitely add some flavor! Add these ingredients when you beat the cream cheese, sugar, sour cream, and vanilla extract together. I recommend leaving out the lemon juice if making the peanut butter, Nutella, chocolate, or coconut variations.
- Peanut Butter: 1/3 cup creamy peanut butter
- Nutella: 1/3 cup Nutella
- Lemon: 2 extra teaspoons lemon juice + 1 teaspoon lemon zest
- Raspberry: 1 and 1/2 Tablespoons raspberry preserves
- Chocolate: 1 and 1/2 Tablespoons unsweetened cocoa powder or chocolate ganache and replace graham crackers with Oreos or chocolate graham crackers
- Coconut: 1 teaspoon coconut extract
- Key Lime: replace lemon juice with lime juice and add 2 more teaspoons of lime juice, plus 1 teaspoon lime zest
Toppings
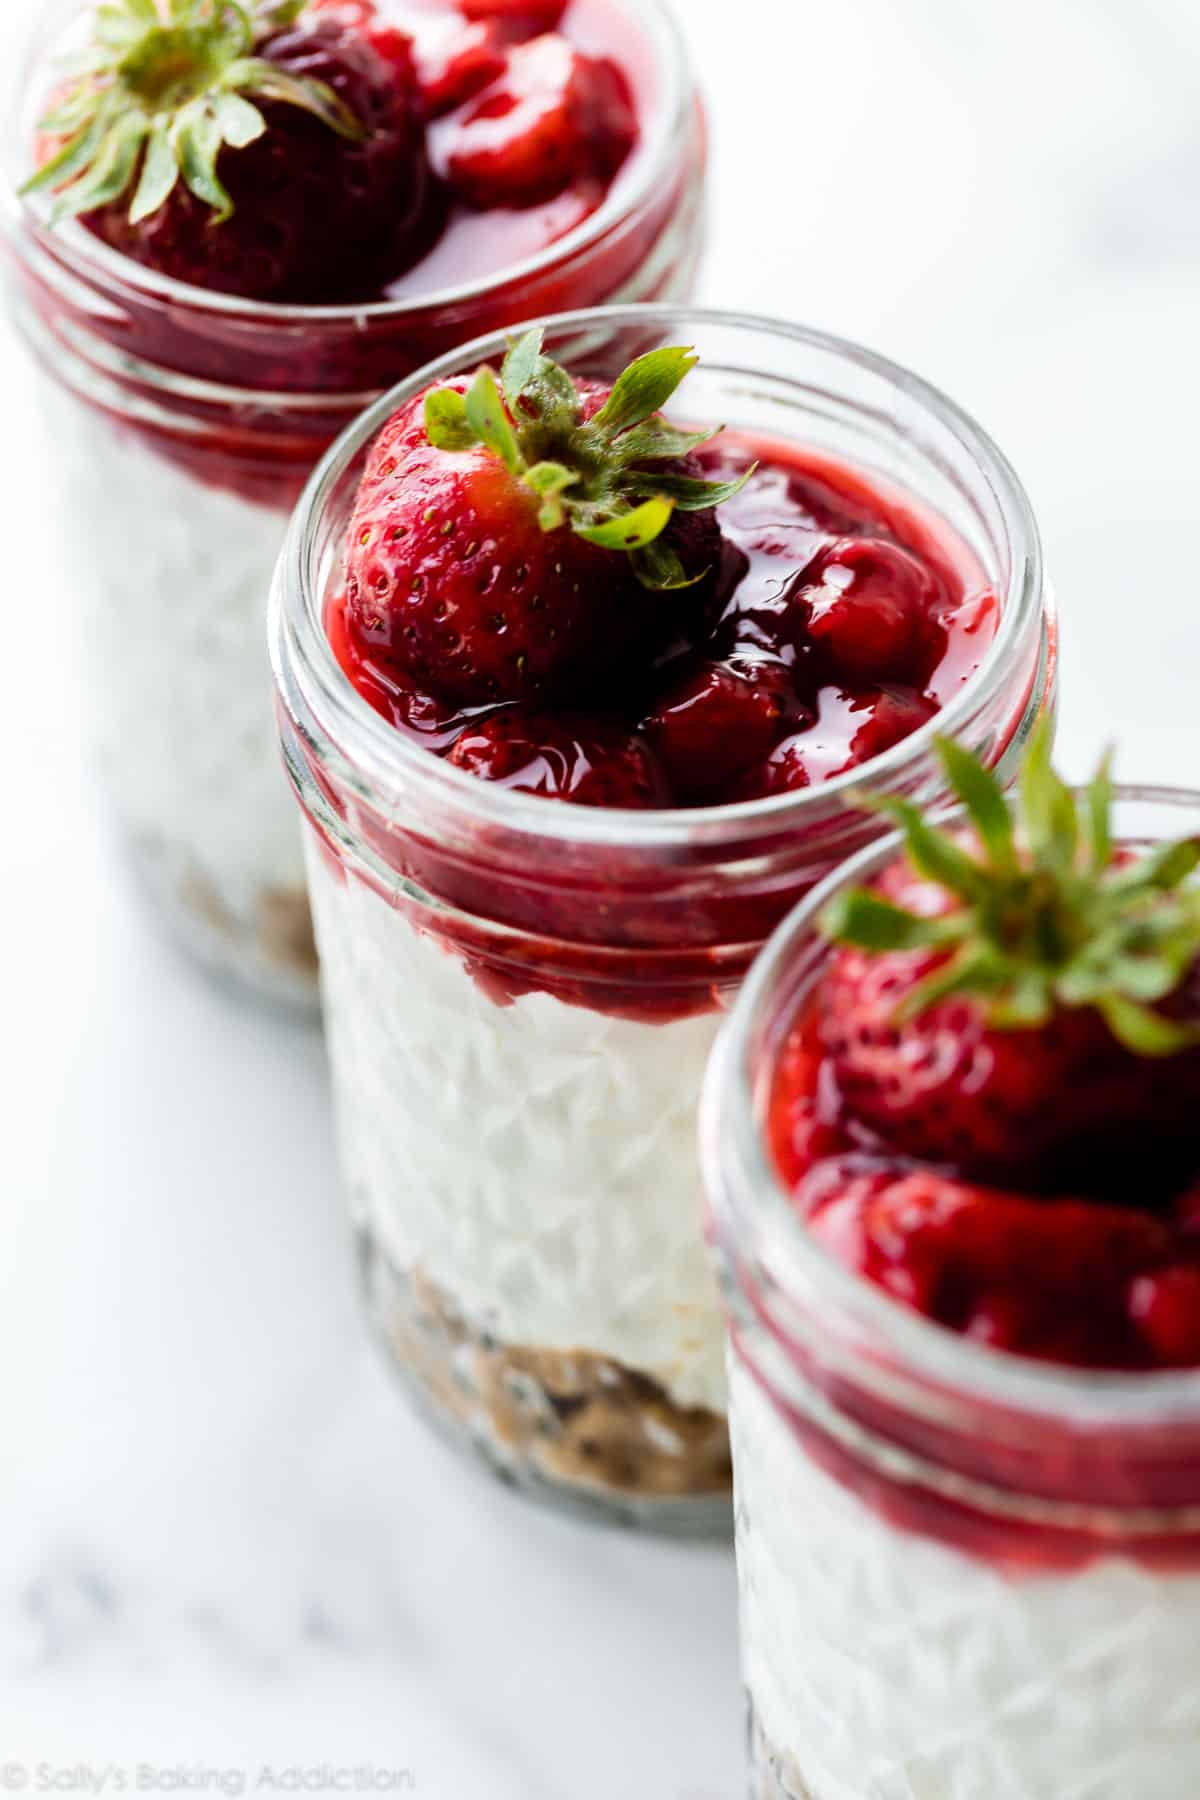
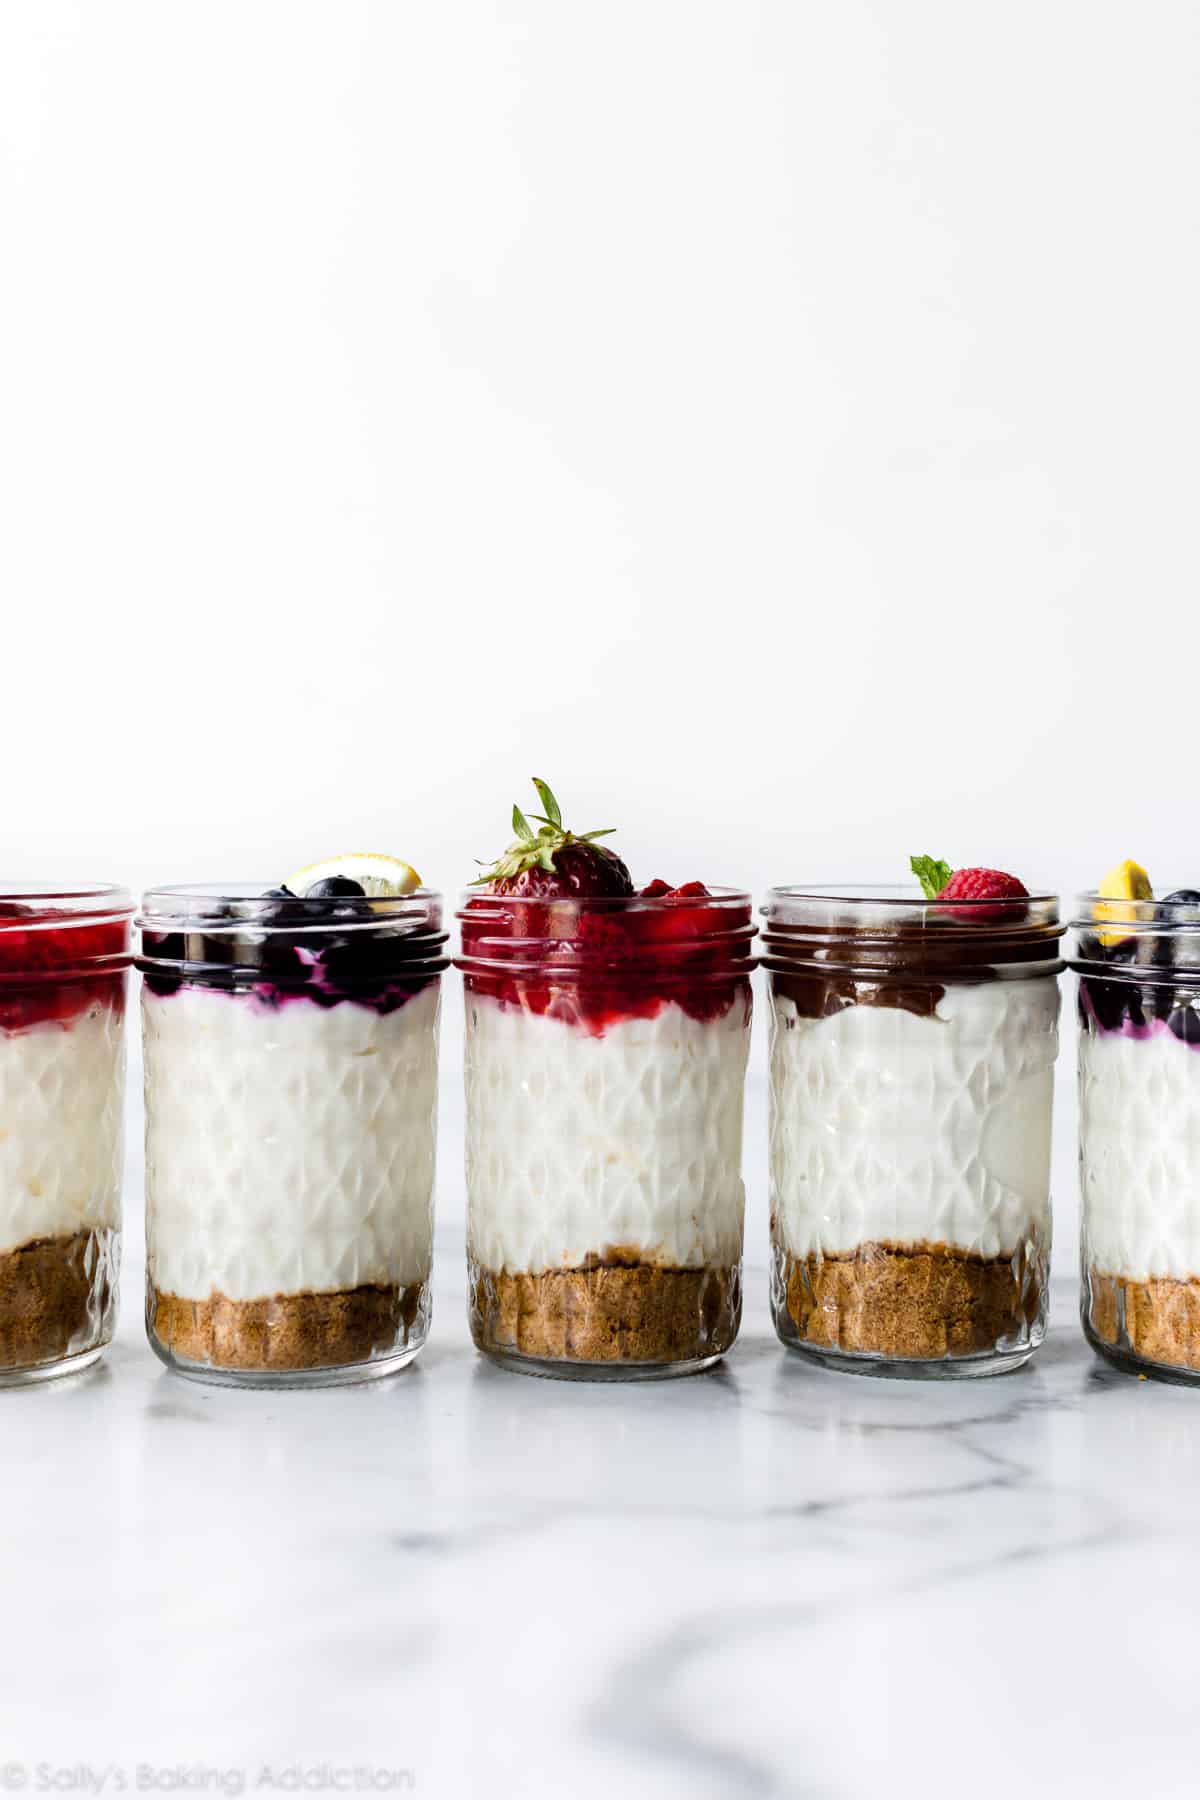
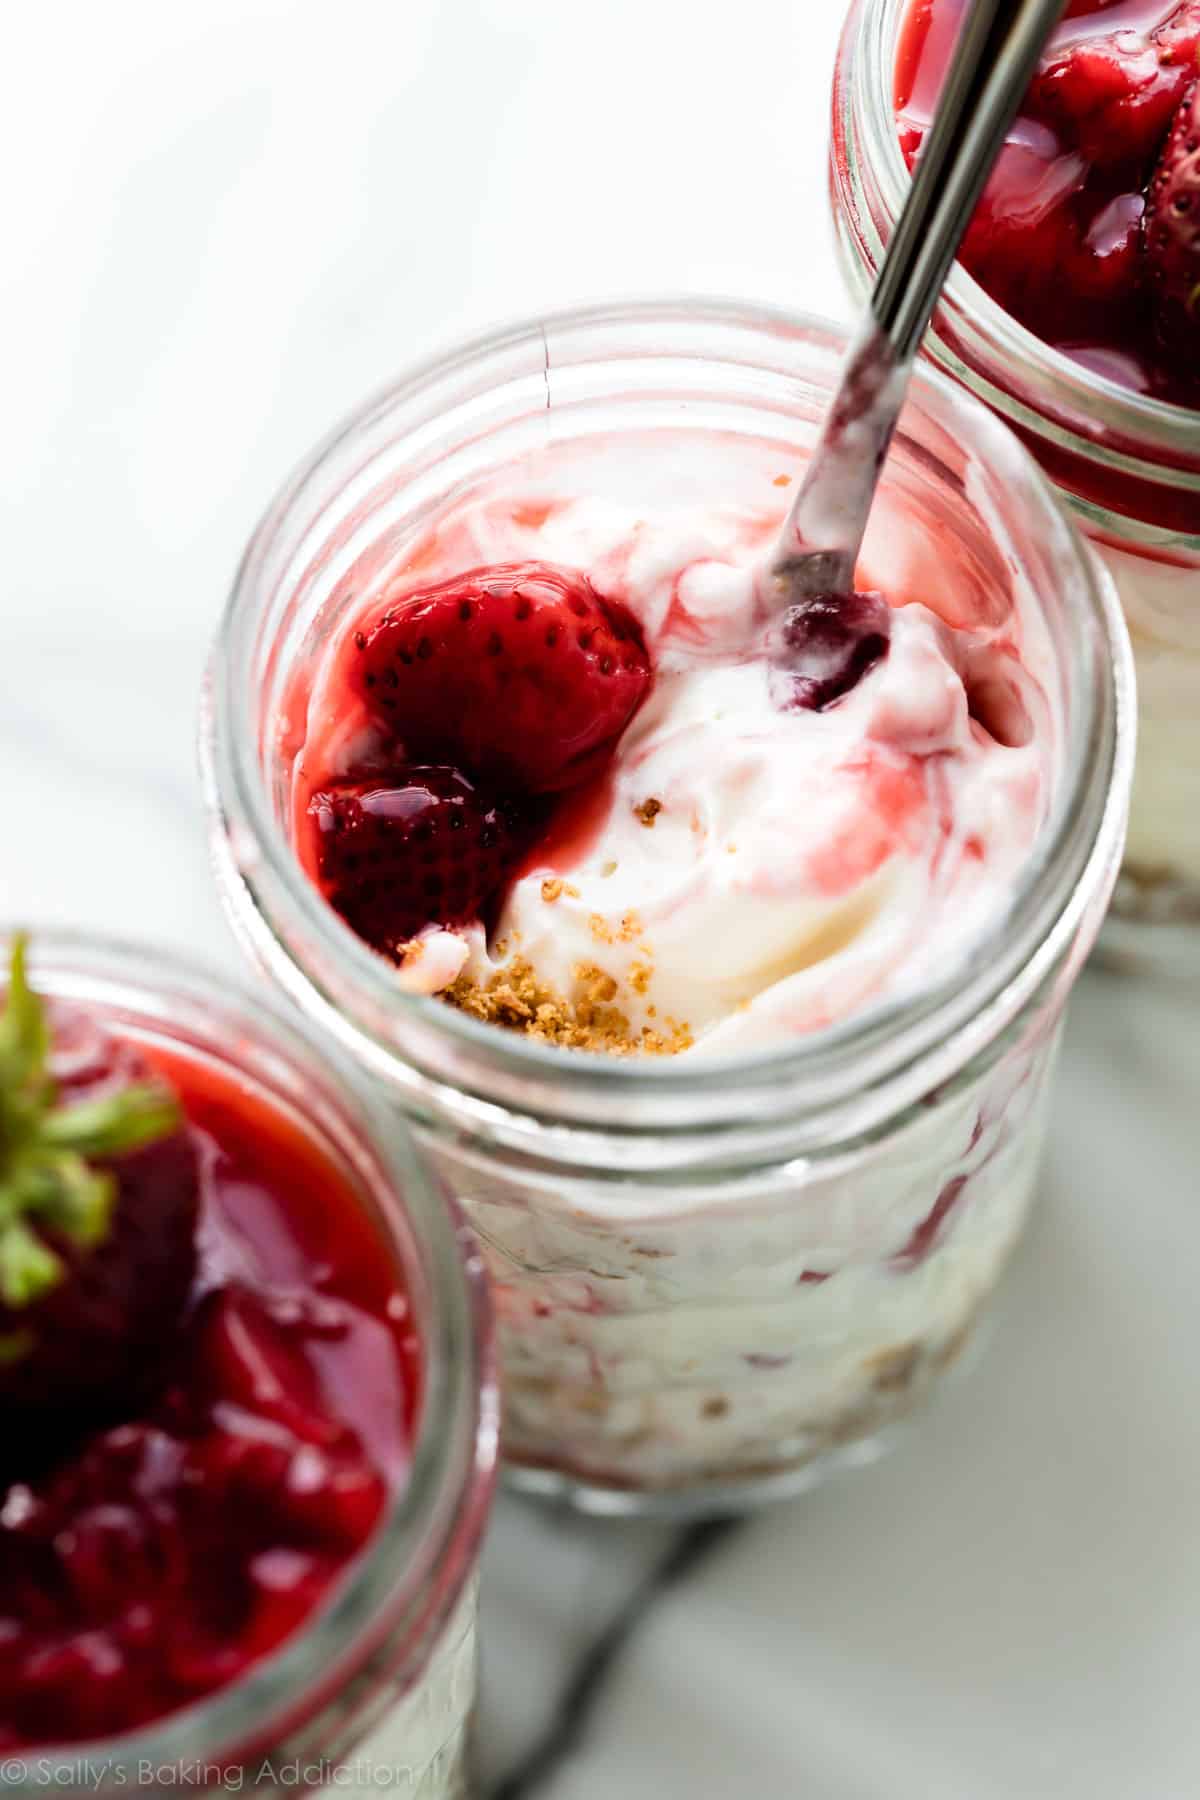
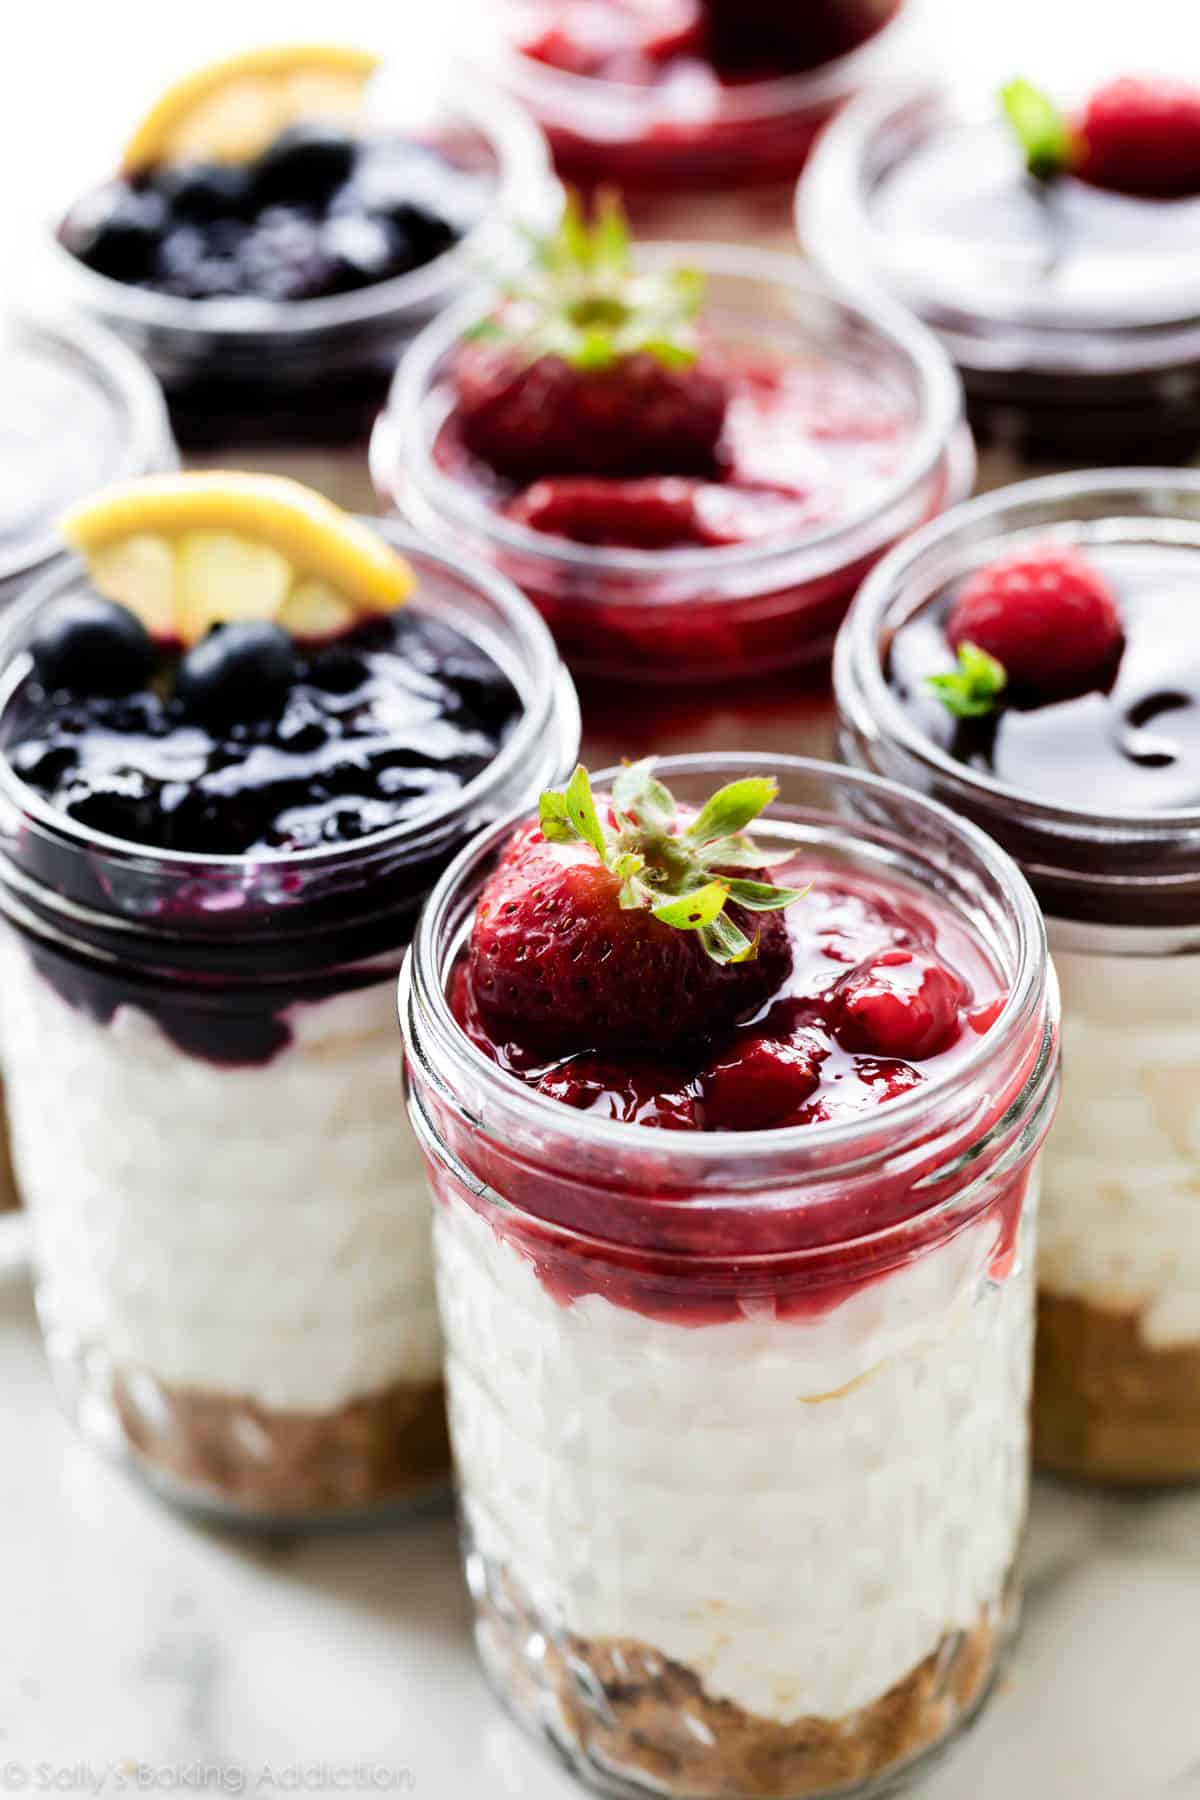
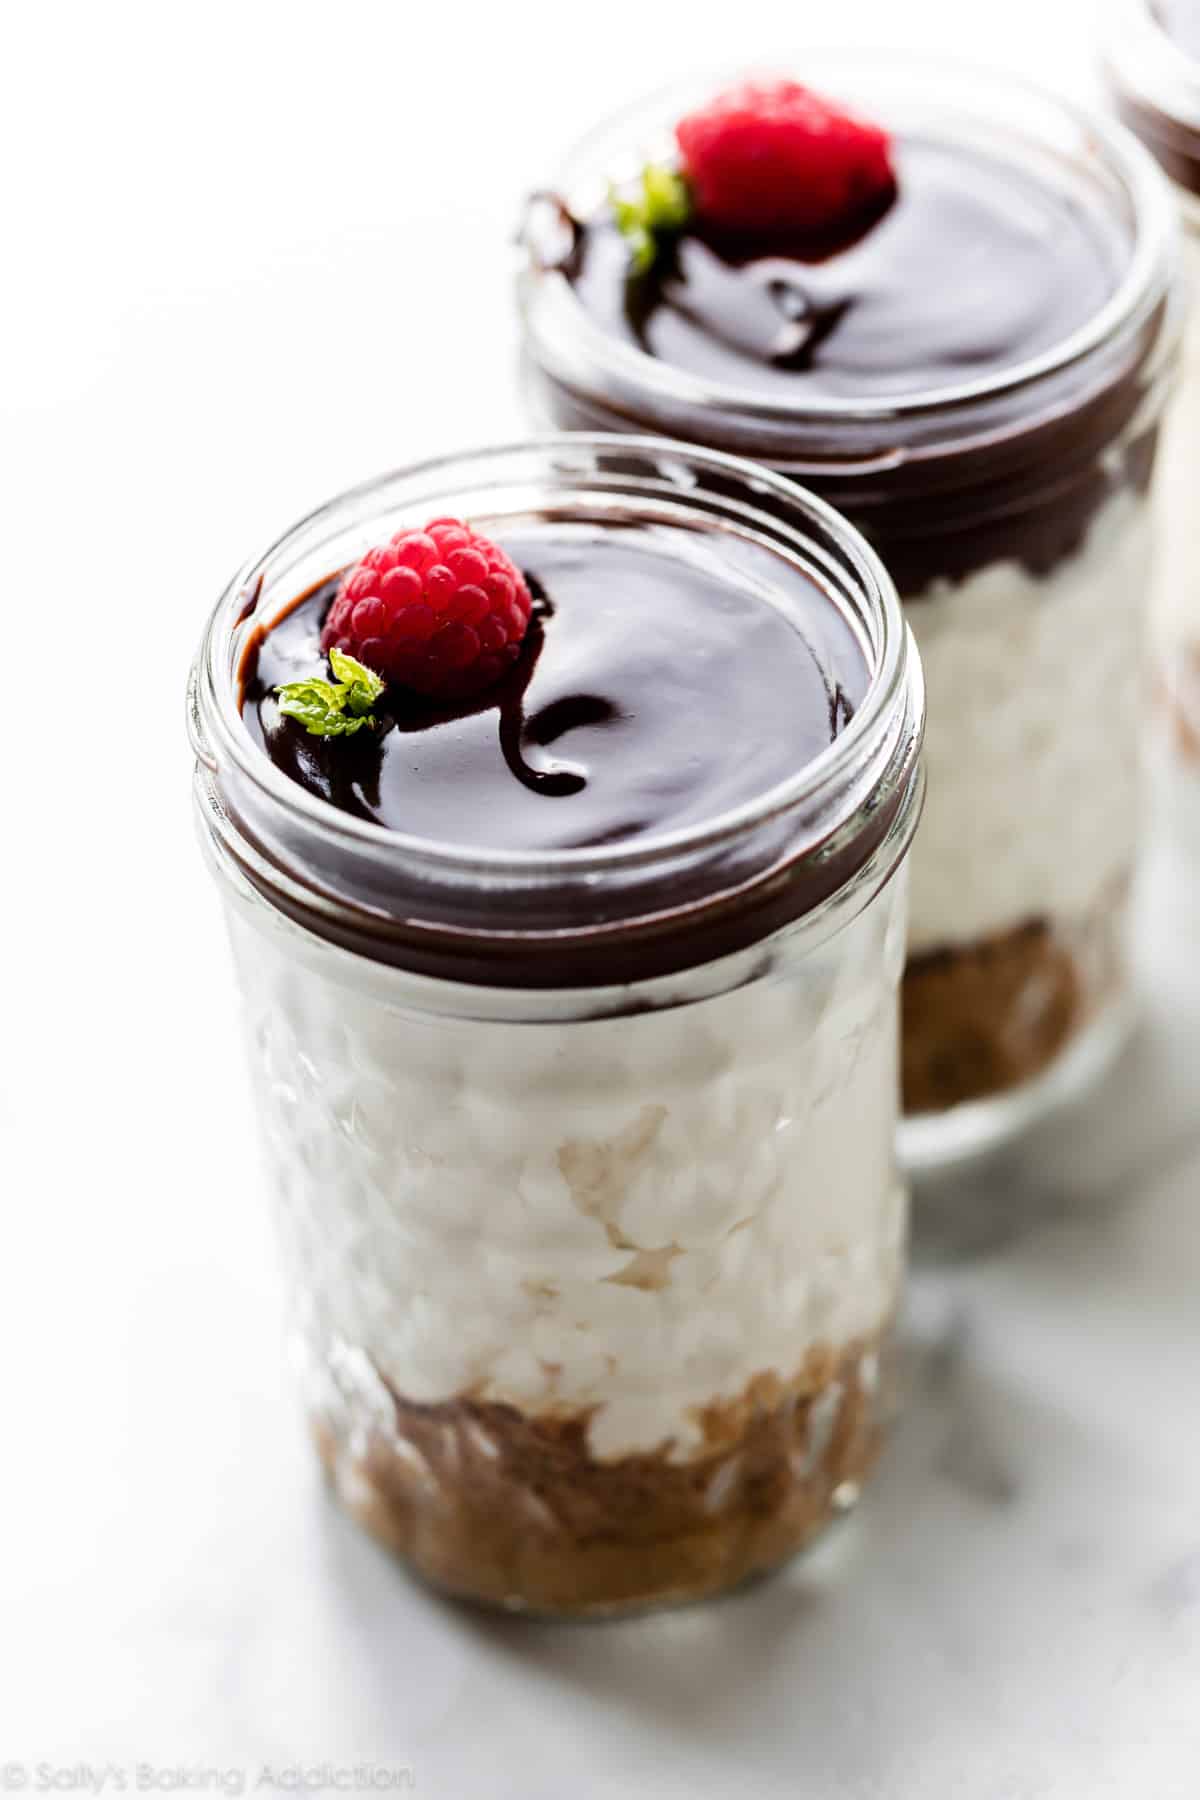
Last layer! Finish the no-bake cheesecake jars with your favorite toppings. This recipe yields about 6 8-ounce cheesecake jars, so you can layer each with a different topping.
- Chocolate Ganache (pictured with raspberries & mint)
- Strawberry Topping (pictured)
- Blueberry Sauce Topping (pictured with fresh blueberries and lemon slice)
- Whipped Cream
- Hot Fudge Sauce
- Lemon Curd
- Salted Caramel
And let’s not forget garnishes like sprinkles, berries, lemons, mint, etc!
Jars for No-Bake Cheesecake Jars
8 ounce jars, as pictured, are a pretty generous serving size. Feel free to use smaller jars like we do for homemade dirt pudding, or even use this recipe as a trifle. Whichever size jar, I highly recommend using wide mouthed jars so you can easily spoon the layers inside. These are all affiliate links.
- 8 ounce glass jars (pictured)
- 8 ounce glass jars (vintage fruit design)
- 6 ounce glass jars (hexagon shape)
- 6 ounce glass jars (smooth surface)
If you don’t have jars, use custard cups or bowls. Same taste, different delivery. This cheesecake filling also works in place of pastry cream in homemade mille-feuille. No matter how you serve it, these are always fun to serve at bridal showers, baby showers, for tea parties, Mother’s Day, Father’s Day, wedding celebrations, BBQs, graduation parties, and more. A crowdpleaser every time!
See Your No-Bake Cheesecake Jars!
Many readers tried this recipe as part of a baking challenge! Feel free to email or share your recipe photos with us on social media. 🙂
Print
No Bake Cheesecake Jars
- Prep Time: 30 minutes
- Cook Time: 0 minutes
- Total Time: 30 minutes
- Yield: 6 8-ounce jars or 10 6-ounce jars
- Category: Dessert
- Method: Mixing
- Cuisine: American
Description
This jar dessert recipe combines a 2 ingredient graham cracker crust with an easy no-bake cheesecake filling. For best results, read through the recipe and watch the video tutorial above before beginning. See blog post for cheesecake filling flavors and see recipe notes or blog post for topping and garnish suggestions.
Ingredients
- 2 Tablespoons (28g) unsalted butter, melted
- 1 cup (100g) graham cracker crumbs (about 8 graham crackers)
- 1 cup (240ml) heavy cream or heavy whipping cream, cold
- 8 ounces (226g) full-fat brick cream cheese, softened to room temperature
- 1/3 cup (65g) granulated sugar
- 2 Tablespoons (30g) sour cream, at room temperature
- 1 teaspoon lemon juice
- 1/2 teaspoon pure vanilla extract
- toppings & garnishes (see note)
Instructions
- Have your jars ready to go and lined up. This recipe yields about 6 8-ounce jars or 10 6-ounce jars.
- Crust: Melt the butter in the microwave in a medium heat-proof bowl or use the stove. Stir in the graham cracker crumbs. The mixture will resemble wet sand. Spoon a generous spoonful into each jar, about 2 Tablespoons into the 8-ounce jars and 1 and 1/2 Tablespoons into the 6-ounce jars. If there’s any crust leftover, sprinkle into the jars to use up or discard. Set jars aside.
- Filling: Using a hand mixer or a stand mixer fitted with a whisk attachment, whip the cold heavy cream into stiff peaks on medium-high speed, about 3-4 minutes. Set aside.
- Using a hand mixer or a stand mixer fitted with a whisk or paddle attachment, beat the cream cheese, sugar, sour cream, lemon juice, and vanilla extract together on medium-high speed until smooth and creamy. Make sure there are no large lumps of cream cheese. If there are lumps, keep beating until smooth.
- Using your mixer on low speed or a silicone spatula, fold the whipped cream into the cheesecake filling until combined. This takes several turns of your silicone spatula. Combine slowly as you don’t want to deflate all the air in the whipped cream.
- Layer a couple large spoonfuls of filling on top of the crust in the jars. Use about 1/4 – 1/3 cup filling in the 8 ounce jars and 3 Tablespoons (or however much you can pack in!) into the 6 ounce jars. Make sure to leave room for the topping.
- The cheesecake jars are at room temperature at this point, but if you’d like to serve chilled, chill for at least 30 minutes and up to 3 days before adding the topping. (Cover if chilling for longer than 30 minutes.) I recommend adding the topping when serving or up to 2 hours in advance. The topping can seep down into the layers, so that’s why I recommend adding it soon before serving.
- Spoon topping and garnishes on top of filling, then serve.
- Cover and store leftover cheesecake jars in the refrigerator for up to 5 days.
Notes
- Make Ahead Instructions: These cheesecake jars can be made 1-3 days in advance. They can be refrigerated in step 7 for up to 3 days before serving. You can also make & layer the crust 1-2 days ahead of time. Another way to make these cheesecake jars ahead of time is to freeze them before adding the toppings. Seal jars with the lids and freeze up to 3 months. Thaw in the refrigerator before topping and serving. You can also freeze the cheesecake filling as a whole. Cover tightly and freeze up to 3 months. Thaw in the refrigerator before layering on top of crust.
- Special Tools (affiliate links): 8-ounce Glass Jars (pictured), 8-ounce Glass Jars (vintage fruit design), 6-ounce Glass Jars (hexagon shape), or 6-ounce Glass Jars (smooth surface) | Glass Mixing Bowls | Electric Mixer (Handheld or Stand) | Silicone Spatula
- Toppings: Chocolate Ganache, Strawberry Topping, Blueberry Sauce, Whipped Cream, Cherry Pie Filling, Lemon Curd, Salted Caramel, Hot Fudge Sauce
- Garnishes: Fresh berries, chopped fruit, nuts, chocolate chips, lemon slices, lime slices, shredded coconut, sprinkles, mint, or whatever you desire.
- More Cheesecake Jars: This recipe can easily be doubled, tripled, or quadrupled. Keep in mind the whipping and beating times will increase with the added volume.


Reader Comments and Reviews
Can I use this filling to fill cupcakes?
Absolutely!
While I loved this recipe, there was not enough cream cheese filling for the jars. In the future, I’m doubling the cream cheese mixture ingredients but keeping the whipped cream amount the same (1 cup).
I added fresh sliced peaches for my topping and kept the peach juice from slicing the peaches. To this juice, I added one tsp of brandy, a dash of cinnamon and one tsp brown sugar. I drizzled about one tsp of this on top of the sliced peaches.
I was searching for a no bake cheesecake recipe for my annual Ladies Night DInner Party. I have very cool martini glasses that I have used for Panna Cotta w/Mascerated Strawberries, a Chocolate Mousse, etc. and needed a NEW dessert for them. I found this and LOVE the idea but want to use my martini glasses…..trying to decide if I should make it “upside down” with the graham cracker on top since the bottom is so narrow….then putting a star dollop of whipped cream on the graham cracker top…..thoughts? I welcome your suggestion(s). 🙂
Hi Regina, your upside down idea sounds wonderful—please do let us know how it goes!
Can I put them in eight tiny 4 oz jars? Kids never seem to eat more than 2 bites.
Hi Serenity, absolutely, feel free to use smaller jars if desired.
Such a great idea!!!! Love it
I have just finished making the Lemon Lavender scones & the Blueberry Pie bars.Both were just great. I can always depend on your recipes to be a success so thank you all for your hard work.
Love your recipes. I am doing a dessert bar for my daughter’s wedding. I need to make as much as possible at least a week before and freeze because I have the wedding cake to do as well (5 tier). I also would like to layer them for a prettier presentation as shooters. Can I do this and freeze them? I have seen some recipes, but like the idea of your one filling and changing it up for different flavors. Can I layer these in plastic shooter glasses and freezing?? Thanks so much!
Hi Cindy, see recipe Notes for freezing instructions. You can freeze them in the shooter glasses before adding the toppings. Hope this helps and that they’re a hit at your daughter’s wedding!
I made this today and it was a huge hit. Thank you so much. The strawberry topping was the star of the day! I have one question…the graham cracker crust was very crumbly, didn’t hold together at all. Is there anything I can do differently next time to get a firmer crust?
Hi Becky, the “crust” is more of a crumbly layer and isn’t meant to stay solid and intact. It’s not baked, and doesn’t contain sugar (which I usually use in graham cracker crust for binding). Feel free to slightly bake the crust (perhaps make these in oven-safe ramekins) and/or add a little sugar.
Delicious! Very light, lightly sweetened and easy to follow/make. Looking forward to trying different flavor combos!
Can you melt chocolate chips, or add Hershey’s chocolate syrup to cheesecake to make chocolate cheesecake?
We’re sure you could make a chocolate version, but we haven’t tried it. It would require some testing because we’re torn if we would use melted and cooled chocolate or cocoa powder. Let us know what you try!
Can you tell me how to seal them before I freeze them?
Hi Vivian! If you use jars that come with lids, you can just use those lids. Otherwise press and seal plastic wrap works great!
Hi Lori, thank you for sharing this recipe, so nice of you. Can you tell me, can I freeze these after making them?
Hi DeeDee, yes, you can freeze the cheesecake jar filling before adding the topping. See recipe notes for details!
I have used this recipe before, and it was amazing! Although I am making it again, and am wondering if I can substitute the sour cream for greek yogurt?
Plain greek yogurt would work!
How many cups will this make…I’m using 8oz cups and don’t need to be filled to the top. But have 200 to make so trying to figure out ingredients. Thanks
Hi Sally – I want to make these for a weekend fund raiser for our high school band. I want to make some with an Oreo crust – can I just sub crushed Oreos for gram crackers?
Yes, absolutely!
Hello we don’t have sour cream where I am. Can I replace it by something else?
Hi Nav, plain yogurt is a great substitute in this recipe.
I made this today just to test out the recipe- I was doubtful because of some past cheesecake recipe disasters. Was I not impressed! I have a go-to no-bake cheesecake recipe now. I did half vanilla then the other jars were flavoured with cherry pie filling. Both flavours are amazing. I can’t wait to play with more flavours this time around. Thank you
Looks yummy! I wonder if coconut-key lime would work?Do I add 1 tablespoon lime juice, 1/2 tablespoon lime zest and 1/2 tablespoon coconut extract?
Hi Wu, You can replace the lemon juice with the same amount of key lime juice. Then you can add in lime zest and your coconut extract without making any other changes. Enjoy!
I absolutely love how light and perfectly sweet these mini darlings are. I made these for dessert tonight but I had to try one and oh so delicious and humming with every bite.
I don’t have the jars, so can this be made in a mini muffin liners in a mini muffin pan? Will it hold its shape if I chill it in the fridge? Thanks.
Hi Lynn, follow this recipe for Mini Cheesecakes (in a standard muffin pan) and follow the recipe note about using a mini muffin pan. Enjoy!
Love the site! Absolutely love the section that matches a recipe to the ingredients on hand. That is quite often a problem, unless you eat the same thing all the time, and I can’t do that.
Thanks for the simplicity! I’m looking forward to going thru another section tomorrow!
I LOVE cheesecake! Cheesecake and brownies are my weakness. I’ve never had no bake cheesecake – unless you count that jell-o thing which, if you’ve never had a real cheesecake or can’t bake, is fine…nothing to write home about but ok.
So I’m wondering about the mouth feel, and that dense creamy Heaven that is the cheesecake. How does this no bake one hold up?
I’d appreciate a response as now I’m in the mood for cheesecake!
Thanks
Hi Melissa! It’s definitely creamy but a lighter texture. Let us know what you think if you give it a try!
This looks yum
In the recipe you say can be kept in the refrigerator for 5 days but then later I read 1-3 days. ?? I want to make them tomorrow for Christmas which will be 4 days will that be ok?? Mind you they make get get eaten before Christmas
Hi Bronwyn, These cheesecake jars are the best when made up to 3 days ahead (so make on Wednesday to serve on Saturday). If you have leftovers they will be ok for a total of 5 days from when they were made but the texture won’t be quite the same after 3 days. Hope this helps!
I want to make these for a friend who pays big money for mail order ones. Can I freeze topping on cheesecake and wasn’t sure what your directions were for sure, thank you.
Hi Lynda! We recommend freezing the assembled cheesecake jars. The cheesecake itself can be frozen, though – see recipe notes 🙂
I think these were a challenge once, but no matter I didn’t get a pic.
Anyway, if anyone is thinking about making them, do it. I took them to a Thanksgiving dinner yesterday. When a grown man is sitting next to you moaning and groaning and uttering YUMMY in between spoonfuls, then you know it was a hit. I just got a text from the Hostess with a picture of an empty jar.
I made some of the homemade strawberry sauce, but subbed blueberries and cherries for the strawberries. Also brought a small jar of sprinkles and one of mini-chocolate chips.
They look yumm.. i have a ques. How long can we keep them on the cake table? Wont they like bit melted? Can they b on the table for 2-3 hrs if no one eats them before and hav them after dinner? I am confused whether they will be ok or not. Please help. My daughter’s party is in 2 days.
Hi Shalini, the cheesecake jars should be fine on the table for a few hours. Keep them in the refrigerator as long as you can before placing on the table for serving, and put them back in the refrigerator when you can. Hope they’re a hit!
Hello!
Could I turn these into eggnog cheesecake jars somehow?
can I mix blueberries into the cream filling?
I made these at the weekend and they were delicious, thanks! The raspberry one seemed to be a fave for all. Would it be possible to replace the heavy cream/cream cheese for quark?
Thanks for the great recipe! What is the secret for getting the cheesecake in the jar without touching the sides so that you get that beautiful, clean look?
Hi Renee, just slow and steady while filling the jars! Using two spoons helps as well. So glad you enjoyed the recipe!
I use one of those tiny spring loaded ice cream-type scoops. Mine is 2 Tablespoons and makes it super easy to drop cleanly into the jars!
Hey Renee! You know what I use to fill them? Large Piping bags! Works like A charm.:-)
I’m a cake baker and I do the same thing. It works so well.
Maybe put it in a piping bag and pipe it in.
Yes! Absolutely, I’ve been making jar cakes and cheese cakes for years. I always pipe whatever batter I’m using to keep jars clean!
You can also use a pastry piping bag and pipe the filling in