

This homemade soft multigrain bread is prepared with multigrain hot cereal mix, such as 5 grain, 7 grain or 10 grain cereal. Whole or quick oats are an excellent option, too. It’s soft and fluffy like regular white sandwich bread, but has a hearty and satisfying flavor. Either instant or active-dry yeast work and you can even turn this dough into multigrain rolls.
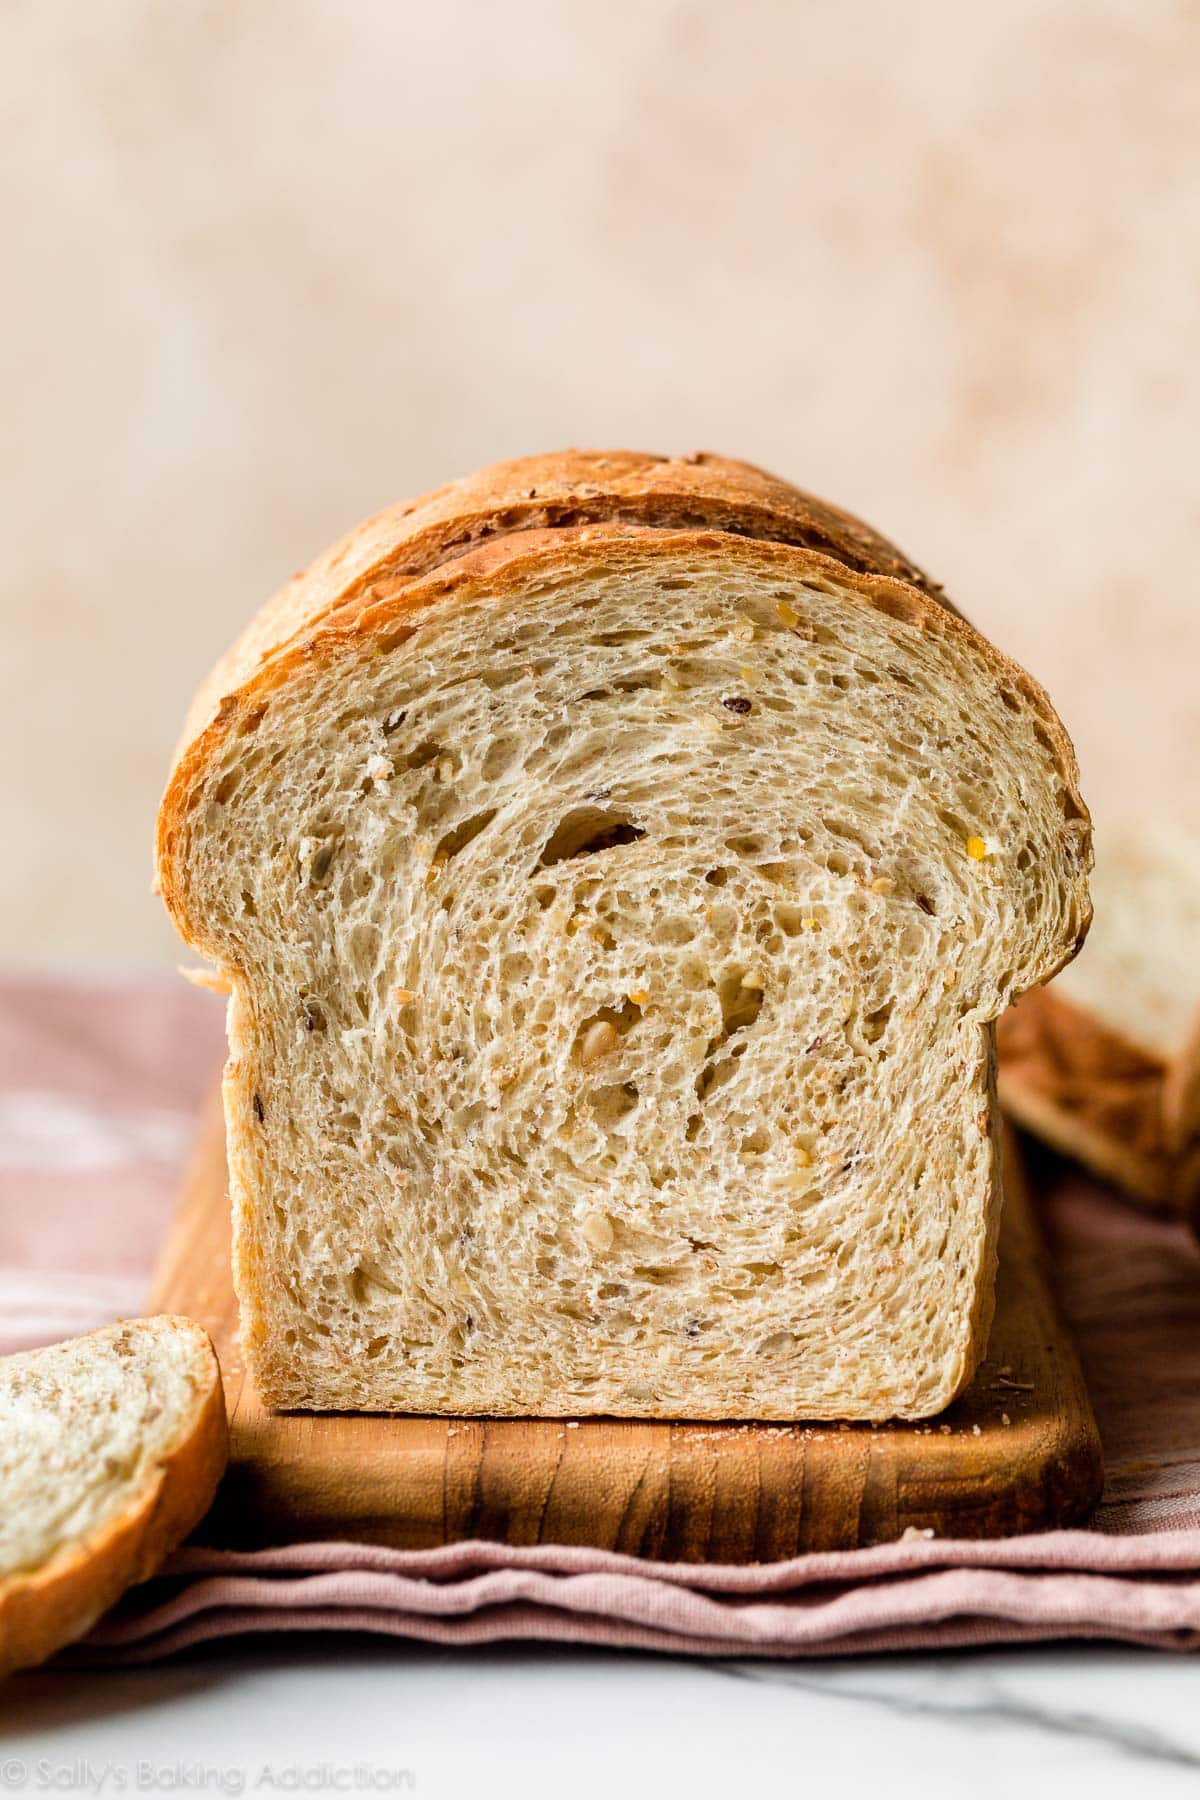
Learn to bake homemade bread. I’ve noticed that’s a common baking goal at the start of each year. Today I’m sharing a new homemade bread recipe, one I’ve been perfecting for months. Using my regular white sandwich bread as the starting point for this new variation, I finally mastered a multigrain bread that’s both soft and sturdy. If you love homemade bread and crave added texture, you’ll enjoy this multigrain loaf. Bonus: You can use this dough for homemade rolls, too!
One reader, Nancy, commented: “I make this recipe all the time. It’s my go-to sandwich bread. In fact, I have a loaf proofing right now on this rare rainy day. Super easy, so it’s a perfect bread for a beginner. Also a blank canvas for whatever you want to add. I bump up the protein and fiber with flax and chia. Give it a try. You won’t regret it. ★★★★★”
Soft Multigrain Bread Details
- Flavor: Slightly nutty with an earthy, satisfying flavor similar to whole wheat bread. A little brown sugar adds mild sweetness.
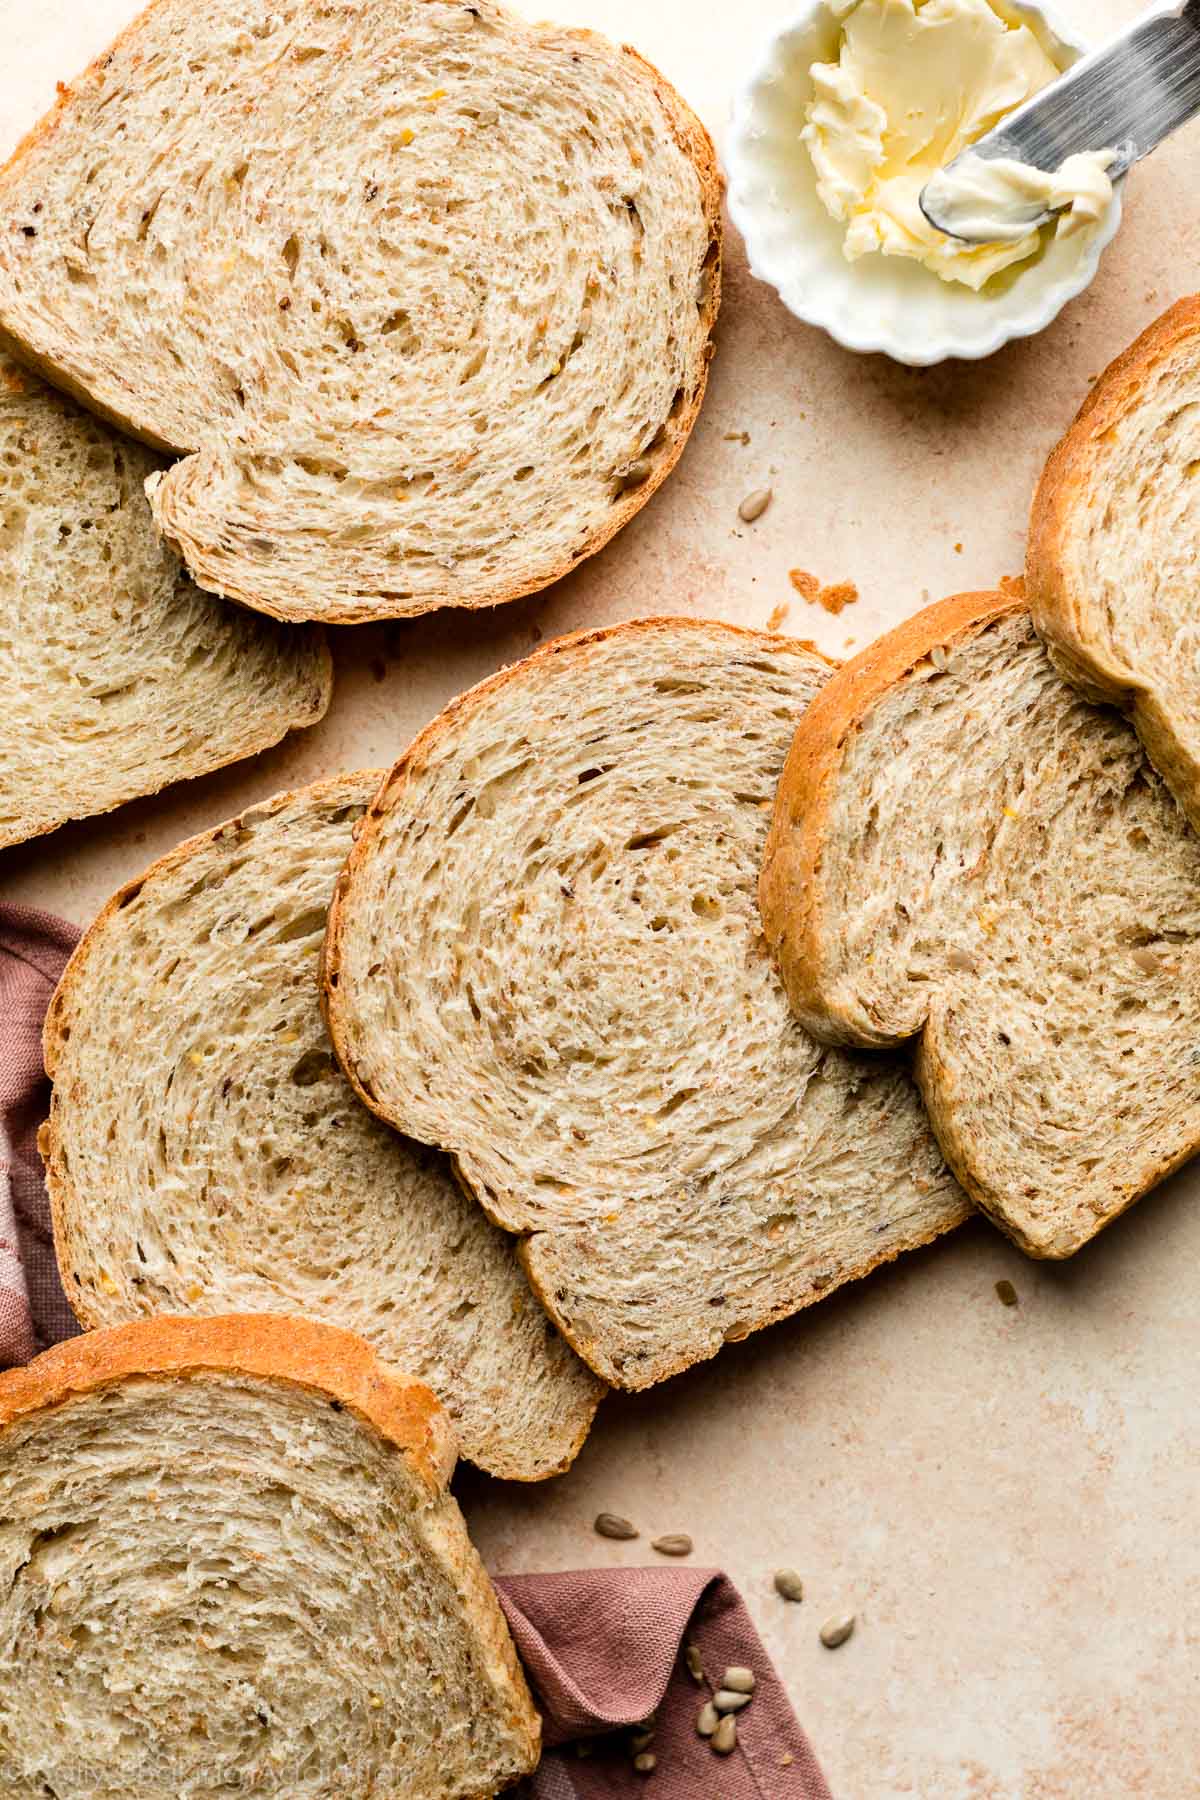
- Texture: This wholesome bread is wonderfully soft without being flimsy. It’s great for sandwiches, but perfectly satisfying plain or with a spread of butter.
- Ease: I categorize this as an intermediate baking recipe. The dough requires an extra step in the very beginning—soaking those grains in water. If you read the directions before starting, you’ll be set for success. Take your time and if you’re new to baking with yeast, review my Baking with Yeast Guide and How to Knead Dough posts first. Lots of helpful information there.
- Time: Between preparing the dough, both rises, and baking, set aside at least 4-5 hours to complete this recipe. But keep in mind that most of the time is hands off as the dough rises. You can even get started on the dough the night before.
If you love wholesome, hearty homemade bread like this, you’ll enjoy no knead honey oat bread and no knead seeded oat bread recipes too.
Video Tutorial: How to Make Soft Multigrain Bread
We need a careful blend & ratio of ingredients to produce a grain loaf that (1) rises tall, (2) maintains a soft fluffy texture, and (3) has legitimate structure for sturdy slices. The ingredients are practically the same as this sandwich bread, but we’re skipping the milk, using hot boiling water, adding grain cereal mix and seeds, slightly reducing the butter, and swapping regular sugar for brown sugar. Took lots of tweaking to perfect.
Key Ingredients You Need & Why
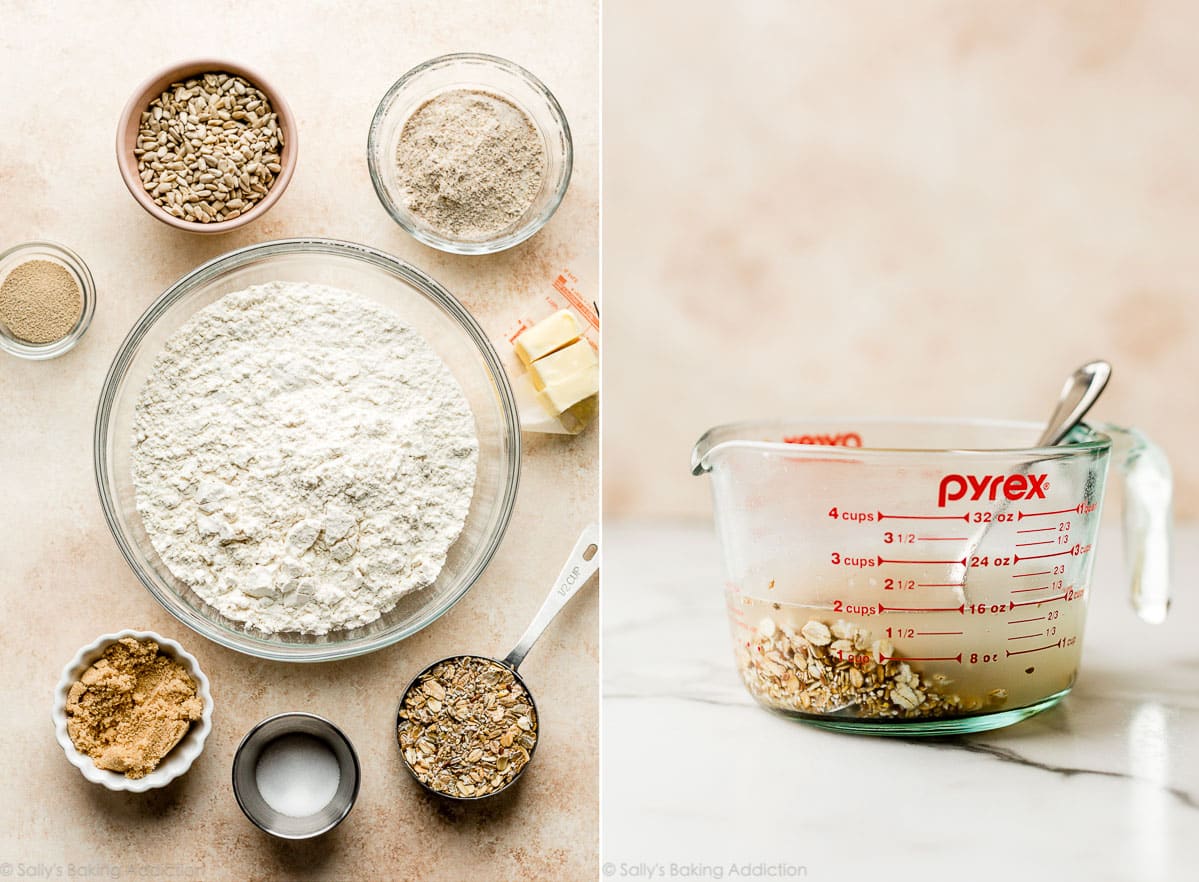
- Multigrain Hot Cereal Mix or Oats: If you read anything in this post, have it be this. This recipe starts with multigrain cereal, such as 5 grain, 7 grain or 10 grain cereal. You can also use whole or quick oats, but I do not recommend steel cut. There are many variations of hot cereal available in grocery stores—a multigrain version may include rye, barley, oats, whole wheat, and/or more. Honestly any grain cereal you mix with hot water works assuming there’s no flavors or sugars added (for example, don’t use brown sugar cinnamon oatmeal mix). If you can’t find any multigrain hot cereals at the store, you can purchase online—or just use plain oats. I really like this 7 grain + flax seed hot cereal. Multigrain baby cereal works too.
- Boiling Water: Just as you would make the hot cereal to eat, mix it with hot water. Use 1 and 3/4 cups (420ml) boiling water, then let the mixture cool until a digital thermometer reads about 110°F (43°C). This usually takes 20 minutes. If it’s too hot, the heat will kill the yeast.
- Brown Sugar: Sugar feeds the yeast, increases its activity, and tenderizes the dough. You can use regular white granulated sugar, but brown sugar was especially tasty in this loaf.
- Butter: To make a soft bread, you need fat in the dough. Butter promises a soft and flavorful loaf. 3 Tablespoons is plenty.
- Flour: If you have both bread flour and all-purpose flour on hand, I recommend using bread flour. All-purpose flour definitely works, but you get a sturdier and more bread-like texture from bread flour. I love using whole wheat flour when I can, but this dough is not fit for all whole wheat flour. In my recipe testing, I found that similar to homemade English muffins, replacing up to 1 cup of the bread/all-purpose flour with whole wheat flour worked just fine. The bread was a bit denser, but had great flavor. I usually make it with 3 cups of bread flour and 1/3 cup whole wheat flour. If you wish to use all whole wheat flour, follow my recipe for whole wheat bread instead.
Add-In Options
Add-ins are completely optional, but I encourage seeds and/or nuts for a little texture. I usually use sunflower seeds. Other options include chopped pecans or walnuts, pepitas, raisins, dried cranberries, or a blend of these. You could also throw in smaller seeds such as chia, flax, or sesame. See recipe note below before starting.
Step-by-Step Photos
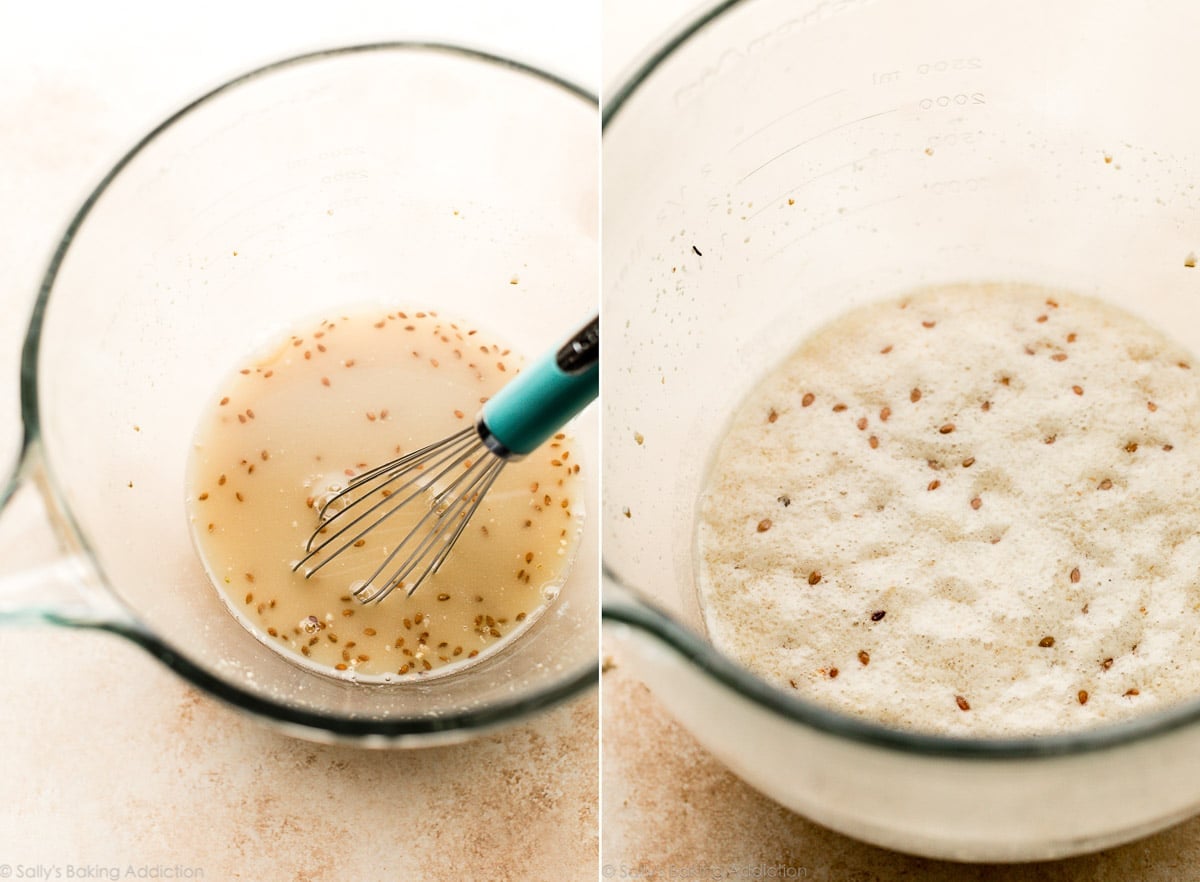
Soak the grain cereal in the boiling water, as pictured above.
Below left: After it cools down, whisk in the yeast and brown sugar. Below right: After 5-10 minutes, you’ll notice foam or bubbles on the surface. This means the yeast is active and ready. Note that the hot cereal that I use contains flax seeds so that’s what you’re seeing floating on top!
The dough will feel heavy. As instructed in the recipe below, knead it before letting it rise. If you’re new to bread-baking, my How to Knead Dough tutorial will be helpful here.
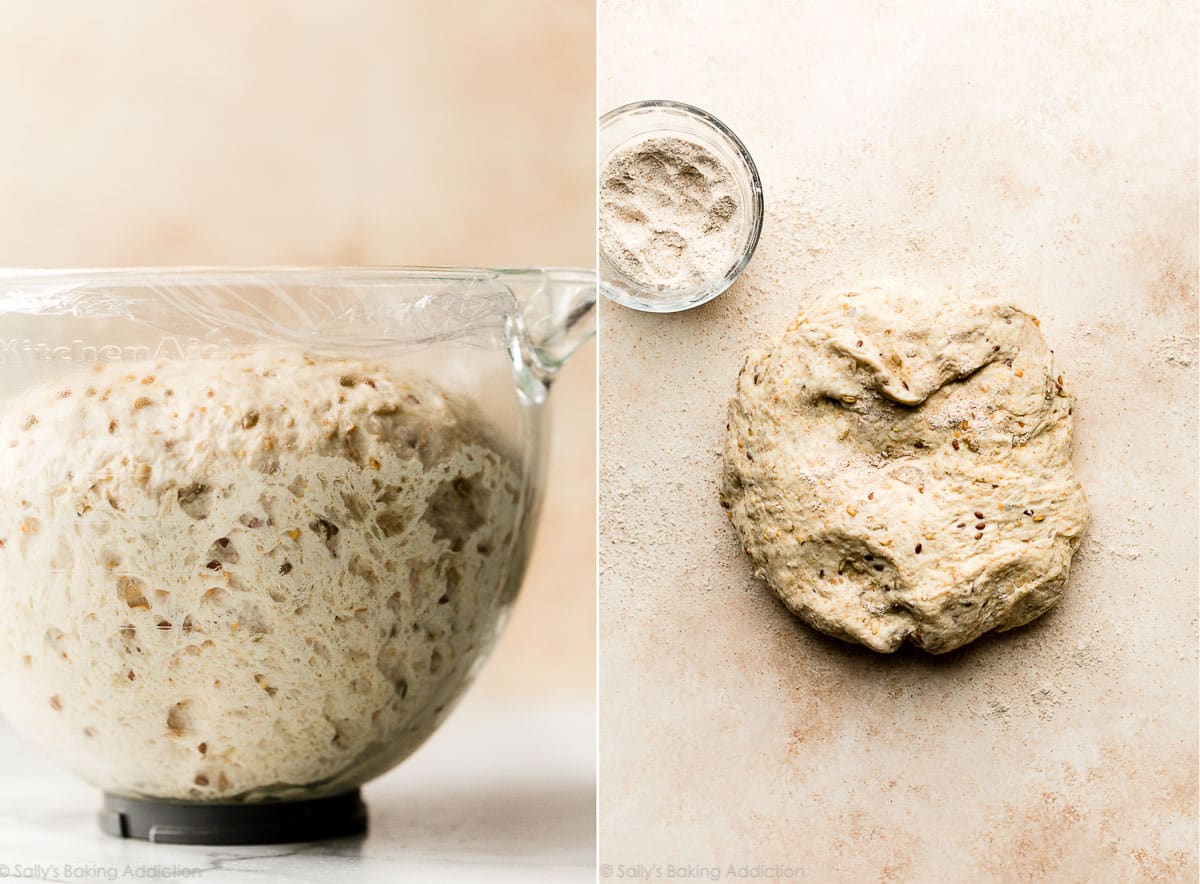
Below left: After you make and knead the dough, let it rise until doubled in size. Below right: Punch it down to release the air, then place on a lightly floured work surface.
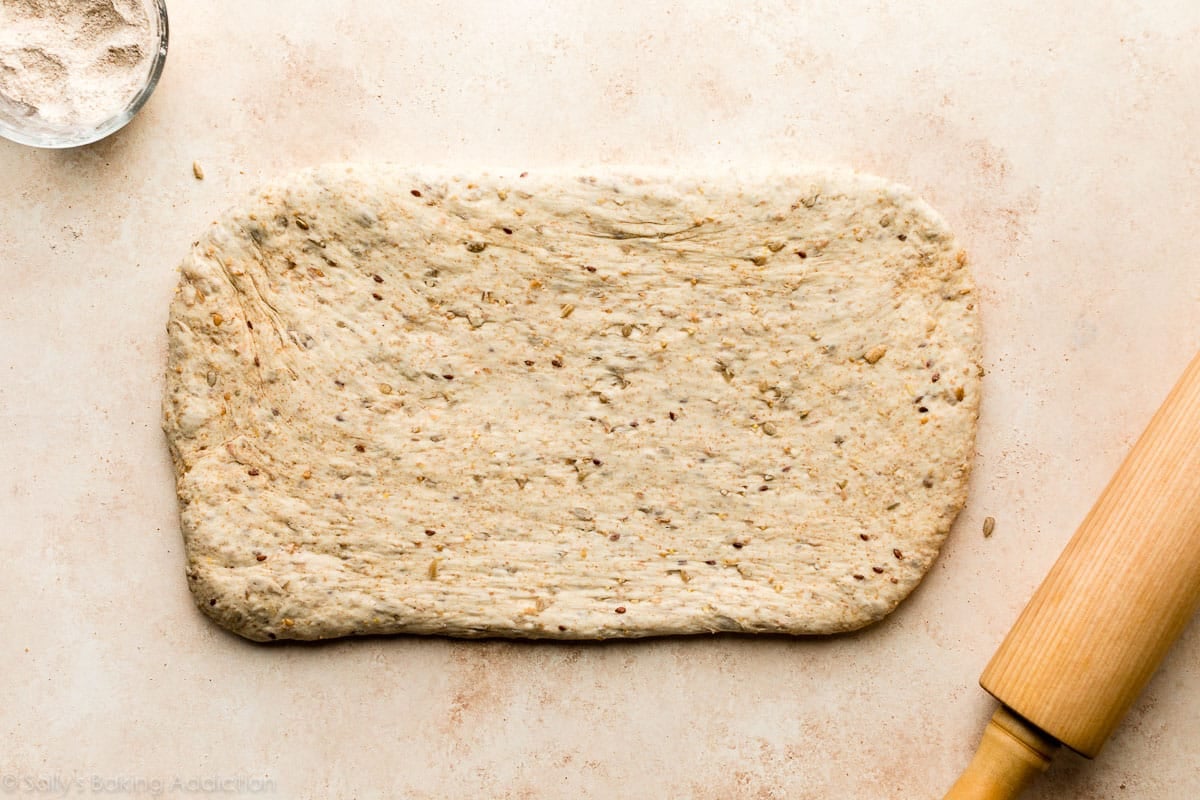
Roll it out into an 8×15-inch rectangle:
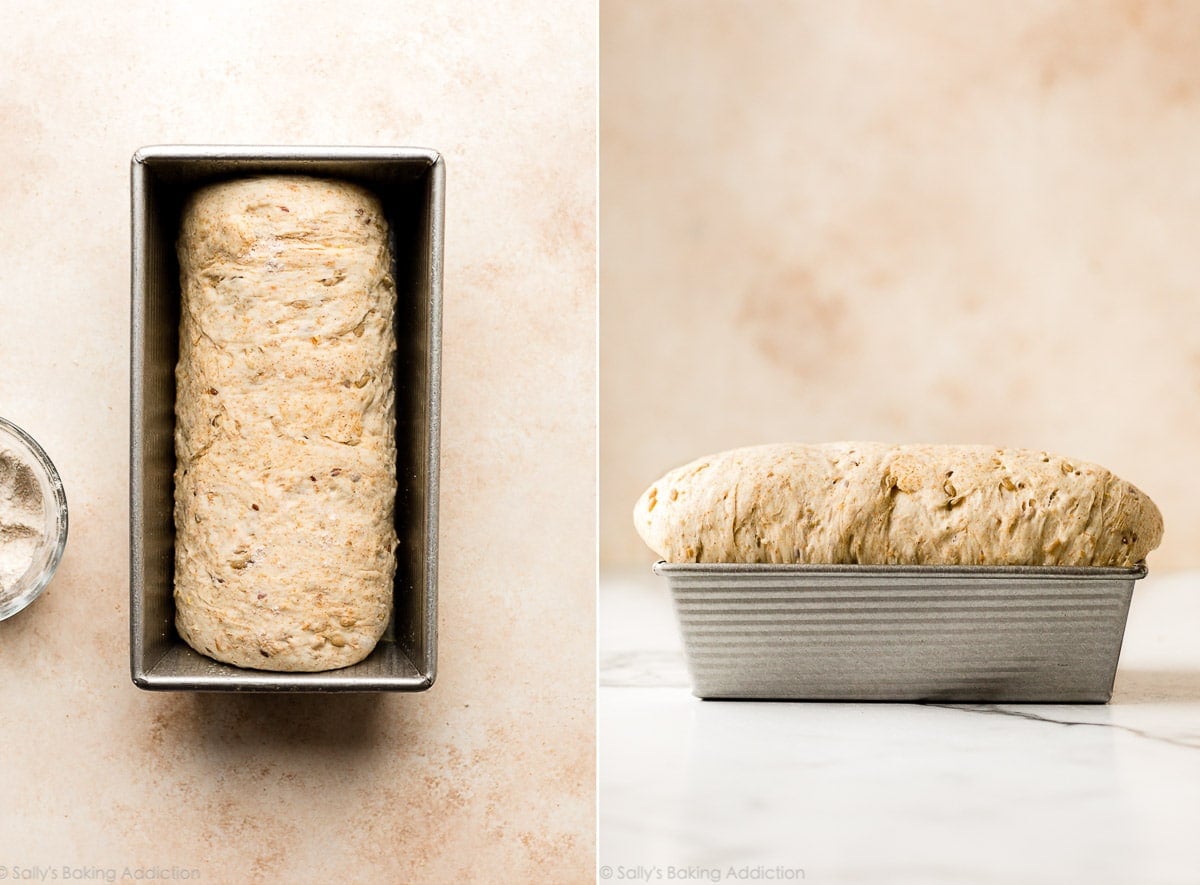
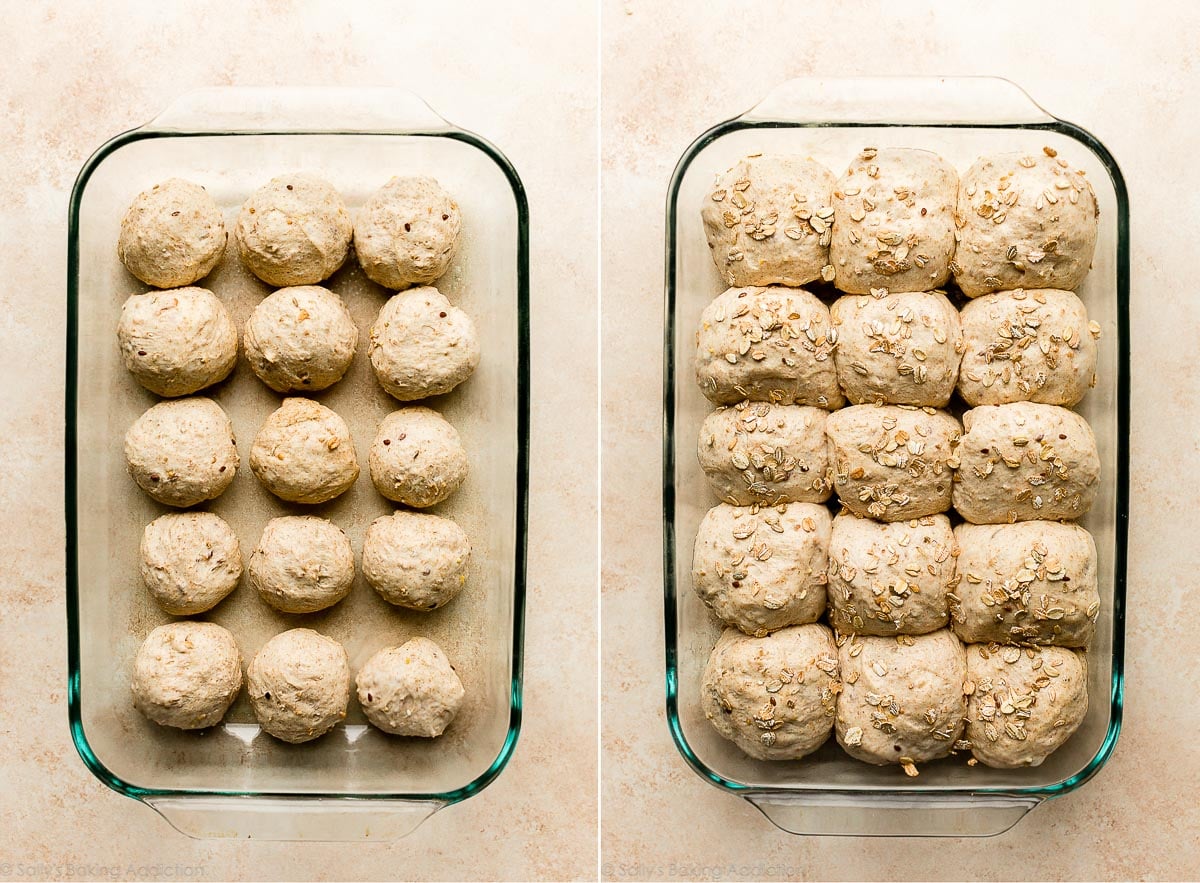
Below left: Roll it up tightly starting with the 8-inch side, so you have an 8-inch roll to fit into your 9×5 inch loaf pan. (Unlike cinnamon rolls where you roll up the dough starting with the larger side.) Below right: Let it rise until it’s 1-2 inches above the rim of the pan.
Look at this height!
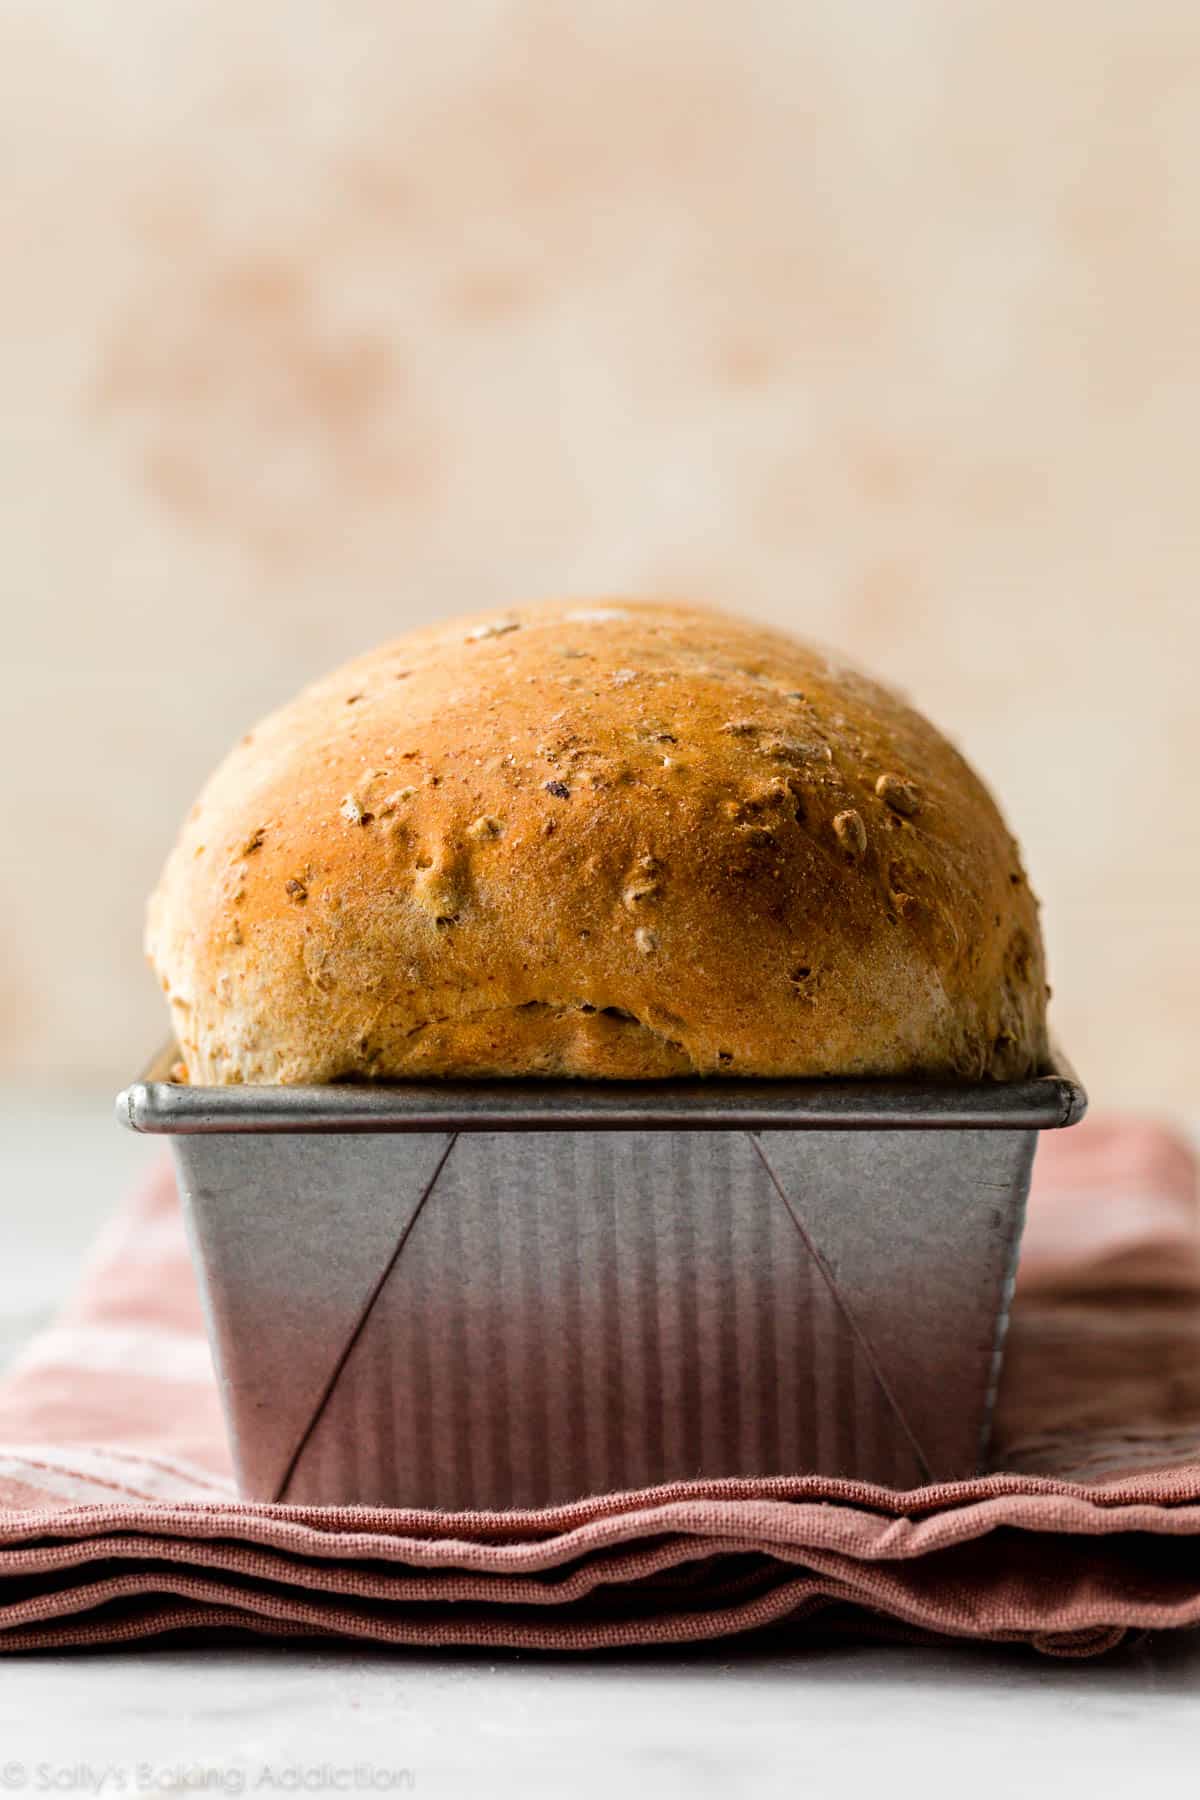
Bake until golden brown:
How do I test for doneness? Give the loaf a light tap. If it sounds hollow, it’s done. For a more accurate test, the bread is done when an instant read thermometer reads the center of the loaf as 195–200°F (90–93°C).
This multigrain bread is phenomenal when sliced and served warm. The exterior is crisp and crusty while cloaking a hearty, yet fluffy crumb inside. The whole slice is just so, so satisfying and cozy. And it’s fabulous with homemade honey butter. This is definitely a homemade bread to try!
If you happen to have any leftovers, day old bread is perfect for soaking up flavors in an easy breakfast casserole.
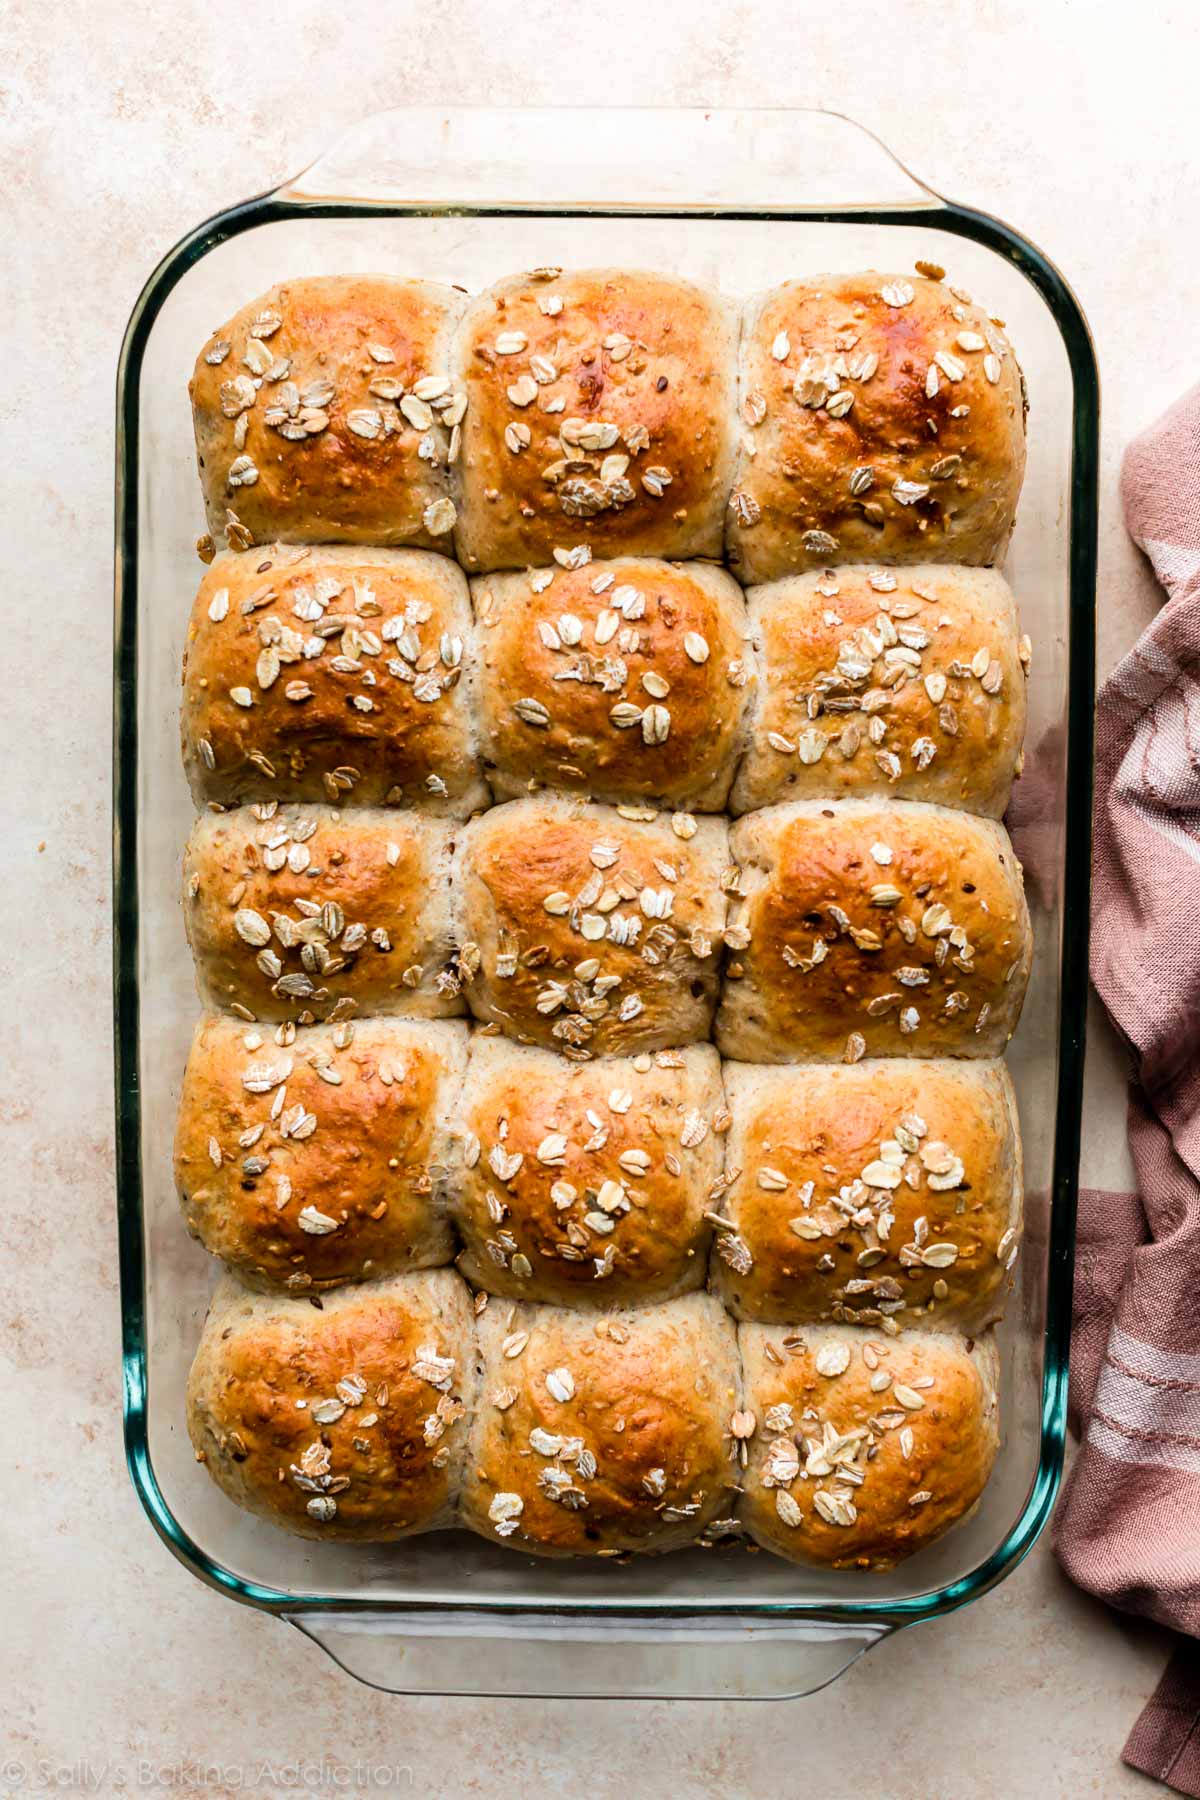
Can I Make This Into Rolls?
I thought you’d ask! I tested this dough to make multigrain rolls and it worked wonderfully. Not quite as soft as regular dinner rolls and not quite as heavy as whole wheat dinner rolls. I will say that I preferred the multigrain sandwich bread because it had a little more texture from the crust. Served warm with a pat of butter, however, the rolls were fantastic. See recipe note for instructions. Though I haven’t tested it, I imagine you could use this dough to make 3-4 bread bowls, too.
Multigrain AND multipurpose!
More Yeast Bread Recipes
Browse all of my yeast bread recipes.
Print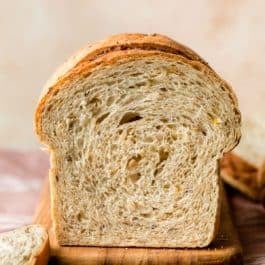
Soft Multigrain Bread
- Prep Time: 3 hours, 40 minutes
- Cook Time: 34 minutes
- Total Time: 4 hours, 15 minutes
- Yield: 1 loaf
- Category: Bread
- Method: Baking
- Cuisine: American
Description
This is wholesome multigrain bread with an irresistibly soft and fluffy interior. For best success, take the time to review the recipe notes before starting. Though not required, an instant read thermometer is helpful in a few of these steps.
Ingredients
- 1/2 cup (60g) dry multigrain cereal mix or old-fashioned whole rolled oats (see note)
- 1 and 3/4 cups (410ml) boiling water
- 2 and 1/4 teaspoons (7g) instant or active dry yeast (1 standard packet)
- 3 Tablespoons (37g) packed light or dark brown sugar
- 3 Tablespoons (43g) unsalted butter, softened to room temperature
- 1 and 1/2 teaspoons salt
- 3 and 1/3 cups (433g) bread flour (spooned and leveled), plus more as needed and for hands/work surface
- optional: 1/2 cup (60g) sunflower seeds, chopped nuts, pepitas, raisins, or dried cranberries
Instructions
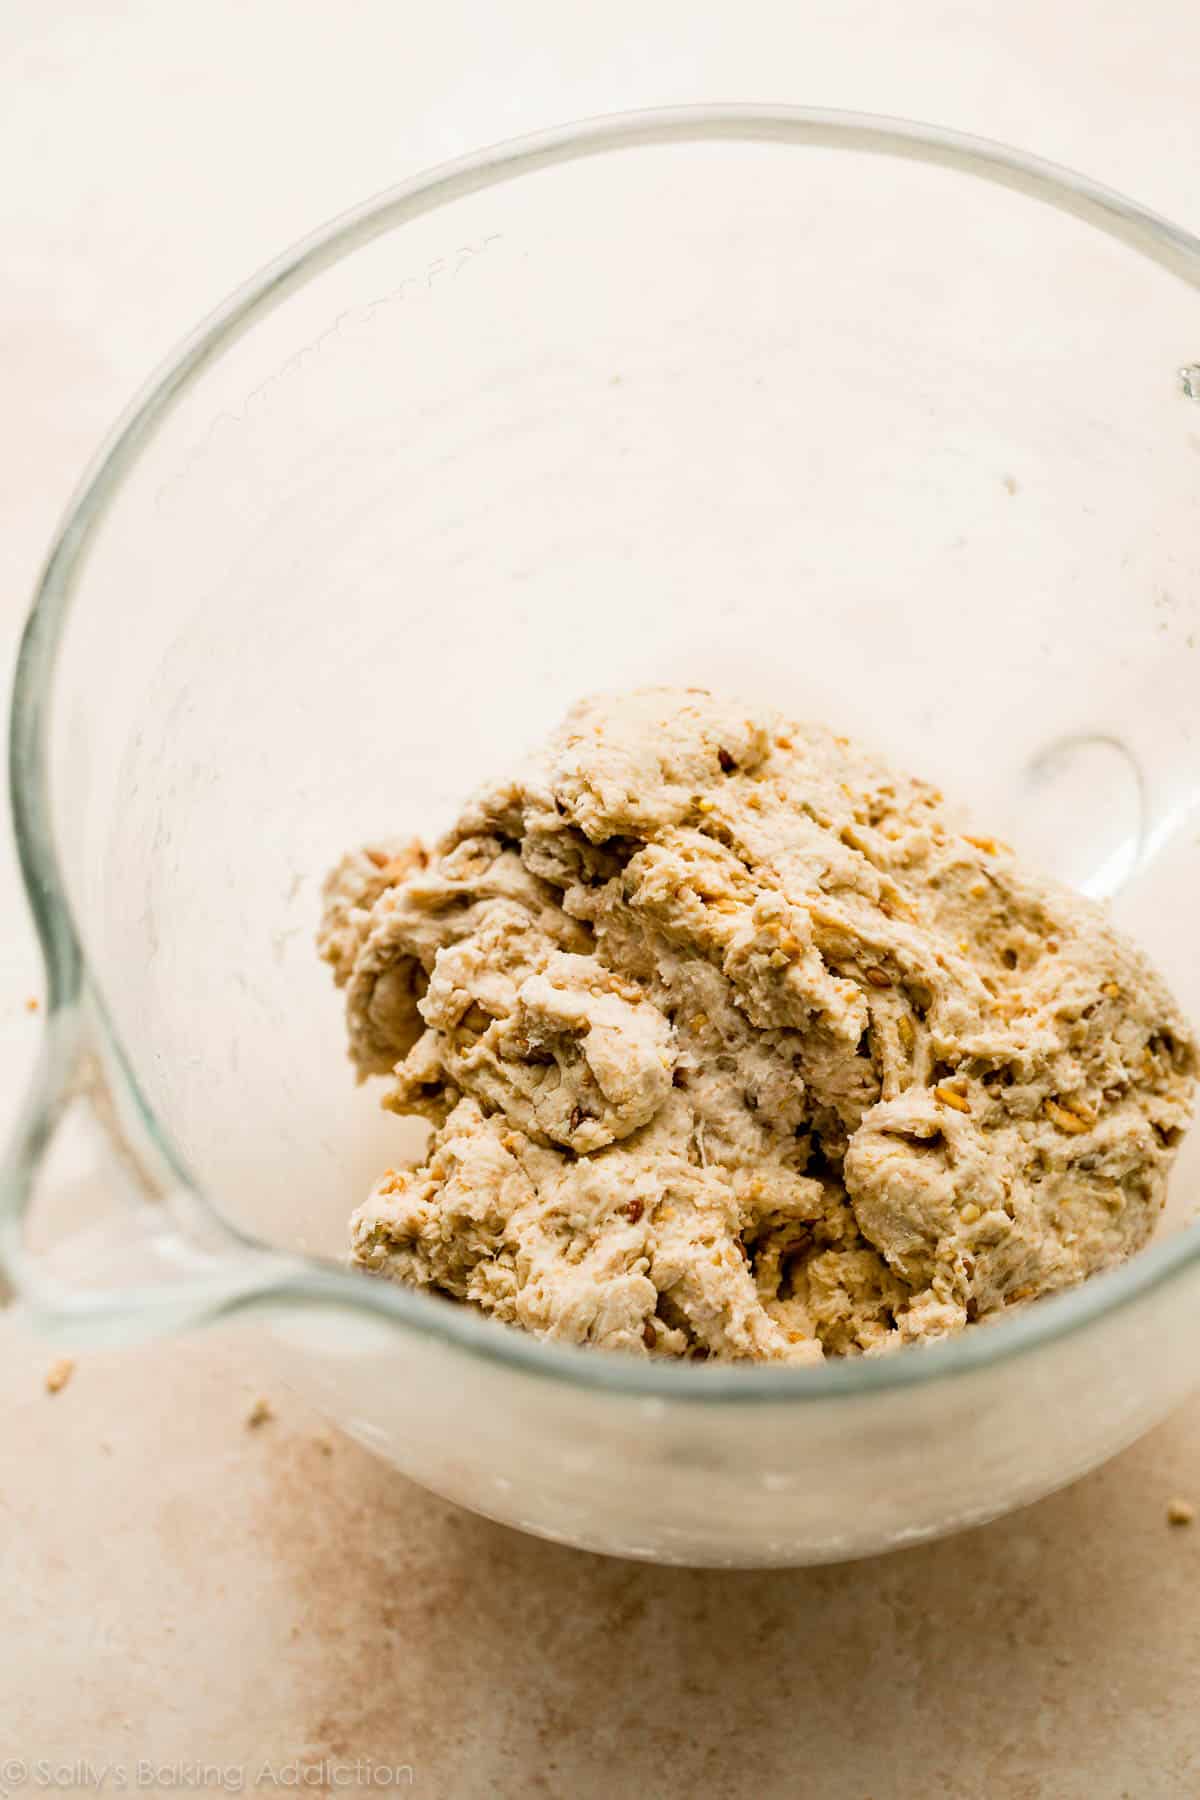
- Prepare the dough: Place cereal mix in a large heatproof bowl (you can also use the bowl of your stand mixer). Pour boiling water on top. Let the mixture cool until a digital thermometer reads about 110°F (43°C). This usually takes 20 minutes. Pay attention to the temperature because if it’s too hot, it will kill the yeast. If it became too cool, however, it’s not a problem—the dough may just take a few extra minutes to rise.
- Whisk the yeast, sugar, and all of the warm water/cereal mixture in the bowl of your stand mixer fitted with a dough hook or paddle attachment. Cover and allow to sit for 5-10 minutes or until foamy and bubbly on the surface.
- Add the butter, salt, and 1 cup (about 130g) flour. Beat on low speed for 30 seconds, scrape down the sides of the bowl with a silicone spatula, then add another cup of flour. Beat on medium speed until relatively incorporated (there may still be chunks of butter). Add all of the remaining flour and the seeds/nuts (if using), then beat on medium speed until the dough comes together and pulls away from the sides of the bowl, about 2 minutes. If it seems too sticky, add more flour, 1 Tablespoon at a time until it begins to pull away from the sides of the bowl. *If you do not own a mixer, you can mix this dough with a large wooden spoon or silicone spatula. It will take a bit of arm muscle!*
- Knead the dough: Keep the dough in the mixer and beat for an additional 3-5 full minutes, or knead by hand on a lightly floured surface for 3-5 full minutes. (If you’re new to bread-baking, my How to Knead Dough video tutorial can help here.) If the dough becomes too sticky during the kneading process, sprinkle 1 teaspoon of flour at a time on the dough or on the work surface/in the bowl to make a soft, slightly tacky dough. Do not add more flour than you need because you do not want a dry dough. After kneading, the dough should still feel a little soft. Poke it with your finger—if it slowly bounces back, your dough is ready to rise. You can also do a “windowpane test” to see if your dough has been kneaded long enough: tear off a small (roughly golfball-size) piece of dough and gently stretch it out until it’s thin enough for light to pass through it. Hold it up to a window or light. Does light pass through the stretched dough without the dough tearing first? If so, your dough has been kneaded long enough and is ready to rise. If not, keep kneading until it passes the windowpane test.
- 1st Rise: Lightly grease a large bowl with olive oil or nonstick spray. Place the dough in the bowl, turning it to coat all sides in the oil. Cover the bowl with aluminum foil, plastic wrap, or a clean kitchen towel. Allow the dough to rise in a relatively warm environment for 1-2 hours or until double in size. (I always let it rise on the counter. Takes about 2 hours. For a tiny reduction in rise time, see my answer to Where Should Dough Rise? in my Baking with Yeast Guide.)
- Grease a 9×5-inch loaf pan.
- Shape the bread: When the dough is ready, punch it down to release the air. Lightly flour a work surface, your hands, and a rolling pin. Roll the dough out into a large rectangle, about 8×15 inches. It does not have to be perfect– in fact, it will probably be rounded on the edges. That’s ok! Roll it up into an 8 inch log and place in the prepared loaf pan.
- 2nd Rise: Cover shaped loaf with aluminum foil, plastic wrap, or a clean kitchen towel. Allow to rise until it’s about 1-2 inches above the top of the loaf pan, about 1 hour. (See photo above for a visual.)
- Adjust oven rack to a lower position and preheat oven to 350°F (177°C). (It’s best to bake the bread towards the bottom of the oven so the top doesn’t burn.)
- Bake the bread: Bake for 35-40 minutes– if you notice the top browning too quickly during bake time, loosely tent the pan with aluminum foil. How to test for doneness– give the loaf a light tap. If it sounds hollow, it’s done. For a more accurate test, the bread is done when an instant read thermometer reads the center of the loaf as 195°F-200°F (90°C-93°C).
- Remove from the oven and allow bread to cool for a few minutes before slicing and serving. Feel free to let it cool completely before slicing, too.
- Cover leftover bread tightly and store at room temperature for 2-3 days or in the refrigerator for up to 10 days.
Notes
- Freezing Instructions: This dough isn’t ideal for freezing. The dough has a hard time rising after thawing. Instead, try the overnight instructions (next) or freeze the baked loaf. To freeze the baked loaf, allow the bread to cool completely, then freeze for up to 3 months. Thaw in the refrigerator or at room temperature, then reheat as desired.
- Overnight Instructions: Prepare the recipe through step 7. Lightly cover the shaped bread and refrigerate for up to about 15 hours. At least 2 hours before you need the bread the next day, remove from the refrigerator, keep covered, and allow to rise on the counter for about 1 hour before baking. Alternatively, you can let the dough have its 1st rise in the refrigerator overnight. Cover the dough tightly and place in the refrigerator for up to 12 hours. Remove from the refrigerator and allow the dough to fully rise for 2 more hours. Continue with step 6.
- Special Tools (affiliate links): Electric Stand Mixer | 9×5-inch Loaf Pan | Rolling Pin | 7 Grain Hot Cereal
- Grain Cereal: Use dry multigrain cereal that you would use to make hot cereal, such as 5 grain, 7 grain, or 10 grain cereal. You can also use quick or whole oats, but I do not recommend steel cut oats. There are many variations of hot cereal available in grocery stores– a multigrain version may include rye, barley, oats, whole wheat, and/or more. Honestly any grain cereal you mix with hot water works assuming there’s no flavors or sugars added (for example, don’t use brown sugar cinnamon oatmeal mix). If you can’t find any multigrain hot cereals at the store, you can purchase online– or just use plain oats. I really like this 7 grain + flax seed hot cereal. Multigrain baby cereal works too.
- Yeast: You can use active-dry or instant yeast. The instructions are the same no matter which you use.
- Flours: If you have both bread flour and all-purpose flour on hand, I recommend using bread flour. All-purpose flour definitely works, but you get a sturdier and more bread-like texture from bread flour. I love using whole wheat flour when I can, but this dough is not fit for all whole wheat flour. In my recipe testing, I found that replacing up to 1 cup (around 130g) of the bread/all-purpose flour with whole wheat flour worked just fine. The bread was a bit denser, but had great flavor. I usually make it with 3 cups of bread flour and 1/3 cup whole wheat flour.
- Seeds/Add-Ins: The pictured loaf was prepared with 1/2 cup (60g) of sunflower seeds. I love extra flavor and texture, so I’ve been increasing that amount to 2/3 cup (80g). Use any of the suggested add-ins like sunflower seeds, pecans, walnuts, pepitas, raisins, dried cranberries, or a blend of these. If you want to use smaller seeds, such as poppy, chia, flax, or sesame, I recommend reducing the amount to 2 or 3 Tablespoons. You could, however, blend these smaller seeds with larger seeds/nuts/dried fruit for a total of 1/2 or 2/3 cup (60 or 80g).
- Multigrain rolls: Make the dough as written above through the first rise (steps 1-5), then follow steps 5-10 in my dinner rolls recipe. Bake time is 25-26 minutes.
- If You Want to Top with Oats or Seeds: If you want to top the dough with oats or seeds prior to baking, carefully brush the dough after the 2nd rise (step 8) with 1 egg white beaten with 1 Tbsp water, then sprinkle 2 Tbsp of oats or seeds on top. Neither will stick without the egg white brushed on first. I did this with the pictured rolls.
- Doubling this recipe: For best results, I recommend making two separate batches of dough. However, if you want to double the recipe all in 1 mixing bowl, double all of the ingredients except for the yeast. Use 2 and 1/4 teaspoons yeast. This amount of dough may overwhelm your stand mixer, so I recommend mixing the dough with a large wooden spoon or silicone spatula instead. It will take a bit of arm muscle.


Reader Comments and Reviews
I love this recipe! I think I just need to perfect my doneness test, my first try it was still a little doughy/wet. I will always bake my own bread from now on! I do feel as if I’m “cheating”, since I bought my Kitchenaid stand mixer just for all your recipes!
Hi, I have a question
Why do you smell and fell the yeast strongly couple days after baking.
Should I keep refrigerated
Sincerely
Gabor
Hi Gabor, warm temperatures can accelerate the fermentation of the yeast, which may be why your bread seems yeasty after a few days. For this particular bread, you can cover leftover bread tightly and store at room temperature for 2-3 days or in the refrigerator for up to 10 days.
How do we find the nutrional values, ie; carbs, protein, etc
Hi Nora, We don’t usually include nutrition information as it can vary between different brands of the same ingredients. Plus, many recipes have ingredient substitutions or optional ingredients listed. However, there are many handy online calculators where you can plug in and customize your exact ingredients/brands. Readers have found this one especially helpful: https://www.verywellfit.com/recipe-nutrition-analyzer-4157076
I made a loaf of this bread yesterday and it turned out perfectly. I only had the Trader Joe’s rolled oats and ancient grains and it worked quite well. I didn’t experience a super wet dough nor a loaf that was too large for the pan. I did not replace any of the flour with whole wheat but I will try that for the next loaf. Thank you for a fabulous, easy to follow recipe!
I love this bread! Made it several times with a couple different grain mixes from the bulk section of our grocery store and they’re all good. I can make a double batch in my mixer without an overload, so I do! Usually let the large loaves cool, cut them in half and put them into extra large freezer bags for the next 2 weeks. They thaw well and have kept well on the counter until we use them up! Thanks for a great, and apparently foolproof, recipe.
One caution, don’t get in a hurry waiting for the mush to cool so you don’t kill your yeast– that stuff holds heat! I will give it a few stirs with the mixer and then actually use my thermometer to double check!
Hi, I’m new to making bread. We had a 9-grain wheat bread at brunch and I was inspired to try something new. I’ve heard of cast iron, dutch ovens, and pizza stones being used for bread. Is that an option with this recipe? I’m not necessarily trying to make a sandwich loaf. Thanks for any guidance.
Hi K.B. We fear the bread would not hold its shape without a loaf pan. Here are a few other bread recipes using a Dutch oven, if you’re interested: Artisan Bread, Jalapeno Cheddar Bread, No Knead Seeded Oat Bread, and Easy Olive Bread.
Love your recipes, I have to try it.
Thanks,
Great loaf of bread. The dough was a little wet. Not sure if it’s because I scoop the flour into the measuring cup. I ended up adding about 1/3 cup more flour. I don’t use a mixer because I prefer to knead by hand. I am
So pleased with this loaf I’m going to try the soft white bread recipe.
Hi Sally… Could I use honey or maple syrup instead of light/ dark brown sugar?? And if so would it still be 3 tablespoons? Thankyou
Hi Vanessa, you can use maple syrup, we would use 2-3 Tbs.
Have made this twice and it our favourite. PLUS it always rises up WAY high (and quickly for me) so I will continue making it. Thanks so much Sally for this great recipe. Every recipe I have tried of your is amazing. I just hope I live long enough to try them all!!
Can you make this bread in a bread machine. This is the best bread I have ever made but want to know if you can do it in a bread machine.
Hi Joni, we have not tested this recipe in a bread machine, but several readers have reported success doing so. Let us know if you try it!
I make this recipe all the time. It’s my go to sandwich bread. In fact, I have a loaf proofing right now on this rare rainy day in So Cal. Super easy, so it’s a perfect bread for a beginner. Also a blank canvas for whatever you want to add. I bump up the protein and fiber with flax and chia. Give it a try; you won’t regret it.
This bread is so good! I make it frequently, and it’s the only sandwich bread I use.
I usually place the dough for the first rise in the fridge overnight. This time, I decided to make the loaf, set it in the pan, and let it rise in the fridge. However, your instructions say to cover it tight. I did that, but it impeded the rise of the dough. I let it sit out for the recommended time, but it only rose a tiny bit. It did rise while baking, but it was a somewhat denser loaf (still delicious).
Should I have covered it so tightly? If so, any idea why this one was more dense?
Hi Sheila, it’s likely tasting denser because it couldn’t rise as much. If you try the recipe again, see if you can lightly cover it instead.
Incredible. My first time making a sandwich loaf and it turned out amazing. I did use regular flour and had to add a bit more than the recipe called for but it is such a light, fluffy and hearty bread. I can’t go back to grocery store bread now, wow! Thank you for sharing this recipe!
I am so happy I found this recipe. I declared 2025 the year I finally make a decent loaf of bread. I’ve tried several whole wheat versions that taste delicious but are heavy as a brick. This loaf is absolutely perfect for toast and sandwiches. I used the 7-grain mix and added in sunflower seeds. I love it so much I showed off my sandwich on a group hike yesterday so I could brag about the bread! Thanks
Gal I must say this is THE BEST loaf I have ever made. Great rise and lovely texture! I took the liberty of adding some cooked wheat berries for additional texture. Thanks for your consistency and great recipes and tips!
I would so very much like to try adding cooked wheat berries to bread. I would be grateful if you could post the amount of wheat berries that you added and if you made any other changes in recipe to accommodate the addition of wheat berries. Thank you!
I used oats and toasted pecans. The bread was attractive and delicious. I will make again.
Using your recommendations, I used some whole wheat flour and added seeds. This is the best loaf of bread I’ve ever made! Thanks, Sally!
I never thought I’d say anything like this but I MUST share that in 50+ years of baking almost anything you can bake, I’ve not ever experienced a source like yours. Everything I’ve made using your guidance has been fantastic! Exactly as described. I use your recipes exactly, and they’ve never failed to provide great successes! Thank you!
Thank you so much for making and trusting our recipes, Diane! We’re so happy to read this.
I love this recipe but the loaf it makes is HUGE. I’ve made it three times, first time in the bread machine was fine but the slices were so big they didn’t fit in the toaster. The second time I used a 9-inch Pullman pan, it overflowed and made a mess in the oven. I just tried it in a 13-inch Pullman pan (the biggest size) and it overflowed into the oven. I followed the recipe exactly and only let the second rise go for 1/2 hour. Do you have any suggestions?
Hi Kitzie! Have you baked the bread in a 9×5 loaf pan? That’s what we use and recommend.
I made one and a half recipes and used two 9 X 5 pans. They were perfect size loaves. The conversion was a bit awkward so it is best to use a scale and weigh the ingredients. Mine used 500g of bread flour and 150g whole wheat flour. Nuts and poppyseeds made it really tasty. It was nice soft bread!
The bread turned out delicious! Do you have the nutritional information you could share?
Hi Lauren, We don’t usually include nutrition information as it can vary between different brands of the same ingredients. Plus, many recipes have ingredient substitutions or optional ingredients listed. However, there are many handy online calculators where you can plug in and customize your exact ingredients/brands. Readers have found this one especially helpful: https://www.verywellfit.com/recipe-nutrition-analyzer-4157076
Trying this one out for the first time. Does it still require a double rise or can ya cut one out if using quick rise (like you can with quick rise recipes)?
Hi Cole, we recommend following the recipe as written with two rises.
This is by far the best sandwich bread recipe I’ve ever made. Delicious and so easy. And best of all, it’s so similar to my favorite farmers market loaf I can save myself a trip most weekends!
I want to try this recipe it have a question: can I use it in the bread machine?
Hi Zora, we haven’t tested it ourselves, but many readers have reported success using this recipe with a bread machine. Let us know if you try it!
I made this for the second time (it’s been a while since the last time) and I can tell my bread skills are improving! It rose beautifully during each rise, and the structure was just right! This bread is so good fresh, and also delicious the next several days (if it lasts that long) toasted with butter (and honey) or peanut butter. Thank you for teaching me how to use yeast!
Been making this bread weekly! The family loves it. Have used Bob’s Red Mill 10 grain hot cereal, or the 5 grain, and adding finely chopped pecans. Following the recipe, it’s turned out perfectly delicious every single time. In the past, I added too much flour, but Sally said it would be tacky and that’s the secret to perfection- don’t over flour. Thank you.
Can you make this using whole wheat flour. What adjustment ie. sponge, kneading, etc.
Hi Rob, we find that whole wheat flour yields quite a dry/dense loaf. You could try adapting our whole wheat dinner rolls recipe into a loaf, but we haven’t tested that. Let us know if you do!
Rob, You may or may not have already attempted. If not, I thought that I would share… I frequently make this recipe with freshly ground whole grains and it makes a fantastic loaf. Whole grains absorb more fluid so either add a tad extra water or use a tad less flour. In my experience, this recipe handles substitutions really well and makes an incredible loaf of flavorful bread that stays soft for days! Fantastic recipe! Enjoy!!!
Weighed ingredients, followed recipe exactly, used recommended cereal mix even, but I had to add 6T extra flour and I still think my dough was too wet… as it was my first time making I was nervous to add more; will have to play around with this next time but definitely want to make again. Also thinking about doing an overnight rise to enhance yeasty flavor. Wondering if this recipe has been tested using regular (not instant) yeast …. any recommendations? Wondering if that would deepen flavors.
Hi Anna, there are overnight instructions in the recipe notes!
Just. Plain. WOW.
This recipe is VERY forgiving. I made some changes I won’t enumerate here b/c I am not a fan of those “I did X and Y and since I didn’t have A I added B” reviews. Just say my additions SHOULD have made this loaf denser and less soft. NOT the case. We have our new sandwich bread in my house
Recipe looks amazing. Can’t wait to try. My 15 year old son absolutely loves home
baked bread. My question – do you need to flour the pan after greasing, if using either metal or ceramic bread pans?
Hi Michelle, we’ve always just used a non-stick spray, like Pam, to grease our pans. Some bakers swear by other methods, though!
Michelle, Flouring the pan is not needed. I rub olive oil in my pans before adding the dough for the second rise. I’ve also used Pam. Either is fine. This recipe makes absolutely outstanding bread. I started making my own bread about a year and a half ago and I haven’t bought loaf bread in any of that time. Sometimes I try other recipes, but I always come back to this one.