

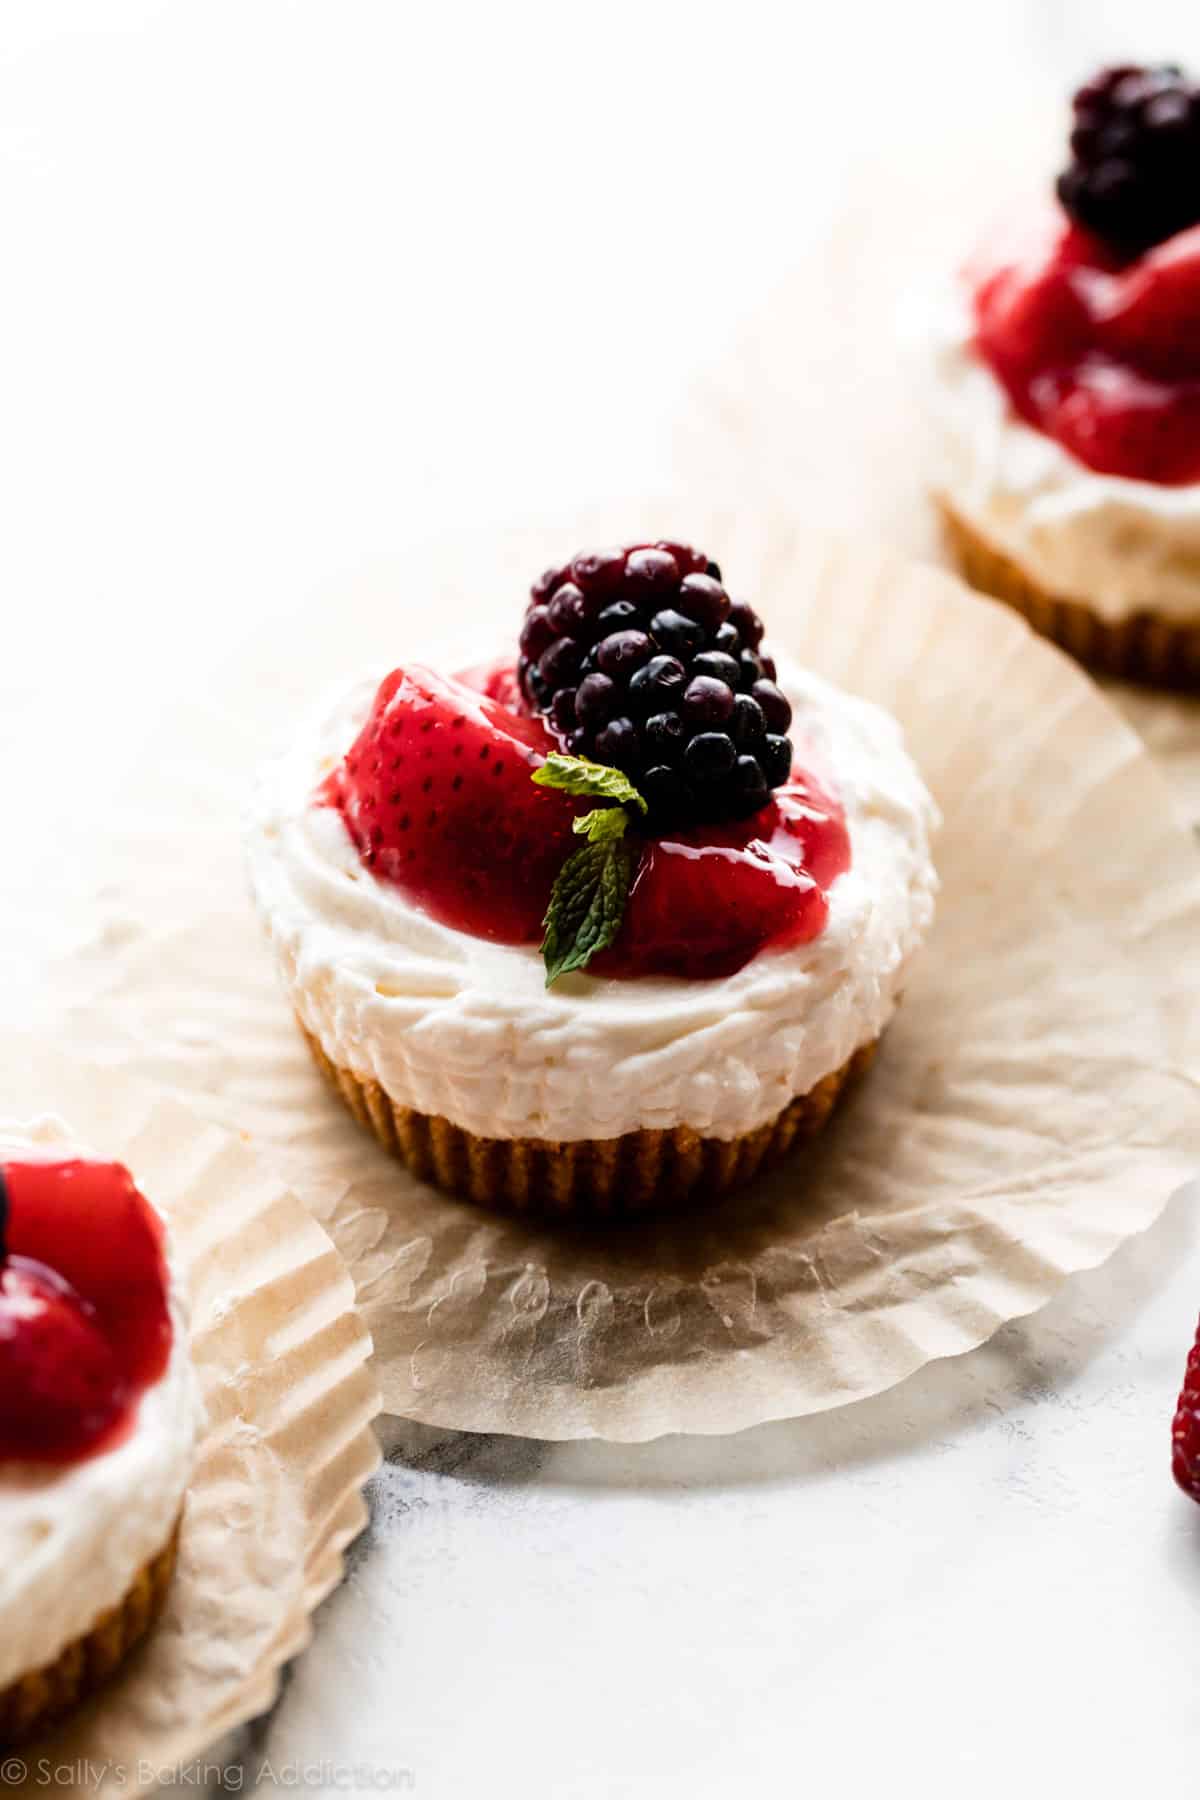
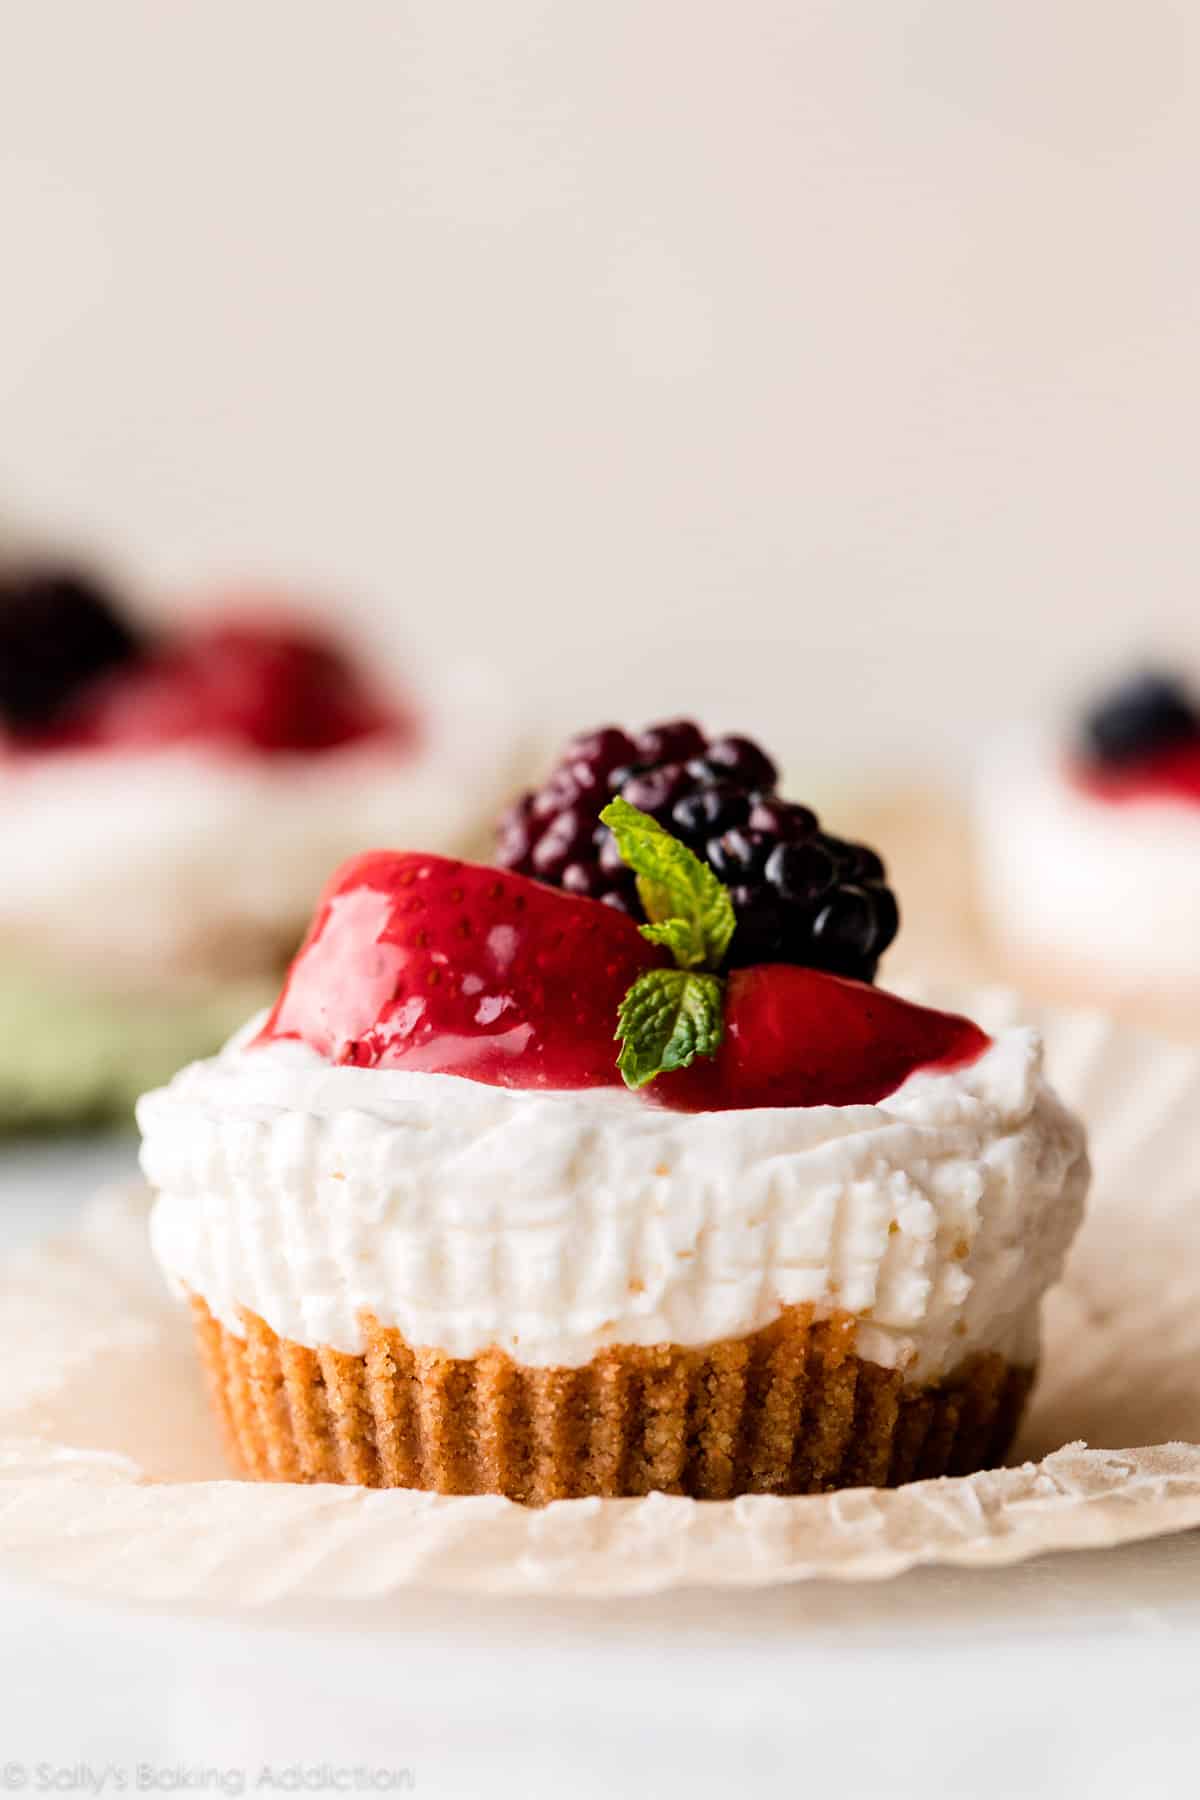
These mini no-bake cheesecakes are formed in a muffin pan. Using only a few basic and delicious ingredients, these tiny cheesecakes set up in the refrigerator instead of the oven. They’re extra creamy and lightly sweetened just like my regular no-bake cheesecake!
One reader, Jennifer, commented: “Such a great recipe. Quick and easy, but the results are delicious and decadent. This is one of those recipes that makes it seem like more work than it actually is. I made some chocolate ganache to go with them and it was the perfect touch. I bet lemon curd would also be incredible. ★★★★★“

So, What Are Mini No-Bake Cheesecakes?
No-bake cheesecake, no-bake pumpkin cheesecake, and even my no-bake cheesecake jars are exactly that: cheesecake without the oven. I like to compare the filling to cheesecake mousse. It has a light and airy texture because it’s made with homemade whipped cream. When spooned over a graham cracker crust and refrigerated, the eggless cheesecake filling sets up beautifully.
It’s pure dessert magic.
What it lacks in oven time, it makes up for in taste and texture:
- Thick, buttery, and crunchy graham cracker crust
- Light, creamy, and velvet-rich cheesecake filling
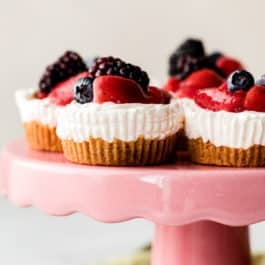
Though I already have a full no-bake cheesecake recipe on my website, sometimes I enjoy making it in individual muffin cups instead of a springform pan. And I figured you’d want to see how it’s done! These mini no-bake cheesecakes are simple, straightforward, and at only a few bites each, perfect for portion control.
Overview: How to Make Mini No-Bake Cheesecakes
- Make room in your refrigerator. Two muffin pans need to squeeze in there!
- Line two standard 12-count muffin pans with liners. Cupcake liners are key—you won’t be able to remove the cheesecakes without them.
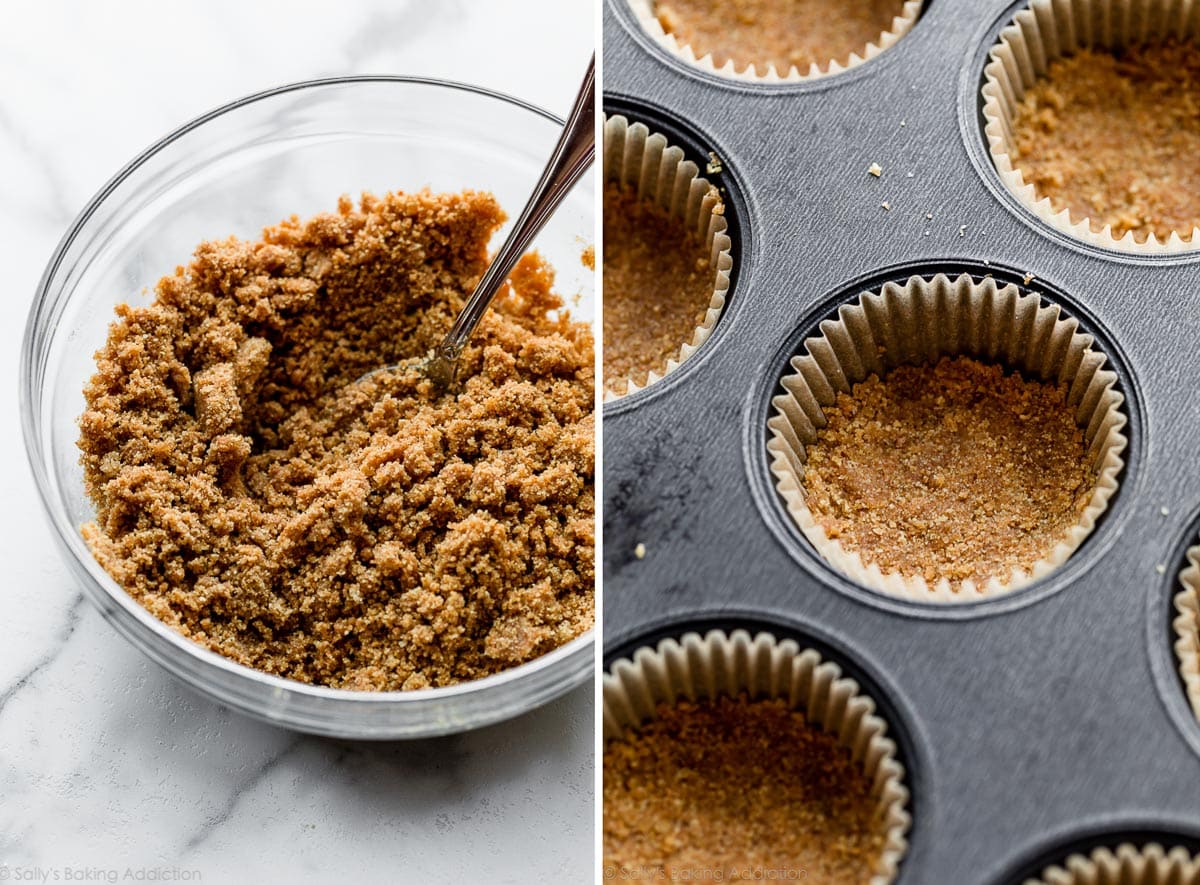
- Combine the crust ingredients. You need graham cracker crumbs, melted butter, and brown sugar. Butter and moist brown sugar (as opposed to regular granulated sugar) help this crust set up properly. Spoon 1 and 1/2 Tablespoons of the crust mixture into each liner and use the back of the spoon to pack it down tightly.
- The next step is optional. To really ensure that these tiny crusts set up properly, I recommend a quick 5 minutes in the oven. Now I know these are NO-BAKE—and the filling still is—I simply found that the crust is sturdier after 5 minutes of baking. But if you can’t use an oven, you can definitely skip it. The crust will just be a bit crumblier.
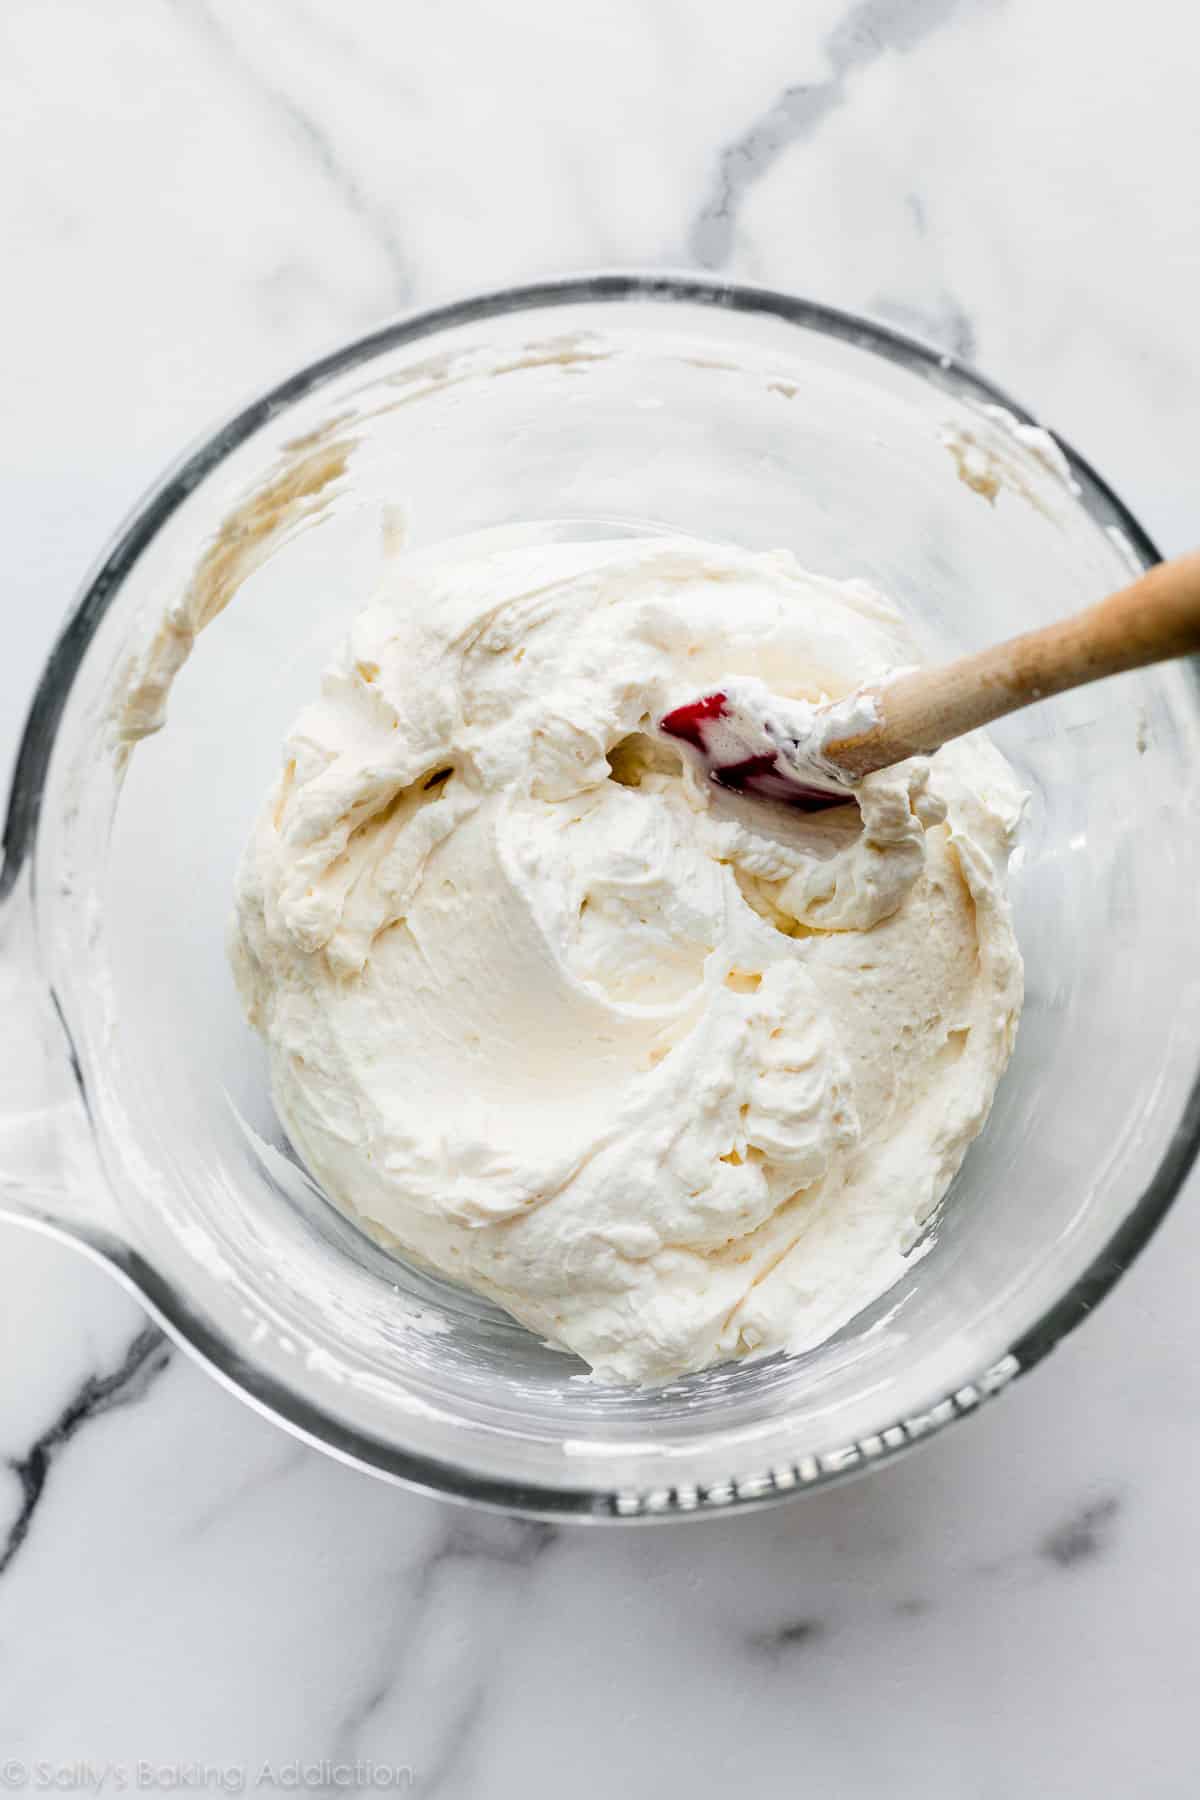
- Make the cheesecake filling. These no-bake cheesecakes set up because we add homemade whipped cream. This is the secret to a thick sturdy filling, and we also use this trick in strawberry cream cheese pie. First, whip heavy cream into stiff peaks and set it aside. Next, combine the rest of the filling ingredients including cream cheese, sugar, sour cream, lemon juice, and vanilla extract. Gently fold in the whipped cream.
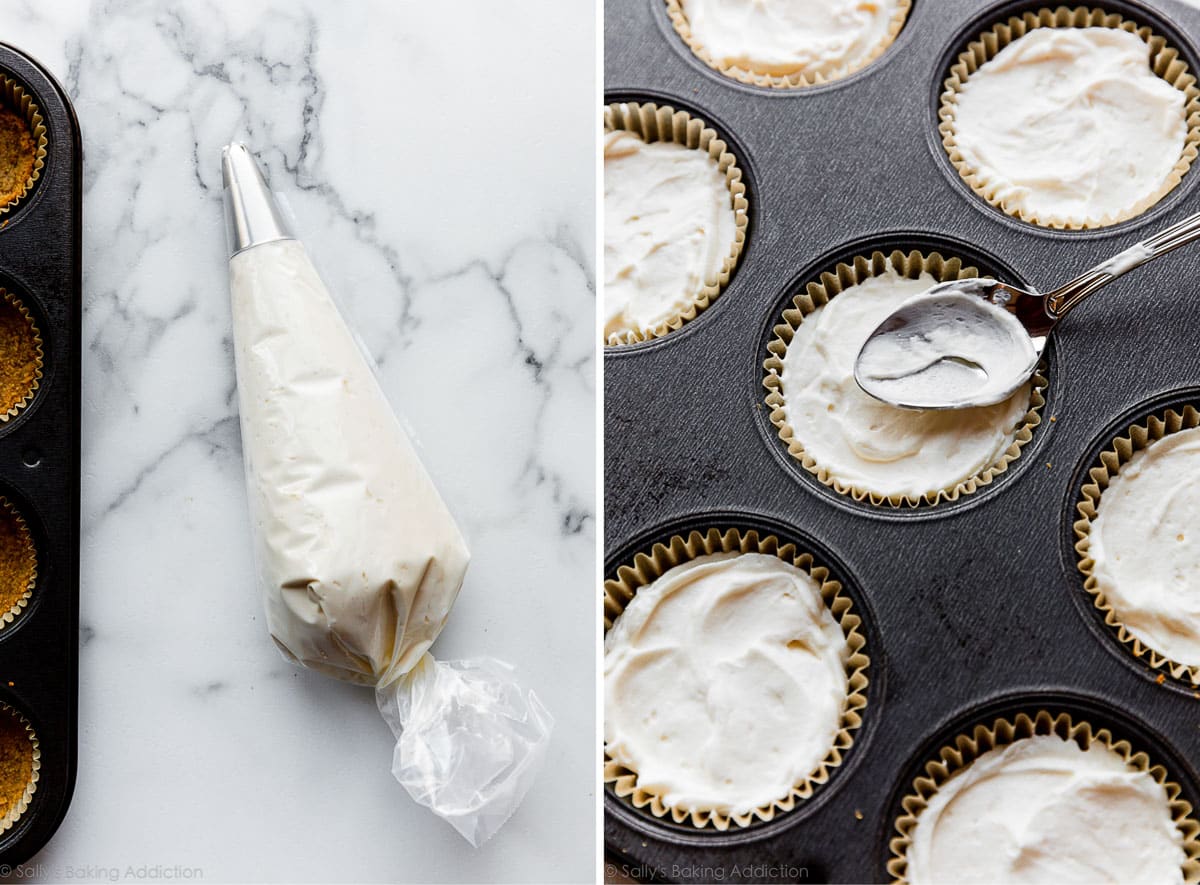
- Add filling over crusts. I’ve made these countless times and prefer piping the cheesecake filling on top of the mini crusts. You can certainly spoon the filling onto the crusts instead, but piping isn’t quite as messy. Feel free to use a piping bag with a large tip (star or round), or you can snip the corner off of a zipped-top plastic bag.
- Refrigerate until set. The mini no-bake cheesecakes set up in about 3 hours. I don’t recommend using the freezer to speed this up because the graham cracker crust will quickly freeze before the filling does. A frozen crust is difficult to bite.
By the way, if you’re looking for a baked variation, here are my regular mini cheesecakes. I even have mini margarita cheesecakes (obviously!), plus plenty more cheesecake recipes and even an easy cheesecake pie too!
Below Left: Heavy cream whipped into stiff peaks. Below Right: Smooth cheesecake filling before adding the whipped cream.

After you fold in the whipped cream, the no-bake cheesecake filling will be fluffy and airy—just like mousse. Here is a photo for a visual:
Won’t the Filling Stick to the Wrappers?
I was skeptical at first, but they don’t. As long as you follow the recipe exactly and chill the mini no-bake cheesecakes for long enough, the wrappers will neatly pull away from the filling. The cheesecakes do begin to soften up when at room temperature, so as long as you unwrap them shortly after taking them out of the refrigerator, you’re fine.
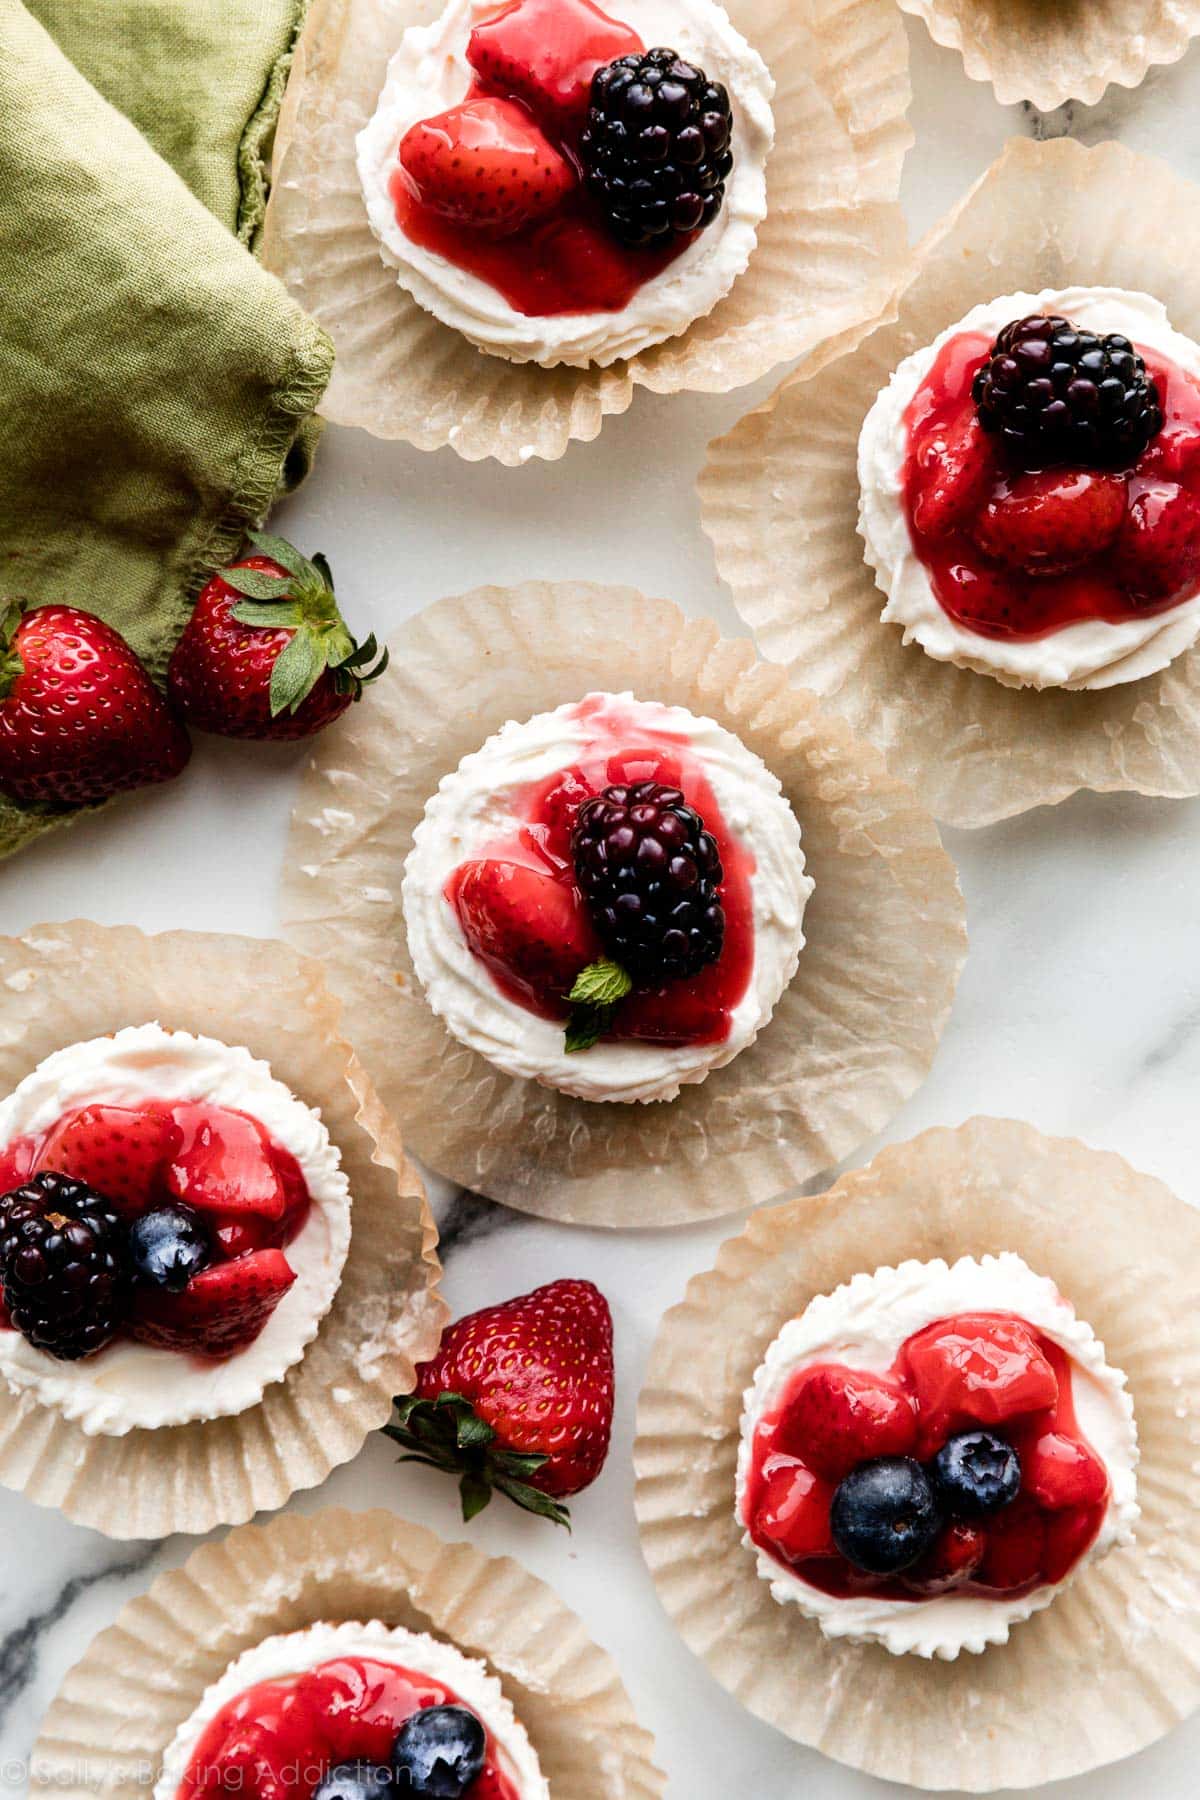
Toppings for Mini No-Bake Cheesecakes
Though plain mini no-bake cheesecakes are flavorful on their own, they welcome all sorts of fun toppings. I love serving these with strawberry sauce and fresh berries. Don’t have fresh berries? Top with a spoonful of lemon curd, salted caramel, apple butter, or your favorite fruit preserves. You can also top with chocolate ganache or hot fudge sauce. If using ganache or hot fudge, I recommend spooning a little over each mini cheesecake before refrigerating so the ganache can set up too.
3 Final Success Tips
- Whip the Heavy Cream: The most important step in this recipe is to beat cold heavy cream into peaks before folding it into the cheesecake filling. The whipped cream helps solidify the filling and its airiness creates an irresistible mousse-like consistency. (You’re basically making unsweetened, unflavored whipped cream!)
- Use Bricks of Cream Cheese: To guarantee the cheesecakes set up properly, use 8-ounce bricks of full-fat cream cheese. Do not use low-fat cream cheese or cream cheese spread that’s sold in a tub. Same success tip I recommend when making the icing for fruit pizza, too!
- Refrigerate, Don’t Freeze: You might be tempted to speed up the chilling process in the freezer, but the colder air won’t chill the cheesecakes evenly. The crust will firm up before the filling does. And trust me, you don’t want to bite into frozen crust underneath partially frozen cheesecake.
Mini No-Bake Cheesecakes
- Prep Time: 25 minutes
- Cook Time: 5 minutes
- Total Time: 3 hours, 30 minutes
- Yield: 24 mini cheesecakes
- Category: Dessert
- Method: Whipping
- Cuisine: American
Description
Follow this recipe for perfect mini no-bake cheesecakes that set in lined muffin pans. Before beginning, read through the recipe and recipe notes below and review the success tips in the blog post above. Step 3 is optional.
Ingredients
Graham Cracker Crust
- 2 cups (240g) graham cracker crumbs (about 16 full sheet graham crackers)
- 1/3 cup (67g) packed light or dark brown sugar
- 1/2 cup (8 Tbsp; 113g) unsalted butter, melted
Filling
- 1 cup (240ml) cold heavy cream or heavy whipping cream
- 16 ounces (452g) full-fat brick cream cheese, softened to room temperature
- 1/3 cup (67g) granulated sugar
- 2 Tablespoons (30g) sour cream or plain yogurt, at room temperature
- 1 teaspoon fresh lemon juice
- 1/2 teaspoon pure vanilla extract
- optional: your desired toppings (see recipe Note)
Instructions
- Line two standard 12-count muffin pans with cupcake liners. Make sure you have room in your refrigerator for both pans. (You refrigerate them in step 6.)
- Prepare the crust: If your graham crackers aren’t crumbs yet, use a food processor to pulse them into fine crumbs. Pour crumbs into a medium bowl and stir in the brown sugar and melted butter until combined. Mixture will have the consistency of wet sand. Spoon 1 and 1/2 Tablespoons of the crust mixture into each cupcake liner and use the back of the spoon to pack it down tightly.
- The next step is optional. Though it’s not required, I recommend baking the crusts for a quick 5 minutes in a 350°F (177°C) oven. The crusts are a little sturdier this way. However, if you can’t use an oven or simply don’t want to, you can skip this step. The crust will just be a bit crumblier. If baking, let the warm crusts cool for 10 minutes before adding the filling on top.
- Make the filling: Using a hand mixer or a stand mixer fitted with a whisk attachment, whip the cold heavy cream into stiff peaks on medium-high speed, about 3 minutes. Set aside. Using a hand mixer or a stand mixer fitted with a whisk or paddle attachment, beat the cream cheese and granulated sugar together on medium speed until smooth and creamy. Scrape down the sides and up the bottom of the bowl with a silicone spatula as needed. Add the sour cream, lemon juice, and vanilla extract. Beat on medium-high speed until smooth and combined, about 1 minute. Make sure there are no large lumps of cream cheese. If there are lumps, keep beating until smooth. Using your mixer on low speed or a silicone spatula, fold the whipped cream into the cheesecake filling until combined. This takes several turns of your rubber spatula. Combine slowly as you don’t want to deflate all the air in the whipped cream.
- You can use a spoon or piping bag to transfer the filling on top of the crusts. Spoon or pipe about 2 Tablespoons of filling over each crust. I prefer piping the filling because it’s a little easier and neater. Fit your piping bag with a large star or round piping tip, then transfer the filling to the bag and pipe. (You could also use a plastic zipped-top bag. Spoon the filling inside, snip an end off a corner, and pipe.) Use the back of a spoon to smooth the tops so they are flat.
- Refrigerate the mini cheesecakes in the pans for at least 3 hours and up to 2 days. If refrigerating for longer than 3 hours, I recommend covering with aluminum foil or plastic wrap.
- Keep refrigerated until ready to serve. Serve with optional toppings (see recipe Note). The cheesecakes begin to soften and stick to the liners after about 30–60 minutes at room temperature.
- Cover and store leftover mini cheesecakes in the refrigerator for up to 5 days.
Notes
- Make Ahead & Freezing Instructions: The mini cheesecakes can be made 1-2 days in advance and refrigerated for up to 2 days before serving, as noted in step 6. Another way to prep these mini no-bake cheesecakes is to freeze them. Refrigerate them as directed in step 6, then remove them from the muffin pan (keep the liners on them) and line in a single layer in a large freezer-friendly container. Cover tightly and freeze for up to 3 months. Thaw in the refrigerator for at least 24 hours before serving.
- Special Tools (affiliate links): 12-count Muffin Pans | Cupcake Liners | Food Processor | Electric Mixer (Handheld or Stand) | Silicone Spatula | Piping Bag (Reusable or Disposable) | Large Piping Tip (like Ateco 808)
- Optional Toppings: Right before serving, you can add toppings to the mini cheesecakes. You can also add the following toppings after the cheesecakes have chilled in the refrigerator for just 1–2 hours (step 6), then store the topped cheesecakes in the refrigerator for the remaining time. Use 3/4 cup strawberry sauce divided over each chilled mini cheesecake. (Spoon about 1/2 Tablespoon over each.) And/or use 1 cup mixed berries, plus a few mint leaves, divided over each for additional garnish. Instead of strawberry sauce, try the same amount of lemon curd, apple butter, or your favorite fruit preserves. You can also top with chocolate ganache. I recommend spooning a little over each mini cheesecake before refrigerating so the ganache can set up too.
- Lemon Juice: Lemon juice brightens up the flavor. This cheesecake does not taste like lemon. For lemon flavored mini no-bake cheesecakes, replace the sour cream with 2 Tablespoons fresh lemon juice (in addition to the 1 teaspoon lemon juice that it already calls for) and add 2 teaspoons lemon zest.
- Room Temperature Ingredients: Bring the cream cheese and sour cream to room temperature before beginning. Room temperature ingredients guarantee a smooth cheesecake filling. Beating cold ingredients together will result in a chunky cheesecake filling. (The heavy cream, however, MUST be cold in order to whip into stiff peaks.)
- Non-US Readers: Don’t have graham crackers where you live? Use 2 cups (240g) ground digestive biscuits instead (about 16 biscuits), the same amount of butter, and add a bit more sugar (about 1/2 cup, or 100g). You may need to add a few extra minutes to the pre-baking time, as digestive biscuits are not quite as crispy-crunchy as graham crackers. And from what I understand, spreadable cream cheese sold in a tub in countries outside of the US is a little different from the spreadable cream cheese in the US. It’s thicker, sturdier, and more solid and should be OK to make cheesecake. I have no experience with it, but this is what I’ve heard from other non-US readers.


Reader Comments and Reviews
These mini no-bake cheesecakes were fantastic! I loved the graham cracker crust! I made a strawberry sauce to go on top, which balanced the cheesecake perfectly!
So easy to make and delicious! Perfect spring dessert!
I made these as the April alternate challenge and for Easter dessert. They were very easy to prepare and my family, including the kids, loved them. The kids are already asking for more! This is a nice option for quick, individual cheesecakes and I’m sure I will be making them again. I did have some grease on my cupcake liners and I will purchase some parchment liners per the suggestion from Sally’s team in response to another review.
These were very easy to make. I made tiny ones (mini cupcake wrappers) and topped them with fresh strawberries.
These were so easy to make! I decided to put them in Texas sized muffin tins using parchment liners. These are great with any flavored toppings or if you have leftover caramel from the salted caramel recipe.
Easiest recipe yet for the baking challenge. Quick and they tasted good.
This recipe turned out so good! I was simple and quick and I enjoyed making it. The family loved them and they were gone very quickly. I can’t wait to make this recipe again!
This is a creamy, yummy, easy summer treat! I topped mine with a blueberry sauce!
Made for the April challenge, and was so glad I did! The crust is delicious and adding toppings makes this super easy for any get together or holiday!
I will admit I went into this recipe a little skeptical that these no-bake cheesecakes would be able to actually come out of their wrappers and not immediately fall apart, but they did, and they looked fantastic! I baked these as part of the baking challenge and for our family Easter, and they were a hit! I wasn’t sure what the texture and taste would be like in these as they are a no-bake recipe, but they were delightful. I will be experimenting with topping options the next time I make these, as this time I did keep them plain. The cheesecakes are not immensely sweet, so they leave a lot of options for toppings to increase the sweetness level of these if you want—lots of ways you can customize them! I did bake the crusts on them, and I really enjoyed the little bit of crunch it added, and I think, as Sally mentioned, it helped with the structure of these, especially when trying to unwrap them. I will definitely be making these again!
These were delicious. I think I like it better as a big pie and I would do double the cheesecake filling!
Very good! Crust was a lil thick for me, might do half next time. I didn’t have heavy cream, so substituted whipped topping and it worked fine! Very nice make ahead recipe!
Can you make the cheesecake filling a day ahead then fill the next day. My granddaughter wants to fill them herself.
Hi Pauline, that should work fine!
Made this recipe as the alternate recipe for the April baking challenge – these mini cheesecakes are so good and easy to fix! I did bake the crusts as instructed and they still were a bit crumbly/messy, however still tasted amazing! I probably didn’t pack them down hard enough. I served them topped with some chopped strawberries and everyone loved them! I did notice even after chilling over night the cheese cakes were still fairly soft – I wouldn’t take these out of the fridge until just before serving.
Made this as the alternate challenge. So delicious! It’s somehow rich but also light and fluffy. It also came out of the wrapper super easy. I added salted caramel on top and it paired really well!
Delicious! I made these for Easter and used a variety of toppings on each – mini eggs, fresh strawberries, and cherry pie topping. My favourite was the fresh strawberry topping but everyone loved that the cheesecakes were so light and not too sweet.
Thank you for the great recipe! My family enjoyed it. It was easy to make and they were so delicious. The cheesecake was creamy and the flavor was spot on. We put cherry pie filling on top and it was delicious. A few of my family members enjoyed caramel sauce on their cheesecakes. Thanks again, Sally!
10 out of 10 recommended!
I made these mini cheesecakes for Easter as the alternate April Baking Challenge. My family loved popping them in their mouth. I also gave some to my mom and her caregivers. Everyone loved them too! The cupcake size was the perfect amount and they are so light and fluffy. I added whipped cream on top and that added another delicious layer.
I made these mini cheesecakes for Easter as the alternate April Baking Challenge. My family loved popping them in their mouth. I also gave some to my mom and her caregivers. Everyone loved them too! The cupcake size was the perfect amount and they are so light and fluffy. I added whipped cream on top and that added another delicious layer.
Such a great recipe. Quick and easy, but the results are delicious and decadent. This is one of those recipes that makes it seem like more work than it actually is. I made some chocolate ganache to go with them and it was the perfect touch. I bet lemon curd would also be incredible.
Easy to prep ahead of time and then top with your choice when serving! Delish light treat!
Absolutely delicious! Loved having bite size treats. I made some regular muffin sized and some in my mini muffin pan. Both were perfect. Perfect recipe as always.
Made these with an Oreo crust and used chocolate sauce as a topping. The crust held up really well thanks to the quick baking step, and they tasted great!
We enjoyed these with chocolate and sugared pecans. We doubled the sugar in the filling as it was too tart for our taste preference. The crust was also too crumbly to stick, so I added some cream to combine.
Excellent recipe! Ways to follow and make for a crowd. Yummy strawberry sauce to top it off!
These turned out perfect! I used the recommended amount of graham cracker crumbs in each cup. I did have some graham cracker crumbs left over that I decided not to use and the ratio of cheesecake to crust ended up being spot on! I topped mine with chocolate ganache, raspberries and chocolate Easter egg candies, but you could put just about anything you wanted on them!
This is a nice, lighter texture alternative to traditional cheesecake. This could be user error, but I found the ratios to be off. I had a lot of extra crust and not enough filling to evenly distribute across all 24 tins. But, overall, great flavor and texture. I’d make again.
This is a great recipe for times such as Easter when the oven needs to be full of others things. I like how accessible the recipe is, and the potential for variations.
This recipe produced a delicious result, but per our families preference there was way too much crust to cheesecake. The ratio was not to our liking. If I were to make it again I would either greatly reduce the crust or increase the filling.