

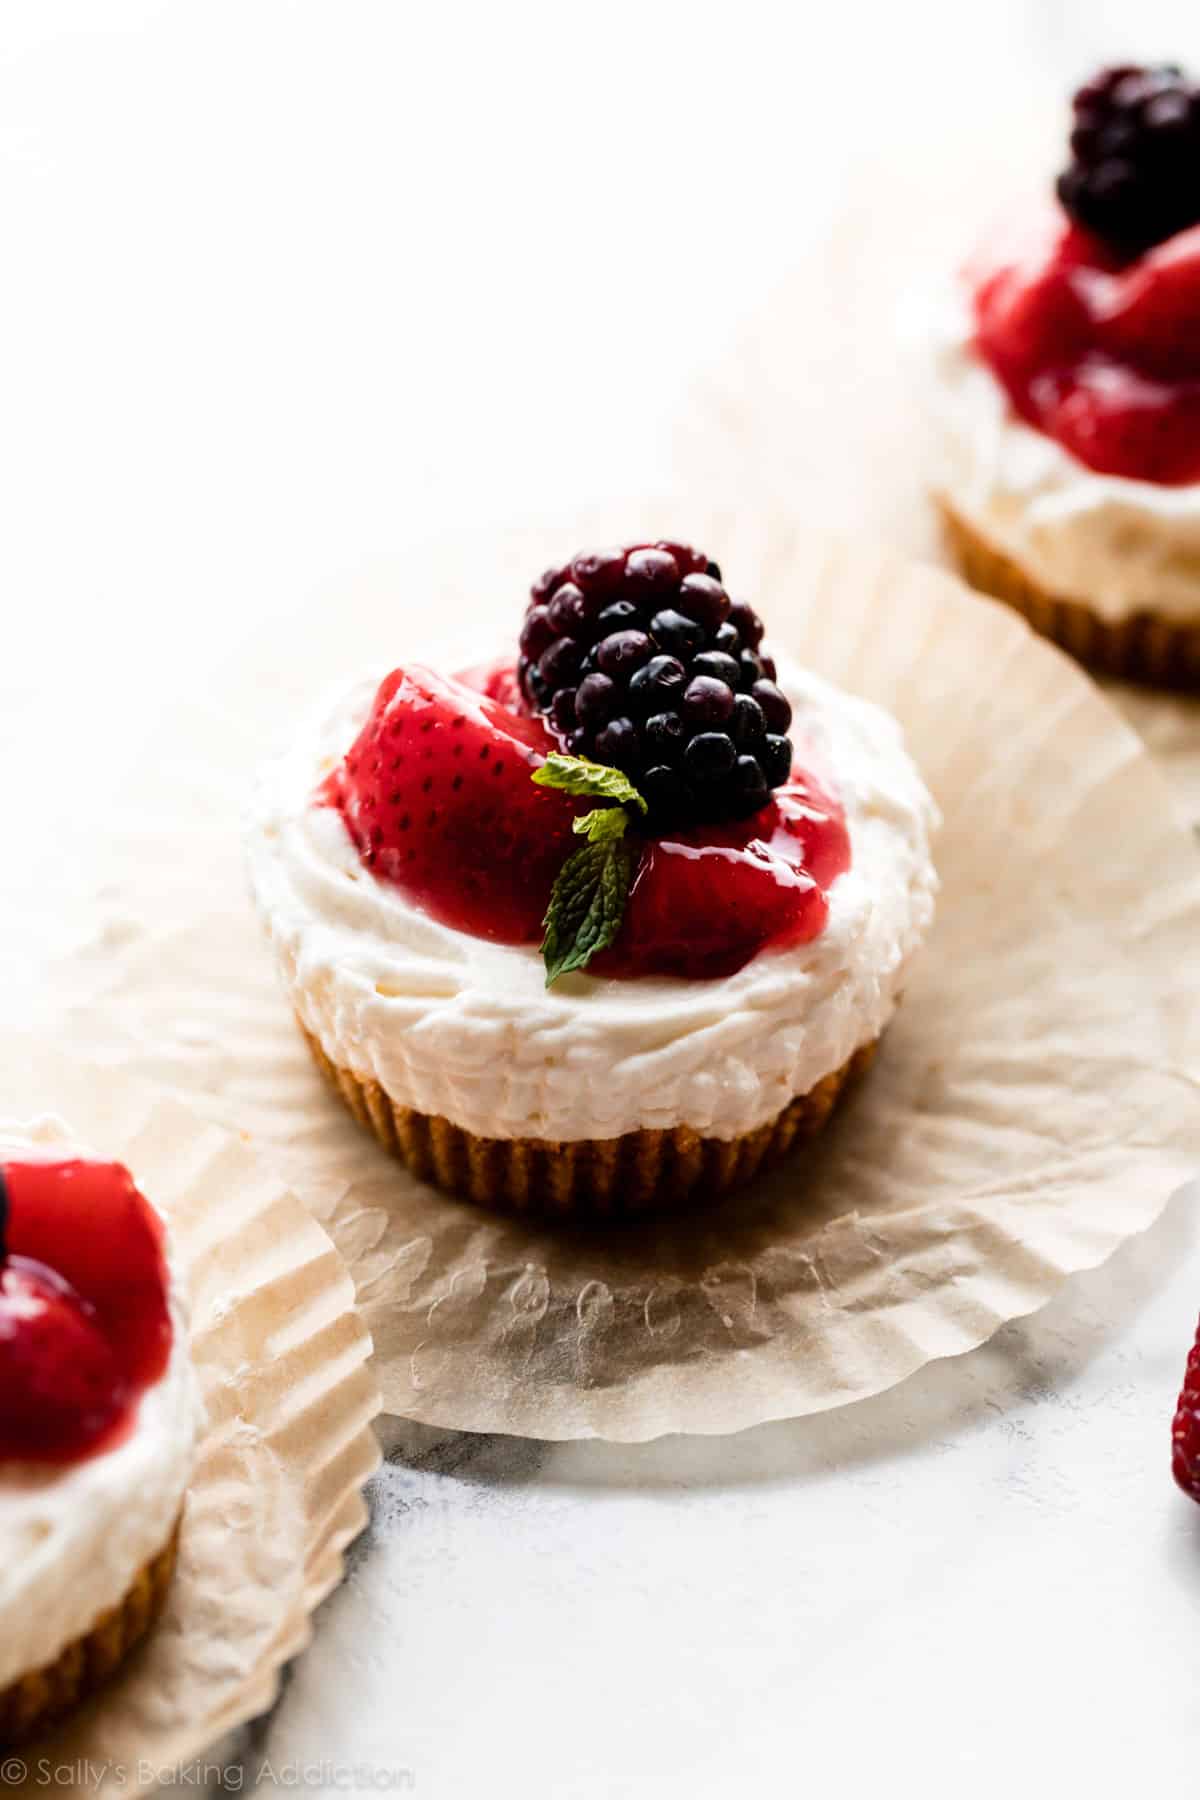
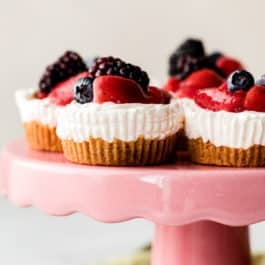
These mini no-bake cheesecakes are formed in a muffin pan. Using only a few basic and delicious ingredients, these tiny cheesecakes set up in the refrigerator instead of the oven. They’re extra creamy and lightly sweetened just like my regular no-bake cheesecake!
One reader, Jennifer, commented: “Such a great recipe. Quick and easy, but the results are delicious and decadent. This is one of those recipes that makes it seem like more work than it actually is. I made some chocolate ganache to go with them and it was the perfect touch. I bet lemon curd would also be incredible. ★★★★★“

So, What Are Mini No-Bake Cheesecakes?
No-bake cheesecake, no-bake pumpkin cheesecake, and even my no-bake cheesecake jars are exactly that: cheesecake without the oven. I like to compare the filling to cheesecake mousse. It has a light and airy texture because it’s made with homemade whipped cream. When spooned over a graham cracker crust and refrigerated, the eggless cheesecake filling sets up beautifully.
It’s pure dessert magic.
What it lacks in oven time, it makes up for in taste and texture:
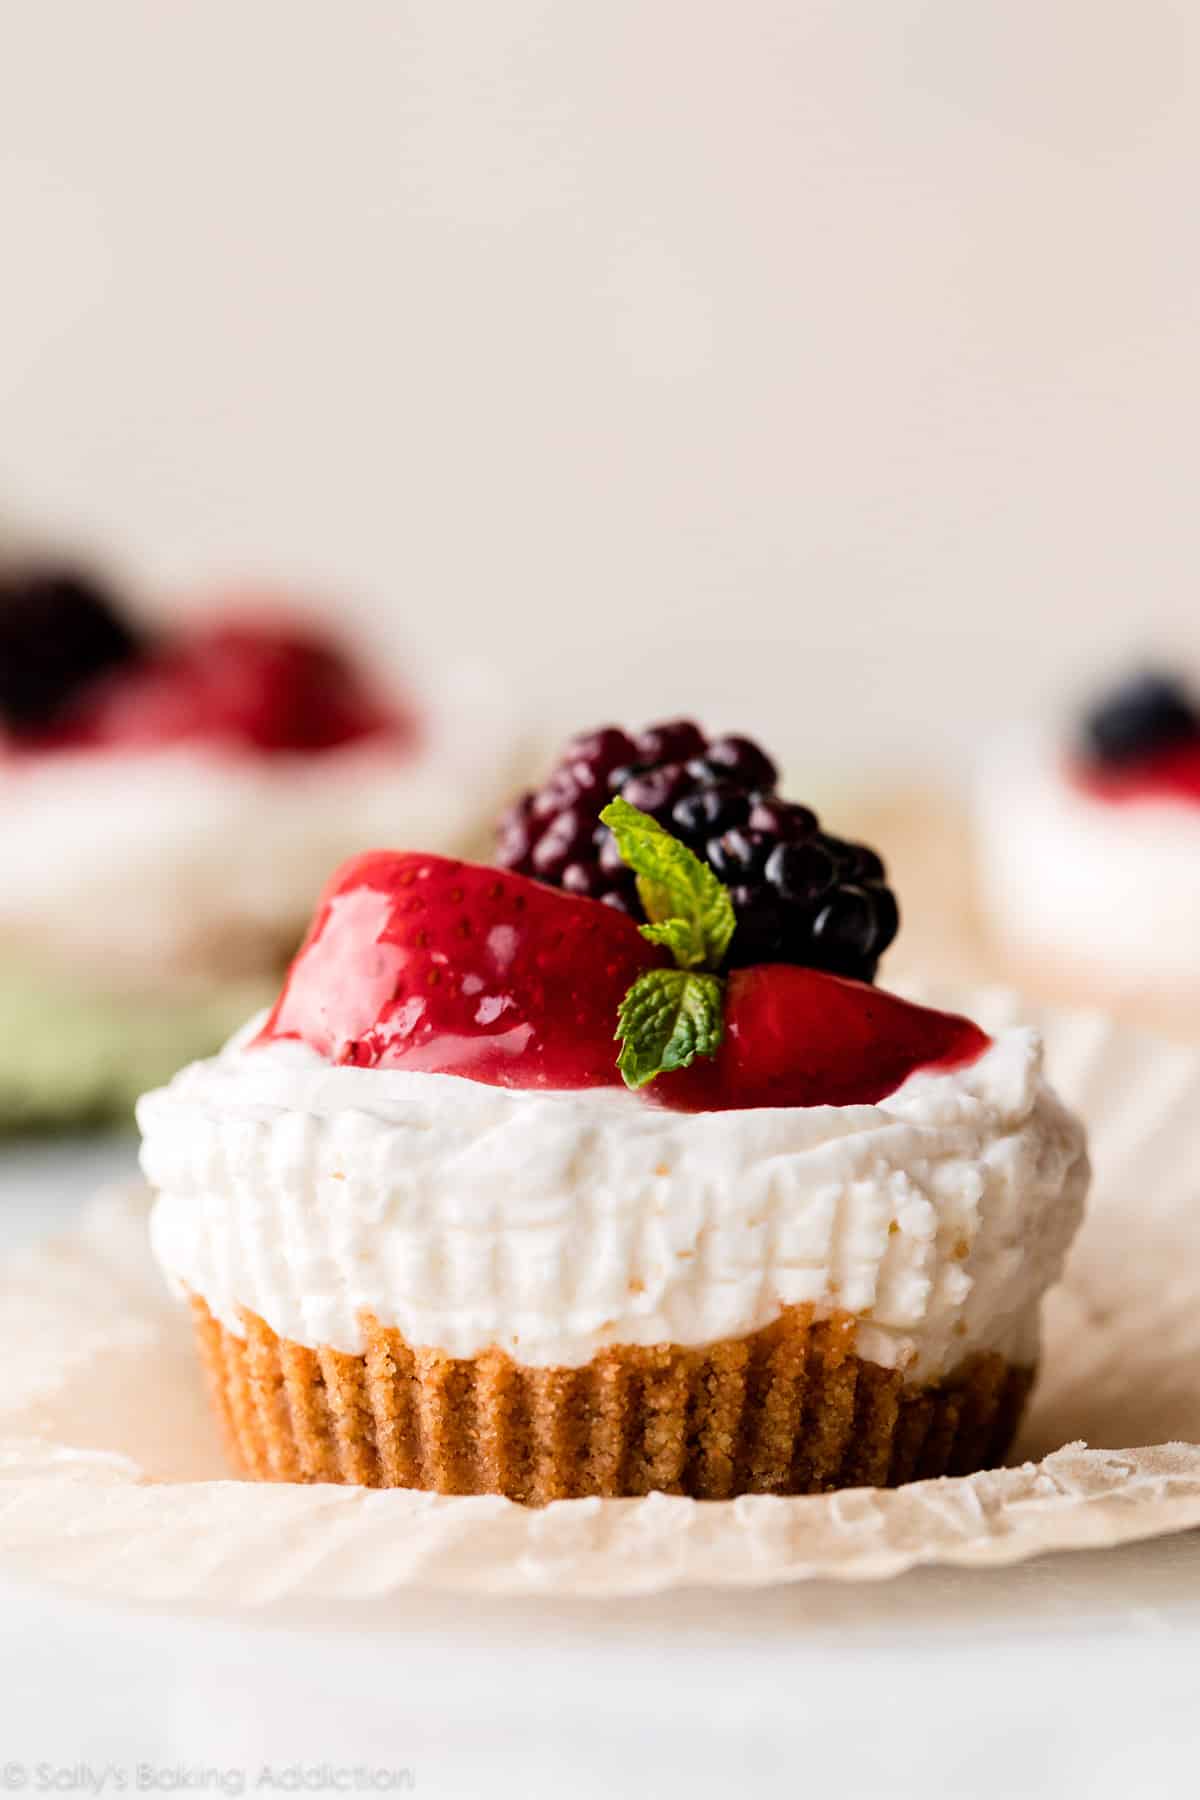
- Thick, buttery, and crunchy graham cracker crust
- Light, creamy, and velvet-rich cheesecake filling
Though I already have a full no-bake cheesecake recipe on my website, sometimes I enjoy making it in individual muffin cups instead of a springform pan. And I figured you’d want to see how it’s done! These mini no-bake cheesecakes are simple, straightforward, and at only a few bites each, perfect for portion control.
Overview: How to Make Mini No-Bake Cheesecakes
- Make room in your refrigerator. Two muffin pans need to squeeze in there!
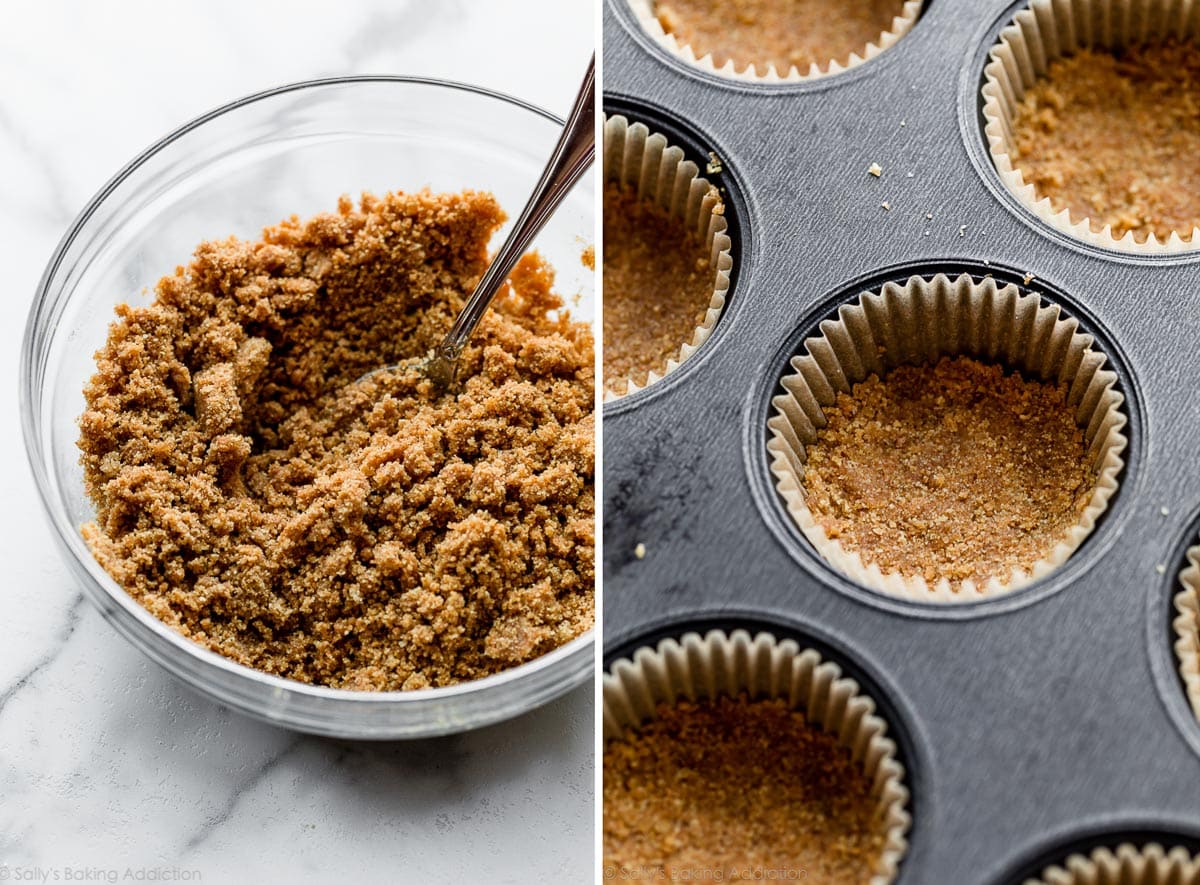
- Line two standard 12-count muffin pans with liners. Cupcake liners are key—you won’t be able to remove the cheesecakes without them.
- Combine the crust ingredients. You need graham cracker crumbs, melted butter, and brown sugar. Butter and moist brown sugar (as opposed to regular granulated sugar) help this crust set up properly. Spoon 1 and 1/2 Tablespoons of the crust mixture into each liner and use the back of the spoon to pack it down tightly.
- The next step is optional. To really ensure that these tiny crusts set up properly, I recommend a quick 5 minutes in the oven. Now I know these are NO-BAKE—and the filling still is—I simply found that the crust is sturdier after 5 minutes of baking. But if you can’t use an oven, you can definitely skip it. The crust will just be a bit crumblier.
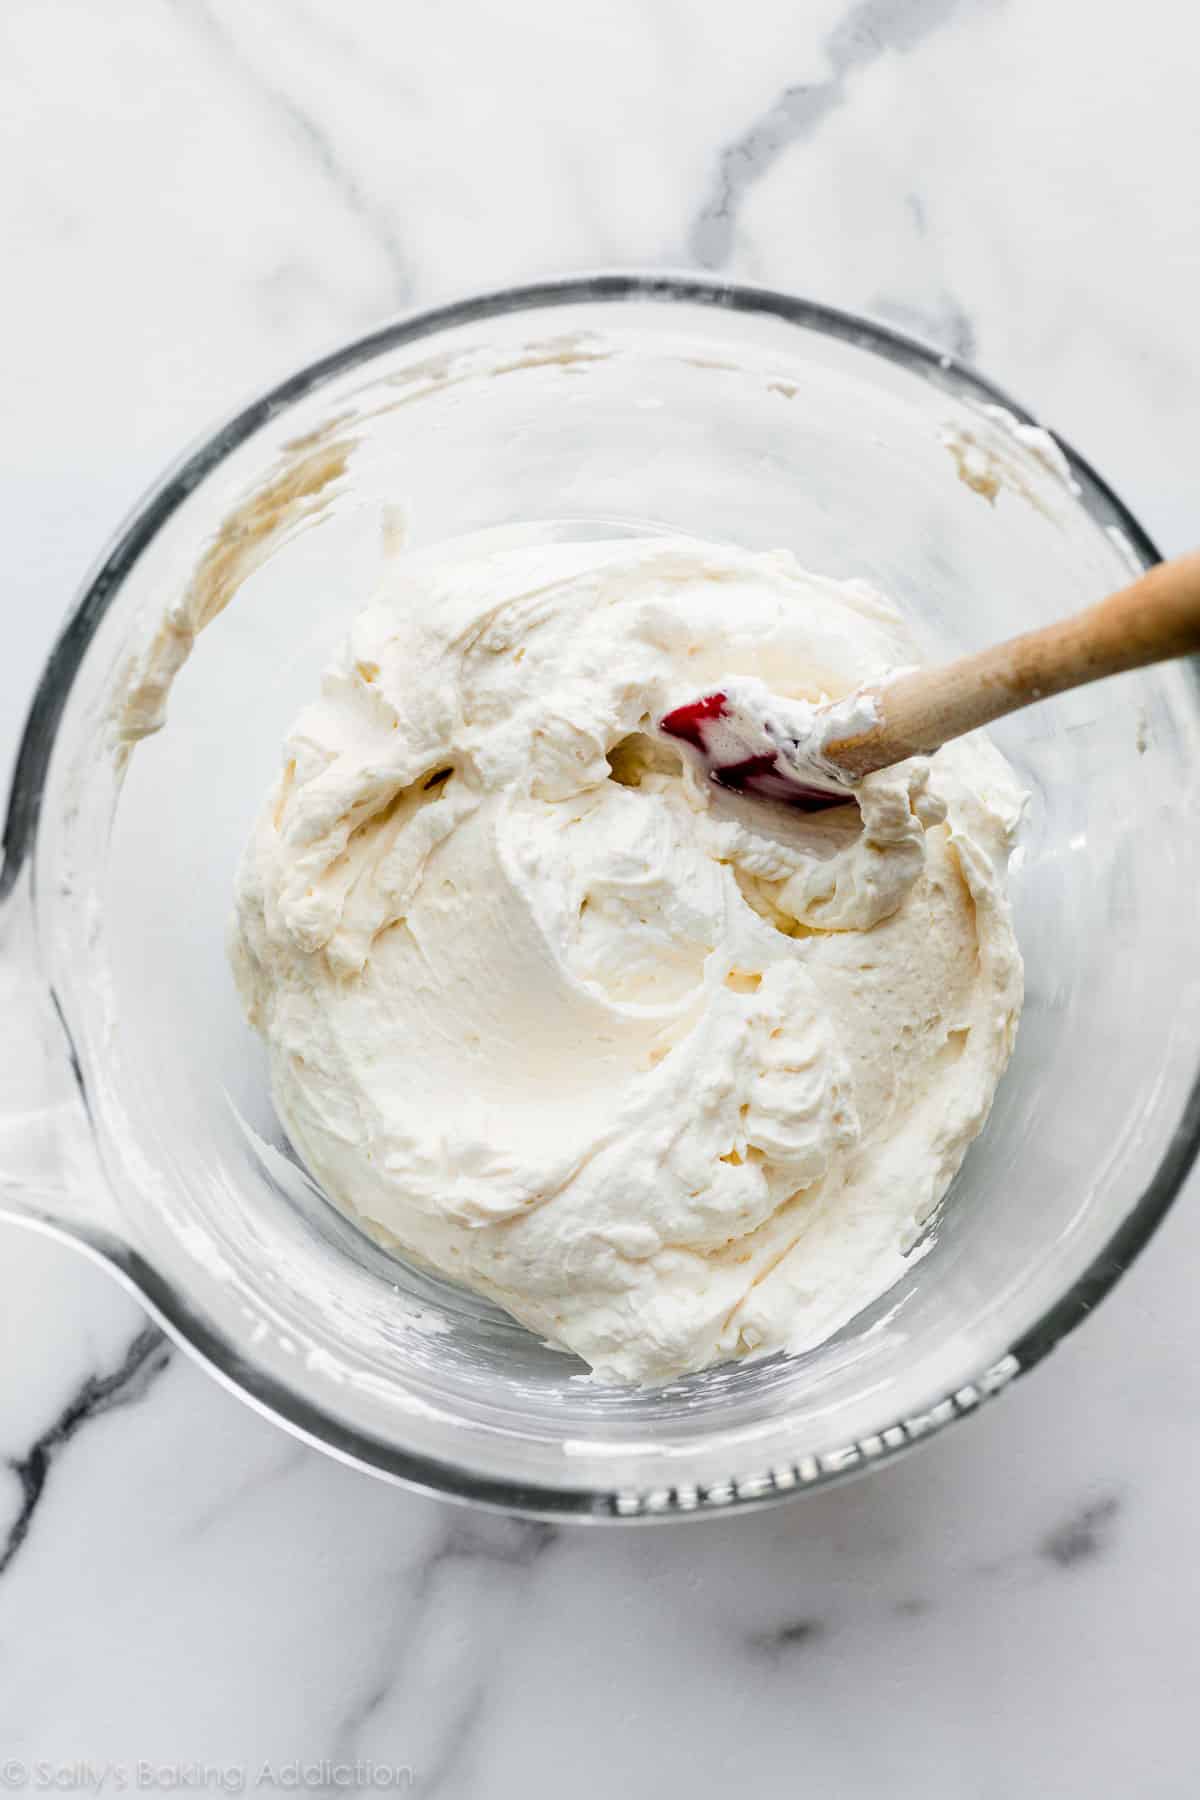
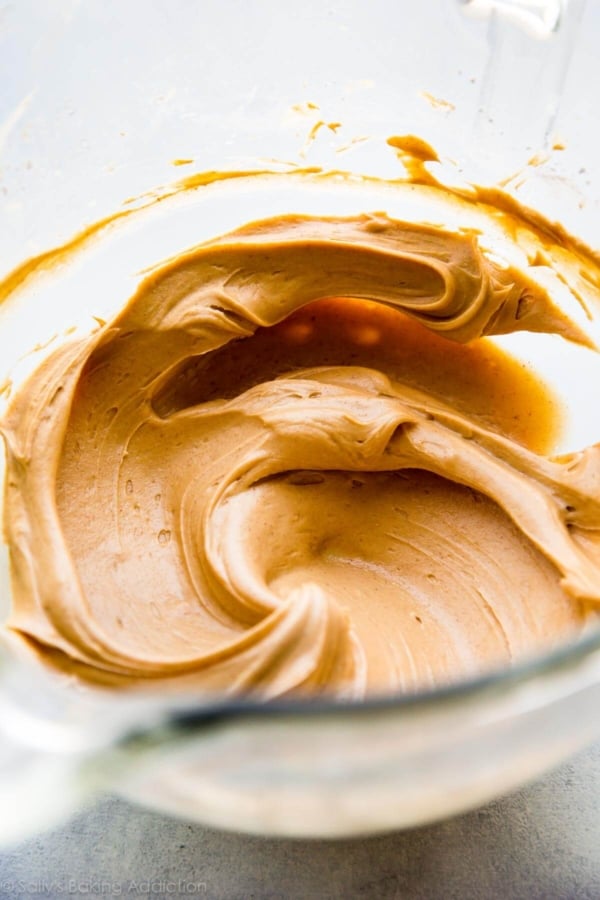
- Make the cheesecake filling. These no-bake cheesecakes set up because we add homemade whipped cream. This is the secret to a thick sturdy filling, and we also use this trick in strawberry cream cheese pie. First, whip heavy cream into stiff peaks and set it aside. Next, combine the rest of the filling ingredients including cream cheese, sugar, sour cream, lemon juice, and vanilla extract. Gently fold in the whipped cream.
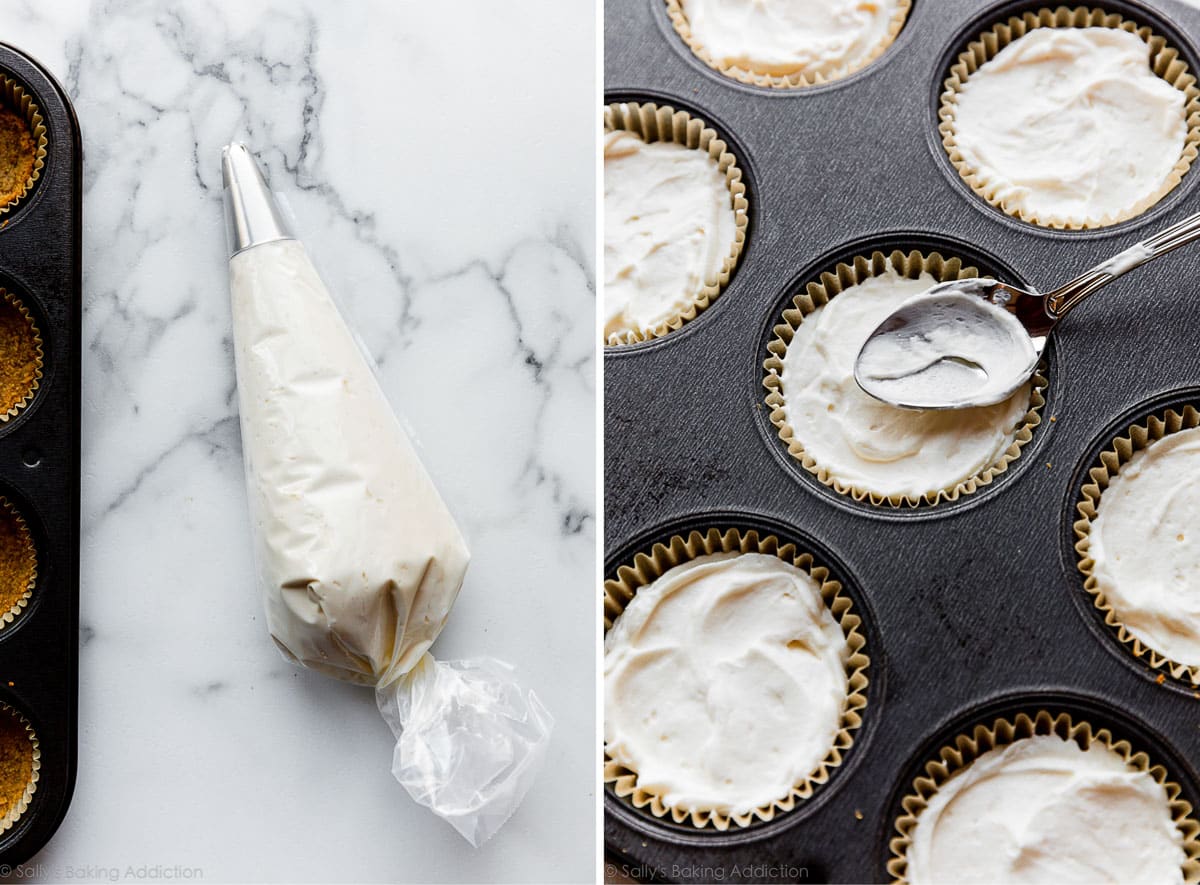
- Add filling over crusts. I’ve made these countless times and prefer piping the cheesecake filling on top of the mini crusts. You can certainly spoon the filling onto the crusts instead, but piping isn’t quite as messy. Feel free to use a piping bag with a large tip (star or round), or you can snip the corner off of a zipped-top plastic bag.
- Refrigerate until set. The mini no-bake cheesecakes set up in about 3 hours. I don’t recommend using the freezer to speed this up because the graham cracker crust will quickly freeze before the filling does. A frozen crust is difficult to bite.
By the way, if you’re looking for a baked variation, here are my regular mini cheesecakes. I even have mini margarita cheesecakes (obviously!), plus plenty more cheesecake recipes and even an easy cheesecake pie too!
Below Left: Heavy cream whipped into stiff peaks. Below Right: Smooth cheesecake filling before adding the whipped cream.

After you fold in the whipped cream, the no-bake cheesecake filling will be fluffy and airy—just like mousse. Here is a photo for a visual:
Won’t the Filling Stick to the Wrappers?
I was skeptical at first, but they don’t. As long as you follow the recipe exactly and chill the mini no-bake cheesecakes for long enough, the wrappers will neatly pull away from the filling. The cheesecakes do begin to soften up when at room temperature, so as long as you unwrap them shortly after taking them out of the refrigerator, you’re fine.
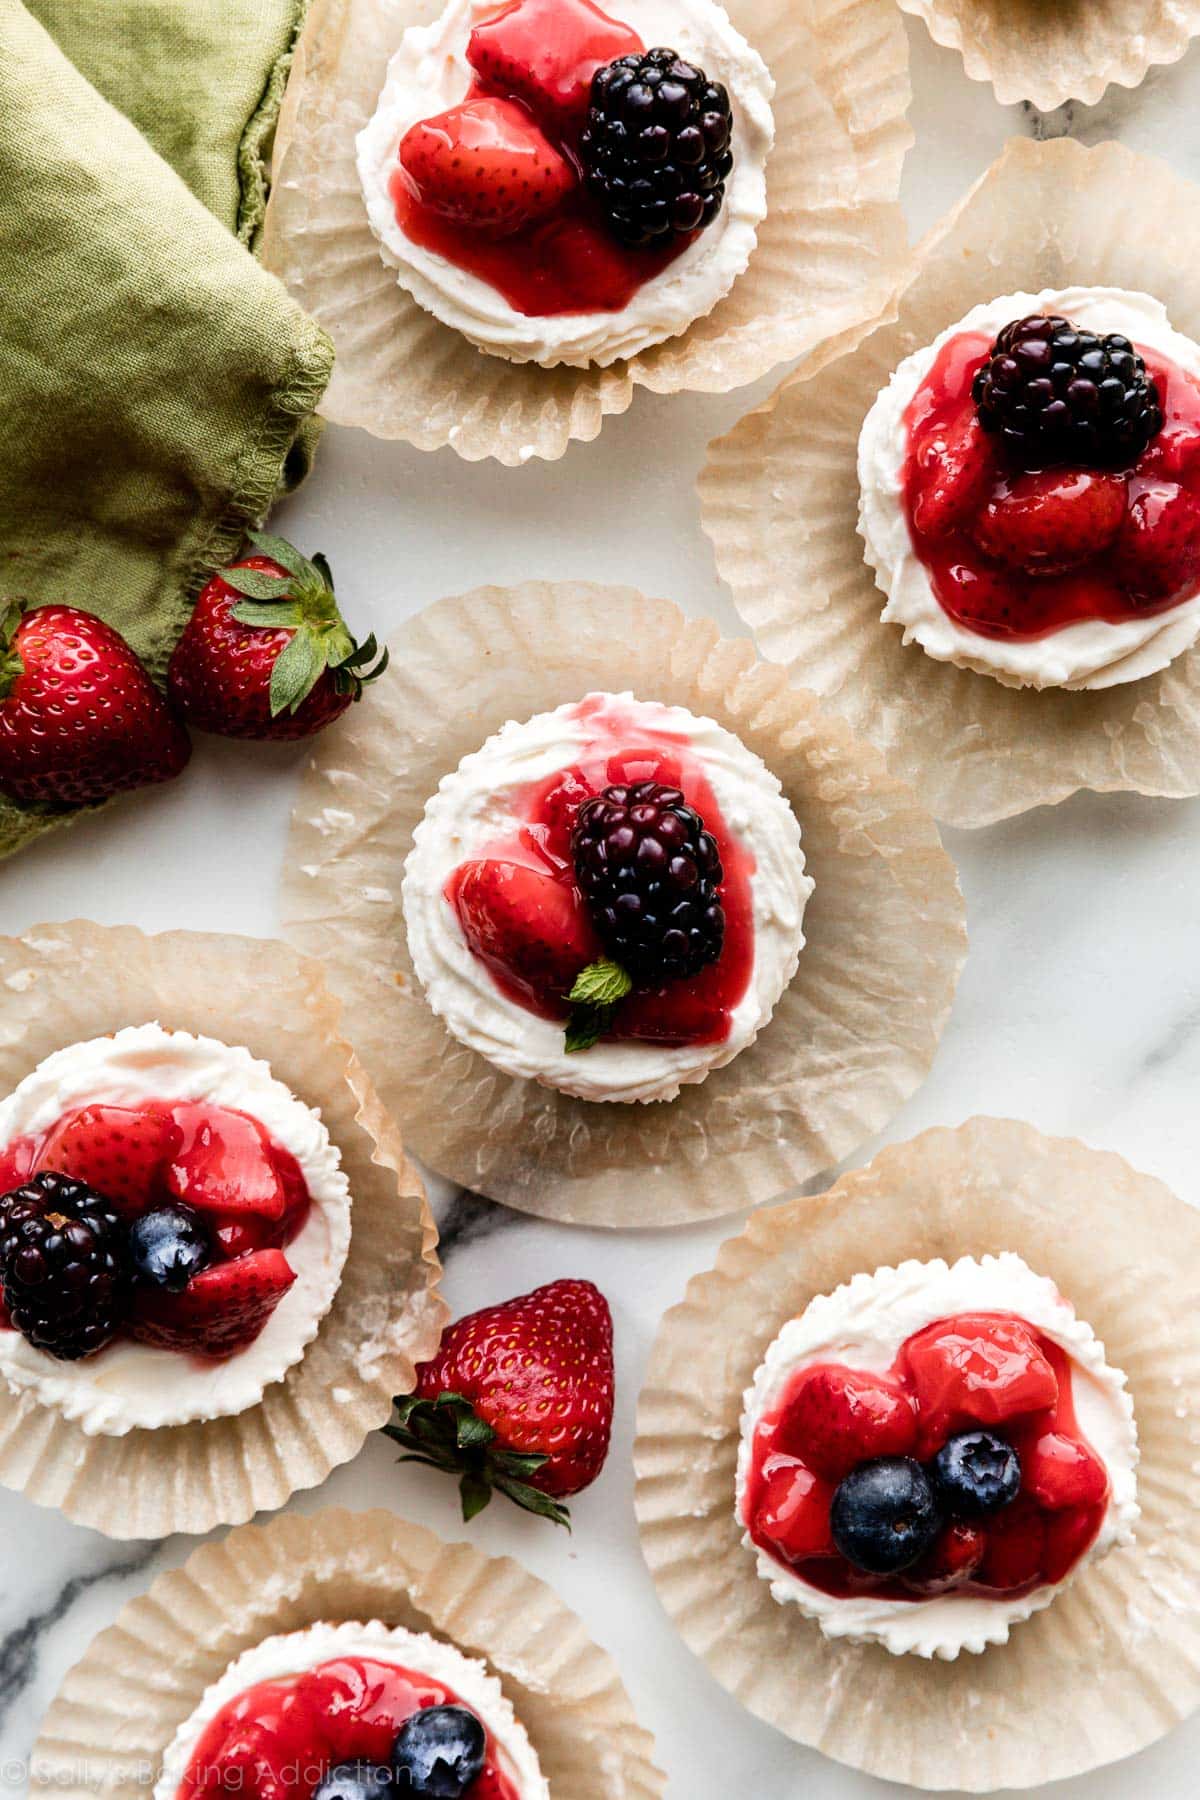
Toppings for Mini No-Bake Cheesecakes
Though plain mini no-bake cheesecakes are flavorful on their own, they welcome all sorts of fun toppings. I love serving these with strawberry sauce and fresh berries. Don’t have fresh berries? Top with a spoonful of lemon curd, salted caramel, apple butter, or your favorite fruit preserves. You can also top with chocolate ganache or hot fudge sauce. If using ganache or hot fudge, I recommend spooning a little over each mini cheesecake before refrigerating so the ganache can set up too.
3 Final Success Tips
- Whip the Heavy Cream: The most important step in this recipe is to beat cold heavy cream into peaks before folding it into the cheesecake filling. The whipped cream helps solidify the filling and its airiness creates an irresistible mousse-like consistency. (You’re basically making unsweetened, unflavored whipped cream!)
- Use Bricks of Cream Cheese: To guarantee the cheesecakes set up properly, use 8-ounce bricks of full-fat cream cheese. Do not use low-fat cream cheese or cream cheese spread that’s sold in a tub. Same success tip I recommend when making the icing for fruit pizza, too!
- Refrigerate, Don’t Freeze: You might be tempted to speed up the chilling process in the freezer, but the colder air won’t chill the cheesecakes evenly. The crust will firm up before the filling does. And trust me, you don’t want to bite into frozen crust underneath partially frozen cheesecake.
Mini No-Bake Cheesecakes
- Prep Time: 25 minutes
- Cook Time: 5 minutes
- Total Time: 3 hours, 30 minutes
- Yield: 24 mini cheesecakes
- Category: Dessert
- Method: Whipping
- Cuisine: American
Description
Follow this recipe for perfect mini no-bake cheesecakes that set in lined muffin pans. Before beginning, read through the recipe and recipe notes below and review the success tips in the blog post above. Step 3 is optional.
Ingredients
Graham Cracker Crust
- 2 cups (240g) graham cracker crumbs (about 16 full sheet graham crackers)
- 1/3 cup (67g) packed light or dark brown sugar
- 1/2 cup (8 Tbsp; 113g) unsalted butter, melted
Filling
- 1 cup (240ml) cold heavy cream or heavy whipping cream
- 16 ounces (452g) full-fat brick cream cheese, softened to room temperature
- 1/3 cup (67g) granulated sugar
- 2 Tablespoons (30g) sour cream or plain yogurt, at room temperature
- 1 teaspoon fresh lemon juice
- 1/2 teaspoon pure vanilla extract
- optional: your desired toppings (see recipe Note)
Instructions
- Line two standard 12-count muffin pans with cupcake liners. Make sure you have room in your refrigerator for both pans. (You refrigerate them in step 6.)
- Prepare the crust: If your graham crackers aren’t crumbs yet, use a food processor to pulse them into fine crumbs. Pour crumbs into a medium bowl and stir in the brown sugar and melted butter until combined. Mixture will have the consistency of wet sand. Spoon 1 and 1/2 Tablespoons of the crust mixture into each cupcake liner and use the back of the spoon to pack it down tightly.
- The next step is optional. Though it’s not required, I recommend baking the crusts for a quick 5 minutes in a 350°F (177°C) oven. The crusts are a little sturdier this way. However, if you can’t use an oven or simply don’t want to, you can skip this step. The crust will just be a bit crumblier. If baking, let the warm crusts cool for 10 minutes before adding the filling on top.
- Make the filling: Using a hand mixer or a stand mixer fitted with a whisk attachment, whip the cold heavy cream into stiff peaks on medium-high speed, about 3 minutes. Set aside. Using a hand mixer or a stand mixer fitted with a whisk or paddle attachment, beat the cream cheese and granulated sugar together on medium speed until smooth and creamy. Scrape down the sides and up the bottom of the bowl with a silicone spatula as needed. Add the sour cream, lemon juice, and vanilla extract. Beat on medium-high speed until smooth and combined, about 1 minute. Make sure there are no large lumps of cream cheese. If there are lumps, keep beating until smooth. Using your mixer on low speed or a silicone spatula, fold the whipped cream into the cheesecake filling until combined. This takes several turns of your rubber spatula. Combine slowly as you don’t want to deflate all the air in the whipped cream.
- You can use a spoon or piping bag to transfer the filling on top of the crusts. Spoon or pipe about 2 Tablespoons of filling over each crust. I prefer piping the filling because it’s a little easier and neater. Fit your piping bag with a large star or round piping tip, then transfer the filling to the bag and pipe. (You could also use a plastic zipped-top bag. Spoon the filling inside, snip an end off a corner, and pipe.) Use the back of a spoon to smooth the tops so they are flat.
- Refrigerate the mini cheesecakes in the pans for at least 3 hours and up to 2 days. If refrigerating for longer than 3 hours, I recommend covering with aluminum foil or plastic wrap.
- Keep refrigerated until ready to serve. Serve with optional toppings (see recipe Note). The cheesecakes begin to soften and stick to the liners after about 30–60 minutes at room temperature.
- Cover and store leftover mini cheesecakes in the refrigerator for up to 5 days.
Notes
- Make Ahead & Freezing Instructions: The mini cheesecakes can be made 1-2 days in advance and refrigerated for up to 2 days before serving, as noted in step 6. Another way to prep these mini no-bake cheesecakes is to freeze them. Refrigerate them as directed in step 6, then remove them from the muffin pan (keep the liners on them) and line in a single layer in a large freezer-friendly container. Cover tightly and freeze for up to 3 months. Thaw in the refrigerator for at least 24 hours before serving.
- Special Tools (affiliate links): 12-count Muffin Pans | Cupcake Liners | Food Processor | Electric Mixer (Handheld or Stand) | Silicone Spatula | Piping Bag (Reusable or Disposable) | Large Piping Tip (like Ateco 808)
- Optional Toppings: Right before serving, you can add toppings to the mini cheesecakes. You can also add the following toppings after the cheesecakes have chilled in the refrigerator for just 1–2 hours (step 6), then store the topped cheesecakes in the refrigerator for the remaining time. Use 3/4 cup strawberry sauce divided over each chilled mini cheesecake. (Spoon about 1/2 Tablespoon over each.) And/or use 1 cup mixed berries, plus a few mint leaves, divided over each for additional garnish. Instead of strawberry sauce, try the same amount of lemon curd, apple butter, or your favorite fruit preserves. You can also top with chocolate ganache. I recommend spooning a little over each mini cheesecake before refrigerating so the ganache can set up too.
- Lemon Juice: Lemon juice brightens up the flavor. This cheesecake does not taste like lemon. For lemon flavored mini no-bake cheesecakes, replace the sour cream with 2 Tablespoons fresh lemon juice (in addition to the 1 teaspoon lemon juice that it already calls for) and add 2 teaspoons lemon zest.
- Room Temperature Ingredients: Bring the cream cheese and sour cream to room temperature before beginning. Room temperature ingredients guarantee a smooth cheesecake filling. Beating cold ingredients together will result in a chunky cheesecake filling. (The heavy cream, however, MUST be cold in order to whip into stiff peaks.)
- Non-US Readers: Don’t have graham crackers where you live? Use 2 cups (240g) ground digestive biscuits instead (about 16 biscuits), the same amount of butter, and add a bit more sugar (about 1/2 cup, or 100g). You may need to add a few extra minutes to the pre-baking time, as digestive biscuits are not quite as crispy-crunchy as graham crackers. And from what I understand, spreadable cream cheese sold in a tub in countries outside of the US is a little different from the spreadable cream cheese in the US. It’s thicker, sturdier, and more solid and should be OK to make cheesecake. I have no experience with it, but this is what I’ve heard from other non-US readers.


Reader Comments and Reviews
Made for the April baking challenge instead of the macaroons as we don’t care for coconut. Easy and delicious. Topped with the homemade strawberry sauce.
These mini cheesecakes are amazing! So easy to make & the perfect size too.
Oh my gosh, soooo delicious!! I topped mine with ganache, whipped cream, and strawberries. My kids are already asking me to make them again!
What an easy, fun and quick recipe! This will be my go to when I’m craving a quick bite of cheesecake!
Excellent cheesecakes! And so easy to make! I baked them both with crust as recommended, they turned out great. Will definitely be making again.
Really easy and perfect for when you want to be indulgent. Also perfect for scaling down for a party of 1!
Chose this instead of the main challenge recipe. Yum! Wish I were neater in making them, but it’s the taste that counts. With or without the strawberry topping, a winning recipe!
Quick, easy. Great beginner cake for kids to learn how to whip cream to proper peaks. It’s a cute little, slightly sweet treat. I LOVE cheesecake and these didn’t even compare to cheesecake so I don’t prefer referring to these as any kind of cheesecake. I will call them parfait tartlets and then I can give them 4 stars.
My kids loved the taste of these no bake cheesecakes. The recipe was simple to follow and I love that I didn’t have to heat up my house to have delicious cheesecake.
Flavor great but I wanted more cheesecake filling! I added strawberry sauce which was also tasty.
A perfect make ahead dessert! Light and fluffy, not too sweet. We swapped the graham crackers for Oreos for a twist!
I’ve been wanting to make the no-bake cheesecake, so I was happy that this came up as a baking challenge. I had family visiting, so it was a great time to try this recipe. Everyone loved them! I made a blueberry topping and it was so delicious, although they were also good without the topping. I will definitely make these again.
These mini cheesecakes were delicious. Like a light and fluffy cheese cake bite. I topped them Sally’s salted caramel sauce and fresh raspberries!! So easy to throw together, the hardest part was waiting for them tons up over night!! Thanks Sally !!
This recipe was so good! I made it for the baking challenge but will definitely come back to it. The crust was crumbly and tasty, while the cream cheese topping was so creamy and delicious. I added berries and chocolate to the top which hit the spot.
I’m confused. Is the no bake cheese cake recipe for 1 pan of 12 muffins and 2 muffin pans for mini muffins.
Hi Teresa, this recipe yields 24 mini cheesecakes using 2 standard 12-cup muffin pans.
So I want to freeze these for my wedding in two weeks. Do you recommend keeping the muffin liner on the cheesecakes even after freezing them?
Hi Kirsten, you can keep the liners on or remove them after freezing—up to you. Hope they’re a hit!
I read through your recipes for No Bake Cheesecake and the mini version made in the muffin tin. I noticed that the recipe for the mini No Bake Cheesecake doesn’t include powdered sugar like the full size version. Is there a reason for the difference? Thank you!!!
Hi Joyce, a smidge of confectioners’ sugar thickens the filling in the full-size no-bake cheesecake, which is helpful since we’re cutting it into slices. We didn’t find it necessary here, where the servings are already made for us with the support of the muffin pan and liners. Hope this helps!
These are no doubt the best! Easy to make and delicious. I made the 3 berry fruit sauce and it was all a hit. Thank you!!
Would silicone liners work?
We haven’t tested it but can’t see why not, Anne. Let us know if you try!
Can I sub a Oreo crust for this? If so, how should I do that?
Hi Kaylie, Absolutely! You can use crushed Oreos instead of graham cracker crumbs (we recommend the quick baking step if using Oreos though), or use one whole Oreo as the crust. Enjoy!
I want to make the mini no bake cheesecake in heart shaped silicone
Will these be easy to remove after being chilled
Hi Suzanne, cupcake liners are key—you won’t be able to remove the cheesecakes without them and we haven’t tested them in a silicone liner to see how it would work.
I loved your excellent receipe. Can You share your receipe on cream cheese and sour cream and heavy cream as we do not have tub of cream cheese. Thanks
Great recipe
Really enjoy added as glass of white wine watching my favorite movie
Hi am from Barbados and I tried this but I am not sure I got the texture correct because I left mine in the fridge overnight but the mixture still looks soft. Any reason why. It’s not firm. When I cut one the mixture just looks kind of like still pulling away from the liner
Hi Aletha, did you use full fat brick cream cheese? Anything else will be too soft and not set properly.
Can I use cool whip instead of whip cream
Hi Debbie, we haven’t tested it, but can’t see why not! 1 cup of heavy cream whips into 2 cups, so you’ll need 2 cups of it. You may want to slightly reduce the sugar in the batter as well. Let us know what you try!
The texture of tub cream cheese results in a different consistency. I use it for spreads and dips but always reserve the brick for desserts.
I have made the mini no bake cheesecakes several times and they are creamy delicious.
I’m sorry I must’ve hit the wrong spot I ask if I could put lemon pie filling or jams on the crust first then the cream cheese and freeze it
Hi Adele! We haven’t tested that, but fear the jam layer would prevent the cups from setting up properly. We would try swirling some into the top instead, but let us know what you try!
I love your page and find myself on it often when looking for recipes! my daughter is holding a bakesale and suddenly I am roped into making mini-cheesecakes. Can I make these with the mini-mini cupcake tin? I have never used it but have one! but can I find mini-mini liners?
Hi Blair, You can definitely make these extra mini using a 24 count mini muffin pan. Make the recipe as directed, but when it comes to assembly, use about half the amount of crust mixture and filling per cheesecake. There are mini cupcake liners available. Enjoy!
Thank you! Making bake and non bake simultaneously to see which work best!
I was looking forward to making this recipe. However, the recommendation to bake the graham cracker crusts for 5 minutes at 350 degrees resulted in greasy cupcake liners and greasy muffin tins. I purchased special liners which I now cannot use and have to wash the muffin tins before I can proceed. The guests would not have been able to hold the mini cheesecake in their hand.
Hi Diane, sorry to hear that the crust didn’t turn out for you. We find the greasiness really depends on the cupcake liners you’re using (true for cupcakes and muffins, too). We like parchment cupcake liners. Did you use pre-ground graham cracker crumbs or did you process them yourself? If the crumbs aren’t ground fine enough (like sand), the crust can end up greasy as well. And make sure to press them in well! Hope these tips help, and thank you for giving these a try 🙂