

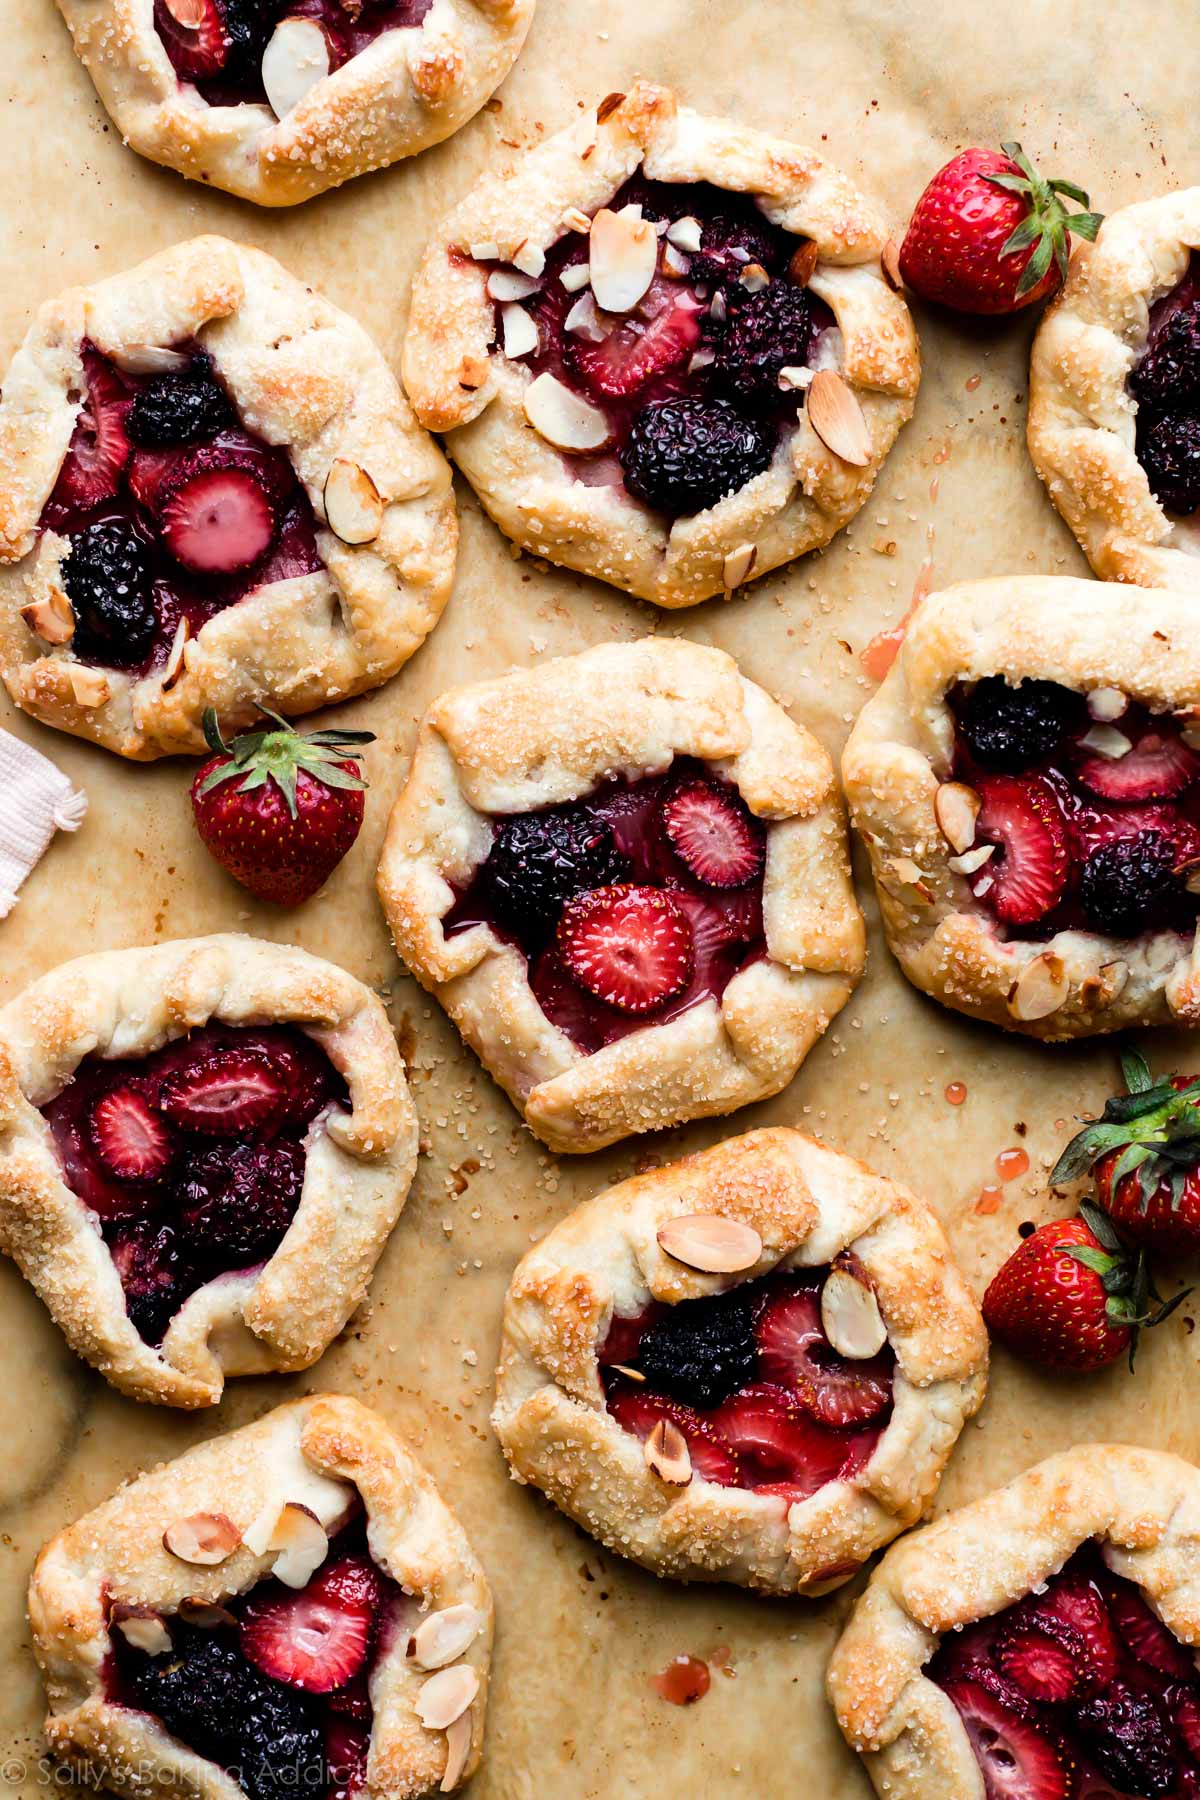
Using a simple fruit filling and homemade flaky pie crust, you can create adorable mini fruit galettes. These small free-form pies are easy to assemble, perfectly portioned, and can be made with a variety of delicious fillings. The recipe is easy to halve if needed and they’re fun to serve as an alternative to larger pies and galettes!
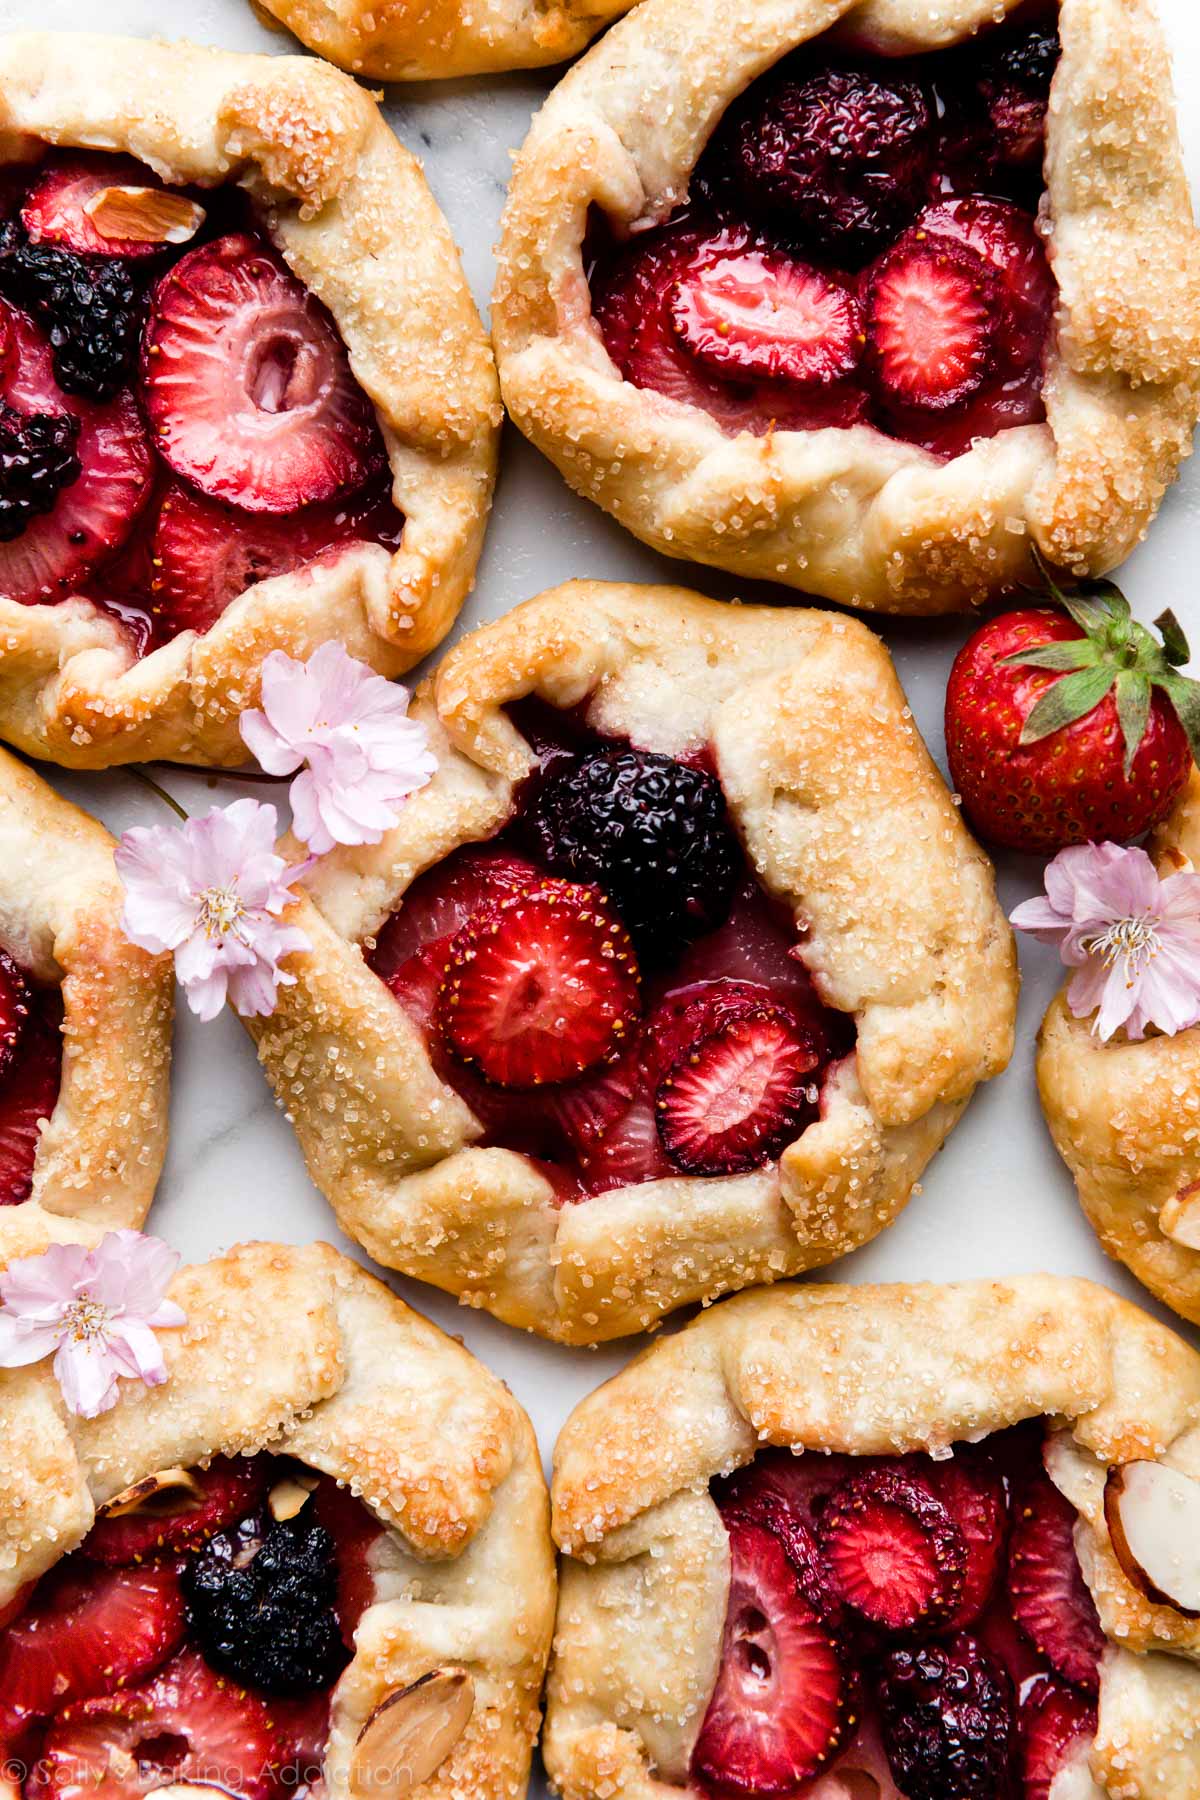
Complete with a flaky golden brown pie crust, juicy berry filling, and crunchy coarse sugar on top (optional but so good!!), these mini fruit galettes are a treat any time of year. But I especially love them as the weather heats up and we can take advantage of the season’s freshest flavors.
Galettes are free-form pies. I like to call them “lazy pies” because there’s no complicated shaping involved. Just as delicious + awesome as pie, but there’s no weaving, crimping, trimming, or any of that meticulous business. (I know that’s appreciated. Galettes are easy!) I usually stick to full size galettes—like my Blueberry Peach Frangipane Galette, Lemony Blueberry Galette, Strawberry Peach Galette, or Apple Galette—but smaller tarts have their benefits. I know you’ll happily agree!
Why Make Mini Fruit Galettes?
- Easier than a full pie or galette
- No complicated shaping
- Fun dessert to make
- Customizable fruit fillings
- Quicker than a full pie or galette
- Recipe is easy to halve
One reader, CeeCee, commented: “It was my first time making pie dough, so I wanted to bake a dessert that was relatively easy. Making a whole pie seemed too intimidating so I decided on mini fruit galettes! The crust was perfectly buttery and flaky and the fruit filling was superb. I only wish I had a little vanilla ice cream to go with it! ★★★★★“
Mini Fruit Galettes Recipe Ingredients
A quick overview of the ingredients you need:
- Pie Crust: Don’t skimp on flavor and texture—make homemade pie crust. My favorite pie crust recipe is straightforward and you can make it ahead of time and freeze. You need flour, salt, butter, shortening, and water. Unlike a full size galette where you only use 1 pie crust (half of the recipe since it yields 2 crusts), you use both crusts here. Very convenient! You could also use my all butter pie crust or the buttermilk cornmeal crust I use for my mixed berry galette. (Double it so you have 2 crusts.) If you can’t make your own, store-bought pie crust works in a pinch.
- Fruit: I recommend using berries or at least some berries in the fruit filling. Fresh fruit is best, though you can use frozen in a pinch. See my recipe note as well as the alternate fruit fillings listed below.
- Cornstarch: Cornstarch helps thicken the filling.
- Granulated Sugar: A little sugar sweetens the filling.
- Lemon Juice or Vanilla Extract: Use either!
- Milk (for brushing): For golden crusts, brush them with a little milk before baking.
Overview: How to Make Mini Fruit Galettes
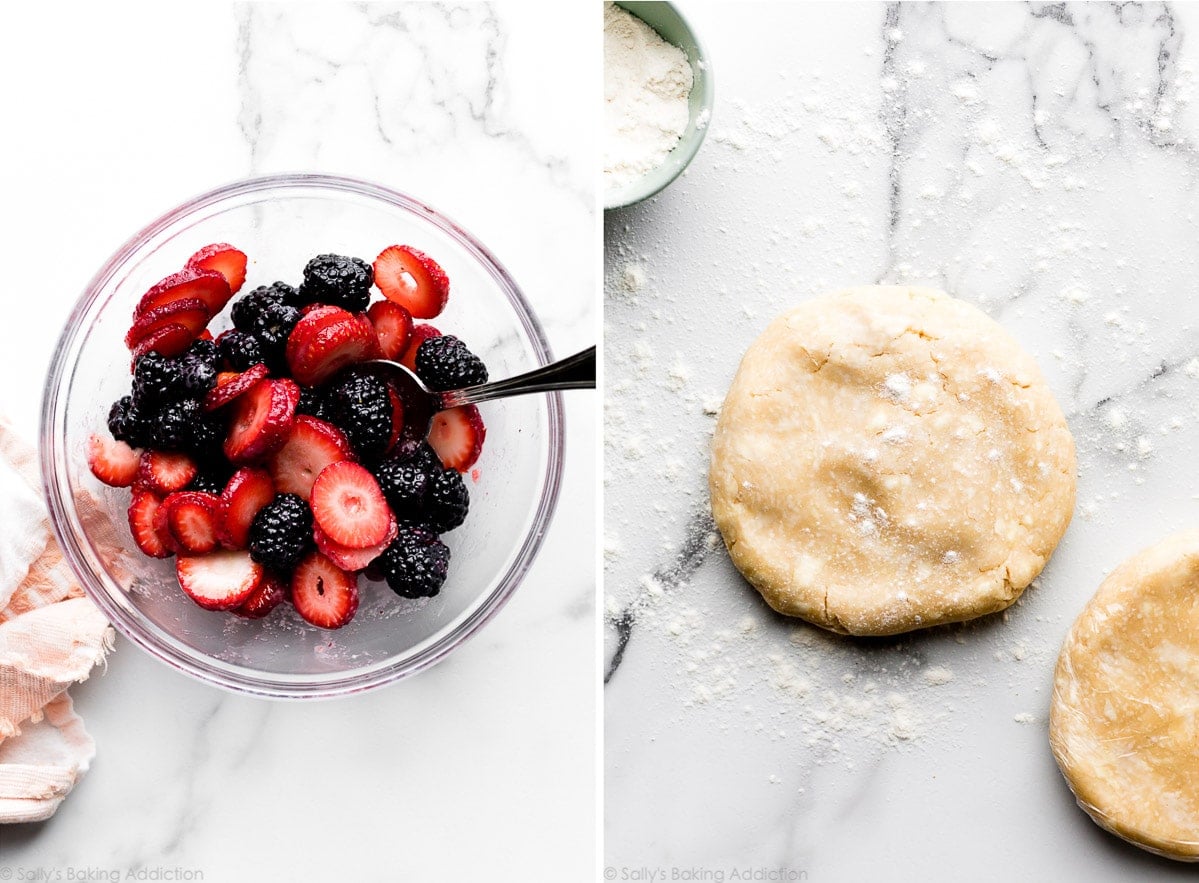
- Make pie dough: Pie dough needs to chill for 2 hours before it’s useable, so I always recommend making it the night before.
- Make the filling: I like to mix the filling ingredients together before I start shaping the crusts. That way it’s ready and the shaped dough isn’t just sitting there—remember, pie dough loves being cold. Chill the filling in the refrigerator as you work on the dough.
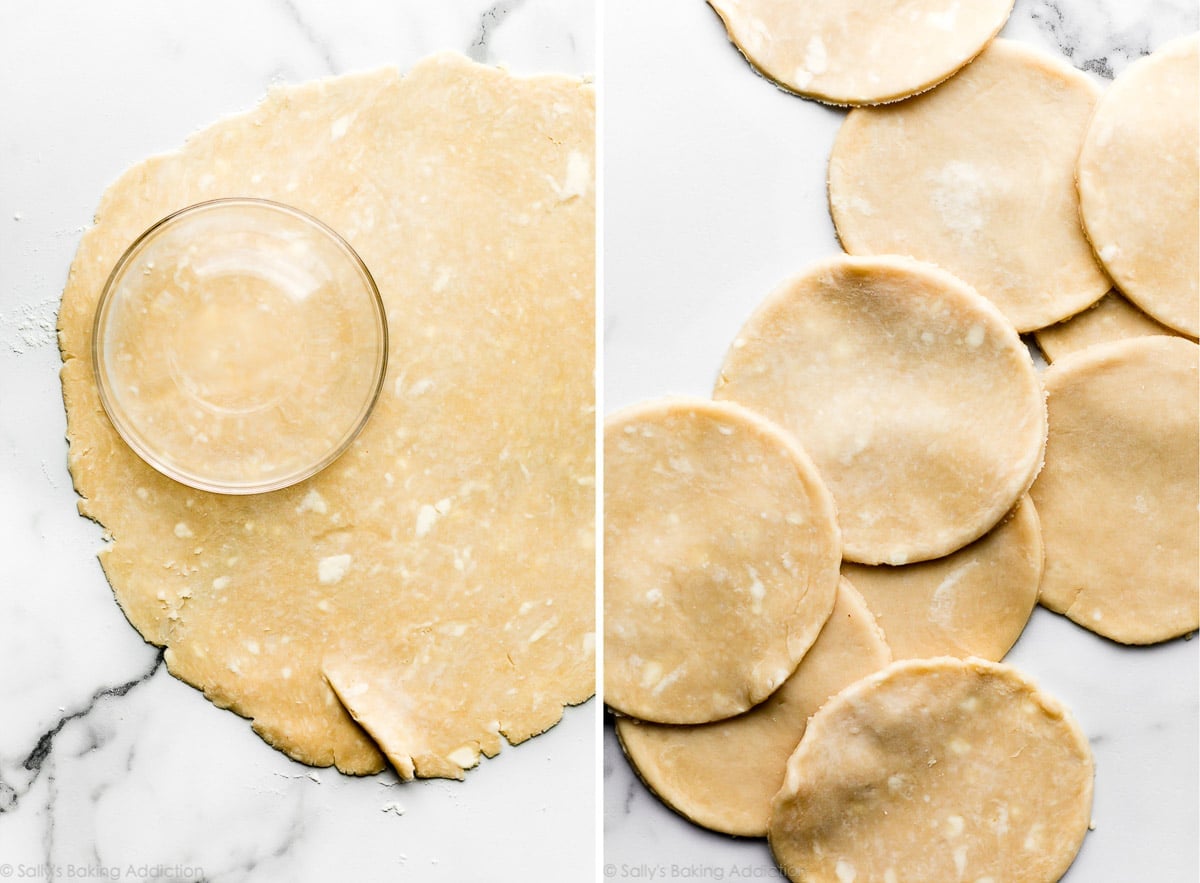
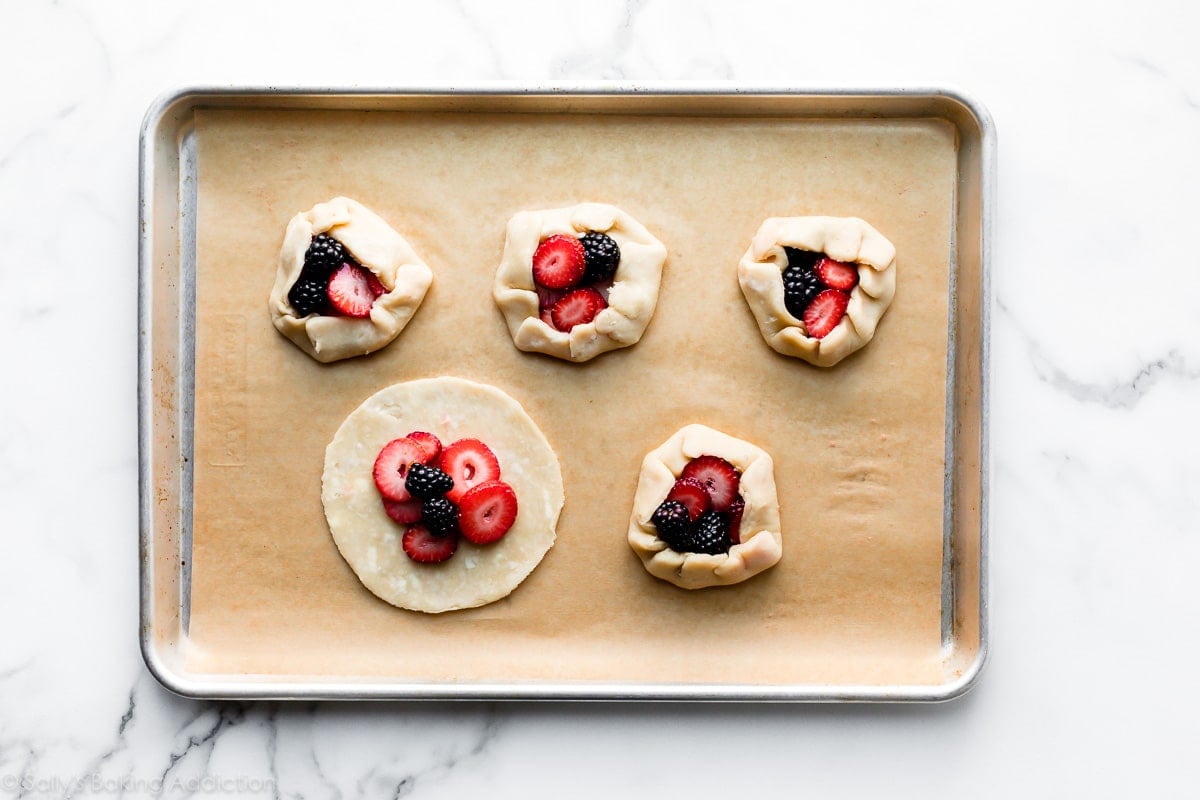
- Roll out pie dough & cut into small circles: Use a 5.5- to 6-inch round cookie cutter. This is a pretty big and unusual size, so if you don’t have one, use the the same size rim of a mixing bowl instead. That’s what I do! Or use a ruler and cut circles with a sharp knife. Re-roll the dough scraps until all the pie dough is used. You’ll have about 5 from each crust (10 total). Work quickly because the dough becomes delicate the longer it sits at room temperature. Arrange rounds on lined baking sheets.
- Fill & assemble: Spoon about 1/4 cup of filling into the center of each dough round. Gently and tightly fold the edges up over the filling, leaving the very center exposed. Make sure the mini galettes are tight and compact so they don’t unfold themselves or lose shape while baking.
- Chill: The most important step in this recipe is to chill the assembled galettes before baking. Brush the dough edges with a little milk, top with coarse sugar and/or sliced nuts if desired, then chill in the refrigerator for at least 20 minutes and up to 4 hours. Without chilling, the mini galettes will lose their shape.
- Bake until the crust is browned: These are so much quicker to bake and cool than a full pie or galette.
Some step-by-step photos:
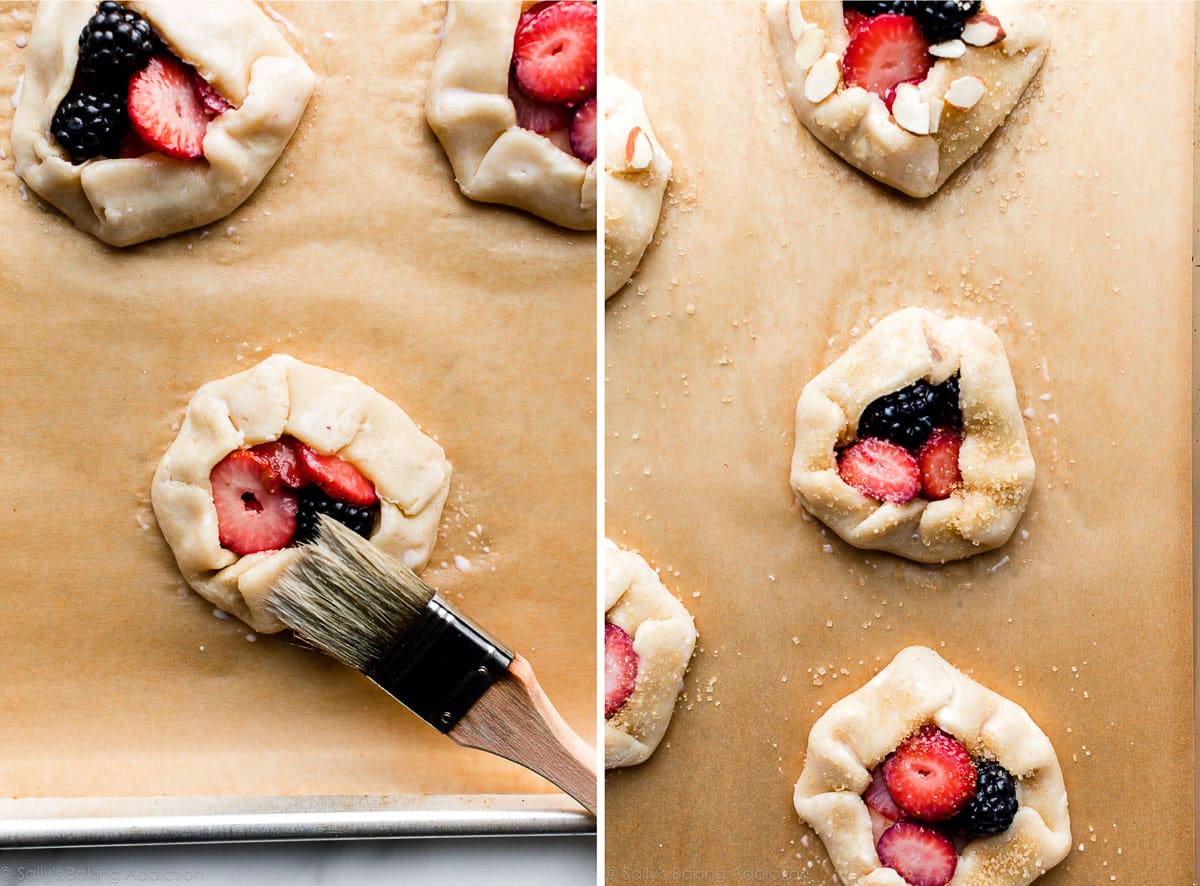
Optional: Before chilling and baking, dress up your galettes! Sprinkle the assembled crusts with coarse sugar. I used Sugar in the Raw. The sugar adds a lovely crunch, but you can skip it if desired. I also sprinkled some of the galettes with sliced almonds. Any nut works, but this is also optional.
Fruit Filling Ideas
Use 2 and 1/2 cups of fruit in the filling. You can pretty much use any fruit. Fresh fruit is best, but you can use frozen if needed. For best results, thaw the fruit first. Blot dry as much as you can before using. Here are my favorites:
- Mixed Berries: Use any combination of mixed berries for a total of 2 and 1/2 cups. I used 1 and 1/2 cups strawberries and 1 cup blackberries. I recommend slicing strawberries as I did in these photos so they’re flatter slices and you can layer more into each.
- Single Berry or Dark/Sour Cherries: Use 2 and 1/2 cups of one berry such as strawberries, blackberries, or blueberries. Or use dark or sour cherries. Avoid using all raspberries. Instead, combine them with other berries. They’re particularly juicy on their own.
- Apple, Peach, Pear, Plum (or combination): Use 2 and 1/2 cups of 1/8 – 1/4 inch thick slices. If the slices are particularly long, cut them in half. Feel free to use brown sugar in the filling and/or add a little cinnamon or other spice you enjoy.
- Banana: I’ve tried this! Use 2 and 1/2 cups of sliced banana. No need to mix with cornstarch unless you are using banana and another fruit listed above. Add a dash of cinnamon, the lemon juice (to prevent browning), and use brown sugar instead of granulated sugar.
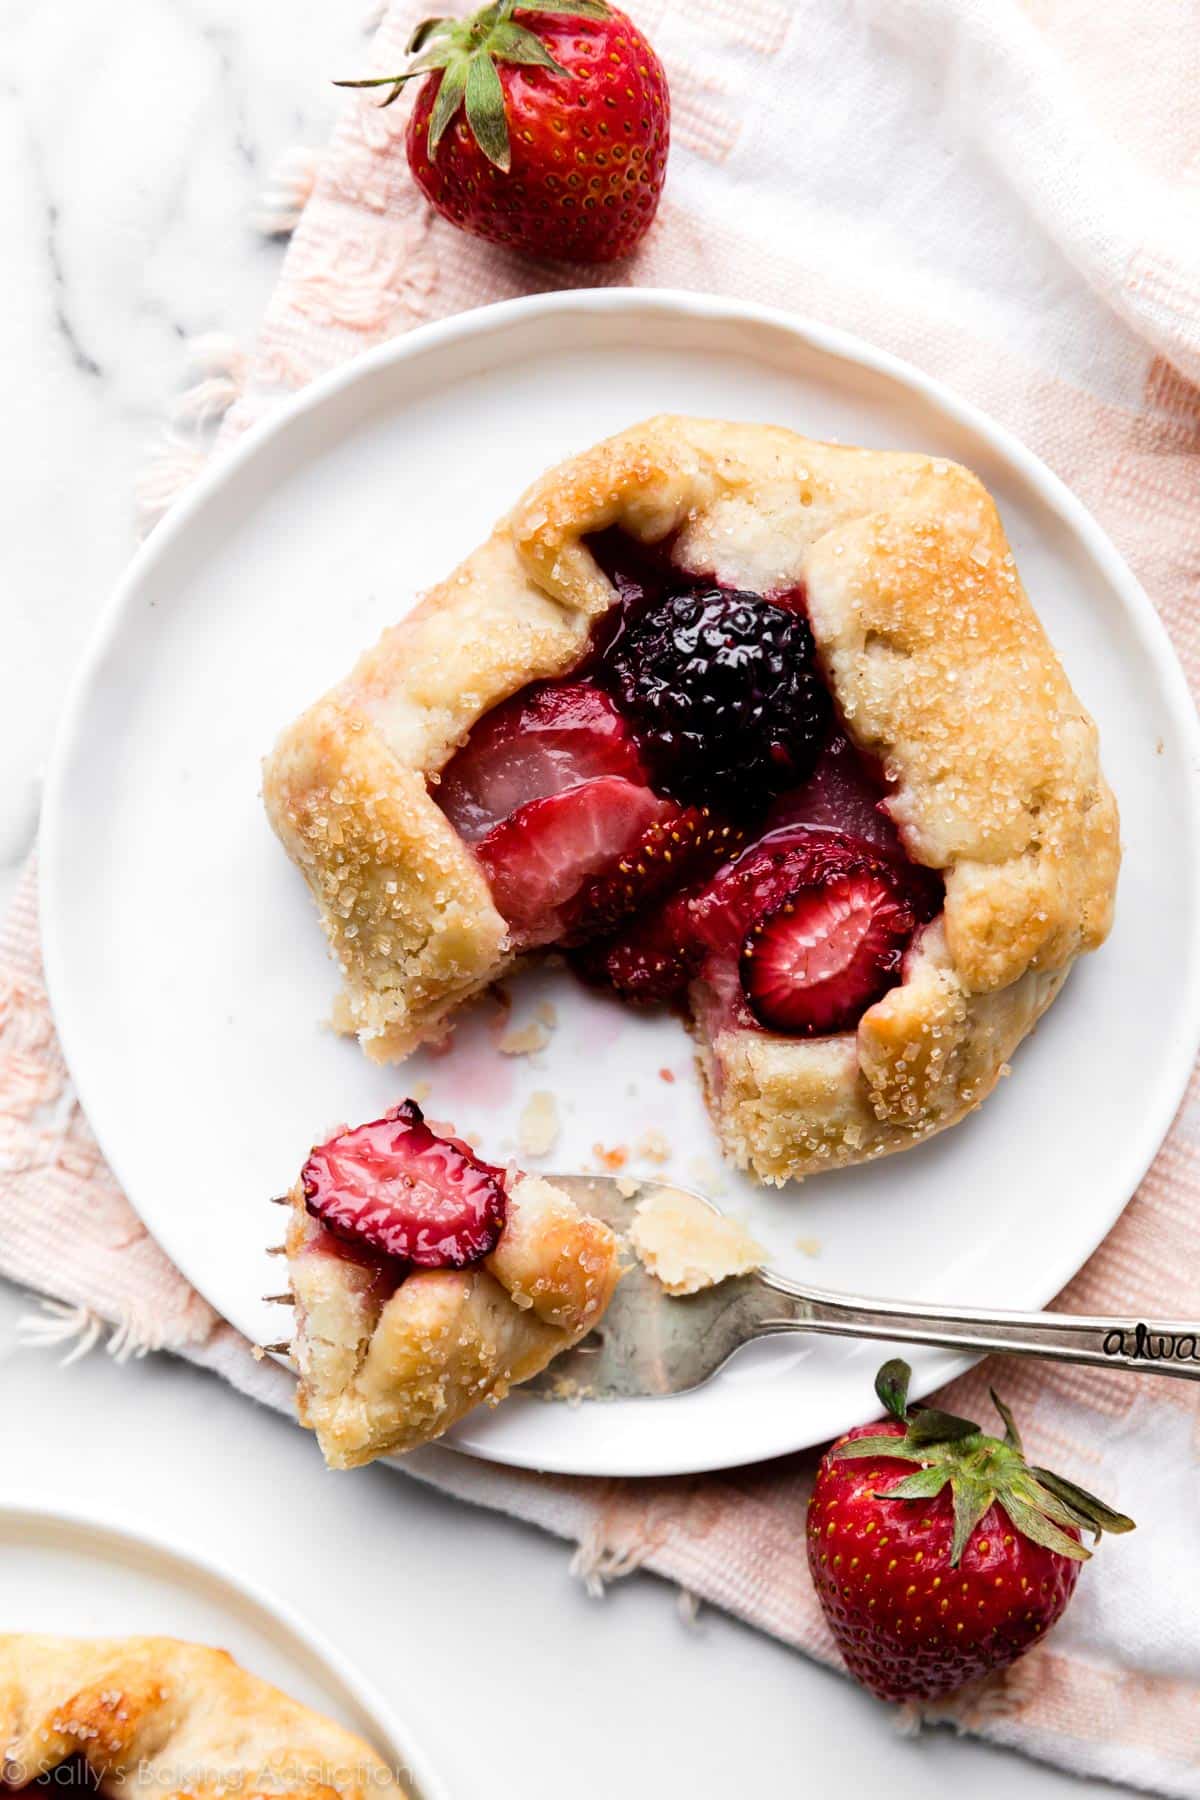
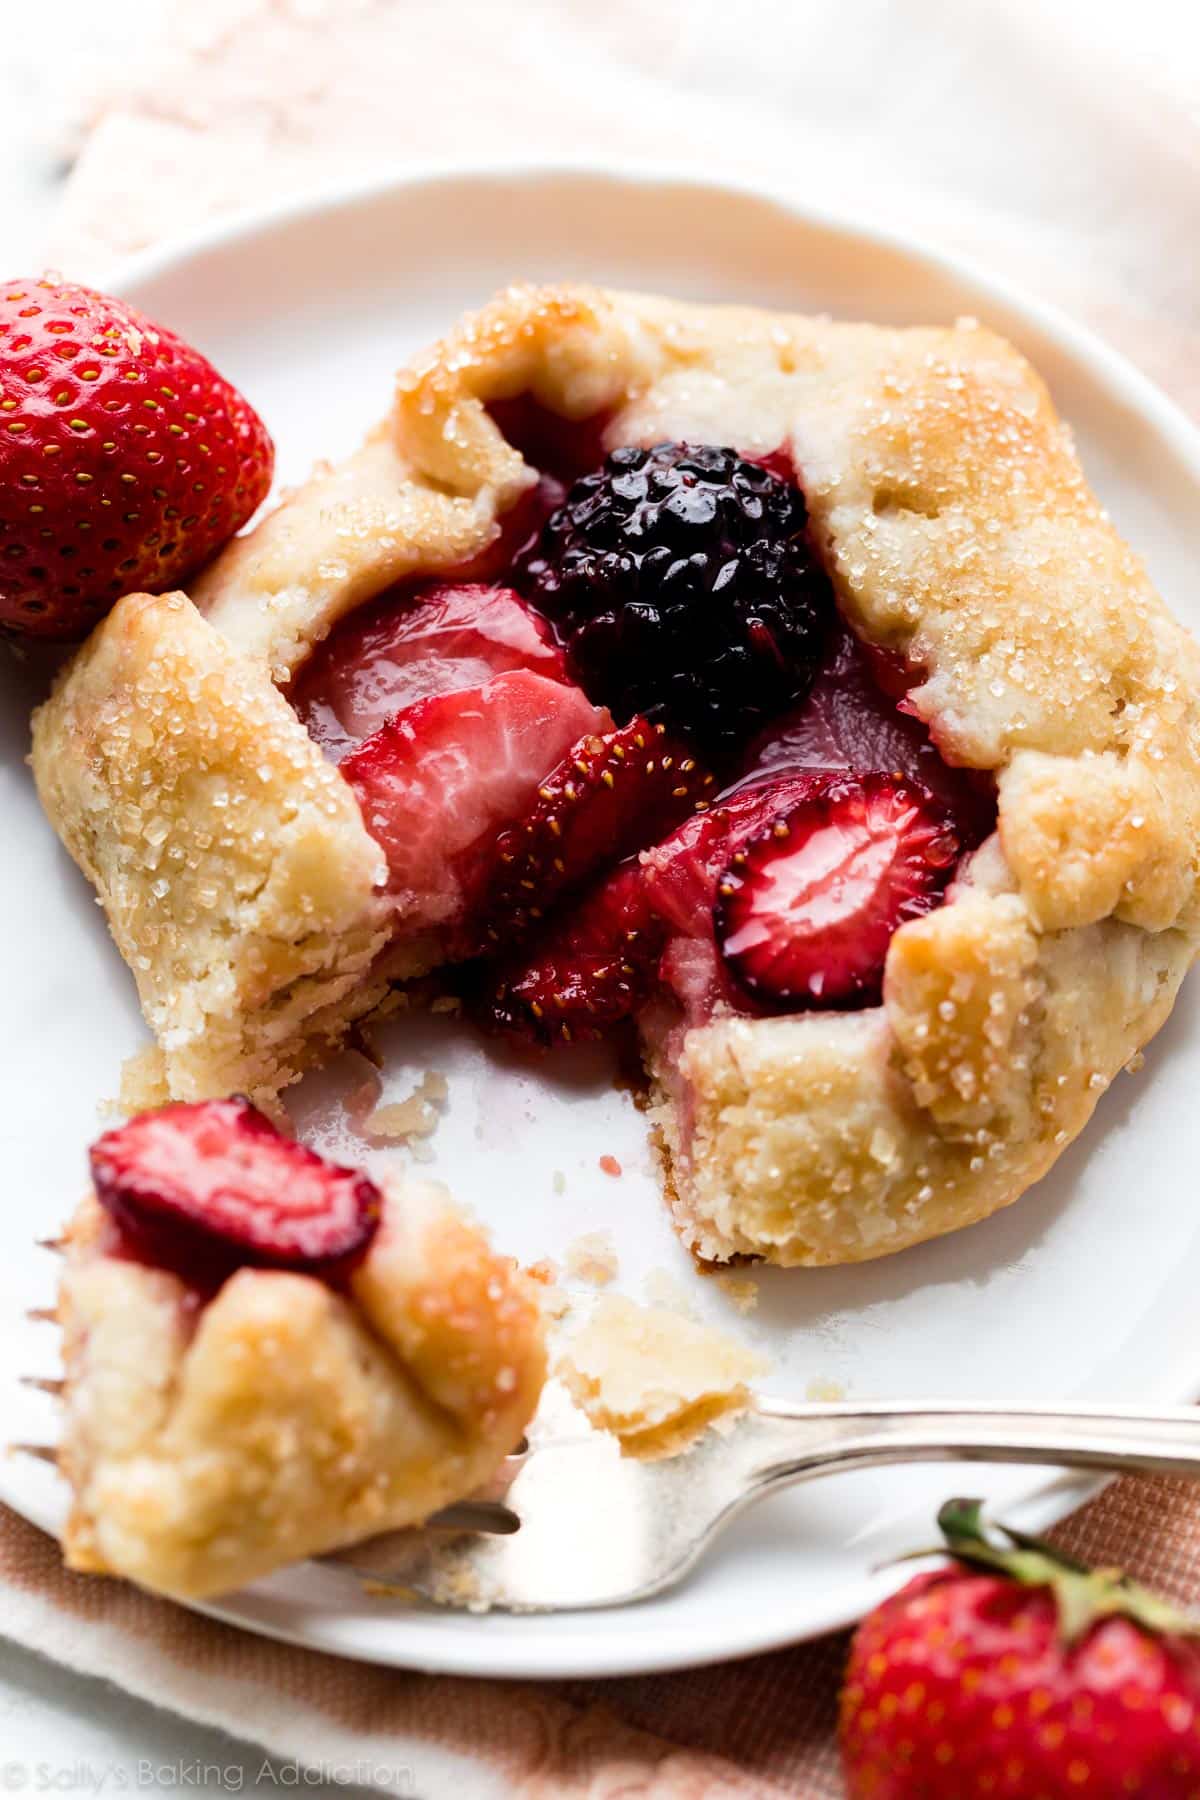
Serve the mini galettes plain or with ice cream, whipped cream, or even salted caramel drizzled on top. Have fun customizing your own!
See Your Mini Fruit Galettes!
Many readers tried this recipe as part of a baking challenge! Feel free to email or share your recipe photos with us on social media. 🙂
Print
Mini Fruit Galettes
- Prep Time: 1 hour
- Cook Time: 28 minutes
- Total Time: 1 hour, 30 minutes
- Yield: 10 mini galettes
- Category: Dessert
- Method: Baking
- Cuisine: American
Description
Using pie dough and a simple fruit filling, you can create mini galettes that are perfectly portioned and fun to serve as an alternative to a full pie or galette. Review the recipe notes below and the helpful video tutorial before beginning.
Ingredients
- Flaky Pie Crust or All Butter Pie Crust dough (either recipe makes enough dough for this)
- 2 and 1/2 cups (about 350-400g) mixed berries or other fruit (see note)
- 1 Tablespoon (8g) cornstarch
- 2 Tablespoons (25g) granulated sugar
- 1 teaspoon lemon juice or vanilla extract
- 2 Tablespoons (30ml) whole milk, for brushing*
- optional for topping: coarse sugar and/or chopped/sliced nuts
Instructions
- Pie crust: I like to make sure my pie dough is prepared before I begin. Make pie dough the night before because it needs to chill in the refrigerator for at least 2 hours before using. (See note.)
- Line two large baking sheets with parchment paper or silicone baking mats. Make sure you have enough room in your refrigerator for these baking sheets because the shaped galettes must chill in step 7.
- Prep the filling: Gently stir the berries, cornstarch, sugar, and lemon juice/vanilla together in a medium bowl until combined. Place in the refrigerator, covered or uncovered, until step 5.
- Shape the crusts: Working with 1 chilled pie dough at a time, place the dough onto a floured work surface. Roll into a large 12-inch circle. Use your warm hands to mold any cracking edges back together as you see me doing in the video tutorial below. From the circle, cut rounds using a 5.5 or 6 inch cookie cutter. I simply use the rim of a bowl that’s about that size. Or you can use a ruler and cut circles with a sharp knife. You’ll have to re-roll the dough scraps a few times. Work quickly because the dough becomes much more delicate the longer it’s at room temperature. You’ll get about 5 rounds per pie crust. Repeat with 2nd chilled pie dough for a total of about 10.
- Fill galettes: Arrange dough rounds on prepared baking sheets. Remove filling from the refrigerator and spoon about 1/4 cup into the center of each dough round, leaving any excess juice behind in the bowl. Gently and tightly fold the edges over the filling leaving the very center exposed, as you see in the photos and video tutorial. Make sure the mini galettes are tight and compact so they don’t unfold themselves or lose shape while baking.
- Brush the edges of the pie dough with milk, which helps guarantee the dough will brown. If desired, sprinkle with coarse sugar and/or sliced almonds/nuts.
- Chill the shaped galettes in the refrigerator, covered or uncovered, for at least 20 minutes and up to 4 hours. The galettes will lose shape if they’re not chilled. You can preheat the oven as they finish up chilling.
- Preheat oven to 375°F (191°C).
- Bake chilled galettes for 25-28 minutes or until the edges are lightly browned.
- Remove from the oven and cool for at least 5 minutes before enjoying. You can enjoy warm or at room temperature. Serve plain or with ice cream or whipped cream.
- Cover leftover mini galettes and store in the refrigerator for up to 5 days.
Notes
- Make Ahead & Freezing Instructions: Pie dough, whichever you use, can be made ahead of time and chilled in the refrigerator for up to 5 days or frozen for up to 3 months, too. Allow to thaw overnight in the refrigerator before rolling out and filling. You can assemble the mini galettes in steps 5 and 6, then chill in the refrigerator in step 7 for up to 4 hours. I don’t recommend longer than this because the crust could become soggy. Baked and cooled galettes can be frozen for up to 3 months. Thaw in the refrigerator then bring to room temperature, if desired, before enjoying.
- Special Tools (affiliate links): Baking Sheets | Silicone Baking Mats or Parchment Paper | Glass Mixing Bowl | Rolling Pin | Pastry Brush
- Fruit: You can pretty much use any fruit here. Rinse, peel, slice/chop, and pat dry as necessary. Make sure the fruit is in thin slices (apples, peaches, pears, plums) about 1/8 or 1/4 inch thick or bite-size pieces. I suggest using berries or at least some berries in the filling. I used 1 and 1/2 cups strawberries and 1 cup blackberries. I recommend slicing strawberries as I did in these photos so they’re flatter slices and you can layer more into each. See my blog post above for different fruit filling ideas. Fresh fruit is best, but you can use frozen if needed. For best results, thaw the fruit first. Blot dry as much as you can before using in the filling.
- Lemon Juice or Vanilla Extract: You can use either. Think about which will pair best with the fruits you’re using. I like using lemon juice with berries.
- Milk: I recommend whole milk for brushing on the crusts, but you can use lower fat, nonfat, buttermilk, half-and-half, or even heavy cream (which will be very thick, thin with a bit of water). You can also use nondairy milk.
- Half Batch: For about 5 mini fruit galettes, use 1 pie dough disc and save the other for another time. (See pie dough recipes linked above for freezing instructions.) Halve each of the filling ingredients. All assembly, chilling, and baking instructions remain the same.
- Chilling the Baking Pans in the Refrigerator: If you’re nervous to chill the baking sheets in the refrigerator then bake them (which can cause warping), you have two other options. You can simply assemble the galettes on parchment paper or silicone baking mats, lift the parchment/baking mat as a whole and place on another baking sheet or directly onto a shelf in the refrigerator. After chilling, carefully lift up and place the entire parchment/baking mat onto the baking sheets for baking. Or you can use a thin spatula and very carefully transfer the assembled unbaked galettes to a large plate to chill.


Reader Comments and Reviews
Yum! Made these with apples, your salted caramel and the streusel topping from your blueberry crumble as recommended by another fan. Topped with vanilla ice cream and a sprinkle of cinnamon. They were so easy to make and tasted wonderful! They reminded us of strudel from our local Oktoberfest, which we love! Easy for our small family but will also be great for a quick but fancy looking dessert when we can entertain again. No surprise, but another great recipe. Thanks Sally!
I made the salted caramel apple galette and it was so yummy!
So, have made this twice now. First time, I think my strawberries were not the best, filling was a wee tart. But by end of May, strawberries much improved.
Both times I made, the crust tended to crumbling rather than flaky. Not sure what I am doing wrong. Also seemed to take a long time to brown up. Pretty sure oven temp is ok.
Hi Sandy, glad you enjoyed these! I’m glad to help with the crust. If the fats are over-worked into the pie dough, the crust will crumble and taste tough. I recommend using a pastry cutter, using extra cold butter and shortening, and making sure there’s enough ice water. (At least 1/2 cup). Always roll it out slowly and don’t over-work it. I hope this helps for next time.
I love pies, but have never made a galette before so this was a fun monthly challenge. Delicious and easy to make with Sally’s clear instructions.
There were four of us for dinner so I only used one pie dough and saved the other for later. It’s an easy recipe to cut in half. Rather than making 5 rounds I made four. I sprinkled the dough scraps with cinnamon sugar and baked alongside the mini galettes. Sally’s all butter pie crust is a winner too!
Thank you for a fun challenge! Looking forward to June’s.
The flakey crust is a MUST for this recipe! Delicious. I recommend chilling the dough for at least 1 day prior to use and then 40 min minimum before baking due to the delicateness of the dough. I would have added a tbs or two more of sugar bc the berries weren’t sweet enough. Overall
This will definitely be made again!
Another baking challenge in the books!! Wow, what yummy galettes . Sally’s buttery flaky crust was out of this world. Perfectly sized summer dessert. Loved them for Memorial Day & I will definitely be making them again . #sallysbakingchallenge
These were fun to make. I had some pie dough in the freezer I had been meaning to use up. The pie dough didn’t quite work with these (was not your recipe!) but I also made some with store bought pie dough that came together really well. I made mine with nectarines and blackberries with whipped cream and almonds sprinkled on top. So yummy!
Great, light summer dessert. I used mango and strawberry for the filling. I can imagine a lot of flavor combinations to make throughout the year. This is the second time I’ve made Sally’s flaky pie crust (my 3rd time making crust from scratch), and I’ve gotten better at rolling it out. My first time making pie crust (another recipe) was very challenging and it didn’t turn out well. Sally’s tips and recipe simplifies making pie crust- just give it a go!
Well, well, well, if I’m not in love with these! This is my second time using your recipes (and my first time participating in the Baking challenge) and I am once again adoring the clear instructions and the end result. I made these with the all butter crust and lingonberry, apple and cinnamon in the filling and they were amazingly flaky and looked adorable. I’m going to use this a lot – I’m sorta allergic to storebought puff pastry and your crust is just the easy substitute I was looking for!
I made the apple version of these with the all butter pie crust and drizzled them with homemade salted caramel sauce! I had never made pie crust before and it turned out to be so easy with the video and step-by-step instructures! These galettes turned out amazingly 🙂
I feel like a Michelin Star chef honestly .
I used the all butter pie crust , added cream cheese to my filling and topped it with chopped almonds .
The pie crust is to die for !
I paired the dough recipe down to make it single-serve, left out the sugar, and then filled the galette with pesto, mozzarella, and tomatoes. It was delicious and I felt so fancy! The olive oil in the pesto made the crust a little more crunchy, but it was still oh-so flaky. What a delightful spring treat.
Tried the butter crust and I also added cocoa powder to the recipe (trying to make a chocolate crust). A lot of the butter leaked out. Was this because of the cocoa powder or was the dough not chilled enough during the rolling out stage? I used a strawberry balsamic filling which tastes really good.
Back to the kitchen to try again.
Hi Susan, I can’t say for sure since I haven’t tried the recipe with your changes. Feel free to use this chocolate pie crust if you ever try these again.
I made these with a strawberry and blueberry filling for the challenge this month. I used Sally’s all butter pie crust and it came out awesome! I did have a little problem with them leaking in the oven but they still came out great, next time I may add a little extra cornstarch. I baked them for 45 minutes and they held their shape well. My family all enjoyed them very much and love that these challenges get me to make things I would never normally make! Next time I would like to try a full size galette and do a pear and apple filling.
Made these (for the first time) with my four year olds! We made a mixed berry galette using the all butter crust. The crust had great flavor and came out flaky. The crust was actually one of my girls’ favorite parts of the galette. I need to make sure we make the folds in the crust tighter next time. They seemed fine, especially after being chilled, but a few still lost their form a little bit while baking. We used raspberries and blueberries. Even with leaving the liquid in the bowl, after baking some seemed to have a little more liquid than I thought we should have, so maybe a little more cornstarch? Or better draining before filling? Sometimes it is hard to tell what is (likely) user error or not when baking with toddlers.
I love this recipe! I used blueberries, blackberries, and raspberries in the filling and it turned out great. Thanks for another fun and easy recipe!
I made these with the all butter crust recipe and strawberries from our garden. They turned out so good! Great easy to follow recipe!
These LOVELY mini fruit galettes taste as superb as they look!!! I used the All Butter Pie Crust which made it so flaky and buttery. I used strawberries, blackberries and blueberries.
The mini galettes were so easy to throw together (especially if you always keep Sally’s homemade pie dough in the freezer) and infinitely customizable! We used strawberries because they were in season, and they paired beautifully with the flaky pie crust. Thanks for another great recipe, Sally! 🙂
I made this recipe as part of the May baking challenge. My first time making my own pastry and the step by step instructions really helped. I’m really happy with how turned out and my partner says they’re delicious. Thank you for the beautiful recipe!
I made these using a spiced apple filling topped with your salted caramel and they are just delicious! I could barely get four 6″ galettes from one pie crust though, so I may need to roll it even thinner next time. I’m looking forward to trying these with different fruits!
Another great recipe! These were very simple to make! We used your pie crust recipe, mixed berry filling and topped ours with ice cream! Yum!
This was my first time making a pie crust and I have to admit I was a little intimidated. I’ve been watching too much GBBO lately and feel like I am much to aware of all the technical challenges However, your instructions were so clear and easy to follow that it really helped ease my worries! I ended up with nice flakes of butter (although they disappeared a little when rolling out the dough). I also had to use some frozen berries, which I think expelled more juice. Some leaked out the sides of my galette, but no soggy bottoms for me! Even though I was nervous, I count this bake as a success.
I slipped up and didn’t rate it!
Sally, I’ve been baking for a very long time and have never made galettes until I saw your recipe. Theses are so delicious! My husband and I are totally enamoured of them! Lol. I don’t remember making a better pie crust than your all butter one. It is amazing!
Thank you so much for this recipe and your generous spirit! I’m looking forward to trying many more of your recipes.
The mini galettes tasted so good, I made them with all butter pie crust and strawberry filling, they came out great, I even shared them my neighbors to cheers them up in this times, so thank you so much sally
Wow, so good! I’ve never made pie crust before and the crust for these is amazing! So buttery and flaky.
I loved baking the mini fruit galettes! I had to improvise and use store bought crust because that is all that I had, but I look forward to being able to make it completely from scratch. I love the fresh fruit and how simple the recipe is. They were such a hit that they barely had time to cool off before they were eaten.
This recipe was soo easy to follow and fun to make! I had never made a pie crust, or any type of pie but I was able to execute this well on my first try! I used strawberries and blackberries and made a simple whipped cream which my paired so well with this treat. I loved that it wasn’t a super sweet dish, and that the flavors of the fruit were really able to shine. I would definitely make this again, probably with peaches.
These were divine. I used blueberries and cherries for my filling, with a frangipane cream too! Definitely a keeper! We ate ours with dollops of coconut whipped cream – highly recommend!
Very easy to make and so yummy! I had a leftover pie crust I used and made apple and strawberry/rhubarb filling. Next time I think I will try some streusel on top!
I finally made my first homemade pie crust and the galettes were delicious! The pie crust was so tender and the strawberries and blackberries were perfectly balanced. This made for a beautiful dessert. My boys weren’t the biggest fans because I think they wanted sweeter filling. I will make these again with a different filling to test on my boys. My husband and I loved them and discovered they also make a delicious treat when paired with coffee in the morning. Also, they were surprisingly quick to assemble so don’t be intimidated!
Another out of the park recipe Sally! I’ve always been unsure about pie crusts so I made a half batch (also because my hubby doesn’t have a sweet tooth) the recipe was so easy to follow and they turned out great! My 3.5 year old helped me assemble which was fun and more importantly my husband asked me to make them again! And he was trying to get all creative with the endless possibilities of fillings!