

From the countless flaky layers of delicate puff pastry, to the creamy clouds of vanilla pastry cream, to the decorative marbled icing, mille-feuille is an impressive dessert worthy of a special occasion. Learn how to make this classic European pastry in your own kitchen—no complicated ingredients or pastry school diploma needed. I include thorough explanations in the blog post below, as well as many step photos in the recipe, to set you up for success.
One reader, Lauri, commented: “This has been on my baking bucket list for years, but I’ve always been too afraid! Sally made the step-by-step instructions very easy to follow, and these are delicious and worth every minute I put into them!! ★★★★★”
Ready to majorly impress yourself and anyone lucky enough to be a taste tester? Let’s make an ornate-looking (but totally approachable) pastry dessert.
What Is Mille Feuille (and How Do You Pronounce It)?
The French “mille feuille” (pronounced meel foy) translates to a thousand sheets or leaves, a description of this dessert’s many whisper-thin pastry layers. It’s also sometimes called a “Napoleon” or a “custard slice” depending on the filling and/or region. (There are so many versions!) No matter what you call it, this eye-catching European pastry is an impressive sight to behold in a pâtisserie display case.
I have loved poring over recipes online, including from The Spruce Eats, Erin Jeanne McDowell’s on Food52, Bake from Scratch, Preppy Kitchen’s mille feuille, and Prue Leith’s on GBBO. I set out to make my own version, using a couple of those recipes as my inspiration.
And today I’m going to teach you how to make it, too. Just like with homemade croissants, it may look like a daunting baking challenge, but if you take your time with some of the technical steps, I promise it’s doable! The process does take time, but the steps can be broken up over a couple of days.
How to Make Mille-Feuille (Millefeuille or Mille Feuille)
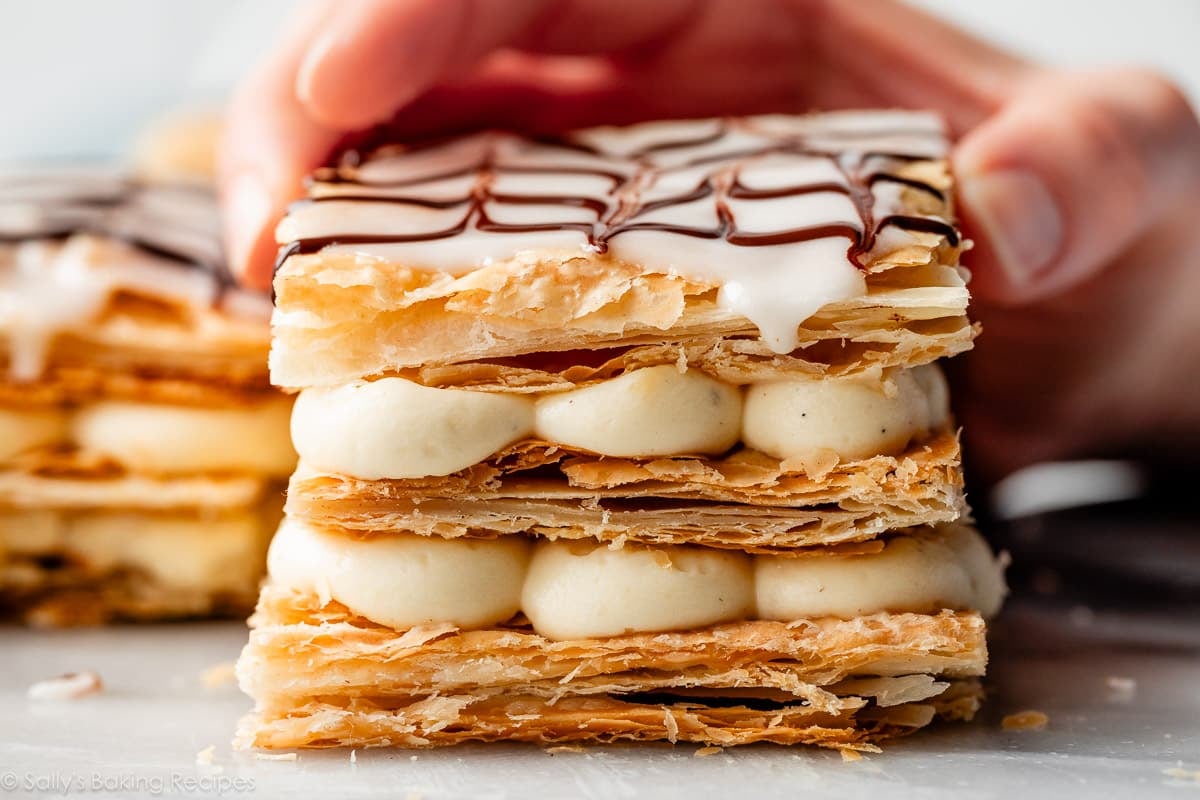
Today’s mille-feuille is made up of:
- 3 layers of baked puff pastry
- 2 layers of pastry cream
- 1 layer of marbled icing
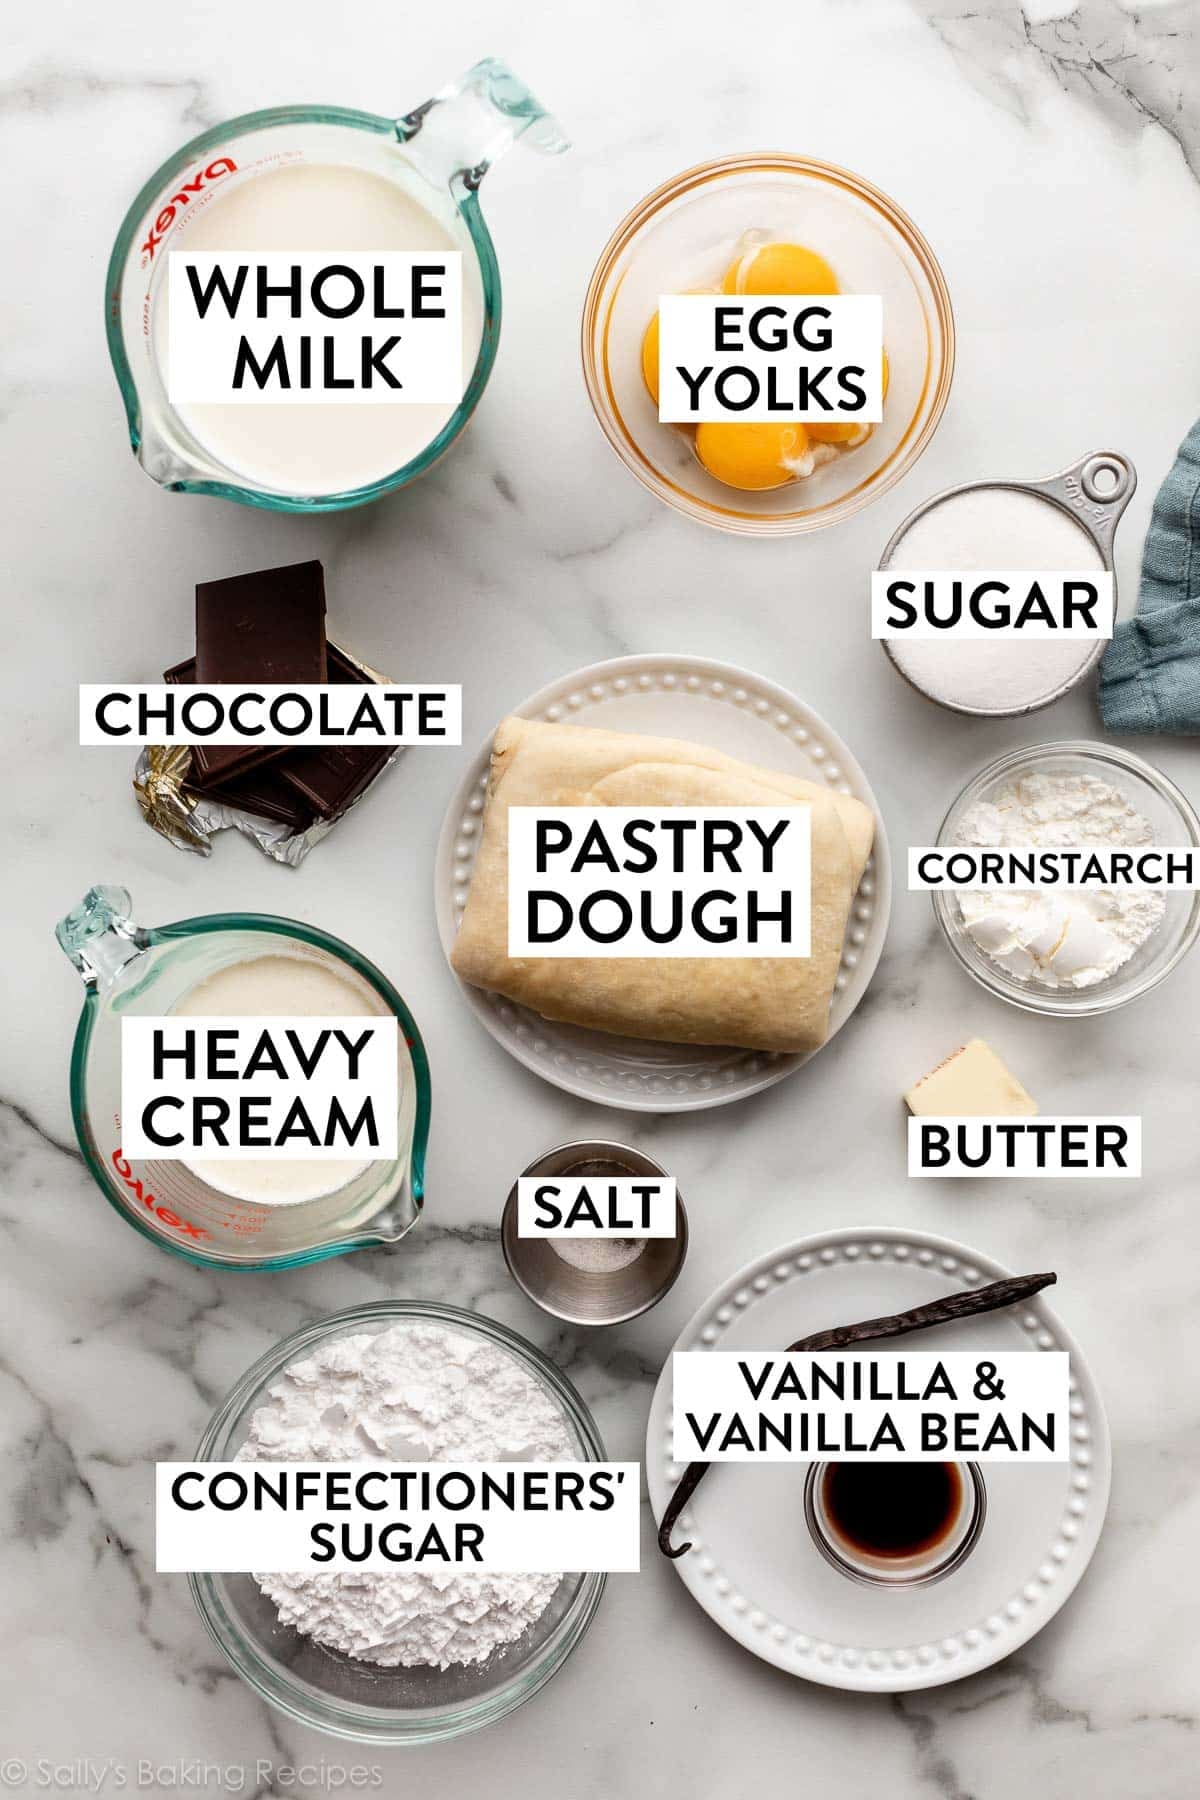
Here is everything you need to make this recipe:
Pastry Cream Filling
Let’s start with the filling because it has cooling and chilling steps involved; it’s efficient to make this first so it’s ready when the baked puff pastry layers are ready. (You can also make it a day ahead.)
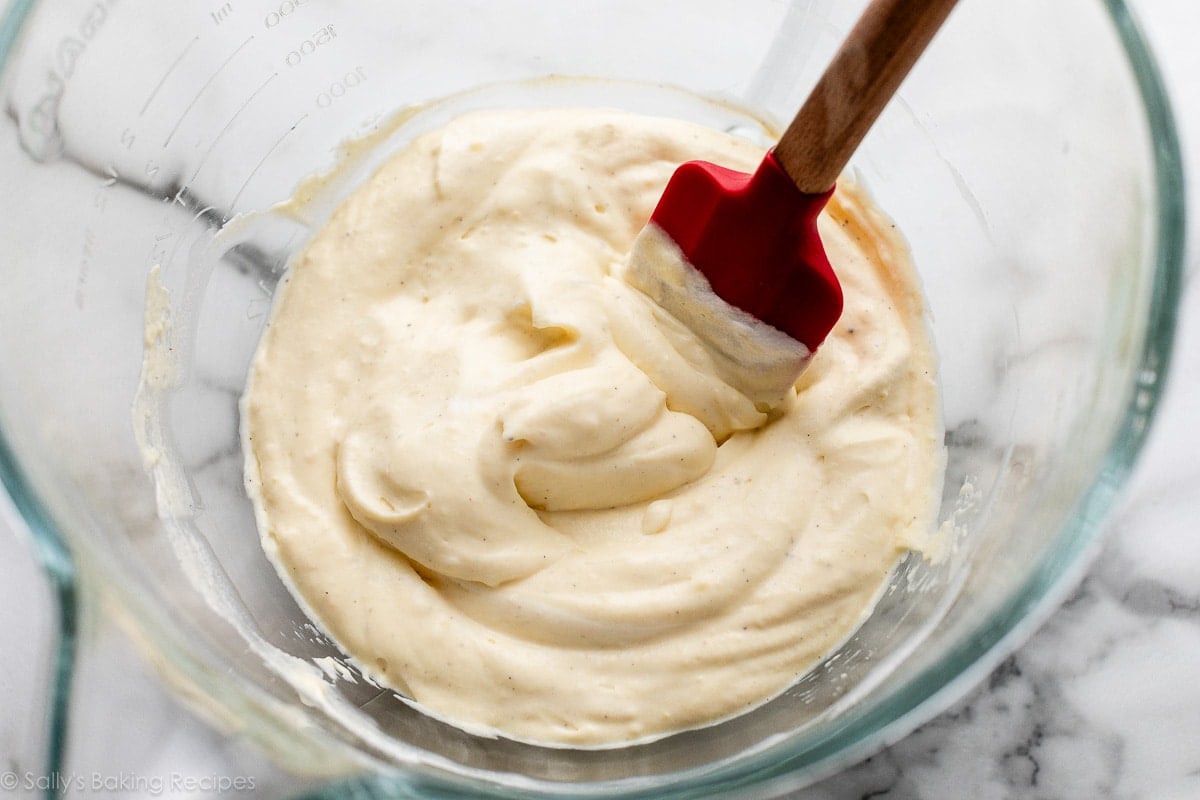
Pastry cream, or crème pâtissière, is a vanilla custard-like filling you can use for treats like pies, eclairs, doughnuts, and more. You cook it on the stove just like you prepare the pudding filling for banana cream pie. It’s quite thick after chilling, so you usually need to give it a stir to smooth it out again. In this layered mille-feuille, we actually take it a step further and add whipped cream. This considerably lightens up the texture, making it velvety-smooth—think homemade whipped cream, but richer and more substantial. When you add whipped cream to pastry cream, I learned, it’s called crème légère, or lightened cream. (It can also be called diplomat cream or crème diplomate, but that sometimes includes gelatin.)
If you’ve ever made Boston cream pie, you’re familiar with pastry cream. I deviated from that recipe, though. It’s a cake filling there, so it’s really sturdy and thick. I needed less pastry cream, and I wanted a lighter consistency for this dessert’s filling.
The detailed instructions and step photos are in the recipe below, but let me share some key steps and success tips so you have a better understanding.
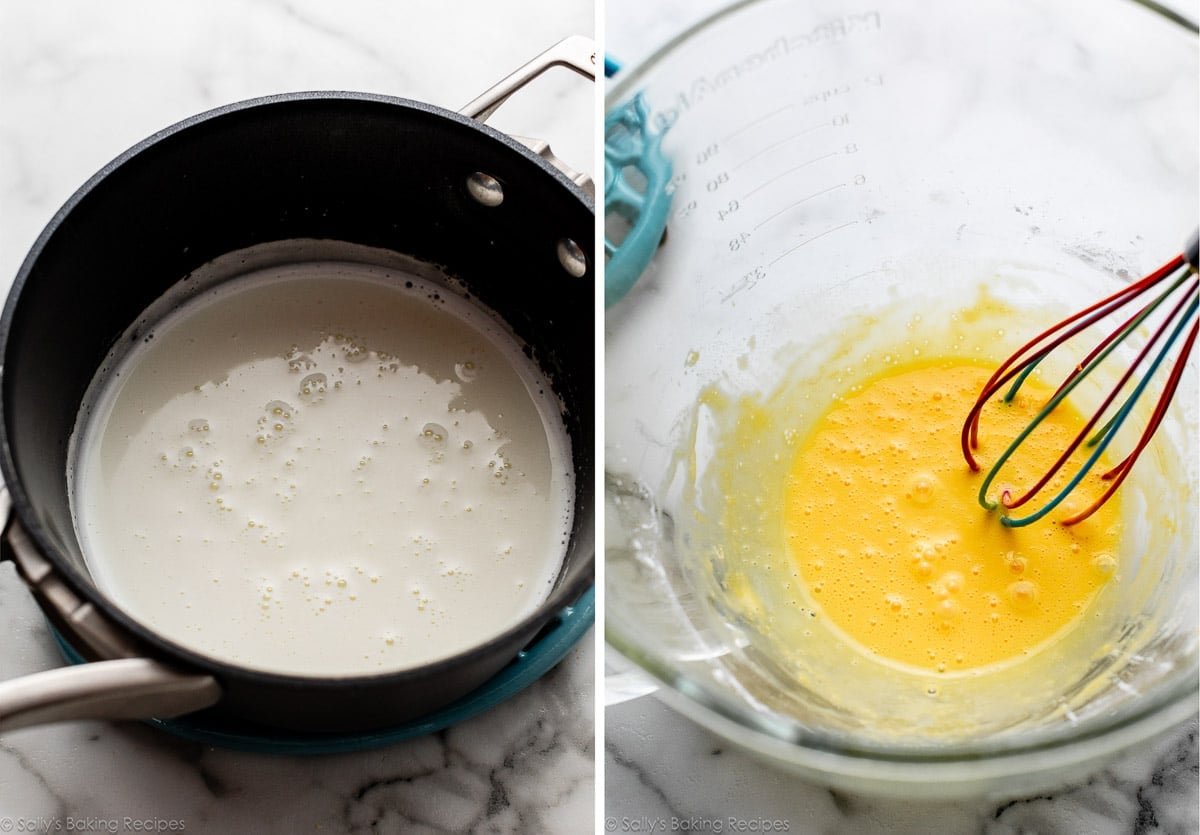
- Cornstarch and egg yolks thicken the cream. Combine those first, and then move to the stove. You’ll simmer whole milk and granulated sugar together, and then remove it from heat and temper the egg yolks.
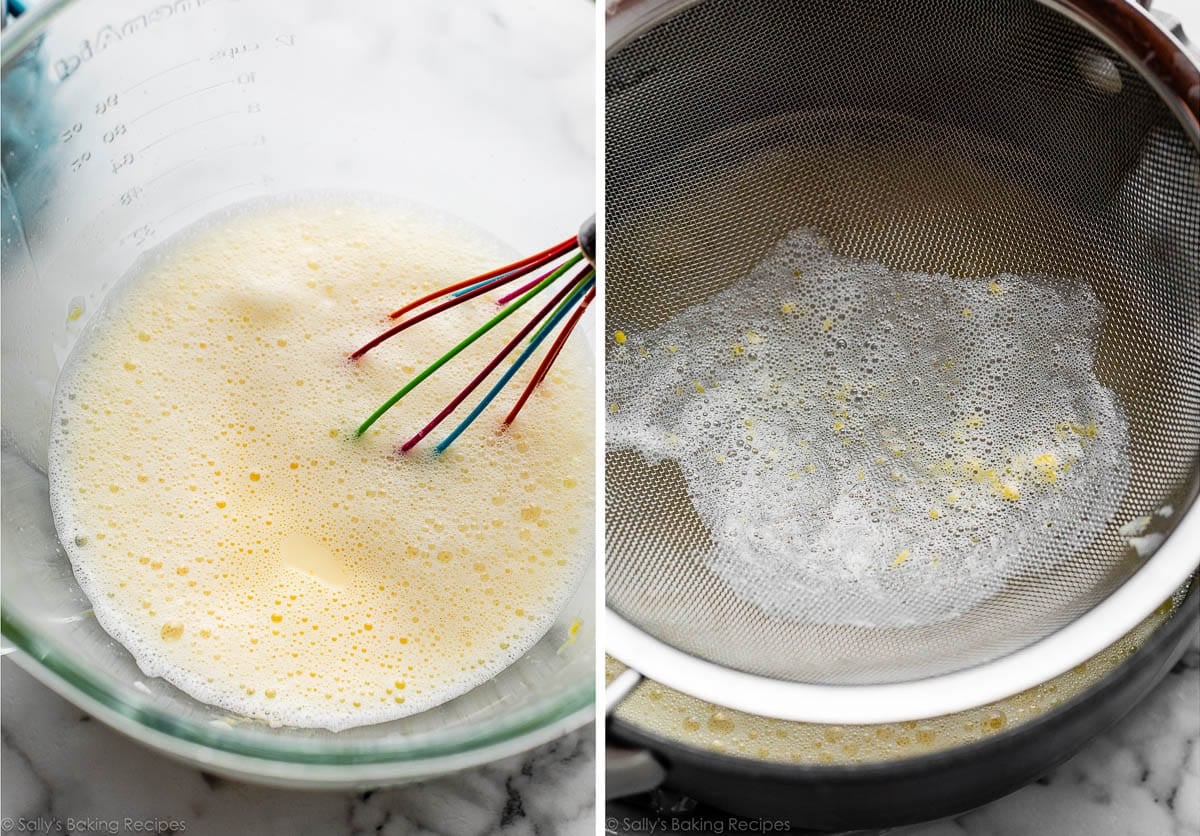
- Tempering is important here. To temper, slowly pour the hot milk mixture into the egg yolks and cornstarch, whisking constantly. This carefully and slowly raises the egg yolks’ temperature. The purpose of tempering is to prevent scrambling them.
- Strain it. Just in case there are some solids! Pour all of the mixture back into the saucepan through a fine-mesh sieve, to strain out any solids that may have formed.
- Bring it to a boil. At first it won’t seem like it’s thickening much, just getting frothy, but as soon as it reaches a boil with big bubbles bursting on the surface, it will thicken up pretty much immediately.
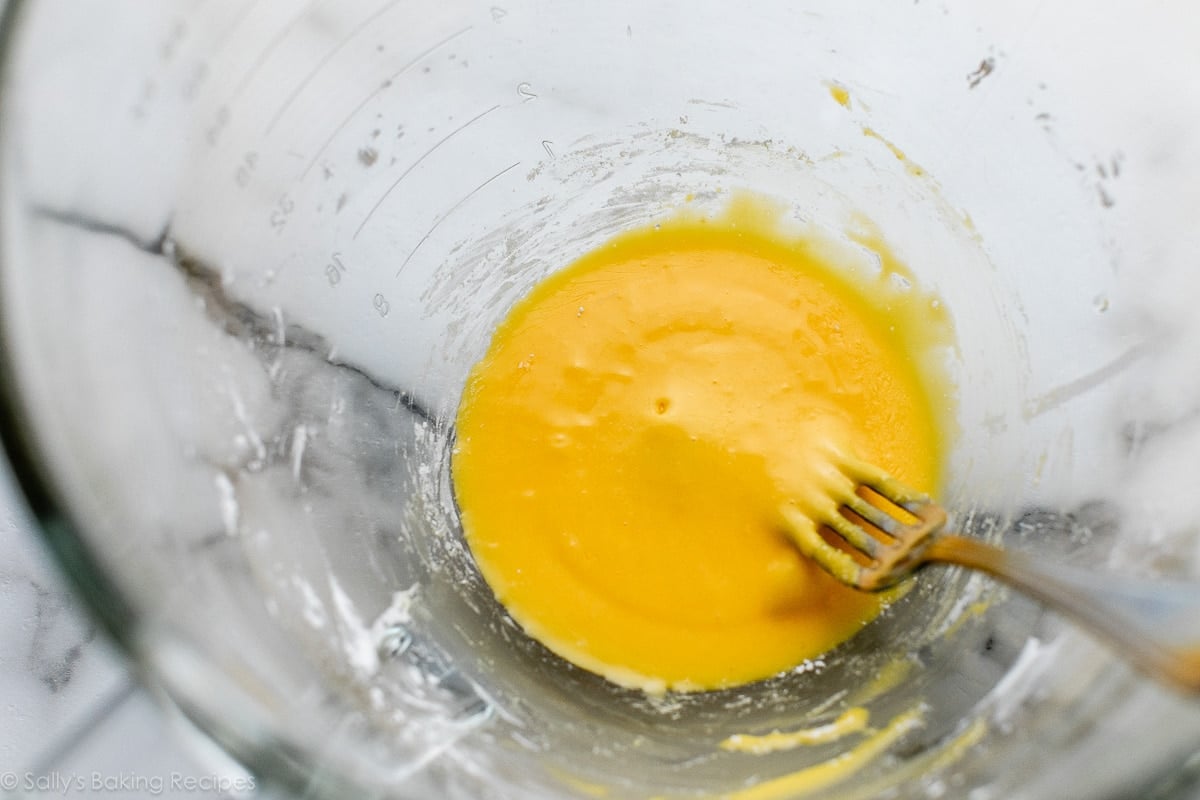
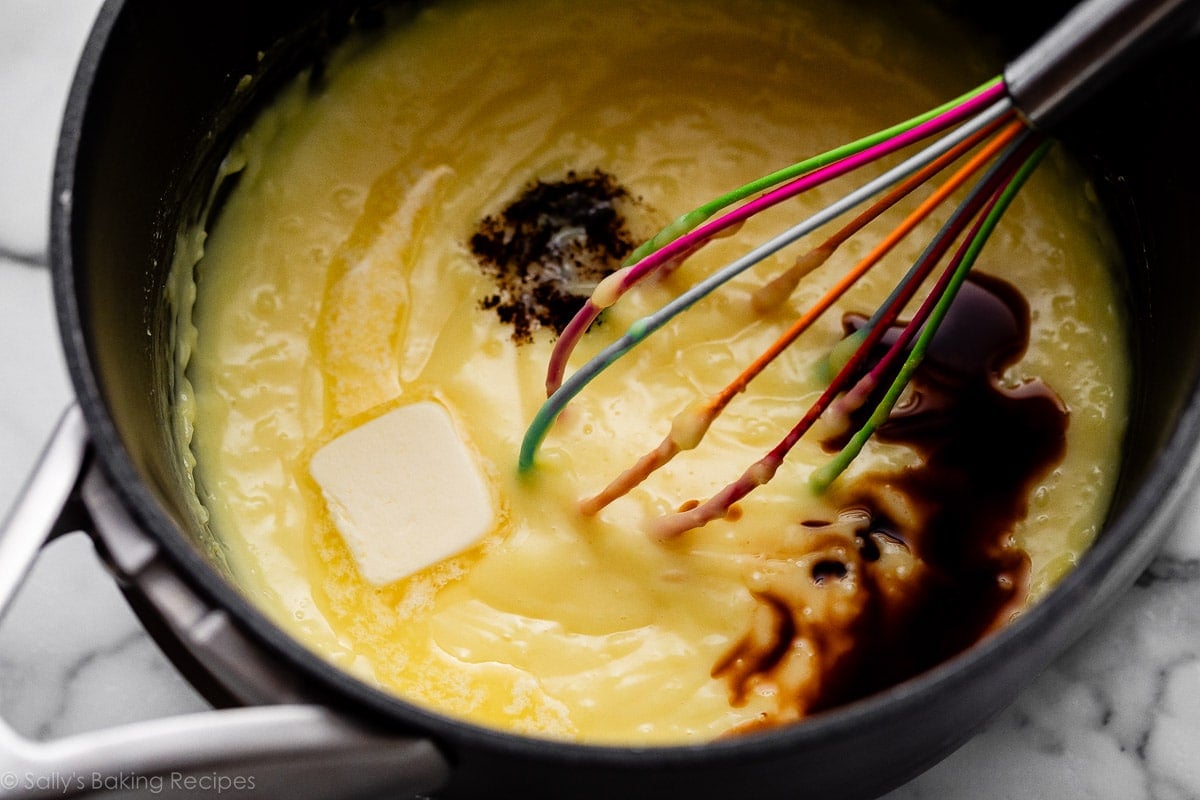
- Remove from heat & add flavor. Stir in butter, vanilla extract, vanilla bean + a pinch of salt.
Then you’ll need to refrigerate it so it thickens.
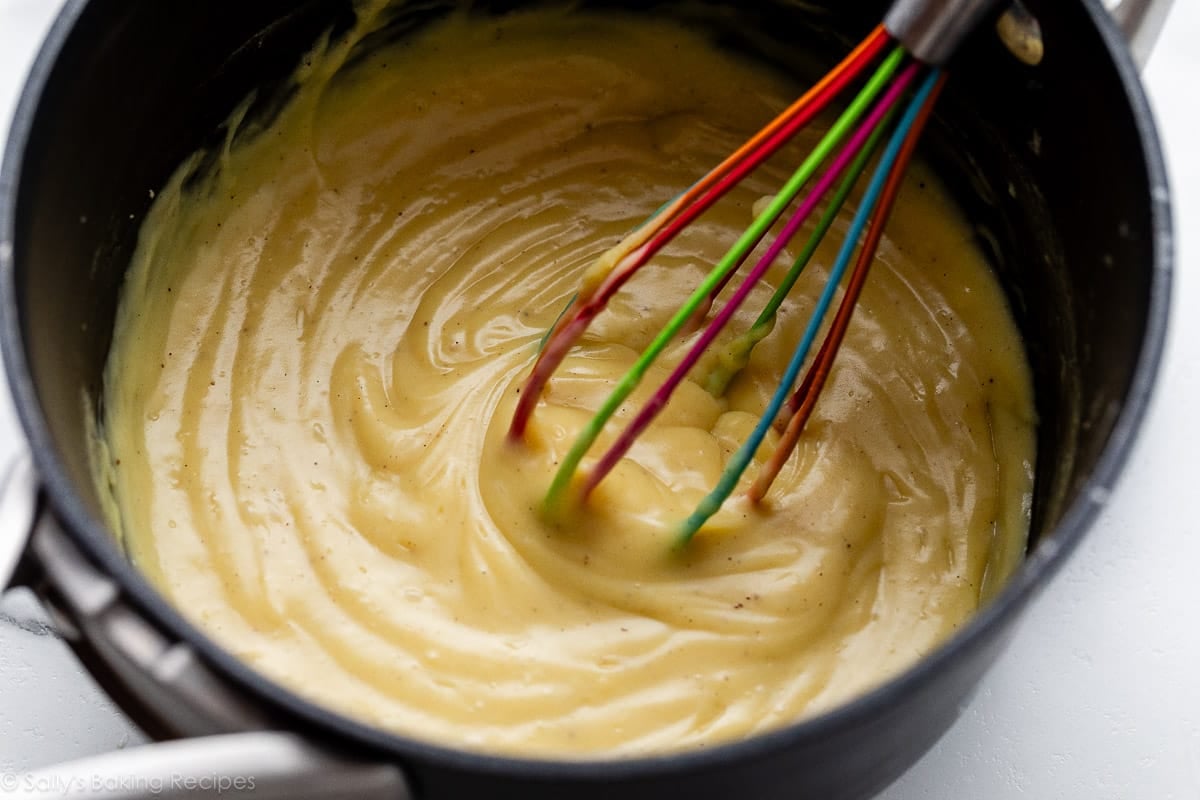
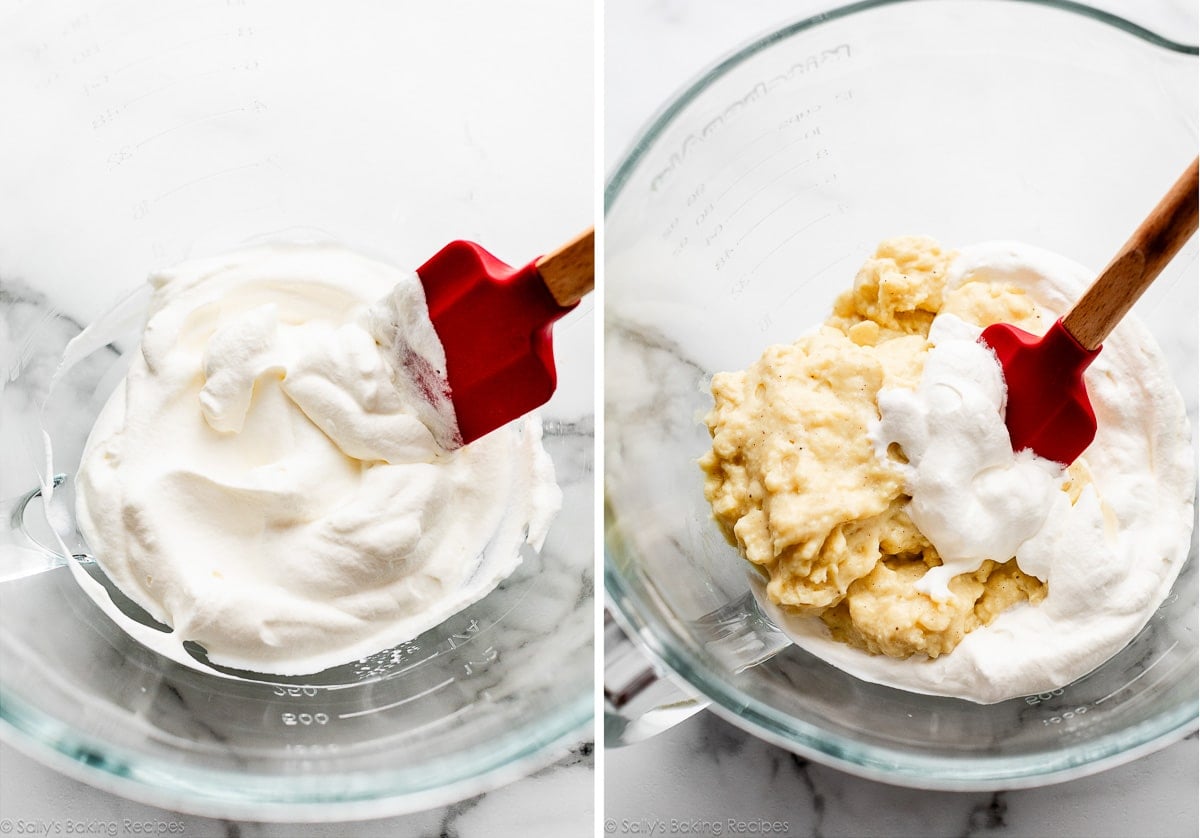
This is the velvet-rich pastry cream before chilling:
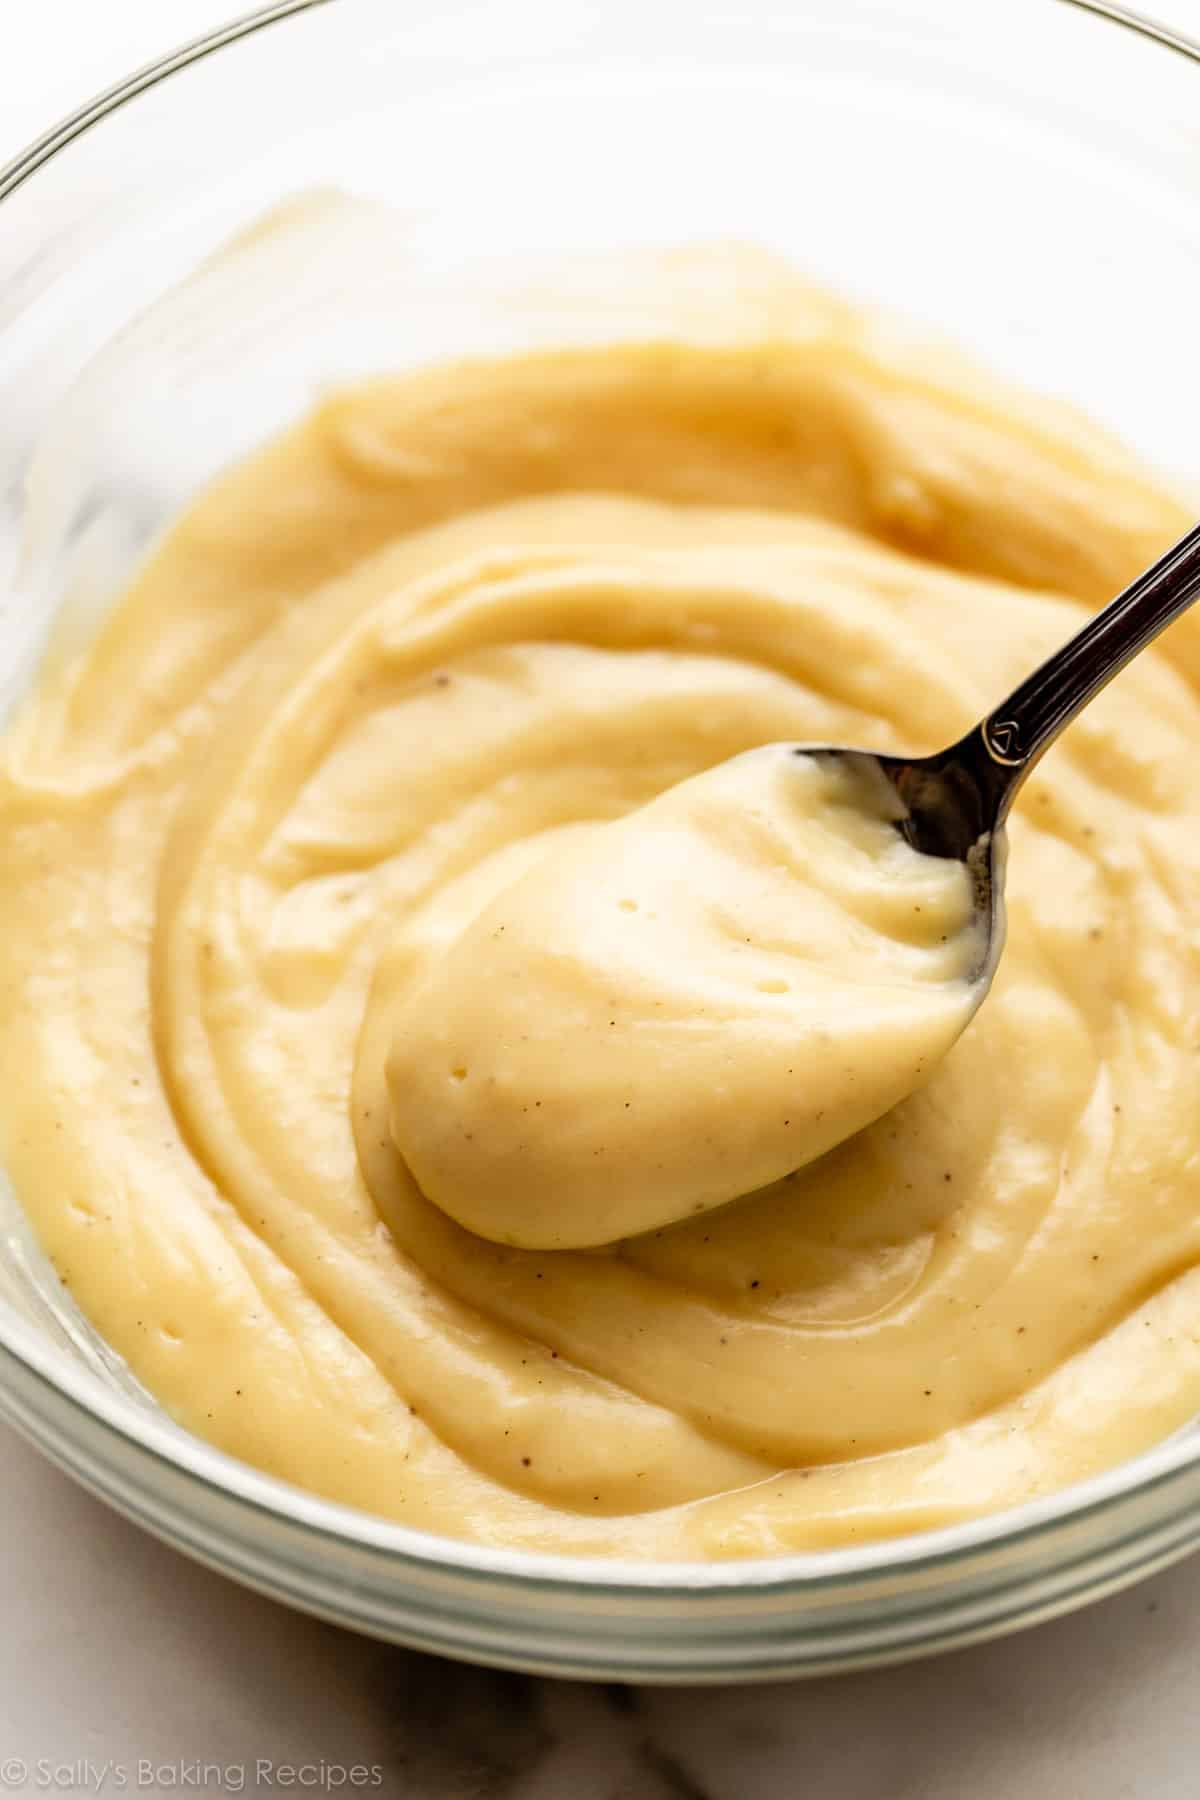
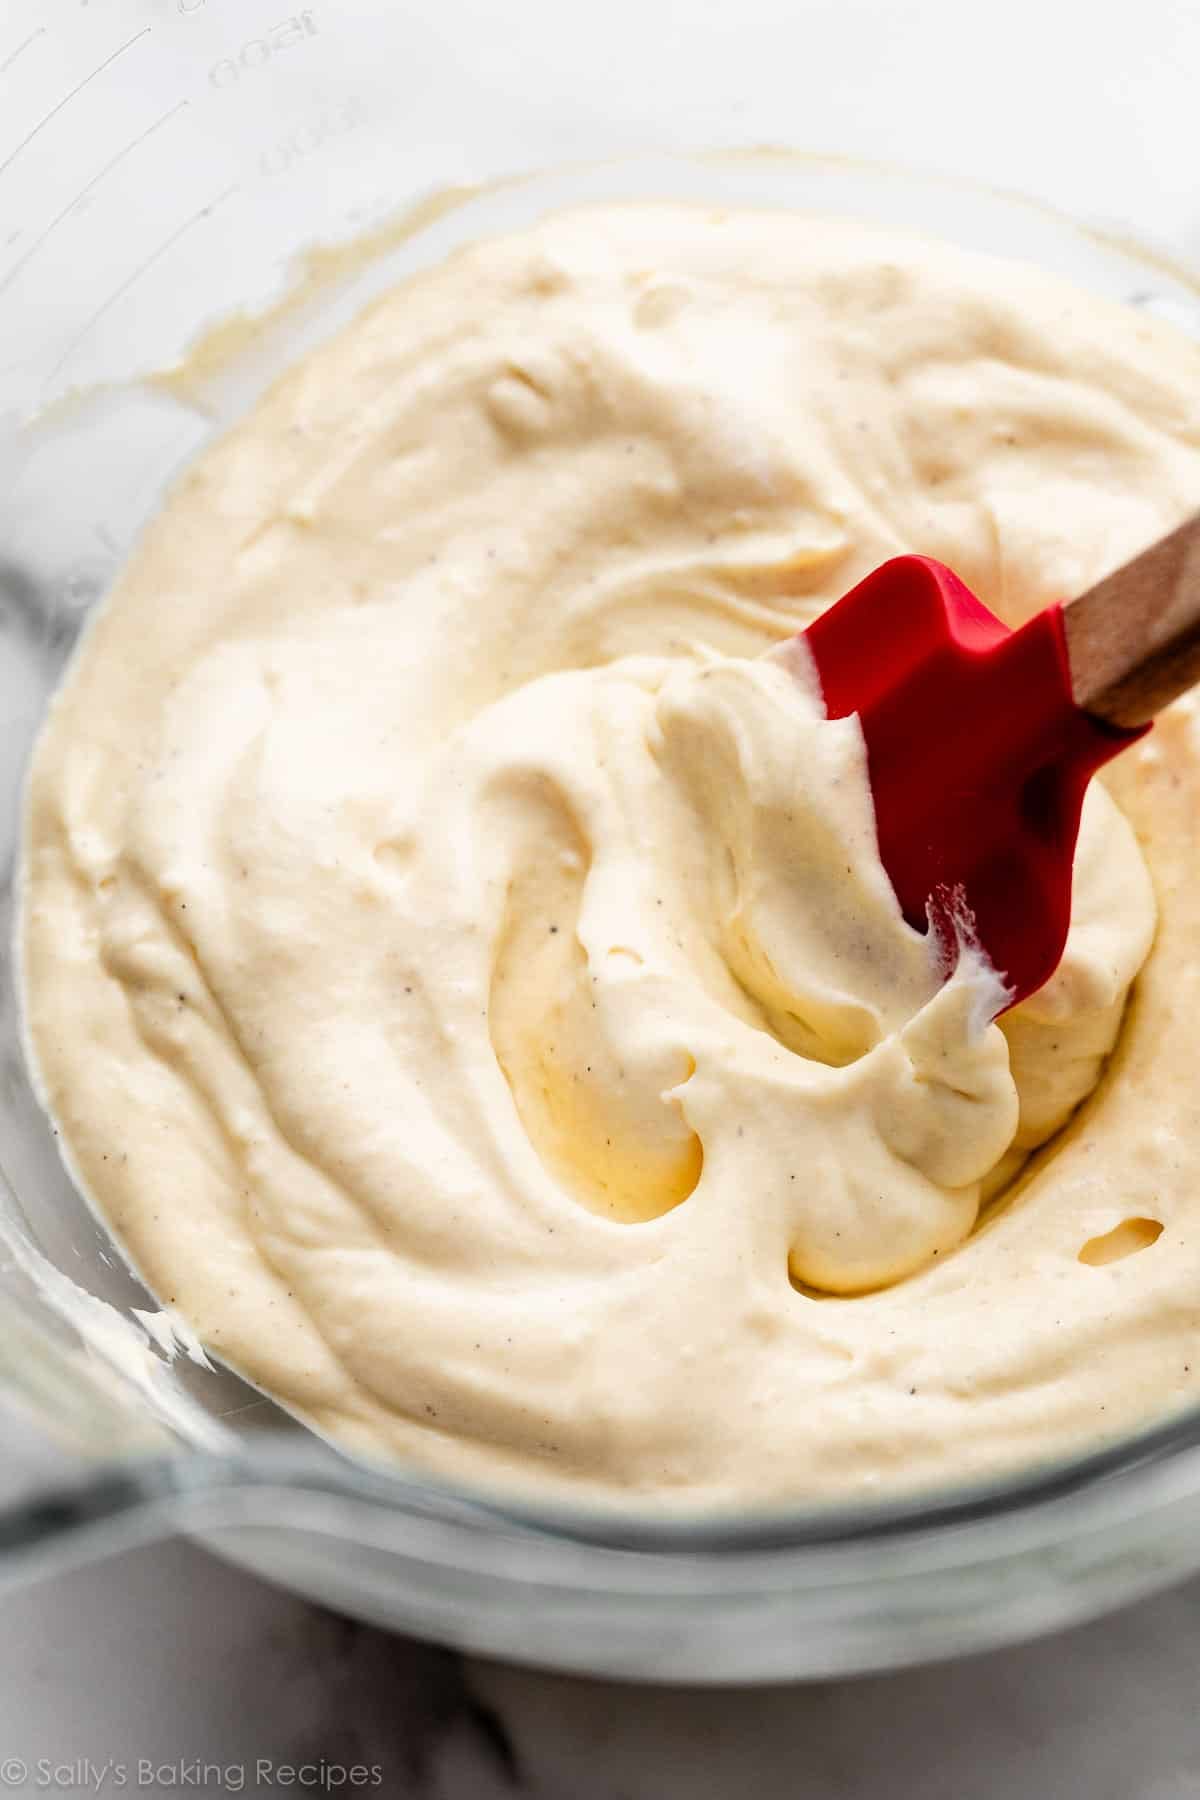
Chill it in the refrigerator for a minimum of 3 hours or overnight. It will firm up a lot during this time. Give it a stir and then combine it with whipped cream. Chill it once again for 1 hour, so it’s nice and thick for piping between the flaky pastry layers.
And this is the pastry cream after combining with whipped cream:
Puff Pastry Layers
I’m using my homemade rough puff pastry, but you can absolutely take the shortcut of using store-bought puff pastry. If frozen, thaw it according to package instructions before you begin.
If you’d like to make the rough puff pastry from scratch, you need just 5 ingredients: flour, sugar, salt, cold butter, and cold water. All of the same ingredients as butter pie crust, but there’s the added rolling and folding process, similar to biscuits, which gives us all of those flaky layers.
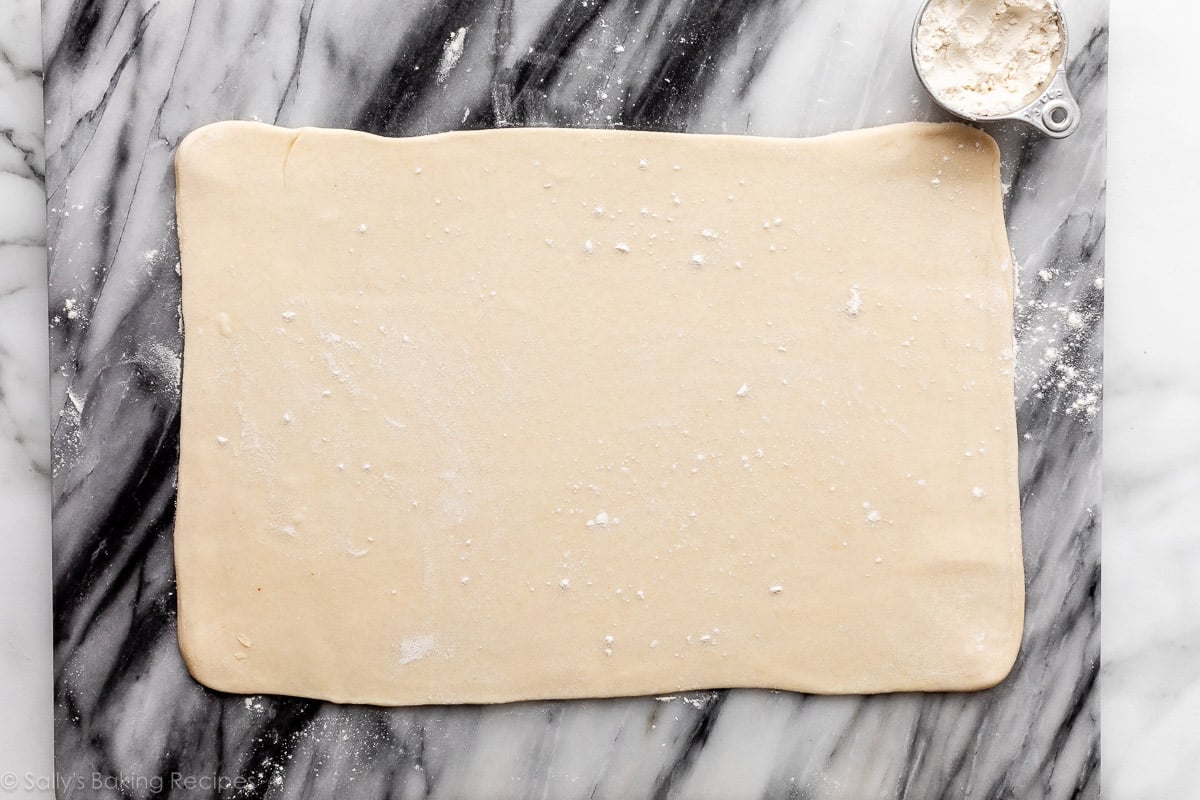
Once you have your store-bought dough thawed, or the homemade dough chilled (after the second refrigeration as detailed in the rough puff pastry post), it’s time to roll it out, and you’ll find those exact instructions below in the recipe. Place the rolled-out dough on a lined baking sheet and dock it with a fork, just like you would when par-baking pie crust.
This is the homemade puff pastry dough ready to bake:
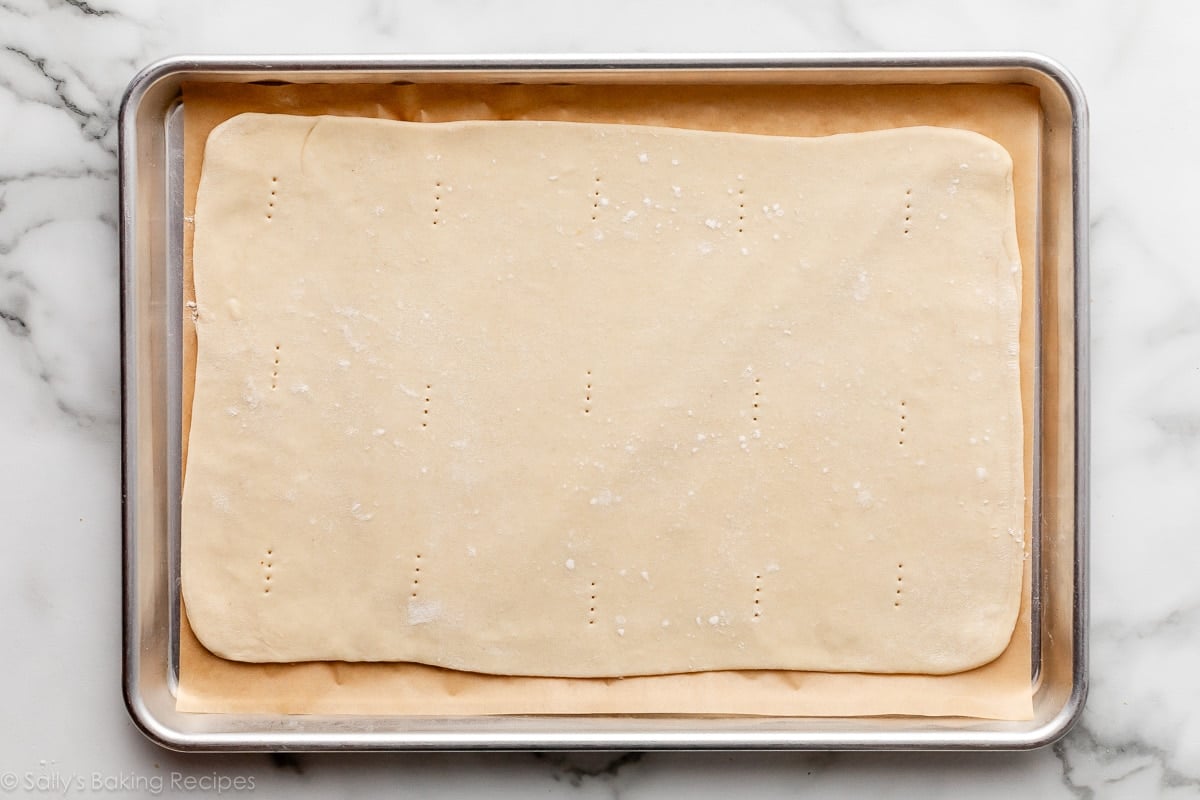
This is the store-bought puff pastry dough ready to bake (you’ll connect the 2 sheets that usually come in a box):
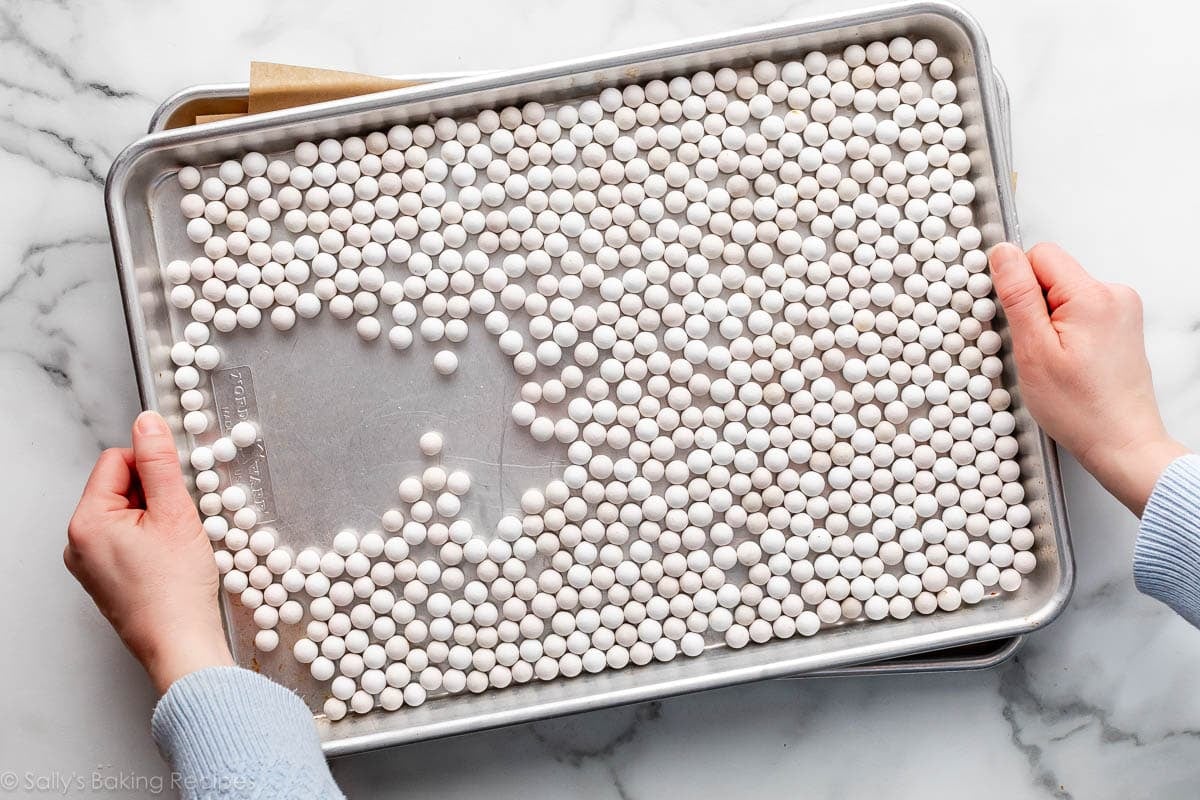
An Odd Step: Weigh It Down!
Now here’s the step not usually included in puff pastry recipes: we are going to weigh down the pastry to prevent it from puffing up too much.
Place another sheet of parchment paper on top of the pastry dough, then set another baking sheet on top of that. If you have pie weights, pour them onto the top baking sheet. You could also use dried beans instead. If you don’t have either, bake it with just the (empty) top baking sheet, and when it comes out of the oven, set a pan or skillet on the top baking sheet while it cools.
You’ll bake it covered with weights (or whatever you’re using) for 20 minutes, and then uncovered (without weights) for another 7–9 minutes.
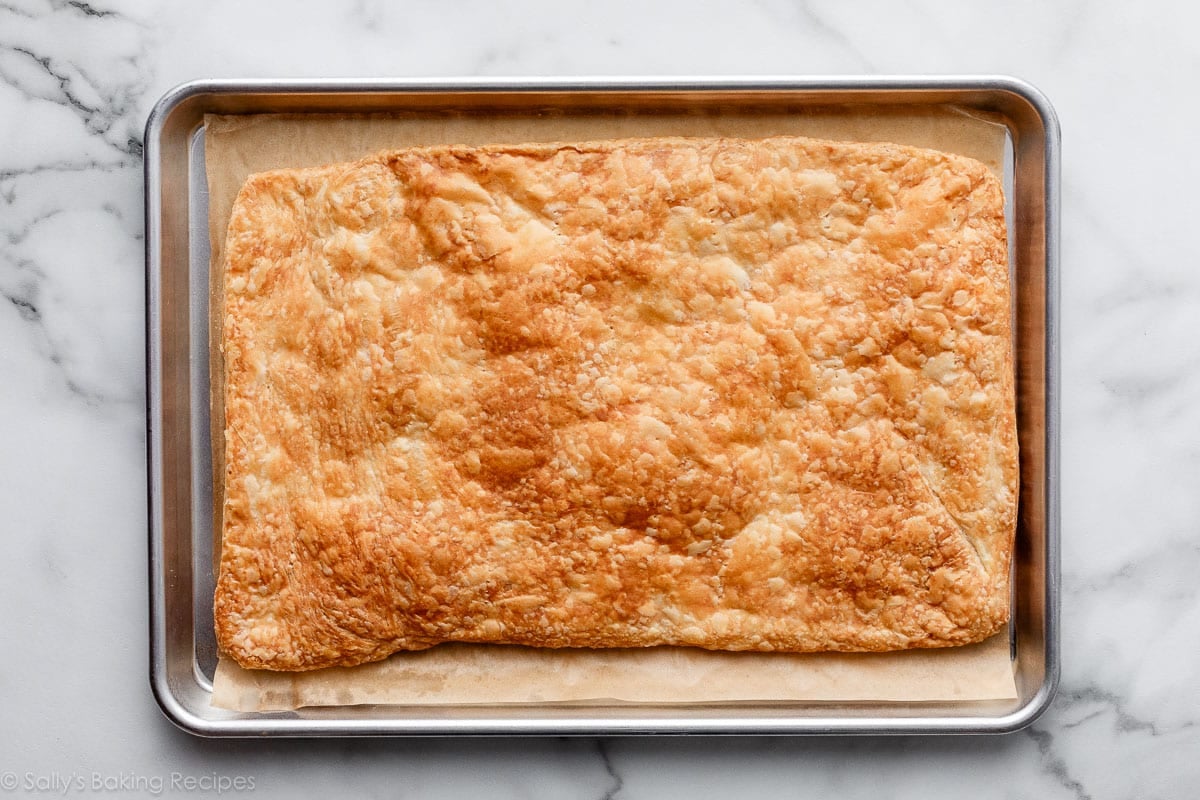
Note: I found that the homemade puff pastry gets much darker than the store-bought; likely because it’s made with butter instead of oil-based fats.
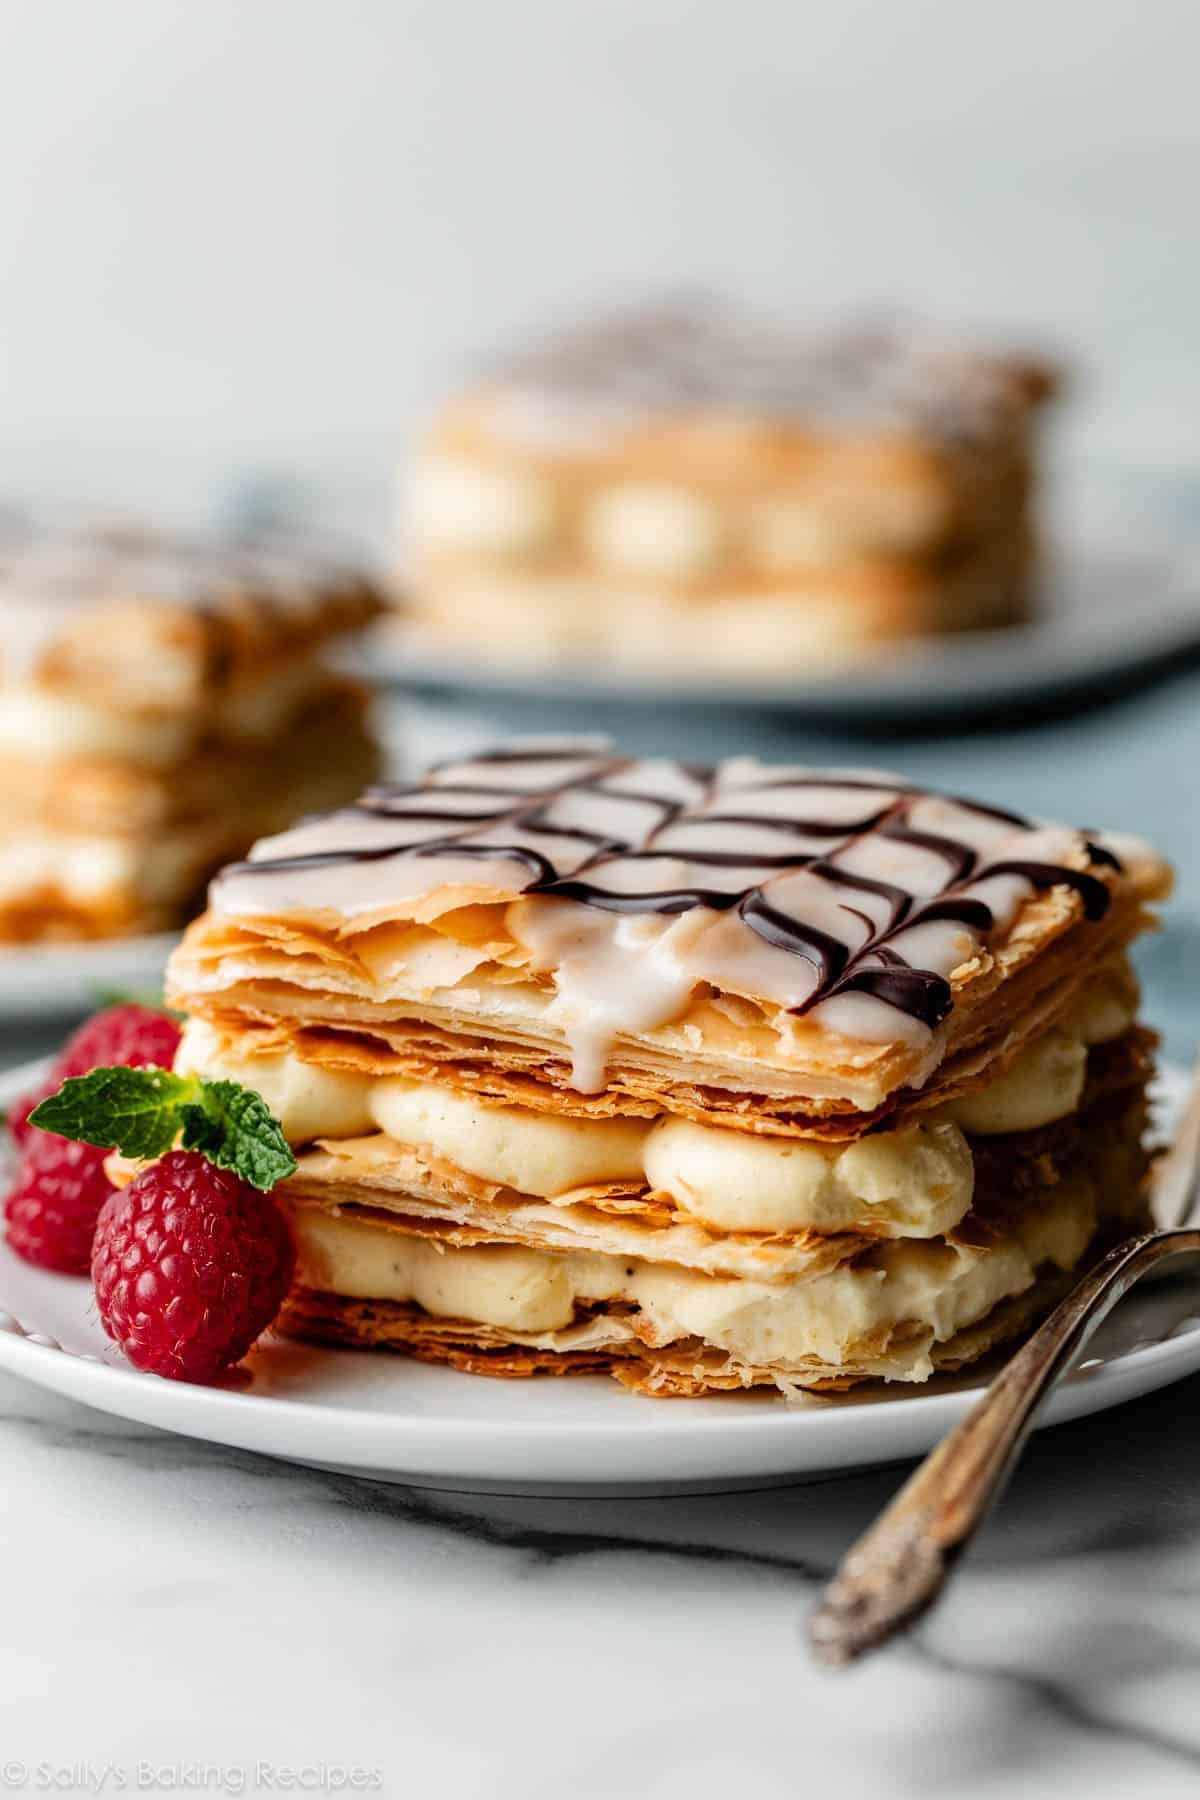
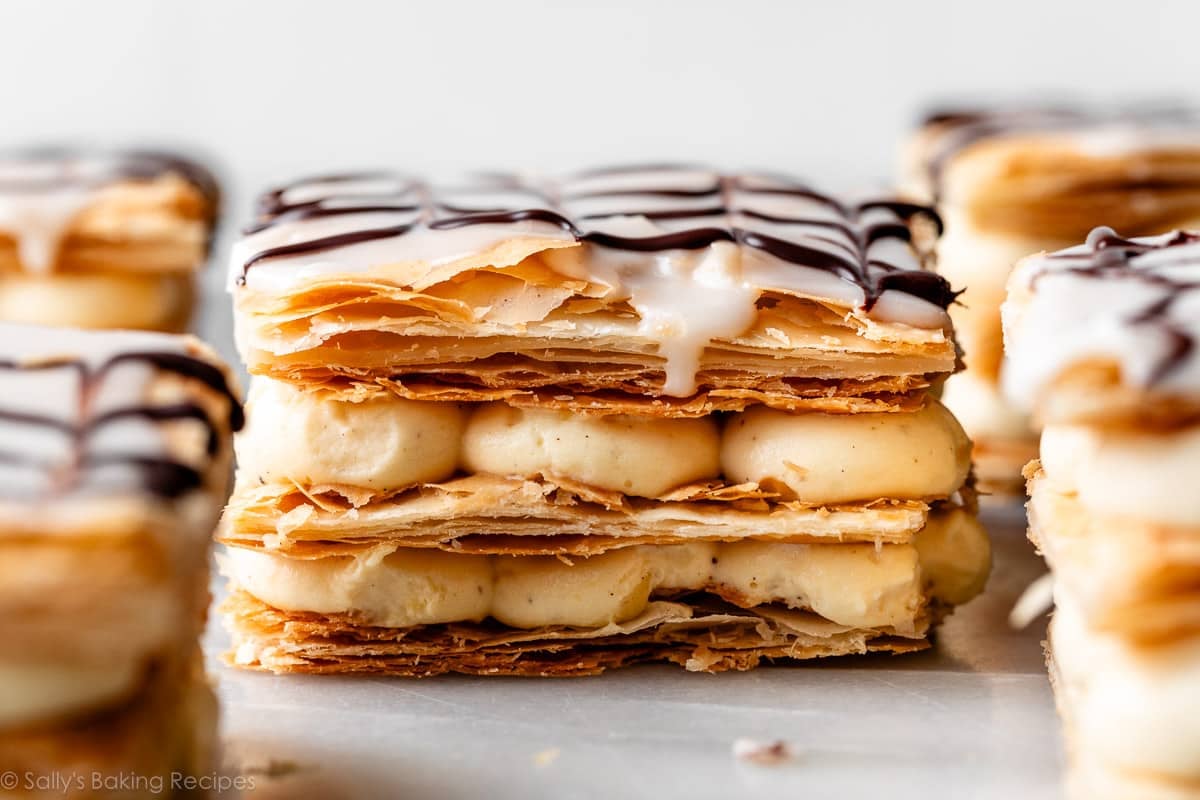
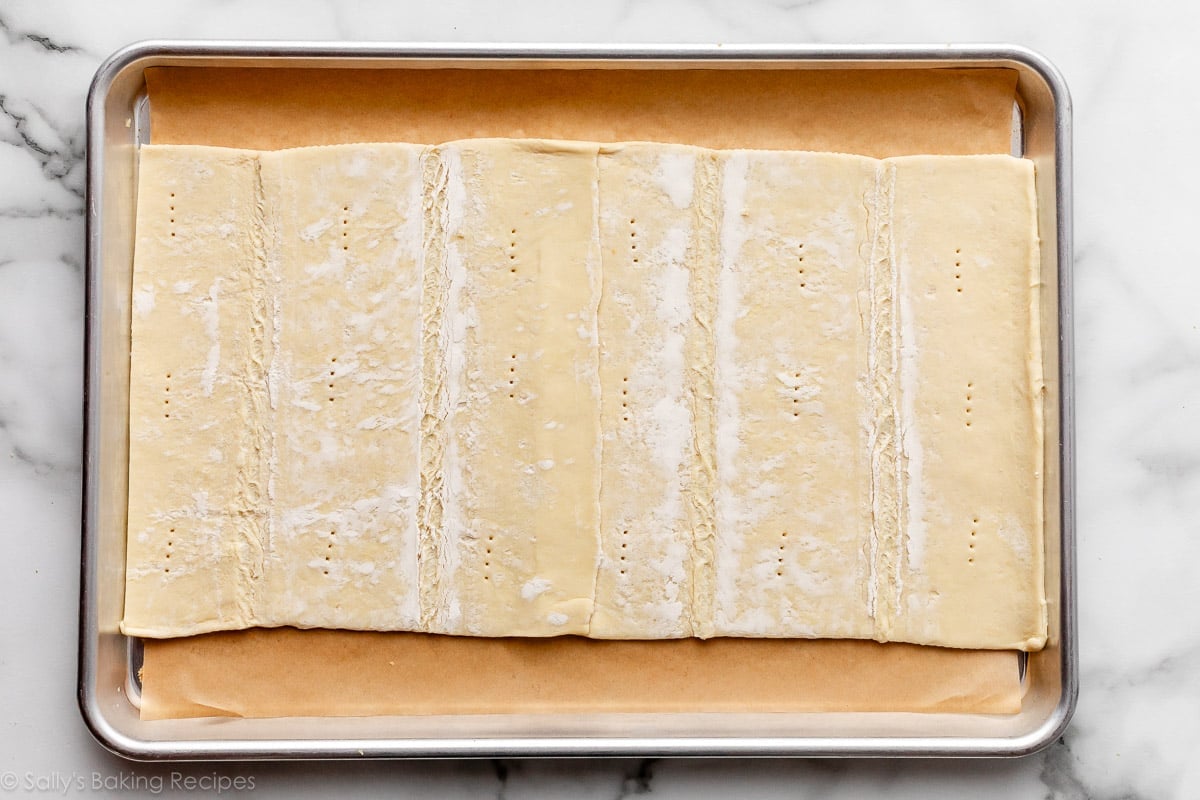
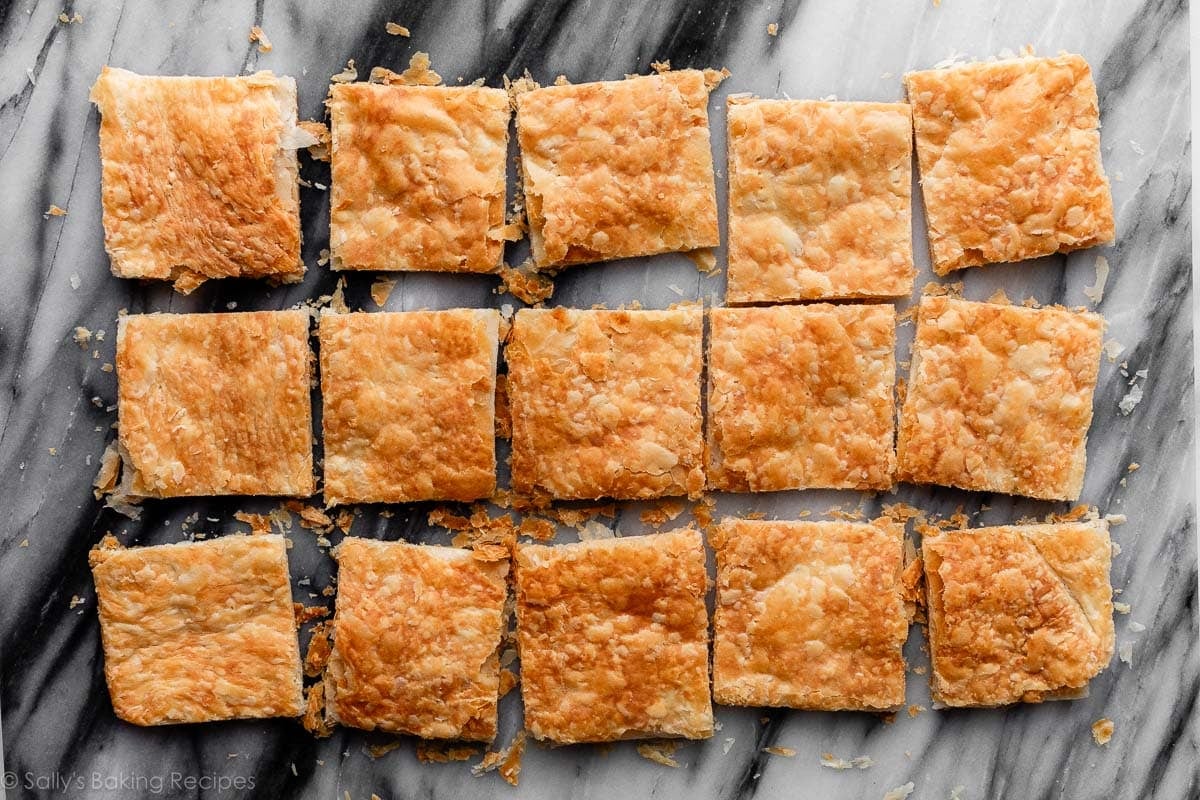
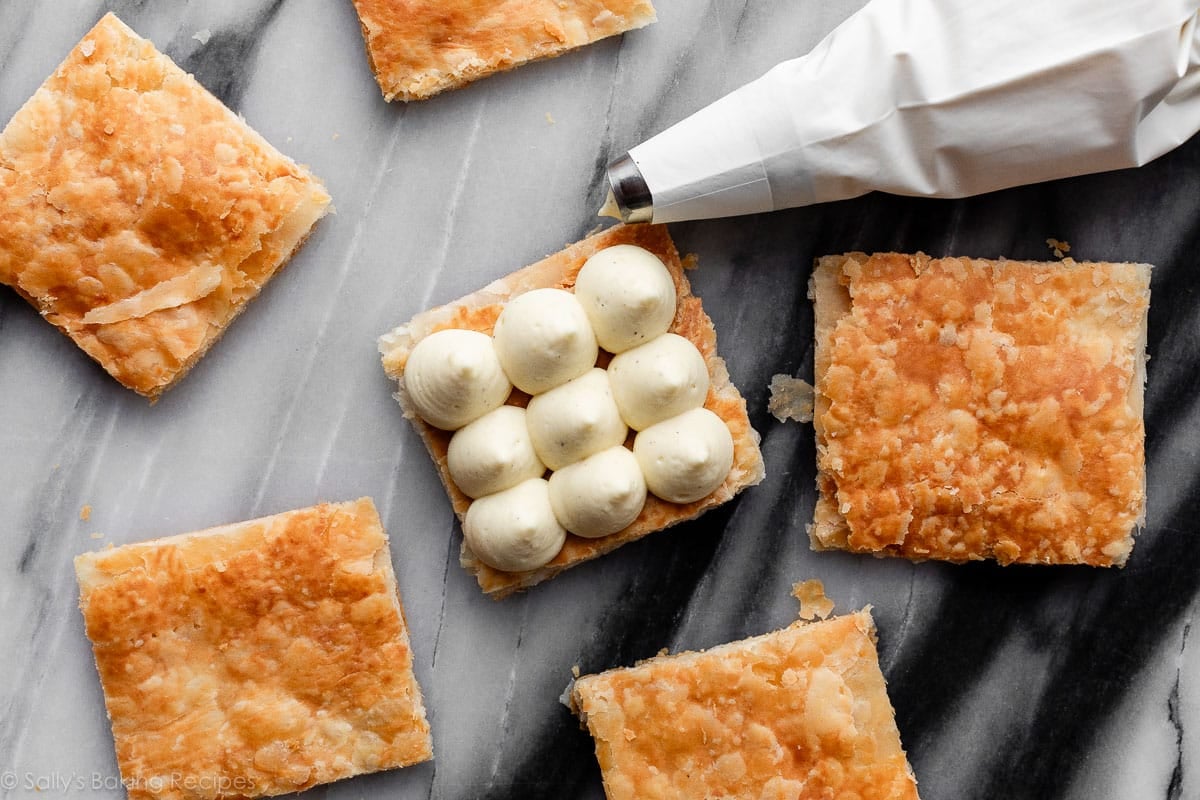
Once the baked pastry has cooled, you’ll cut it into 15 (roughly) equally sized pieces, to make 5 mille-feuille stacks containing 3 pastry layers each.
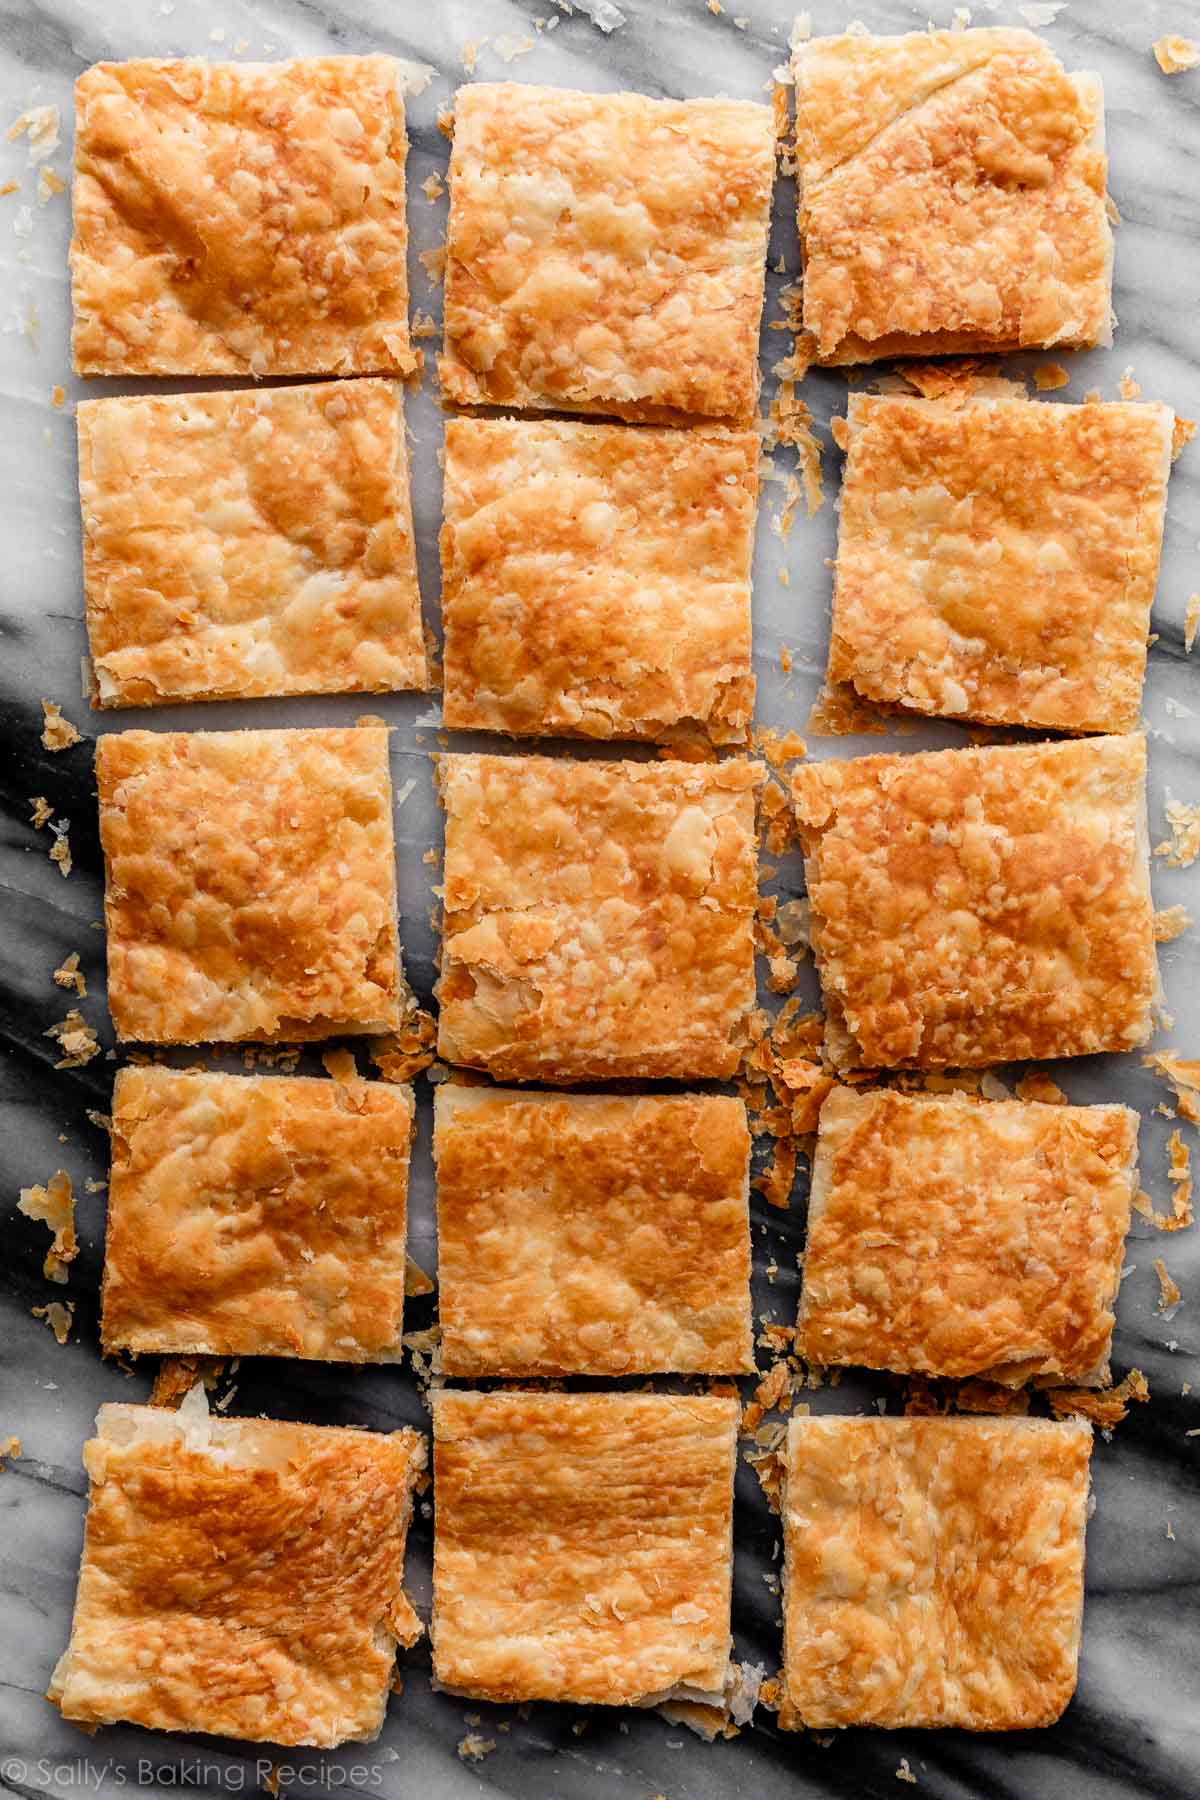
Mille-feuille are often rectangular in shape, but I found that making them as squares was easier when it came to cutting uniform-size pieces. When I tested these as rectangles, I found they were either too small and difficult to assemble, or else made 4 huge pastries that were much too large for individual portions. I had the best success with making 5 assembled 3-inch square pastries.
Top & Assemble the Mille-Feuille
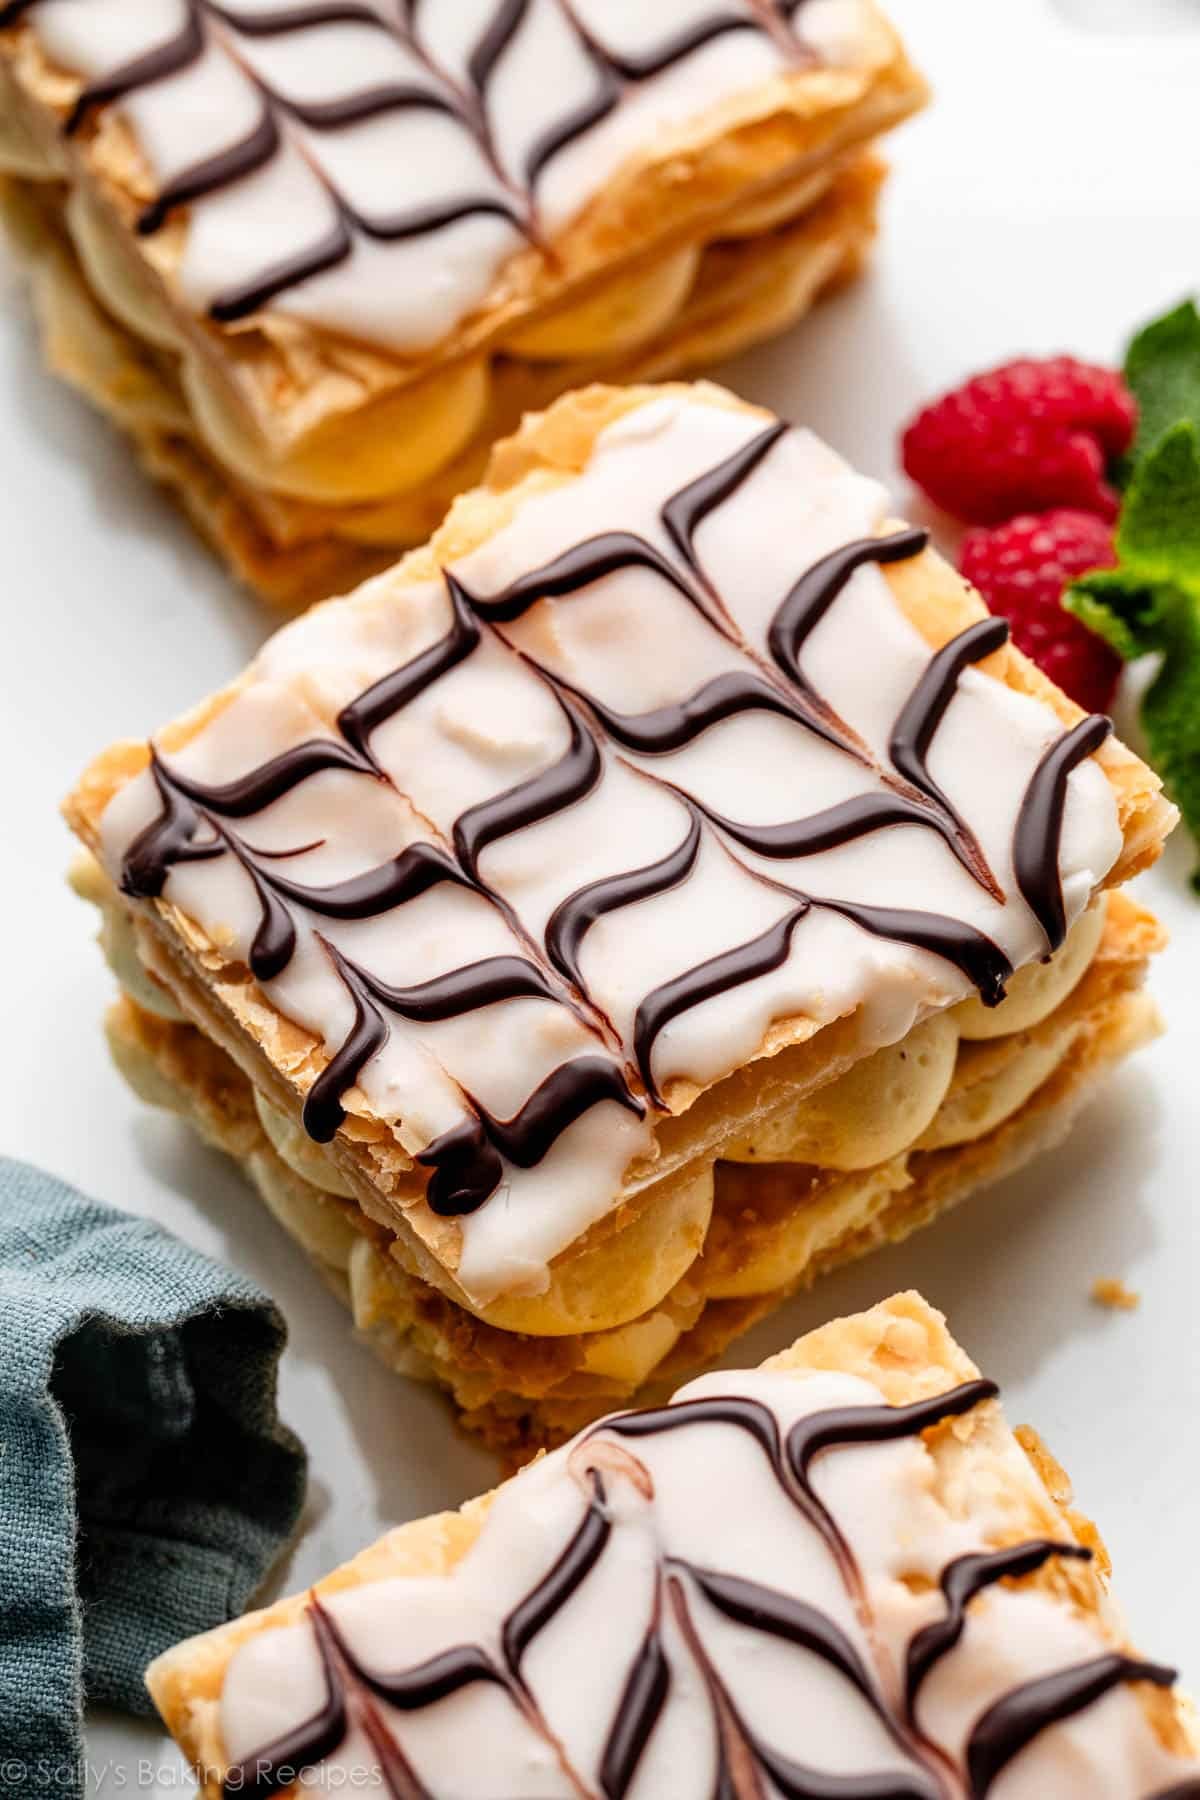
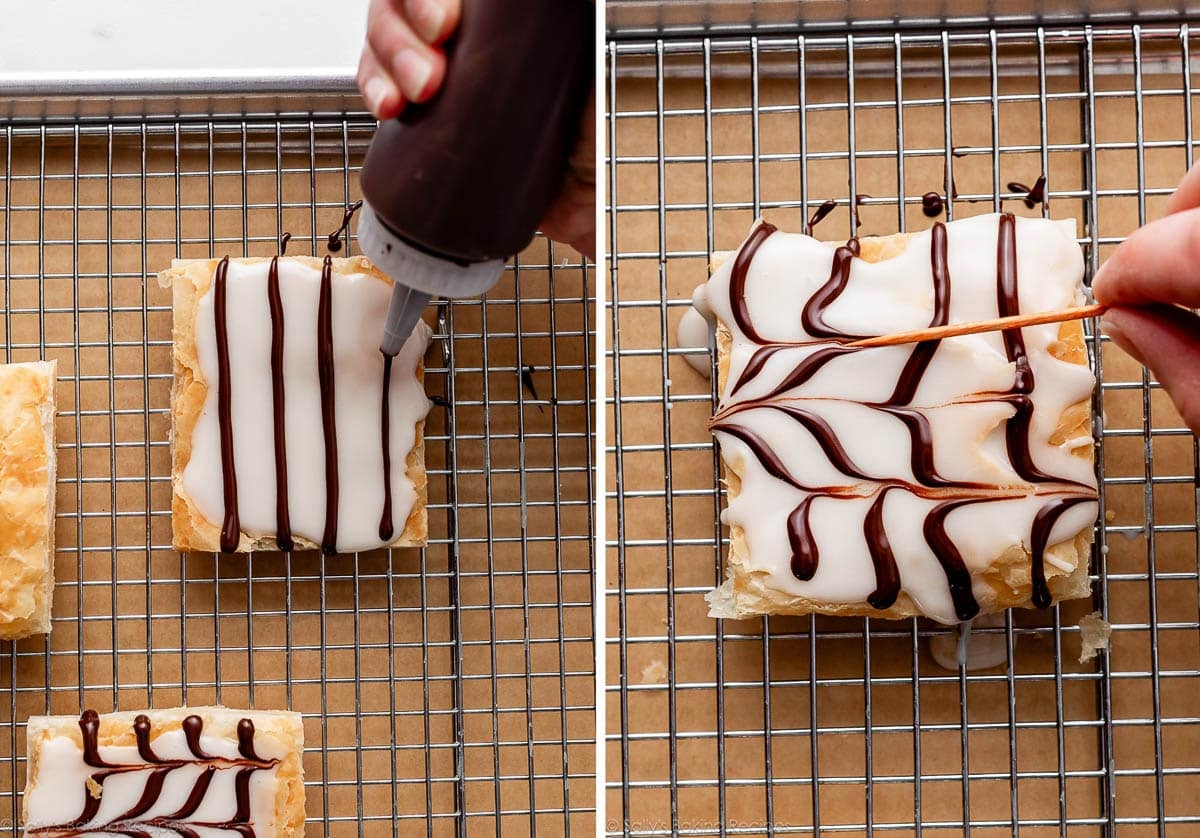
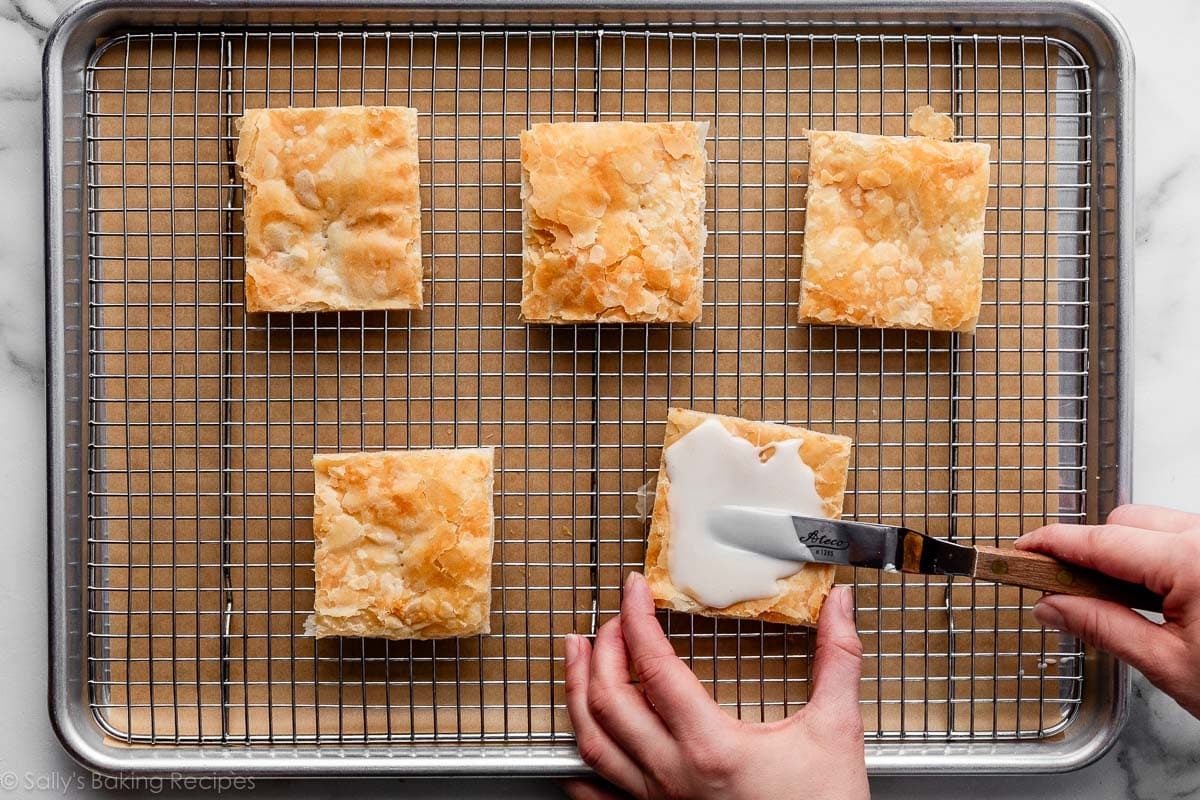
There are many ways to top these, ranging from a simple dusting of confectioners’ sugar to fanciful swirls of two-toned icing. Some recipes call for royal icing, while others use fondant. I love the signature marbled icing look, so that’s what I’m demonstrating.
After testing many variations, my taste testers and I determined that a thick vanilla icing + melted chocolate pairing makes for the tastiest topping. Dark, bittersweet, or semi-sweet chocolate tastes best with the sweet vanilla icing. Like I always recommend for melting chocolate, chop up a bar of baking chocolate—save the chocolate chips for chocolate chip cookies.
You’ll ice all of the tops first, before assembling, because it’s difficult to ice the tops efficiently when they’re layered on top of a creamy filling. Place the 5 pastry squares you’ll use for the tops on a wire rack. With an icing spatula or a spoon, spread the vanilla icing on each square. Then pipe or drizzle melted chocolate on top. For this, I piped 4 stripes across and then used a toothpick to create the classic chevron design by dragging it in a perpendicular direction. Like this:
Now let’s fill the pastries. Fit a pastry/piping bag with a large round tip, such as Ateco 808 (which I use for a lot of cupcakes—see this piping tips post). Or, you can simply use a large plastic bag and snip off a bottom corner with scissors.
Start with one plain (un-iced) square of pastry and pipe on 3 dollops of cream in 3 rows, so you have a grid of 9 dollops. Place another pastry square on top of that, and then repeat the piping the same way. Finally, place one of the iced pastry layers on top.
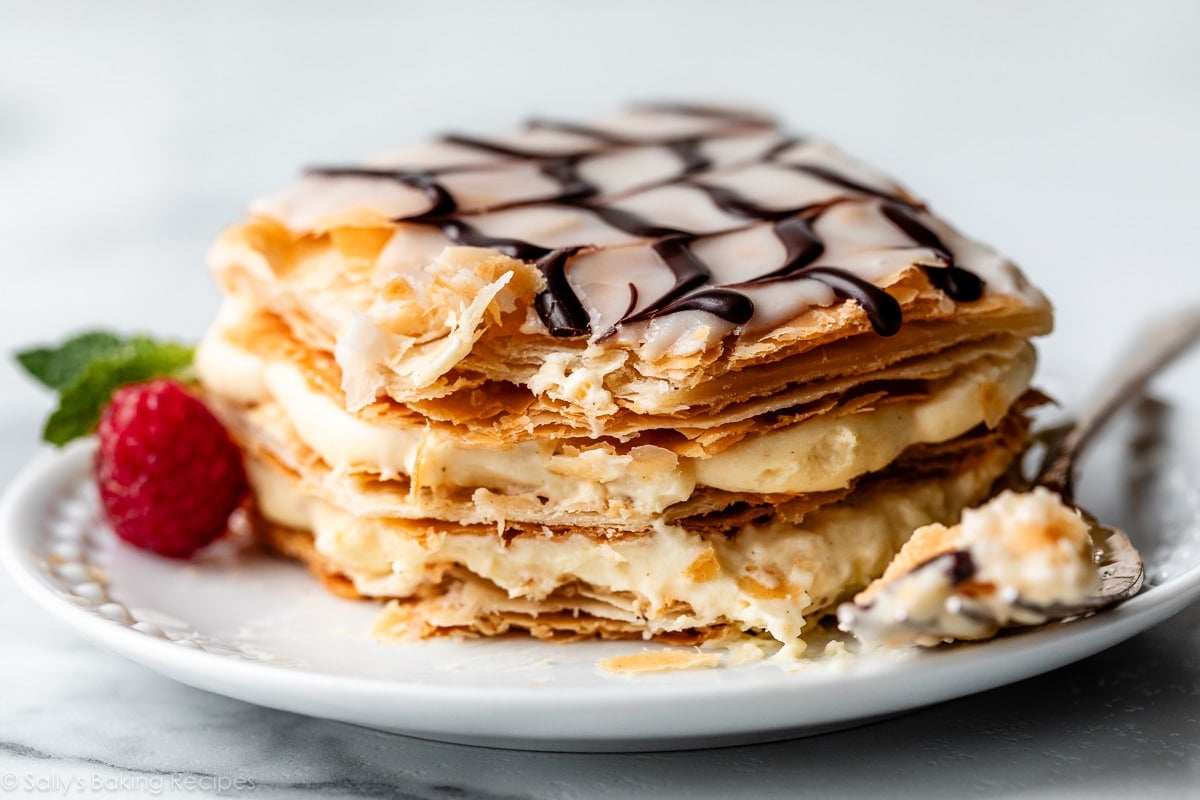
Refrigerate the assembled pastries (uncovered) for a minimum of 30 minutes before serving, just so they aren’t toppling over. Like in most pastry recipes, the refrigerator is your friend here.
How to Eat Mille-Feuille
Ahh, yes. The most difficult instruction of the day. 😉 In this step, you’ll simply stuff your face with it. But slowly! Savor and enjoy every bite. Respect the time that went into making it!
Plate each mille-feuille and serve with a fork, or you can eat it handheld. The longer the assembled pastries sit in the refrigerator, the more solid they’ll become. But regardless of the time it sets, the soft filling will spill out the sides when you cut or bite into it, and that’s fine! It’s crispy, it’s creamy, it’s close-your-eyes-and-sigh dreamy.
Yes, absolutely. But if you want the challenge, and a heightened flavor experience, I strongly encourage you to use homemade puff pastry. You’ll be rewarded with an optimal flavor and texture experience. And you can really taste that butter in the homemade version!
You can use dried beans. OR you can just add the baking sheet on top and not fill it with weights or beans. (Always add a piece of parchment paper on top of the dough, though, so the pan is not touching it.) OR as the baked pastry is cooling, place something heavy like a pot or pan on top of the top baking sheet, to weigh down the baking sheet that is on the puff pastry. (I have done that last suggestion before and it works just fine.)
Though it’s the most common filling in this dessert, you do not have to use pastry cream between the layers. I have a list of other filling options below, like mousse or no-bake cheesecake filling.
Instead of the vanilla icing + chocolate combo, you can simply dust the tops with confectioners’ sugar. You can also skip the chocolate for a plain vanilla icing topping, or skip the vanilla icing and drizzle melted chocolate directly on top. Or, some recipes call for royal icing. (If you want to use my recipe for royal icing, I recommend halving it.)
Other Filling Options
- Peanut butter mousse from my homemade eclairs recipe
- Whipped cream (for an extra light and barely sweetened filling)
- Lightly sweetened whipped frosting
- No-bake cheesecake filling from these cheesecake jars
- Chocolate mousse filling from my dark chocolate mousse cake
Or you can still use pastry cream, or any of the suggestions above, and layer your filling of choice with fresh raspberries or thinly sliced strawberries and dollops of jam. Or pipe rows of raspberry cake filling between rows of your choice of cream/mousse filling. Lots of options!

Some Special Tools You Need
- Sieve
- Rolling pin
- Half sheet pans (12×17-inch baking sheets)
- Pie weights, but you can get around not having these!
- Electric mixer (handheld or stand)
- Squeeze bottle or pastry bag, a larger round tip like Ateco 808, or plastic sandwich & gallon-size bags with corner cut off for piping

Mille-Feuille (Napoleon Pastry)
- Prep Time: 1 hour, 45 minutes
- Cook Time: 35 minutes (includes stovetop time)
- Total Time: 5 hours (includes chilling)
- Yield: 5 3-layer squares (each is shareable!)
- Category: Dessert
- Method: Baking
- Cuisine: French
Description
From the countless flaky layers of delicate puff pastry, to the creamy clouds of vanilla pastry cream, to the decorative marbled icing, mille-feuille is an indulgent dessert worthy of a special occasion. Learn how to make this classic European pastry in your own kitchen by carefully following the detailed recipe below. I also include thorough explanations in the blog post above, and step photos in the recipe instructions, to set you up for success. Review recipe Notes below before starting.
Ingredients
Dough
- 1 lb. homemade rough puff pastry or store-bought frozen & thawed puff pastry (2 sheets)
- all-purpose flour as needed to roll dough
Pastry Cream Filling
- 4 large egg yolks, cold or room temperature
- 3 Tablespoons (23g) cornstarch
- 2 cups (480ml) whole milk (do not use low-fat or nondairy)
- 1/2 cup (100g) granulated sugar
- 1 Tablespoon (14g) unsalted butter, softened to room temperature
- 1 teaspoon pure vanilla extract
- seeds scraped from 1/2 vanilla bean (or extra 1/2 teaspoon vanilla extract)
- small pinch salt
- 1/2 cup (120ml) heavy cream or heavy whipping cream, cold
Topping
- 1 cup (120g) confectioners’ sugar, sifted
- 1.5 Tablespoons milk (dairy or nondairy)
- 1/2 teaspoon pure vanilla extract
- 2 ounces (57g) semi-sweet chocolate, coarsely chopped
Instructions
I encourage you to read through this recipe entirely before beginning, so you understand each step and are prepared for the various cooking, cooling, and chilling stages.
- Prepare homemade rough puff pastry dough through 2nd refrigeration. If using store-bought frozen puff pastry, thaw according to package directions. Keep either dough in the refrigerator until step 7 below.
- Make the pastry cream: In a large heatproof bowl (preferably with a pour spout), whisk the egg yolks and cornstarch together with a fork. It may not look like it will all come together (it will be dry at first), but keep mixing until the mixture is thick and combined. If it’s not coming together at all, add a few drops of the milk you need in step 3 to bring together. Set aside at room temperature.

- Combine the milk and sugar in a medium saucepan over medium heat. Whisk until the sugar has dissolved, then bring to a gentle simmer. Remove from heat. Pour the warm milk and sugar mixture in a slow and steady stream into the egg yolk and cornstarch mixture, whisking the entire time. Keep those egg yolks moving so they don’t scramble. Over a sieve, to strain out any egg yolk solids that may have formed during tempering, pour the mixture back into the saucepan.


- Return the saucepan to medium heat, and whisk constantly. The mixture will be frothy on the surface at first, and then it will begin to thicken quickly and large bubbles will begin to burst on the surface. This usually takes about 1–2 minutes. Stand back and use caution. Let the bubbles burst for about 20 seconds, or until the mixture has thickened into a custard- or pudding-like consistency. (For a more accurate test, the custard is done when the temperature reaches 185–190°F (85–88°C).) Remove from heat. Whisk in butter, vanilla extract, vanilla bean seeds, and a pinch of salt. Cool for 10 minutes. (You will use the heavy cream later, in step 9.)
- Transfer the pastry cream from the saucepan to a heatproof bowl and place a piece of plastic wrap or parchment directly on the surface of the custard, to prevent a skin from forming. Refrigerate for at least 3 hours, and up to 24 hours. Makes 2–2.5 cups, or about 580–610g.
- Preheat oven to 400°F (204°C). Line a 12×17-inch baking sheet (half sheet pan) with parchment paper. Have a second baking sheet and more parchment paper out as well. Set aside.
- Shape the dough: On a floured work surface using a floured rolling pin, roll pastry dough into a rectangle about 11×16 inches in size. (If using store-bought puff pastry sheets, place them side by side, with the edge of one sheet overlapping the other in the center, and use a rolling pin to adhere them together as you roll the whole thing out into an 11×16-inch rectangle.)
- Transfer the dough to the lined baking sheet. Dock the surface with a fork to allow steam to escape. Place a second piece of parchment paper on top of the pastry dough. Set a second baking sheet, filled with pie weights (or dried beans, or other options see recipe Note below) on top. Bake for 20 minutes with pan & weights on top. Remove from oven and carefully remove the top weighted baking sheet and the top piece of parchment. Return the uncovered pastry to the oven for 7–9 more minutes, or until golden brown. Remove from the oven and cool for 20 minutes on the pan, and then carefully lift it and place on a cooling rack to cool completely.
- Finish the cream filling: Using a handheld or stand mixer fitted with a whisk attachment, whip the cold heavy cream on medium-high speed until medium peaks form, about 3 minutes. Add the chilled pastry cream to the bowl with the whipped cream. Beat on low speed until just combined and smooth. Do not over-mix. Cover and refrigerate for at least 1 hour and up to 4 hours. You’ll use it in step 12.

- Assemble the pastries: Using a large, very sharp knife, trim around the sides of the cooled pastry to straighten up any uneven edges. Use the knife to cut the pastry into 15 squares roughly uniform in size. NOTE: The pastry will shrink some while baking. After starting with dough rolled out to 11×16 inches, after baking it typically ends up around 9–10×14–15 inches. So if you have a baked pastry that’s 9×15 inches (after trimming the edges), your 15 squares will be 3×3 inches. If your pastry is a slightly different size, don’t panic! Use a measuring tape or ruler to measure the sides to determine exactly how wide to space your cuts. Measure the long side and divide by 5, then measure the short side and divide by 3.
- Make & add the topping: In a small bowl, whisk together the sifted confectioners’ sugar, milk, and vanilla until combined and smooth. Place the chopped chocolate in a small microwave-safe bowl or liquid measuring cup. Melt in 20-second increments in the microwave, stirring after each increment, until completely melted and smooth. Transfer the melted chocolate to a squeeze bottle or a piping bag fitted with a small round tip, or use a small plastic sandwich bag and cut off a bottom corner. Place 5 pastry squares on a wire rack set over parchment paper. With a spoon or icing spatula, spoon and spread the vanilla icing on one square. Before the icing has a chance to set, pipe 4 lines of melted chocolate across each top. Use a toothpick to create a chevron design, dragging it across the stripes in a perpendicular direction. Alternate directions with the toothpick, wiping the toothpick end with a paper towel in between each pass. Repeat with the remaining 4 pastry squares.
- Assemble the mille-feuille: Fit a pastry/piping bag with a large round tip. Or, you can simply use a large plastic bag and snip off a bottom corner with scissors. Starting with one of the (plain/un-iced) pastry squares, pipe 3 dollops of cream filling in 3 rows (9 dollops total). Place another (plain) pastry square on top, pressing down very lightly. Repeat the piping of 9 dollops on the next layer. Place one of the decorated (iced) pastry squares on top of the second layer of cream filling. Repeat with the remaining pastry squares; you will have 5 assembled pastries. Refrigerate uncovered for at least 30 minutes before serving, or up to 8 hours. The soft filling will spill out the sides when you cut or bite into it, and that’s expected.
- Store mille-feuille in an airtight container in the refrigerator for up to 3 days. The pastry will become softer and less crisp over time.


Notes
- Make-Ahead & Freezing Instructions: There are several ways to get started on this recipe. If using homemade dough, you can prepare it 1-2 days in advance. See rough puff pastry dough recipe for details. You can prepare the pastry cream 1 day ahead of time, see step 5. The baked and cooled puff pastry, either as a whole or cut into squares, is fine covered at room temperature for up to 1 day. To freeze, after the assembled pastries have been refrigerated for at least 30 minutes in step 12 (or until the icing sets), you can wrap them each in plastic wrap and freeze for up to 3 months. Thaw in the refrigerator. You will lose some of that crisp, flaky texture in the puff pastry though.
- Special Tools (affiliate links): Whisk | Sieve | Instant-Read Thermometer | Electric Mixer (Handheld or Stand) | Rolling Pin | Parchment Paper | Baking Sheet | Pie Weights | Cooling Rack | Small Offset Icing Spatula | Piping Bag (Reusable or Disposable) | Ateco 808 Piping Tip or other large round tip | Squeeze Bottle or small icing tip such as Wilton Icing Tip #5
- Puff Pastry: If using homemade puff pastry, be generous with the bench flour when rolling out, to prevent sticking.
- Pie Weights: If you don’t have pie weights, you can use dried beans. OR you can just add the second baking sheet on top and not fill it with weights or beans. (Always add a piece of parchment paper on top of the dough, though, so the pan is not touching it.) OR as the baked pastry is cooling, place something heavy like a pot or pan on top of the top baking sheet, to weigh down the baking sheet that is on the puff pastry. (I have done that last suggestion before and it works just fine.)
- Chocolate: The best chocolate for melting and drizzling is the “baking chocolate” bars found in the baking aisle of the grocery store. I typically use Baker’s or Ghirardelli brands, either semi-sweet or bittersweet. They are usually sold as 4-ounce bars, so you’ll need half of one for this recipe. Do not use chocolate chips because they contain stabilizers, which prevent them from melting into the correct consistency.
- Other Filling Options: Instead of pastry cream, you can use the peanut butter mousse filling from these homemade eclairs; whipped cream for an extra light and barely sweetened filling; lightly sweetened whipped frosting; the no-bake cheesecake filling from these cheesecake jars; or the mousse filling from this dark chocolate mousse cake. Or you can still use pastry cream, or any of the suggestions I just listed, and layer your filling of choice with fresh raspberries or thinly sliced strawberries and dollops of jam. Or pipe rows of raspberry cake filling between rows of your choice of cream/mousse filling.
- Other Topping Options: Instead of the vanilla icing and melted chocolate combo, you can simply dust the tops with confectioners’ sugar. You can also skip the chocolate for a plain vanilla icing topping, or skip the vanilla icing and drizzle melted chocolate directly on top. Or some mille-feuille recipes use royal icing. If you want to use my recipe for royal icing, I recommend halving it.
- Adapted from a combination of Bake from Scratch & The Spruce Eats; I made changes to the cream filling, used homemade pastry (and found baking it as a whole sheet and then cutting into squares to be easiest), and opted for vanilla icing and melted chocolate instead of topping with royal icing or confectioners’ sugar.


Reader Comments and Reviews
This recipe was absolutely delicious! The pastry cream in between layers of beautiful puff pastry with that beautiful icing top was delicious and beautiful! I love Sally’s recipes and love trying them. Some recipes online look gorgeous but don’t taste the best at all, Sally’s website shows that you don’t have to be a professional pastry chef to make simple yet beautiful, delicious desserts! Thank you Sally!
A bit time consuming but easy to follow. I didn’t put the chocolate on quickly enough so the icing had already started to set and didn’t look as nice as I had hoped but still very tasty.
When I saw this recipe, I knew I wanted to make the rough puff pastry. The instructions were easy to follow and working thru each step filled me with the same zen feeling I have when making bread. The finally baked pastry was amazing, golden and flaky. When I cut into the pastry and tasted it, it just melted in my mouth. I made the Mille-Feuille for guests and they were wowed by it. The only problem I encountered was baking the pastry. My oven did not bake the pastry in the indicated time. I should have baked it longer with the sheet on top. Noted for the next time I make this.
My family is really enjoying the palmiers! The recipe was easier than I thought it would be!
Could you please offer a version to print without the pictures?
Hi Lori! You can use the “print recipe” button in the recipe card above for a printable version.
Definitely a labor of love, but it was so delicious! The directions were easy to follow. After seeing others say their creme diplomat got too slack, I whipped my cream to slightly firmer than medium peaks and it held nicely.
As always, Sally’s instructions covered everything and made this super impressive dessert easy and fun to make. It took me several days to finish it but only because I got busy between the steps. And it was delicious as well as gorgeous!
Wonderful recipe!
Nice recipe. Lots of fun to make!
I choose to make the Palmiers with store bought puff pastry. The recipe was super easy. I loved the spice mixture – fragrant and delicious. I could not resist adding nuts to this recipe – it was a big hit in our house. Will definitely make these again!
Yum!
I went with the store bought puff pastry. Super easy recipe! loved the mix of spices – fragrant and so delicious. I couldn’t resist adding nuts to my palmiers. Everyone thoroughly enjoyed them.
This is a great recipe, time consuming but not difficult. It tastes phenomenal! I will definitely be making this one again!
This was such a fun recipe to make! Time consuming with the chill time but much easier than expected! I love that there was so much pastry cream left over…will make something else with it! Will definitely make again.
Great recipe with super clear instructions! Was a hit with the family.
I had so much fun with this recipe. I made it for my sister-in-law’s birthday. Simple, yet elegant and absolutely delicious!
This is the most complex dessert I have ever tackled, however the step by step instructions made it fun and less daunting! I did it over 2 days making the pastry and custard on day one and the rest on the following day. Like other reviewers noted, I wish that I had left the custard on the stove for a bit longer as it ended up a bit soft. End result was beautiful though and my kids were shocked that I had made it. A bit messy to eat, but that didn’t stop anyone from digging in – it tasted delicious! Thank you for taking me out of my comfort zone with this one!
This might be the most amazing thing I have ever made. For those who don’t want to spend the money on vanilla beans, buy vanilla bean paste. 1 tsp = 1 bean. Less expensive and you still get the bean specks. Thank you Sally for yet another amazing recipe. The rough puff recipe is also incredible, I can’t wait to use it more.
A Daunting, yet irresistible recipe! Sally once again can break down a challenging recipe into manageable steps that produce a great product! The rough puff pastry was deliciously crisp in contrast to the creamy and rich pastry cream. All topped with a beautiful chocolate laced argyle glaze! Stretched my skills, engaged my senses and had me craving more! Great job with this recipe Sally!
The mille-feuille was amazing. I chose to make the homemade puff pastry and all I can say is wow!!!!
This recipe was so good I loved it so much!
This recipe was definitely more involved than I anticipated. The custard was delicious but I am thinking I took it off the heat too early as it seemed too soft at assembly time. In the end, it was good. Maybe not my favourite dessert (just personal preference) but my husband and I enjoyed it.
I found this recipe very easy to follow. I decided to make my own rough puff pastry and couldn’t be more happy with how it turned out. I also chose to use chocolate mousse as the filling and wasn’t at all disappointed with that decision! Thanks, Sally!
Delicious! Was definitely a challenge to make but the step by step instructions and photos made it very manageable.
Lots of steps, but rough puff was way easier than I expected, and the final product was worth it.
This was so awesome! The puff pantry was flakey and pastry cream was good enough to eat on its own. Sally’s directions were clear and easy to follow. French pastry made easy!
My oven isn’t big enough to bake the dough, would it be possible to split the dough and bake it on two separate pans ?
Absolutely!
I don’t have much experience with pastry, but it turned out great. The instructions were easy to follow. I did it over two days so it wasn’t so daunting.
The Mille feuille recipe was detailed – didn’t leave anything out. The end result was so flaky and delicious! Worth the indulgence!