

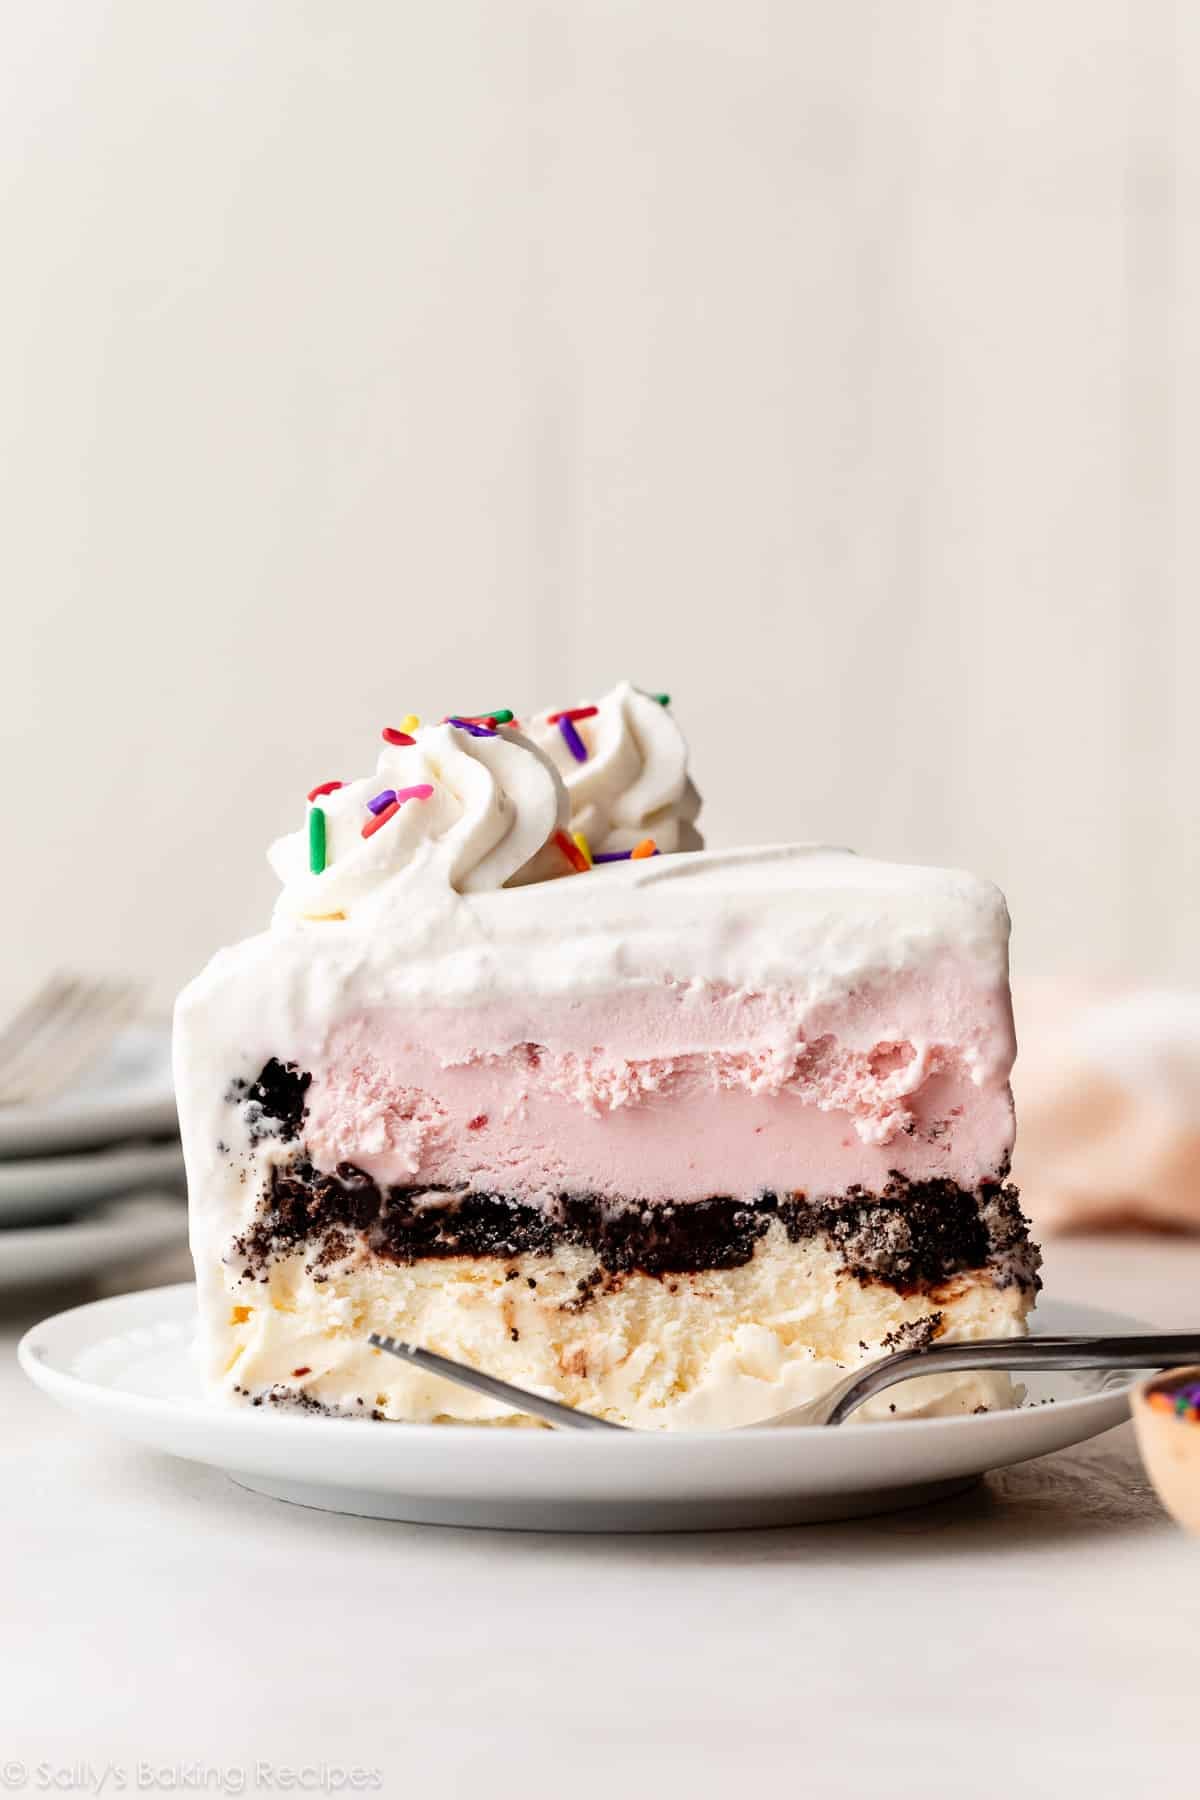
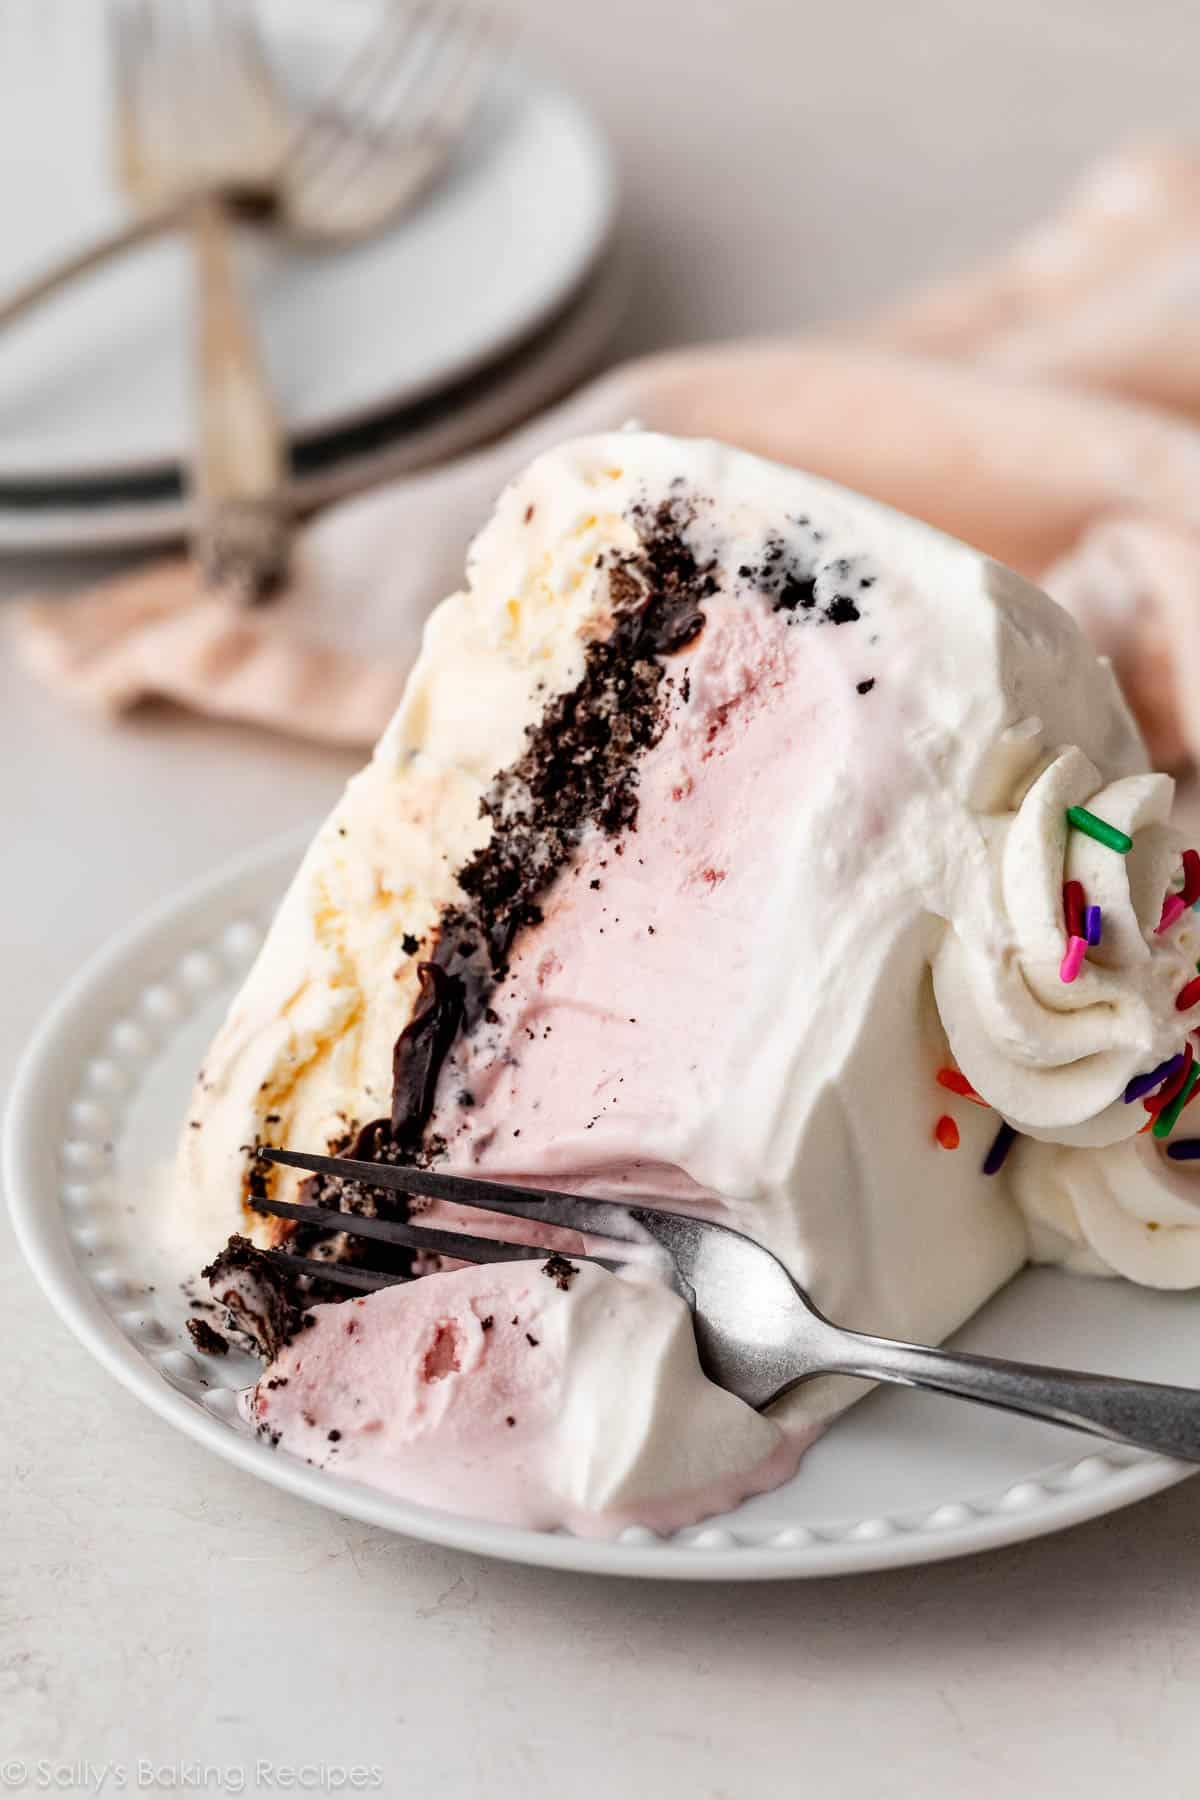
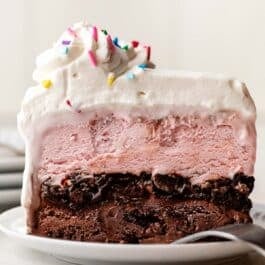
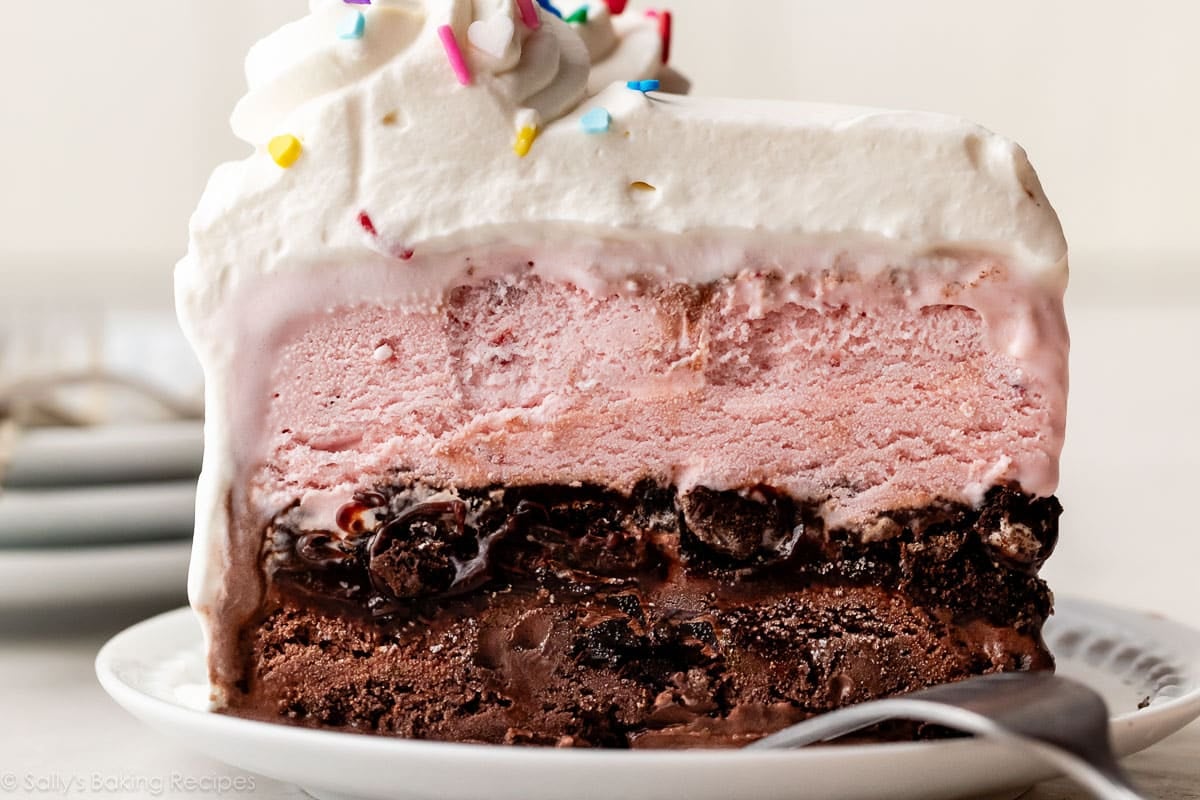
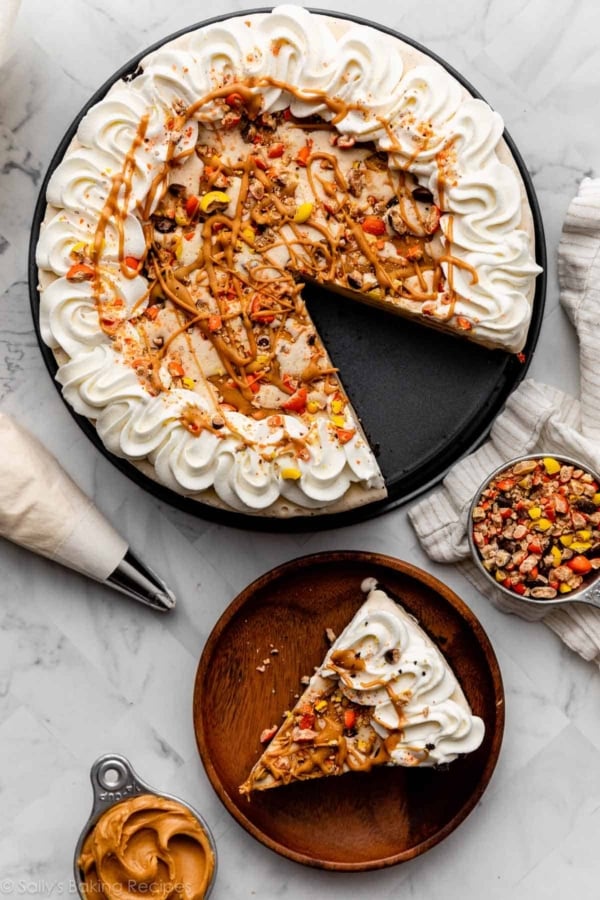
Chill out with a slice of ice cream cake! This crowd-pleasing, totally no-bake Dairy Queen-inspired treat combines two of your favorite ice cream flavors, plus layers of crunchy Oreo cookies, homemade hot fudge, and whipped cream. Because this cake needs to freeze for at least 12 hours prior to serving, it’s a great make-ahead dessert for celebrations.
One reader, April, commented: “I’ve made ice cream cakes several times before. But the hot fudge and Oreo layer in this recipe takes it to the next level! This will be the staple recipe used in our house from here on out. ★★★★★“
One reader, Stacie, commented: “This was a big hit for my daughter’s birthday party! We’ll definitely be making it again. The fudge/Oreo layer in the middle is everything! ★★★★★“
Need a celebratory ice cream dessert? Obviously it’s easiest to just pick up a ready-made ice cream cake from the grocery store or ice cream shop, but if you’ve never made an ice cream cake before, I encourage you to try it at least once! And if you love it, be sure to check out these copycat desserts to make at home for more ideas!
It requires a few back-and-forth trips between the freezer and counter, but other than that, it’s surprisingly easy—absolutely no baking and very few tools and ingredients needed.
And just wait for the moment the jaws drop open when you tell your guests you made this yourself! (And they’ll pretty much remain open until their plates are licked clean. I know this from experience.)
This Homemade Ice Cream Cake Is:
- A fun frozen dessert perfect for a summertime celebration
- 5 layers of cool, creamy decadence
- Easy to make, completely no-bake recipe
- Customizable with your favorite flavors of ice cream
- Ribboned with homemade hot fudge
- Topped with fluffy whipped cream and cheerful sprinkles
- As tempting as cookie ice cream sandwiches, but made in 1 pan to serve a group
- A great make-ahead option to add to your list of BBQ cookout desserts.
You can use any flavors of store-bought ice cream you want. Chocolate + strawberry is a favorite combination in my family, but you could also try: chocolate + peanut butter, chocolate + mint chip, cookies dough + chocolate, or coffee + cookies and cream. The combination is entirely up to you.
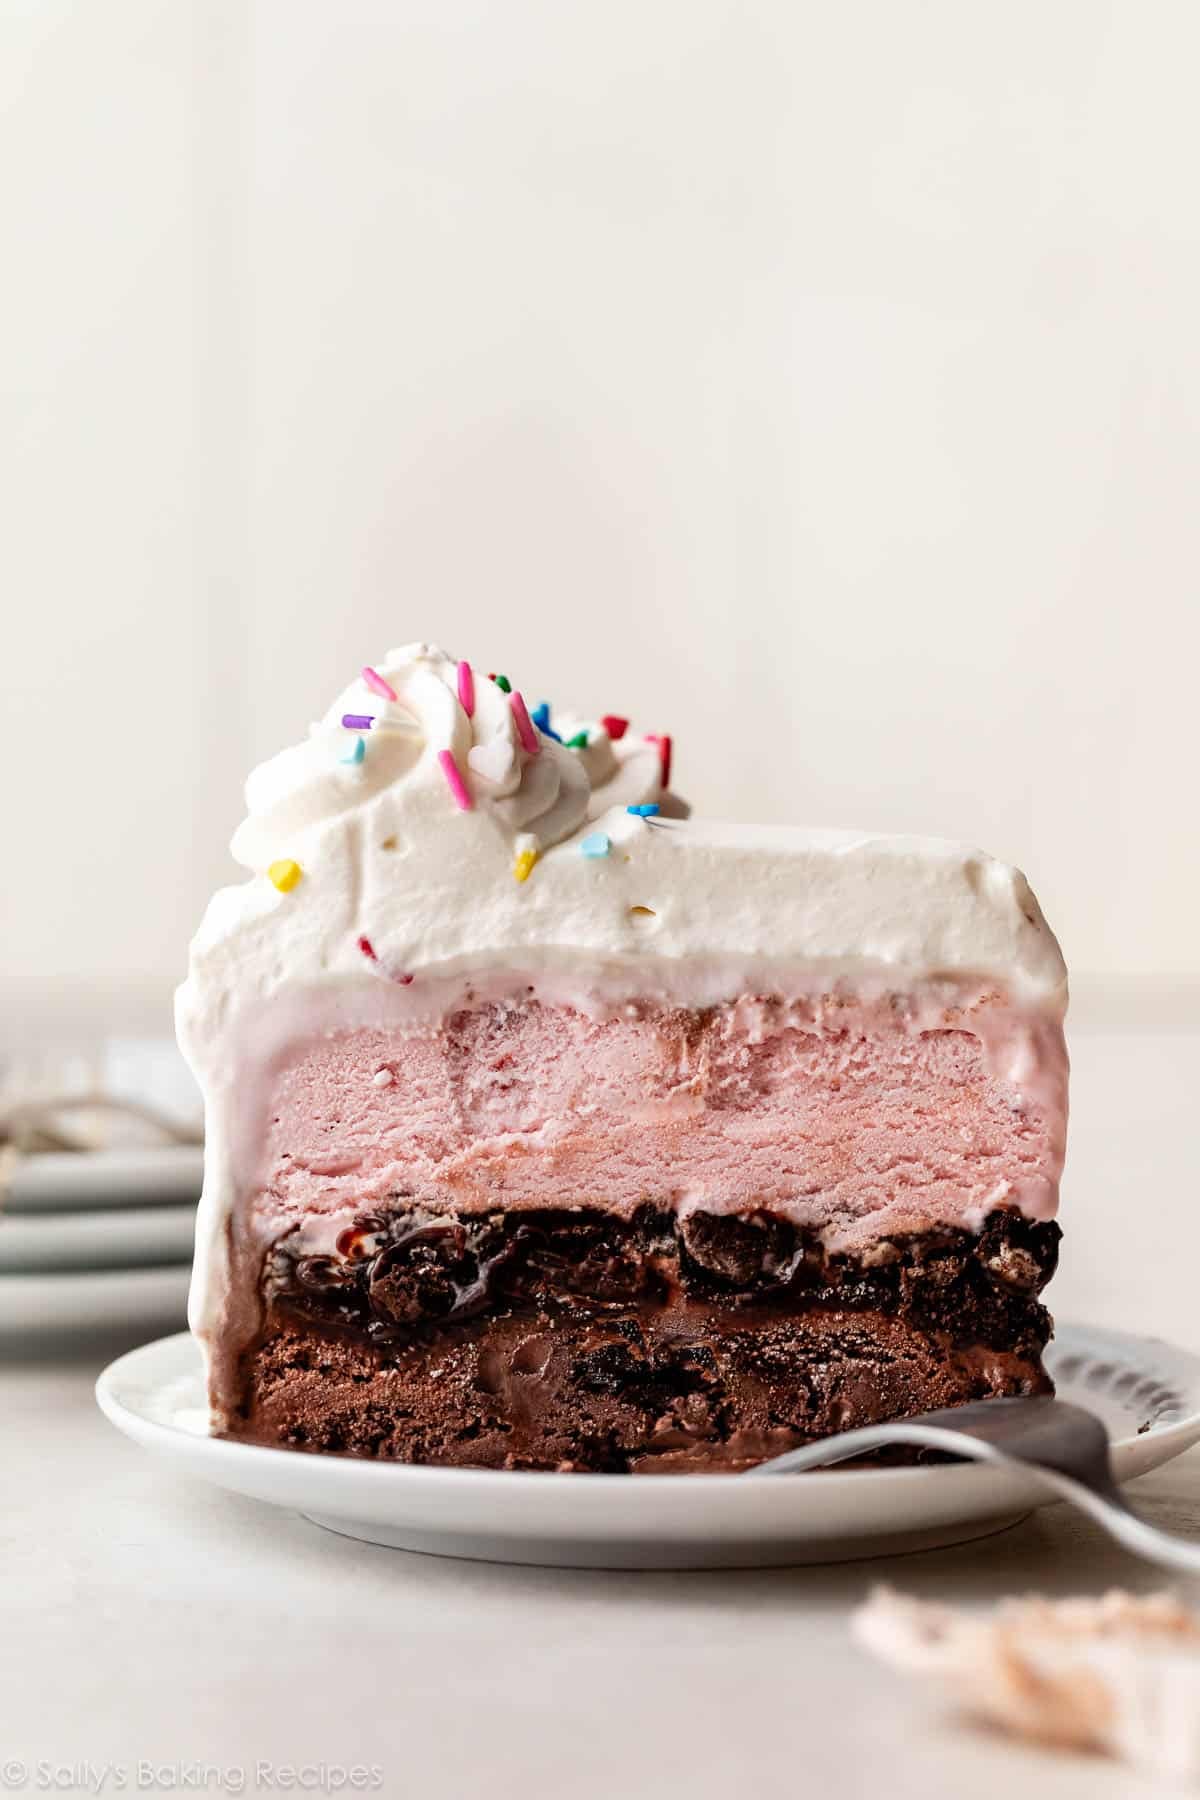
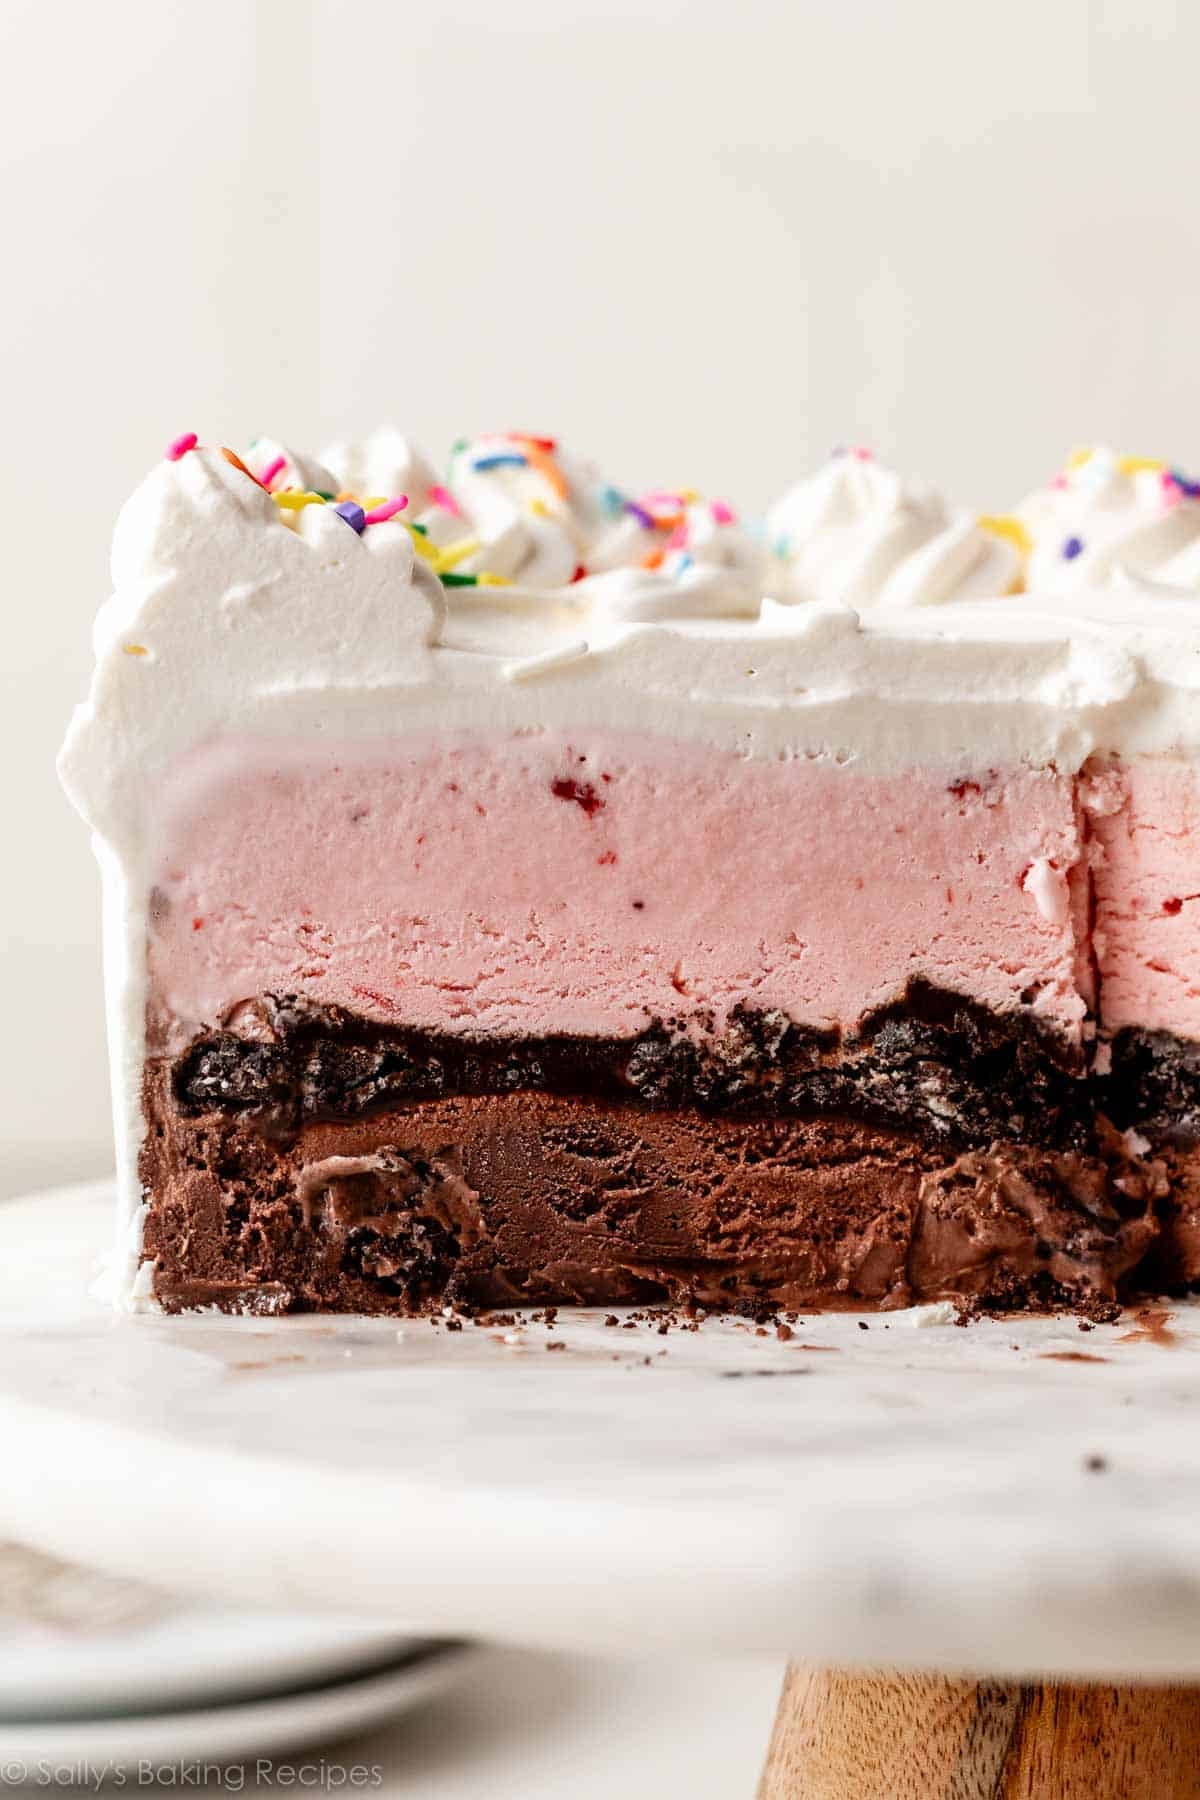
5 Layers to Love
- Ice Cream: Start with a 1.5-quart carton of ice cream, and let it soften.
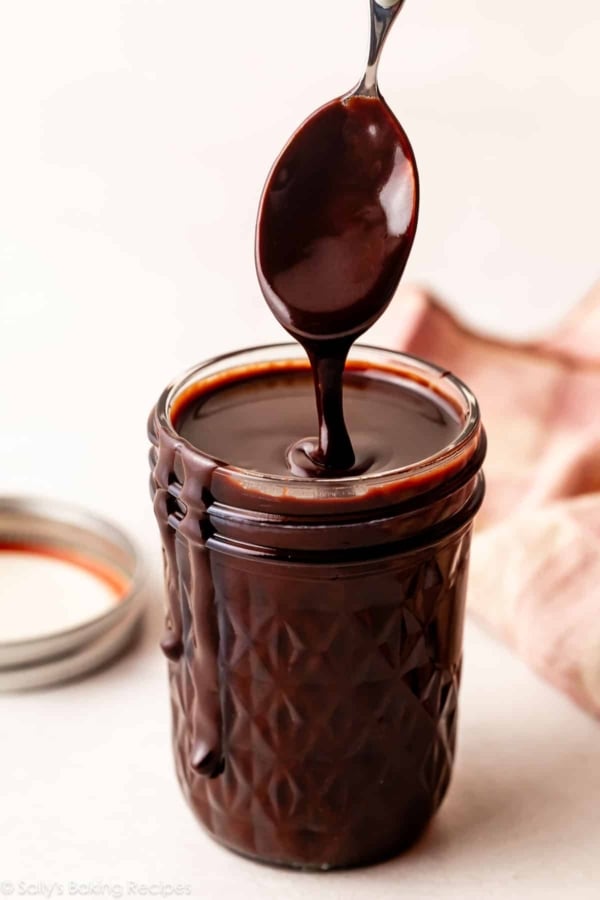
- Hot Fudge: I highly recommend making your own homemade hot fudge—it tastes so much better than store-bought and takes just 5 minutes on the stove.
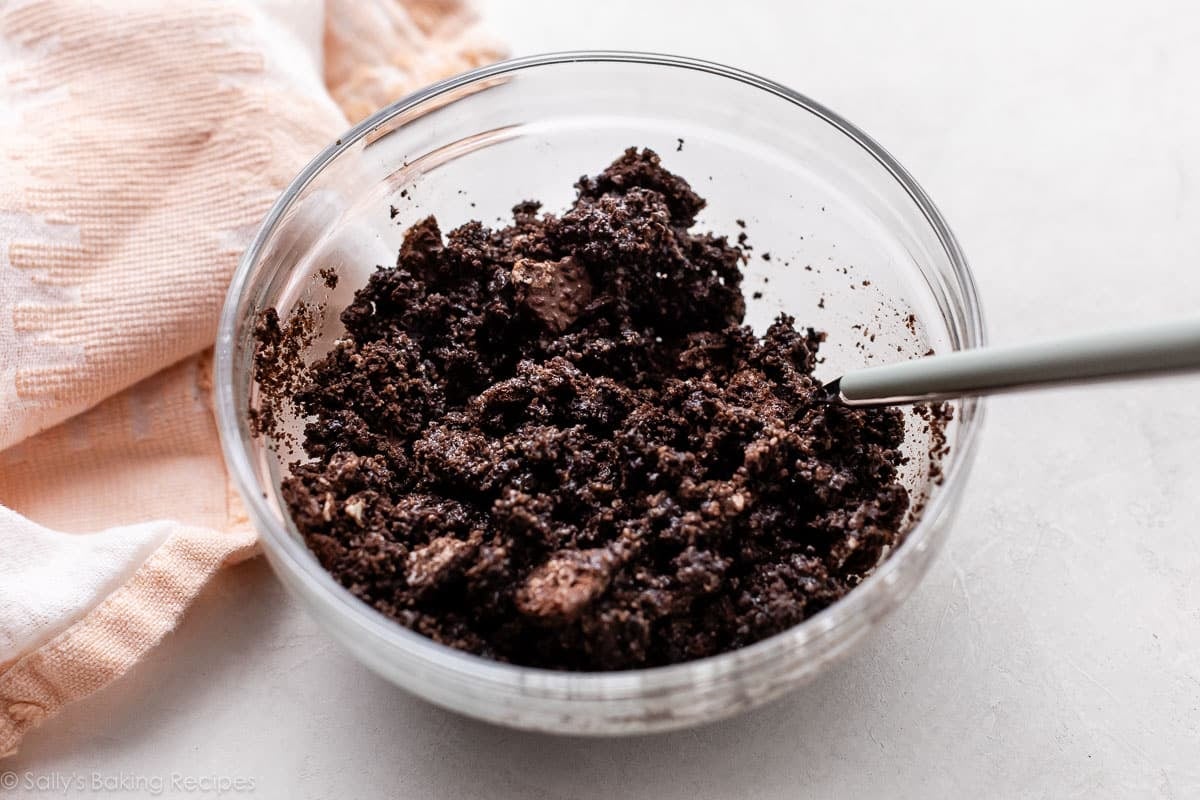
- Crushed Oreo Cookies + Melted Butter: A layer of crushed Oreos mixed with melted butter adds incredible texture to this cake, while keeping the assembly easy and totally no-bake. Melted butter helps the Oreos stay a bit crunchy, and also helps adhere them to the two layers of ice cream. I tested this recipe without the butter, and the two layers completely separated. (Literally, the top layer fell off the cake. It was quite the cleanup job!)
- Ice Cream: A second 1.5-quart carton of softened ice cream, in another flavor.
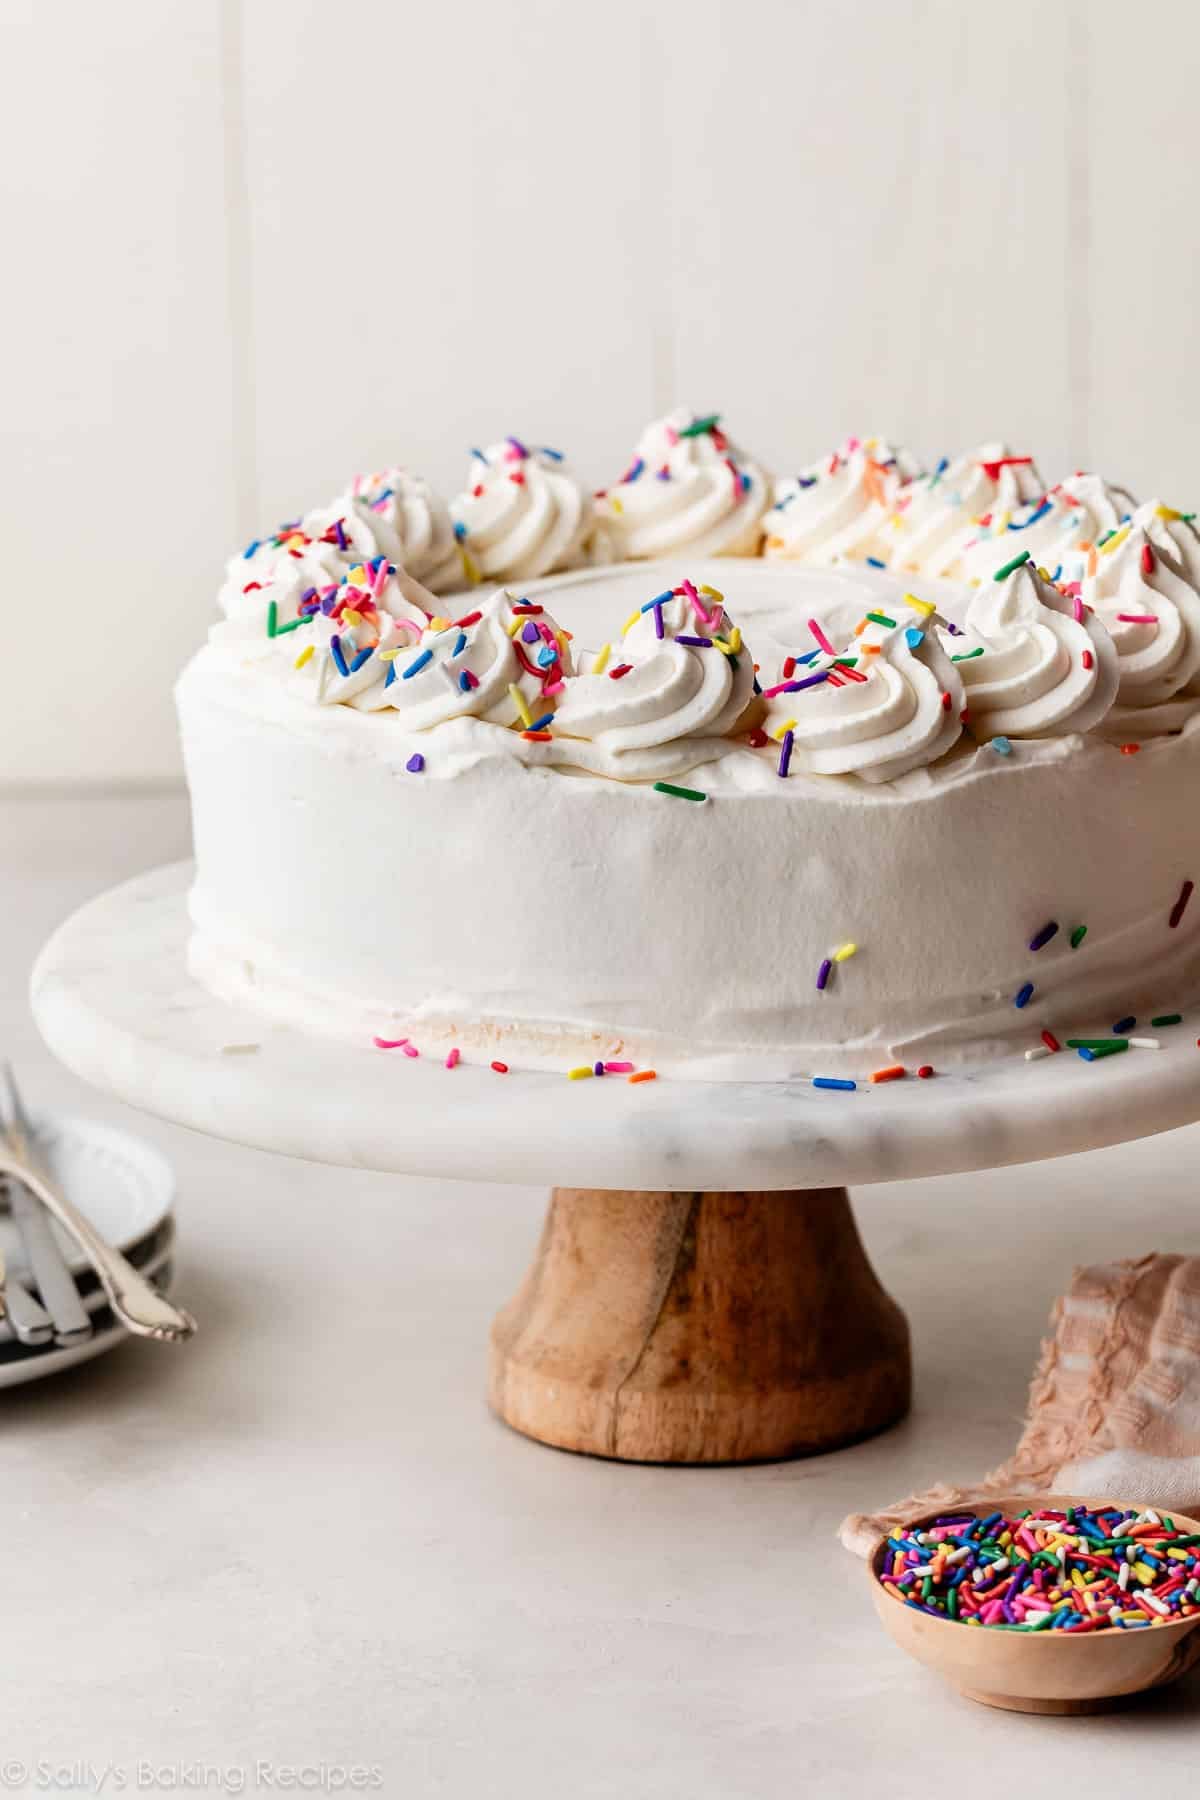
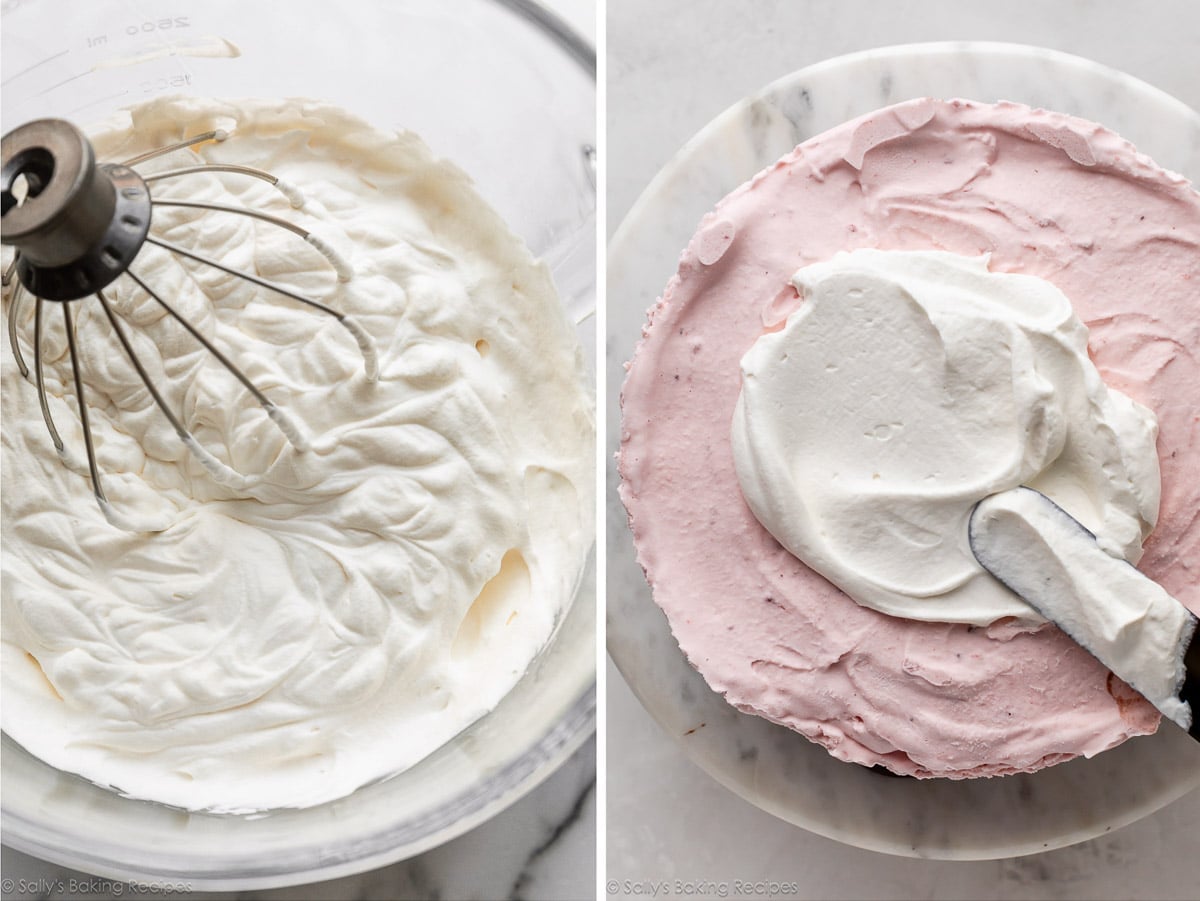
- Whipped Cream: Homemade whipped cream is quick to make and the perfect topping for this frozen dessert. The recipe below yields enough to cover the cake, plus some extra for decorative piping detail. It’s nice to have a second homemade element to this dessert, since we’re using store-bought ice cream and Oreos.
I like to garnish it with sprinkles for a festive finish. Because of course I do!
Best Pan to Use:
You need a 9-inch or 10-inch springform pan that’s at least 3 inches high. If you don’t have a pan this size, you can turn this into a quarter sheet cake using a 9×13-inch pan, or halve the recipe for an 8×2-inch square pan.
Whichever pan you use, line it with plastic wrap. Why? You will have a heck of a time slicing this frozen cake while it’s still inside the pan! You’ll want to completely remove the cake and place it on a frozen or cold cutting board or cake plate to slice. And, if using a springform pan like pictured, the plastic wrap prevents any melty ice cream leakage.
Ice Cream Cake Success Tips (Learned From Experience!)
I made a slew of ice cream cakes the past month, determining the most successful (and non-melty) way to frost and serve this chilly dessert. Take my advice:
- Take the ice cream out of the freezer and let it sit and soften for 10 minutes before layering.
- Line the pan with plastic wrap.
- Freeze the cake as directed in the instructions in between adding your layers.
- Don’t skip the melted butter with the crushed Oreo cookies; the melted butter helps the two layers of hot fudge and ice cream adhere to one another.
- Work quickly. Read through the recipe so you understand each step.
- If using store-bought hot fudge, heat it up a bit. This makes it a little easier to spread on top of the ice cream.
- Freeze the cake for at least 12 hours (and up to 2 days).
- If you intend to serve this on a cake stand or other serving platter, freeze the cake stand/platter for 30 minutes before placing the ice cream cake on top and frosting it with the whipped cream. (Otherwise, it will melt immediately, making frosting very difficult!)
- For clean cuts, run a sharp knife under hot water before slicing. This trick works when cutting brownie ice cream sandwiches, too.
Here is the ice cream cake again with vanilla on the bottom layer. Have fun customizing your own ice cream cake using various flavors!
Ice Cream Cake FAQ
Yes—it can take the place of the bottom ice cream layer. Bake a cake in a 9-inch springform pan. I recommend the vanilla cake recipe from my homemade cake pops or the chocolate cake recipe from my chocolate cake pops. Both yield one 9-inch cake in a springform pan. After the cake cools, keep it in the pan, and freeze for 1 hour. Continue with assembling the remaining layers of the ice cream cake.
You can make this in a 9×13-inch pan, or halve the recipe for an 8×2-inch square pan. Be sure to line the pan with plastic wrap so you can easily remove the ice cream cake from the pan to slice it.
Yes, absolutely. Crushed crunchy chocolate chip cookies (homemade or store-bought), Nutter Butters, Nilla Wafers, graham crackers, and Biscoff cookies are some top choices. Any crunchy cookie works!
Yes. Reduce the ice creams to 1 quart each. Keep the hot fudge, Oreo, and whipped cream amounts the same. Your cake will be a bit shorter.
Homemade Ice Cream Cake (Like Dairy Queen)
- Prep Time: 2 hours
- Cook Time: 0 minutes
- Total Time: 14 hours (includes freezing)
- Yield: serves 10-12
- Category: Dessert
- Method: Freezing
- Cuisine: American
Description
This crowd-pleasing dessert combines two of your favorite ice cream flavors, plus layers of crunchy Oreo cookies, homemade hot fudge, whipped cream, and sprinkles. Read the recipe in full before starting so you’re prepped, and don’t skip freezing the layers during the assembly process. A 9×3-inch springform pan, 9×3-inch pan with removable bottom, or a 10×3-inch springform pan is ideal for this cake. For other pan options, or to add a layer of baked cake, see recipe Notes below.
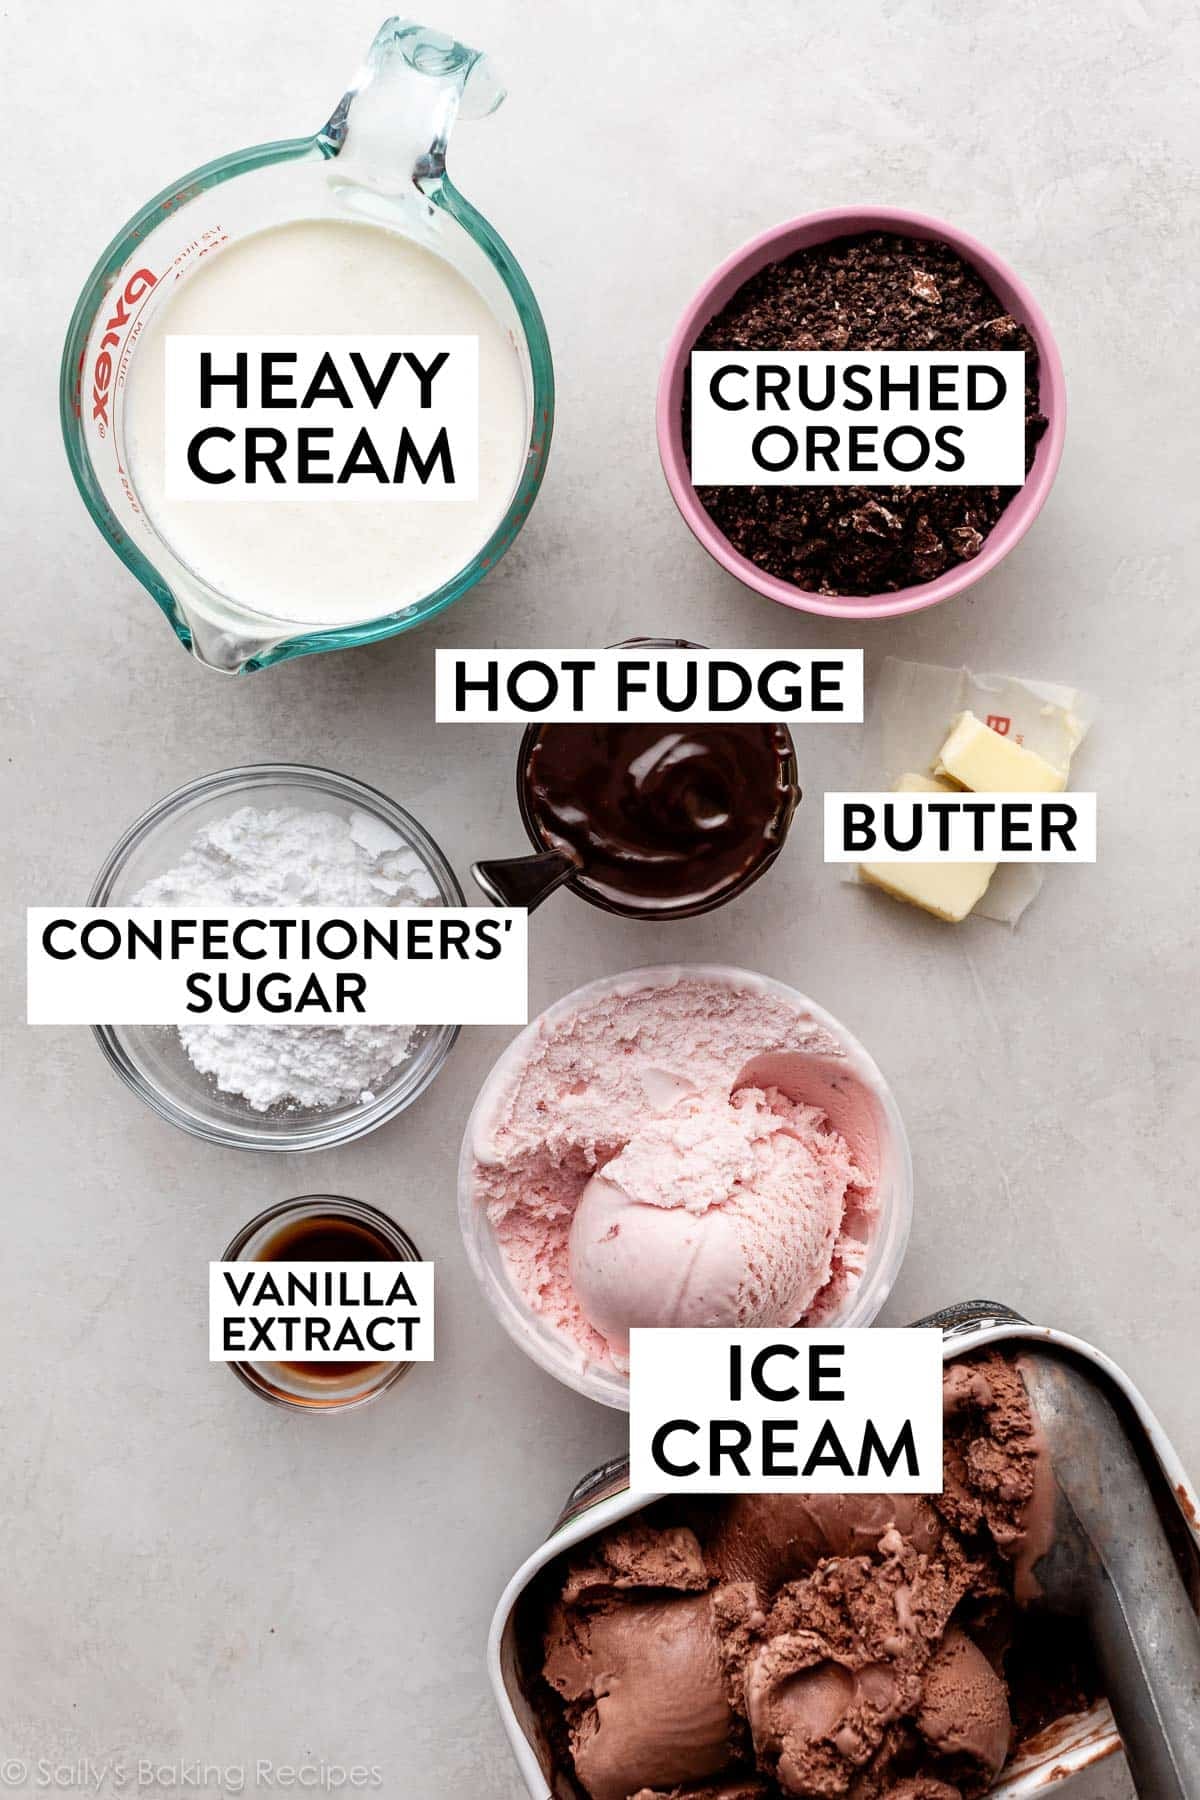
Ingredients
Cake
- 10 Oreo cookies (110g)
- 2 Tablespoons (28g) unsalted butter, melted
- 1.5 quarts (1.42L) chocolate ice cream, softened (or other flavor)
- 1 cup (8 ounces/227g) homemade hot fudge (or use store-bought), divided
- 1.5 quarts (1.42L) strawberry ice cream, softened (or other flavor)
Topping
- 2 cups (480ml) heavy cream, cold
- 1/3 cup (40g) confectioners’ sugar
- 1 and 1/2 teaspoons pure vanilla extract
- optional for garnish: sprinkles
Instructions
- In a food processor or blender, pulse 10 Oreos (including the cream filling) into a coarse crumb; feel free to leave some larger chunks. You should have about 1 cup crumbs. Mix with the melted butter and set aside to use in step 4.

- Remove chocolate ice cream (or desired bottom-layer flavor) from the freezer and let it soften for 10 minutes. Meanwhile, line a 9×3-inch or 10×3-inch springform pan with plastic wrap. I usually use two pieces to ensure all sides have a little overhang. See recipe Note for other pan options.
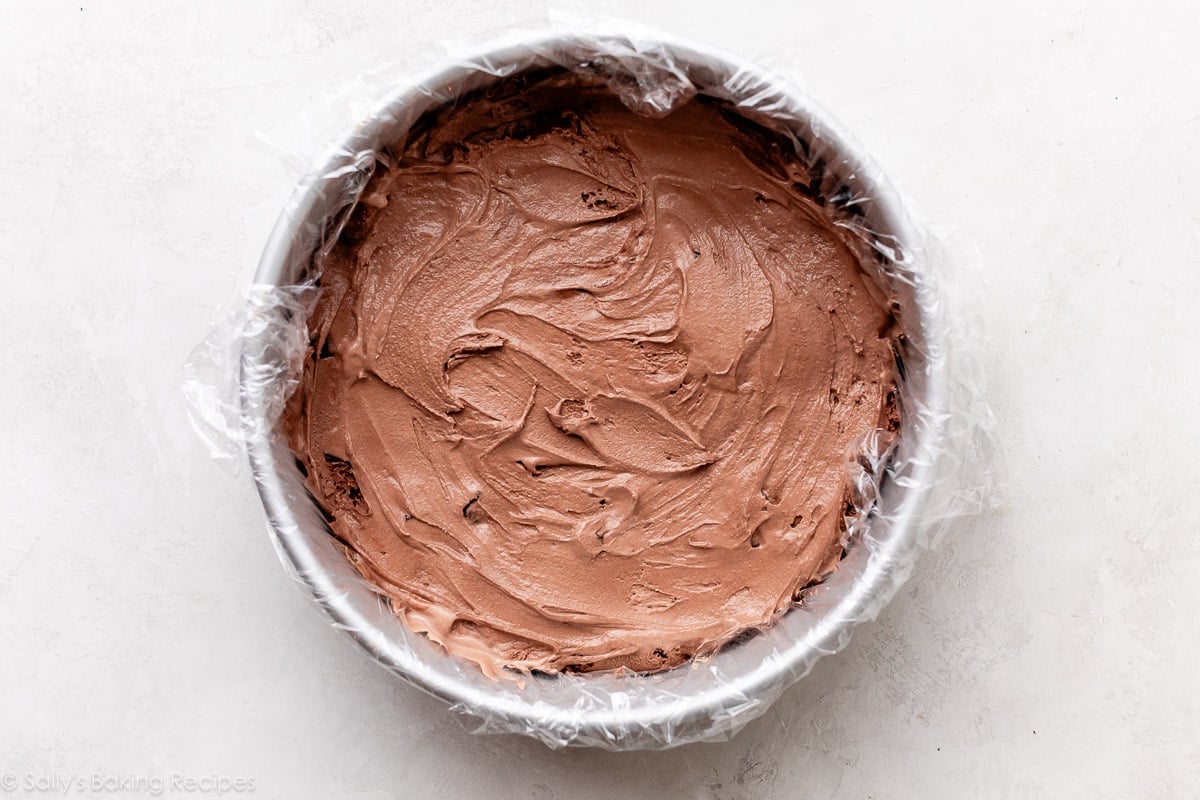
- Scoop chocolate ice cream into lined pan and, working quickly, use the back of a large spoon to spread it into an even layer as best you can. Place it in the freezer for 30 minutes.
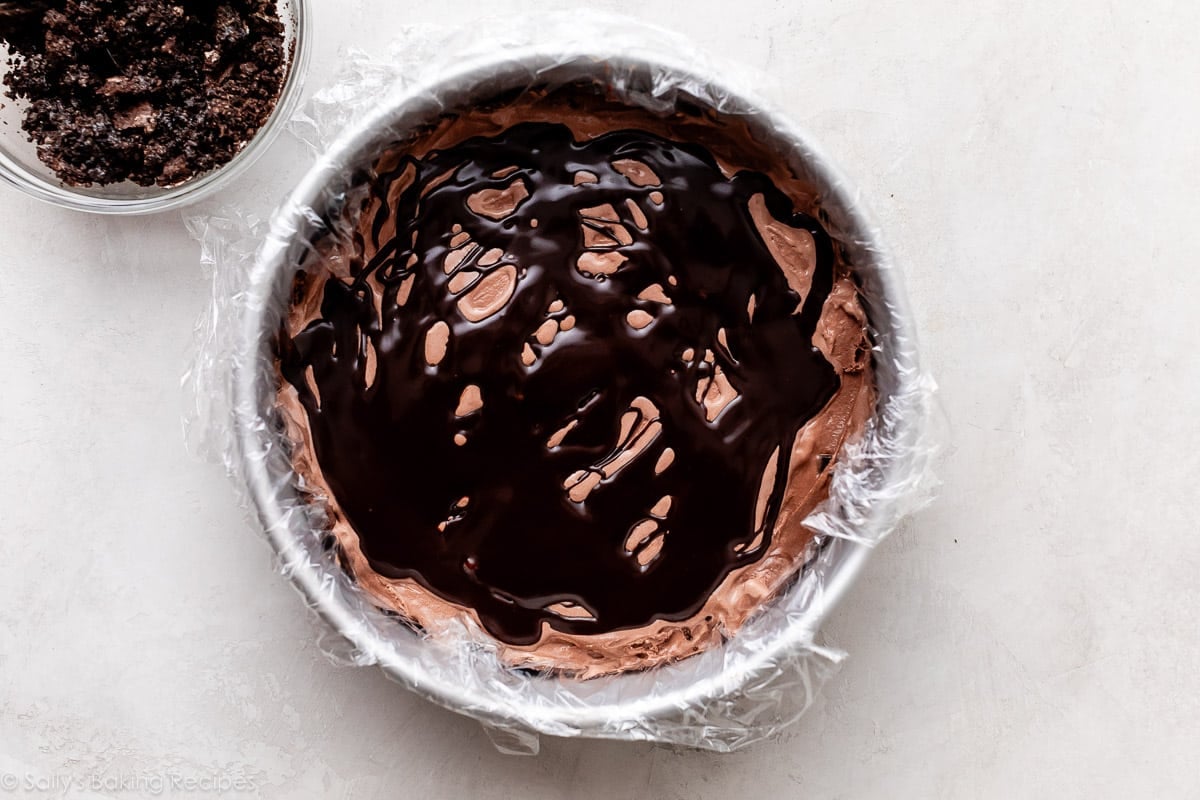
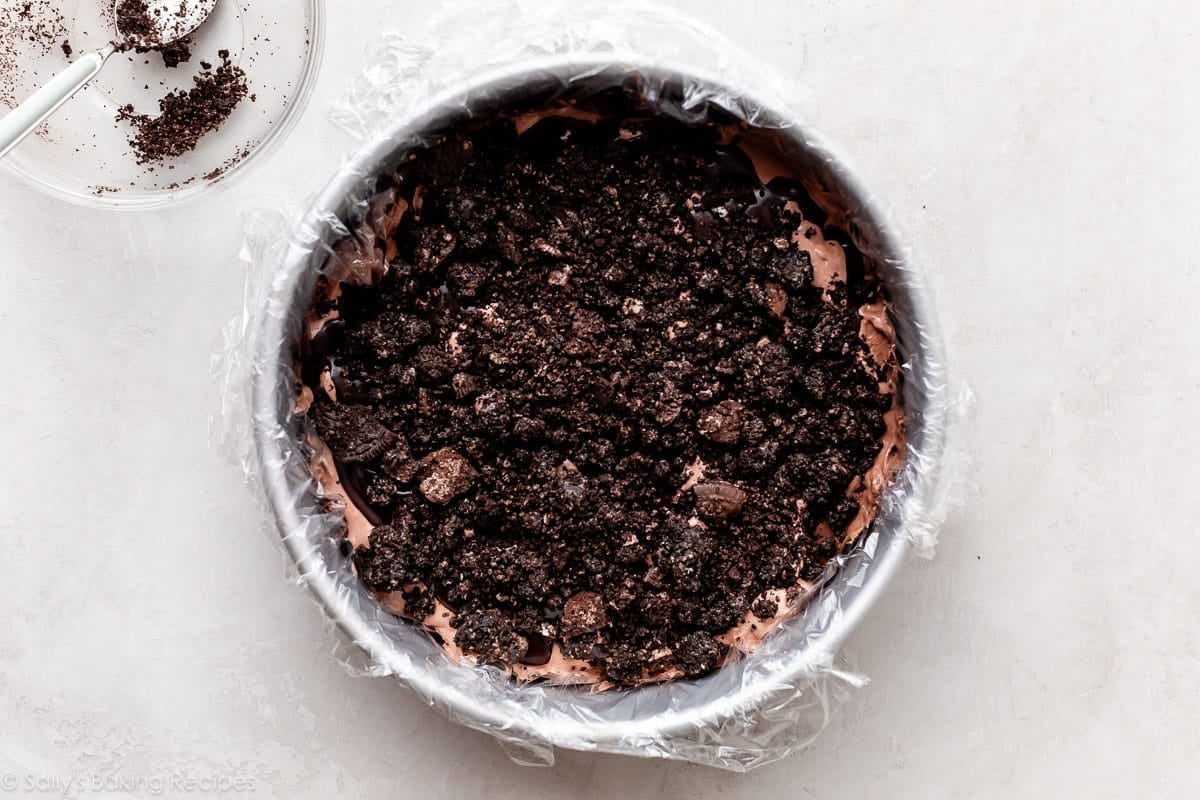
- During that time, make your homemade hot fudge, or warm up pre-made hot fudge sauce so that it’s a spreadable consistency. Pour and spread 1/2 cup hot fudge evenly over the first ice cream layer, then top with Oreo mixture.
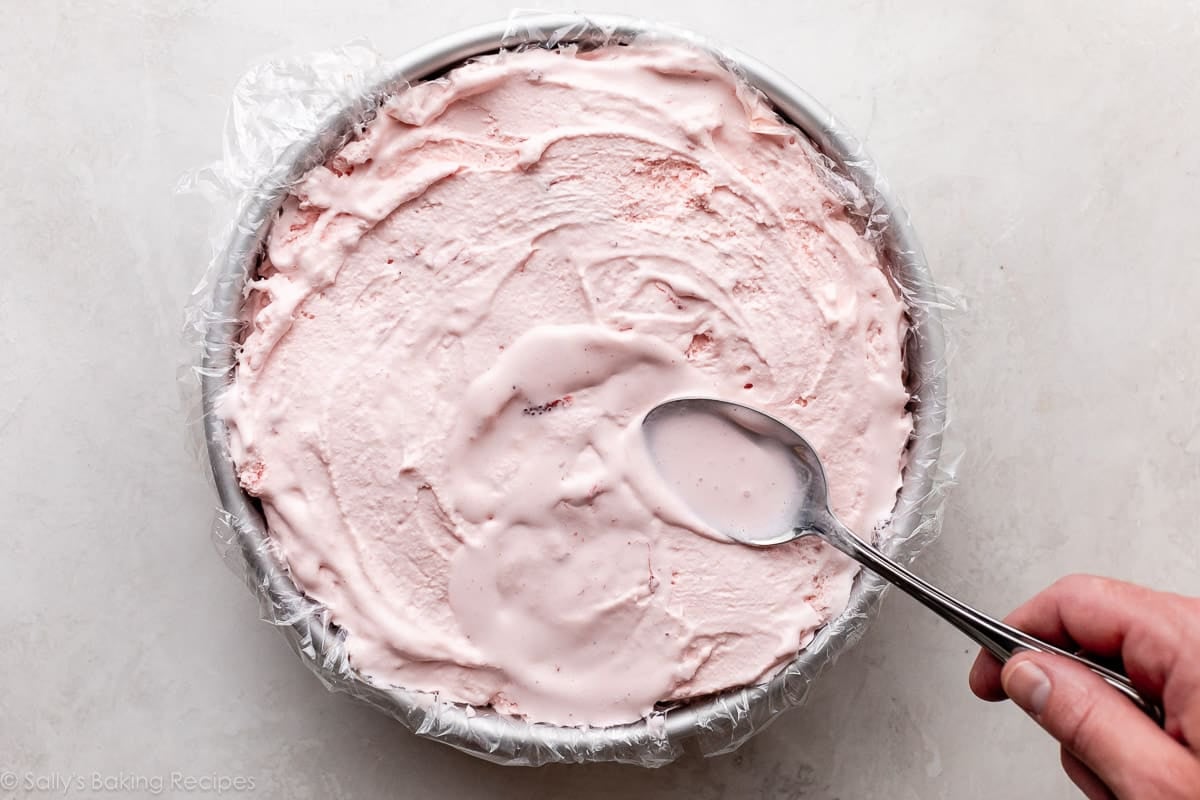
- Freeze for 30 minutes. After 20 minutes, remove strawberry ice cream (or desired top flavor) from the freezer to soften for 10 minutes.
- Drizzle remaining 1/2 cup hot fudge on top of Oreo layer. Working quickly, spoon and spread strawberry ice cream into an even layer as best you can.
- Cover with plastic wrap or aluminum foil and freeze for at least 12 hours and up to 2 days.
- Freeze the cake plate: If you want to serve the cake on something other than the bottom of the springform pan (or if you made this in a 9×13-inch pan or 8-inch square pan), place your desired cake plate/stand or cutting board in the freezer for at least 30 minutes. (The bottom ice cream layer will begin to melt immediately on a room-temperature surface.)
- Make the whipped cream topping: Using a handheld mixer or a stand mixer fitted with a whisk attachment, beat the heavy cream, confectioners’ sugar, and vanilla on medium-high speed until stiff peaks form, about 4 minutes.
- Remove the frozen ice cream cake from the freezer. Remove the rim from the springform pan. Lift the cake up using the plastic wrap and carefully peel off the plastic. Place the cake back on the bottom of the springform pan, or the frozen cake plate/cutting board. Working quickly, spread the whipped cream all over the top and sides of the ice cream cake. Feel free to pipe a border around the top of the cake; I used Wilton 1M piping tip. Garnish with sprinkles, if desired.

- Slice and serve immediately or freeze for up to 1 hour before serving. (I don’t recommend longer than this.) Use a very sharp knife to cut, dipping it into a glass of hot water in between slices. Keep leftover ice cream cake covered in the freezer.

Notes
- Making Ahead: You can prepare this cake through step 7 up to 48 hours ahead. I do not recommend longer than that, as the ice cream cake becomes extremely difficult to cut through. Feel free to extend that time, but the cake will have to sit out for a bit before slicing (and the edges may begin to melt). You can also make the whipped cream ahead of time, up to 24 hours. Cover tightly and refrigerate until ready to use as frosting on the cake.
- Special Tools (affiliate links): Food Processor | 9×3-inch Springform Pan, 9×3-inch Pan with Removable Bottom or 10×3-inch Springform Pan | Electric Mixer (Handheld or Stand) | Piping Bag (Reusable or Disposable) | Wilton 1M Piping Tip
- To Use a 9×2-inch Springform Pan: Reduce the ice creams to 1 quart each. Keep the hot fudge, Oreo, and whipped cream amounts the same. Your cake will be a bit shorter.
- Other Pan Options: You can make this in a 9×13-inch pan, or halve the recipe for an 8×2-inch square pan. Be sure to line the pan with plastic wrap so you can easily remove the ice cream cake from the pan to slice it. In step 8, freeze the cutting board or whatever you are slicing/serving the cake on for at least 30 minutes.
- Instead of Oreos: Crushed crunchy chocolate chip cookies (homemade or store-bought), Nutter Butters, Nilla Wafers, graham crackers, and Biscoff Cookies are some top choices. Any crunchy cookie works!
- Can I Use Homemade Oreos? I don’t recommend it. They aren’t crunchy enough.
- Bottom Cake Layer Instead of Ice Cream: Instead of ice cream, the bottom layer can be a cake and I recommend making this in a 9×2- or 9×3-inch springform pan. I recommend the vanilla cake recipe from my homemade cake pops or the chocolate cake recipe from my chocolate cake pops. Both yield one 9-inch cake in a springform pan. After the cake cools, keep it in the pan, and freeze it for 1 hour. Continue with assembling the cake with the hot fudge/Oreo/top ice cream layer. No need to wrap the pan in plastic wrap. Note that if you used a 9×2-inch springform pan, only 1 quart of top-layer ice cream will fit instead of 1.5 quarts. In step 9, before removing the springform pan’s rim, run a sharp knife around the edges to loosen the ice cream.


Reader Comments and Reviews
I am planning on making this for my husbands birthday and just read it needs to be in the freezer for 12 hours minimum..wish I read that last night!
Do you think it would be ok if it were in the freezer for 8 hours?
Hi Katie, you can certainly try it, but you may find the ice cream to still be too soft. 12 hours really is best.
I followed this recipe exactly for my husband’s birthday cake. Sally and team, thank you for an amazing recipe with easy-to-follow directions and guidance!! My husband raved about the hot fudge and Oreo crumbles, which turned out so well. This beats previous ice cream cake recipes I’ve tried by a mile, and I’m sure we’ll be enjoying it again in the future.
How do you store the ice cream cake in the freezer after icing it? Will the whipped cream set firmly enough that plastic wrap can make direct contact with it without smooshing it?
Hi Ryan, after covering the cake with whipped cream and before serving, we will place the cake in the freezer uncovered for up to an hour. After serving, you can cover the cake with plastic wrap. The whipping cream may not look as nice and neat on the leftover slices, but if you’re not concerned about that, then that’s the best option.
What are the amounts for the ingredients?? Oreos butter etc
Hi Debra, do you see the gray recipe card above this comments section? You can find the whole written recipe there.
My 10-year-old daughter and I made this for her cousin. It was actually enjoyed by all which isn’t necessarily the case with a traditional cake and frosting! We made it the night before and decorated it the hour before we served it. It was easy to cut into but not melty! We will definitely make this again and try different ice cream flavors!
So easy and delicious! One comment: each time I’ve made it I’ve needed three 1.5 quarts of ice cream (the recipe calls for 2). Great recipe, thank you!
Made this and loved it!!! Can the bottom layer be Oreos?
Hi Galina, that should be fine, go for it!
Hi, I have a question regarding the hot fudge, I assume you don’t put it on hot or you will have a melty mess. How much should I let it chill before it becomes non spreadable. Will it harden to much if I let it go to room temp? Thank you so much! I am making this between today and tomorrow.
Hi Maliinda, it goes right back in the freezer after adding the hot fudge, so it’s ok if it is still warm. You can let it cool a bit so it isn’t scalding hot.
If using a cake layer, isn’t it going to be too hard to serve straight out of the freezer?
Hi MK, The best way to cut the frozen cake is to use a very sharp knife, dipping it into a glass of hot water in between slices. Hope this helps!
My son wants an ice cream cake for his birthday but I don’t want to hassle with putting the whipped topping on during the party. Could I decorate it with something else that could be frozen for longer instead? For example making the cake the day before to step 8. Then the morning of the party, skipping the whipped cream in step 9, and in step 10 plating the cake and decorating with more fudge or sprinkles or something and then putting the whole thing (including cake tray) back in the freezer for several hours until it’s time to cut & serve?
You could definitely add a top layer of the hot fudge sauce (+ sprinkles!) instead of the whipped cream. Hope your son loves it!
Hi! My daughter asked for an ice cream cake for her birthday and I’d like to try this recipe. However, she asked for a four-layer ice cream cake (making it easy for me ). Is it possible to double this recipe and then stack them? I wonder how that would slice. Thanks for your help!!
Hi Kate, we fear four layers would be quite difficult and messy to slice through. You could try making each layer about half the height, so that the total height is still about the same. Let us know what you decide to try!
So easy and so delicious… it was a huge hit at my twins’ bday party! I tweaked the recipe slightly… I did a layer of chocolate, Oreo/chilled chocolate sauce, a layer of vanilla, and then a second layer of Oreo/chilled chocolate sauce (since that’s the yummiest part!). Before eating, I flipped it upside down on a big plate, removed the pan, peeled off the Saran Wrap, and then added birthday candles and some squirts of redi-whip around the top of the cake. Looked great!
Hi Julia,
What size springform pan did you use with the two Oreo layers?
Making a practice round before my son’s upcoming birthday. I’m excited how easy it is. However, I would caution anyone who lives in Texas like me to increase the freezing time between layers. Thirty minutes isn’t long enough. My bottom layer was still soupy from the hot fudge after 40 minutes when I tried to smooth the top layer of ice cream on. It’s a balmy 79 in October currently for reference.
I have made this 3 times already and it was great. I am making one for a friend and was wondering if I could make it with a chocolate ganache instead of whipped cream frosting?
Hi Kathy, you could cover the cake in chocolate ganache, but it will get quite hard in the freezer. You’ll need to let it sit out for a few minutes before slicing. You might wish to cover it in the chocolate hot fudge sauce from this recipe instead.
This looks so good and I love strawberry ice cream! Do you remember what brand was used for this? Im struggling finding any that are as pretty and have a good, strong strawberry flavor. So many are bland and overpowered by sugar or the milk flavor.
Hi Shani, the strawberry ice cream I used in these photos was from a local ice cream shop. I agree, it can be hard to find strawberry ice cream at the store that has a strong flavor.
Made this for my husband’s 40th. Use peanut butter ripple and vanilla icecream and orea and nutter butter cookies. It was messy but so fun and yummy. The only thing I would do differently is assemble the entire cake and frosting and freeze. Both husband and I agreed, we liked the cake the next day with the icing frozen.
I love this recipe so much. My family said it was even better than DQ! The homemade fudge sauce is an absolute must. Thanks for creating this.
I’ve made this cake for my son’s birthday today, with a chocolate cake layer at the bottom. Wondering what the frozen cake at the bottom will taste like. Should I take it out of the freezer a bit sooner to give the cake bottom layer a chance to unthaw?
You could likely let it sit for around 10 minutes. I wouldn’t wait any longer than that before cutting, especially if the cake is in a warmer environment.
I forgot to add the butter to the hot fudge sauce! Didnt realise until after assembly 🙁 will it be ok? I saw a comment on here saying the fudge cookie layer was uncuttable. Wondering if they also forgot the butter
I made this for my daughter’s 6th birthday and it was such a hit! And for good reason. I wish I understood the parameters of the frosting a bit better. I frosted probably 3 hours before it was served and it was great! I can see how it maybe gets harder. Put it in the fridge for 30 mins beforehand and it was perfect! Borderline too soft, but really perfect. Will make again!
Can I substitute caramel sauce for the hot fudge sauce layer? Or would caramel get too hard? Making this for my daughter’s birthday but she doesn’t really like chocolate.
Hi Becky, caramel sauce should work great!
Just made this for my son’s birthday and it is DANGEROUS lol! I made an oreo cake using this recipe with a chocolate cake layer on the bottom, oreo ice cream, added oreo crumbs to the whipped cream frosting, and used the leftover fudge (from the recipe) to drizzle down the sides. My son said it tastes better than the store bought and I’d have to agree with him! So pleased with the recipe! I let it freeze for 24 hours or so. Just give yourself plenty of time to make and use a sharp knife dipped in hot water to cut.
Any reason why you recommend only freezing for an hour after putting the whipped cream on top? Trying to prep the cake for an event and would like to decorate with the whip cream and then freeze for about 4 hours. What’s the downside in doing that?
Hi Bailey, we recommend an hour because much longer than that, and the cake can get very hard to cut. Feel free to extend that time, but the cake will have to sit out for a bit before slicing (and the edges may begin to melt). Hope it’s a hit!
Loved it!!
Unfortunately, the hot fudge and oreo layer became a hard, uncuttable layer. I let the cake soften a lot to see if I could cut it, but even once the ice cream was soupy, it was impossible, I ended up scraping the ice cream from above and below the fudge layer to serve my family. They rolled with it but I am very disappointed. (Note, I made the linked homemade hot fudge.)
what happens if you don’t freeze each layer and do the layers all at once before freezing?
Hi KG, the ice cream will get too warm and start to melt together, making assembly very messy. We don’t recommend skipping any of the individual layer freezing times.
Can I use food coloring to make the whipped topping a different color?
Hi M, that shouldn’t be a problem. I recommend gel food coloring because the color is intense and you don’t need much of it.
My granddaughter, who is Type 1 Diabetic and Celiac, and I made this delicious ice cream cake using Gluten Free Oreos. What a treat! We had trouble getting the cream to whip (nothing to do with the recipe) so used a sugar free whipped topping. Thank you for this wonderful recipe! Dairy Queen’s Ice Cream Cake is the thing I’ve missed most as our household has worked on gluten-free recipes. This brought that sweet treat home!
Hi! Could you make this with an Oreo crust?
Hi Toni, You could press an Oreo crust into the bottom of your pan before you started. Enjoy!
I was looking to make a taller cake. Would a 6 inch or 8 inch pan work? And if so the same amount of ice cream?
Hi Patty, if you wish to use a smaller pan, you’ll want to scale the ice cream and other ingredients proportionally. Making a much taller cake may be tricky, as it will probably be more difficult to cut. We haven’t tried it ourselves, but let us know if you do.
Hi Patty. I’m making a taller cake as well. What frosting are you using? I need to decorate the ice cream cake with a Kuromi theme.