

Use this page to learn how to blind bake a pie crust, whether that’s fully blind-baking before adding a no-bake filling, or partially baking (par-baking) the crust before returning to the oven with a filling. Many pie recipes require par-baking pie crust and this tutorial provides step-by-step instructions, as well as a helpful video tutorial and plenty of success tips.
I originally published this tutorial in 2018 and have since added new photos, a video tutorial, and a few more success tips.
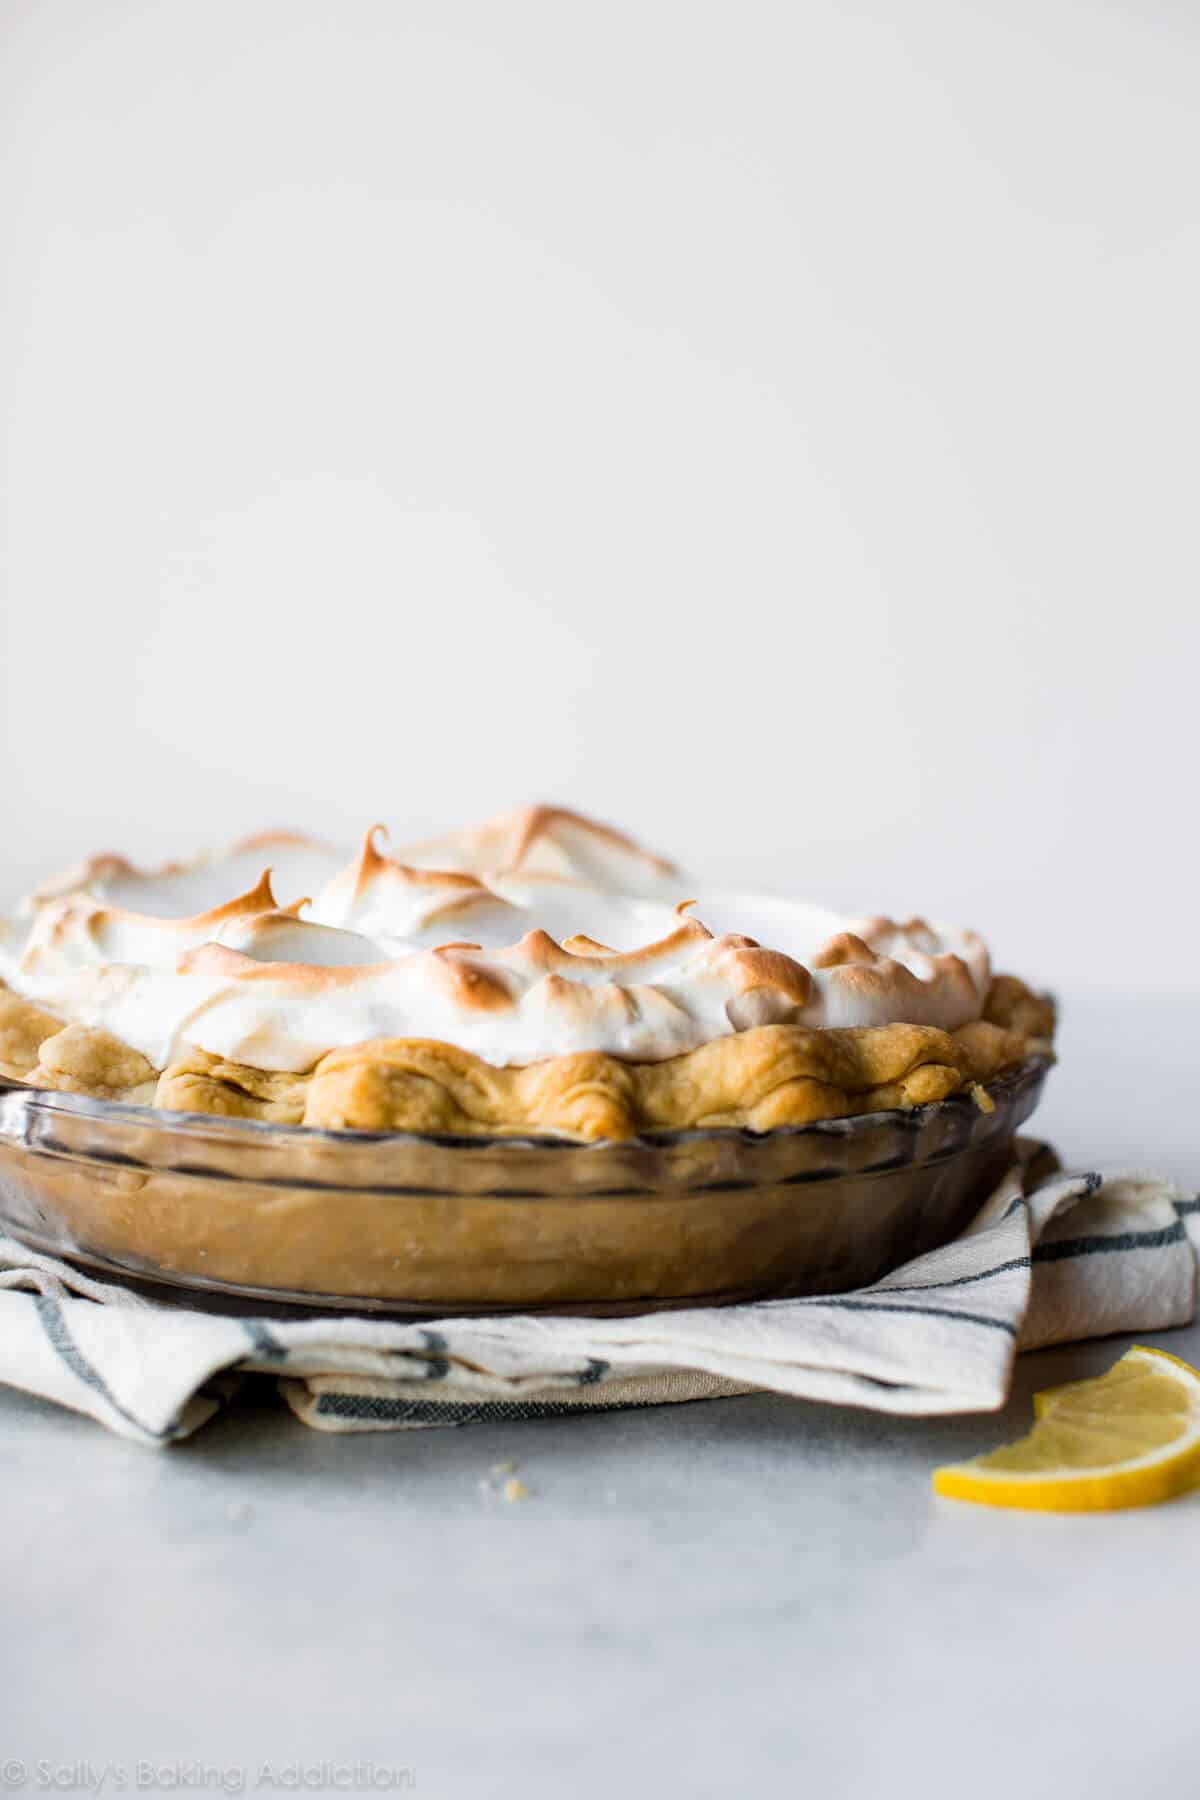
Par-baking (which can also be called blind baking) is an integral step in many pie recipes and a basic baking technique to have in your back pocket. Classic recipes such as coconut cream pie, pumpkin pie, and lemon meringue pie require some sort of blind baking.
Par-baking pie crust sounds pretty intimidating, especially if you’re already nervous about making pie from scratch. I’m here to tell you (and show you!) that blind baking pie crust is simple, and I have a few tips to help guarantee success.
Why Par-Bake?
Why would you bake pie crust without a filling? There are a few instances, actually. You need a par-baked or fully baked crust if you’re making quiche, no-bake pie, custard pie, cream pie, pudding pie, or simply want an extra-crisp pie crust. If you’re making a pie that doesn’t require a baked filling, you still need a baked crust. Or if you’re baking a pie with a liquid-y filling that sets quickly in the oven, like pumpkin pie, your crust may need a baking headstart.
One reader, Marylou, commented: “I made 2 par-baked crusts for pumpkin pies. They turned out perfectly. Well worth the extra step. No mushy bottom crust! ★★★★★“
Fully Blind Baked vs. Partially Baked
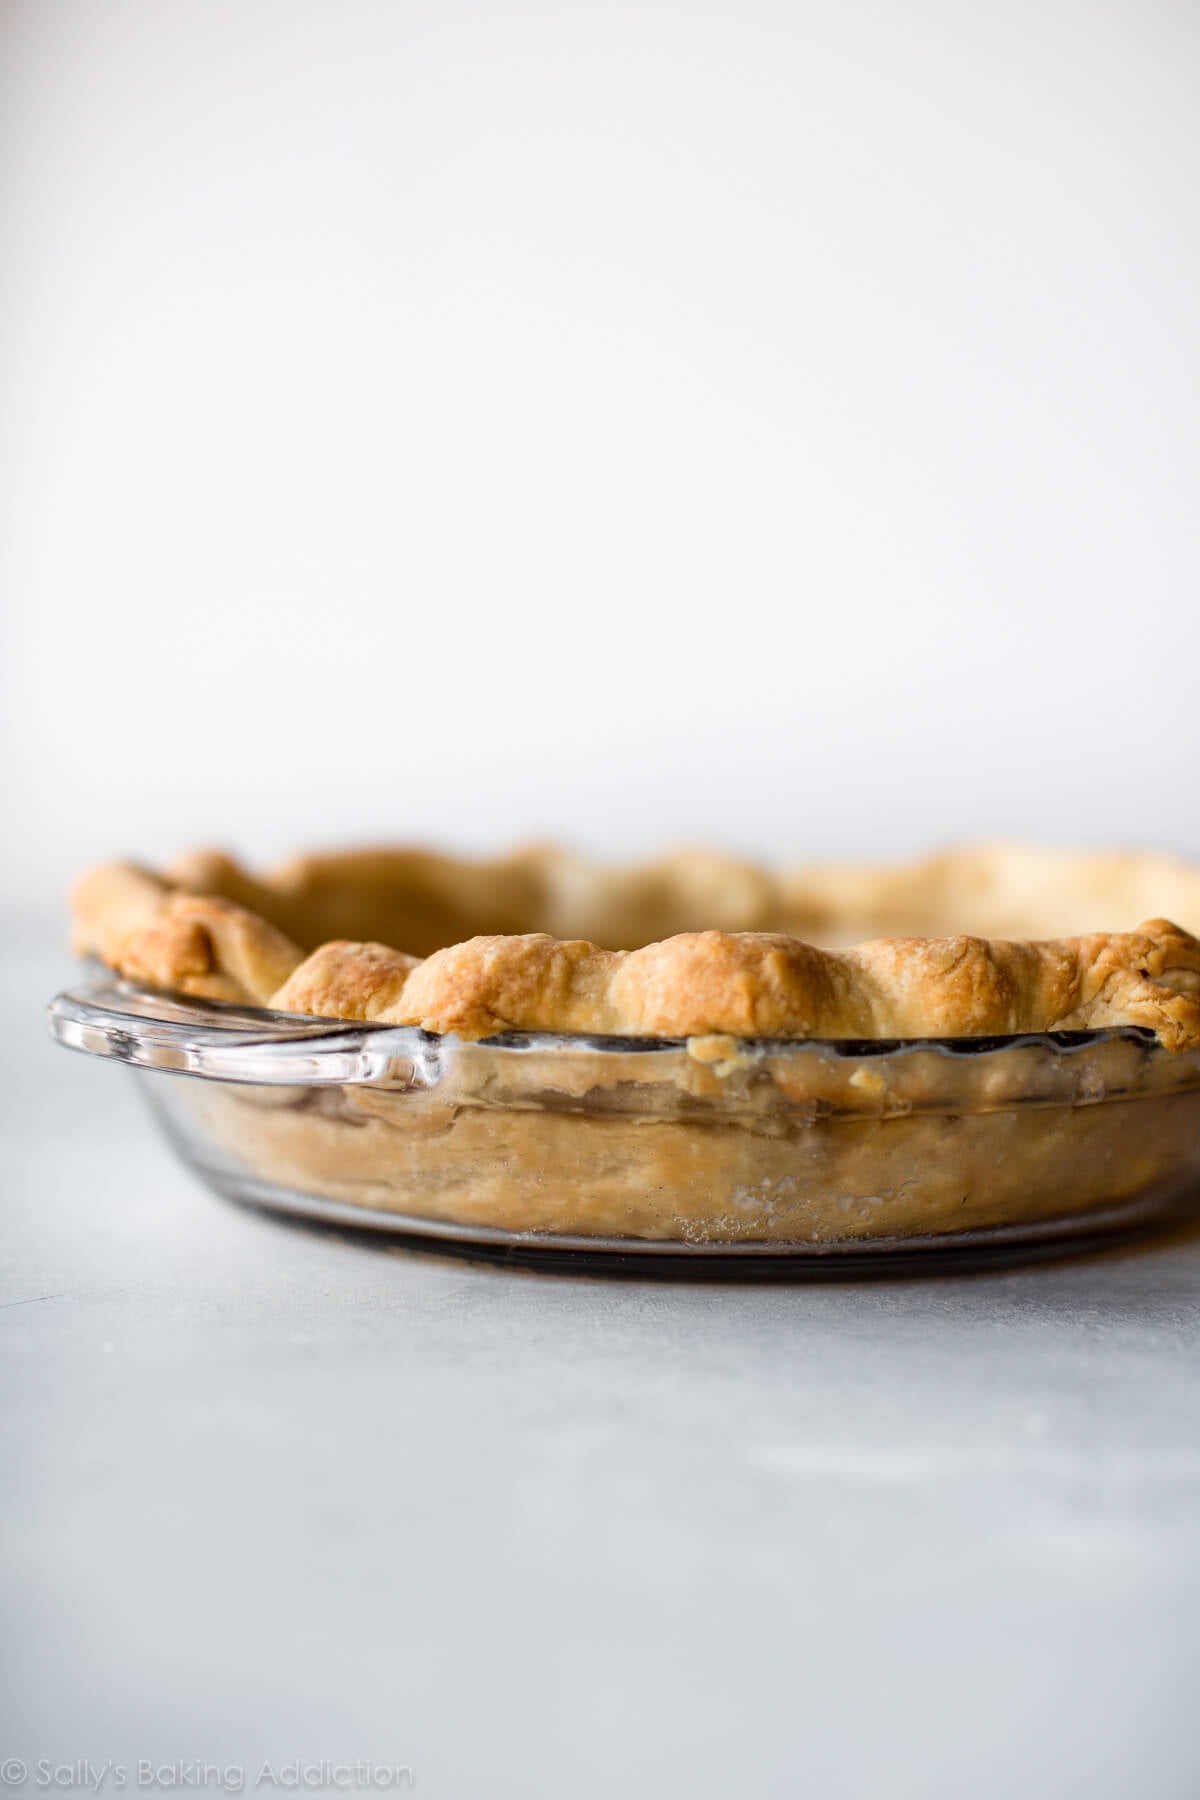
If your pie recipe calls for a baked pie shell, such as butterscotch pie, you need to fully bake it. But some recipes require a partially baked pie crust and those recipes will typically include “pre-baking,” “partially baking,” or “par-baking” the crust in the instructions. I’ll show you both methods below.
Whether you’re fully blind baking or partially blind baking pie crust, the process is exactly the same; it’s the bake time that differs. Fully baked pie crusts bake for longer than partially baked pie crusts.
- Fully blind bake a pie crust if you’re making no-bake pie like coconut cream pie.
- Partially bake a pie crust if your crust needs longer in the oven than the pie filling, such as brownie pie or quiche. And if you want an extra-crisp pie crust for your apple pie, you can partially blind bake the crust before adding the filling.
How to Par-Bake Pie Crust
While the idea of baking pie crust is quite simple, there’s more to it than just throwing pie dough in a pie dish and baking.
Here’s our problem: As the pie dough bakes, the fat melts. This causes the pie crust to shrink down the sides of the pie dish. And as the fat melts, it creates steam. Steam is both good and bad. It creates DELICIOUS layers and flakes, but also causes the pie dough to puff up when there’s no heavy filling weighing it down.
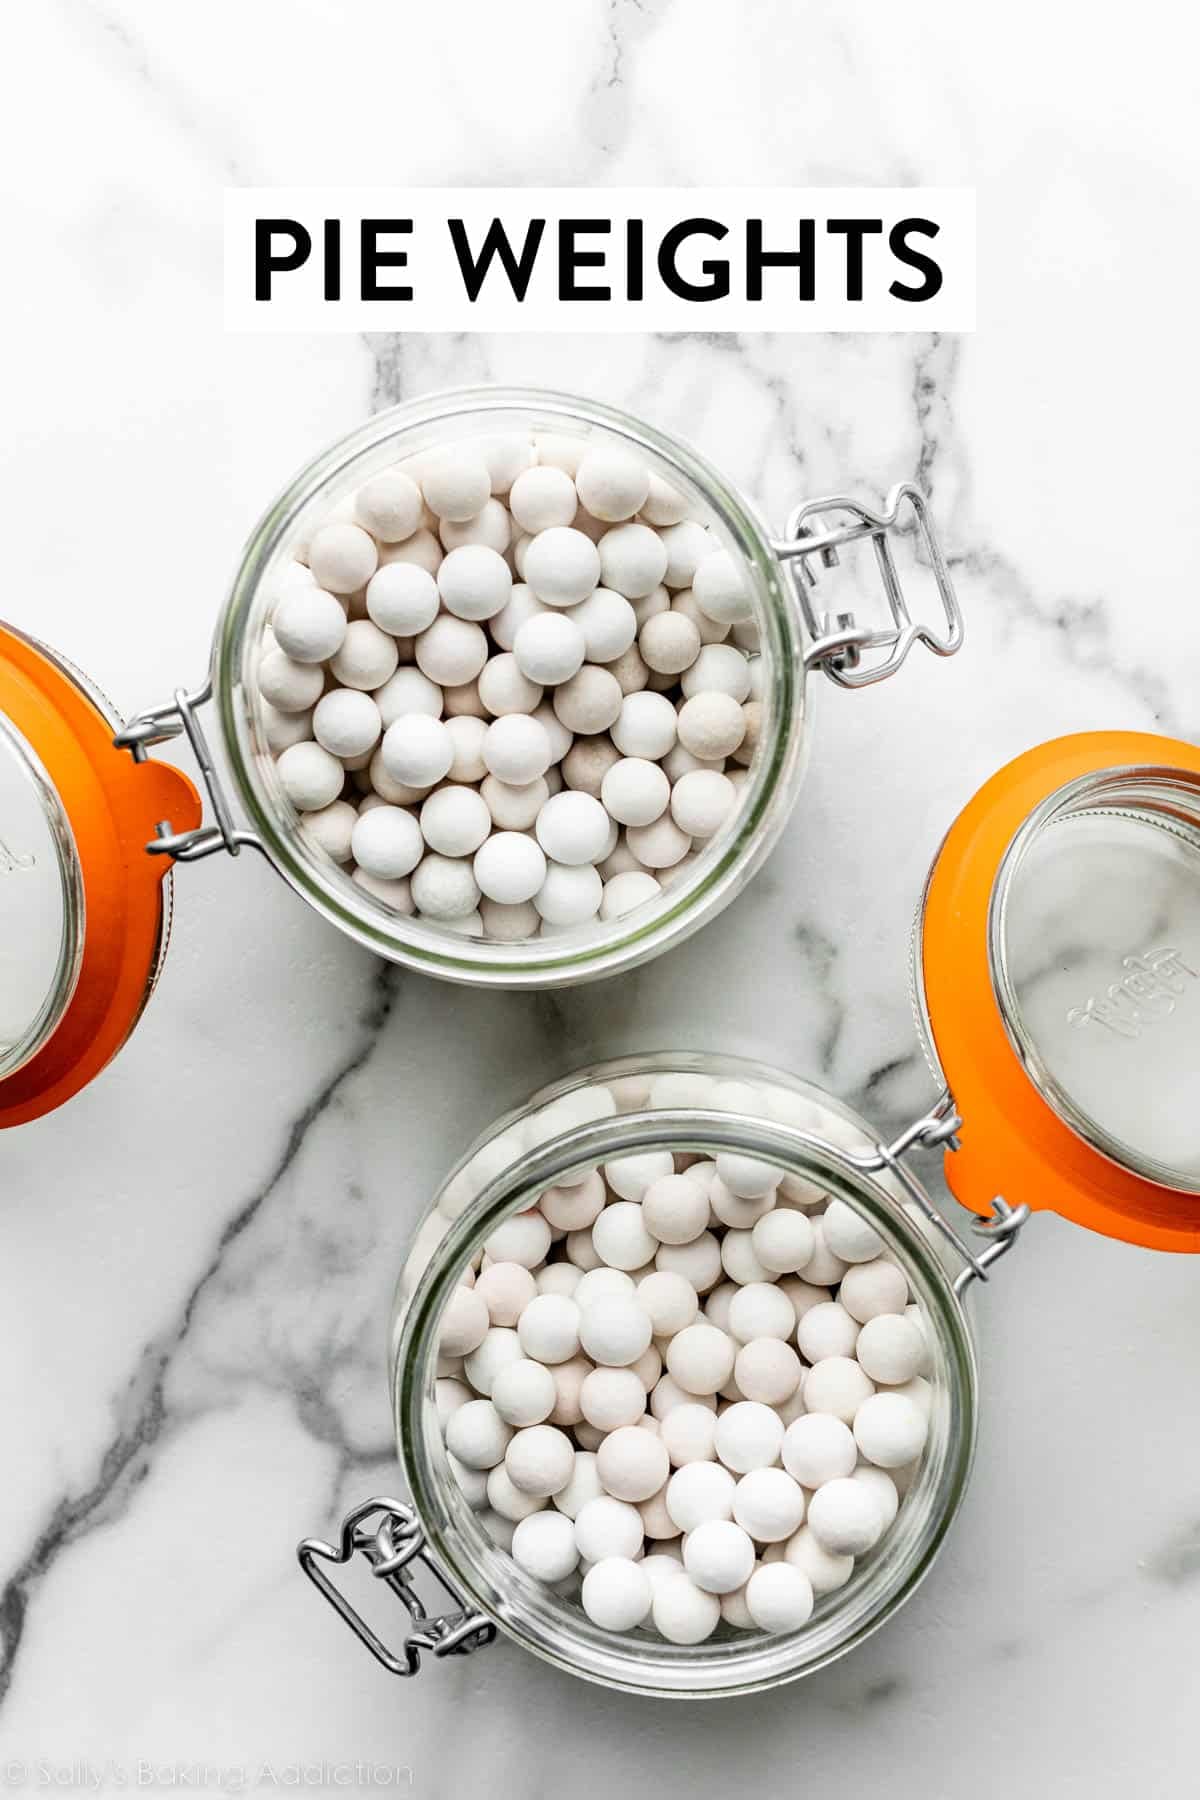
Here’s our answer: Weigh down the pie crust with something so it doesn’t puff up in the center or shrink down the sides. Carefully line the pie dough with parchment paper first, then add some weight. You can purchase special pie weights or you can use dry beans. I’ve also seen the use of granulated sugar and even pennies. I just stick to pie weights. Note: 2 packs of these pie weights is definitely needed!
You’ll bake the pie crust with pie weights until the edges set, or lightly brown, which is about 15 minutes.
One reader, J.D., commented: “Finally had a pie crust that didn’t shrink or melt down the sides. Great instructions, thank you! ★★★★★“
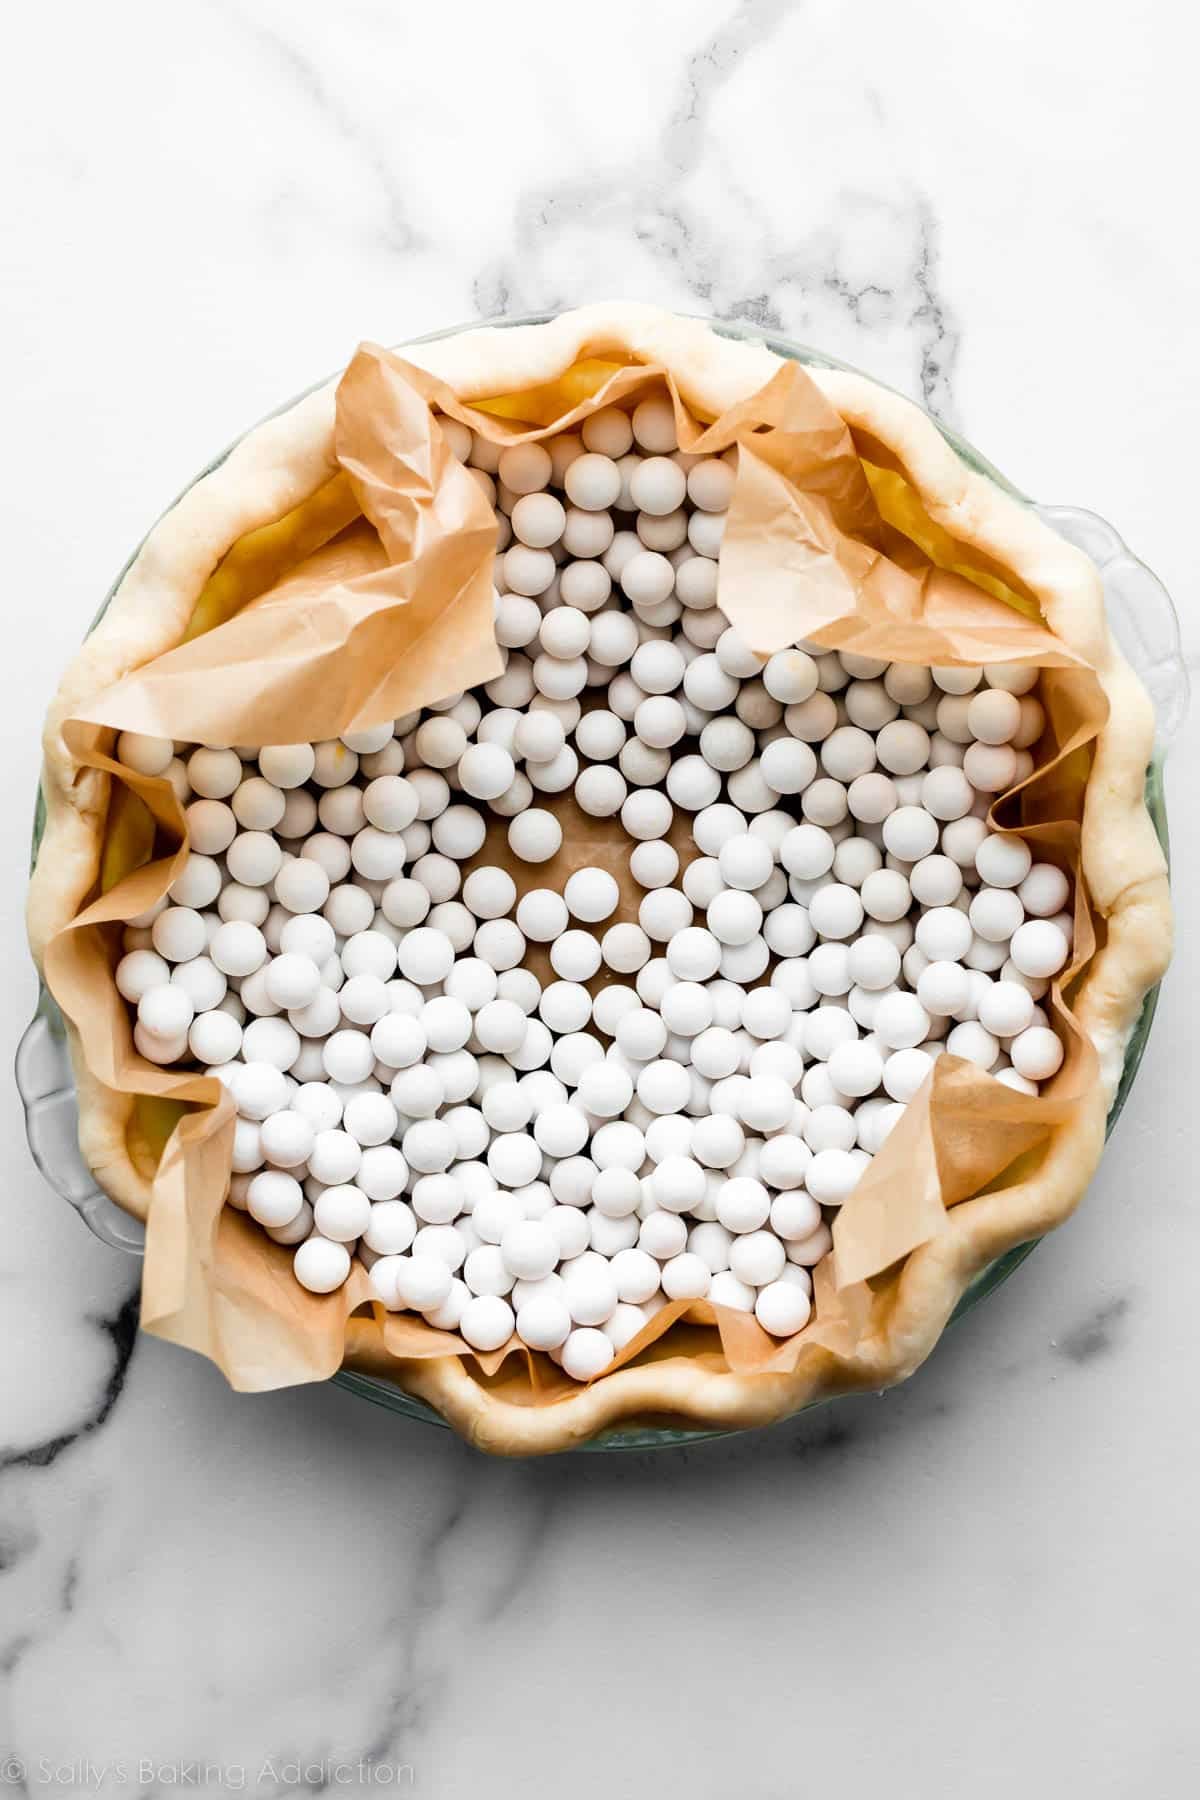
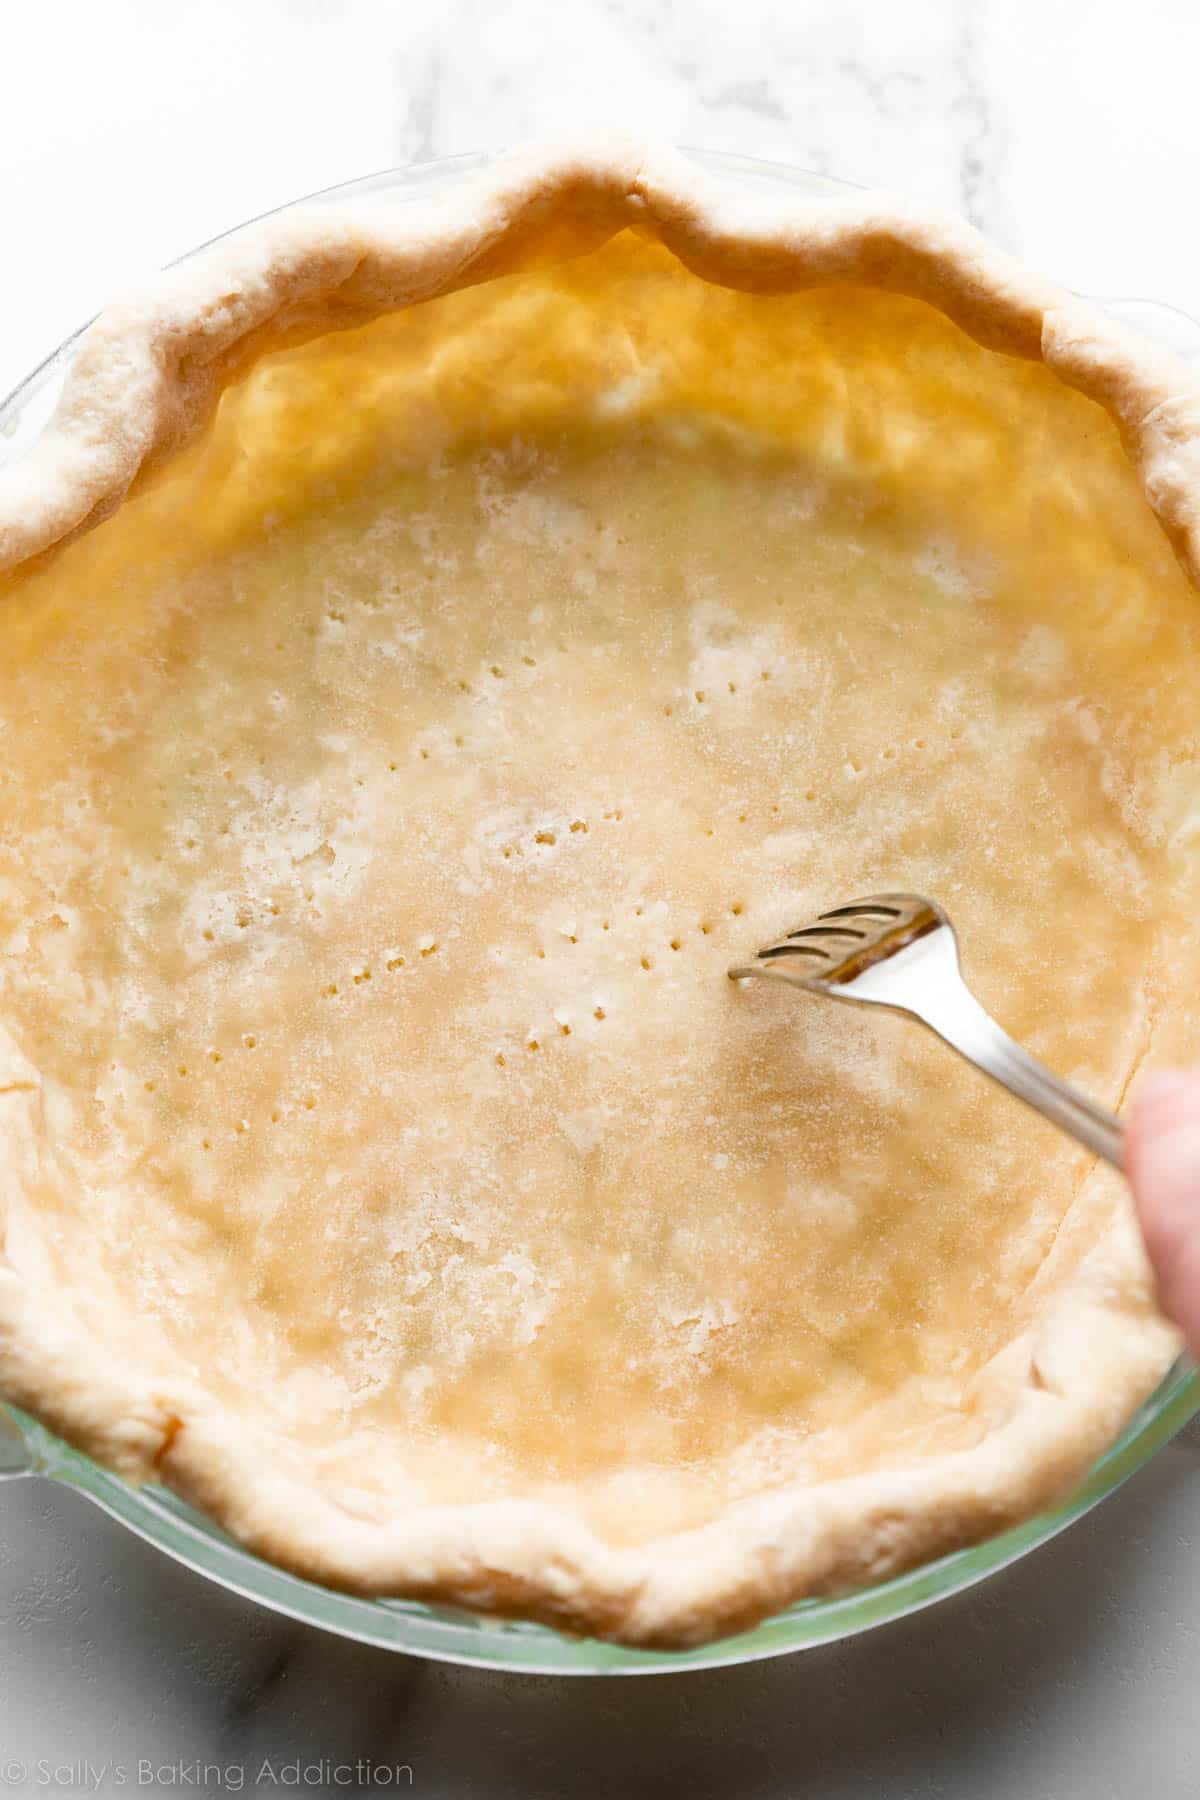
Because it’s covered with weights, the bottom of the pie crust doesn’t cook. You have to return it to the oven after the edges have set. But first, dock it with a fork:
How to Dock Pie Crust
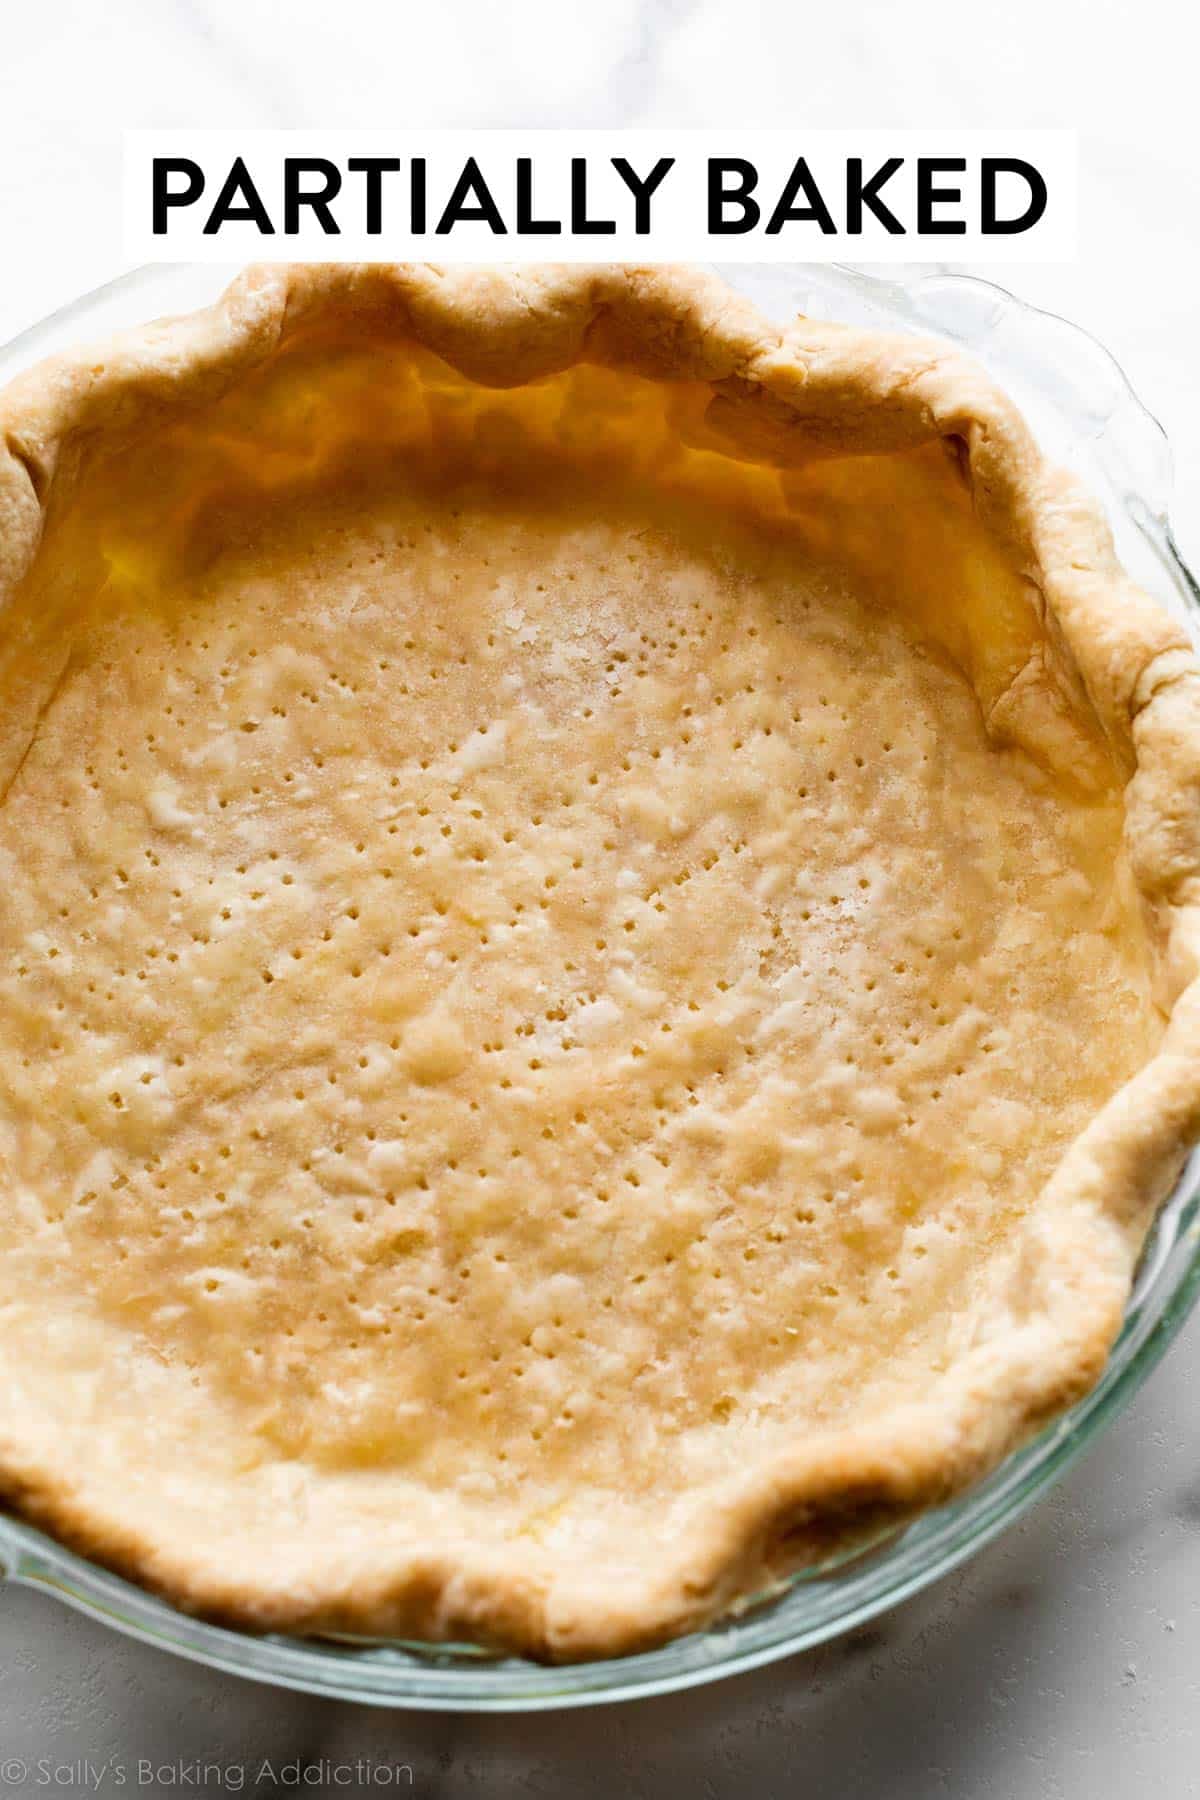
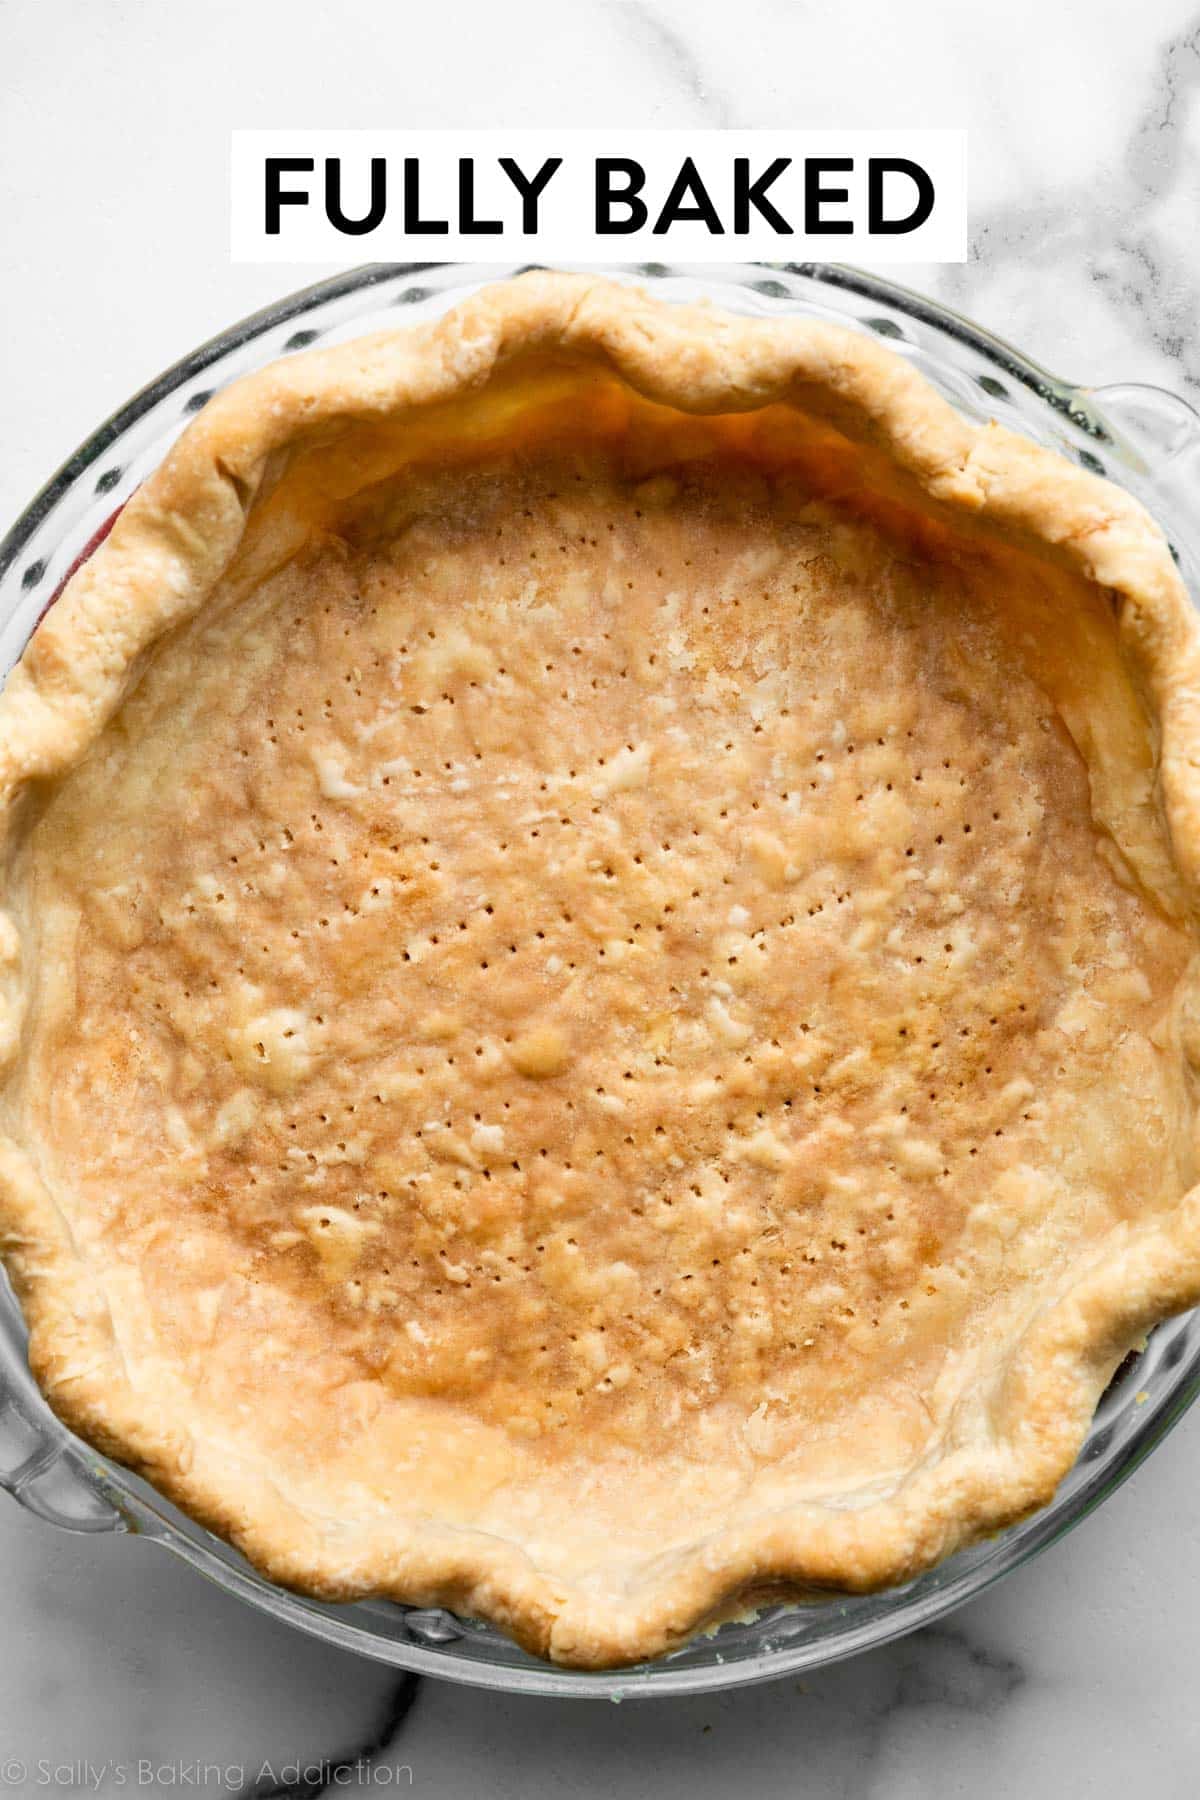
Once the crust is brown around the edges, carefully remove the parchment paper + weights, then let the crust cook a little longer on its own. The amount of time the “weight-free” pie crust bakes depends on if you need a partially baked crust or a fully baked crust.
Before returning to the oven without the weights, you need to prick the bottom crust with a fork to prevent it from puffing up. Pricking holes in pie crust is also called “docking” the pie crust.
Some bakers skip the pie weights and just dock the pie crust from the beginning, but I’ve never had luck this way. The sides of my pie crust still shrink down. So I always use pie weights, remove them after the edges begin to turn brown, dock the crust with a fork, then return it to the oven so the bottom cooks.
How Long Does the Pie Crust Bake After Removing the Weights?
The remaining oven time depends on whether you want a partially blind baked pie crust or a fully blind baked pie crust. For a partially baked pie crust, bake until the bottom just begins to brown, usually about 7–8 more minutes. To fully bake a pie crust, bake until the bottom and edges are browned and cooked through, about 15 more minutes.
Partially baked means your crust is just barely brown and the pie will return to the oven with a filling:
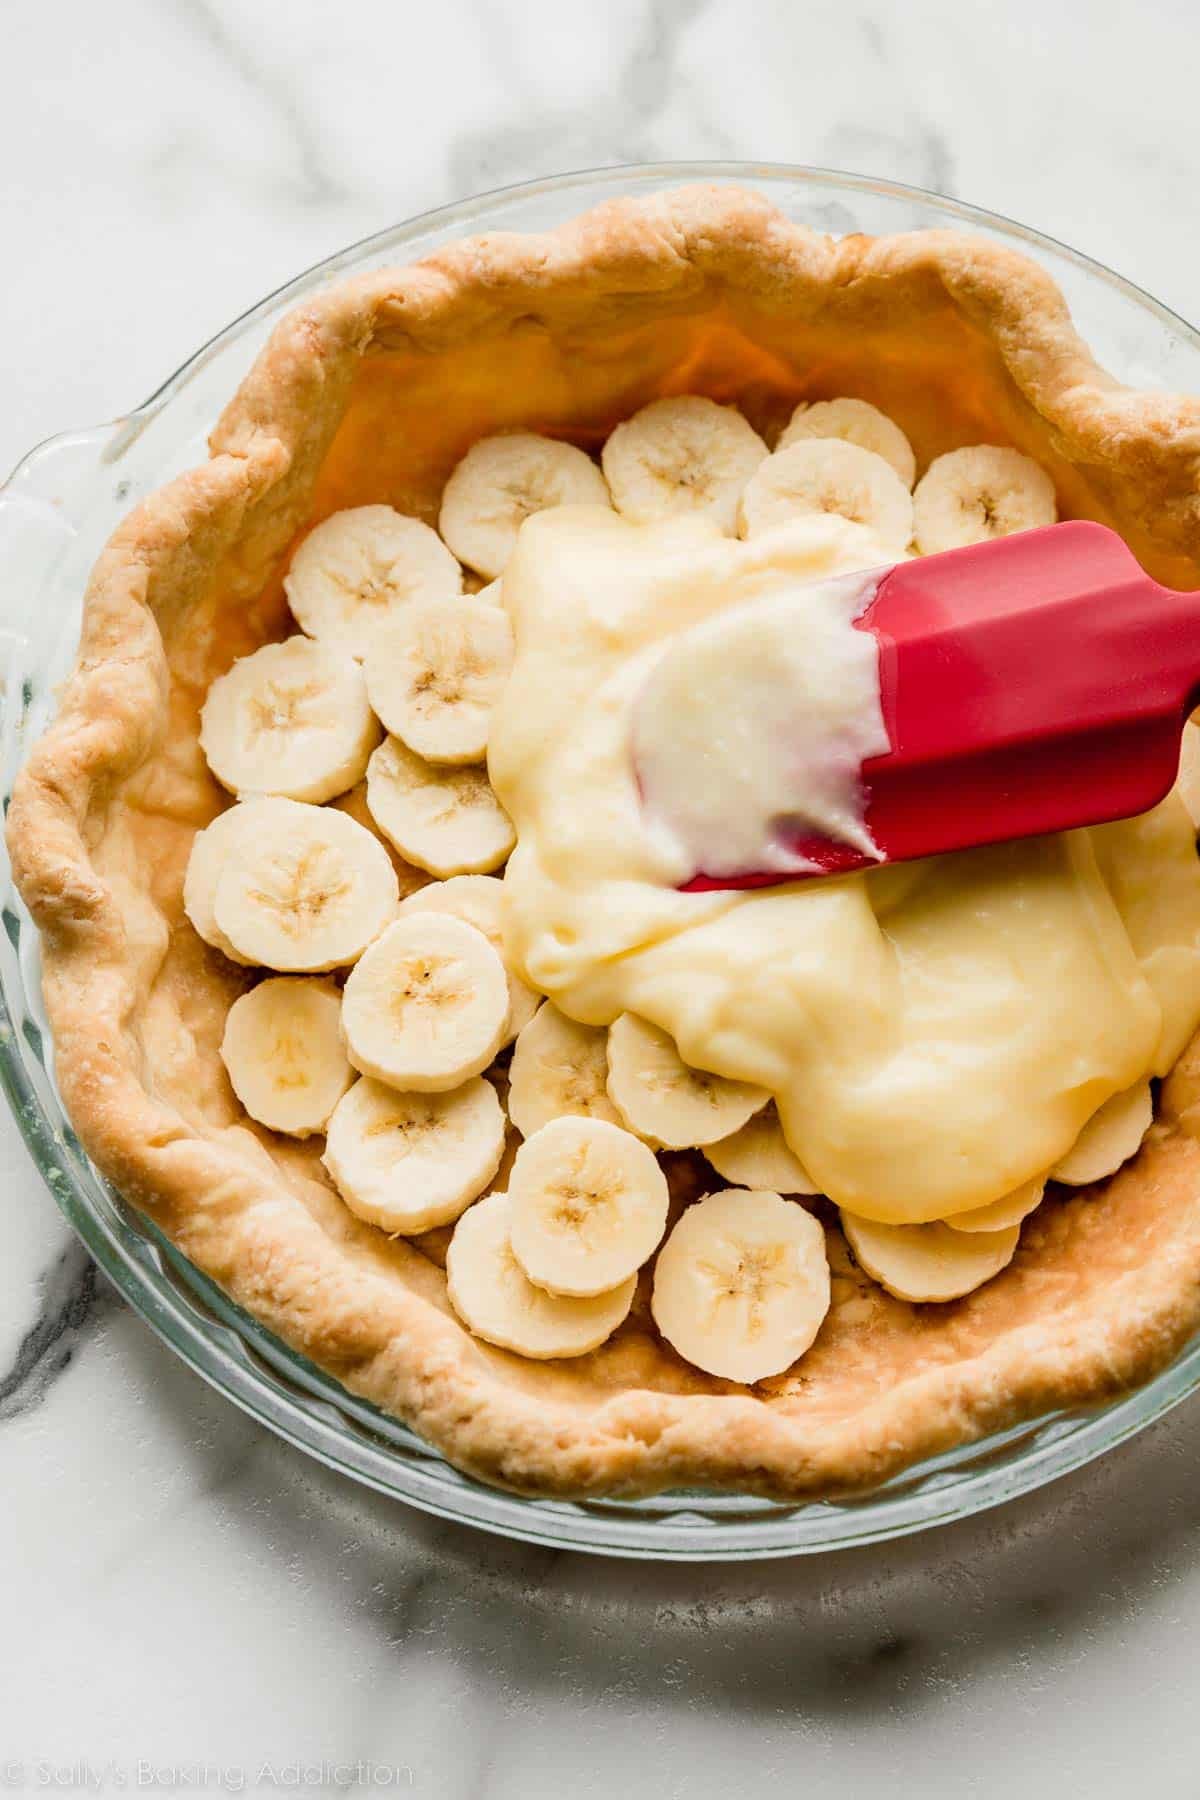
Fully baked means your pie dough is 100% cooked and ready for a no-bake filling:
Like banana cream pie:
FAQ: Do I Need to Par-Bake a Store-Bought Pie Crust?
If your recipe calls for a baked or par-baked pie crust, and you are using store-bought pie dough, you still need to par-bake it. For example, if using store-bought crust in this brownie pie recipe, you still need to follow the par-baking instructions in that recipe (which are the same instructions you find below).
FAQ: Can I Add an Egg Wash?
Many pie recipes call for brushing the crust with an egg wash, and typically the recipes will tell you when to do that. If you aren’t sure when, and you need to par-bake the crust, you can brush the crust’s edges with an egg wash after par-baking with pie weights, and before returning to the oven to bake without the weights. This is what we do for my chai pumpkin meringue pie recipe. An egg wash is 1 egg beaten with 1 Tablespoon of milk or water. Use a pastry brush.
FAQ: How Can I Apply a Top Crust to Par-Baked Bottom Crust?
Blind-baking is usually required for custard-type pies, where there generally isn’t a top crust. Adding a top crust, such as lattice pie crust or other beautiful pie crust designs is possible though. I’ve always found Erin McDowell’s tutorial for this helpful. A lot of it is tucking the top dough edges under the par-baked bottom crust edge, and then crimping the pie crust edges together.
How to Prevent Pie Crust From Shrinking
Pie weights prevent the bottom crust from puffing up and help prevent the sides from shrinking down, but up until recently, I still had trouble with the sides losing shape. It was so frustrating. I played around with some techniques and now my pie crusts never shrink. I have a nice thick crust with a beautifully fluted or crimped shape around the pie dish. And you can too!
2 TRICKS THAT HELP:
- Make sure you chill your pie shell before par-baking.
- Make sure you have a thick crust on the sides using my “dough strip” technique.
Chilling the pie shell before par-baking doesn’t need much explanation, so let me show you how I create thick edges.
DOUGH STRIP TECHNIQUE
Roll out your pie crust dough and fill your pie dish. Grab some extra pie dough, cut into strips, and meld the strips around the edges.
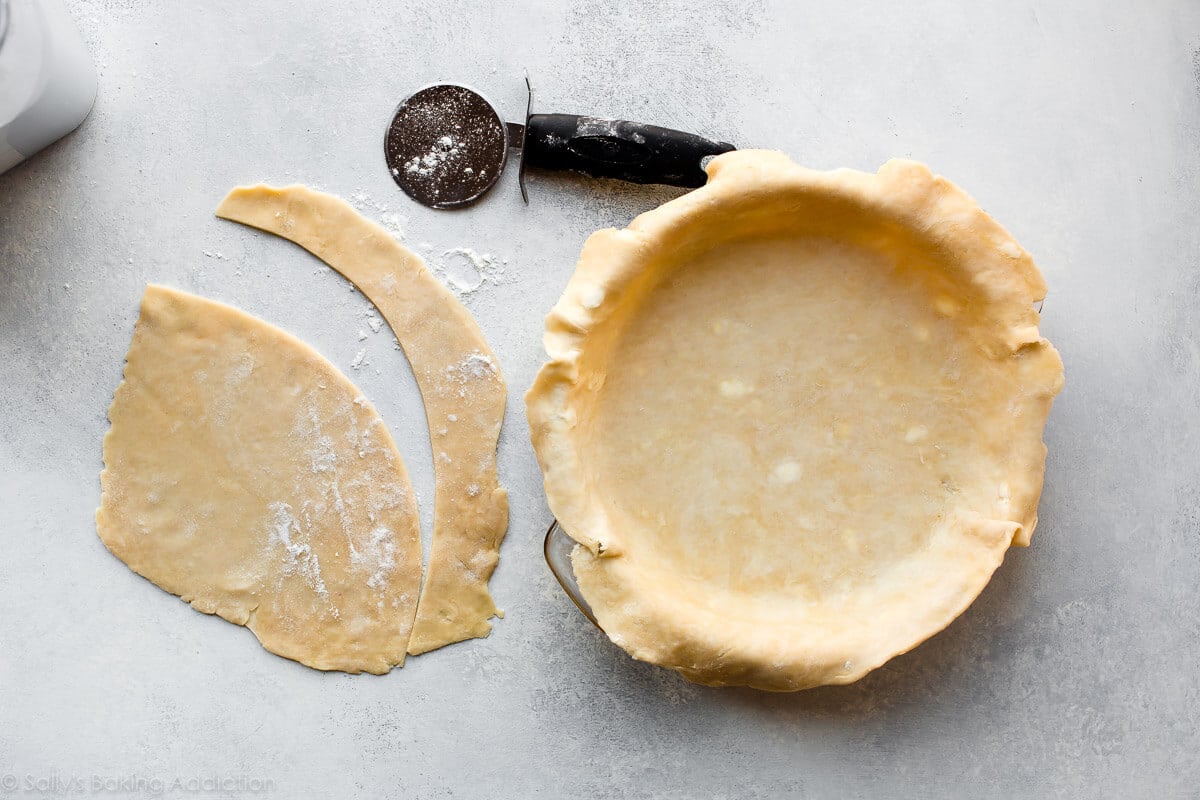
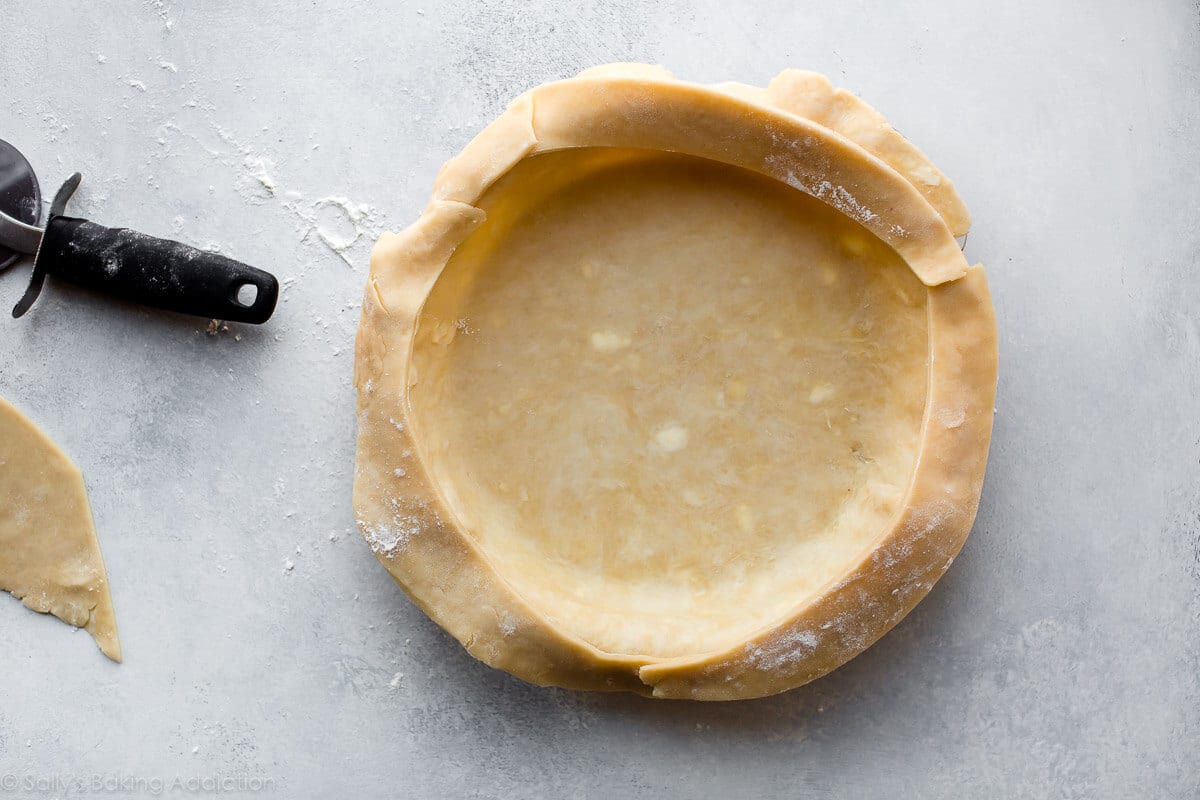
Use your fingers to work the extra strips of dough into the edges.
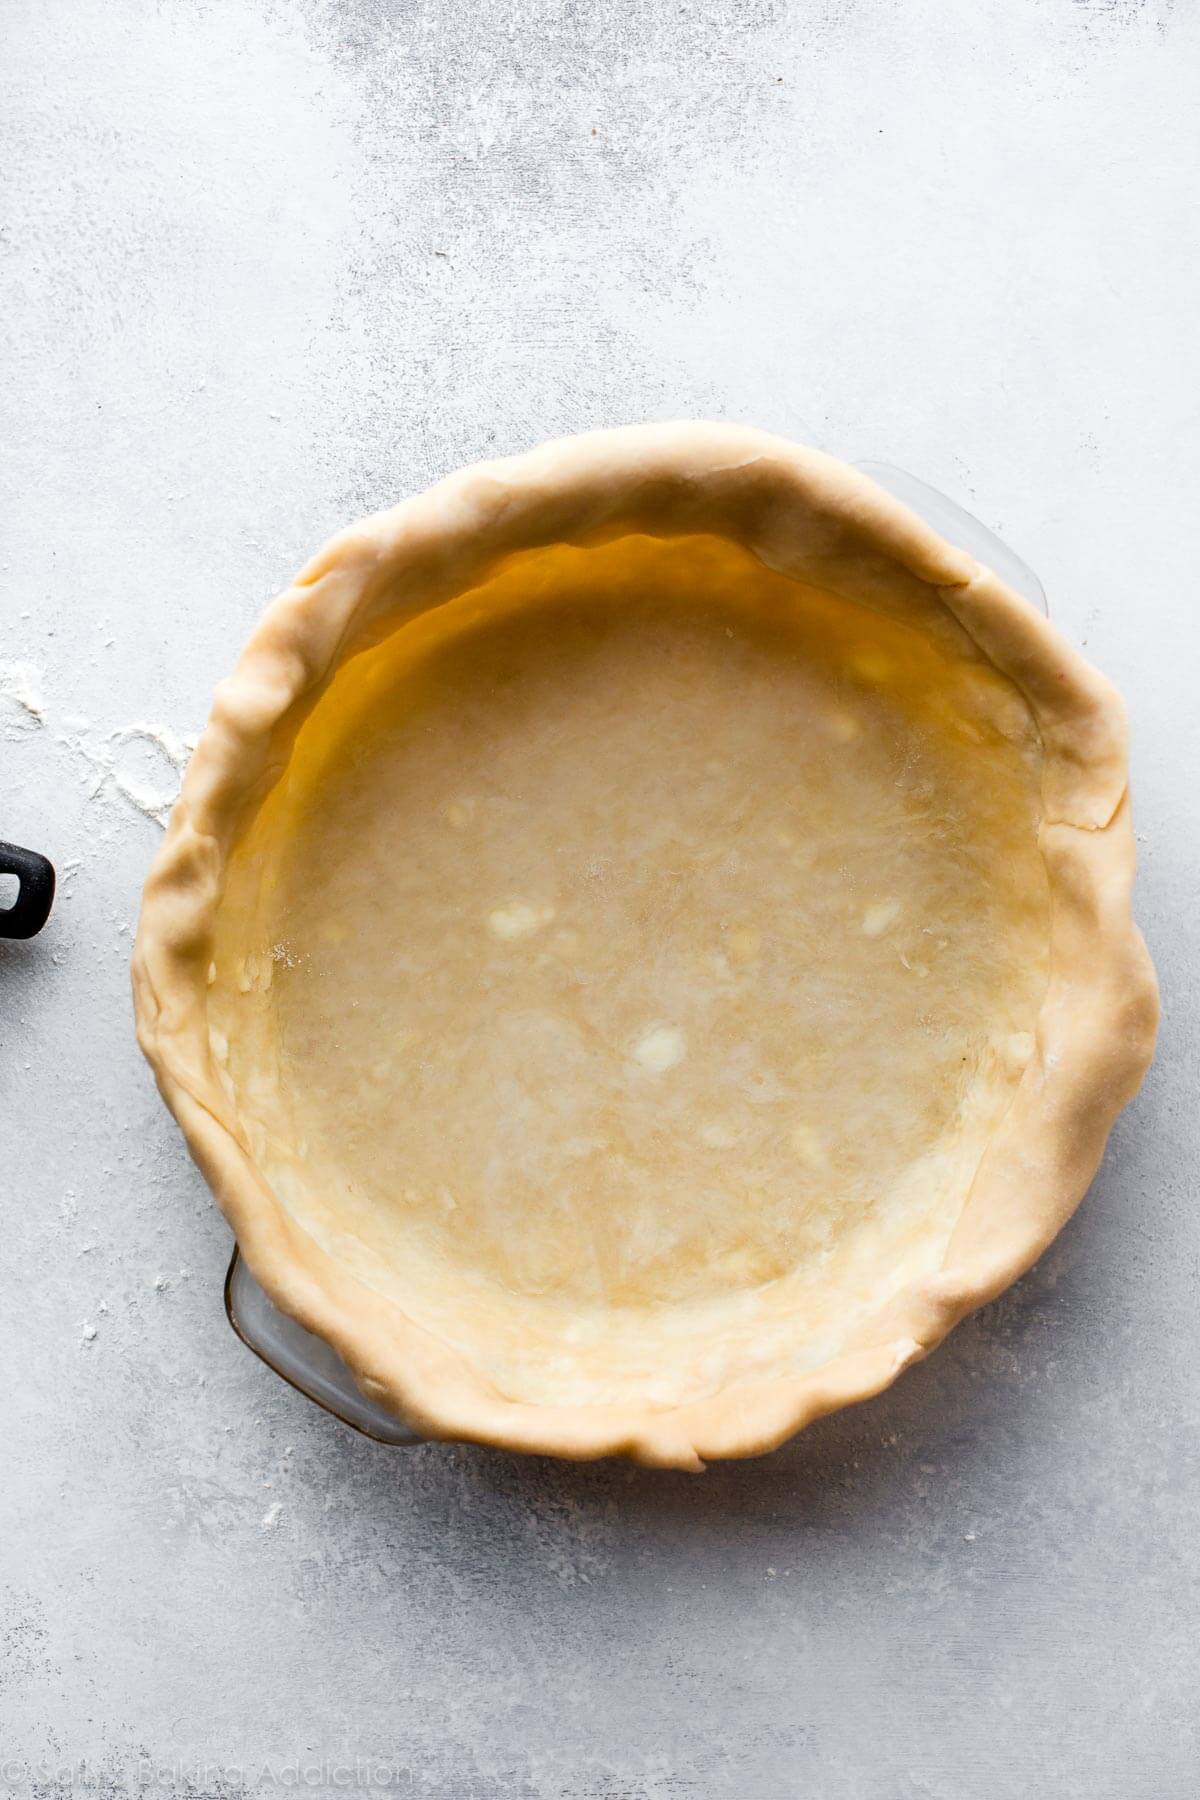
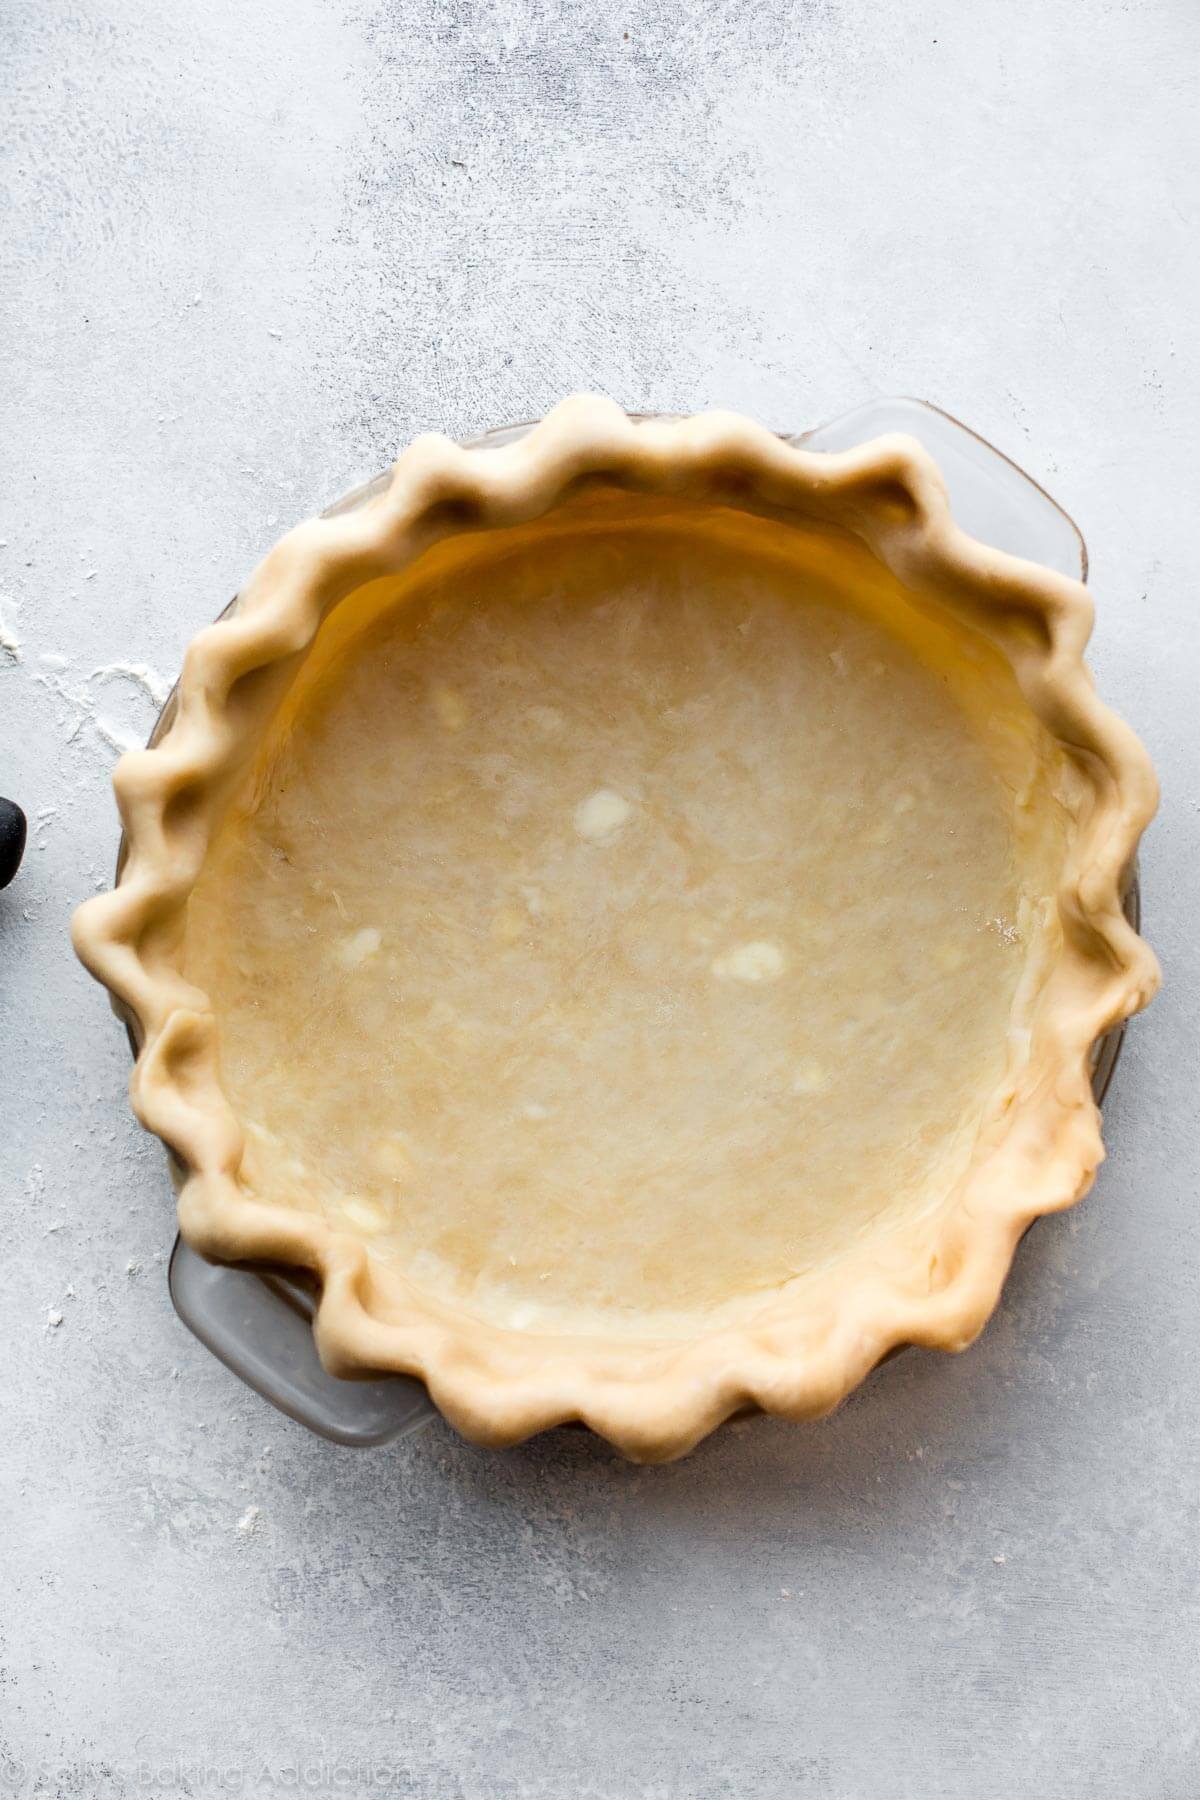
Now it’s all 1 uniform crust with extra thick and sturdy edges. My dough strip technique uses about 1 and 1/2 pie crusts. No big deal since my pie crust recipe makes 2 crusts. You’ll have 1/2 pie crust leftover for the next time you need dough scraps.
If you need extra help with the shaping, review my how to crimp and flute pie crust tutorial.
One reader, Shannon, commented: “FINALLY—my crust didn’t shrink on the sides or lose its shape! This was always my problem—and it was so frustrating—until I tried the dough strip technique. THANK YOU! ★★★★★“
That was a lot of information thrown at you, but I promise it’s manageable! And if you need it, I also have a list of my top 10 pie baking tools.
Print
How to Blind Bake Pie Crust
- Prep Time: 2 hours 45 minutes
- Cook Time: 30 minutes
- Total Time: 3 hours 15 minutes
- Yield: 1 pie
- Category: Pie
- Method: Baking
- Cuisine: American
Description
Use this tutorial to learn how to blind bake a pie crust, whether that’s fully blind-baking before adding a no-bake filling, or partially baking (par-baking) the crust before returning to the oven with a filling.
Ingredients
- pie dough such as homemade pie crust (recipe makes 2 crusts)
- pie weights (you need 2 packs)
- all-purpose flour, as needed for rolling out dough
Instructions
- Make the pie dough: Prepare and chill your pie dough for at least 2 hours. If using the linked recipe, prepare pie crust through step 5.
- Roll out the chilled pie dough: On a floured work surface, roll out one of the discs of chilled dough (keep the other one in the refrigerator until you need it). Turn the dough about a quarter turn after every few rolls until you have a circle 12 inches in diameter. Carefully place the dough into a 9-inch pie dish. Tuck it in with your fingers, making sure it is completely smooth.
- Dough strip technique: This step is optional, but will help prevent the sides from shrinking down as well as promise a thick and sturdy crust. Remove the 2nd pie dough disc from the refrigerator. Roll out the same way you rolled out the first one. Using a pizza cutter, slice rounded 1- or 2-inch strips, and arrange around the edges. Use your fingers to meld the dough together. What you’re basically doing here is adding another layer of crust to just the edges. Crimp or flute the pie crust edges. They should be nice and thick now. Wrap up any leftover pie dough to use for next time. Freeze it for up to 3 months.
- Refrigerate: Chill the shaped, unbaked pie crust in the refrigerator for at least 30 minutes and up to 5 days. Or freeze for up to 3 months. Cover the pie crust with plastic wrap if chilling for longer than 30 minutes or if you’re freezing it. If you freeze it, let it thaw for a couple hours in the refrigerator before continuing.
- While the crust is chilling, preheat oven to 375°F (190°C).
- Fill with weights: Line the chilled pie crust with parchment paper. (Crunch up the parchment paper first so that you can easily shape it into the crust.) Fill with pie weights or dried beans. I like to push the weights up against the sides of the pie crust to help ensure the sides don’t shrink down.
- Bake: Bake until the edges of the crust are starting to brown and appear set, about 15–16 minutes. Remove pie from the oven and carefully lift the parchment paper (with the weights) out of the pie. With a fork, prick holes all over the bottom crust. Return the pie crust to the oven.
- If you need a fully baked pie crust, bake until the bottom crust is golden brown, about 14–15 minutes longer. For a partially baked pie crust (if you’re baking the pie once it is filled, like a quiche), bake until the bottom crust is just beginning to brown, about 7–8 minutes.
- If you’re making a no-bake pie, let the baked crust cool completely before adding the filling unless your pie recipe states otherwise. For pies that will go back in the oven, like quiche or pumpkin pie, the crust can still be warm when you add the filling. (Again, unless your recipe states otherwise.)
Notes
- Make Ahead Instructions: You can make pie dough and freeze it for up to 3 months. See my pie crust recipe for details. If you want to shape the pie dough ahead of time, see step 4 above.
- Special Tools (affiliate links): Rolling Pin | 9-inch Pie Dish | Pizza Cutter | Pie Weights
- Egg Wash: Many pie recipes call for brushing the crust with an egg wash and, typically, your pie recipe will tell you when to do that. If you aren’t sure when, and you need to par-bake the crust, you can brush the crust’s edges with an egg wash after par-baking with pie weights (step 7), and before returning to the oven to bake without the weights (step 8). An egg wash is 1 egg beaten with 1 Tablespoon of milk or water. Use a pastry brush.
- How Can I Apply a Top Crust to Par-Baked Bottom Crust? Blind-baking is usually required for custard-type pies, where there generally isn’t a top crust. Adding a top crust, such as lattice pie crust or other beautiful pie crust designs is possible, though. I’ve always found Erin McDowell’s tutorial for this helpful. A lot of it is tucking the top dough edges under the par-baked bottom crust edge, and then crimping the pie crust edges.


Reader Comments and Reviews
Made it according to her instructions and it was so easy and came out perfectly. Thank you.
Hi Sally,
You give such great pie pastry advice, I am grateful. However, I don’t see any advice—anywhere (this is after an extensive Google search) about how to store the baked pie. I hate going to all the effort + crossing my fingers (will it be runny?) to find that my wonderfully flaky crust has sogged out overnight. Should the pie be left uncovered / open to air on the counter (this is what I tend to do) , wrapped in plastic-wrap? Your best advice please. I have your cherry pie with lattice and sliced almonds sitting on the counter right now.
Susan
Hi Susan, You can prepare the pie in full 1 day in advance – after pie cools, we recommend covering it tightly and keep at room temperature. After one day it’s best to keep it covered in the refrigerator for up to 5 days. You can check out the recipe notes at the end of each specific recipe – most of them have “make ahead instructions.” I hope this helps!
Hi Sally,
I made your pie crust today. I made a Pecan Pie and was very satisfied. I do need a little practice handling the crust though.
I plan to make a Lemon Meringue Pie with the other crust. In the past with store bought crust, I have had the problem of the crust getting soggy. I tried brushing with an egg wash before baking and it still got soggy.
Will this method help prevent the crust from getting soggy?
Hi Karen! We can’t speak to other recipes, but in our Lemon Meringue Pie we par-bake the crust to help prevent sogginess.
Sally! Your site has saved my bacon more times than I can count!! Thank you for all the delicious recipes and the super easy to follow instructions!!! I was a good baker and cook before, but with your help my husband says I’ve been upgraded to awesome! Again, thanks!!!!
I am so glad to have found your site and have made several variations of quiche using your directions and ratio suggestions for the filling amounts. I start with your pie crust recipe (so easy), use the info to blind bake the crust and went on from there to produce the best quiche I ever made, as indicated by the comments from my guests. I like the visuals you present along with the very clear directions and explanations of how things work. Knowing how much of each component is needed to produce a finished quiche makes it fun to put together different fillings. Thank you.
Hi Sally – If i’m using a glass pie dish, should i still grease it with butter / shortening?
Hi Lydia, no need to grease your pie pan when par-baking a pie crust. Happy baking!
My first time making pies. Maybe I should’ve chosen something a bit easier but I’m making a coconut cream pie and French silk just finished blind baking the crusts and it looks like they came out decent. I’m quiet happy considering this is my first time. There was a bit of shrinking and rolling out the pie dough was surprisingly more difficult than I expected as it kept cracking. Maybe too much flour in the dough? The crusts are cooling and I’ll be starting the fillings later today.
Hi Marea! If you are experiencing a crumbly crust, the dough may have been over-worked and/or it was too dry. Don’t be afraid to add more ice water until the dough clumps together and feels a little moist. Keep the fats as cold as possible, use a pastry cutter to cut in the fats by hand, and don’t overwork them. You want little pieces of cold butter throughout. Hope this helps, we would love to hear how your pies turned out!
Hi Sally, I made your Coconut Cream Pie, the filling was wonderful, but my crust shrieked on one side. I followed all the instructions carefully and chilled after rolling the crust, weighed down dry beans up to the rim. After baking 16 minutes I removed the parchment & beans, pricked crust with a fork and baked another 15 minutes, but on one side the crust shrunk quite a bit. I was going to dump it in the trash, but I filled it anyway and tomorrow I will put on the whipped cream and toasted coconut for Easter dinner. What went wrong????
Hi Patty, Sorry you’re having trouble with the crust shrinking, but we’re happy to help troubleshoot for next time. It sounds like you did everything right. Do you think the dough was thicker on the side that shrunk down? It could also be that, on that one side, there was a little more butter or perhaps the butter wasn’t cut in enough so it melted quicker, resulting in the sides shrinking down. If you try it again, see if you can chill the shaped dough before baking for 1 hour before baking. Even more chill time should significantly help.
I’m making traditional Easter Pie which is mostly eggs and Ricotta cheese. Should I blind bake fully it not at all, I don’t want a soggy bottom
I’m looking to make a bumble berry pie. The last time I did, I didn’t blind bake and got the dreaded soggy bottom. I’m thinking to partially blind bake this time and do a weave top; any tricks to get the top raw crust to form nicely to the bottom (cooked) crust?
I absolutely love your pie crust recipe, and it works great in the normal pies I make. However, I’m trying to blind bake the crust for a cream pie, I do the double crust method, and then crimp it up (the way you have it in the picture in this post), but the pretty crimps KEEP COLLAPSING when I bake it, it’s driving me nuts. What am I doing wrong??? I chill the pie crust before I stick it in the oven, but pfffffft it collapses into an ugly mess. I’d really appreciate help from anyone on this.
Hi Adi, We’re so glad to help here because we know how frustrating pie crust can be. Something that usually helps is using extra floured hands to flute the edges. The flour will help soak up some of the fat in the dough, which is what causes the crust to fall and collapse down the sides of the pie dish. When using the pie weights, push them more towards the edges of the dish (rather than piling them in the very center). The more weight against the edges, the less likely they will sink. And keep chilling the pie crust before baking– that always helps too.
This recipe is the best lemon meringue pie I’ve ever tasted! The lemon has the right amount of tartness to balance out the crust & meringue. This recipe has definitely inspired me to start baking more pies from scratch! I’m looking forward to trying your other recipes. However, I didn’t realize the entire crust recipe was not included when I printed the main recipe. But it all worked out fabulously! Thanks Sally!
I love your double crust chicken pot pie. Why do I have to blind bake the crust for quiche and not this? Is it just because of more moisture in quiche??
Hi Rachel! You bet. Quiche will likely taste soggy if not partially blind baked because it’s extra moist. We don’t find it necessary to blind bake the double crust chicken pot pie.
I use your recipe mainly for the lemon filling. You say to “partially” blind bake the crust before putting in the lemon filling. But you give NO idea of the time for that “partially” blind baking. How much please? I use my mother’s oil crust.
Hi Peggy, I’m glad to help. Follow as instructed through step 8, then for step 9, refer to the partial blind bake instructions.
For a partially baked pie crust (like if you’re baking the pie crust once it is filled like a quiche) bake until the bottom crust is just beginning to brown, about 7-8 minutes.
Hi, Sally.
Your instructions are a godsend.
I have recently bought a couple of glass pie dishes. I am usually careful with sudden temperature changes when using glassware.
Your recipe calls for a 30-min chilling before it goes in the oven. Is it okay to put the pyrex bakeware into the oven straight from the fridge?
Hi sally! I baked your deep dish apple which turned out great! First time pie maker! I did blind bake the bottom but only partially since I didn’t know how it’d turn out. The inner center of it was undercooked (grayish) so I’ll try fully blind baking it, maybe? The only issue I had was how to seal the bottom blind baked crust to the upper raw crust before cooking the entire pie? I managed by tucking but it was awkward. Thanks!
Can you tell me why my crust didn’t brown? It was flaky and delicious and not raw at all. But it just didn’t brown. I did use part vodka and part water. I did 20 minutes with the weights and 20 without.
I’m going to make your pecan pie and it led me to this page for partially blind baking the crust. What a great tutorial and I also understand now how to do the fluted edges. I could never figure out how to do that. So, thanks for teaching me some new skills!
So im making the edges thin, so how long do i bake the pie crust for the lemon meringue pie for, and also I’m going to make two pies should i make the lemon meringue pie one at a time.
Hi Margaret, follow these instructions as written for the lemon meringue pie blind baking step. You only need to partially bake crust (step 9) for that pie since you’re baking it again with the filling.
Wow! I must disagree! I’m the worst baker in the world and I felt the instructions were organized and comprehensive. For once, my crust came out perfectly.
Rubbish, recipe is great and easy to follow
Strongly disagree… precise instructions, easy to follow and my Par-Bake was SPOT ON for once.
Perfection!! Thank you Sally
Thank you for such explicit instructions. I am not a good baker and your recipient/photos and videos make me feel more confident. One question, in making a chicken pot pie should I add the pre-made and chilled filling to the raw crust or the blind baked crust? Thank you, Roberta
Hi Roberta! I’m so glad you find my instructions helpful in the kitchen. No need to blind-bake the crust before when making a pot pie. See my Double Crust Chicken Pot Pie for more details.
Hi Sally I did use your all butter pie crust recipe ( since I didn’t have shortening here) and I will use a glass pan and cook it on the bottom rack I assume . Thank you for your tips and your quick reply!
my best.
Hi, I’m making your pecan pumpkin pie, and partially baked the crust before. It looked pretty doughy under the weights. But the edges were set. Is that correct? Or is the bottom supposed to be cooked too? I’m afraid it will be not cooked on the bottom.
Hi Emma, The quick blind bake gets the crust started but then the long bake time of the pumpkin pie is enough to fully bake the bottom of the crust! If the edges start getting too brown be sure to use a pie shield of strips of aluminum foil part way through the bake time.
I am baking apple pies, and you suggested to blind bake. Great. My question, how do I get the top crust on if the bottom is partial baked?
Hi Colleen, I don’t usually par-bake pie crust when there’s a top pie crust going on top since it’s difficult to adhere the two. However, here’s a very helpful tutorial you could use: https://food52.com/blog/18422-par-bake-your-double-crust-pies-join-the-anti-soggy-crust-crusade
Love your pie crust recipe! How long are you chilling your crust in the dish before baking, and how are you taking a glass dish from fridge to oven without thermal shock?
I did not take the weights out midway and my bottom crust is not completely baked. Is there any way to fix this as I was going to fill with a pre cooked blueberry filling?
Hi Dawn, it may be too late now, but if you forget to remove the pie weights next time, you can simply remove them and then place the pie crust back in the oven and cook until the bottom is lightly browned. Use a pie crust shield to protect the edges.
Hi Sally. I love your recipes. Which oven rack is best for the blind baking and cooking of the lemon meringue pie. Thanks so much.
Center is best!
You are truly the very best tutor for baking out there. I am old – and have been baking and cooking since I was a young girl – and I have learned more just recently finding you about baking than I have ever learned.
Thank you, Sally. I am your newest subscriber. Remind people how important it is to go to YouTube and give a thumb’s up – they may not realizing subscribing and thumbs upping helps you with costs and searchability strength.
Best of luck – you are remarkable and my family appreciates you, too!
I see your instructions to bake or freeze crust within 5 days. If my disk has been in the frig for 14 days, how will this crust come out?
Hi Sally, thanks so much for your detailed instructions! I’ve made your lemon meringue and chicken pot pies. Both have been fantastic. For fully blind baking a pie crust, should you put the pie weights back in for the second bake?
Hi Julia, You should leave the weights out for the second half.
Thank you so much for this recipe and instructional. I have made it multiple times now. It is such an amazing feeling to have this gorgeous flaky crust (rivaling something a grandma could make!) come out of my oven.
Hi, Sally. My par-baked crust lost its fluted shape and puffed up quite a bit. I rested the rolled out dough in the fridge, docked and used 2 packages of pie weights. When you dock, should you pierce all the way to the pan?
Hi Brittany! You may need to use more pie weights – you want to fill up the pan most of the way to prevent it from puffing up or shrinking. Chilling the shaped and fluted dough in the fridge for longer before baking will help it hold its shape as well. You do want to poke through the crust when docking. Hope these tips help for next time!
After I blind bake my pie crust, can I leave it in the fridge overnight and make the coconut filling the following day?
Absolutely. After cooling, cover it and refrigerate overnight.