

This easy pizza dough recipe is great for beginners and produces 2 soft and chewy homemade pizza crusts. Skip the pizza delivery because you only need 6 basic ingredients to begin!
This recipe is brought to you in partnership with Red Star Yeast. Originally published in 2013, this pizza dough recipe is a massive fan favorite and you’ll also find it in my New York Times best-selling cookbook, Sally’s Baking 101.
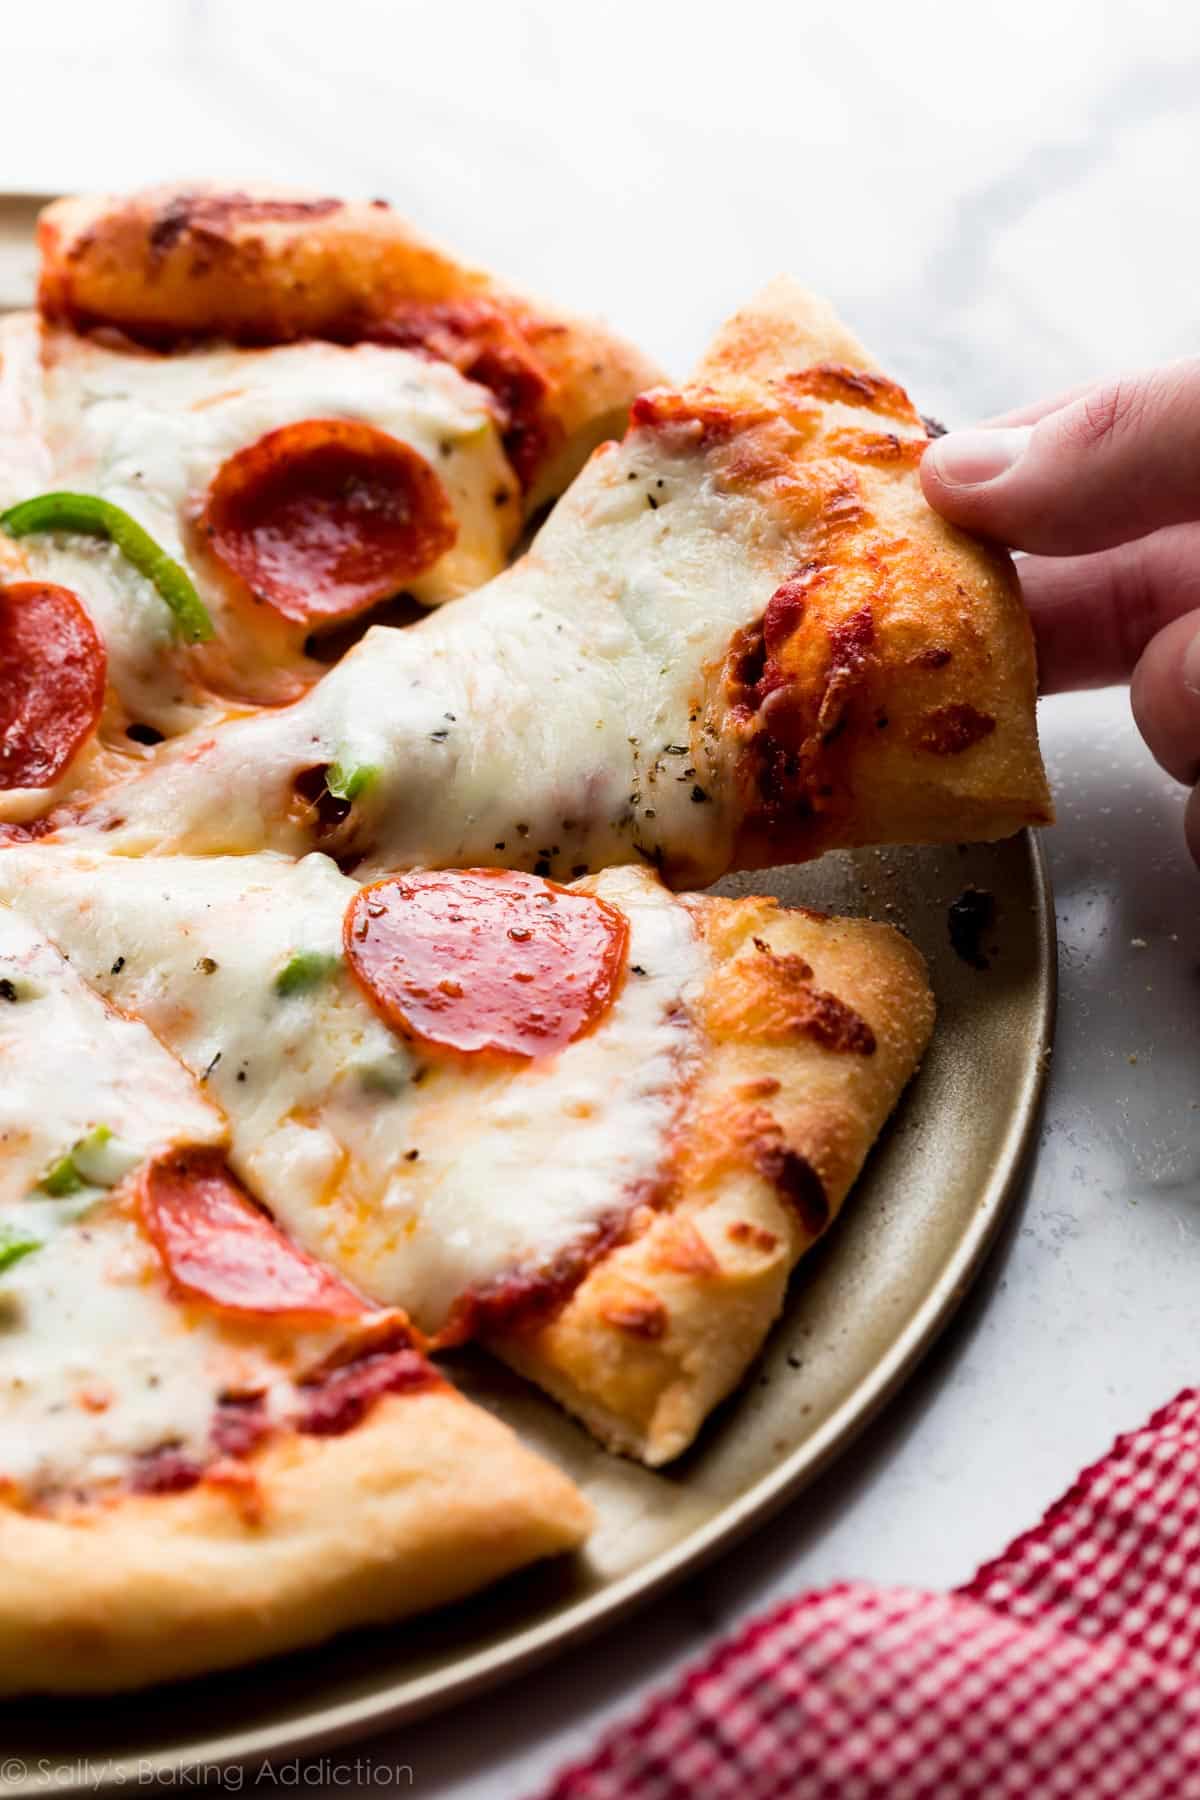
Every great pizza begins with a great pizza crust. Some like it thin and crispy, while others prefer a thick and soft crust. This homemade pizza crust has it all: soft & chewy with a delicious crisp and AWESOME flavor. It’s my go-to pizza dough recipe and just a glance at the hundreds of reviews in the comments section tells me that it’s a favorite for many others too. In fact…
Easy Dough for Bread Beginners
This is a no-fuss dough recipe for beginners. You need just 6 basic ingredients, plus a little cornmeal for preparing the pan. (You can skip that if needed.) Most of the time is hands off as the dough rises. You might wonder… why waste the time when you can just buy frozen pizza dough? Frozen pizza dough is certainly convenient, but from-scratch crust has unbeatable flavor and texture that only comes from fresh dough. And you can use the dough for cheese breadsticks, too!
If you’ve ever made homemade bagels or sandwich bread, you can easily make pizza dough because it’s quicker, easier, and requires fewer steps.
Reader, Andy, commented: “Super easy, super fast, super good! I don’t like doughy thick pizzas and I find with this recipe that I can make them thin and crunchy, I love how easy it is. I make pizza once or twice a month! Haven’t bought one for quite some time now! ★★★★★“
Overview: Homemade Pizza Dough Ingredients
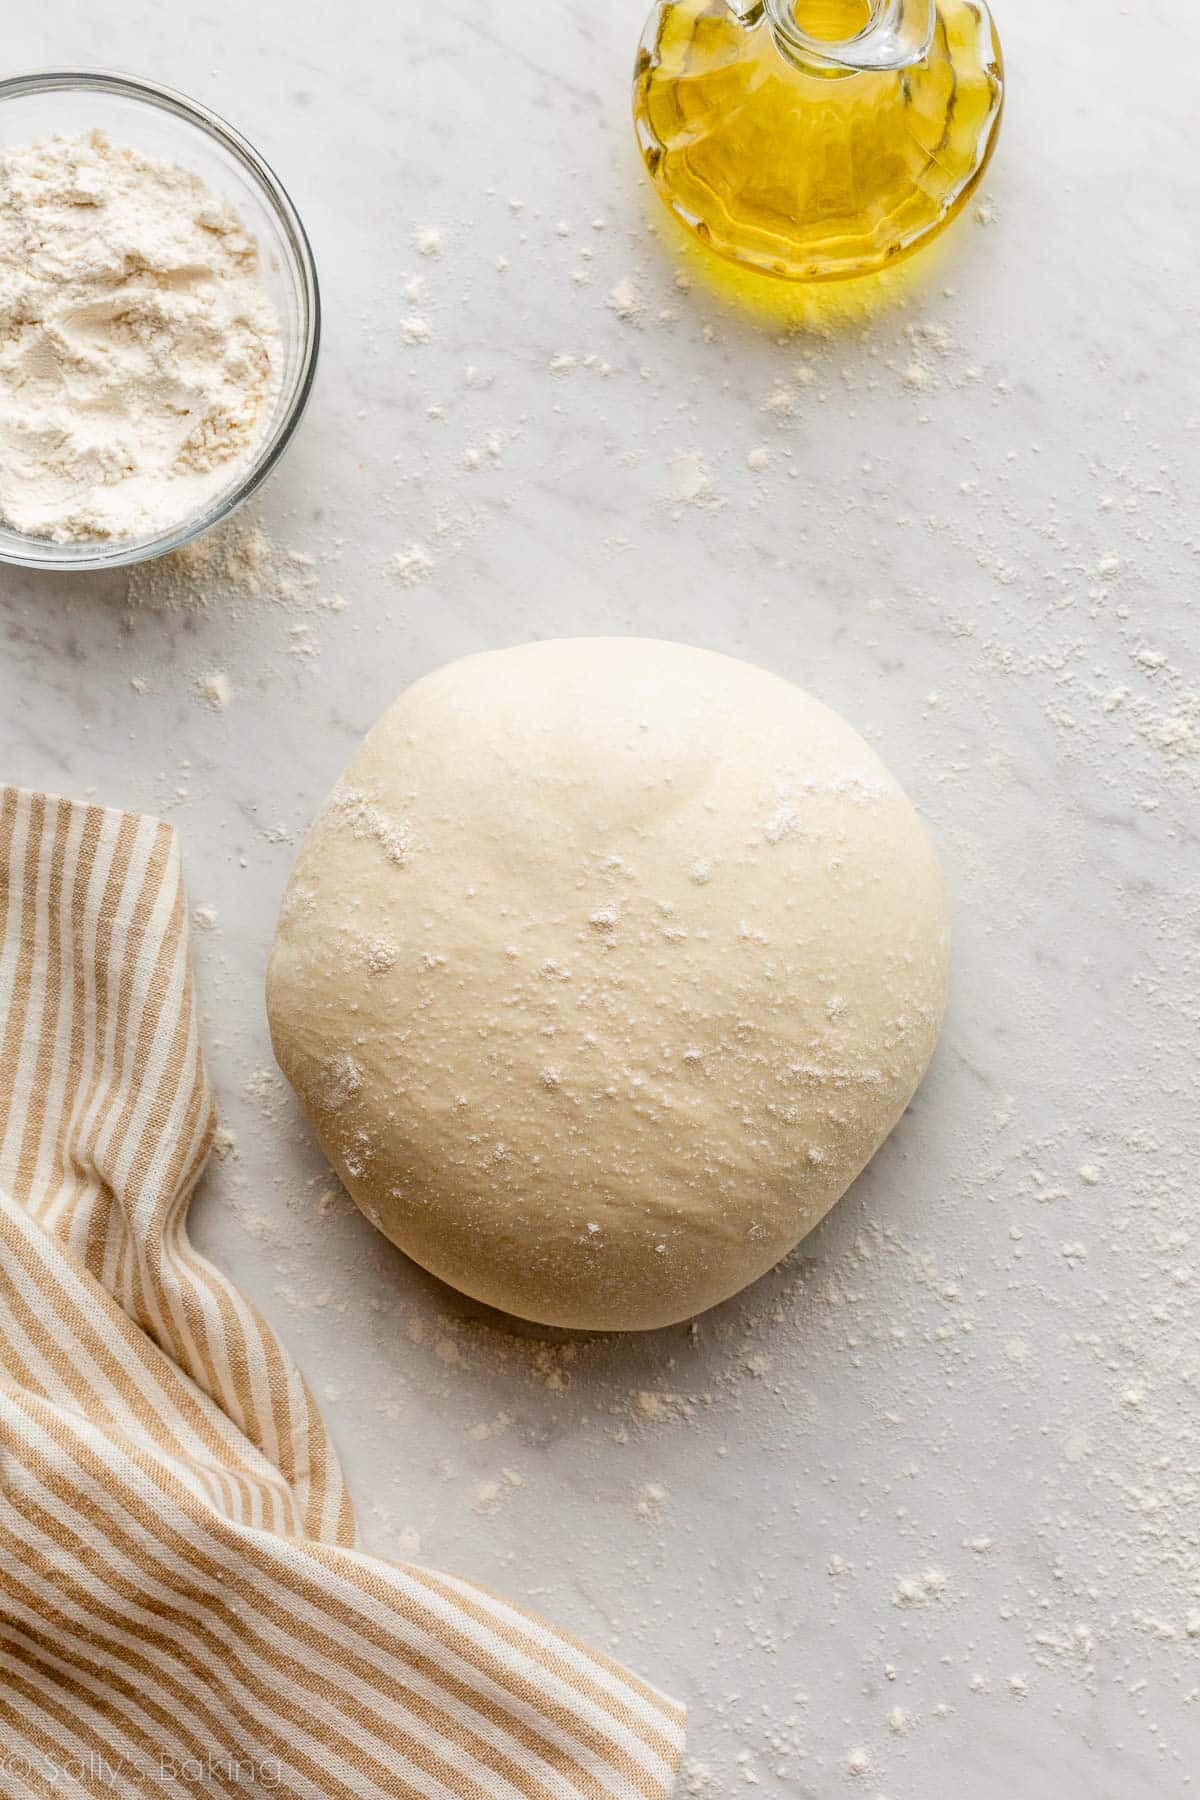
All pizza dough starts with the same basic ingredients: flour, yeast, water, salt, and olive oil.
- Yeast: I use Platinum Yeast from Red Star. I have the best results when I use this instant yeast. The Platinum yeast is fantastic because its careful formula strengthens your dough and makes working with yeast simple. You only need 1 standard packet of yeast (2 and 1/4 teaspoons) to get the job done.
- Water: I tested this pizza dough recipe with different amounts of water. 1 and 1/3 cups is the perfect amount. Use warm water to cut down on rise time, about 100-110°F. Anything over 130ºF kills the yeast.
- Flour: Use unbleached all-purpose white flour in this recipe. Bleaching the flour strips away some of the protein, which will affect how much water the flour absorbs. You can substitute bread flour for a chewier pizza crust. If you love whole grain bread, try this whole wheat pizza dough instead.
- Oil: A couple Tablespoons of extra virgin olive oil adds wonderful flavor to the dough. Don’t forget to brush the dough with olive oil before adding the toppings, which prevents the crust from tasting soggy.
- Salt: Salt adds necessary flavor.
- Sugar: 1 Tablespoon of sugar increases the yeast’s activity and tenderizes the dough, especially when paired with a little olive oil.
- Cornmeal: Cornmeal isn’t in the dough, but it’s used to dust the pizza pan. Cornmeal gives the pizza crust a little extra flavor and crisp. Most delivery pizzas you enjoy have cornmeal on the bottom crust!
You could also add 1 teaspoon each garlic powder and Italian seasoning blend to the dough when you add the flour.
One reader, Shane, commented: “Excellent pizza dough. I add about 1 tbs of garlic powder and Italian herbs to give the dough more flavor as well as 40 grams of cornmeal for a little crunch. It freezes well and makes a nice thin crust. ★★★★★“

This is a Lean Bread Dough
Pizza crust, like homemade bagels, artisan bread, and focaccia, requires a lean dough. A lean dough doesn’t use eggs or butter. Without the extra fat to make the dough soft, you’re promised a crusty pizza crust. (However, I recommend using some olive oil for flavor and to keep the interior on the softer side.) Recipes like dinner rolls & sweet potato dinner rolls, homemade breadsticks, and overnight cinnamon rolls require fat to yield a “rich dough,” which creates a softer and more dessert-like bread.
Overview: How to Make Easy Pizza Dough
- Make the dough: Mix the dough ingredients together by hand or use a hand-held or stand mixer. Do this in steps as described in the written recipe below.
- Knead: Knead by hand or with your mixer. I like doing this by hand. If you’re new to yeasted doughs, my How to Knead Dough post and video can help with this step.
- Rise: Place dough into a greased mixing bowl, cover tightly, and set aside to rise for about 90 minutes or overnight in the refrigerator.
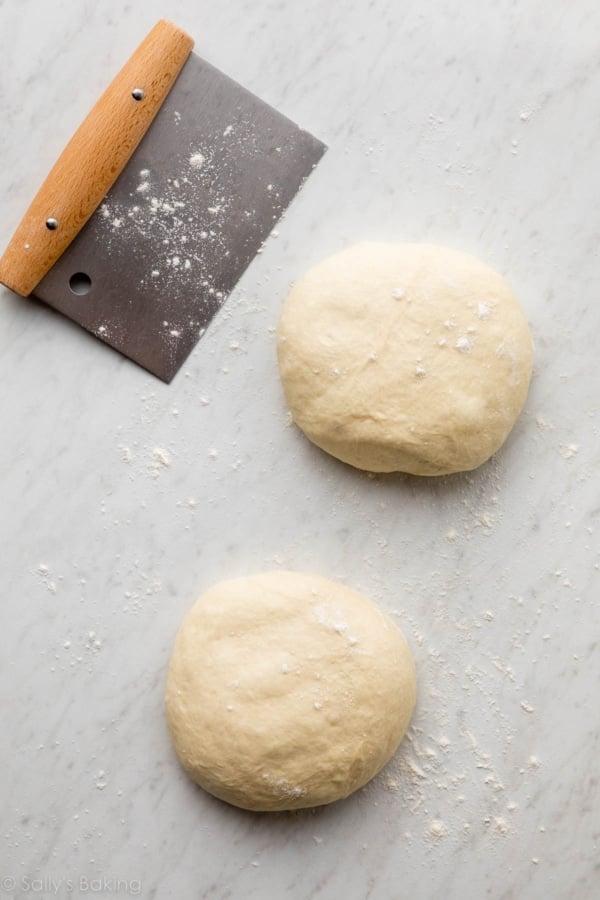
- Punch & shape: Punch down risen dough to release air bubbles. Divide in 2. Roll dough out into a 12-inch circle. Cover and rest as you prep the pizza toppings.
- Top it: Top with favorite pizza toppings.
- Bake: Bake pizza at a very high temperature for only about 15 minutes.
Young bakers can lend a hand AND have fun in the process. Let the kids help you press down the dough and shape into a circle. They can add their cheeses and make pepperoni faces on top of the pie. Who doesn’t love a smiley pizza? 🙂
Favorite Pizza Pans
Let me share my top choices for pizza pans just in case you’re shopping for a new one. I use and love (affiliate links) this one and this one. If you like baking your homemade pizzas on pizza stones, I’ve used this one before and it’s wonderful.
If you don’t have a pizza pan, use a regular sheet pan. Grease it with olive oil and sprinkle with cornmeal as directed below, and then press the dough into whatever shape that will fit. Make sure the dough is about 1/2-inch thick. For a thinner pizza, stretch the dough out more.
Uses for Homemade Pizza Dough
Here are the many uses for this homemade pizza dough:
- Stuffed Crust Pizza
- Pesto Pizza
- Homemade Ham & Cheese Pockets
- Pepperoni Pizza Rolls
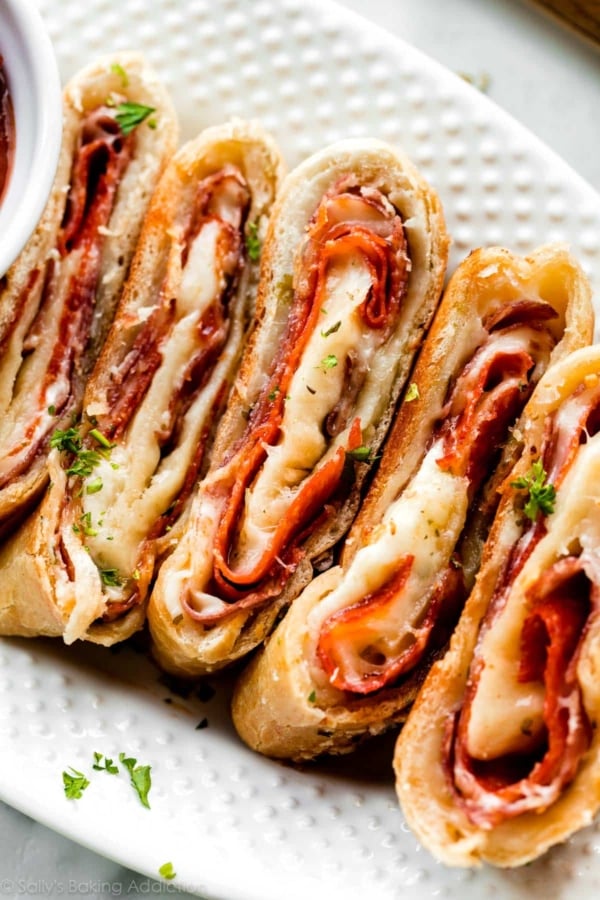
- Stromboli
- Spinach Artichoke White Pizza
- Homemade BBQ Chicken Pizza
- Garlic Knots
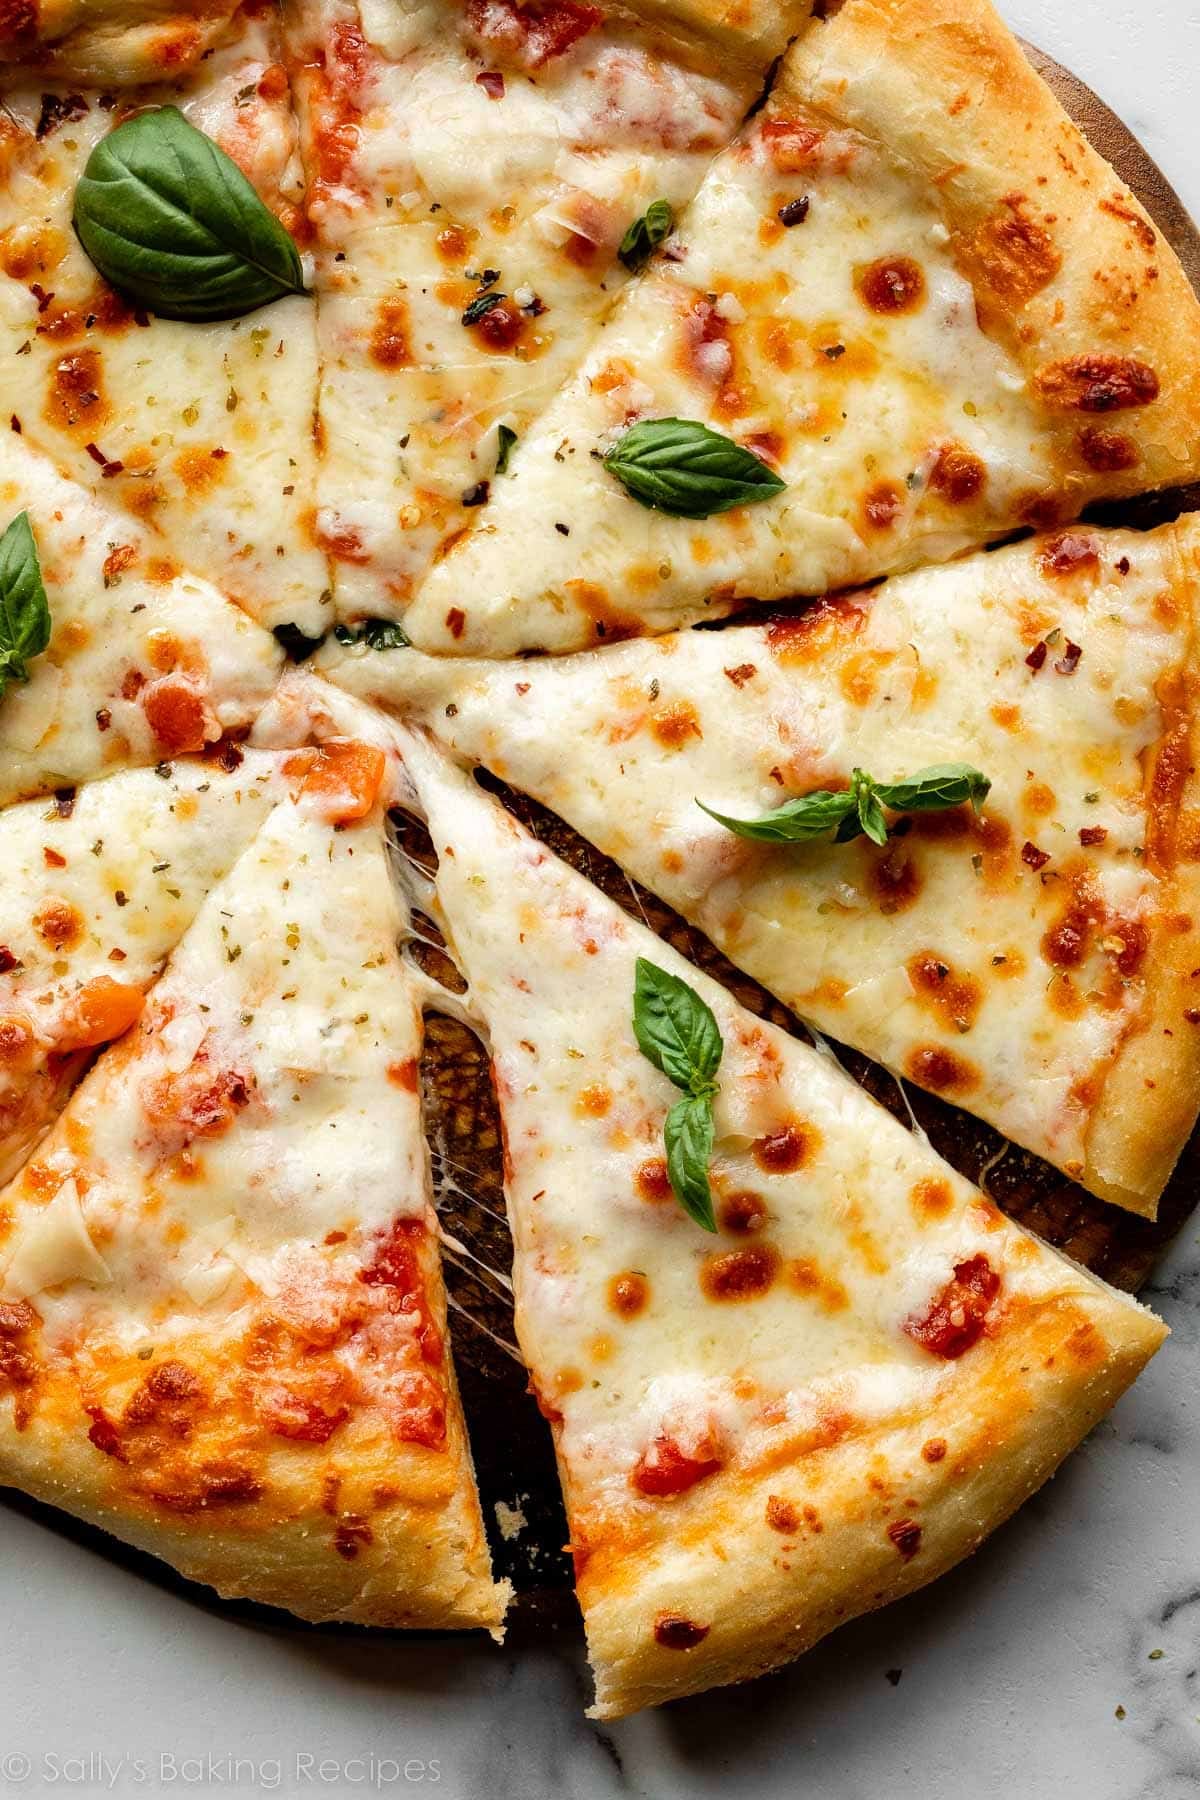
- Margherita style (pictured above): For 2 pizzas, when it’s time to top it in step 6 below, top with the following. (Feel free to halve for only 1 pizza.) Make a homemade tomato sauce by blending 1 28-ounce can San Marzano tomatoes, 1 Tablespoon olive oil, pinch of salt, and 2 minced cloves of garlic. Spread on shaped doughs. Top each with 2-3 ounces thinly sliced fresh mozzarella. Bake as directed, and then sprinkle each hot pizza with 2 Tbsp freshly grated parmesan cheese and a handful of roughly chopped fresh basil.
- Apple gorgonzola pizza is a favorite: For 1 pizza, when it’s time to top it in step 6 below, top with 1 and 1/2 cups (6oz or 168g) shredded mozzarella cheese, 8 ounces crumbled gorgonzola cheese, thin slices of apple, then sprinkle with chopped fresh or dried rosemary before baking.
- Or any other pizza topping you love: pepperoni, crumbled sausage, black olives, onions, mushrooms, jalapeños, etc
Here are my flatbread pizza crust, whole wheat pizza dough, Chicago-style deep dish pizza, and cold veggie pizza recipes.
Print
Easy Homemade Pizza Dough
- Prep Time: 2 hours, 15 minutes
- Cook Time: 15 minutes
- Total Time: 2 hours, 30 minutes
- Yield: 2 12-inch pizzas
- Category: Dinner
- Method: Baking
- Cuisine: American
Description
Follow these basic instructions for a thick, crisp, and chewy pizza crust at home. The recipe yields enough pizza dough for two 12-inch pizzas and you can freeze half of the dough for later. Close to 2 pounds of dough total. This recipe is also in my New York Times best-selling cookbook, Sally’s Baking 101.
Ingredients
Dough
- 1 and 1/3 cups (320ml) warm water (about 110°F/43°C)
- 1 Tablespoon (13g) granulated sugar
- 2 and 1/4 teaspoons (7g) Platinum Yeast from Red Star instant yeast (1 standard packet)*
- 3 and 1/2 to 4 cups (438–500g) unbleached all-purpose flour (spooned & leveled), plus more as needed
- 2 Tablespoons (30ml) extra-virgin olive oil, plus more for greasing
- 1 teaspoon salt
- sprinkle of cornmeal, for dusting the pan
Toppings (halve these amounts if making just 1 pizza)
- extra-virgin olive oil, for brushing
- 2 garlic cloves, minced (optional)
- 1 cup (250g) store-bought pizza sauce
- 4 cups (1lb/454g) shredded mozzarella cheese
Instructions
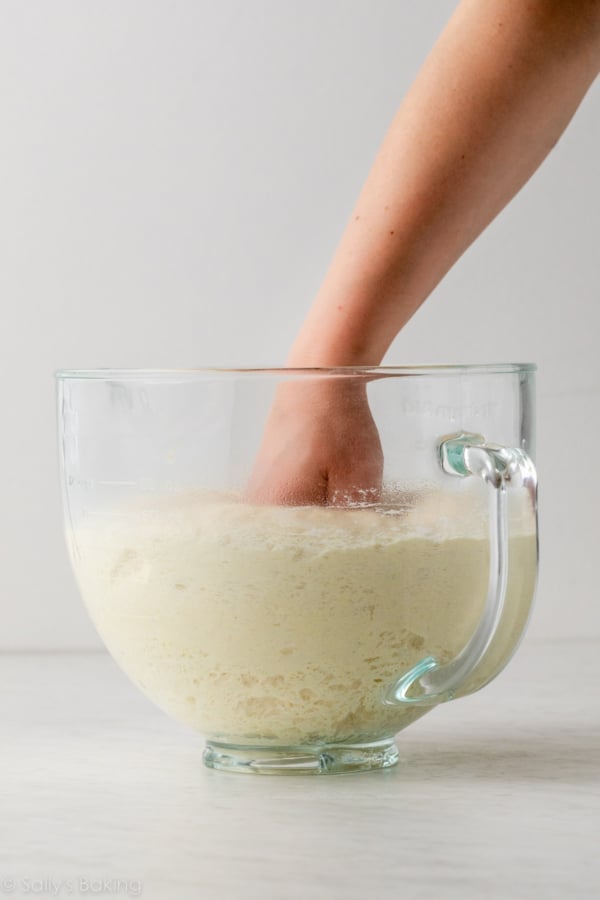
- Whisk the warm water, granulated sugar, and yeast together in the bowl of your stand mixer fitted with a dough hook or paddle attachment. Cover and allow to rest for 5 minutes. *If you don’t have a stand mixer, simply use a large mixing bowl and mix the dough with a wooden spoon or silicone spatula in the next step.
- Add the flour, olive oil, and salt. Beat on medium speed for 2 minutes, until the dough pulls away from the sides of the bowl.
- Knead the dough: Keep the dough in the mixer and beat for an additional 5 full minutes, or knead by hand on a lightly floured surface for 5 full minutes. (If you’re new to bread-baking, my How to Knead Dough video tutorial can help here.) If the dough becomes too sticky during the kneading process, sprinkle 1 teaspoon of flour at a time on the dough or on the work surface/in the bowl to make a soft, slightly tacky dough. Do not add more flour than you need because you do not want a dry dough. After kneading, the dough should still feel a little soft. Poke it with your finger—if it slowly bounces back, your dough is ready to rise. You can also do a “windowpane test” to see if your dough has been kneaded long enough: tear off a small (roughly golfball-size) piece of dough and gently stretch it out until it’s thin enough for light to pass through it. Hold it up to a window or light. Does light pass through the stretched dough without the dough tearing first? If so, your dough has been kneaded long enough and is ready to rise. If not, keep kneading until it passes the windowpane test.
- Rise: Lightly grease a large bowl with oil or nonstick spray—just use the same bowl you used for the dough. Place the dough in the bowl, turning it to coat all sides in the oil. Cover the bowl with aluminum foil, plastic wrap, or a clean kitchen towel. Allow the dough to rise at room temperature for 60–90 minutes or until double in size. (Tip: For the warm environment on a particularly cold day, heat your oven to 150°F (66°C). Turn the oven off, place the dough inside, and keep the door slightly ajar. This will be a warm environment for your dough to rise. After about 30 minutes, close the oven door to trap the air inside with the rising dough. When it’s doubled in size, remove from the oven.)
- Preheat oven to 475°F (246°C). Allow it to heat for at least 15–20 minutes as you shape the pizza. (If using a pizza stone, place it in the oven to preheat as well.) Lightly grease baking sheet or pizza pan with nonstick spray or olive oil. Sprinkle lightly with cornmeal, which gives the crust extra crunch and flavor.
- Shape the dough: When the dough is ready, punch it down to release any air bubbles. Divide the dough in half. (If not making 2 pizzas, freeze half of the dough for another time. See freezing instructions below.) On a lightly floured work surface using lightly floured hands or rolling pin, gently flatten the dough into a disc. Place on prepared pan and, using lightly floured hands, stretch and flatten the disc into a 12-inch circle, about 1/2-inch thick. If the dough keeps shrinking back as you try to stretch it, stop what you’re doing, cover it lightly for 5–10 minutes, then try again. Once shaped into a 12-inch circle, lift the edge of the dough up to create a lip around the edges. I simply pinch the edges up to create the rim. If using a pizza stone, place the dough directly on baker’s peels dusted with cornmeal.
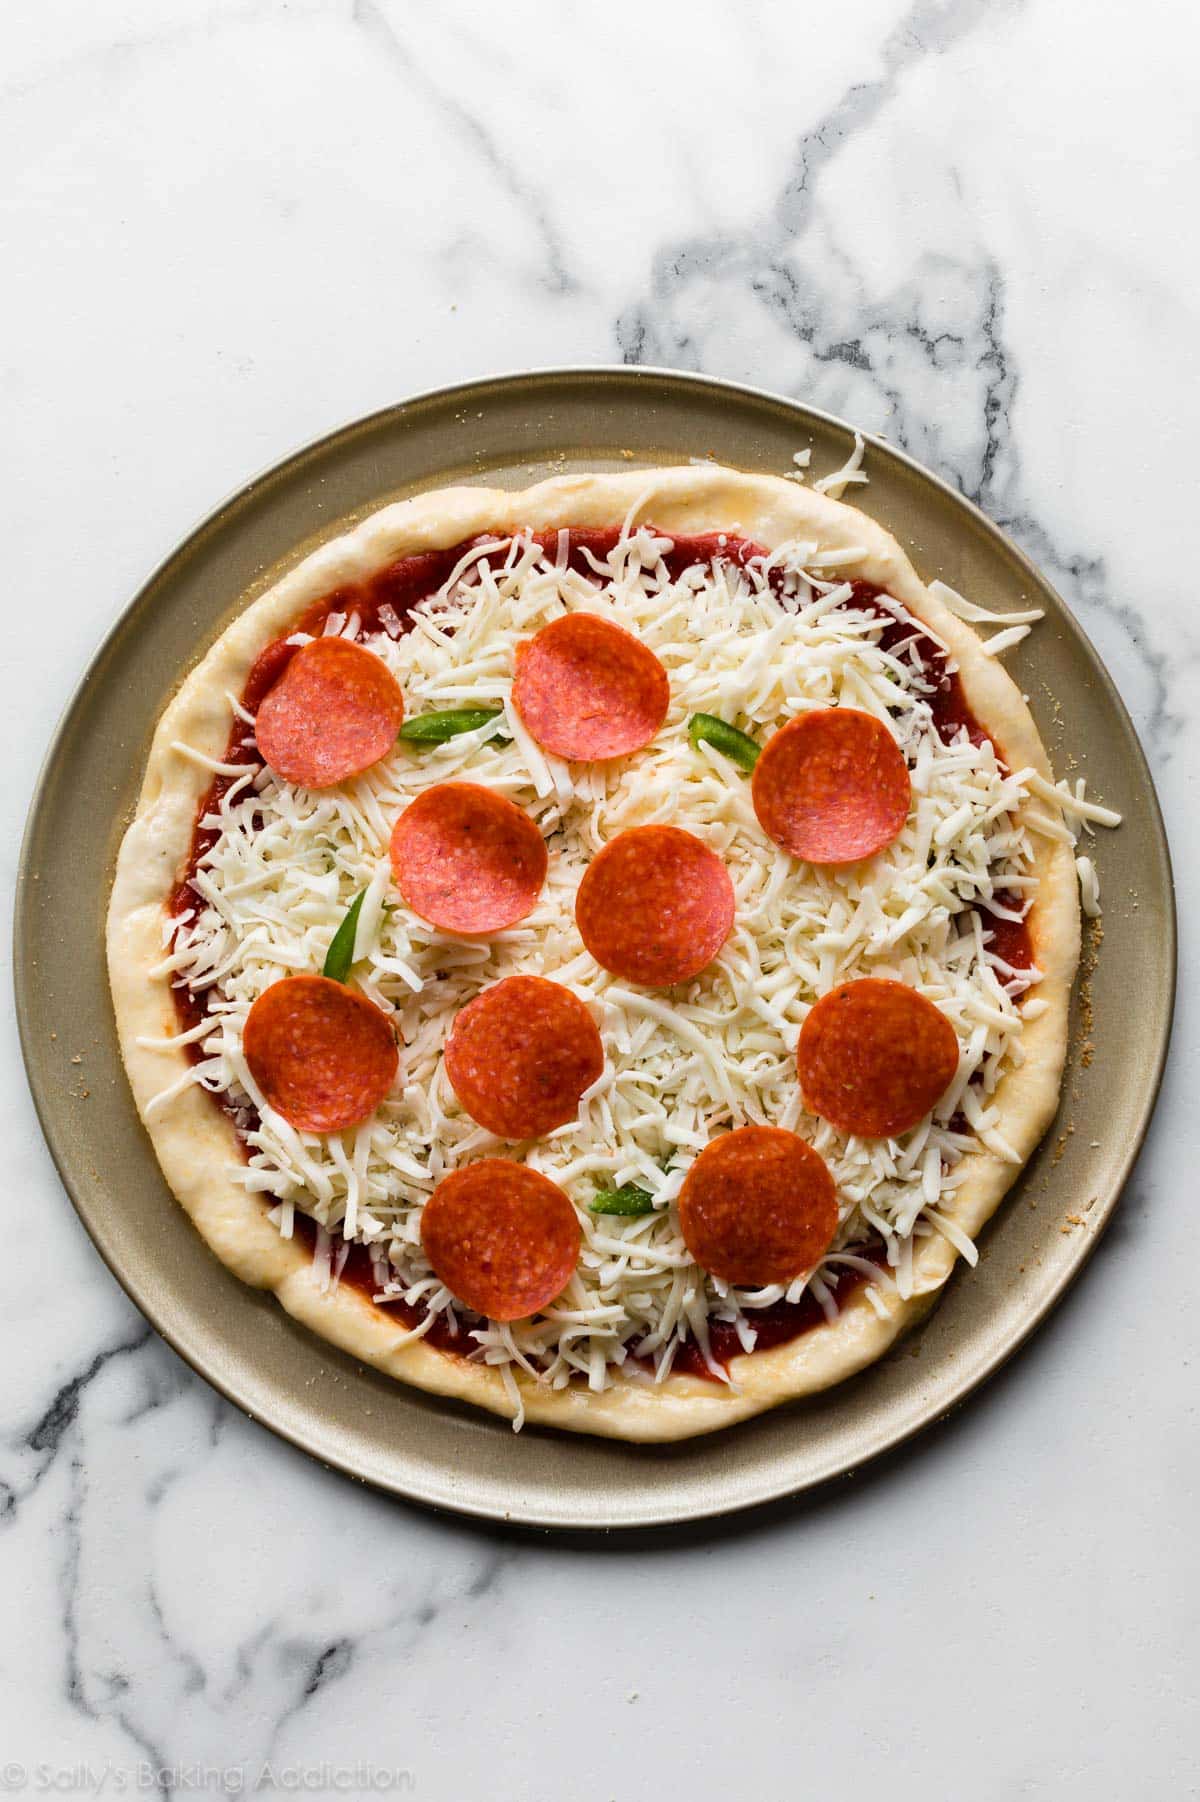
- Cover dough lightly with plastic wrap or a clean kitchen towel and allow to rest for a few minutes as you prepare your pizza toppings. I suggest pepperoni & green peppers or jalapeño slices, Hawaiian pizza, pesto pizza, spinach artichoke white pizza, or homemade BBQ chicken pizza.
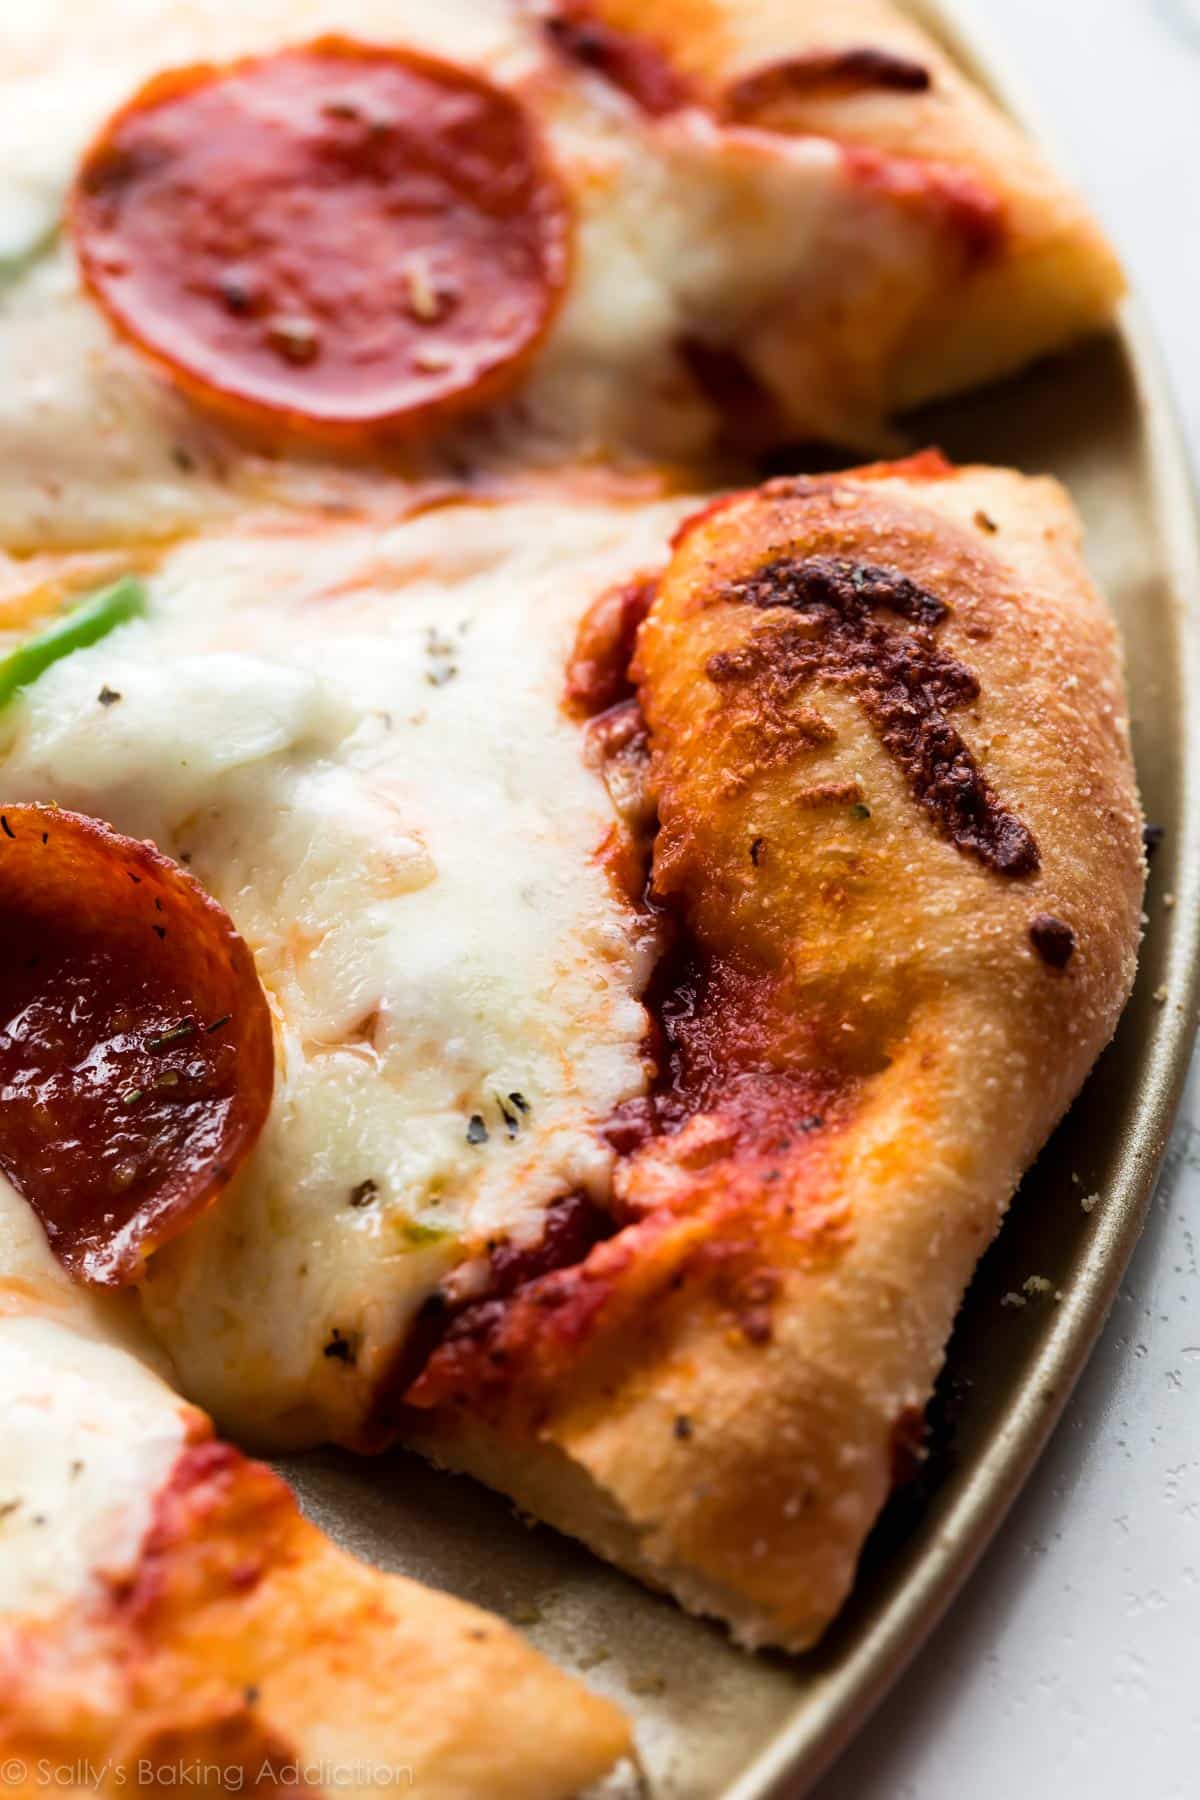
- Top & bake the pizza: Using your fingers, press dents into the surface of the dough to prevent bubbling. Lightly brush olive oil over the top of the crust. Sprinkle with minced garlic (if using), then spread on 1/2 cup (125g) pizza sauce, and top with 2 cups (227g) shredded mozzarella cheese. Top with any additional toppings of your choice and bake for 13–15 minutes or until the crust is golden brown.
- Slice hot pizza and serve immediately. Cover leftover pizza tightly and store in the refrigerator.
Notes
- Freezing Instructions: This recipe yields enough dough for two 12-inch pizzas, a little less than 2 pounds (900g) total. After the pizza dough rises and you divide the dough in half (step 5), you can freeze one of the balls of dough to make pizza at a later time. Or you can simply freeze both balls of dough separately. Lightly coat all sides of the dough ball(s) with nonstick spray or olive oil. Place the dough ball(s) into individual zipped-top bag(s) and seal tightly, squeezing out all the air. Freeze for up to 3 months. To thaw, place the frozen pizza dough in the refrigerator for about 8 hours or overnight. When ready to make pizza, remove the dough from the refrigerator and allow to rest for 1 hour on the counter. Preheat the oven and continue with step 5, punching down the dough to release air if needed.
- Overnight/All Day Instructions: Prepare the dough through step 3, but allow the dough to rise for 8–12 hours in the refrigerator. (If it needs to be in the refrigerator for longer, use cooler water (about 70°F/21°C) in the dough, which will slow the dough’s rise and allow for more time.) The slow rise gives the pizza dough wonderful flavor! When ready, continue with step 4. If the dough didn’t quite double in size overnight, let it sit at room temperature for 30–45 minutes before punching down (step 5).
- Special Tools (affiliate links): Stand Mixer or Large Mixing Bowl and Wooden Spoon or Silicone Spatula | Dough Scraper | Pizza Pan or Baking Sheet | Pastry Brush | Pizza Cutter
- Yeast: Red Star Platinum yeast is an instant yeast. You can use active dry yeast instead. The rise time will be at least 90 minutes. Reference my Baking with Yeast Guide for answers to common yeast FAQs.
- Pictured Pizza: This recipe yields 2 pizzas. For each, top with 1/2 cup pizza sauce, 2 cups shredded mozzarella cheese, pepperoni slices, thinly sliced green pepper or jalapeño, and a sprinkle of Italian seasoning blend or dried basil.
Recipe originally published on Sally’s Baking Addiction in 2013
FAQ: How Can I Make The Dough Ahead of Time?
Prepare the dough through step 3 above, but allow the dough to rise for 8-12 hours in the refrigerator. (If it needs to be in the refrigerator for longer, use cooler water in the dough which will slow the dough’s rise and allow for more time.) As a bonus, the slow rise gives the pizza dough wonderful flavor! When ready, continue with step 5 in the recipe above (the shaping step). If the dough didn’t quite double in size when rising, let it sit at room temperature for 30-45 minutes before shaping.
FAQ: How Do I Freeze Homemade Pizza Dough?
This recipe yields two 12-inch pizzas. After the pizza dough rises and you divide the dough in half (step 5), you can freeze one of the balls of dough to make pizza at a later time. Or you can simply freeze both balls of dough separately. Lightly coat all sides of the dough ball(s) with nonstick spray or olive oil. Place the dough ball(s) into individual zipped-top bag(s) and seal tightly, squeezing out all the air. Freeze for up to 3 months.
FAQ: How Do I Thaw Frozen Pizza Dough?
Place the frozen pizza dough in the refrigerator for about 8 hours or overnight. When ready to make pizza, remove the dough from the refrigerator and allow to rest for 30 minutes on the counter. Continue with step 5 in the recipe above.


Reader Comments and Reviews
Can I use high grade flour?
A high-grade flour like bread flour will work here—the crust will be even chewier.
This pizza dough recipe turned out amazing! The crust was soft yet crispy at the edges – exactly how I like it. Thanks for the step-by-step guide, it was super easy to follow.
I was nervous about trying this the first time, but I’m not sure why… there honestly hasn’t been a recipe on Sally’s blog that I’ve ever been disappointed with.
I was a little bit worried because, technically, my dough didn’t pass the window pane test, but I was afraid to keep on kneading it for fear that it would turn out tough. But I let it rise the amount of time instructed, cut the dough in half, froze 1/2 for later and rolled out the other for my first ever homemade pizza. It was great! I put it on a sheet pan and within 14 minutes it was ready to eat. I had no idea it would be this easy.
When I was a kid, we made homemade pizza but we used bisquick for the crust so it was more biscuit-y. Making your own homemade crust is like realizing that you can make a cake homemade instead of coming out of a box it opens up a whole new world.
I’d also like to say that Sally’s blog has encouraged me start baking again. The amount of time and effort she puts in to explaining each recipe along with tips and tricks and explanations… it’s giving me confidence for sure. It’s made baking cathartic – especially when I had given up baking because it didn’t bring me joy anymore.
Thank you Sally!
Can the rise time in the refrigerator go as long as 18 hours? Thinking of making the night before.
Hi Shelby! Up to 12 hours in the refrigerator is best. We recommend freezing if storing longer than that (see recipe Notes). So glad you love it!
Hi Sally! Love love love your recipes! You are my #1 go to for all baking needs!
Can you convert this recipe for high altitude?
It would be helpful if you left high altitude tips on all of your recipes, as I always have to make miner adjustments
Thanks a ton for your time!
Hi Lindsey, we wish we could help, but we have no experience baking at high altitude. We know some readers have found this chart helpful: https://www.kingarthurflour.com/learn/high-altitude-baking.html
Hi. Can I use a breadmaker for this recipe? If yes, would I need to make any changes?
Thank you
Hi Karen, we haven’t tested this recipe in a bread machine, but several readers have reported success doing so.
Can I replace the sugar with and alternative sweetner ?
Hi Jessica, The sugar increases the yeast’s activity and tenderizes the dough, we don’t recommend skipping it. You could try to use honey instead.
hi you have the best pizzas in the world
great recipe
I want to put Italian sausage (pork based) on the pizza. If it’s fully cooked first and then put on the pizza and then baked, it is dried out. I’m afraid if I put it on raw and bake it, it won’t be fully cooked when the pizza is done baking. Do you have any suggestions?
Hi Roxane, we would used cooked sausage.
I use raw sausage, place it on top and make it small pieces. It’ll cook through just fine.
500 degrees 8-12 minutes.
Could this recipe be doubled? I’m thinking of making enough dough for my family of 5 to make individual pizzas for 2 consecutive nights.
Hi Catherine, you can double this recipe. Enjoy!
Hi. I live in a high humidity and warm climate country. I find my dough to be very wet and I had to add 2 TBSP of flour for my dough to pull away from the side of the bowl during mixing. Should I add more flour next time or less water?
I could barely shape my dough without flour or wetting my hands.
Appreciate any advice! Thank you.
Hi Cheng! You can add more flour as needed to make your dough workable.
Can the salt reduced?
Hi Nyla, you can, but the flavor will be impacted.
This is the only pizza crust recipe my family uses now. Consistently good. I have the recipe memorized now. Thanks!
Once again, sallys baking addiction recipe has outdone themselves. Amazing recipe
My grandsons have only liked one pizza for the past 5 years from a local pizza place. I decided to try this recipe on a whim and made it for them last night. They literally ate every last piece and wanted more. This is a FANTASTIC RECIPE and super easy to make. I rolled it really thin and it stayed that way through the baking process and only rose a little on the edges. Beautiful results!!!
I’ve been making this pizza dough for years and it’s always a big hit at my house when I do. Sally’s recipe is a staple of our menus. Two things to know: 1) the dough proofing takes at least 1 hour, so this is not the recipe to try to throw together after a long day at work & school; and 2) I leave out the kneading of the dough before it proofs. I always ended up making the crust too tough. It gets kneaded after it rises though. Great recipe!!!
I actually use this pizza crust to make mini calzones and pizza pockets for the family, then freeze them for after school snacks or quick meals
Since I’ve tried this recipe, it is the only recipe I use for making pizza bases! Family and friends love it, which is saying something
Wondering if gluten free flour would work?
Hi Stacie, gluten free flour doesn’t work well in this yeasted dough. We recommend looking for a recipe formulated to be gluten free for best results! Here are all of our gluten free recipes, if you’d like to browse.
Loved how my pizza turned out. Followed your recipe. I made 2 batches and made 8 personal pizzas. I left them on the kitchen counter under kitchen wrap while we went to a parade. Came back and the dough had risen again. Punched it and cut it into 8 pizzas again. It was so chewy and delicious. Will be making it again soon.
Holy cow!!! This is the BEST!!! I was buying the pre-made crusts or the pre-made dough but I will NEVER go back now! I already had everything I needed to make this delicious dough already in my cabinet! Thank you!
I am measurement challenged. Can this recipe be used in a 13 x 18 inch sheet pan?
Hi Diane, a sheet pan works great for this, but any baking sheet you have should be fine. The number of pizzas you get really depends on how thin or thick you roll out the dough.
Sally, you’ve become my go-to baking blogger when I want to try something new. This was another delicious success. Thank you!
Thank you so much, Amelia!
I love this pizza dough recipe! How would using ’00’ flour change the recipe quantities? Has anyone tried the ’00’ pizza flour with this?
Hi Jennifer, yes, you can use the same amount of 00 flour. Enjoy!
Want to make the easy pizza dough, but want to put it in a rectangular pan. What size would you suggest?? 13 x 9, or 13 x 18??
Hi Diane, if you are using all of the dough for a rectangle pizza, use a 13x18inch half sheet pan. If you are dividing the dough in half and using half of the dough, a 9×13 inch pan is sufficient. (Though you would still use a 13×18 inch pan and just not stretch it all the way to the edges.)
Hello, I’m hoping to make personal pizzas by separating the dough into 4, 6 in pizza. Any suggestions for cook time? Thanks!
Hi Nikki, we’re unsure of the bake time needed for 6 inch pizzas, keep an eye on them in the oven and look for golden brown crust.
This is a great pizza dough recipe!! The whole family loves it! We added a touch of garlic and herb seasoning to the dough while mixing and it’s superb! Thank you for sharing!!!
This dough was easy and quite tasty—my family really liked it! It is now my go-to when I don’t want to (or forget to) start a sourdough recipe early in the day.
Hi!
Can the shaped dough be kept in the fridge for a couple of hours before toppings and baking?
Hi Lana, yes, you can cover the shaped dough for just a few hours—but be cautious not to let it rest for too long as it will continue to slowly rise. Enjoy!