

Make your own ham & cheese pockets from scratch using my simple pizza dough, ham, and your favorite cheese. They’re total comfort food and easier to make than you think! See my recipe notes for freezer-friendly instructions.
This recipe is brought to you in partnership with Red Star Yeast.
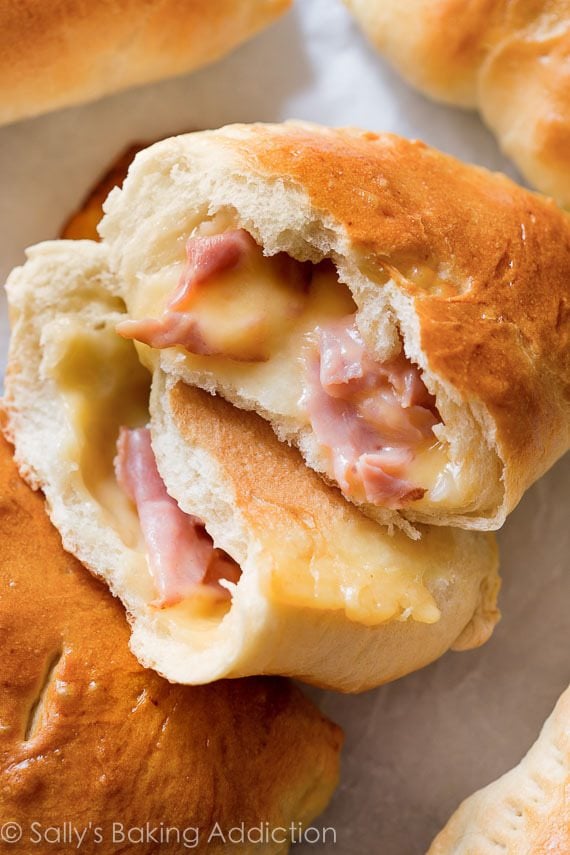
Will you just look at these?! Homemade pizza dough + ham & cheese = handheld bliss!
You may have grown up eating microwaved hot pocket snacks. Though I really don’t buy them anymore, I’m not ashamed to say that I loved them. (And still do!) A few years ago, I actually started I making my own using homemade dough. You can freeze them, microwave them, eat them on the go, etc. And, the best part of all, you can definitely taste the homemade difference!
Homemade Ham & Cheese Pockets Video
Homemade Dough Ingredients
Have you ever made my pizza dough before? I hope you have—it’s the only dough I’ll use for homemade pizza. It’s really simple to make and is actually the same dough we use for today’s ham & cheese pockets. You can also use it to make garlic knots, pepperoni pizza rolls, and cheesy breadsticks, too!
Here’s what you’ll need to make the dough:
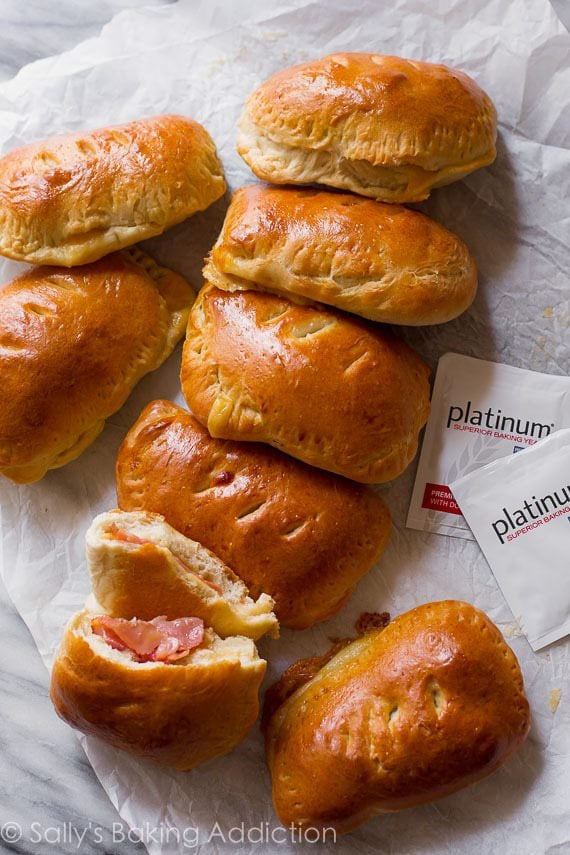
- Yeast: I use Platinum Yeast from Red Star. I have the best results when I use this instant yeast. The Platinum yeast is fantastic because its careful formula strengthens your dough and makes making working with yeast simple. You’ll see and taste the difference. I’ve been a fangirl for years! You only need 1 standard packet of yeast (2 and 1/4 teaspoons).
- Water: I tested this dough recipe with different amounts of water. 1 and 1/3 cups is the perfect amount. Use warm water to cut down on rise time, about 100-110°F. Anything over 130ºF kills the yeast.
- Flour: Use unbleached all-purpose white flour in this recipe. Bleaching the flour strips away some of the protein, which will affect how much water the flour absorbs.
- Oil: A couple Tablespoons of extra virgin olive oil adds wonderful flavor to the dough.
- Salt: Salt adds necessary flavor.
- Sugar: 1 Tablespoon of sugar increases the yeast’s activity and tenderizes the dough, especially when paired with a little olive oil.
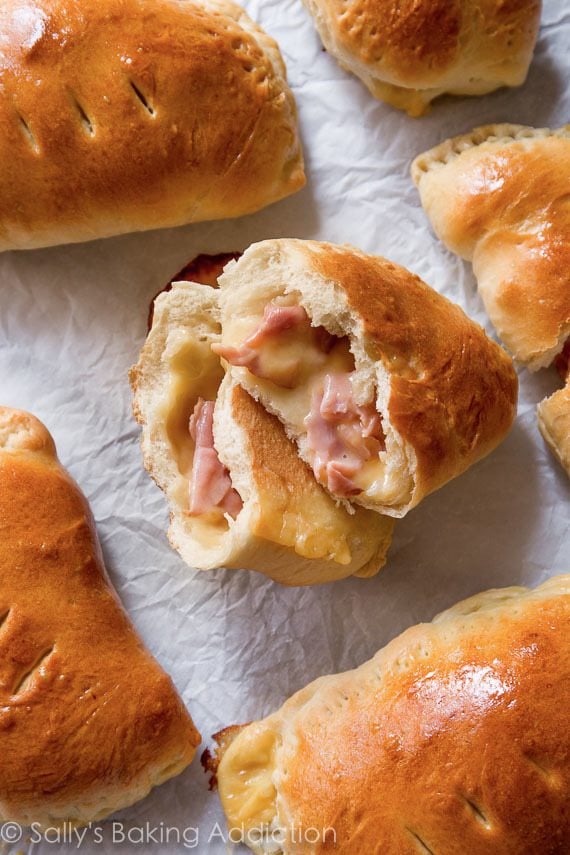
Though the warm ham & melty cheese filling is fantastic, the crust is the best part. This bread tastes phenomenal!
Overview: How to Make Homemade Ham & Cheese Pockets
Here’s a quick overview of the process. For full instructions, scroll down for my complete recipe.
- Make the dough. If you need help with the kneading step, my How to Knead Dough video tutorial has you covered.
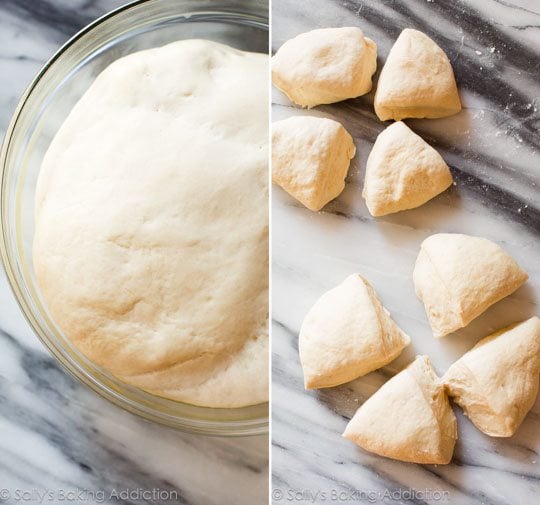
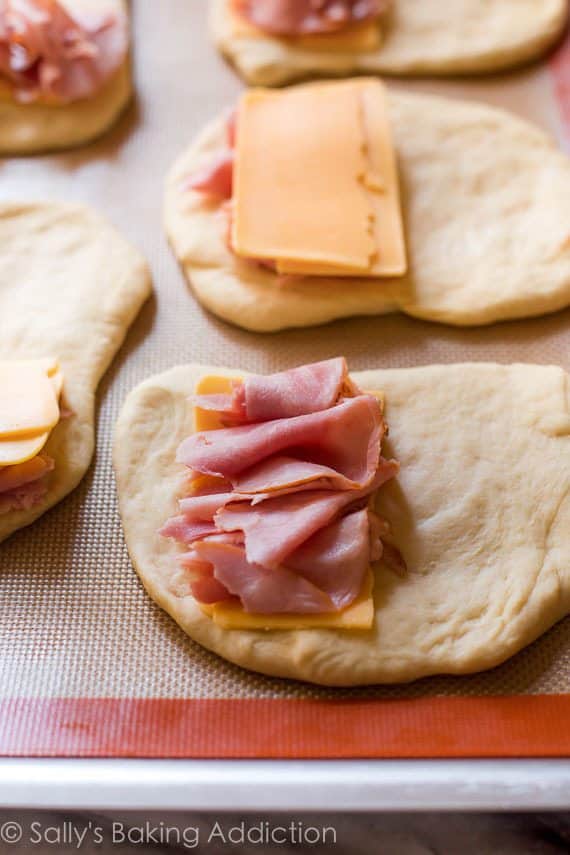
- Divide the dough. Slice the dough in half, then cut each half into quarters. You’ll have 8 pieces of dough for 8 homemade pockets!
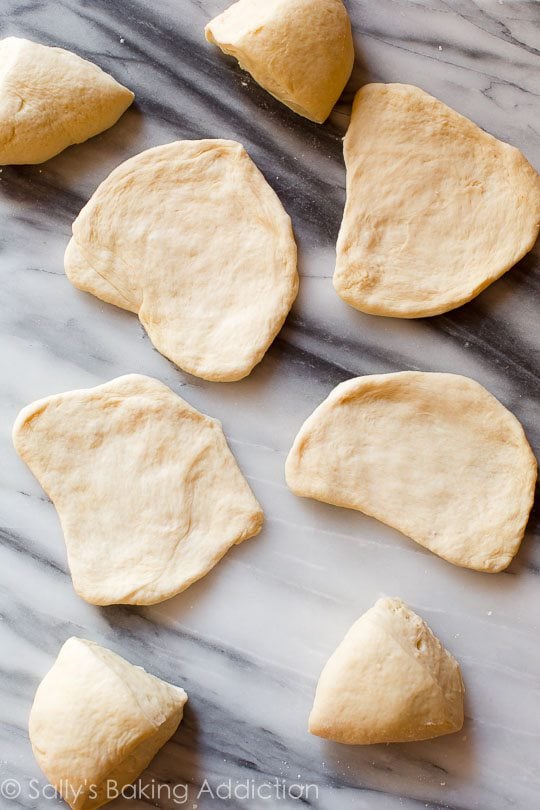
- Shape the dough. Flatten each piece of dough into a rectangle (about 4×6 inches). Place the shaped dough onto prepared baking pans.
- Add ham & cheese. Place the ham and cheese on one side, then fold the dough over to fully enclose it. Do you like this combination? If so, try my ham & cheese scones too.
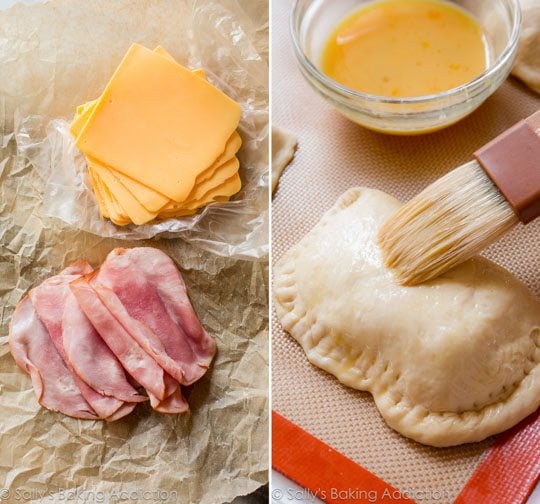
- Pinch the edges. Seal the pockets up as best as you can—use a fork to crimp the edges.
- Brush the sides & tops with egg wash. The egg wash helps brown the tops and gives each a beautiful sheen.
- Cut 2-3 slits into the tops.
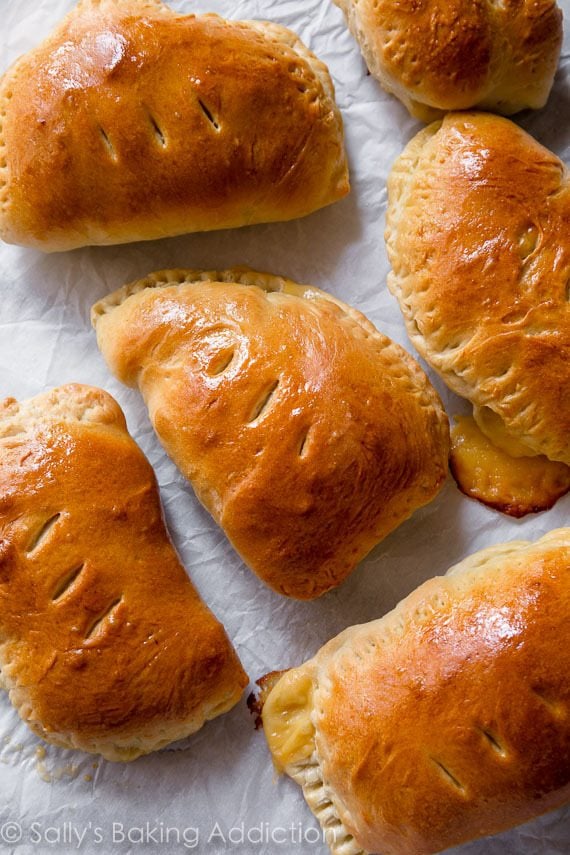
- Bake.
- Enjoy! They are incredible right out of the oven because the bread is crispy on the outside and soft on the inside. It’s a miracle in hand-held form. Just be careful when taking that first bite because the center is very hot!
Two Other Filling Ideas
You can use this dough and recipe to make other flavors of homemade pockets. Here are two of my favorites.
- Chicken, Broccoli, & Cheese Filling: Mix 2 cups chopped cooked broccoli, 1 cup chopped cooked chicken (such as rotisserie chicken), 1 cup shredded cheese, 2 Tablespoons sour cream or plain yogurt, plus a pinch of salt and pepper together. Spoon/spread onto the 1 side of your dough rectangles (as you do with the ham and cheese) before folding up/assembling.
- Pepperoni Pizza Filling: Spread 1 heaping Tablespoon of your favorite pizza sauce onto the 1 side of each dough rectangle (as you do with the ham and cheese). Divide 1 and 1/2 cups of shredded mozzarella cheese and 3/4 cup of mini pepperonis between each and layer on top of the sauce.
More Surprisingly Simple Homemade Breads
Print
Homemade Ham & Cheese Pockets
- Prep Time: 1 hour, 45 minutes
- Cook Time: 25 minutes
- Total Time: 2 hours, 15 minutes
- Yield: 8 pockets
- Category: Dinner
- Method: Cooking
- Cuisine: American
Description
Make freezer-friendly homemade ham & cheese pockets with this easy recipe!
Ingredients
- 1 and 1/3 cups (320ml) warm water (between 100-110°F, 38-43°C)
- 2 and 1/4 teaspoons (7g) Platinum Yeast from Red Star instant yeast (1 standard packet)*
- 1 Tablespoon (13g) granulated sugar
- 2 Tablespoons (30ml) olive oil, plus more for pan and brushing on dough
- 1 teaspoon salt
- 3 and 1/2 cups (about 450g) all-purpose flour (spooned & leveled)
- egg wash: 1 large egg beaten with 1 Tablespoon milk
Filling
- 8 slices cheese or 2 cups shredded (I use sharp cheddar)
- 16 thin slices deli ham or 2 cups cubed ham
Instructions
- Whisk the warm water, yeast, and granulated sugar together in the bowl of your stand mixer fitted with a dough hook or paddle attachment. Cover and allow to rest for 5 minutes. *If you don’t have a stand mixer, simply use a large mixing bowl and mix the dough with a wooden spoon or silicone spatula in the next step.
- Add the olive oil, salt, and flour. Beat on low speed for 2 minutes until combined.
- Knead the dough: Keep the dough in the mixer and beat for an additional 5 full minutes, or knead by hand on a lightly floured surface for 5 full minutes. (If you’re new to bread-baking, my How to Knead Dough video tutorial can help here.) If the dough becomes too sticky during the kneading process, sprinkle 1 teaspoon of flour at a time on the dough or on the work surface/in the bowl to make a soft, slightly tacky dough. Do not add more flour than you need because you do not want a dry dough. After kneading, the dough should still feel a little soft. Poke it with your finger—if it slowly bounces back, your dough is ready to rise. You can also do a “windowpane test” to see if your dough has been kneaded long enough: tear off a small (roughly golfball-size) piece of dough and gently stretch it out until it’s thin enough for light to pass through it. Hold it up to a window or light. Does light pass through the stretched dough without the dough tearing first? If so, your dough has been kneaded long enough and is ready to rise. If not, keep kneading until it passes the windowpane test.
- Lightly grease a large bowl with oil or nonstick spray—just use the same bowl you used for the dough. Place the dough in the bowl, turning it to coat all sides in the oil. Cover the bowl with aluminum foil, plastic wrap, or a clean kitchen towel. Allow the dough to rise at room temperature for 60-90 minutes or until double in size. (Tip: For the warm environment on a particularly cold day, heat your oven to 150°F (66°C). Turn the oven off, place the dough inside, and keep the door slightly ajar. This will be a warm environment for your dough to rise. After about 30 minutes, close the oven door to trap the air inside with the rising dough. When it’s doubled in size, remove from the oven.)
- Preheat oven to 400°F (204°C). Line 2 large baking sheets with parchment paper or silicone baking mats.
- Once risen, punch the dough down to release the air. Turn the dough out onto a lightly floured surface. Using a sharp knife, slice dough in half. Then slice each half into quarters. You’ll have 8 pieces of dough, as shown in the photo above. Flatten each piece with your fingers or use a rolling pin. You want each piece of flattened dough to be about 6 inches long and 4 inches wide. They don’t have to be perfect rectangles, as you can see in my photos! Transfer flattened dough to the baking sheets. Place the cheese (I fold the slice in half) and ham (2 slices for each) on top of the dough on one side, then fold the other side over top. Pinch the edges to seal as best you can. Use a fork to crimp the edges. Brush the tops and sides of each pocket with egg wash, then slice 2-3 slits in the tops for air vents (use a super sharp knife to do that).
- Bake the pockets for 20-25 minutes, or until the tops are golden brown. Make sure to rotate the baking sheet once or twice during bake time. Remove pockets from the oven and allow to cool on the pan until ready to handle and serve.
Notes
- Make Ahead & Freezing Instructions: The pockets can be made through step 5 then covered and refrigerated for up to 1 day. Then bake as directed. You can also freeze the baked pockets, which is what I do. After the pockets cool, wrap them individually in aluminum foil and freeze. Then microwave for 2-3 minutes on high or bake at 350°F (177°C) for 20 minutes. No need to thaw. To make just the dough ahead of time, see freezing and thawing instructions in my pizza crust post.
- Overnight/All Day Instructions: Prepare the dough through step 3, but allow the dough to rise for 8-12 hours in the refrigerator. (If it needs to be in the refrigerator for longer, use cooler water in the dough which will slow the dough’s rise and allow for more time.) The slow rise gives the dough wonderful flavor! When ready, continue with step 4. If the dough didn’t quite double in size overnight, let it sit at room temperature for 30-45 minutes before punching down (step 5).
- Special Tools (affiliate links): Stand Mixer or Glass Mixing Bowl with Wooden Spoon or Silicone Spatula | Dough Scraper | Baking Sheet | Silicone Baking Mats or Parchment Paper | Pastry Brush
- Yeast: Red Star Platinum yeast is an instant yeast. You can use active dry yeast instead. The rise time will be at least 90 minutes. Reference my Baking with Yeast Guide for answers to common yeast FAQs.
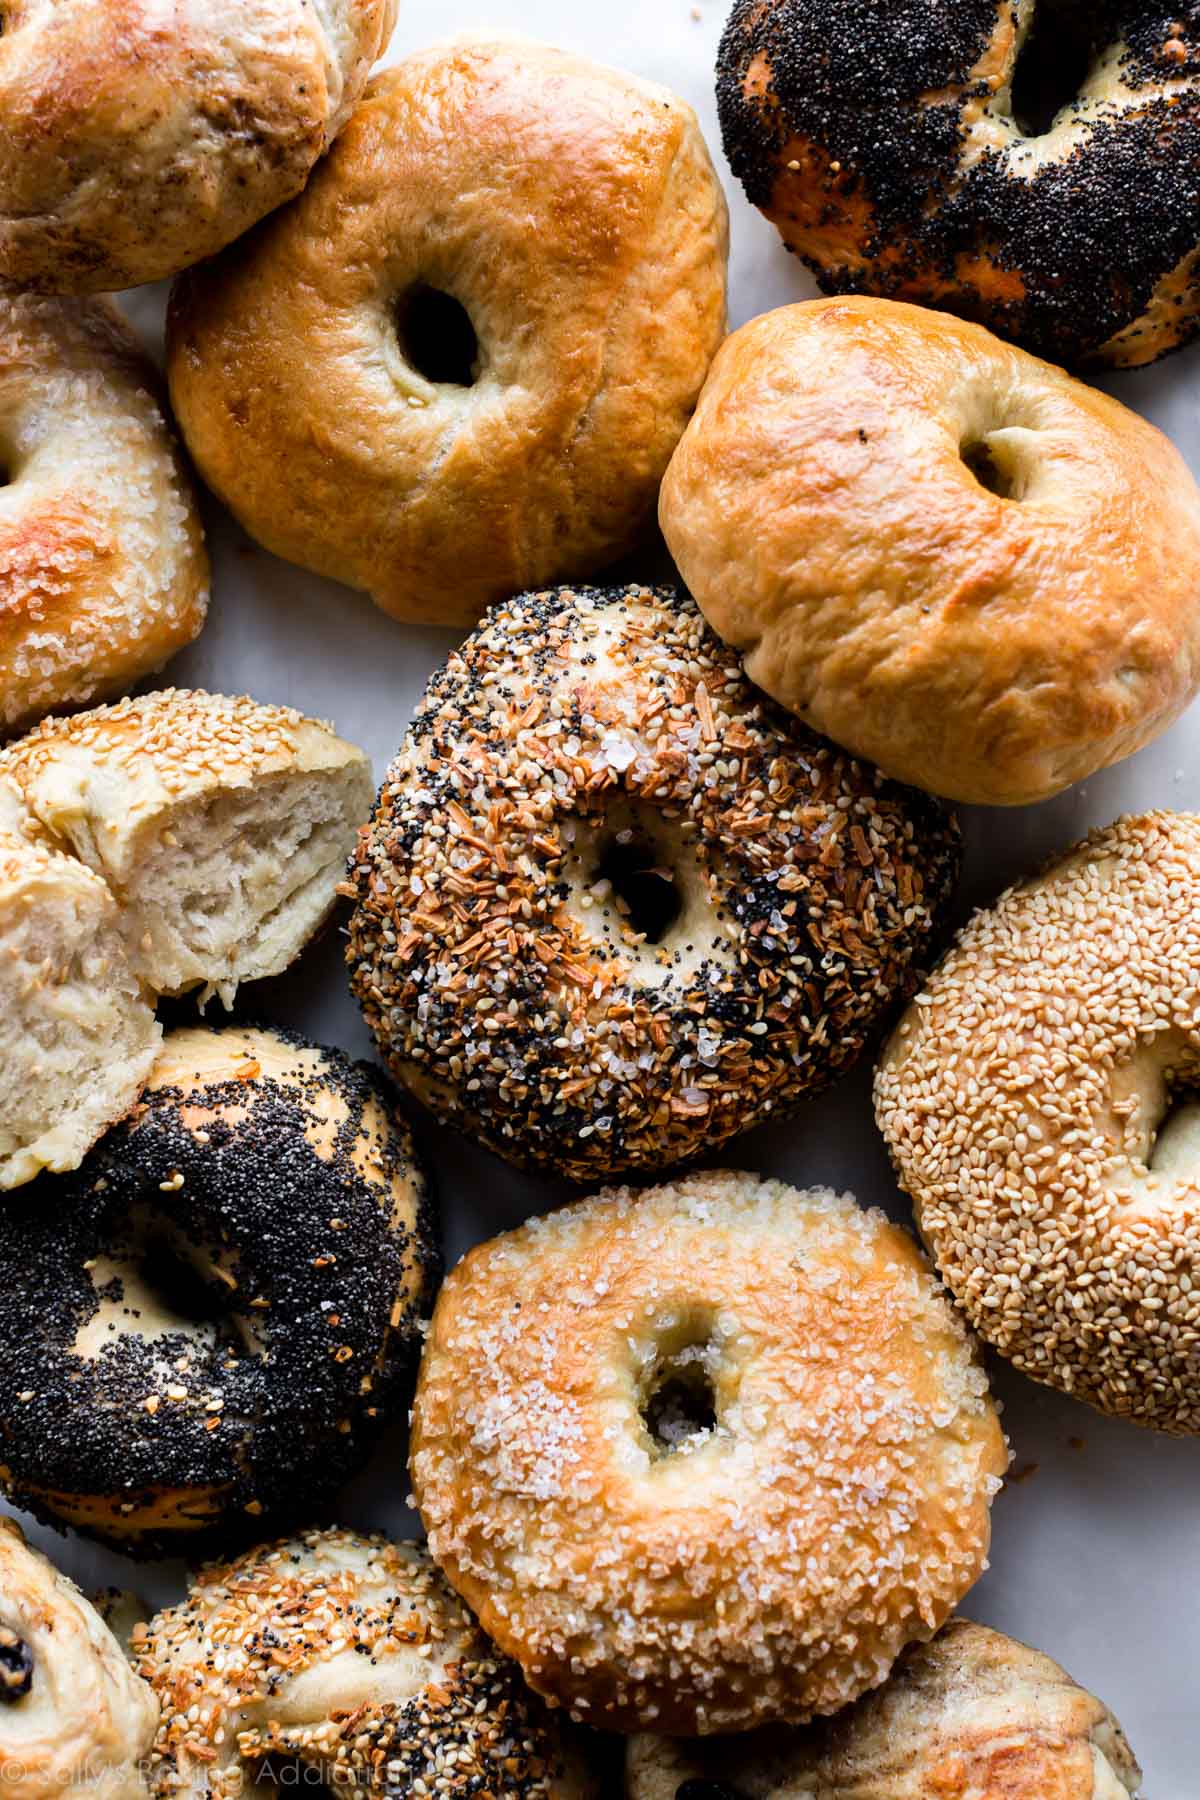
Also freezer-friendly: homemade bagels! I take you through each step, so you fully understand what’s happening. They’re surprisingly simple to make, too!


Reader Comments and Reviews
You have the craziest delicious compilation of recipes!
Love this recipe! I really like how well they freeze.
Has anyone tried to do a breakfast version of this? Just wondering if scrambled eggs would reheat well after being in the freezer.
Thanks!
Love this dough. Made the ham ones. I ran out of ham so for a couple of them, I used Spam. Also made these using scrambled eggs, bacon and cheese. They were delicious!!
I never use all purpose flour because I don’t want to sacrifice nutrition for texture. Would you recommend trying these with your whole wheat pizza dough? They look so yummy and my pizza is turning out awesome!
Hi Jim, that should work just fine!
Can I use rhodes rolls from freezer?
Hi Donna, we haven’t tested it, but let us know if you do.
I have become a kitchen slave! This is a very popular recipe in a house of 7!
This dough for the pockets is amazing! I add garlic powder, onion powder and 1/2 cup of fresh parm every time! Literally soooo delicious. Have stuffed with many different things- including rotisserie chicken, cream cheese and artichokes together. I live in Maryland and tons of my friends who live here use your website! (We are all mom’s). Is there a way we could pay to host you for an event?
Loved this recipe! We did shredded cheddar and ham in four of them and mozzarella and pepperoni in the other four. Also, I threw all of the dough ingredients in my bread maker on the dough setting and it turned out great!
This recipe sounds fabulous for a super bowl party! Can I safely double the dough recipe?
Hi Eve, for best results, we recommend making the dough twice rather than doubling. Hope they’re a hit!
Awesome very tasty and easy to make
I have made thrse twice. my two teenage grandsons gobbled them up and my adult daughter raved about them i also had one or two , I had to try them, right? these were easy to make and i used uo leftover ham gradsons want more so off I go to buy some ham, coldcuts this time . Delicious, thank you the receipe!
This dough was really easy to work with-it didn’t tear when folding over, and the edges sealed well even though I only used my fingers to seal the edges. I added steamed broccoli to some of the pockets. Yummy!
If I were to do a sweet version, what fillings would you recommend? My family loves dessert pizzas & these would be a handy on the go breakfast idea.
Hi Heidi, you could try the fruity filling from these berry turnovers or even the cream cheese filling from these breakfast pastries (see the recipe for the cream cheese filling in the recipe Notes section). Let us know what you try!
it doesn’t look like you do a second rise after you have filled the dough and crimped together…is that true? Seems like it might make the dough very dense? I am anxious to try these, but am used to do doing 2 rises…once as a blob and once after shaping…for my doughs.
Hi Deb, that’s correct. If you let the shaped pockets rise, they will puff up too much. This is actually like my pizza dough recipe, which only has 1 rise too (and a short rest period).
Would this recipe work with almond flour instead of all-purpose?
Hi Kristen, we haven’t tested this recipe with GF flour, but many of our readers report success using 1:1 swaps with brands like Bob’s Red Mill or Cup4Cup. If you give anything a try, we’d love to know how it turns out for you.
I’d like to make a big batch of these and freeze ahead of time for school lunches. My child won’t have access to a microwave at school and would have eat them cold or room temp at lunch time. What would be the best way to defrost one to put in a lunch box?
Overnight in the fridge? Microwave in the morning?
Any other savoury recipes that you recommend for taking to school?
Thanks!
Hi Cari, we would thaw overnight. We love these homemade cheese crackers and pepperoni pizza rolls! You can browse all our savory recipes here 🙂
These are great! Made them tonight with pepperoni and mozzarella, left off the egg wash, and brushed with garlic butter and parsley flakes after they were done. Fantastic! I’m thinking of doing a breakfast version for my kids. Not sure what fillings I will try first but these would be awesome and easy to make for a quick breakfast on the go!
This is a fantastic recipe. Most recipes for “hot pockets” call for puff pastry and my husband is not a fan. We made these with chicken and another time with pizza fillings. My 3 year old didn’t want the pockets so I left one flat and put pizza toppings on it. Awesome versatility!
Excellent recipe!! I was looking for a “hot pocket” type recipe and hoping that my little people would enjoy it. Bam! This was wonderful! Most recipes called for puff pastry which my husband doesn’t like so this was awesome! Ill definitely be keeping this one for easy make ahead lunches or to take during long days out.
How long do you think I would want to parbake these if wanted to freeze them and have them ready to drop in my air fryer for an easy lunch? I can experiment of course, but tips and hints would be awesome.
Hi Josh, we haven’t tested with these ham & cheese pockets so can’t offer much advice. Maybe 7-10 minutes? Let us know what you try!
can the ham and cheese hot pockets be left out for a picnic lunch? if so how long can they be left out?
Hi Irene, these ham and cheese pockets are best served hot, so we don’t recommend leaving them outside for too long.
Made these today and my husband and I loved them! The dough is so easy and deliciously light. I’ll need to practice for a better seal on the pockets though, as some of the cheese ran out. Any tips to share? Also do cheese slices or grated cheddar make for a tastier bite? Thank you SO MUCH for your recipes. I really enjoy trying your bakes! Cheers for 2022!
Hi Wendy, Try moistening the tips of your fingers and sealing them shut with your hands instead of a fork. Let us know if you try that again and it works better! We use a sharp cheddar – either slices or shredded cheese!
My dough raised too much; my pockets turned out like regular bread (you could not even see the fork markings) although it was delicious! What did I do wrong?
Can you make this with bread flour instead of all purpose flour? Would I need to increase/decrease the hydration levels?
Hi Claire, You can substitute the same amount of bread flour for a chewier crust, but you may need to add a couple extra Tablespoons of water since bread flour contains more protein than all-purpose flour.
Sally, these are very tasty. I made them
for dinner tonight for my husband and I and we both enjoyed them. We will have the left overs for lunch tomorrow . I made 6 instead of 8, so mine were a little bigger and they didn’t look as pretty as yours, but still delicious!
My family of 8 love these! I just put their individual favorite pizza toppings in. My husband loves;cooked, crumbled ground beef, cheese, onions, pickles, BBQ sauce (not too much just to coat beef or else it runs out of bun). My daughter loves chicken & Alfredo sauce with peppers. This dough is by far the best I’ve tried & been making these for 20+ years!
Hi Sally! What would the bake time be if I made mini pepperoni pizza ones? Like, half the size of the normal ones?
Hi Marvel, you can certainly make these smaller, but we’re unsure of the exact bake time. It will be less, but keep a close eye on them. Hope you enjoy them!
Can I use already prepared dough? Pizza dough perhaps.
Hi Joanne, absolutely.
Hiii–I make these every week but no matter what I do, the bottoms burn to char within 10 minutes. They’re still delicious regardless of this but…any tips?
Hi Bec, it’s possible that your pans might be causing the bottoms to overheat quickly, but you can try either moving the pan down a rack (away from the heating element) or cooking for longer on a lower temperature. Hope this helps!
Moving the pan to bottom of the oven 100% fixed the problem, thank you so much!
Hi- I want to refrigerate and pop in the oven in 4 hours. Do I wrap each calzone Individually in plastic wrap to prevent another rise and bring to room temp before placing in the oven?
How should I proceed .. thanks very much !
Hi Ann, no need to wrap the calzones individually. You can simply place them on a baking sheet and then gently cover the sheet with a clean dish towel or plastic wrap. Enjoy!