

If you enjoy making from-scratch versions of store-bought favorites, you will love these homemade frosted brown sugar cinnamon pop tarts. Like my chocolate pastry tarts recipe, this is a fun baking project you can absolutely handle if you follow my thorough step-by-step instructions. I have plenty of step photos for you, too.
I originally published this recipe in 2014 and have since added new photos and a few more success tips.
One reader, Tara, commented: “Such a fun project this week, thank you for sharing! We love this flavor pop tart but it’s so nice to make them at home. These were easier than I thought once we got going! ★★★★★”
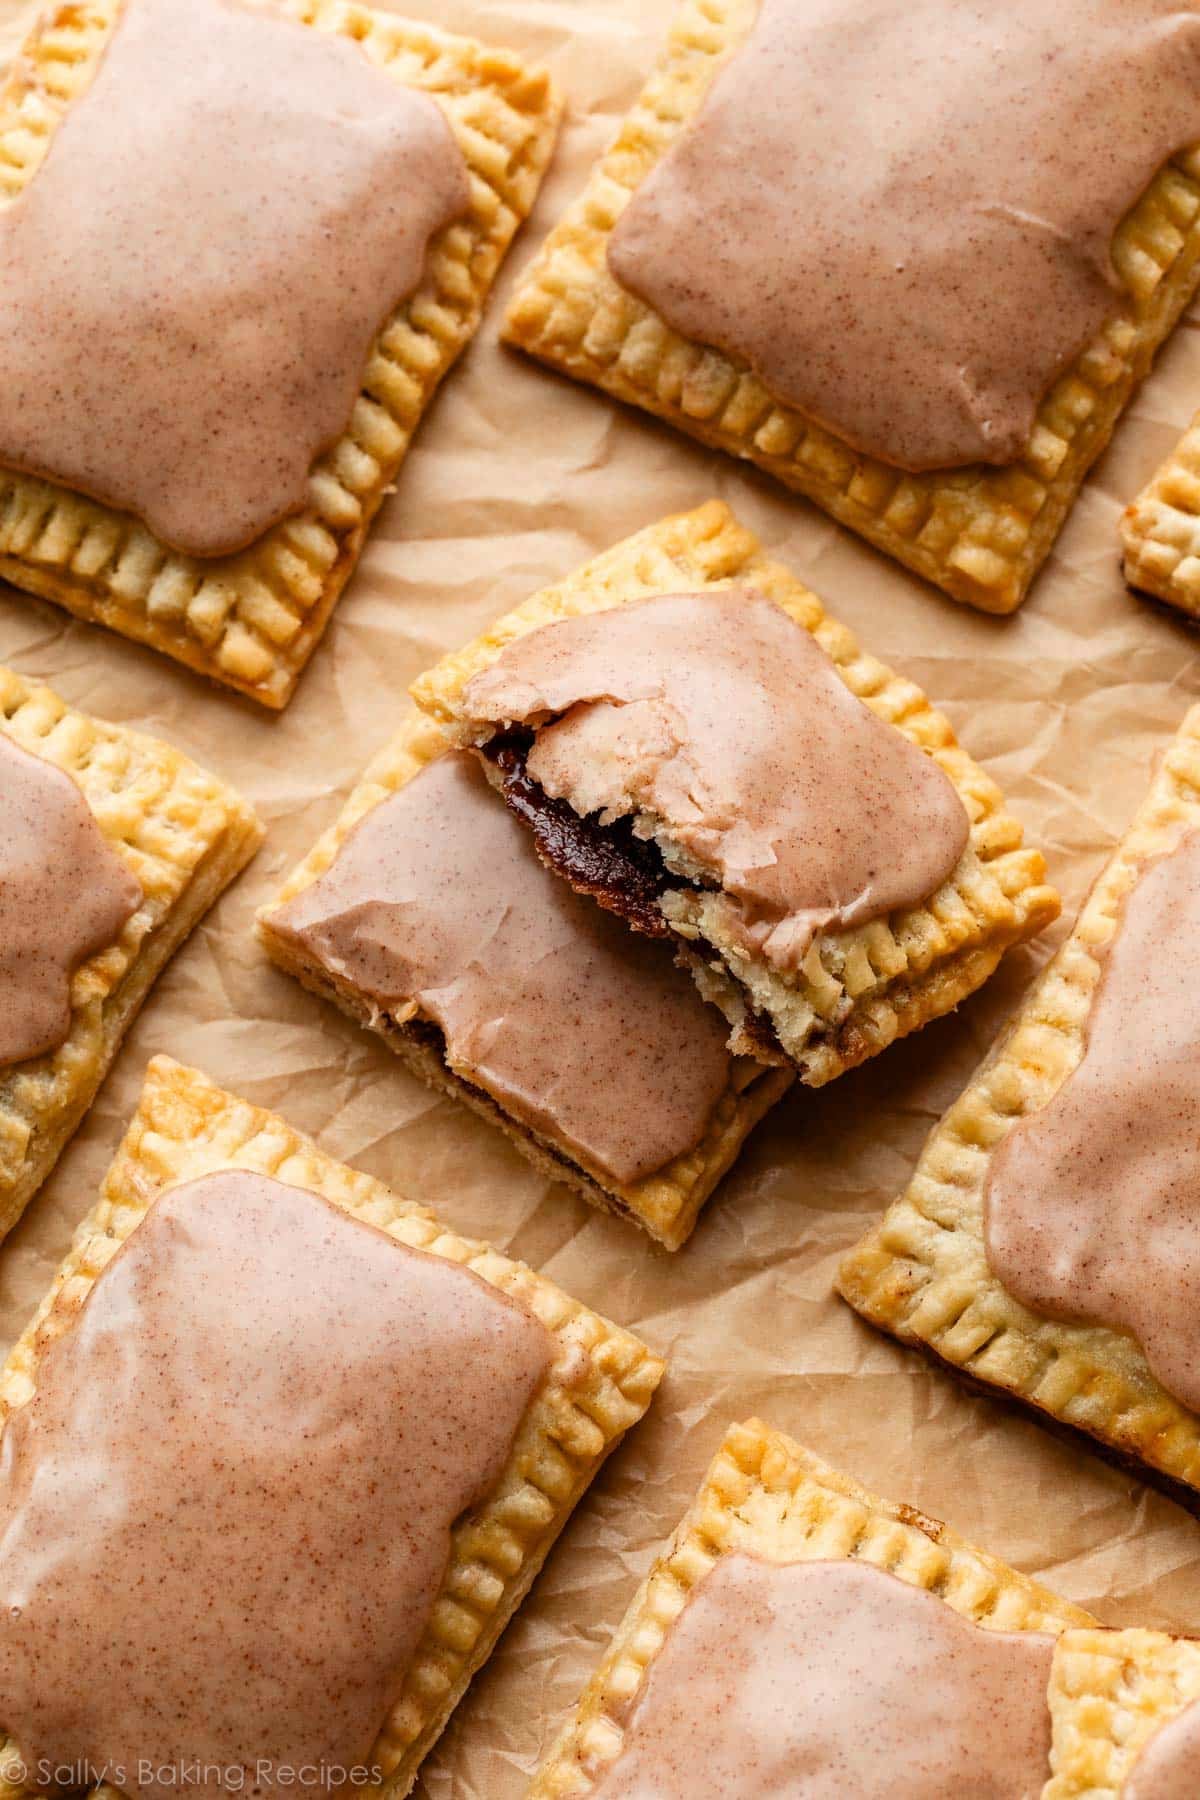
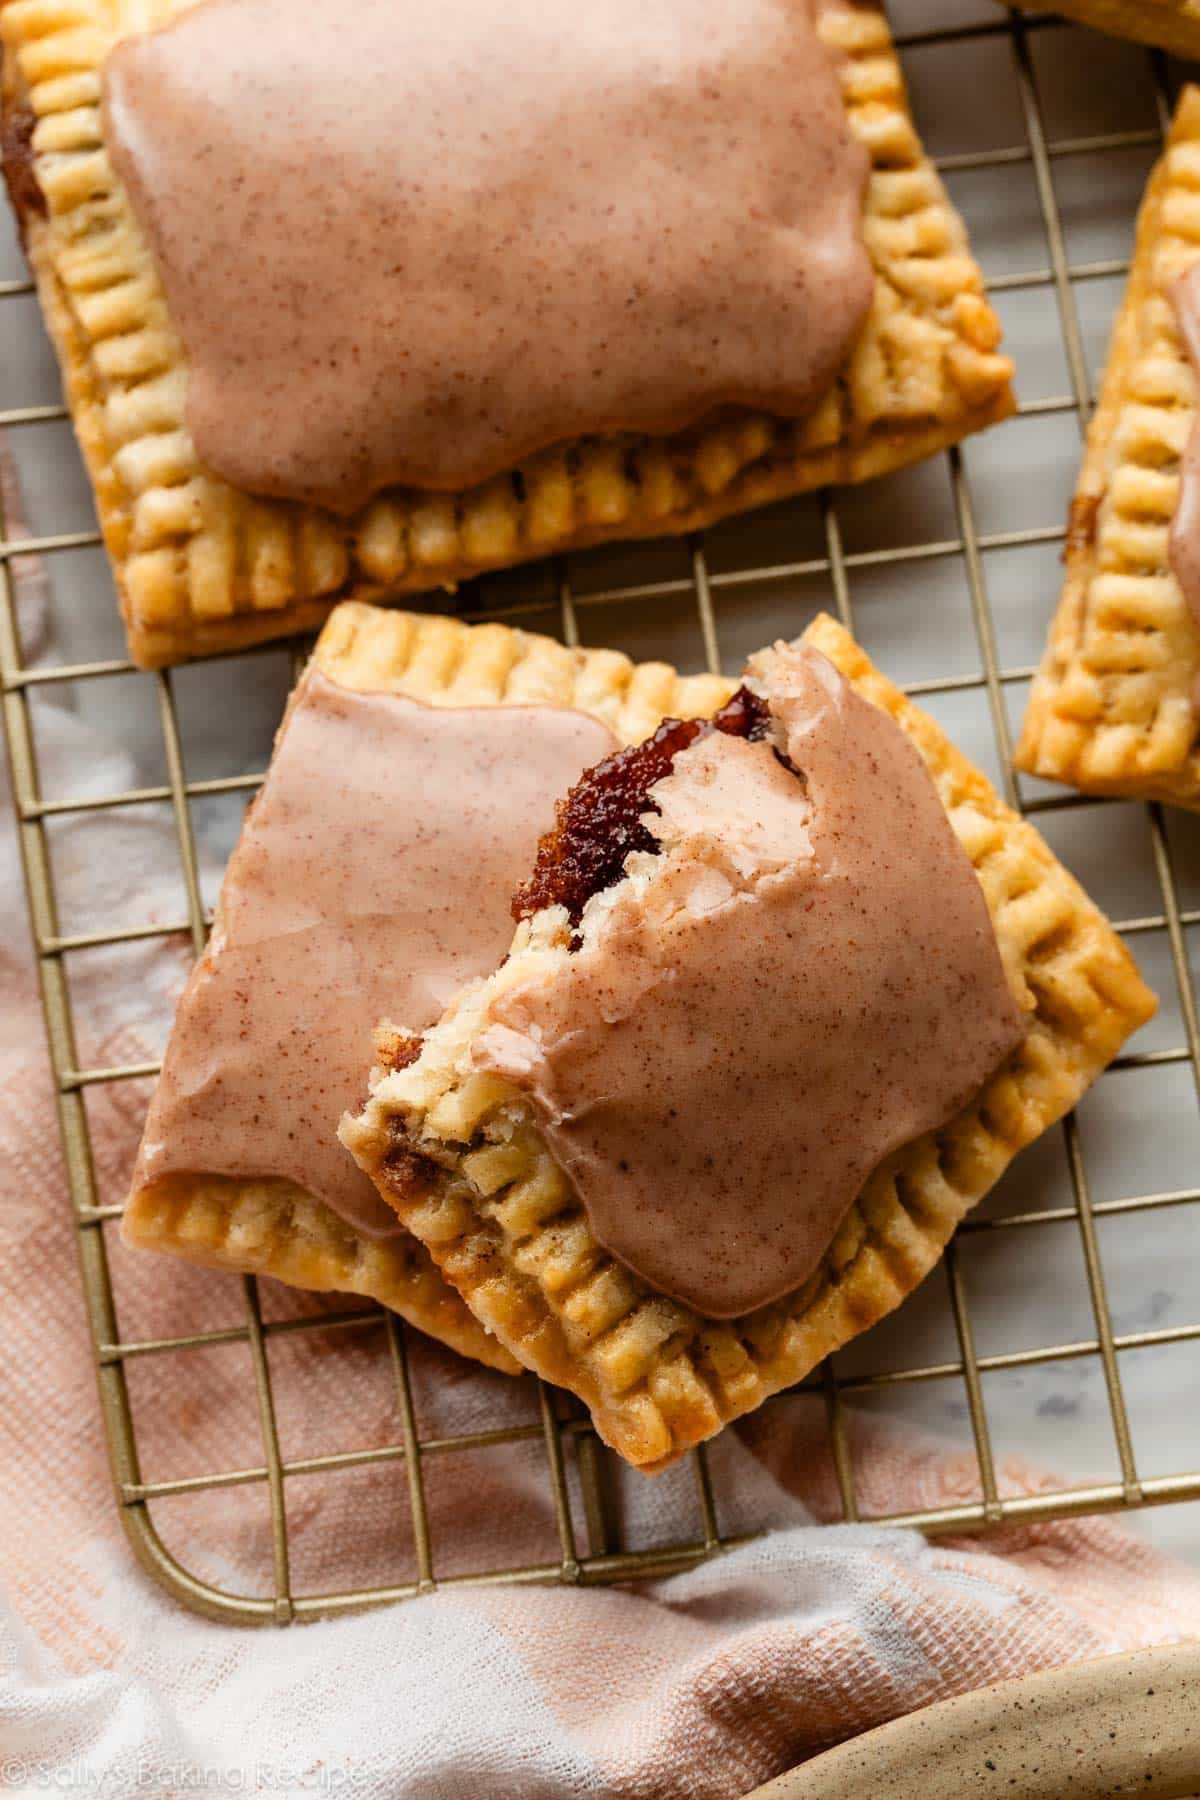
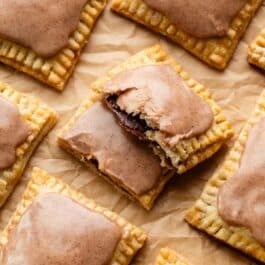
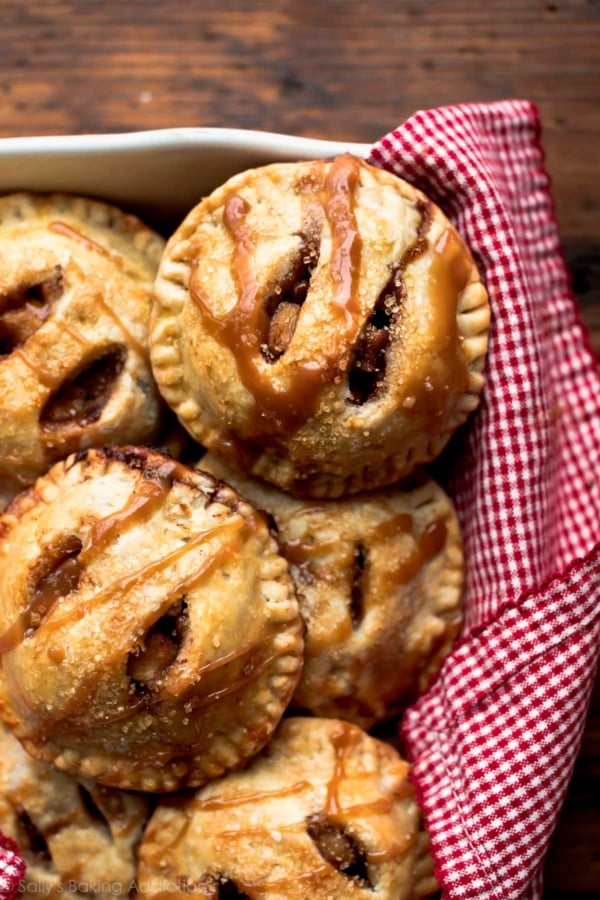
Allow me to introduce you to a homemade version of the all-time best pop tart flavor in the history of time. Frosted Brown Sugar Cinnamon—the toaster pastry that puts all other toaster pastries to shame. (Although chocolate pop tarts are a close second!)
These Brown Sugar Cinnamon Pop Tarts Are:
- Filled with brown sugar and cinnamon, and topped with a sweet cinnamon glaze
- Encased in buttery, flaky pie dough, like these apple hand pies
- Best after they have completely cooled
- An intermediate baking recipe and doable for most home bakers
- Definitely a dessert, but feel free to indulge as a special breakfast treat
My homemade pop tarts taste just like the original, but better. You don’t get a flaky, slightly crumbly, all-butter-crust with store-bought pop tarts. You just get… crumbles.
And you get about twice the amount of filling with my homemade version. And none of the preservatives or mystery additives.
Making pop tarts at home, 100% from scratch, isn’t the quickest. It’s not impossible, nor should this recipe intimidate you… but you have to take your time, read all of the instructions before beginning, and practice patience. There are quite a few steps, but I have plenty of photos to walk you through it. (I feel the same way about homemade eclairs… a labor of love, but totally worth it!)
Here’s what you need:
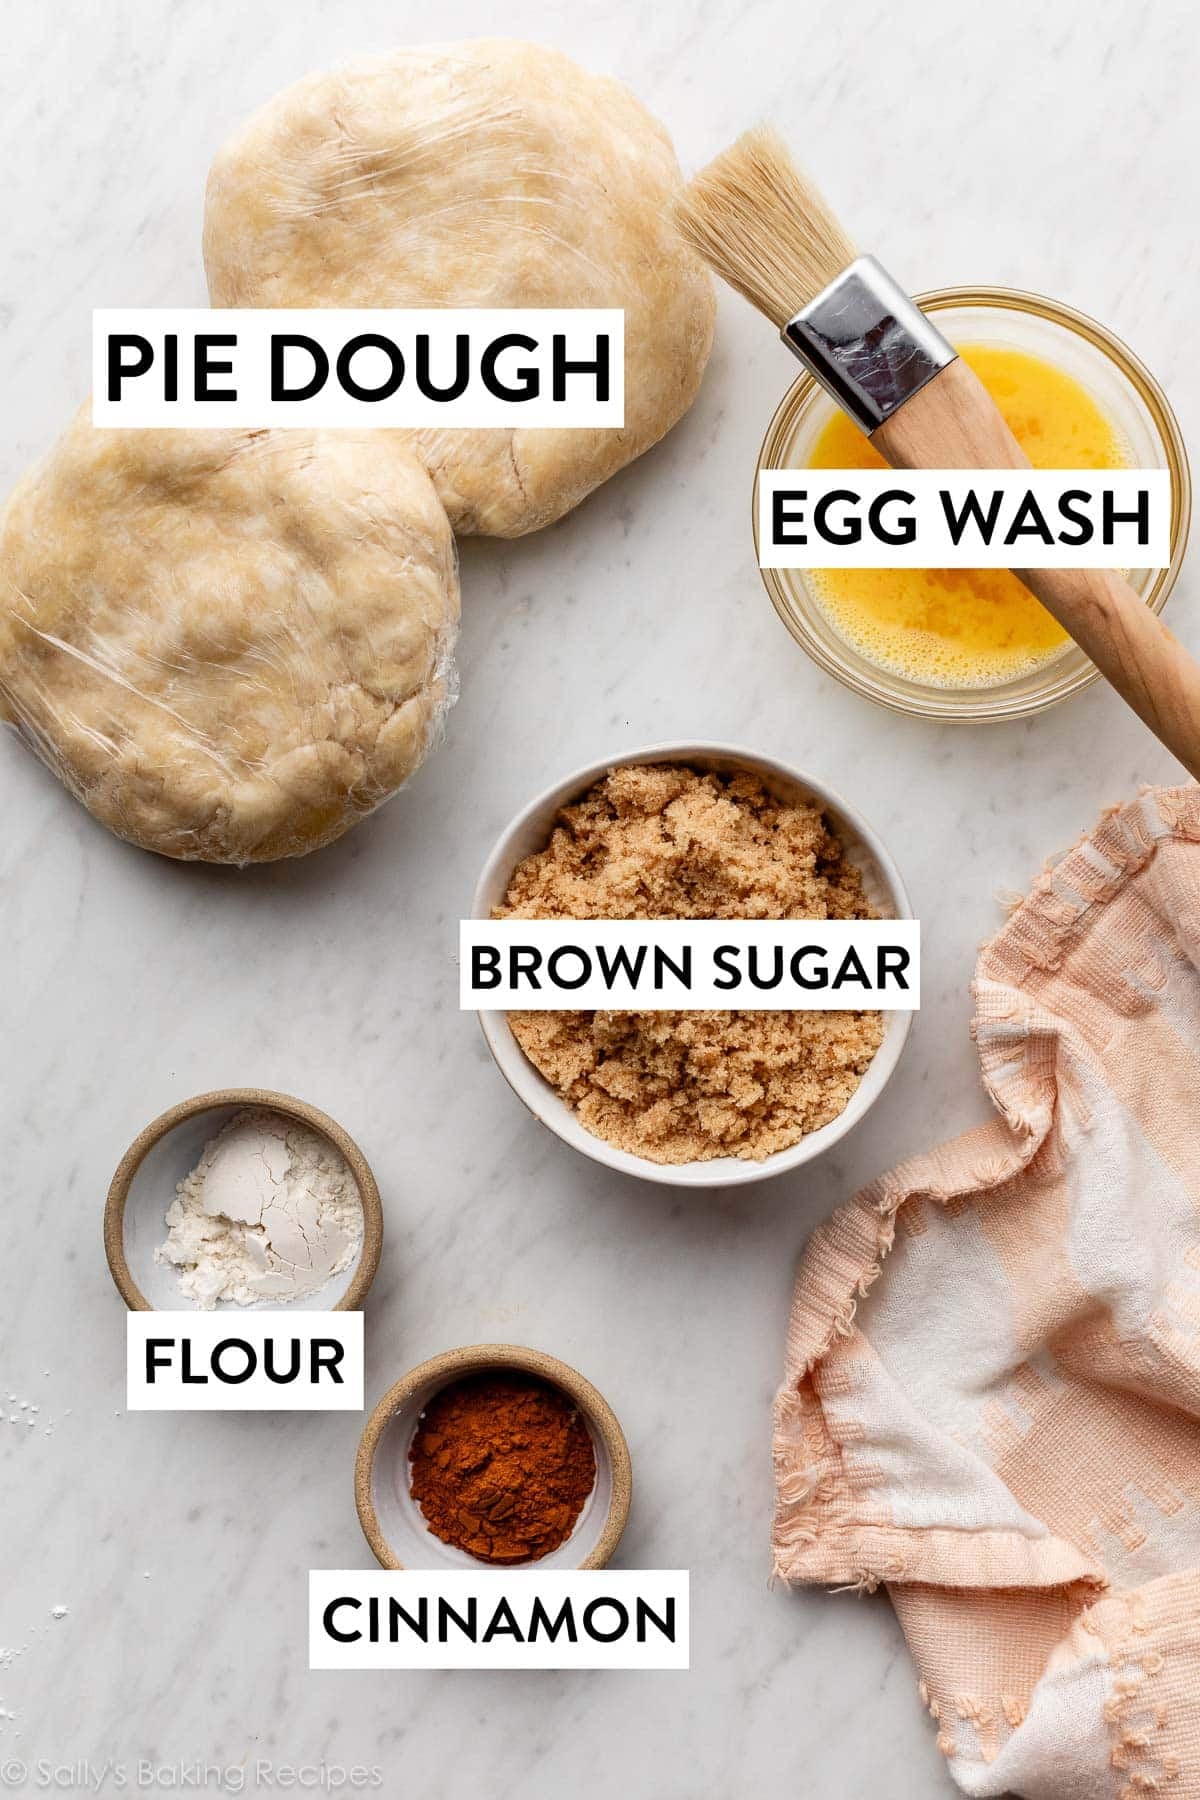
Start With the Pie Dough
Step 1 is to make the pie dough, which needs to chill for at least 2 hours before rolling out. I always make it a day (or even a couple days) ahead of time, so it’s ready to go on the day I want to make these pop tarts.
I recommend using my butter pie crust. This crust, while gloriously buttery and flaky, is sturdy enough to bake in different shapes and designs. I also have a shortening & butter pie crust recipe you could use instead; that one holds wonderful shape because shortening has a higher melting point than butter.
Either one works for this recipe.

Both dough recipes yield 2 crusts, and you’ll use both crusts today to produce 9 pop tarts.
How to Assemble Homemade Pop Tarts
After the 2 discs of dough have chilled for at least 2 hours, remove one from the fridge. Roll the disc into a rectangle about 1/8th-inch thick—about 9×12 inches in total size. Trim off the sides of this rectangle as needed. A pizza cutter is really helpful here.
Cut dough into 3 even sections, then cut each section into 3 sections. You’ll end up with 9 rectangles, each about 3×4 inches. These will be the bottoms of your homemade pop tarts.
Place each rectangle onto a lined baking sheet. Place the baking sheet in the refrigerator and repeat this process with the second disc of dough. These 9 rectangles will be the tops of your pop tarts.
Brown Sugar Cinnamon Pop Tart Filling
The brown sugar cinnamon pop tart filling is made with—you guessed it—lots of cinnamon and brown sugar, plus a touch of flour. That’s it, just 3 ingredients.
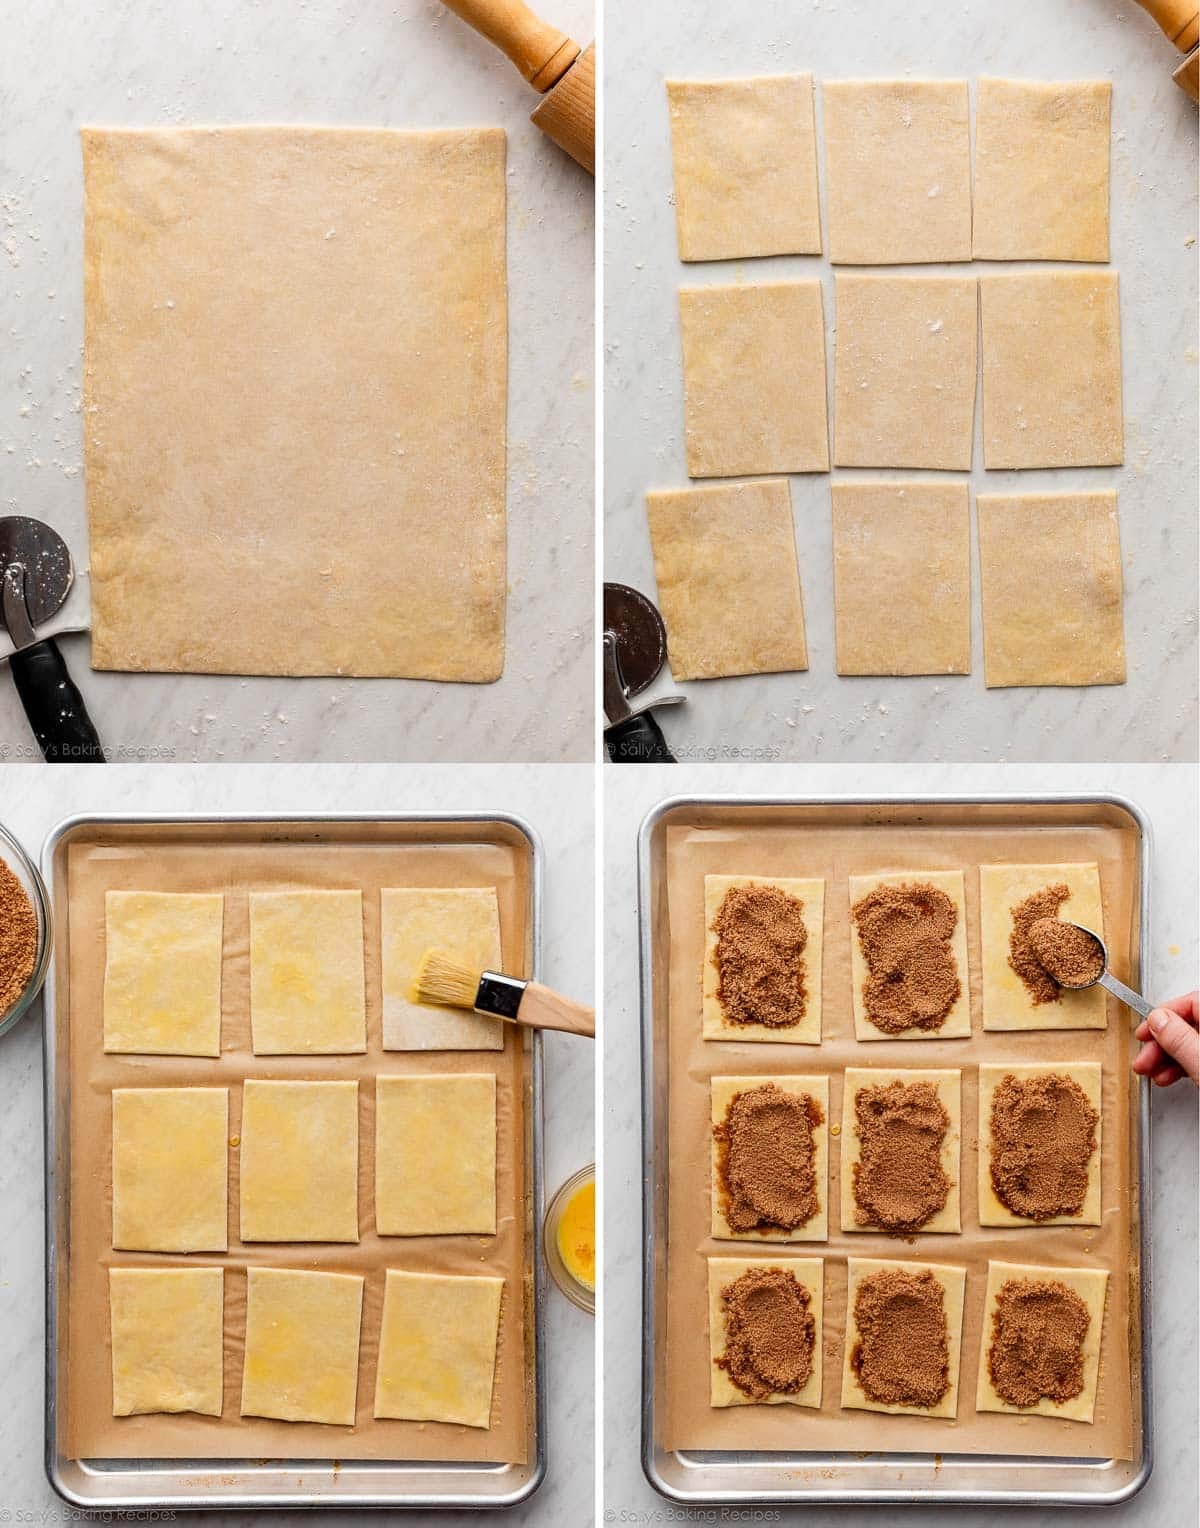
Before filling the homemade pop tarts, brush the rectangle “bottoms” with a little egg wash. This helps the filling melt down and stick to the crust. It also serves as the “glue” to bind the top and bottom crusts together.
Egg wash = 1 egg beaten with a little milk.
Place 1 heaping Tablespoon of filling onto each rectangle and spread it around. Leave a 1/4-inch border around the rectangle, as pictured above. Brush the rectangle “tops” of the pop tarts with egg wash. Place on top of the filled bottoms, egg wash-side-down.
Use a toothpick to poke holes in the tops of each pastry, which allows steam to escape. This helps your pop tart crust get nice and flaky, too. Crimp the edges with a fork to seal.
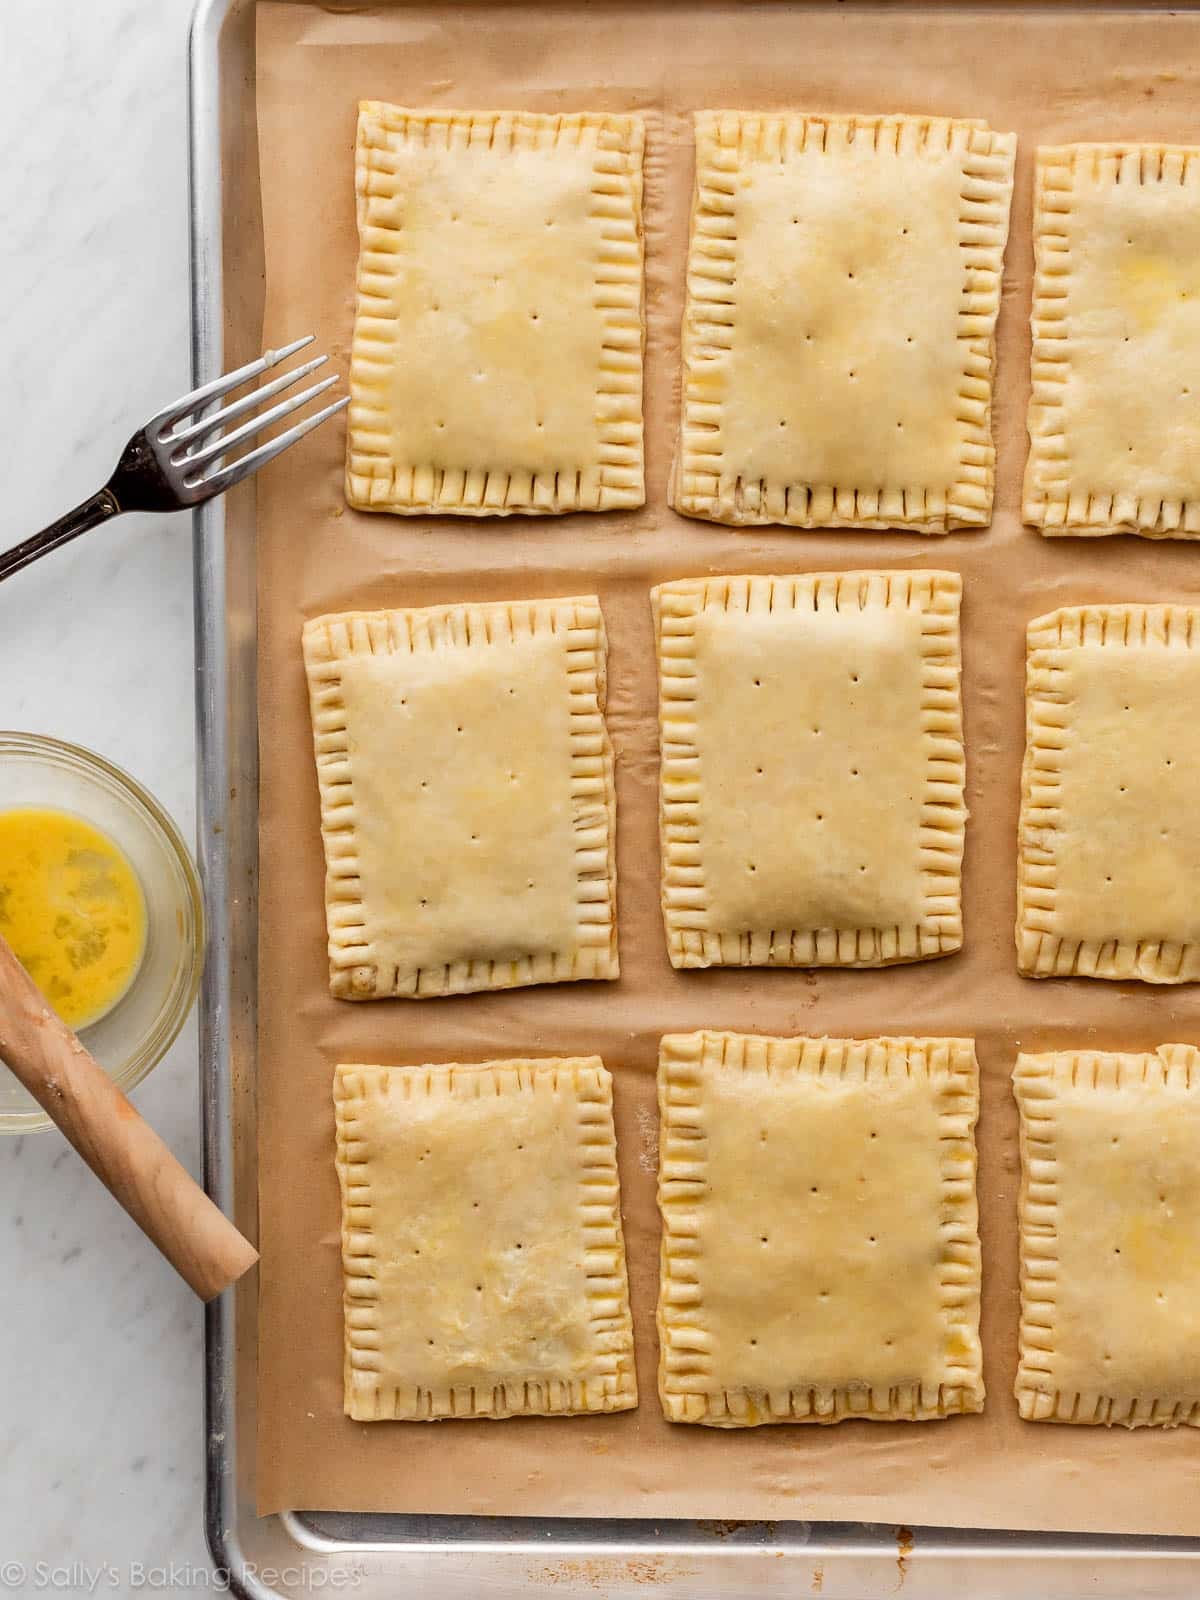
Now, place the ready-to-bake pop tarts in the refrigerator. This helps the pie dough firm up, since it has been out at room temperature for so long. Chill for 20 minutes while your oven preheats. Once chilled, brush the tops with egg wash. This is what gives your pastry crust that beautiful golden sheen.
Pop Tart Frosting
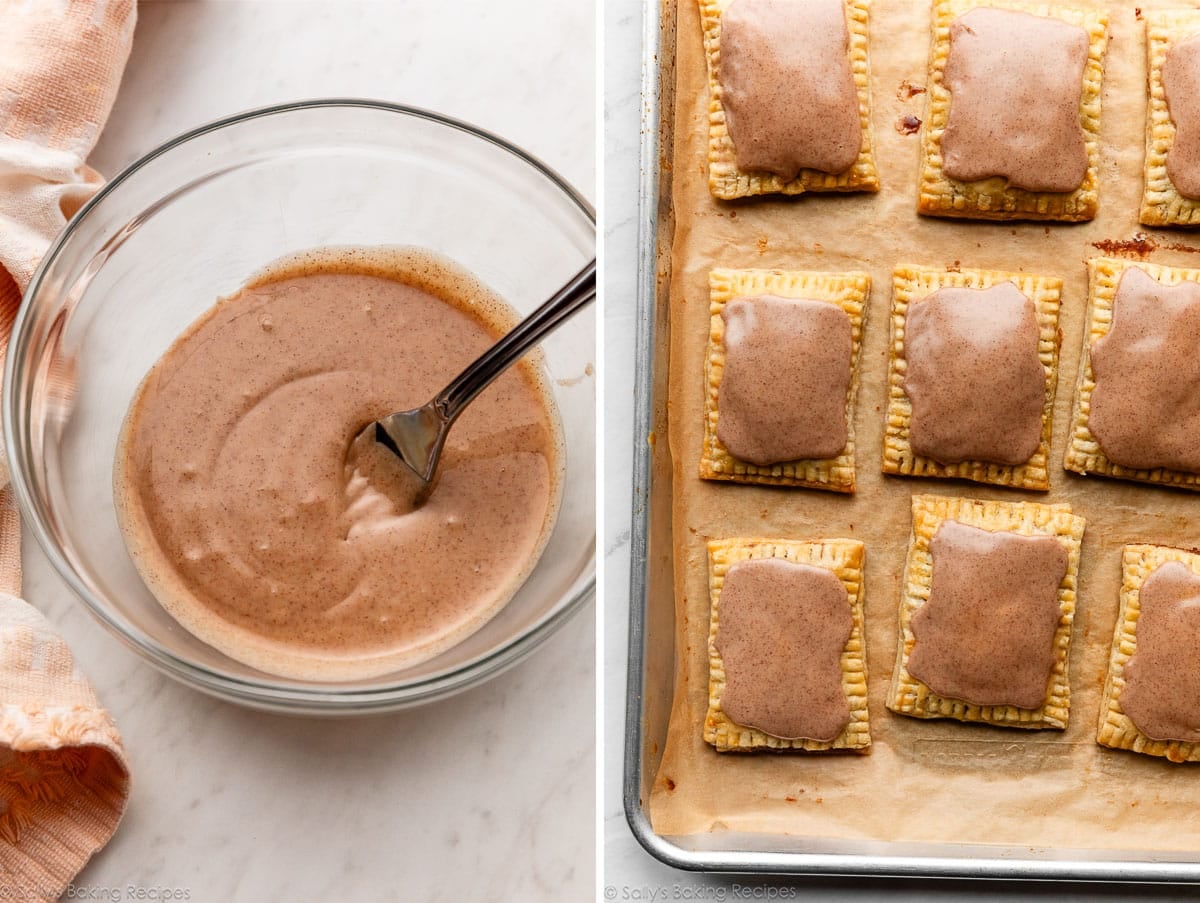
The icing is so simple. It’s more of a glaze, less of a frosting. And it’s absolutely incredible paired with the homemade pastry and brown sugar cinnamon filling.
Just a few ingredients: confectioners’ sugar, milk, cinnamon, and vanilla. Whisk until slightly thick, but still a little runny—you want it to be spreadable. Use a knife, icing spatula, or the back of a spoon to spread on top of each homemade pop tart.
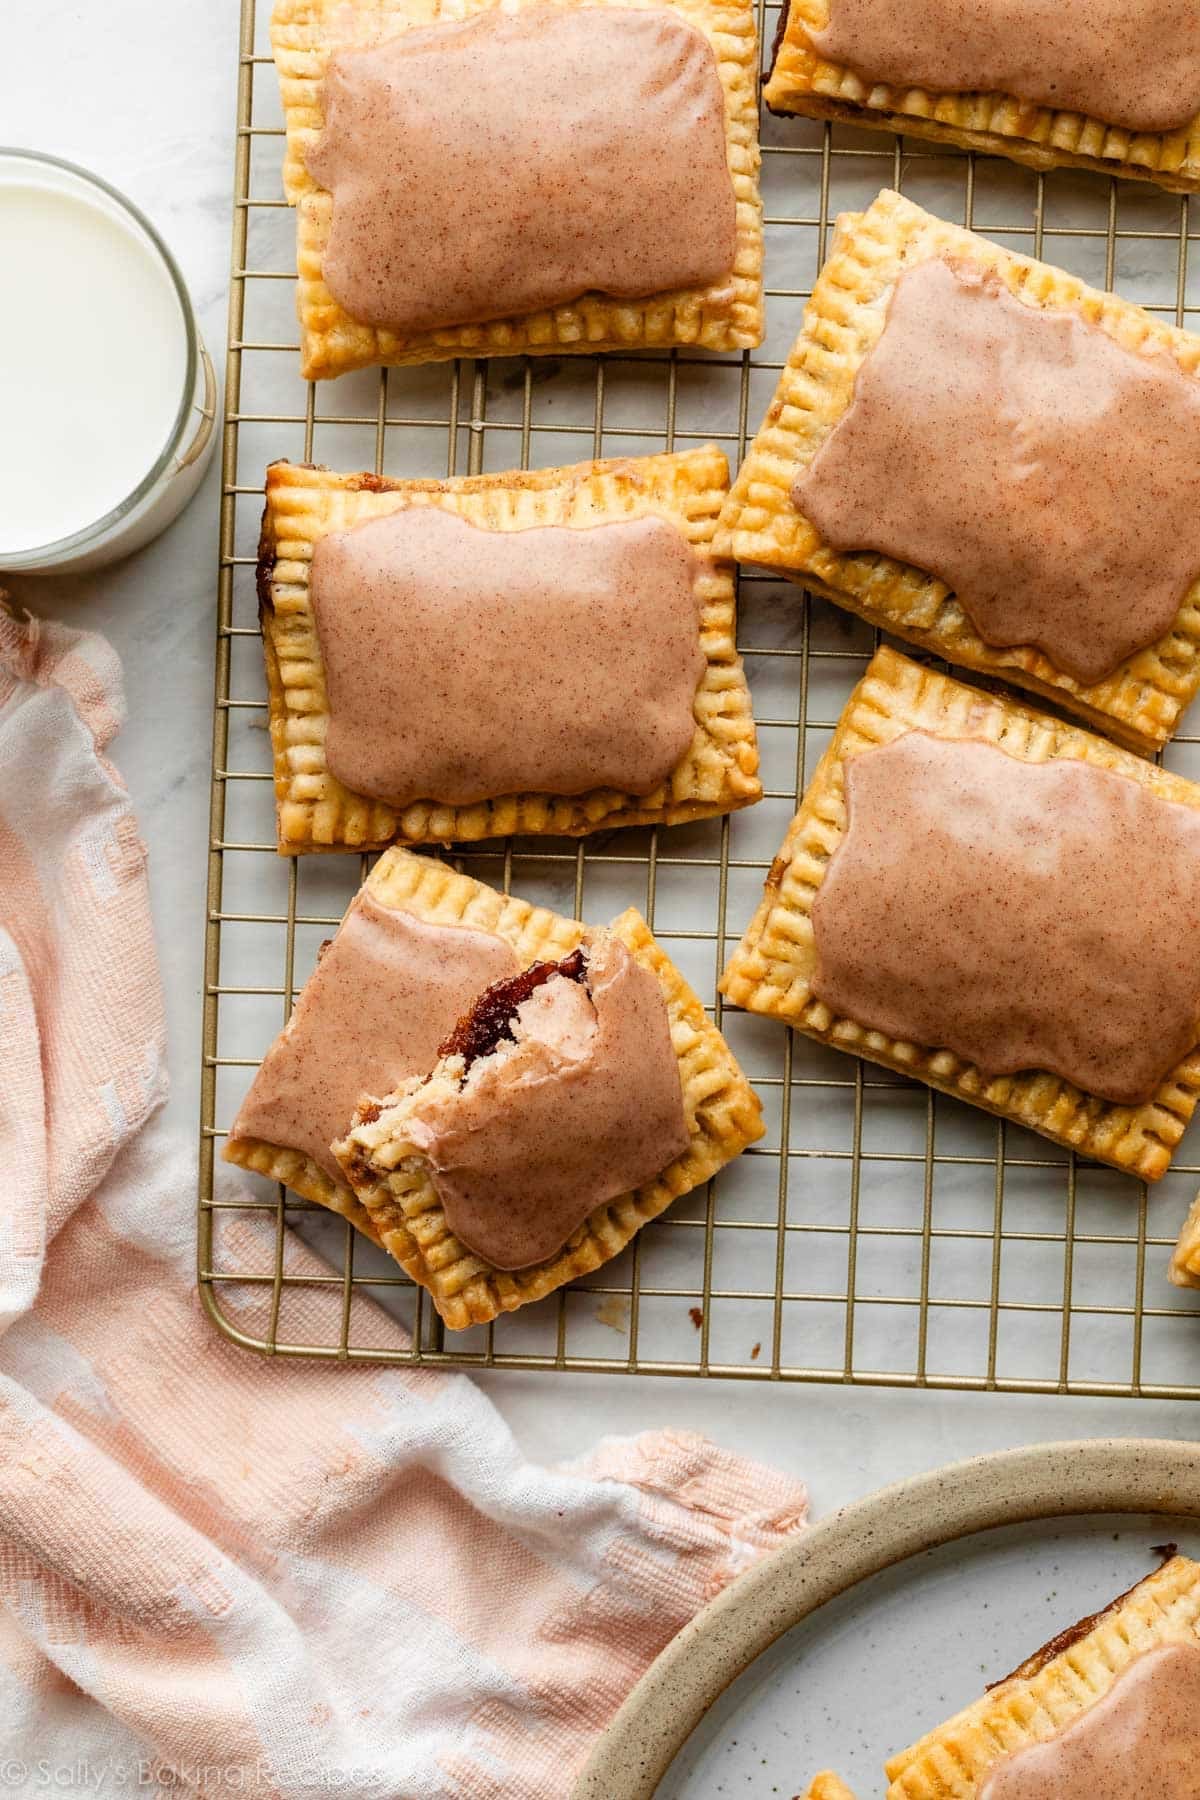
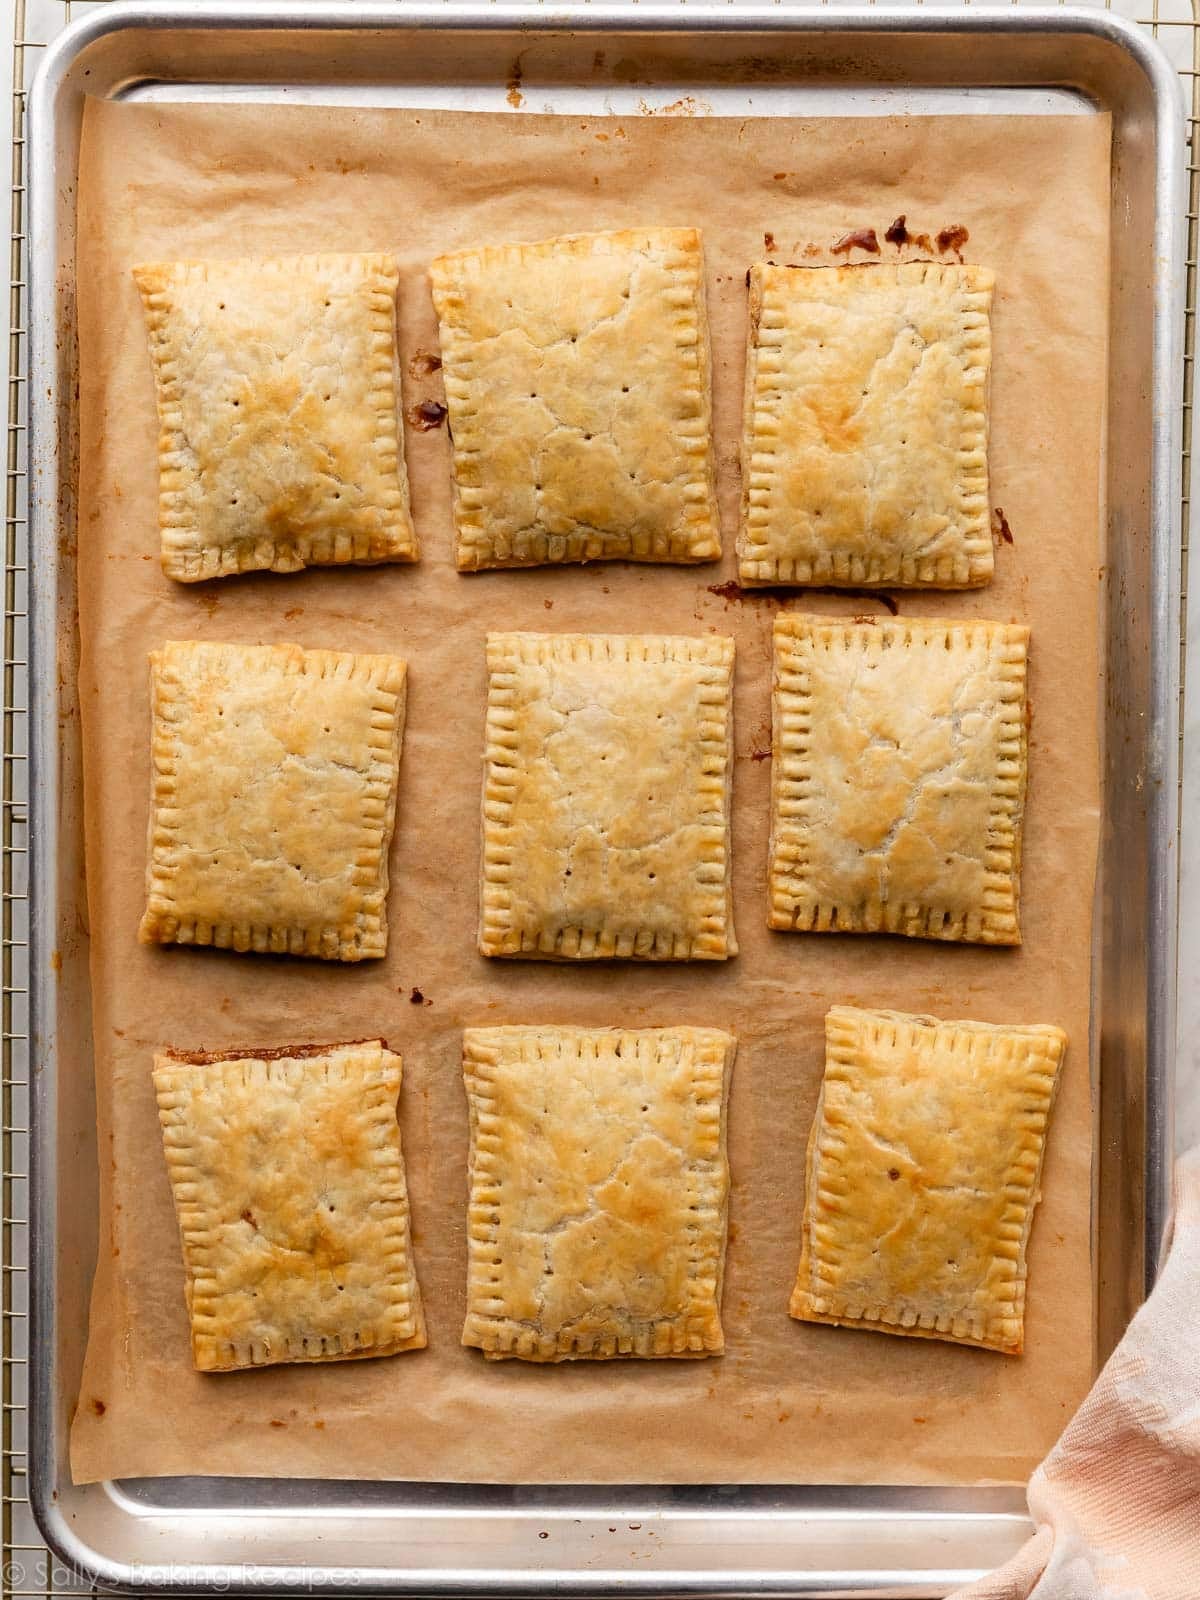
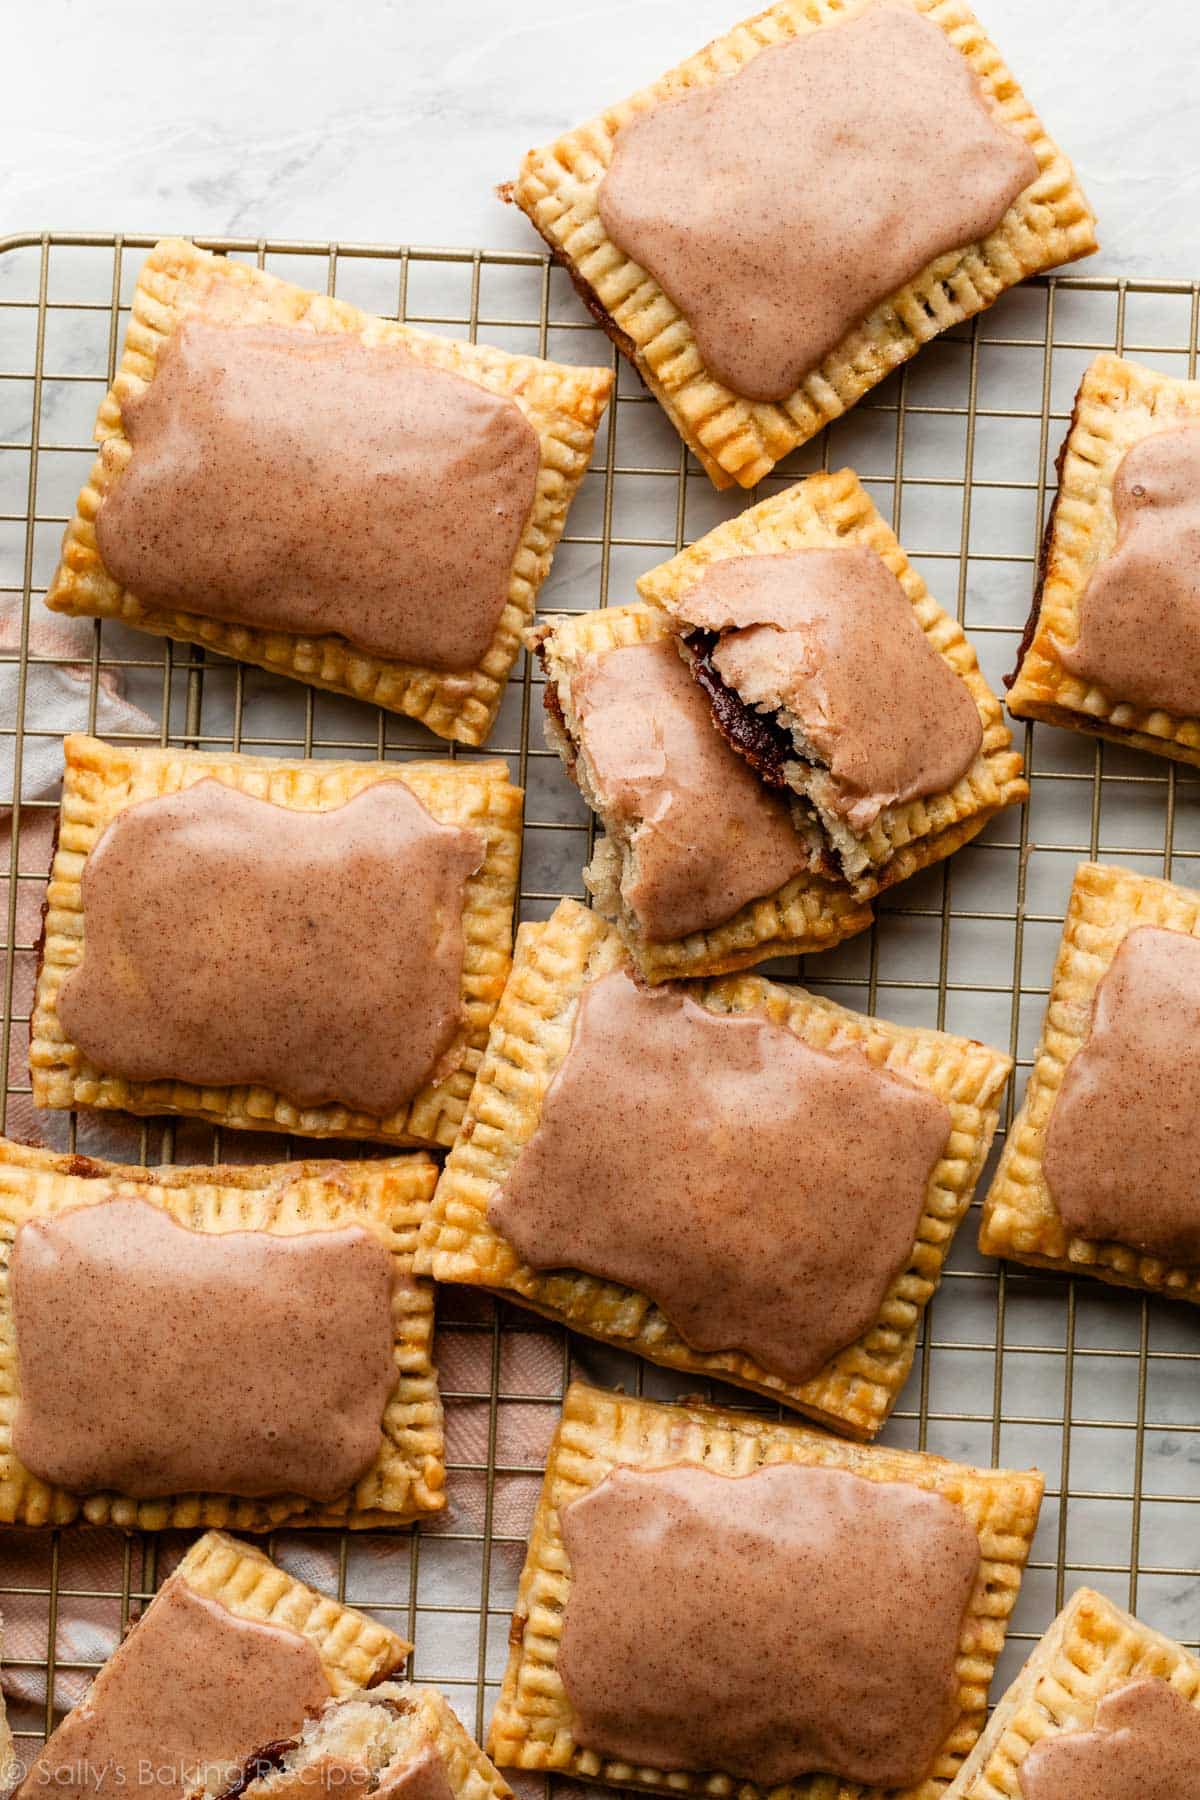
After completely cooling, the crust is deliciously flaky, the filling has thickened, and the icing has set. If you can manage the self control, wait to eat one until the icing has set (it takes about an hour)… yep, it’s practically impossible.
We actually love these homemade pop tarts even more the next day. The icing slightly hardens, making them taste much more like the originals.
These brown sugar cinnamon pop tarts are really more like hand pies. They taste like the store-bought pop tarts (only 1000x better!), but I don’t suggest putting them in the toaster to reheat. If you want to enjoy them warm, I recommend warming them in the oven for about 10 minutes.
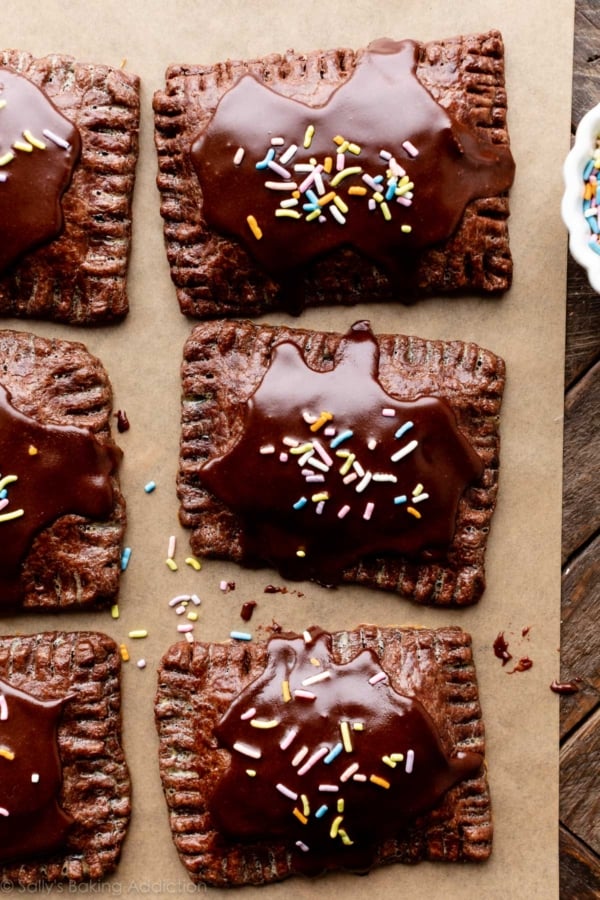
Yes. Instead of brown sugar cinnamon filling, try spreading 1 Tablespoon of preserves or a thick jam in the center of the bottom crust. You can top the fruit pop tarts with vanilla icing. Or try a Tablespoon of Nutella, apple butter, or lemon curd; or try these homemade chocolate pop tarts.
More Homemade Versions of Favorite Childhood Treats
If you love a homemade taste of nostalgia, try one of these copycat dessert recipes next!
- Chocolate Cake Roll (Swiss Roll)
- Oatmeal Creme Pies
- Cream-Filled Chocolate Cupcakes
- Rice Krispie Treats
Homemade Frosted Brown Sugar Cinnamon Pop Tarts
- Prep Time: 3 hours
- Cook Time: 25 minutes
- Total Time: 3 hours, 30 minutes
- Yield: 9 pop-tarts
- Category: Pastries
- Method: Baking
- Cuisine: American
Description
If you like Brown Sugar Cinnamon Pop-Tarts, you will love this homemade version. They’re made completely from scratch with REAL ingredients and an all-butter pastry crust. Read through the recipe before beginning, and view the step-by-step photos and video tutorial to help guide you. Be sure to chill the pastry dough for at least 2 hours as instructed in step 2.
Ingredients
Pastry
- 2 and 1/2 cups (313g) all-purpose flour, plus more as needed (spooned & leveled)
- 2 teaspoons granulated sugar
- 1 teaspoon salt
- 1 cup (16 Tbsp; 226g) unsalted butter, chilled and cubed
- 1/2 cup (120ml) ice water, plus more as needed
Filling
- 1/2 cup (100g) packed dark or light brown sugar
- 2 teaspoons ground cinnamon
- 1 tablespoon (8g) all-purpose flour
- egg wash: 1 large egg mixed with 2 teaspoons milk
Glaze
- 3/4 cup confectioners’ sugar (90g), sifted
- 1 Tablespoon (15ml) milk, plus more as needed
- 1/2 teaspoon ground cinnamon
- 1/4 teaspoon pure vanilla extract
Instructions
- For the pastry: This is the same recipe as all butter pie crust. See step-by-step photos in the pie crust post if you need visuals for making the pastry. I usually make the pastry the night before. In a large bowl, whisk together the flour, sugar, and salt. Using a pastry cutter or two forks, cut the butter into the mixture until it resembles a coarse meal (pea-sized bits with a few larger bits of fat is okay). You can also use a food processor, and pulse the mixture together, but be careful not to overwork the ingredients. Drizzle the water over the flour mixture, 1 Tablespoon at a time, and stir with a spatula after every Tablespoon has been added until the dough begins to form large clumps. Do not add any more water than needed.
- Transfer the dough to a floured work surface. Using floured hands, gently bring the dough mixture together into a ball. Avoid overworking the dough. If it feels too dry or is too crumbly to form a ball, dip your fingers in cold water and then continue bringing dough together. If it feels too sticky, sprinkle more flour on the dough and then continue bringing it together. Using a sharp knife or bench scraper, cut the dough in half. Gently flatten each half into 1-inch-thick discs. Wrap each tightly in plastic wrap. Refrigerate for at least 2 hours and up to 5 days (or in the freezer for up to 3 months).
- Roll out the dough: Remove 1 chilled dough disc from the refrigerator and allow it to sit at room temperature for 5 minutes. Keep the other disc in the refrigerator. After 5 minutes, place disc onto a lightly floured work surface, and roll it into a 9×12-inch rectangle, about 1/8 inch thick. Trim the sides as needed. With a pizza cutter or sharp knife, cut the dough into thirds and each third into thirds again. You will end up with 9 rectangles, each measuring 3×4 inches. Use a ruler to help make this easier and more accurate. Place each of the 9 rectangles onto a baking sheet lined with parchment paper or a silicone baking mat. The pop tarts will not spread much in the oven, so you may place them near one another. Place the baking sheet in the refrigerator.
- Repeat step 3 with the 2nd disc of dough to make 9 more rectangles. Place each of the 9 rectangles onto a baking sheet lined with parchment paper or a silicone baking mat. Place the baking sheet in the refrigerator.
- Make the filling: Mix the brown sugar, cinnamon, and flour together in a small bowl.
- Assemble the pop tarts: Remove 1 baking sheet of pastry rectangles from the refrigerator. These will be the bottoms of your pop tarts. Brush egg wash over the entire surface of each rectangle. Place a heaping Tablespoon of the filling into the center of each rectangle and spread it around with the back of a spoon, leaving a 1/4-inch border around the edges.
- Remove the 2nd baking sheet of pastry rectangles from the refrigerator. These will be the tops of your pop tarts. Brush egg wash over the entire surface of each top rectangle, then place each top rectangle, egg-wash-side-down, on the filling-topped bottoms. Use your fingertips to press firmly around the pocket of filling, sealing the dough well on all sides. Reserve remaining egg wash.
- Using a toothpick, poke 6 to 8 holes in the tops of each filled pastry to allow the steam to escape. You can, instead, use a knife to make a few small slits. Seal the edges tightly by crimping with a fork. Refrigerate the filled pop tarts, uncovered, for at least 20 minutes and up to 1 hour.
- Preheat the oven to 350°F (177°C). Once the unbaked pop tarts have chilled for 20 minutes, remove from the refrigerator and brush the tops with the remaining egg wash. Bake for 25–30 minutes or until golden brown, rotating the pan halfway through baking. Let the pop tarts cool on the pan for about 5 minutes, then transfer to a cooling rack to cool completely before icing.
- Make the icing: In a medium bowl, whisk together the confectioners’ sugar, milk, cinnamon, and vanilla. You want a thick glaze, but not too thick that it is hard to spread. If it’s too thick, add more milk, 1 teaspoon at a time, until it reaches a spreadable consistency. Spoon the icing on top of each cooled pop tart, and use the back of the spoon or an icing spatula to spread. The icing will set in about 1 hour.
- Store pop tarts in an airtight container at room temperature for up to 3 days or in the refrigerator for up to 5 days. To reheat, bake in a 350°F (177°C) oven for 10 minutes.
Notes
- Freezing Instructions: Baked and unfrosted pop tarts freeze well, up to 3 months. Thaw in the refrigerator or at room temperature. To reheat, bake in a 350°F (177°C) oven for 10 minutes.
- Special Tools (affiliate links): Glass Mixing Bowls | Pastry Cutter | Silicone Spatula | Rolling Pin | Pizza Cutter | Baking Sheet | Silicone Baking Mat or Parchment Paper | Pastry Brush | Whisk
- Pastry: Store-bought pie dough works here, but this homemade version creates that unique flaky, slightly crunchy yet tender texture you know and love from classic pop tarts. You could also use my shortening and butter pie crust if desired. Or feel free to use your own favorite pie crust recipe.
- Filling: Get creative! Use your favorite fillings instead of brown sugar cinnamon. You can use a thick fruit preserves or jam, Nutella, raspberry cake filling, lemon curd, or make chocolate pop tarts instead.
- Adapted from King Arthur Flour.


Reader Comments and Reviews
Filling setup rock hard after cooling. Any idea why?
Hi Chris, We’ve never had that happen as the butter in the dough usually keeps the filling very soft. Was your brown sugar fresh and soft? If it was toward the end of the bag and was hard and dry that certainly could have been the problem. If you try it again you can try to mix a little warm milk (just 1-2 TBS) to make it more of a paste. We haven’t tested it that way but it should help!
So delicious! A little fiddly to make but so delicious! I heated in the toaster on bagel setting so the glaze side wouldn’t melt and it was perfect. A few puffed up, so next time I’ll make bigger holes in the top crust, and I ended up with lots of extra filling. I did notice that the pop tart recipe says 3/4 cup shortening but your pie crust says 2/3. I used 3/4 and the dough was VERY soft so will use 2/3 next time. Thank you!
These Pop Tart-like pastries were really fun to make. A bit labor intensive, as far as steps and planning, but pretty easy to make overall. Plus, it’s nice you can customize the flavor profile with both the dough and the filling. I was distracted and ended up cutting the first disc of dough into sixteen pieces, so I ended up making eight mini-tarts. I then cut the second disc in to twelve pieces, making six larger ones. So it was a nice variety. I ended up finishing them with colored sprinkles, to make them extra festive! So far, they’ve been a HUGE hit. I sent some of them to work with my husband and everyone said they were great – warming them up to enhance the flavor. I’ll make these again, for sure.
So delicious! A little fiddly to make but so delicious! I heated in the toaster on bagel setting so the glaze side wouldn’t melt and it was perfect. A few puffed up, so next time I’ll make bigger holes in the top crust, and I ended up with lots of extra filling. I did notice that the pop tart recipe says 3/4 cup shortening but your pie crust says 2/3. I used 3/4 and the dough was VERY soft so will use 2/3 next time. Thank you!
This recipe was great! One question, with my second batch, the filling hardened up. Any idea as to what might have caused the brown sugar and cinnamon filling to become hard, like toffee hard? Thanks for everything!!!
Hi Sara, We’ve never had that happen as the butter in the dough usually keeps the filling very soft. Was your brown sugar fresh and soft? If it was toward the end of the bag and was hard and dry that certainly could have been the problem. If you try it again you can try to mix a little warm milk (just 1-2 TBS) to make it more of a paste. We haven’t tested it that way but it should help!
Could you sub a different filling? I’ve been dying to make pastries with some guava paste I have.
Hi Kate, Definitely!
I’m so excited to make these for my brother for Christmas. He loves PopTarts, esp the brown sugar cinnamon. Eats them all the time (we all wish he wouldn’t, as many of the ingredients are fake/weird). I’ll let you know how it goes. LOVE your recipes!
Hi Sally, I love all your recipes! I made these last night and all 9 were gone by school this morning! I wanted to ask you why my glaze turned out quite a few shades darker than yours? I followed the recipe exactly. It was delicious, just darker in color. Thanks for sharing this home run recipe!
Hi Elizabeth! It could be a few things. Icing darkens as it dries/hardens. Certain brands of ingredients could also play a part in the final colors. And, the vanilla extract, depending on how potent, could also darken the icing more. We’re so glad you enjoyed this recipe!
Hey Sally! I have a question will it can I fill the pop tarts with nutella
Hi Aria, we can’t see why not! Let us know how it goes for you.
Just made these according to the recipe–except I just used straight butter for the crust due to laziness (I didn’t feel like running to the store for shortening). OMG. Very good. Excellent warm with the glaze. Will definitely make again.
I made these months ago and they were so good! Today I’m making more, except I’m making half of them with pumpkin butter and I’ll add pumpkin spice to the glaze. I can’t wait to share with my parents, husband & son. I’m thinking raspberry may be next. And strawberry.
Sounds amazing, Summer — let us know how they turn out for you!
I’m making these right now and when making the dough I was looking at your recipe for the pie crust because I wanted the step by step photos–I did not realize until my dough was already chilling in the refrigerator that the pop tart dough uses 1/4 teaspoon more salt than the pie crust dough. Is there any way to adjust for the salt that will be missing in the dough or should I just give up and use this batch of dough for pies and start this recipe over?
Hi Robyn, You won’t notice much of a difference with the extra 1/4 tsp of salt so you can go ahead and use that crust for these. Enjoy!
These turned out great! They are just like the store bought, but so much better. I made them for my dad’s birthday and they were a hit! And they were not that hard to make either. I will be making more soon!
I put mine in a teflon toaster bag and it reheated perfectly. 🙂 So delicious.
Hey Sally!! Do you have any recommendations for an egg wash substitute? (We have egg allergies in our house) Love your recipes!!!
Hi Kayla, you can skip the egg wash on the outside, and use water or milk instead to adhere the top and bottom crusts. Hope they’re a hit!
I filled mine with marshmallows dipped in melted butter, then tossed in cinnamon sugar. AMAZING.
I made these with raspberry pie filling and the cinnamon filling. As an easy substitute I bought pillsbury pie crust sheets and made 2 dozen in about an hour. So good!!
Is it normal not to need any ice water? I used cubed, frozen butter and chilled shortening as called for, but I pulsed the mixture in a food processor for about 10 seconds. It clumped together without any water. Does that mean it was overworked?
Hi Rachel, unfortunately it sounds like the dough was overworked and that your butter and shortening were a bit too warm. When making pie crust, we recommend using a pastry cutter or fork to ensure the dough doesn’t get overworked. Cold ingredients are also key to producing a light and flaky pastry crust. Hope this helps for next time!
These were tricky to roll out, but turned out beautifully! I wish there had been a bit more dough to work with, because after trimming my tarts ended up being smaller than 3×4, which made them harder to fill, and I had lots of extra filling mix, but that’s likely my in-expertise in working with pastry.
I made this recipe twice and it is amazing! My family ate them ridiculously quick! The only problem I have is that mine were ugly. I had problem with uniformity. I didn’t use a straight edge so I’m sure that was the real issue. They might not have been pretty but they sure were good!
Question please!! Could I use a fruit flavored jam for these? Would you also use the egg wash inside? I have made these for myself (yummmmm) but I have friends who prefer the fruit flavors, like strawberry. I appreciate the help, thanks Sally!!!
Definitely! A fruit flavored jam would be delicious. Yes, still use the egg wash inside. Hope your friends enjoy these!
Hi Sally! I can’t buy shortening where I live. Would you recommend substituting with something else (lard maybe?) or just following an all-butter pie crust recipe?
Thanks!
Hi Taylor, you can use our all-butter pie crust recipe instead!
loved making these! my glaze was about 4 shades darker though- and I followed your recipe exactly. not sure what the difference could have been!
I tried this recipe last night. My family loves it! I didn’t have a ruler to measure rectangles so I used a large round biscuit cutter for my pop tarts. Last night they tasted good but were even better this morning. They are just like pop tarts but better-fresher, flakier, more buttery! Thanks so much Sally. I can always trust your recipes!!! 🙂
This dough was very difficult to work with. Mine came out solid as rocks after the first trip to the fridge, making this take forever to roll out. We got there in the end, but even after 30+ minutes to get to room temp, the dough was too cold/hard to work with.
Sally, could I use this Cinnamon filling for scones instead of the cinnamon chips?
Hi Teresa, I haven’t tested it, but I can’t see why not!
Can these be made a day ahead and popped into the oven the next morning?
Hi Jonelia, At the end of step two you can refrigerate the dough for or up to 5 days.
I halved the recipe. I forgot to chill again before baking and worried they wouldn’t flake up. They did! Super good. Will roll put a little thinner next time, and add more filling. Other than that (my fault- not the recipe), I’m super pleased. The hubby loved them too. He is pretty picky also! Thanks.
I made these this weekend and they’re absolutely fantastic! 100x better than the real ones. Added a dash of vanilla extract to the pie dough as another commenter said he did. Can’t wait to make them again. Because they are already all gone!
These were super fun and yummy! I made them with an all-purpose gluten free flour (cup for cup mix) and vegan butter. I filled them with homemade strawberry jam! Yum! My son has never had a pop tart because of allergies, and he was thrilled he could eat these. Thank you for all of your great recipes that are easily adapted!
I made these and there are to salty. I added the right amount of salt.
Hi Auggie, Any chance you used salted butter instead of unsalted?
OMG…I just made this recipe. I am gifting homemade pop tarts to my husbands boss who loves them. They are beautiful and tasty! I cannot wait to make another batch for myself. They are delicious!
May I ask what is the purpose of flour in the filling? and what would happen if I only made it with the sugar, cinnamon and egg wash?
thanks.
Hi A, It helps to give it a bit of structure so that the cinnamon and sugar do not simply melt into the crust when baked.