

This easy homemade bagels recipe proves that you can make deliciously chewy bagels in your own kitchen with only a few basic ingredients and baking tools! Watch the video tutorial before you get started.
Today I’m teaching you how to make homemade bagels with only a few basic ingredients and kitchen tools. Today you’re going to tackle any fears of yeast-bread baking—and I’m right here to guide you along! This recipe is such a fan favorite that I included it in my New York Times best-selling cookbook, Sally’s Baking 101.
Bagels, crème brûlée, soft pretzels, and French macarons. What do these foods have in common? Each seem really complicated to make at home. That’s why you’ll often find them on your baking bucket list. But secretly, they couldn’t be easier. Homemade bagels taste fresher, are cheaper, and you’ll earn the bragging rights for from-scratch baking. (P.S. Each of those recipes has a video tutorial!)
Bagels Require a Lean Dough
The first step is to make the bagel dough. You need only 5 ingredients:
- Warm Water: Liquid for the dough.
- Yeast: Allows the dough to rise. I recommend an instant or active dry yeast.
- Barley Malt Syrup or Sugar: Bakeries use barley malt syrup to sweeten the bagel dough—it can be a little difficult to find, but either white or brown sugar is a fine substitute.
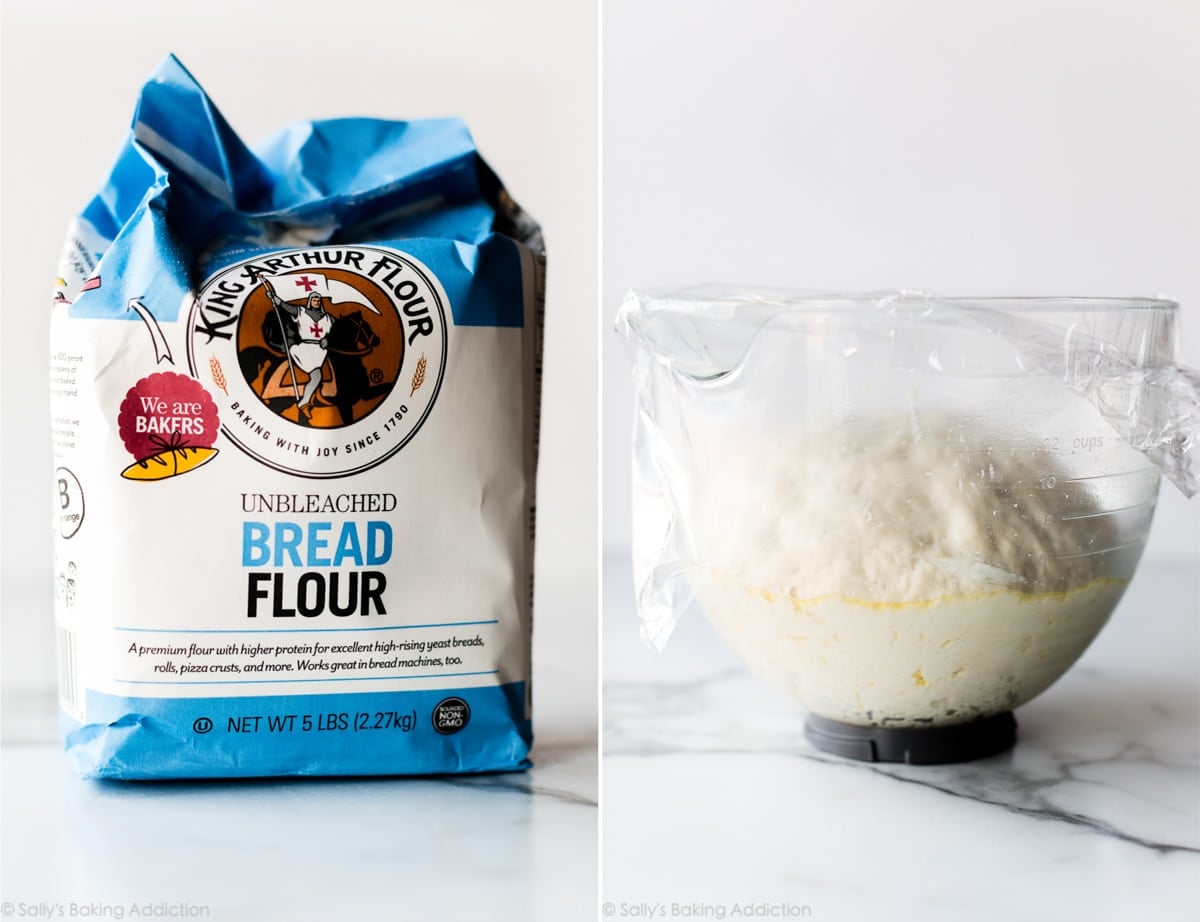
- Bread Flour: A high-protein flour is necessary for bagels. We want a dense and chewy texture, not soft and airy like cinnamon rolls. Bread flour is the only solution!
- Salt: Flavor.
Notice how there is no fat? This is called a lean dough. Lean dough is ideal for recipes like focaccia, pizza dough, artisan bread, and cranberry nut no-knead bread. Breads like dinner rolls and homemade breadsticks, and sweet bread, such as cinnamon rolls, include fat for richness and flavor.
You can prepare and knead the dough with a stand mixer or by hand. If you’d like a visual of how to knead the dough by hand, you can watch the full video tutorial in my post on How to Knead Dough.
After the dough has been kneaded, let it rise for 60–90 minutes. Punch it down, then divide into 8 sections and shape into bagels.
How to Shape Bagels
Shaping bagels is easier than it looks. Poke your finger through the center of the ball of dough, then use 2 fingers to widen the hole to about 1.5–2 inches. That’s it! I don’t really do anything fancy and the bagels don’t need to be perfect. Mine never are!
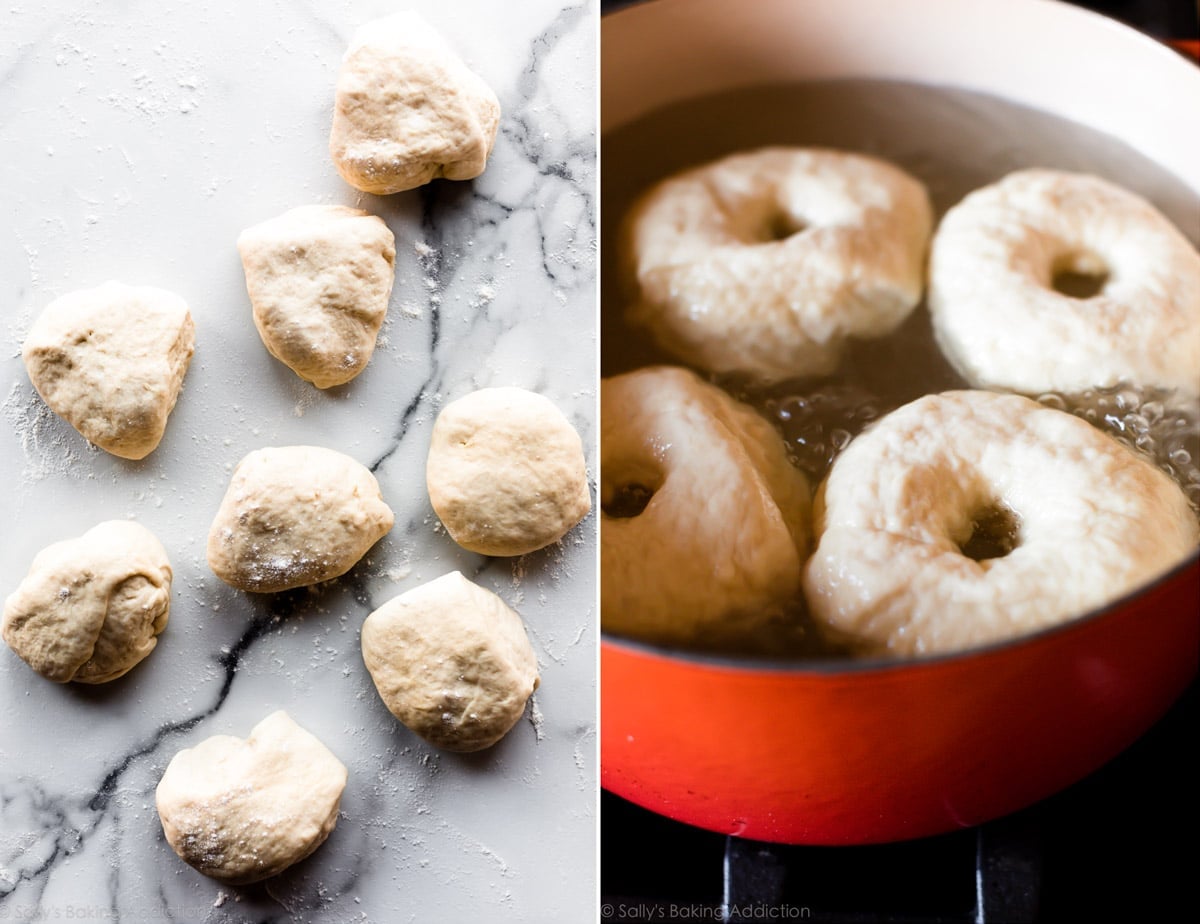
Bagel Water Bath
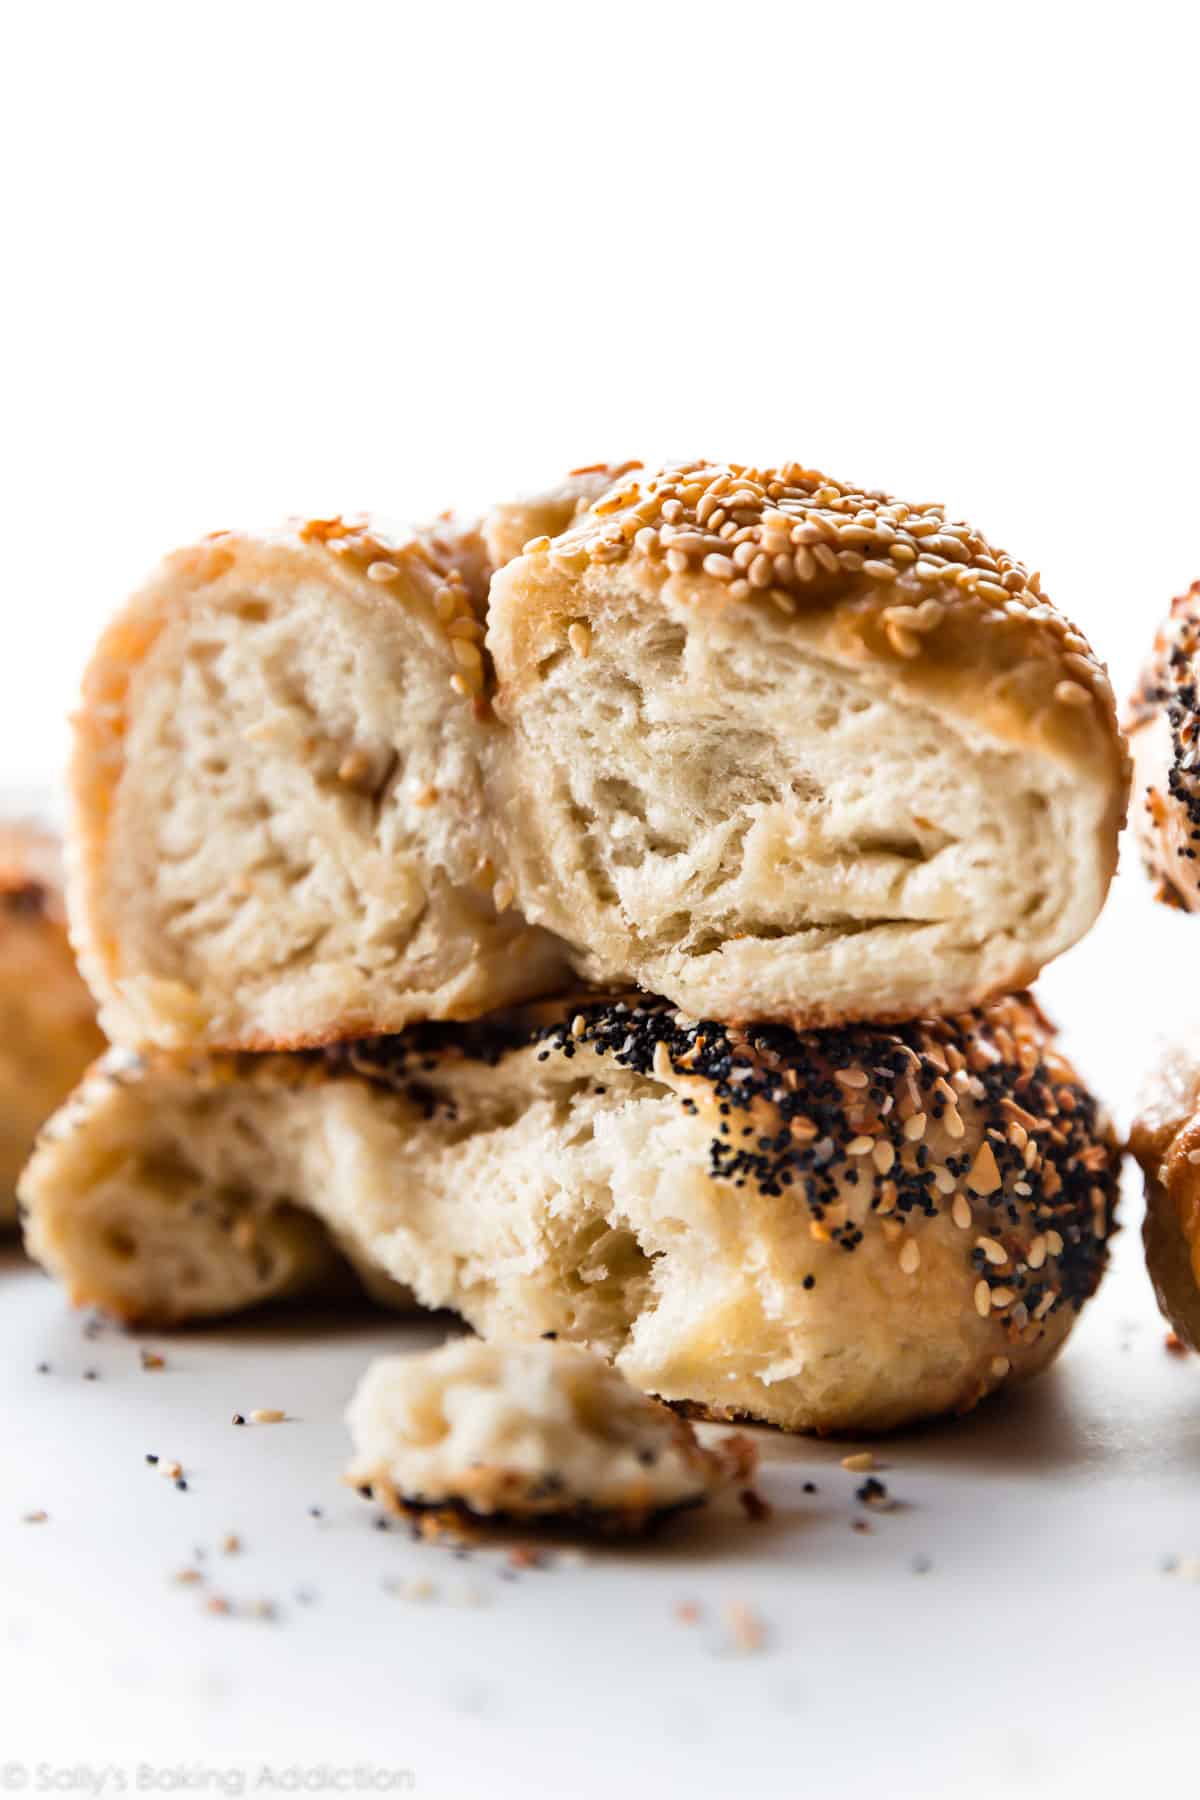
Bagels must cook for 1 minute on each side in a pot of boiling water. This is actually the most important step in the whole recipe. Why?
- Boiling the bagels gives the bagel its beautiful shine. But looks aren’t everything—this shine is actually a result of the dough’s starches gelatinizing which creates a crisp, shiny coating. I learned this from Cooks Illustrated.
- Boiling bagels cooks the outer layer of dough, which guarantees they’ll hold their shape in the oven.
Add honey or barley malt syrup to the water bath. Why? The sugar adds extra caramelization and crisp. Brushing the boiled bagels with egg wash does the same. Don’t skip either!
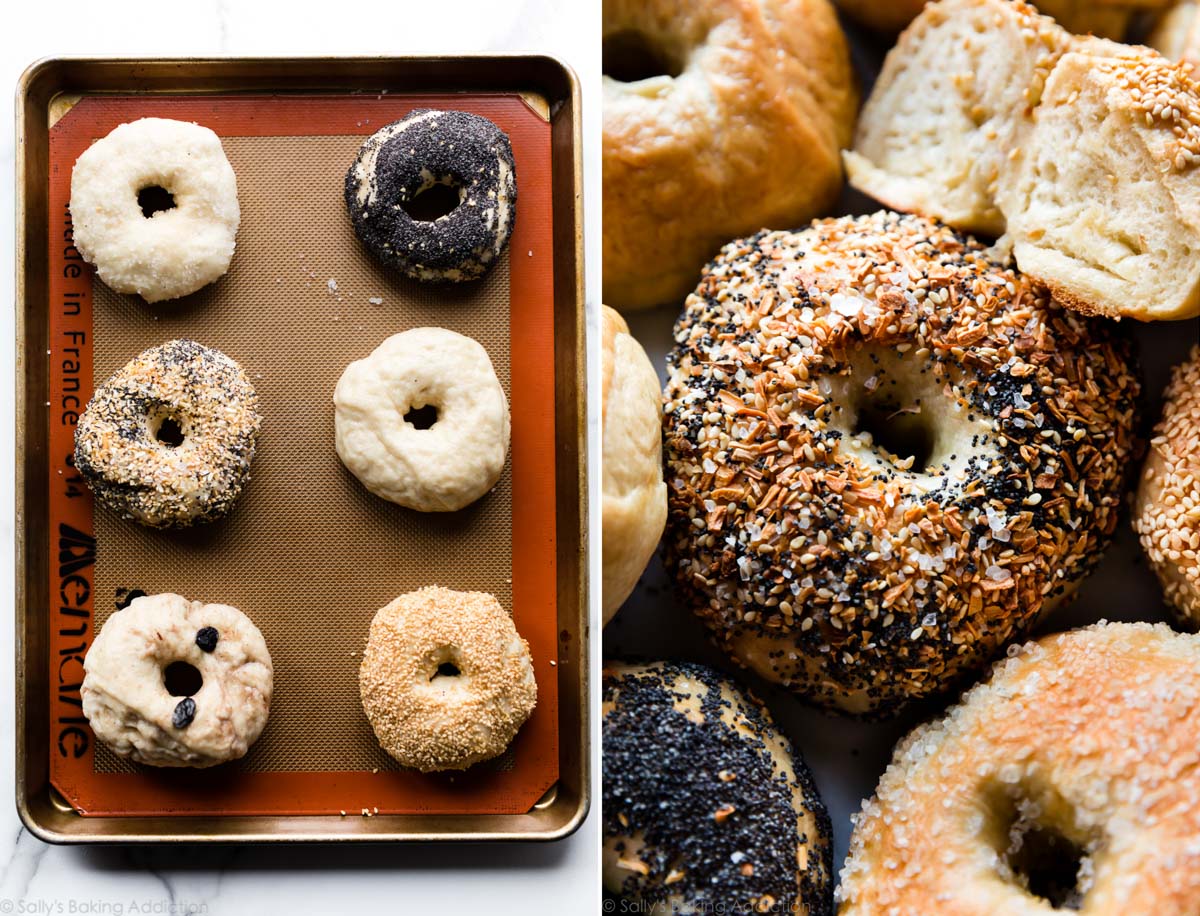
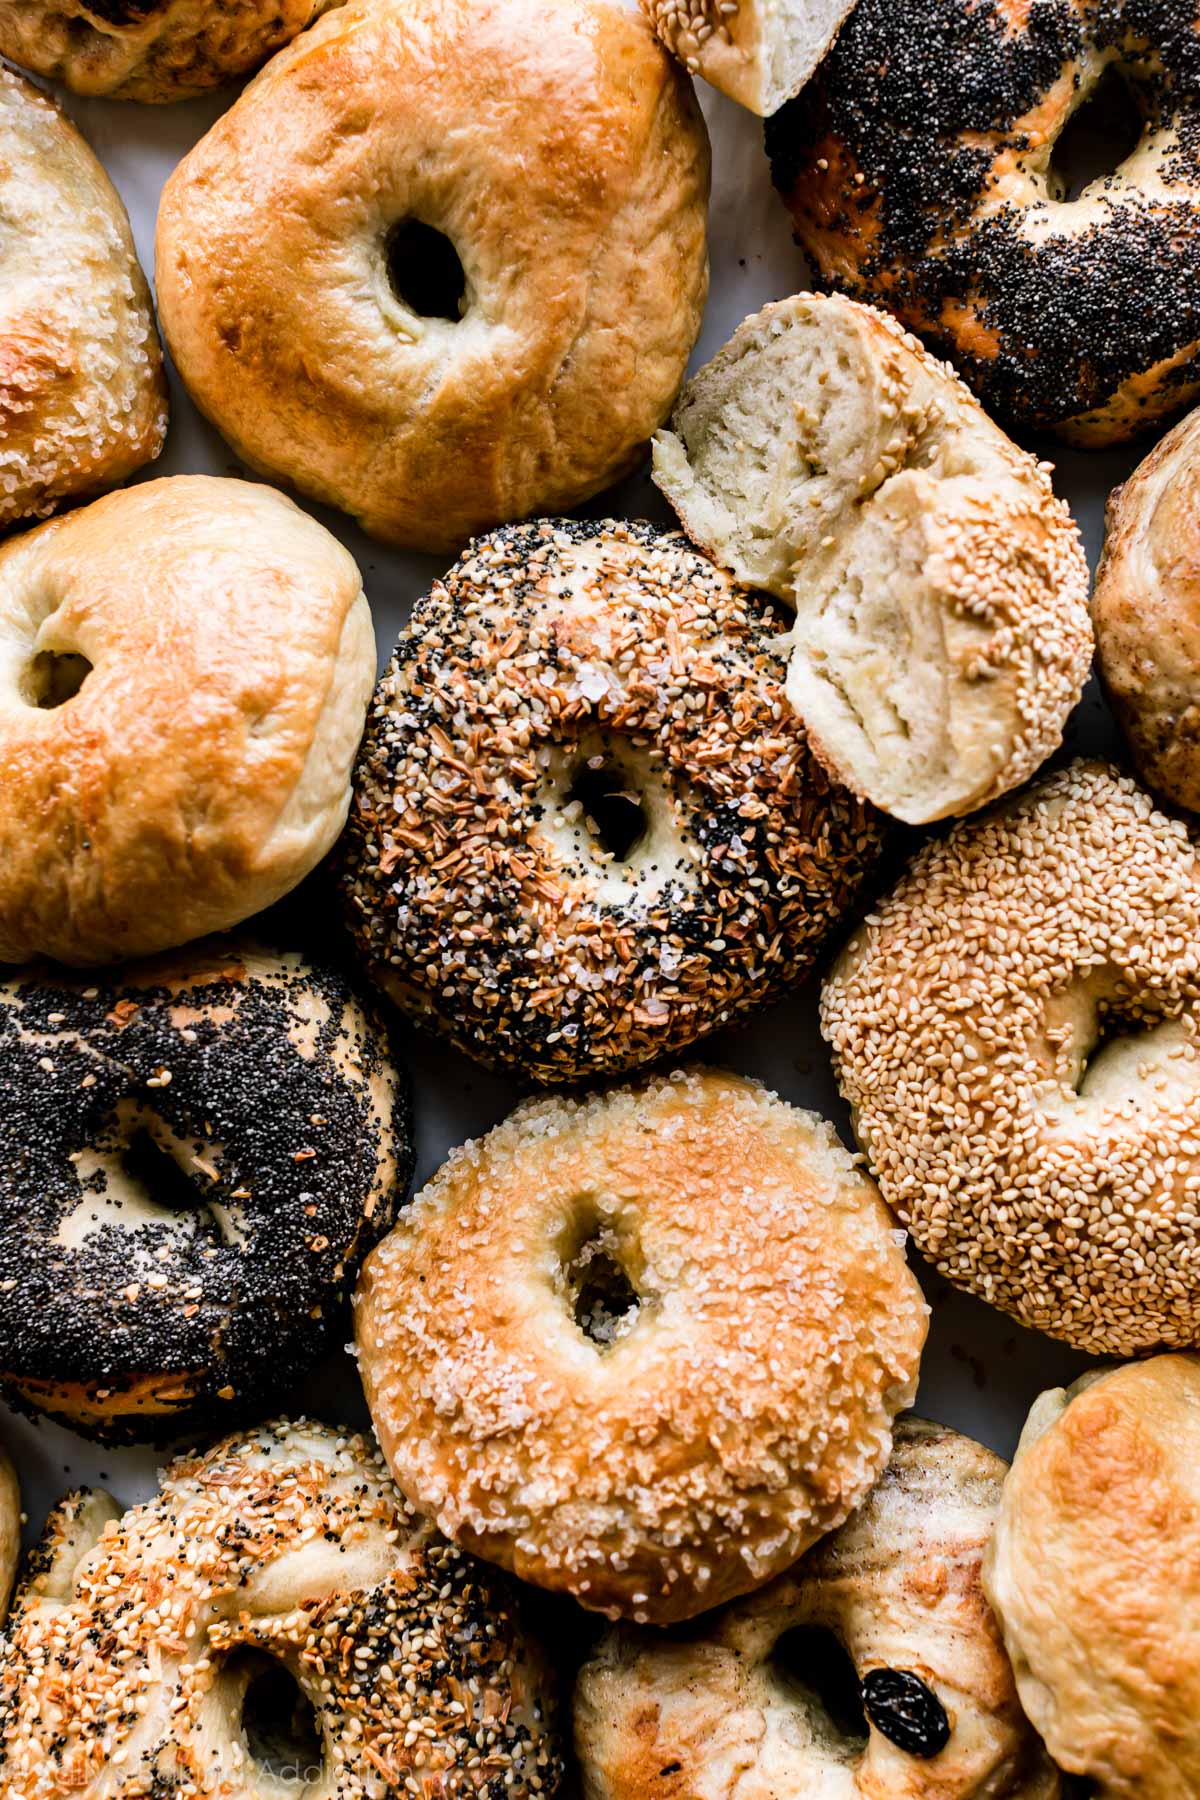
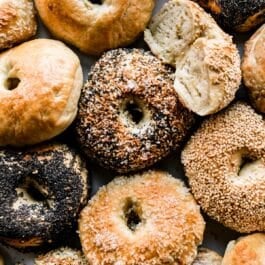
Homemade Bagel Varieties
- Plain Bagels: Follow the recipe below. These are excellent as the base for breakfast casserole.
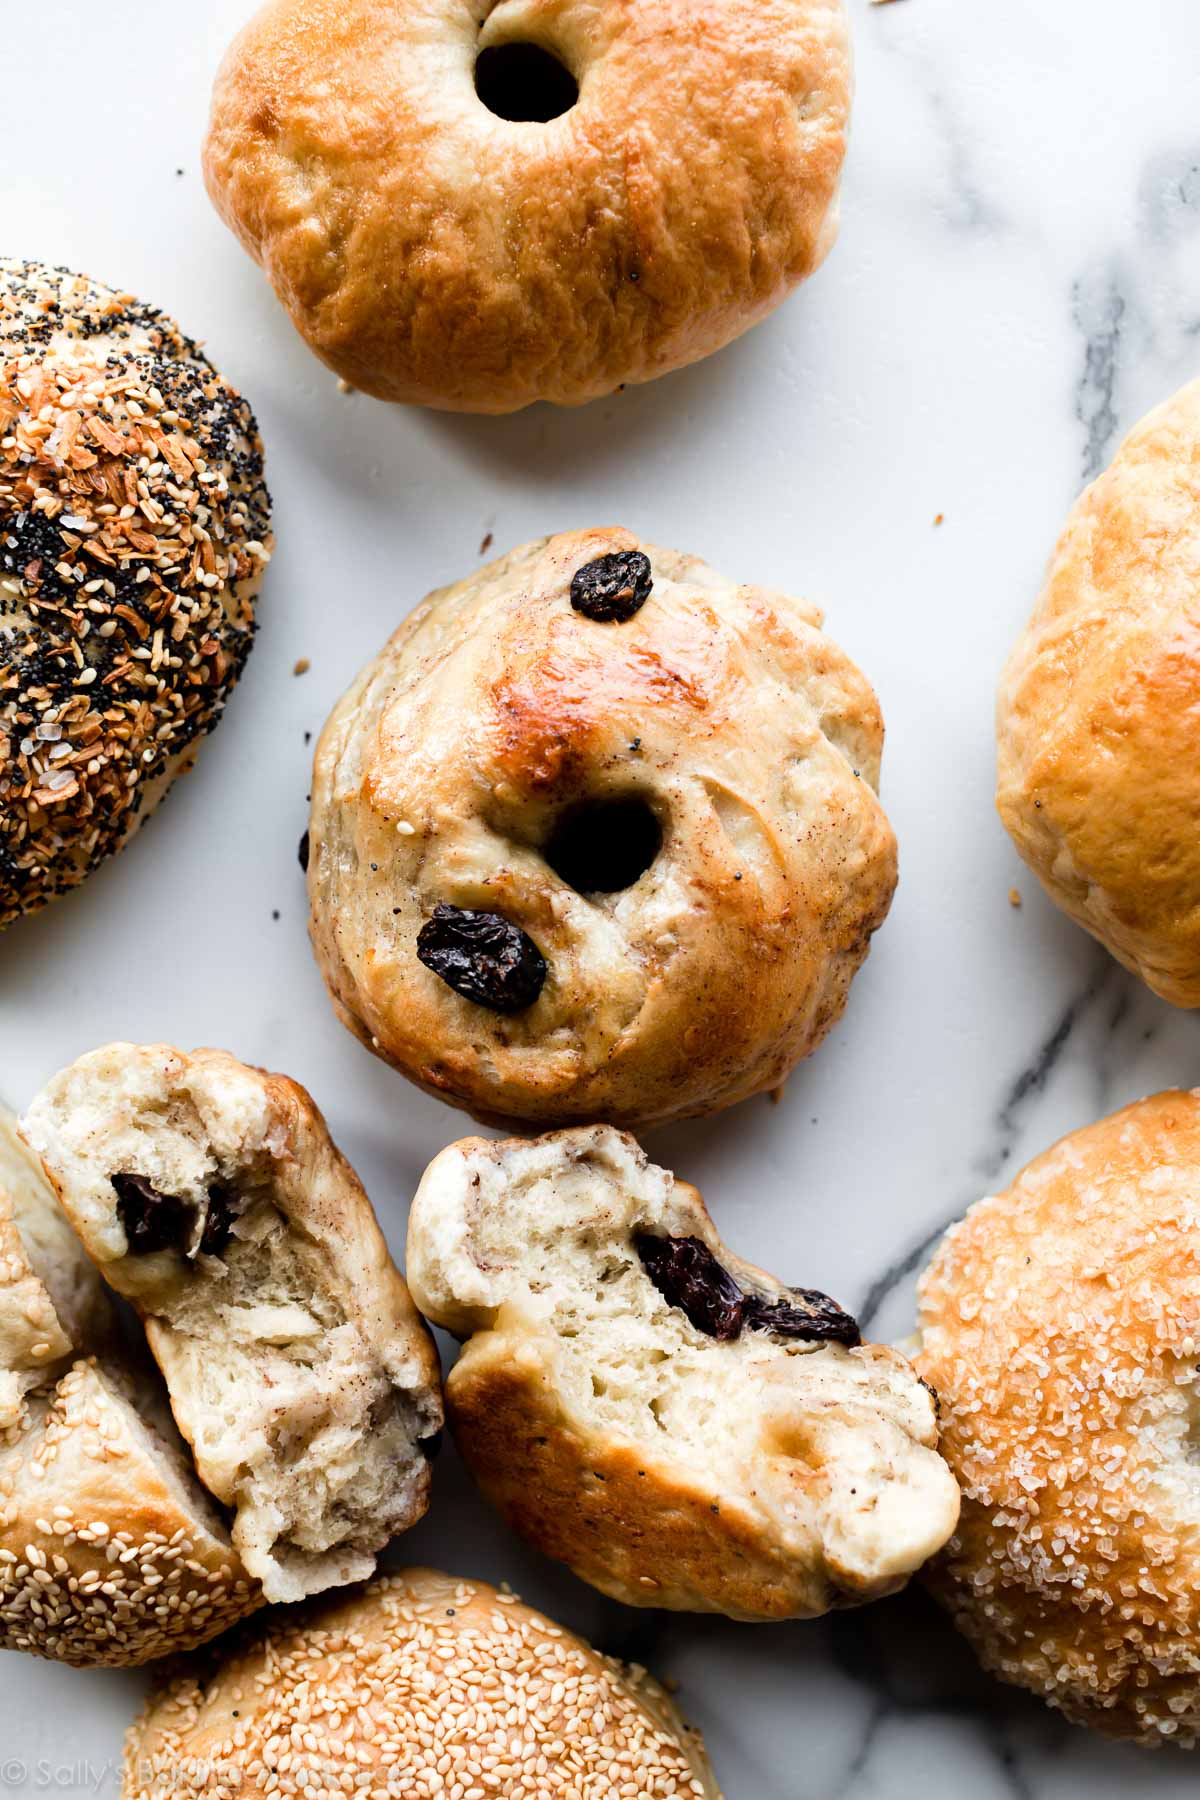
- Cinnamon Raisin Bagels: Follow my cinnamon raisin bagels recipe.
- Everything Bagels: Follow my everything bagels recipe.
- Blueberry Bagels: Follow my blueberry bagels recipe.
- Sesame Seed Bagels: Use 1/3 cup sesame seeds. After brushing with egg wash in step 9, top with or dunk each bagel into topping. Use more as needed.
- Poppy Seed Bagels: Use 1/3 cup poppy seeds. After brushing with egg wash in step 9, top with or dunk each bagel into topping. Use more as needed.
- Salt Bagels: Use 1/3 cup coarse sea salt. After brushing with egg wash in step 9, top with or dunk each bagel into topping. These are pretty salty, so feel free to go lighter on the salt.
- Cheese Bagels (Asiago, Cheddar, etc.): Add 1/2 cup of shredded cheese to the dough when you add the flour. After brushing with egg wash in step 9, sprinkle with extra cheese.
- Cinnamon Crunch Bagels: Add 1 teaspoon of cinnamon to the dough recipe below when you add the salt. Double the cinnamon crunch topping from cinnamon crunch bread. After brushing the bagels with the egg wash in step 9 below, spoon cinnamon crunch topping on each.
Some readers have used this bagel recipe to make whole wheat bagels by replacing half of the bread flour with whole wheat flour. I haven’t tried it, but I do use some whole wheat flour when making homemade English muffins, another breakfast staple!
Homemade Bagels Recipe
- Prep Time: 2 hours, 10 minutes
- Cook Time: 25 minutes
- Total Time: 3 hours
- Yield: 8 bagels
- Category: Bread
- Method: Baking
- Cuisine: American
Description
Make fresh bagels right at home with this tested dough recipe. Don’t skip the water bath and egg wash—both provide an extra chewy and golden brown crust. This recipe is also in my cookbook, Sally’s Baking 101.
Ingredients
- 1 and 1/2 cups (360g/ml) warm water (between 100–110°F/38–43°C)
- 2 and 3/4 teaspoons (8g) instant or active dry yeast*
- 1 Tablespoon barley malt syrup, granulated sugar, or brown sugar*
- 4 cups (520g) bread flour (spooned & leveled), plus more as needed*
- 2 teaspoons salt
- for coating the bowl: nonstick spray, butter, or oil
For Boiling & Topping
- 2 quarts (1.9L) water
- 1/4 cup (85g) barley malt syrup or honey
- egg wash: 1 egg white beaten with 1 Tablespoon water
Instructions
- Prepare the dough: In the bowl of a stand mixer fitted with a dough hook attachment, whisk the warm water, barley malt syrup/sugar, and yeast together. Cover and allow to sit for 5 minutes. *If you don’t have a stand mixer, use a large mixing bowl and mix the dough with a wooden spoon or silicone spatula in the next step.*
- Add the flour and salt, and beat on medium speed for 2 minutes, until the dough comes together and pulls away from the sides of the bowl. If it seems too sticky and clings to the sides of the bowl instead of forming a rough mass around the dough hook or spoon, add more flour, 1 Tablespoon at a time, and continue to mix until the dough pulls away from the sides of the bowl. The dough should be stiff and somewhat dry. If it is crumbly and breaks off in pieces, add more water, 1 teaspoon at a time, mixing well after each addition.
- Knead the dough: When the dough has reached the proper consistency, beat on low speed with the dough hook for an additional 6–7 minutes, or knead by hand on a lightly floured surface for 6–7 minutes, until the dough feels smooth, supple, and elastic. (If you’re new to bread-making, my How to Knead Dough video tutorial can help here.) If the dough becomes too sticky during the kneading process, sprinkle 1 teaspoon of flour at a time on the dough or on the work surface/in the bowl to make a soft, slightly tacky dough. Do not add more flour than you need because you do not want a dry dough. After kneading, the dough should still feel a little soft. Poke it with your finger—if it slowly bounces back, your dough is ready to rise. You can also do a “windowpane test” to see if your dough has been kneaded long enough: tear off a small (roughly golfball-size) piece of dough and gently stretch it out until it’s thin enough for light to pass through it. Hold it up to a window or light. Does light pass through the stretched dough without the dough tearing first? If so, your dough has been kneaded long enough and is ready to rise. If not, keep kneading until it passes the windowpane test.
- Lightly grease a large bowl with nonstick spray, butter, or oil. Place the dough in the bowl, turning it to coat all sides in the oil. Cover the bowl with plastic wrap or a clean kitchen towel. Allow the dough to rise at room temperature for 1.5–2 hours, or until doubled in size.
- Line two large baking sheets with parchment paper or silicone baking mats.
- Shape the bagels: When the dough is risen, punch it down to release the air. On a lightly floured surface, divide the dough into 8 equal pieces, about 4 ounces (113g) each. Shape each piece into a ball. Press your index finger through the center of each ball to make a hole, then stretch and widen the hole to about 1.5–2 inches in diameter. Arrange the shaped bagels on the prepared baking sheets. Loosely cover the shaped bagels with a kitchen towel or plastic wrap and let them rest for 5–10 minutes as you prepare the water bath.
- Preheat the oven to 425°F (218°C).
- Water bath: Fill a large, wide pot with 2 quarts (1.9L) of water. Whisk in the barley malt syrup or honey. Bring to a boil over high heat, then reduce heat to medium-high. Drop 2 or 3 bagels in at a time, making sure they have enough room to float around. Boil the bagels for 1 minute, then use a spatula to flip each bagel over and boil for 1 minute more. Using a slotted metal spatula, lift the bagels out of the water, letting the excess water drain off. Place the bagels back on the lined baking sheets. Repeat with remaining bagels.
- Using a pastry brush, brush the egg wash on top and around the sides of each bagel. If you’re adding toppings, dip the tops of the bagels into the toppings immediately after applying the egg wash.
- Bake for 20–25 minutes, rotating the pans halfway through, until the bagels are dark golden brown. Allow the bagels to cool on the baking sheets for 20 minutes, then transfer to a cooling rack to cool completely.
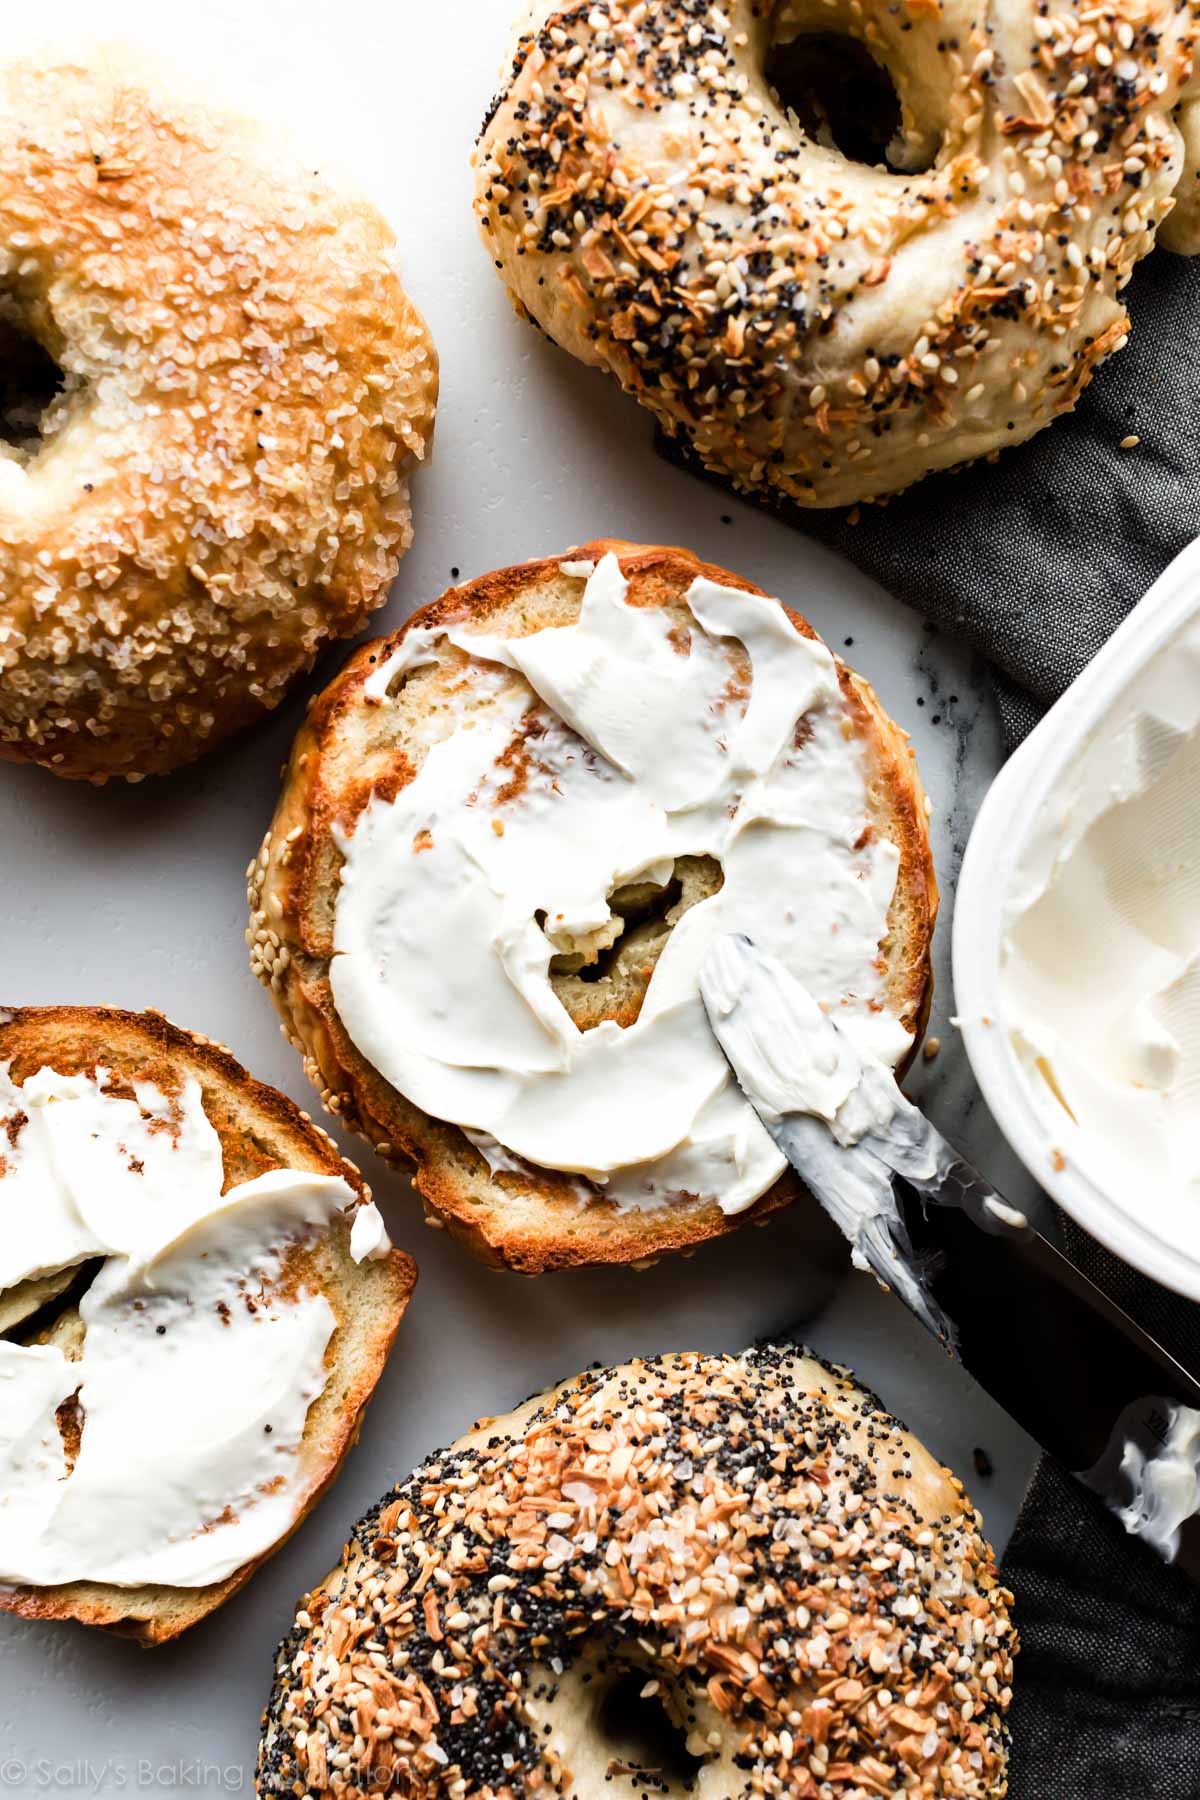
- Slice, toast, top, enjoy however you want! Cover leftover bagels tightly and store at room temperature for up to 4 days or in the refrigerator for up to 1 week.
Notes
- Overnight Make-Ahead Instructions: Prepare the dough through step 4, but allow the dough to rise overnight in the refrigerator instead of at room temperature. The slow rise gives the bagels wonderful flavor! In the morning, remove the dough from the refrigerator and let the dough rise for 45 minutes at room temperature. Continue with step 5. I don’t recommend shaping the bagels the night before as they may puff up too much overnight.
- Freezing Make-Ahead Instructions: Baked bagels freeze wonderfully! Freeze them for up to 3 months, thaw overnight in the refrigerator or at room temperature, then warm to your liking. You can also freeze the bagel dough. After punching down the dough in step 6, wrap the dough tightly in plastic wrap, then a layer of aluminum foil. Freeze for up to 3 months. Thaw overnight in the refrigerator, then punch the dough down again to release any air bubbles. Continue with the rest of step 6.
- Special Tools (affiliate links): Stand Mixer | Baking Sheets | Parchment Paper or Silicone Baking Mats | Large Pot (such as a 5- or 6-quart Dutch Oven) | Pastry Brush
- Yeast: Use instant or active dry yeast. If using active dry yeast, the rise time may be closer to 2 hours. 1 standard packet is about 2 and 1/4 teaspoons, so you will need a little more than 1 packet of yeast. Reference my Baking with Yeast Guide for answers to common yeast FAQs.
- Barley Malt Syrup: This ingredient can be a little hard to find, but truly gives bagels that traditional malty flavor we all know and love. Most natural food stores carry it. I offer alternatives such as brown sugar in the dough and honey in the water bath; I’ve made bagels with these alternatives AND with barley malt syrup and honestly love both versions.
- Bread Flour: Bagels require a high protein flour. Bread flour is a must. Here are all my recipes using bread flour if you want more recipes to use it up. All-purpose flour can be used in a pinch, but the bagels will taste flimsy and won’t be nearly as chewy.
- Bread Machine: Place the dough ingredients into the pan of the machine. Program the machine to dough or manual, then start. After 9–10 minutes, the dough will be quite stiff. Allow the machine to complete its cycle, then continue with the recipe.
- Bagel Varieties: See blog post above for various add-ins and toppings. Note that the toppings are added after the egg wash in step 9. Some readers have used this bagel recipe to make whole wheat bagels by replacing half of the bread flour with whole wheat flour. I haven’t tried it, but let me know if you do!
- Halve or Double: You can halve this dough recipe by simply halving all of the dough ingredients (do not halve the water or honey for the boiling step). No changes to the recipe instructions. For best taste and texture and to not overwhelm your mixer with excess heavy dough, I do not recommend doubling this dough recipe. Instead, make separate batches of dough.
- Adapted from a mix of recipes I’ve tried: King Arthur Flour, Cook’s Illustrated, and Complete Book of Breads


Reader Comments and Reviews
Great recipe and so easy. My only issue was that the outside was not crunchy/crisp enough but they were very brown @23 minutes in oven. Next time I will bake longer. In your opinion was bake time the only possible issue with over-soft shell (e.g. boil time, kneading, ingredients)? Thanks for the fantastic recipes.
Hi Laura, the water bath and egg wash both provide an extra chewy and golden brown crust, so be sure you’re boiling them for just a minute on each side and completing the egg wash after. If you find the outsides are browning too quickly, for next time you can try moving the baking sheet a rack further from the heating element. Hope this helps, and thanks so much for giving these a try!
This recipe is great and I’ve used it tons of times! One question – if half my bagels are unusually tall, did I over- or under-boil them? This is the only factor that was different because I boiled 4 at a time.
Malted barley syrup is easily obtained at any homebrew beer shop either locally or online. Light malt extract is the same thing. You can get it in syrup or powder form.
As a first-time bagel maker I was happy these turned out great! Perfect bagel texture, just wish the bagel itself was a little more flavorful. Any tips?
Hi Shannon! Did you use table salt? We use table salt in all our recipes. Adding a pinch more can add flavor. Or try some additional add-ins or toppings! Thank you for giving this recipe a try.
Amazing bagels! I have made these a few times with different variations (plain, cinnamon raisin, everything). Great video, great recipe, easy to follow. (I am an experienced baker with cookies and cakes but a beginner with yeast.) Could not believe how easy to make bagels at home and much better than store bought! Thank you for another winner Sally!
Thank you so much for this rave review, Betsy! We’re so glad you love this bagel recipe as much as we do.
This is a great recipe! Has anyone tried adding blueberries for blueberry bagels? Thoughts?
Hi Sarah, for blueberry bagels, you can add dried blueberries in when we add the raisins in our Cinnamon Raisin Bagels. So glad you loved them!
Go to Wymann.com (even more expensive but it is available on Amazon) they have dried wild blueberries and wild blueberry powder. Since wild blueberries are sweeter and have a stronger flavored that will work well. This is an expensive option but it can be used for other things. You can also buy the ones in the freezer section and dry them out yourself in your oven or toaster oven to not over hydrate your dough. Happy baking!
My son and I just made them and will definitely make them again! Easy and fantastic! For a first ever attempt at making bagels I’m impressed at how straightforward this was! the most difficult part was finding the Barley Malt Syrup!! That took almost a month. We let these raise in the fridge overnight but they can easily be made in a couple hours. My only question is where to put the oven rack because it seems ours was too low at one notch below middle. They’ve much darker on the bottom than they should be but still super yummy!
Hi Casey, we’re so glad the bagels were a hit! We recommend baking them on the middle rack.
If I wanted to make these into mini bagels and make 16 instead of 8, how long should I bake them for? Should I just cut the bake time in half and check after 10 minutes?
Hi Paige, we’re unsure of the exact bake time for mini bagels, but yes, start checking them early!
Made these as written (except I only had 00 flour) Total success!
My biggest regret? I didn’t double the recipe.
I love this bagel recipe and it has become a great hit in my family. If I wanted to add chocolate chips, at what point could I do that?
Hi Nadia, so glad you love this recipe! For chocolate chip bagels, you can chocolate chips in when we add the raisins in our Cinnamon Raisin Bagels. Same amount. Let us know if you give them a try!
I tried this tonight (letting them rise overnight) for Mother’s Day in South Africa tomorrow. I found that the chocolate chips melted into the dough due to the heat from the lukewarm water (I used 27% drops). So I basically have a chocolate dough. It also became more sticky than the plain dough, so I added little bits of flour until it reached the consistency I’m used to. Then finally added some more chips at the end of kneading (they didn’t melt). I will let you know how they turn out tomorrow!
This is a great recipe, I did have to mix them by hand, as I don’t have a mixer, but that was fine. I was wondering if that is why they turned out a little misshapen though? I just *could not* get them into round balls at the shaping stage the dough wouldn’t come together, super shaggy. I almost felt like I was missing a binding agent like an egg or even a bit more water or something. Any advice? They still taste amazing!
Hi Reilly! Did the dough seem dry? How did you measure the flour? Make sure to spoon and level (instead of scooping) to avoid packing in too much flour into your measuring cups – or use a kitchen scale. You can read more about properly measuring baking ingredients in this post.
Love this recipe – but sometimes my bagels look a little shrivelled the next day, even if they look gorgeous and plump after baking, what am I doing wrong?
Hi Roxie, that can often happen with bagels and yeasted breads as moisture starts get into the bread. To help a bit, leave your storage container or bag cracked open slightly to let some of the moisture out. Glad this one is a favorite for you!
I’ve never written a review before, but this really was easy and came out great the first time. My husband and I split the first one after they had been cooling for 20 minutes. It turned out that wasn’t enough, so we split another. They
taste and chewiness was awesome. These are so much better then store bought. God bless you and have a great day.
I’ve been making these a couple times a month for a while and they are delicious! I do double the recipe and it turns out great still. It’s a little harder to knead but I haven’t noticed any difference. The other thing I do is add honey to my water before I add the yeast instead of adding brown sugar to the dough.
Absolutely wonderful recipe!! I am from NJ where the bagels are abundant and so tasty. When I moved to PA I was disappointed that there were no bagel shops. I tried a different recipe and it did not turn out well. I almost gave up..UNTIL I came across this recipe. They turned out so delicious and chewy with a crunchy crust. 5 out of 5. I will be following this recipe from now on!!
This is an excellent recipe, turns out every time! I’m a fan of mixing ingredients into the dough – I’ve done blueberry, apple cinnamon, cheddar herb, jalapeño cheddar, bacon egg and cheese, everything… all turn out great! Just reduce the water a bit if you’re going to add a high-moisture ingredient, like eggs or apples. Thank you for this recipe!
Did you use fresh blueberries? I want to try it but unsure what to do exactly.
I make these bagels a couple times a month–I love them! I usually do a batch of the everything and a batch of the cin. raisin (I need an egg bagel recipe, please!) Letting the dough rest overnight really does wonders for the flavor, but baking same time after the proof still yields absolutely great results. 🙂
I like my bagels B I G so after shaping them I usually cover again and let rest for a bit longer than the recipe instructs. Perfect snack right out of the oven.
Great recipe! I have a question about the bread flour measurement. The flour I use weighs 120g/c so I’m wondering how it would work if I measure it since that would only be 480 g which is less than the 520 g that the recipe calls for? Thank for all the wonderful recipes!!
I recommend using the weight given in this recipe. It’s how the recipe was tested. Thank you so much!
Thank you!
Have you ever made garlic bagels? Just wondering how much I would add to the dough. I used to get fabulous ones but the bakery closed years ago.
Hi Courtney! We haven’t tested it before, but you could try adding a clove or two of minced garlic to the dough, or a teaspoon or two of garlic powder, then adjust for future batches to your liking. Let us know what you try!
Should I use convection bake or just bake when making these bagels?
Hi Lizzy! All of the recipes on this site are written for conventional (not convection) settings.
Best Bagles Ever
Restaurant quality
I have made these twice and both times they didn’t cook thoroughly after 25 min. By the time I lowered the temp and cooked another 20 min, they’re rock hard on the outside. Also, how do you get them to not have cracks everywhere?
Hi Jess, We’re glad you tried this recipe but I’m sorry it gave you a little trouble. It sounds like your dough was simply too heavy, which is why it kept splitting and why the bagels cracked as they baked. If this happens again, work more warm water into the dough to smooth it out. Even just a few teaspoons will help– and you can drizzle it on the dough after you punch it down, then work it in with your hands. I hope this is helpful.
Hi there, I’m making this recipe this morning and have a question. Should I bake the bagels using the convection setting on my oven?
Hi Nicole, We always recommend conventional settings for baking (not convection/fan). The flow of air from convection heat can cause baked goods to rise and bake unevenly and it also pulls moisture out of the oven. If you do use convection/fan settings for baking, lower your temperature by 25 degrees F and keep in mind that things may still take less time to bake. Hope you enjoy the bagels!
What salt is used in the homemade bagels dough – table salt? morton kosher salt? diamond crystal kosher salt?
Hi Jaclyn! Our recipes always use table salt unless otherwise specified.
Best recipe, i just added a lil extra virgin olive oil in the recipe!! Added regular sugar, in the water bath i add honey and maple syrup!! Was fantastic!!!
I made these bagels today. I made half plain and half everything. LOVE them! The hardest thing about this recipe is the waiting. I will be making them again
The bagels stuck to parchment paper. Was I upposed to oil it ??
Do you happen to have silicone baking mats? They’re really the best to prevent the bagels from sticking.
Hi great site, love your recipes! For the bagels, for some reason, they come out of the boil puffy, they come out of the oven puffy so all great and good, but then after they have cooled awhile, they “deflate” and go flatter? What causes that? Any solve? Thank you!
Is your dough doubling in size during the rising stage? Yeast recipes/breads will deflate if the dough has risen/proofed too long. Hope that helps for next time!
I searched lots of bagel recipes and I’m glad I came across this one. Took forever to make since I’m not a baking enthusiast, but well worth it. Soft on the inside and crunchy on the outside. I made plain and Asiago and the Asiago is better than any I’ve ever tasted. 5 out of 5!
I am having an issue with the browning. They have cooked for 28 mins but they still dont have the nice golden broken to them. I follow the instructions to the T and baked 12 mins, rotated it, and cooked another 13 mins, but they still werent getting the nice golden look. I cooked them a few more minutes but didnt want to over cook them. Do you have any suggestions for this?
Hi James, try moving them on a higher oven rack. That can help them develop a deeper color, or you can increase the oven temperature slightly to 435°F (224°C).