

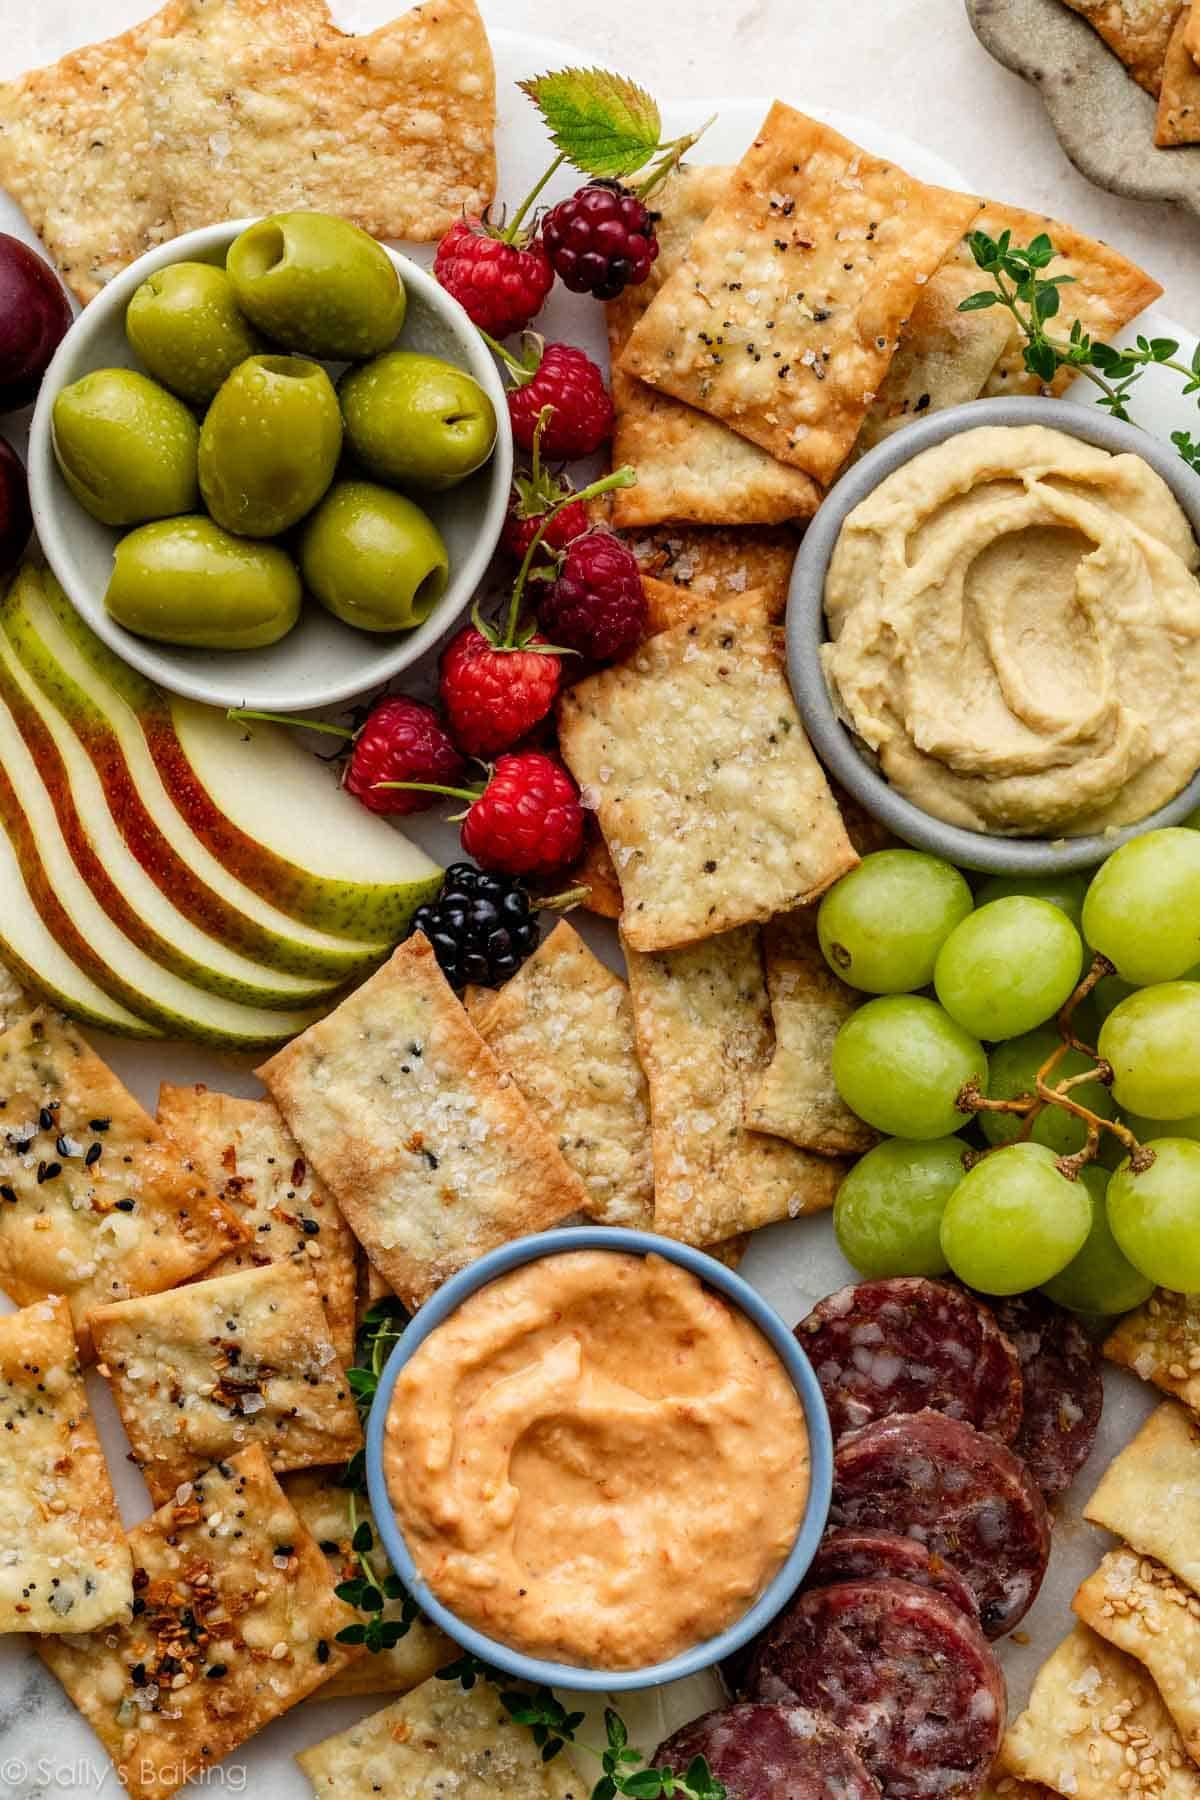
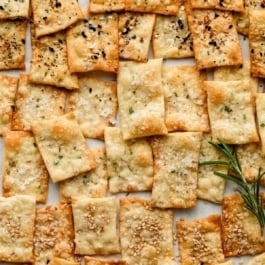
Give snack time an upgrade with homemade artisan crackers. Crispy, salty, savory, and endlessly customizable, the simple dough comes together quickly and easily in one bowl from basic pantry ingredients. These flavorful flatbread-style crackers are perfect for picnics, dunking into your favorite dips, and pairing with cheese or charcuterie.
Have you ever made homemade crackers before? I must admit, I haven’t played around with making crackers much over the years that I’ve been baking. I love this recipe for homemade cheese crackers, but that’s actually the only other cracker recipe on my website!
My team & I wanted to develop a great foundational cracker recipe, one that could be used as a jumping-off point for lots of different flavors. We tested many, many (I do mean many) batches until we got it right. And the resulting recipe you’ll see below makes crispy, salty, savory cracker deliciousness!
Why You’ll Love These Homemade Artisan Crackers:
- Made from simple, basic ingredients
- Customizable for so many flavors
- A no-yeast savory baking recipe
- Kid-approved
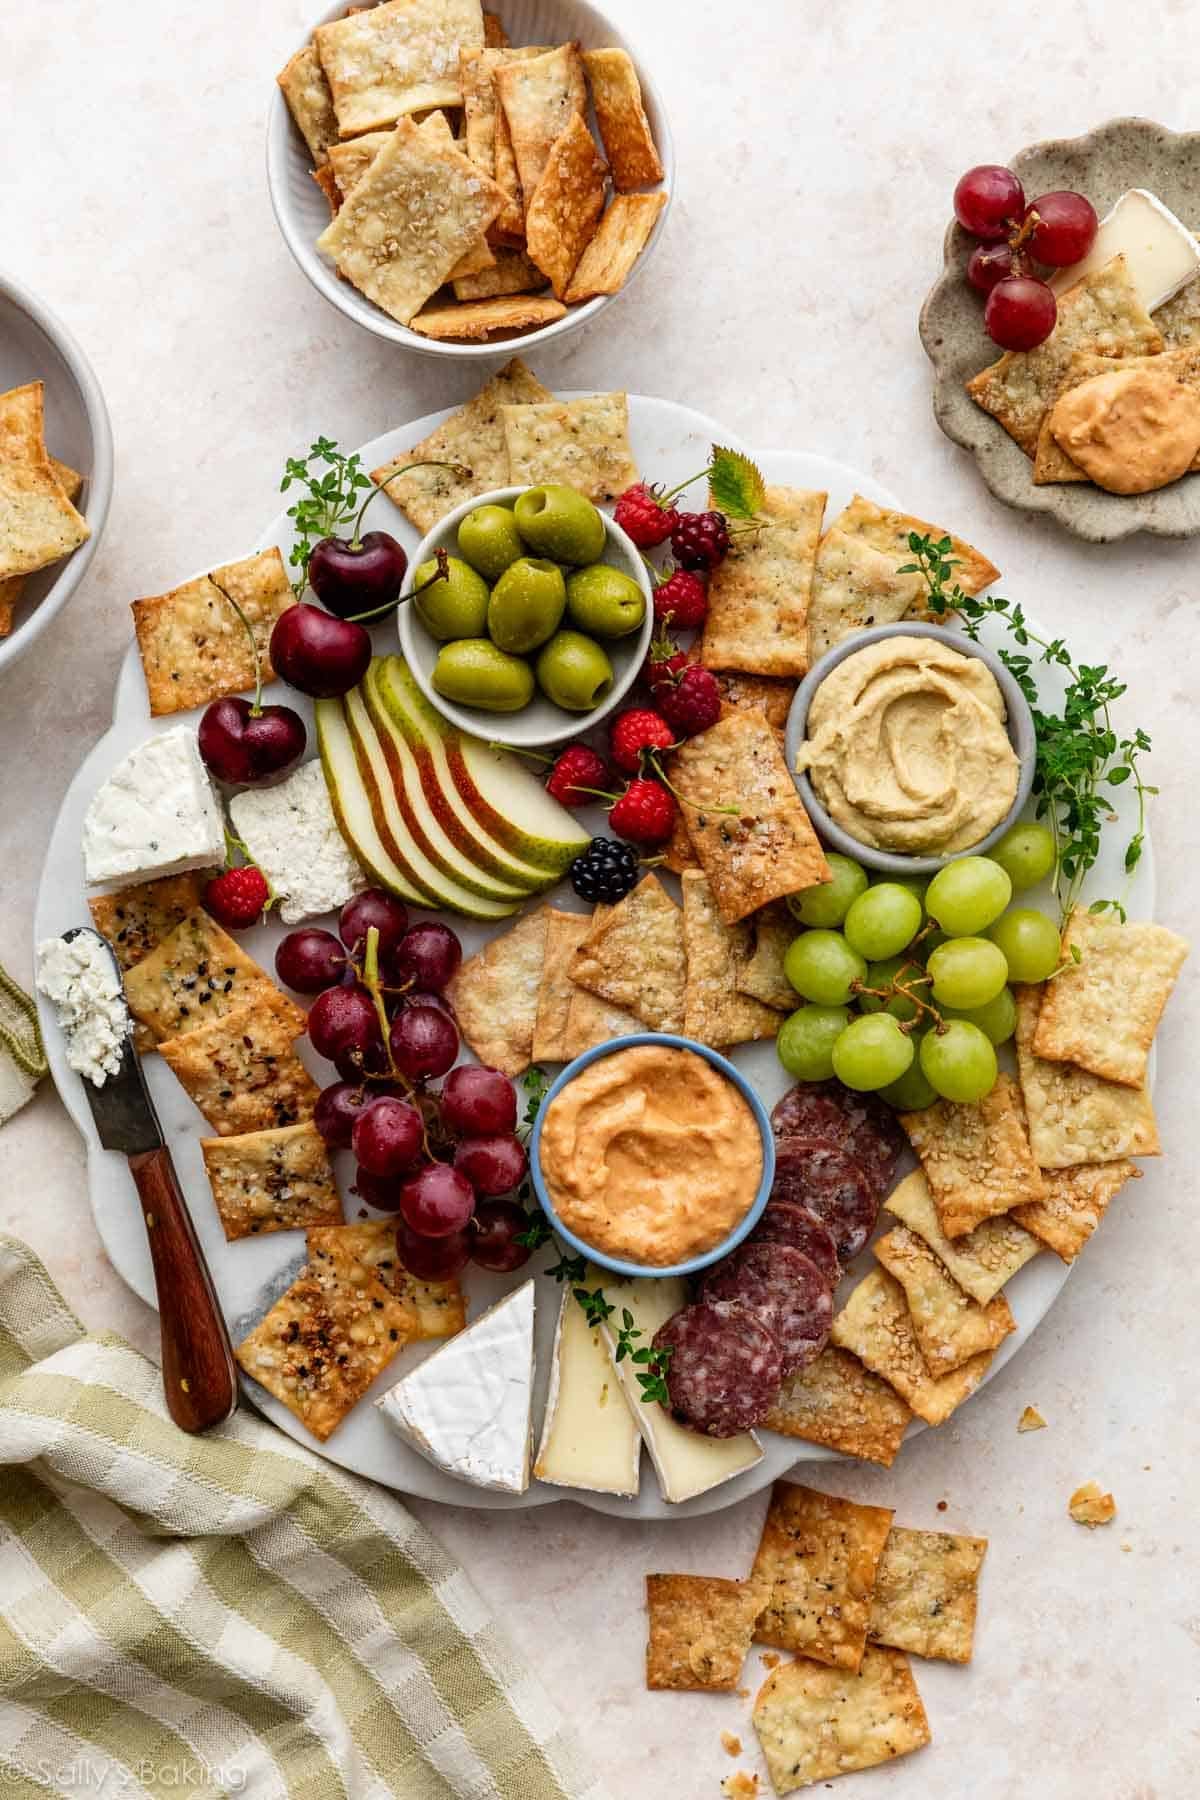
- Adds an instant upgrade to a charcuterie board
- Dairy-free, egg-free, nut-free, and vegan recipe
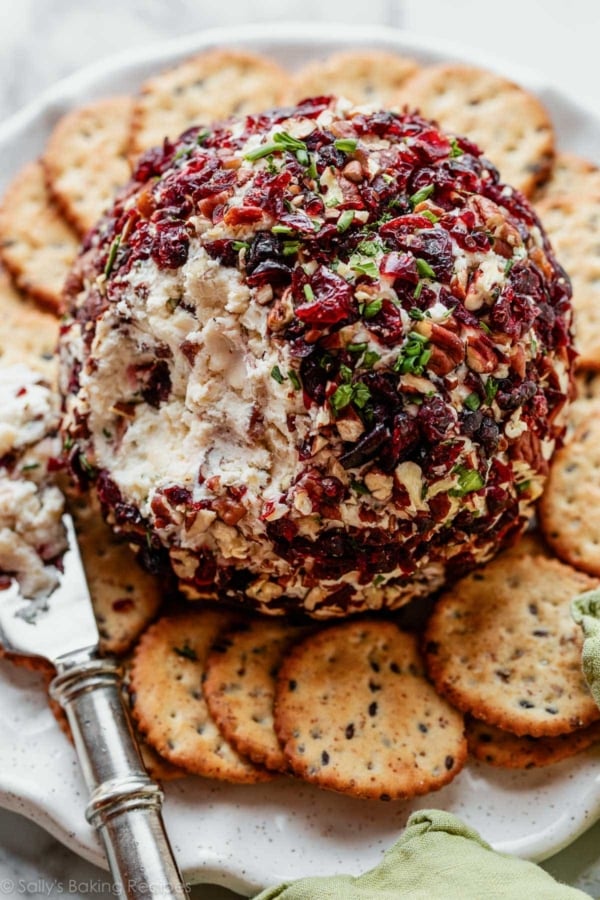
- Fantastic with hummus, crab dip, various cheeses, or serve with a cranberry pecan cheese ball
- No mixer or food processor required; the dough comes together super quickly in 1 bowl with a wooden spoon. Back to basics!
One reader, Elyanna, commented: “This recipe was super easy to follow and honestly foolproof. I haven’t made crackers or flatbread before and these turned out great. My picky 3-year-old even ate some! ★★★★★“
One reader, Cheryl, commented: “These artisan crackers were a joy to make and even better to eat!! I made the black pepper and thyme version and they were the perfect accompaniment to my homemade tomato jam! I don’t think I’ll ever go back to store-bought. ★★★★★“
One reader, Kelly, commented: “‘These are the best crackers I’ve ever eaten,” was my family’s review of this recipe, and we’ve eaten our fair share of crackers! Not only are they delicious but relatively quick and easy to make. This recipe will be made repeatedly in our home from now on! ★★★★★“
8 Basic Ingredients for Homemade Crackers
Here’s what you need to make them:
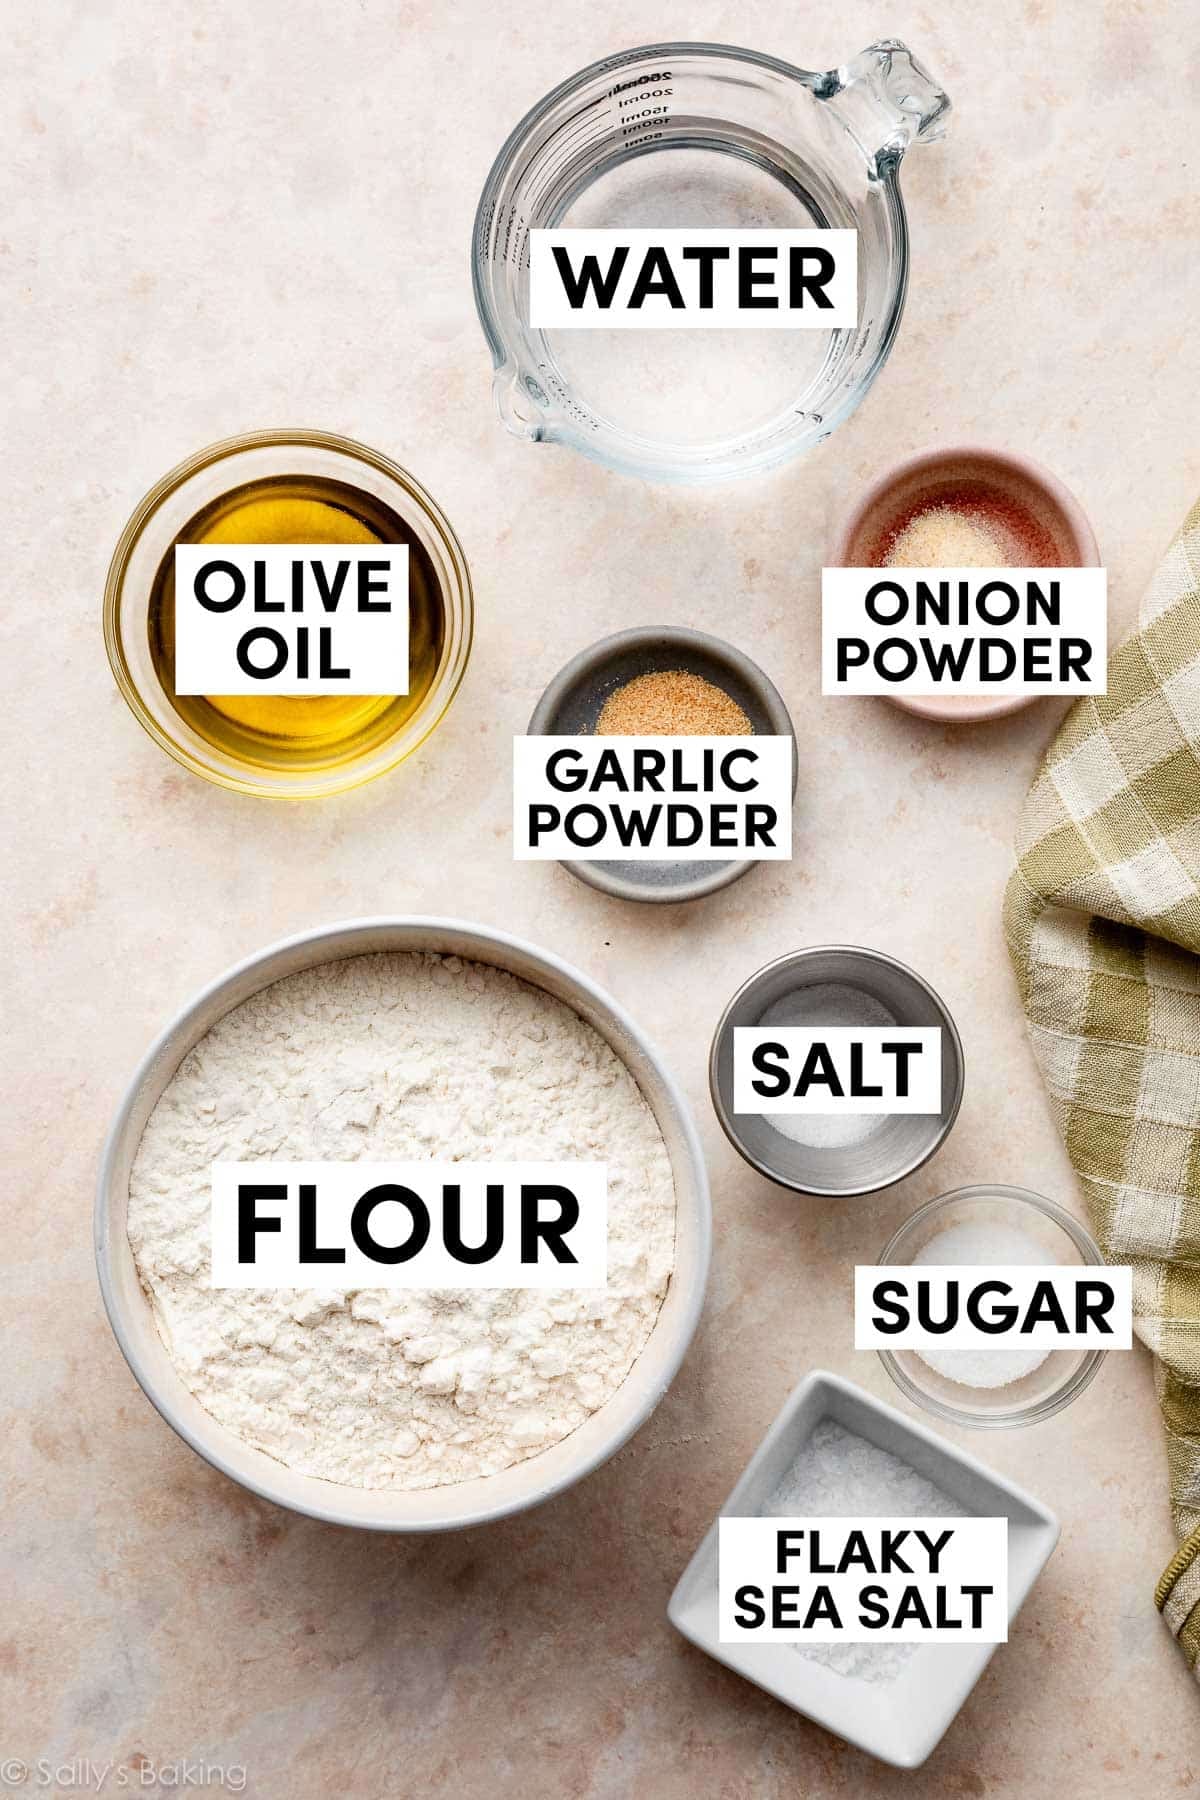
- Flour: You need all-purpose flour for these crackers. We tested this with different varieties of gluten-free flours and the crackers were chip-your-teeth hard, so we don’t recommend substituting gluten-free flour here. Whole wheat flour created incredibly tough crackers, too. (You can try using 1/2 all-purpose and half whole wheat, though.)
- Sugar: Just a bit—these crackers aren’t sweet! Sugar helps create a crisp texture by inhibiting gluten development and contributes to the browning of the crackers.
- Salt: Essential for flavor.
- Onion & Garlic Powder: More essential flavor! We tested versions without these, and the crackers tasted a lot like plain wontons.
- Rosemary or other add-in: Finely chopped fresh rosemary gives the plain cracker base amazing savory flavor, but you can swap this out for something else. More on our favorite varieties below.
- Water: Brings all the dry ingredients together.
- Olive Oil: You need some for the dough, and more for brushing on top before baking.
- Flaky Sea Salt: For topping before baking. We like Maldon sea salt. (Not working with the brand, just genuinely use and love it!)
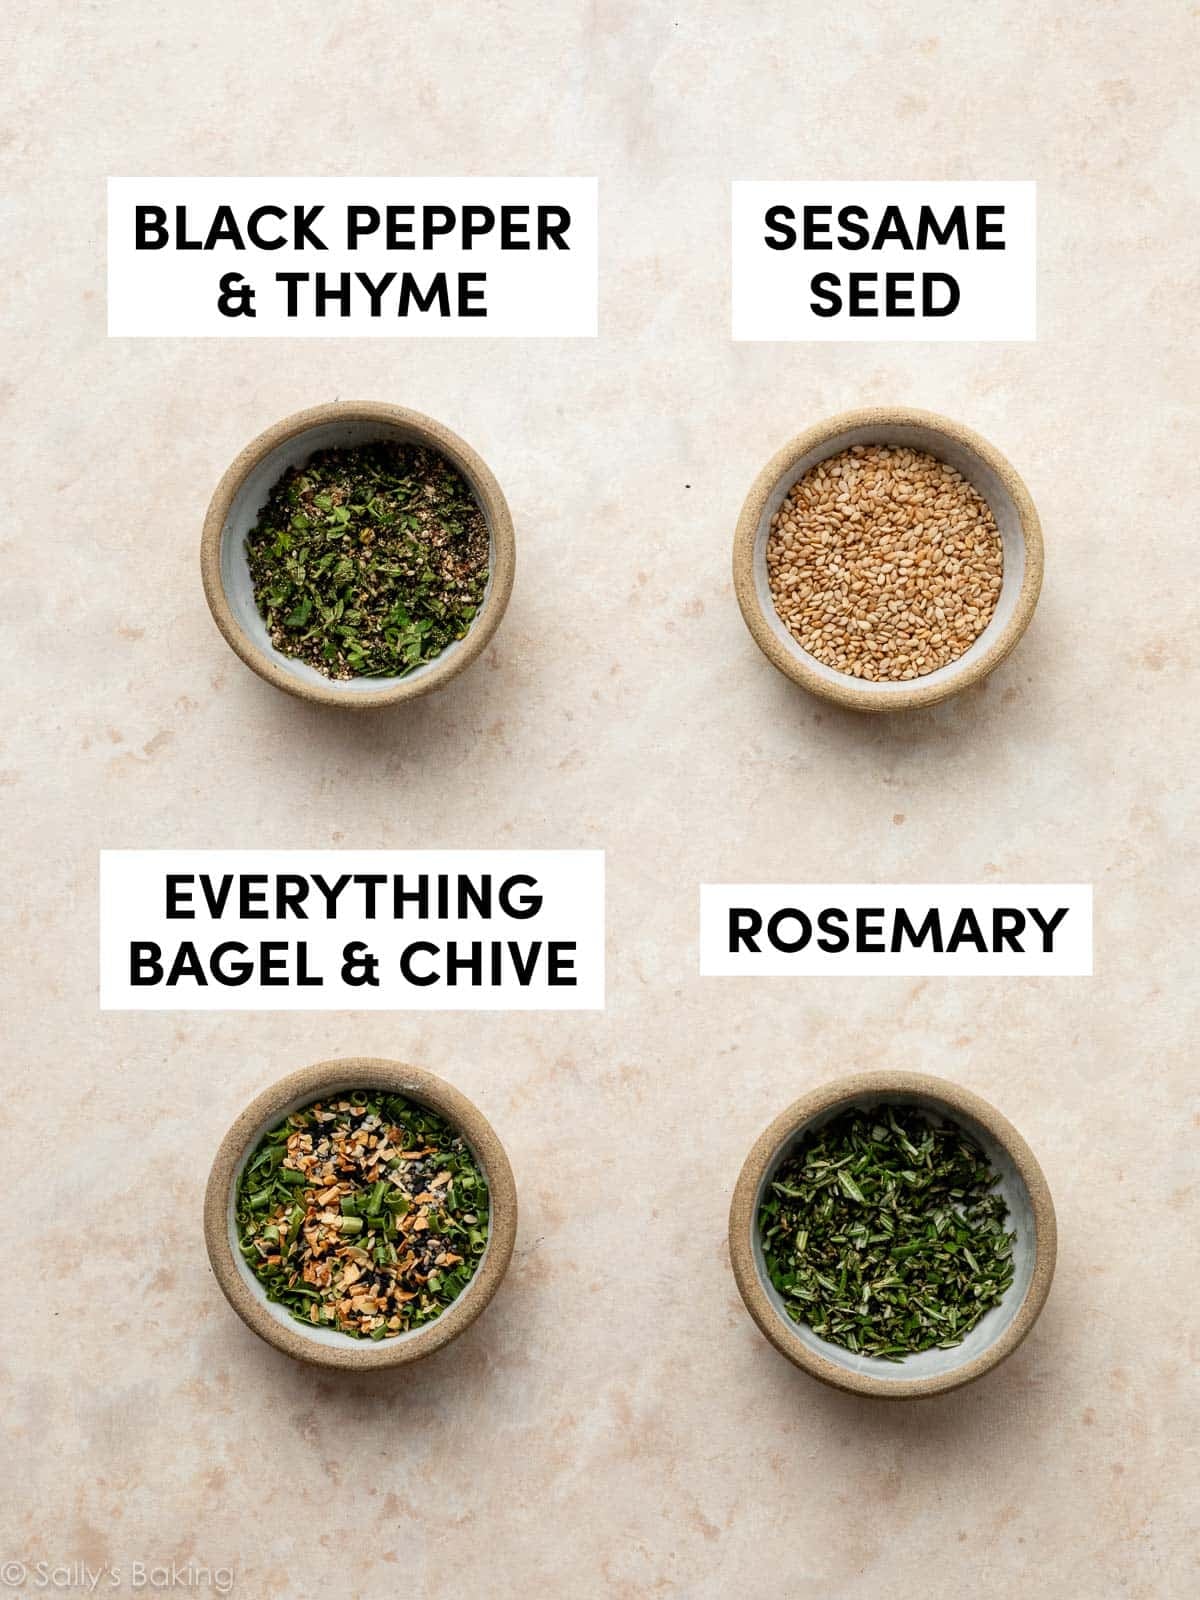
4 Favorite Ways to Flavor
- Freshly cracked black pepper + thyme
- Sesame seeds
- Everything bagel seasoning + dried chives
- Rosemary
Rosemary was the crowd’s favorite; I loved the sesame seed version the best, though!
Let Me Show You How to Make Them
Start by whisking together all the dry ingredients, including any herb/seed add-ins.
Pour in the water and olive oil and stir together with a wooden spoon or silicone spatula:
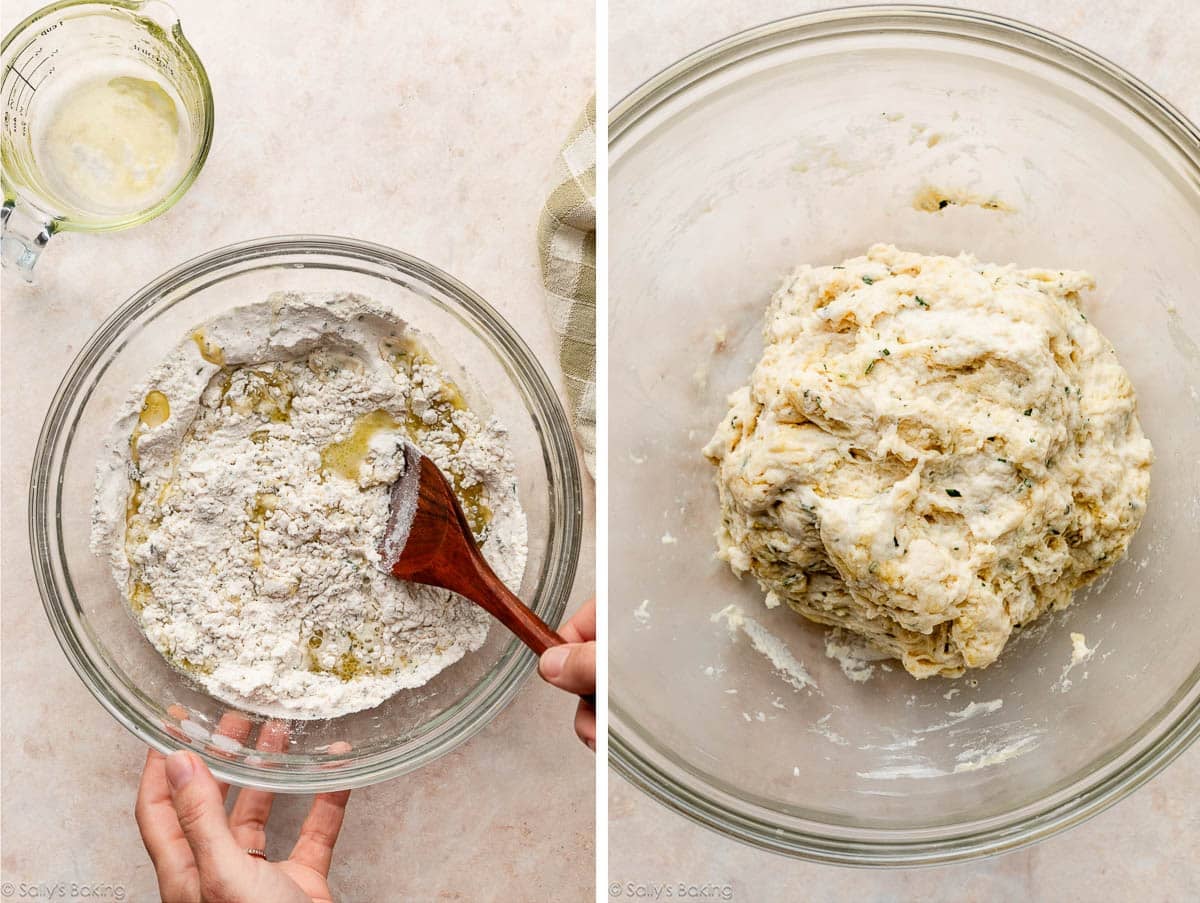
Turn the slightly wet dough out onto a floured countertop and knead it by hand, sprinkling on a little more flour as you go, until it’s no longer sticking to your hands and you can form it into a ball. This only takes a minute or two. Return the dough to the bowl and cover it.
Let the dough rest for at least 10 minutes before rolling it out.
After it’s had its rest, cut the dough in half:
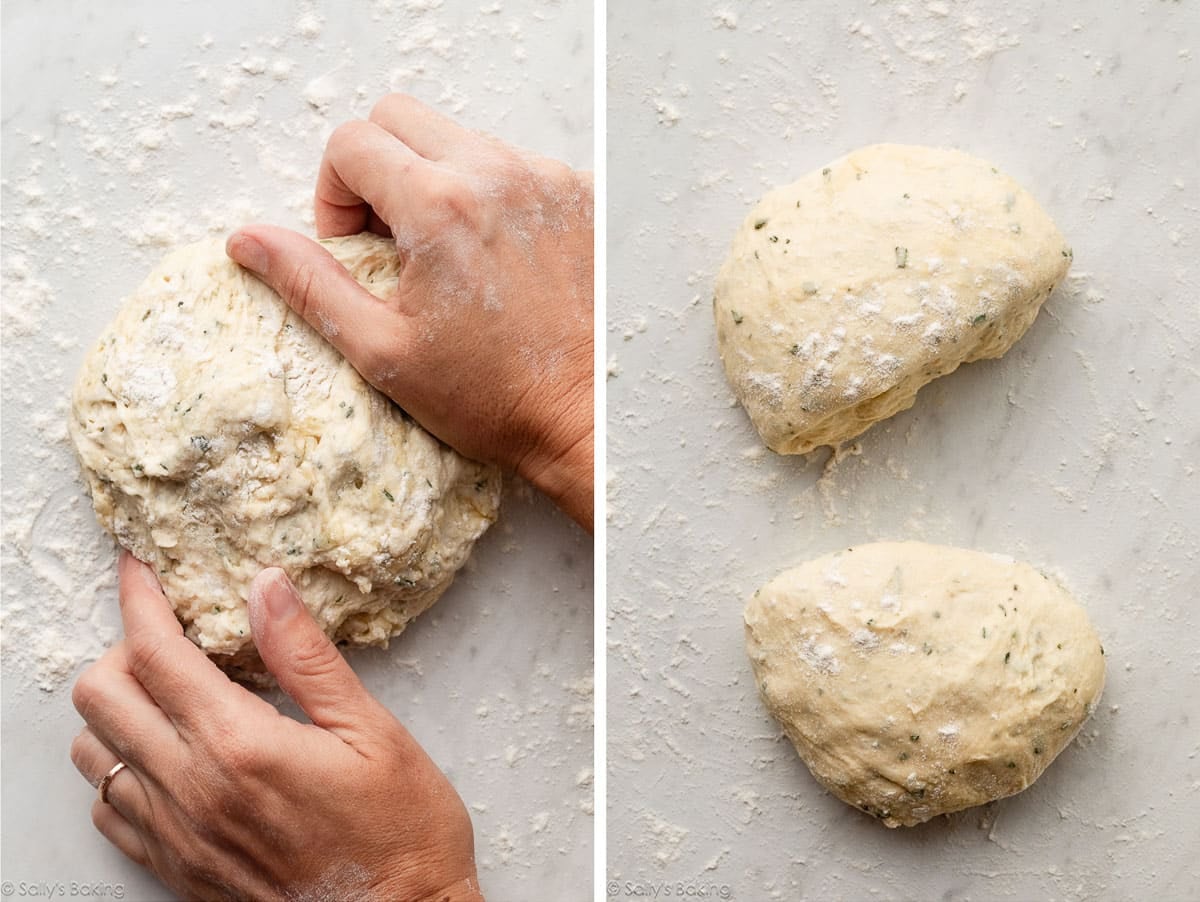
Start with just one half of the dough, keeping the other half covered while you work with the first.
Tools for shaping homemade crackers:
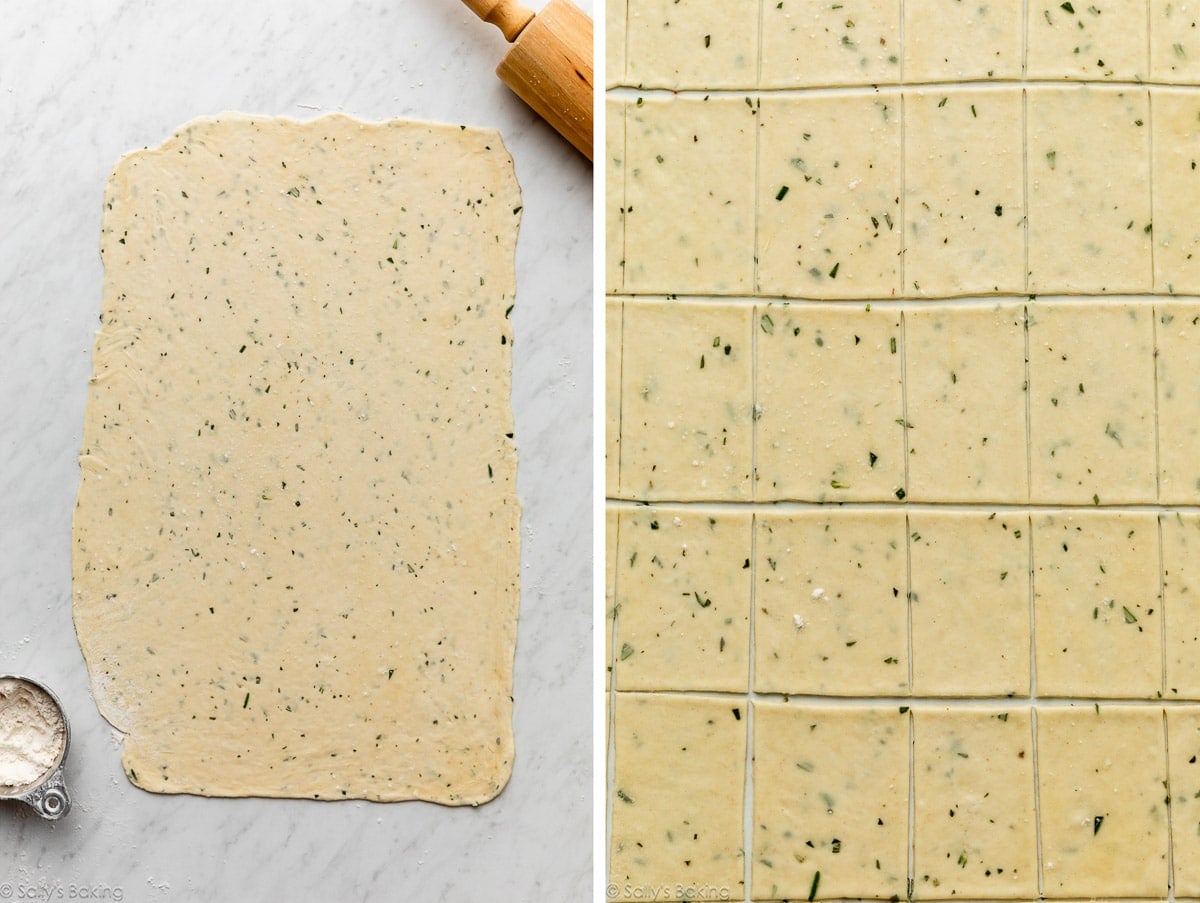
Roll out the first half of the dough until it’s very, very thin. The thinner you can get the crackers, the crispier they will be after baking.
If the dough keeps shrinking back as you try to roll it out, cover it lightly and let it rest for 5 minutes, then try again. As the gluten relaxes, it will become easier to roll out. (It will most definitely shrink at first, so don’t get worried if it does!)
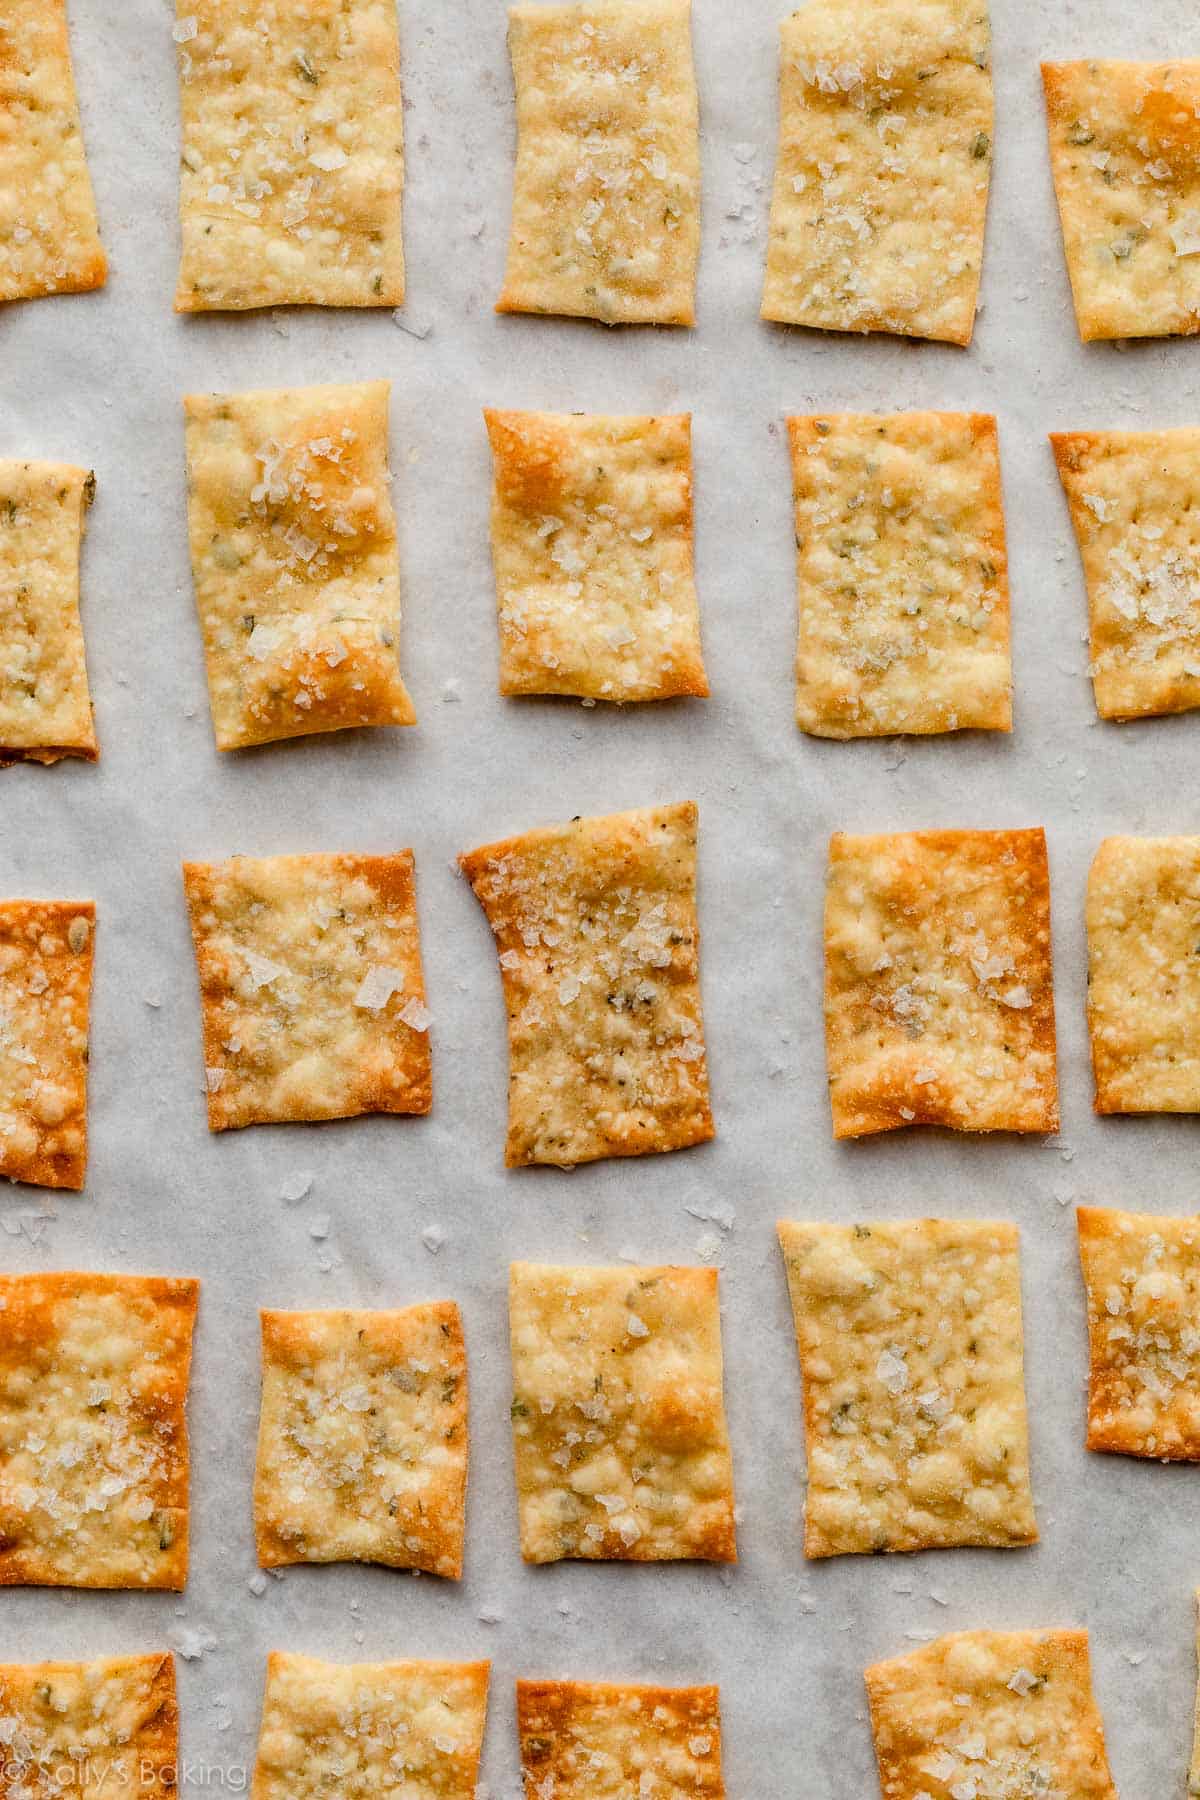
Use a pizza cutter to cut the dough into rectangles, about 3 x 1.5 inches in size. A ruler is helpful here, but don’t worry about trying to cut perfect rectangles. The crackers will all shrink a bit and end up wonky shapes with uneven edges—all part of their rustic charm! These are handmade crackers, they’re not going to look like they were cut by machines in a factory.
The number of crackers you’ll get depends on how thin you roll the dough, how large you cut the crackers, and how much scrap you discard. My team and I typically got around 75–80 crackers per batch (but to be honest, we usually lost count…).
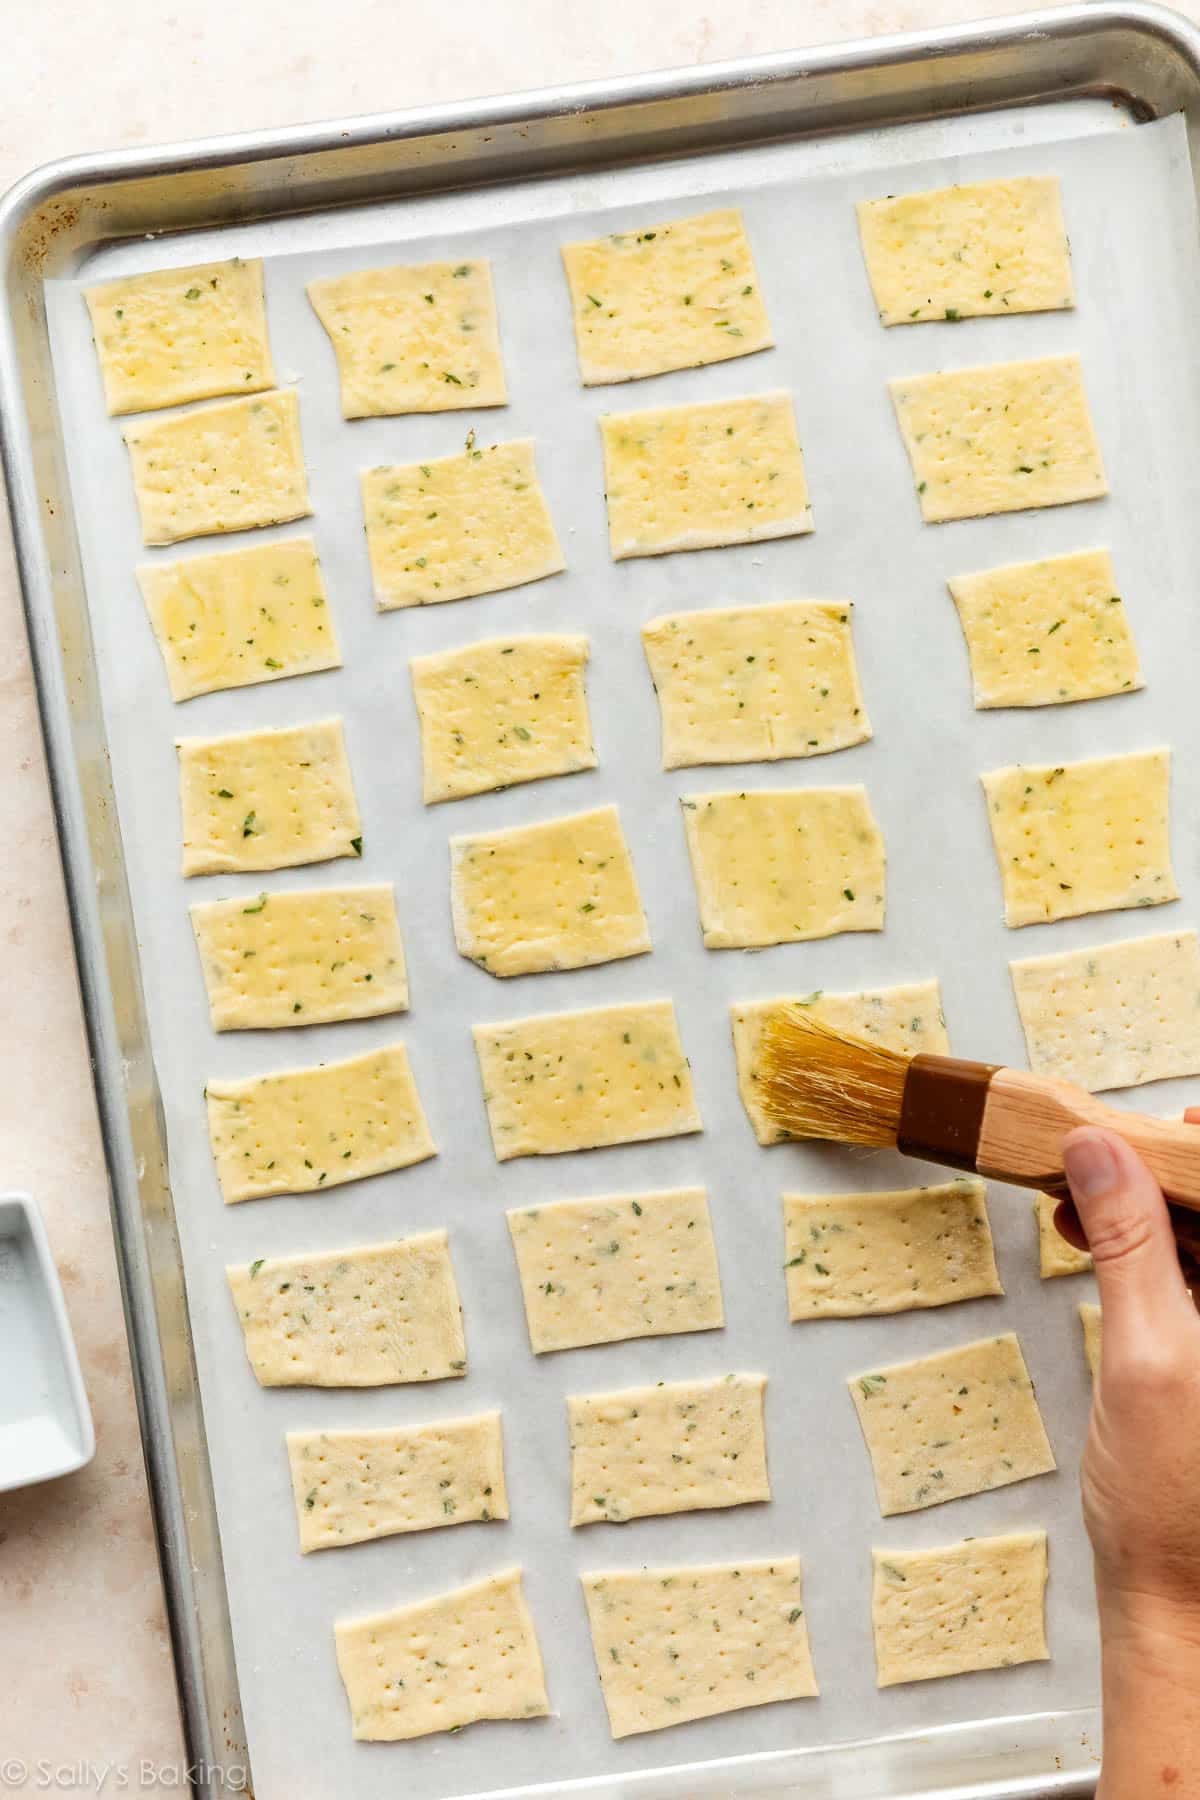
Transfer the cut crackers to a parchment-lined baking sheet. It’s best to use a light-colored (silver) baking sheet, rather than a dark-colored one, so the crackers don’t over-brown. I use and recommend these half sheet pans.
Dock (i.e., poke holes in) the crackers several times with a fork. This helps steam escape and prevents large bubbles forming. (You’ll still get some bubbling, that’s normal.)
Brush with olive oil and sprinkle with flaky sea salt. If you like, you can also sprinkle a little more of your chosen add-in on top, such as sesame seeds or everything bagel seasoning.
And bake! At 425°F (218°C), these crackers take about 9–12 minutes, give or take, depending on the size and thickness you make them. You’re aiming for golden brown, crispy crackers. They should continue to crisp up a bit more while they cool on the baking sheet.
And then repeat the shaping/baking steps with the remaining half of the cracker dough.
Success Tips for Making Homemade Crackers
- Let the dough rest. Trying to roll it out too soon is an exercise in frustration, trust me on this!
- Roll the dough out suuuuuper thin. The crackers need to be very thin to bake up crispy. Too thick and they taste a little chewy.
- If the dough keeps shrinking back as you roll it out, cover it lightly and let it rest for 5 minutes to allow the gluten to relax, then try again.
- Use a light-colored (silver) baking sheet, not a dark baking sheet, and make sure your parchment paper is safe for high-temperature baking.
- Rotate the pan(s) halfway through baking, for even browning. Ovens can have hot spots, and this recipe will show you where they are!
- We don’t recommend using gluten-free flour in this recipe. The test batches we tried with different brands of GF flour came out chip-your-teeth hard. You’re better off looking for a cracker recipe that has been developed specifically to be gluten free.
- Homemade crackers get stale a lot faster than store-bought crackers, because they don’t have added preservatives. Store them in an airtight container in a dry spot, and, if needed, re-crisp them in the oven at 350°F (177°C) for up to 10 minutes.
Get creative and have fun with it—let us know what flavors you try in the comments!

Homemade Artisan Crackers
- Prep Time: 40 minutes
- Cook Time: 12 minutes
- Total Time: 1 hour, 20 minutes (includes cooling)
- Yield: 75–80 crackers
- Category: Appetizer
- Method: Baking
- Cuisine: American
Description
Give snack time an upgrade with flavorful homemade artisan crackers. Crispy, salty, savory, and endlessly customizable, the simple dough comes together quickly and easily in one bowl from basic pantry ingredients.
Ingredients
Crackers
- 2 cups (250g) all-purpose flour, plus more for kneading and rolling
- 1 teaspoon granulated sugar
- 1 teaspoon salt
- 1/2 teaspoon onion powder
- 1/4 tsp garlic powder
- 1 Tablespoon finely chopped fresh rosemary or other add-in (see Notes)*
- 2/3 cup (160g/ml) water
- 3 Tablespoons (41g/45ml) extra-virgin olive oil, plus more for brushing on top
- flaky sea salt, for topping
Instructions
- In a large bowl, whisk together the flour, sugar, salt, onion powder, garlic powder, and rosemary (or other add-ins). Pour in the water and olive oil and stir with a wooden spoon or silicone spatula until the dough comes together in a clump.
- Turn the dough out onto a lightly floured work surface. Lightly flour your hands and the dough and knead it, sprinkling on a little more flour as you go, until it’s no longer sticking to your hands and you can shape it into a rough ball, about 1 to 2 minutes. Return the dough to the bowl and cover the bowl with plastic wrap. Let the dough rest for at least 10 minutes, and up to 1 hour at room temperature.
- Preheat the oven to 425°F (218°C) and line large silver baking sheets with parchment paper.
- Cut the dough in half. Keep one half of the dough covered while you work with the other half.
- On a lightly floured work surface with a lightly floured rolling pin, roll one half of the dough out into a rectangle. Roll the dough very thin—about 1/16th of an inch (1.5mm). If the dough keeps shrinking back as you try to roll it out, lightly cover it and let it rest for 5 minutes, then try again. (Don’t worry if it shrinks, that’s completely normal and expected.)
- Using a ruler and a pizza cutter, cut the dough into small rectangles about 3 x 1.5 inches in size. Carefully transfer the crackers to the prepared baking sheet(s).
- Repeat steps 5 and 6 with the second half of dough.
- Dock (poke holes in) the crackers several times with a fork. Brush with olive oil, then sprinkle with flaky sea salt (and everything bagel seasoning or sesame seeds, if making those varieties. Note that extra seasonings on top can sometimes fall off of the crackers when eating them).
- Bake until golden brown and crispy, about 9–12 minutes. To ensure even browning, rotate the baking sheet(s) halfway through baking.
- Let crackers cool completely on the baking sheet(s) set on a cooling rack. Crackers need several minutes of cooling before they taste crispy. They taste fantastic with hummus, crab dip or other dips, various cheeses, or serve with a cranberry pecan cheese ball.
- Store in an airtight container at room temperature in a dry place for up to 2 days. To re-crisp crackers, spread them on a baking sheet and bake at 350°F for 10 minutes. Cool completely before serving.
Notes
- Make Ahead & Instructions: These crackers taste best for up to 2 days after you make them. See step 11 for how to re-crisp them, if desired. You can freeze cooled crackers. Cover tightly and freeze up to 3 months. Thaw at room temperature. Re-crisp if needed (see step 11).
- Special Tools (affiliate links): Glass Mixing Bowl | Whisk | Wooden Spoon or Silicone Spatula | Rolling Pin | Fluted Pastry Wheel or Pizza Cutter | Baking Sheets | Parchment Paper | Pastry Brush | Flaky Sea Salt | Cooling Rack
- Other Flavors/Add-Ins: Do not leave the crackers plain. You need a flavor in the dough. Instead of rosemary, try another favorite herb, or any of these team favorites:
- Black Pepper & Thyme: 2 teaspoons freshly cracked black pepper (do not use pre-ground fine pepper) + 1 Tbsp finely chopped fresh thyme
- Everything & Chives: 1 Tbsp everything bagel seasoning (plus more for sprinkling on top) + 1 Tbsp dried chives
- Sesame Seed: 1 and 1/2 Tbsp sesame seeds (plus more for sprinkling on top)
- Gluten-Free Flour? We don’t recommend using gluten-free flour in this recipe. The test batches we tried with different brands of GF flour came out break-your-teeth hard. You’re better off looking for a cracker recipe that has been developed specifically to be gluten free.
- Whole Wheat Flour? Crackers made with whole wheat flour were also quite hard. If you want to use whole wheat flour, try using half all-purpose and half whole wheat. Expect a slightly dense, less crisp cracker.


Reader Comments and Reviews
These crackers are SO GOOD. I used half all purpose flour half wheat flour and they were still crunchy and delicious! They were also super easy and quick to make!
Very easy to make, and so savory! I took Sally’s advice and re-crisped them a few hours after baking because they felt a little chewy. The second bake crisped them right up.
Very easy to make, and so savory! I took Sally’s advice and re-crisped them a few hours after baking because they felt a little chewy. The second bake crisped them right up.
I made this recipe sans sugar, as we are on a sugar-free diet right now, and it still worked! Like some of the other reviewers stated, I wish I would have rolled the crackers more thinly. Nevertheless, this was a relatively easy and fun baking challenge to complete. Thanks, Sally and team!
So easy! I’m excited to try different add ins
Hi! Can you freeze the second half of the dough before it’s baked?
Hi Marie, we know the baked and cooled crackers can be frozen (and then need to be re-crisped in the oven after thawing), but have not personally tested freezing the dough. We assume it would be just fine, though. We plan to test it ASAP!
These are so easy and delicious! I used half whole wheat flour and a spicy pepper spice mix and they turned out great!
These Artisian crackers are so good & easy! They were crunchy enough, yet didn’t break when I scooped pimento cheese!
Great recipe! I love cooking with my two year old toddler and this was a forgiving recipe for him to try. It didn’t matter if he over-kneaded or the crackers weren’t cut perfectly square. Lots of fun and yummy!
Great recipe
Hi Sally and Team! Great recipe! I made mine with the everything but the bagel seasoning. Delicious! Since I don’t really 100+ crackers staring me in the face ☺️ I was wondering if the dough can be frozen or refrigerated before baking?
Easy to follow and delicious as always!
Easy and delicious
Easy and delicious
Crackers were delectable! Easy instructions to follow. A little tedious, but worth the effort I would recommend to keep your eye on the time because depending on the thickness of your dough, they could be perfect to burnt very quickly. I found 10 mins to be good for me.
Made the artisan crackers topped with everything but the bagel seasoning. Delish but not as crispy as I had hoped.
Could you use dried rosemary to season?
Hi Joanna, yes, you can!
So easy and so good! I used Herbes de Provence and couldn’t be happier! Even made some into heart shapes! Would be so cute for holiday charcuterie plates!
What a great idea! Cut them into holiday shapes!
I had never made crackers before, but this recipe was very easy to follow—and most importantly, enjoyable to follow through! I loved the added rosemary and they are perfect with sea salt flakes. I’m excited to share these crackers with my family.
This is a super simple & quick recipe! We tried the rosemary version, and it has just the right amount of flavor. I do wish I’d have been a little more generous with the flaky salt – a lesson for next time! It goes great with my jalapeno popper chicken salad. Also love the fact that they are sturdy enough to scoop up the chicken salad without breaking- the club crackers I’ve been eating with it always seems to snap as I scoop.
Can you use dried rosemary?
Hi Laurie, yes, you can. Enjoy!
Can I use my kitchen aid mixer?
Hi Hilarie, you can use a stand mixer, but you really don’t need to. Also, the dough is quite sticky, and will likely stick to the beater (and would definitely stick to the beaters of a hand mixer).
I did a black pepper and thyme version. Very crispy and they go great with hummus and some celery!
Do you think it would work to roll the dough through a pasta machine?
Absolutely!
Definitely roll them thinner than you think, I thought I rolled mine plenty thin but I did not. However the flavor is bang on and they’re so tasty.
Hello,
Could whole wheat flour be used in this recipe?
Suzanna
Hi Suzanne, see the post above! Whole wheat flour created incredibly tough crackers, too. (You can try using 1/2 all-purpose and half whole wheat, though.)
Do you think a pasta roller would work with this dough?
Yes, definitely.
Instead of using a rolling pin we put the cracker dough through our Atlas pasta roller (setting about 5 or 6). Keeps the thickness relatively uniform for better baking.
Can these be rolled out on parchment paper, cut, oiled and baked instead of moving from cutting to parchment?
You may have difficulty with the parchment paper sliding when rolling out the dough very thinly, but I’m sure that would be fine!
Hi! Can you freeze these after baking? Would be good to have on hand.
Yes, absolutely. See freezing instructions.
Instead of rolling the dough can you feed it through a pasta maker until it gets thin enough?
I was wondering if you can make these crackers keto? If not, I wonder if you have a keto style cracker recipe? My sister does not eat anything carbs so I would like to make these crackers for your crab dip (which btw is fantastic).
Hi Brenda, I’m really unsure. For best results, I would search for a keto cracker recipe, as adjusting this base recipe may lead to disappointing results.