

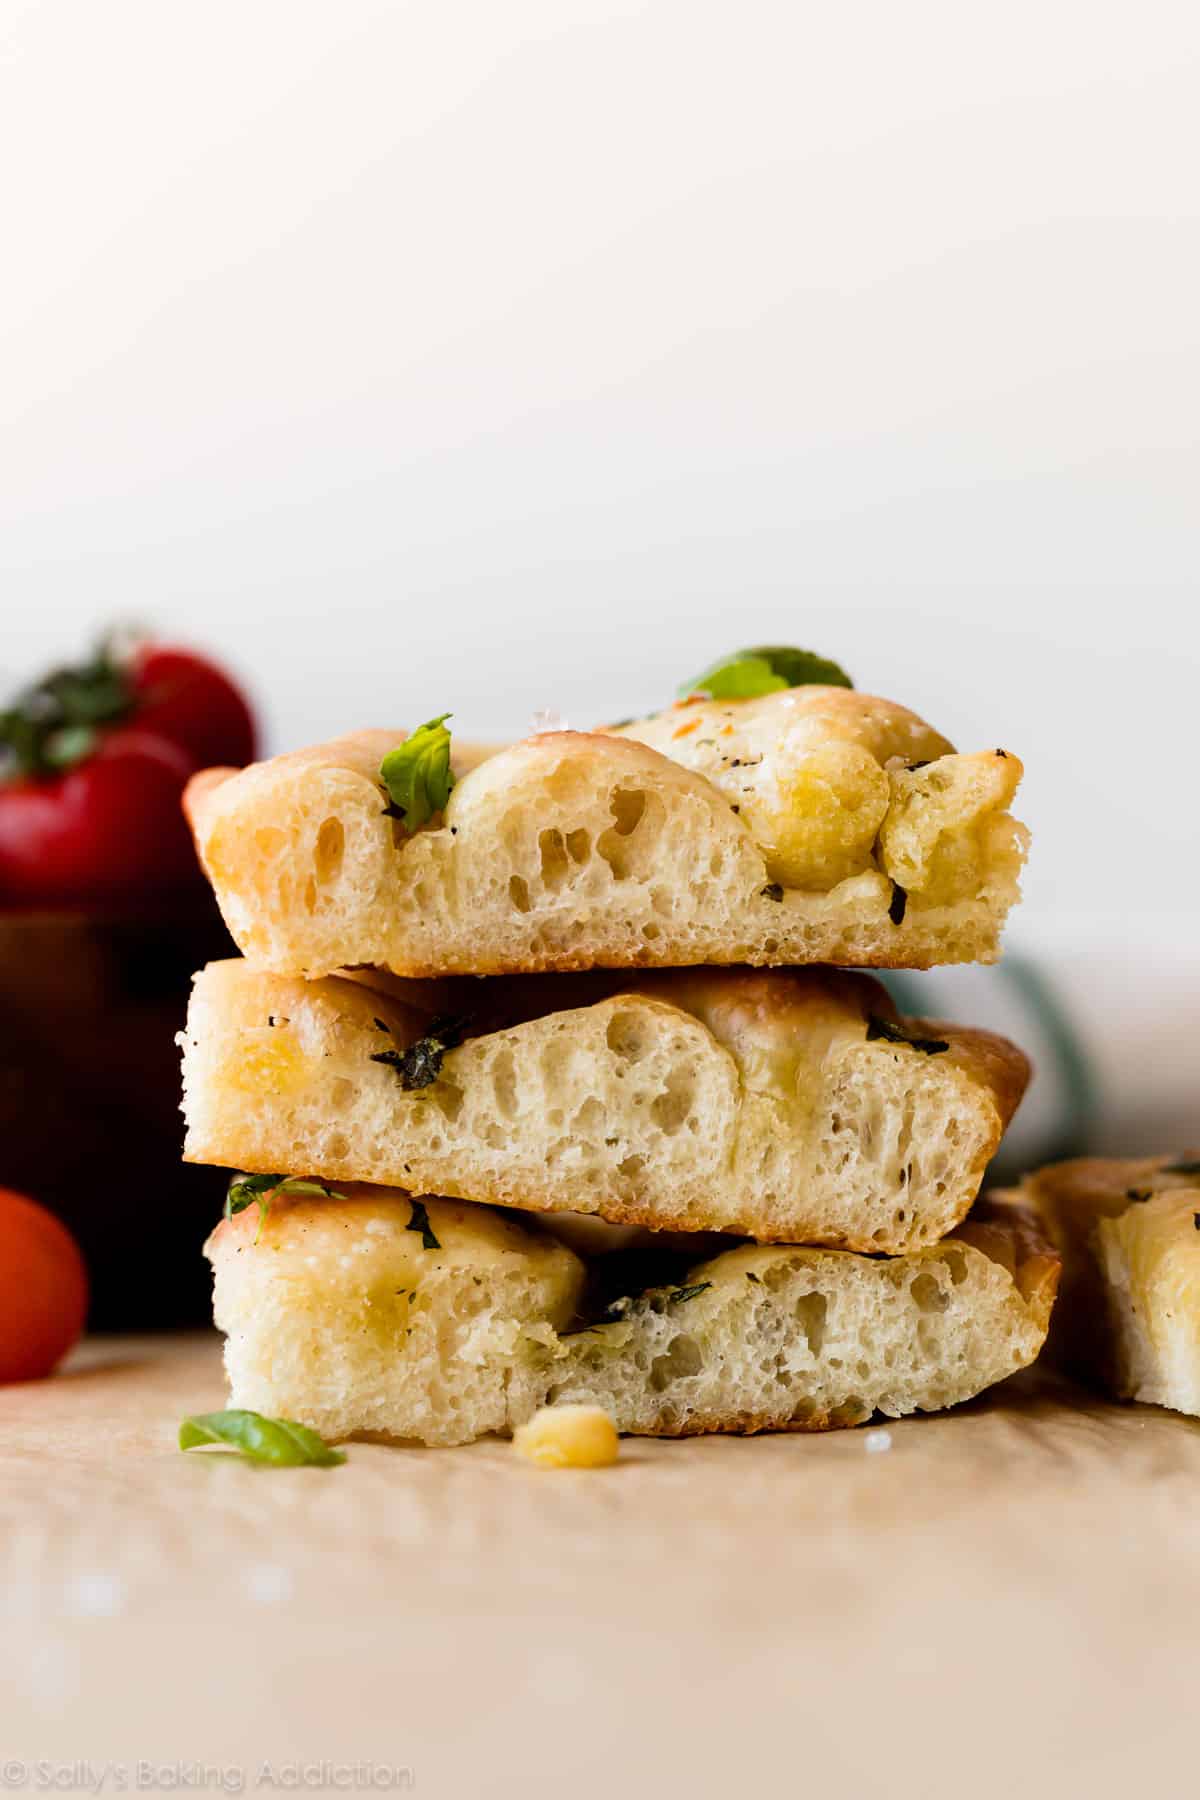
This simple 6 ingredient focaccia dough is a wonderful starting point for many different flavors, including garlic rosemary herb focaccia. The homemade bread is chewy and soft in the center with a mega crisp exterior. For the BEST flavor, let the dough rest in the refrigerator overnight. Olive oil seeps down and infuses every bite. You’ll love it!

Let’s make focaccia!! I’ve been working on perfecting focaccia for awhile. Focaccia is an Italian yeast bread. At the heart of it, focaccia is pizza dough without the sauce and cheese. Though it appears plain, focaccia is anything but boring. Its defining characteristics are the olive oil infused flavor and deliciously crisp exterior. Olive oil enrobes the entire crust, seeping into the interior as the bread bakes. Herbs and garlic are popular toppings, but you can add anything like olives, tomatoes, sesame seeds, parmesan cheese, pine nuts, pesto, caramelized onions, and more.
Pizza is a meal, but focaccia can be part of a meal, an appetizer, a soup dipper, a sauce soaker-upper, and even the crust of a sandwich or panini. I particularly enjoy serving it in the summer and always include it on my menu of Memorial Day recipes. Regardless of how and when it’s served, this garlic rosemary herb focaccia is remarkably chewy, rich, and flavorful.
Video Tutorial: Garlic Herb Focaccia
Sit back, relax, and watch as I walk through each step in this garlic rosemary herb focaccia recipe. In fact, most of the “work” is hands-off while the dough rises and rests so you can literally sit back and relax when it’s your turn to make it!
Only 6 Ingredients in Focaccia Dough
Focaccia dough comes together with only 6 basic ingredients. Whether or not you’re a seasoned baker, I bet you have most of these items in your kitchen. This recipe yields a big pan of bread and leftovers freeze wonderfully. (We’ve been snacking on test recipes for weeks now!) If you don’t need that much bread on hand, feel free to halve the recipe.
Let’s quickly discuss the importance of each ingredient.
- Yeast: Yeast raises focaccia bread. If you’re nervous about working with yeast, I encourage you to review my Baking with Yeast guide. You can use active dry or instant yeast. I played around with different amounts and ultimately favored the bread with less yeast than some other recipes call for. The flatter the focaccia, the more the interior is infused with the olive oil and toppings!
- Sugar: 2 teaspoons of sugar feeds the yeast.
- Warm Water: When combined with liquid and sugar, yeast makes dough rise. Use warm water to cut down on rise time, about 100-110°F. Anything over 130ºF kills the yeast.
- Salt: A lot of focaccia’s flavor comes from salt and this dough requires a lot of it. For the best flavor, I strongly recommend using kosher salt.
- Olive Oil: Some recipes only call for olive oil as the topping, but adding olive oil to the dough creates a richer-tasting bread. You’ll also use it to coat the pan and top the dough before baking, just like we do when we make pesto pizza. Use your favorite kind—I prefer extra virgin olive oil.
- Bread Flour or All-Purpose Flour: I tested this focaccia with both and prefer the bread flour variety. Both are great, but bread flour has a higher protein content so it yields a chewier texture. This recipe calls for 4.5–5 cups of flour, and if using bread flour, you’ll need closer to 4.5 cups since it absorbs more water. If using all-purpose flour, you’ll need closer to 5 cups. It all depends on how sticky the dough feels. Adding a bit too much or too little flour won’t ruin the recipe, so don’t be nervous.
Baking with Yeast Guide
Reference this Baking with Yeast Guide whenever you work with baker’s yeast. I include practical answers to all of your common yeast questions!

How to Make Garlic Herb Focaccia
Focaccia is a very simple bread. This recipe requires a rise, plus a considerable amount of “resting” in the refrigerator. Most of the dough’s flavor is developed during this cold resting period, so I don’t recommend rushing it. You can’t rush good bread.
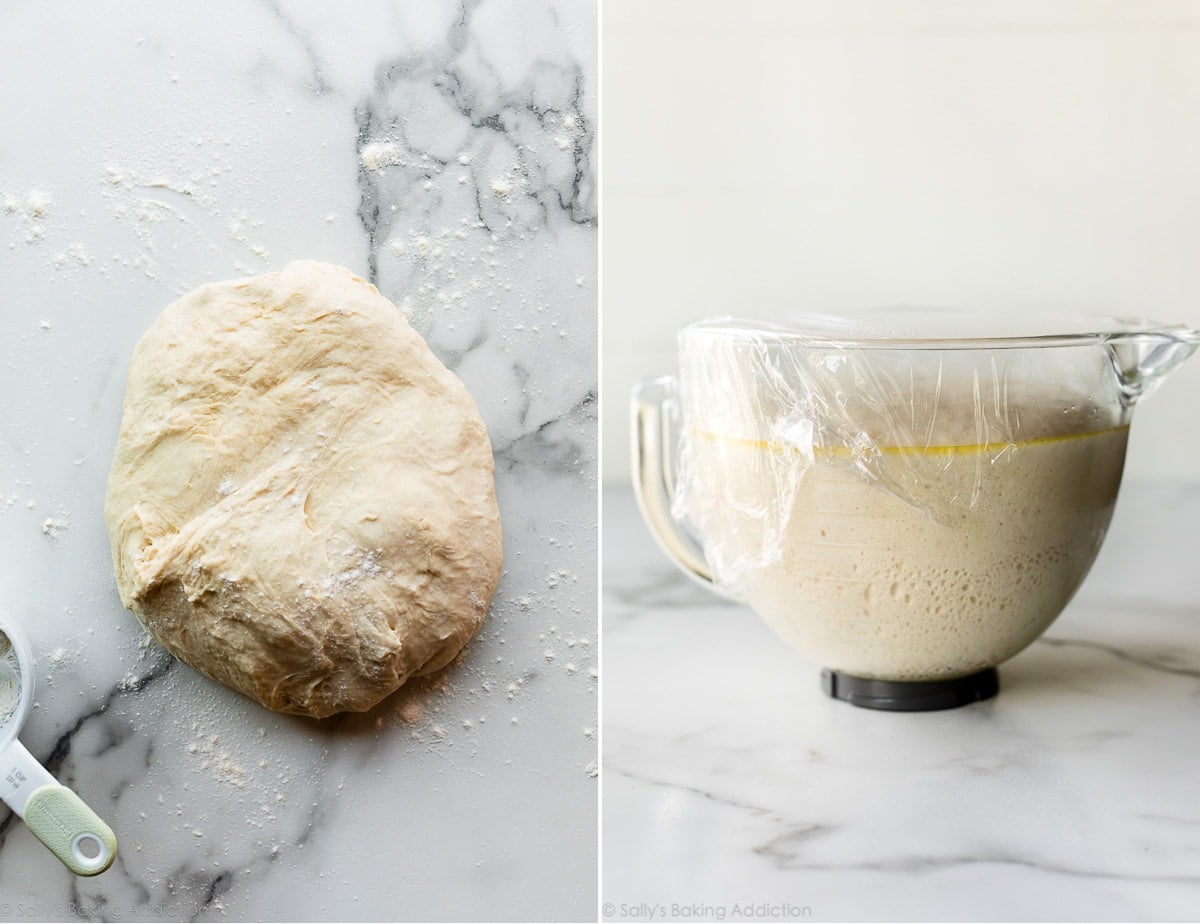
- Make the dough: Mix the ingredients together, and then knead the dough by hand or with your mixer. I like doing this by hand and you can watch me in the video, or in my separate How to Knead Dough tutorial.
- Let the dough rise: Place dough into a greased bowl, cover tightly, then set aside to rise for about 2–3 hours.
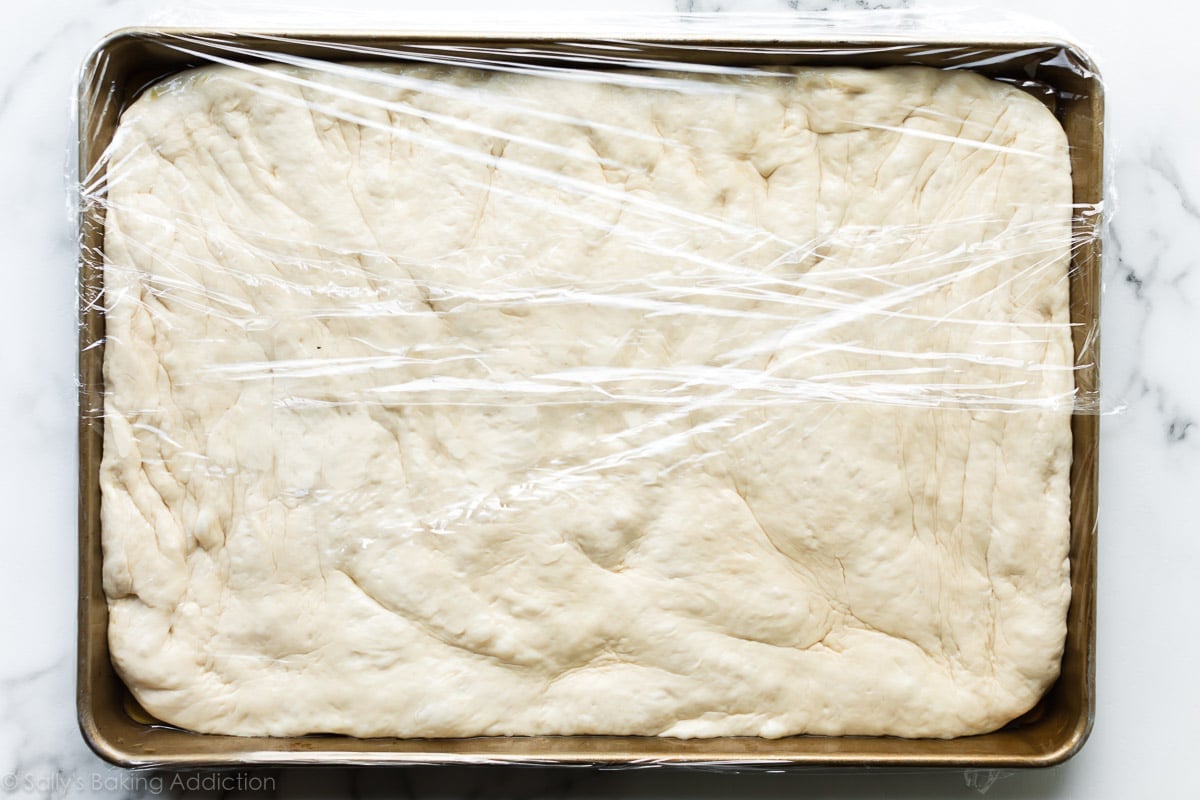
- Flatten dough out onto a baking pan: Punch down the risen dough to release the air, then use your hands to flatten the dough out onto an oiled baking sheet. If the dough keeps shrinking, cover it for 5 minutes to let the gluten settle.
- Let the dough rest in the refrigerator: The cold temperature slows down the rising. In fact, there’s so little yeast that the dough will hardly rise at all during this step. Let it rest in the refrigerator for as little as 1 hour and up to 24 hours. The longer it rests, the better the flavor. I recommend at least 12 hours, just like with my artisan bread and ciabatta bread recipes. You won’t regret it!
- Remove from the refrigerator: Let the dough hang out on the counter as you preheat the oven and prep the toppings. It will rise a little bit, but not much.
- Preheat oven: Focaccia bakes in a very hot 450°F (232°C) oven.
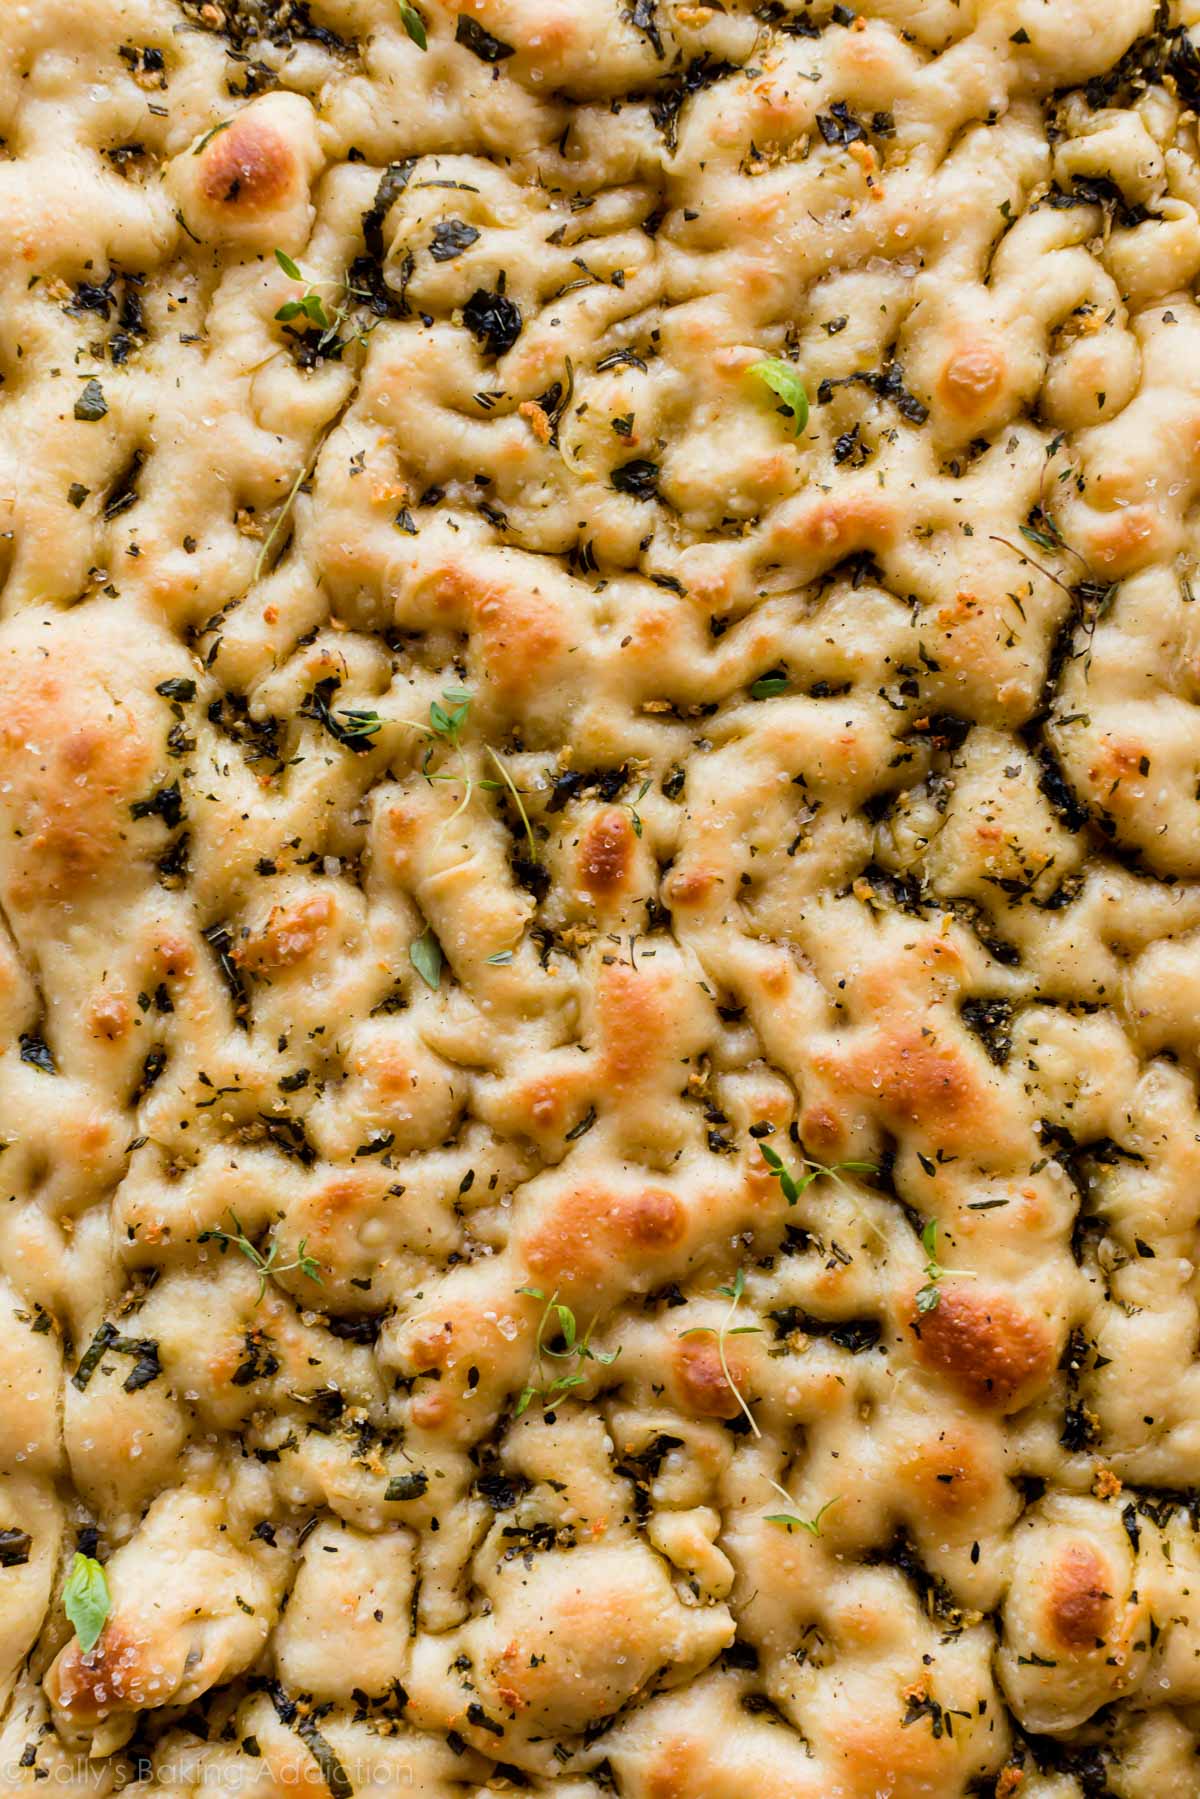
- Dimple the dough: A good stress reliever! Use your fingers to dimple the entire surface of the dough just like we do when making cold veggie pizza. The dimples give the olive oil and toppings “a place to go.” This step is fun!
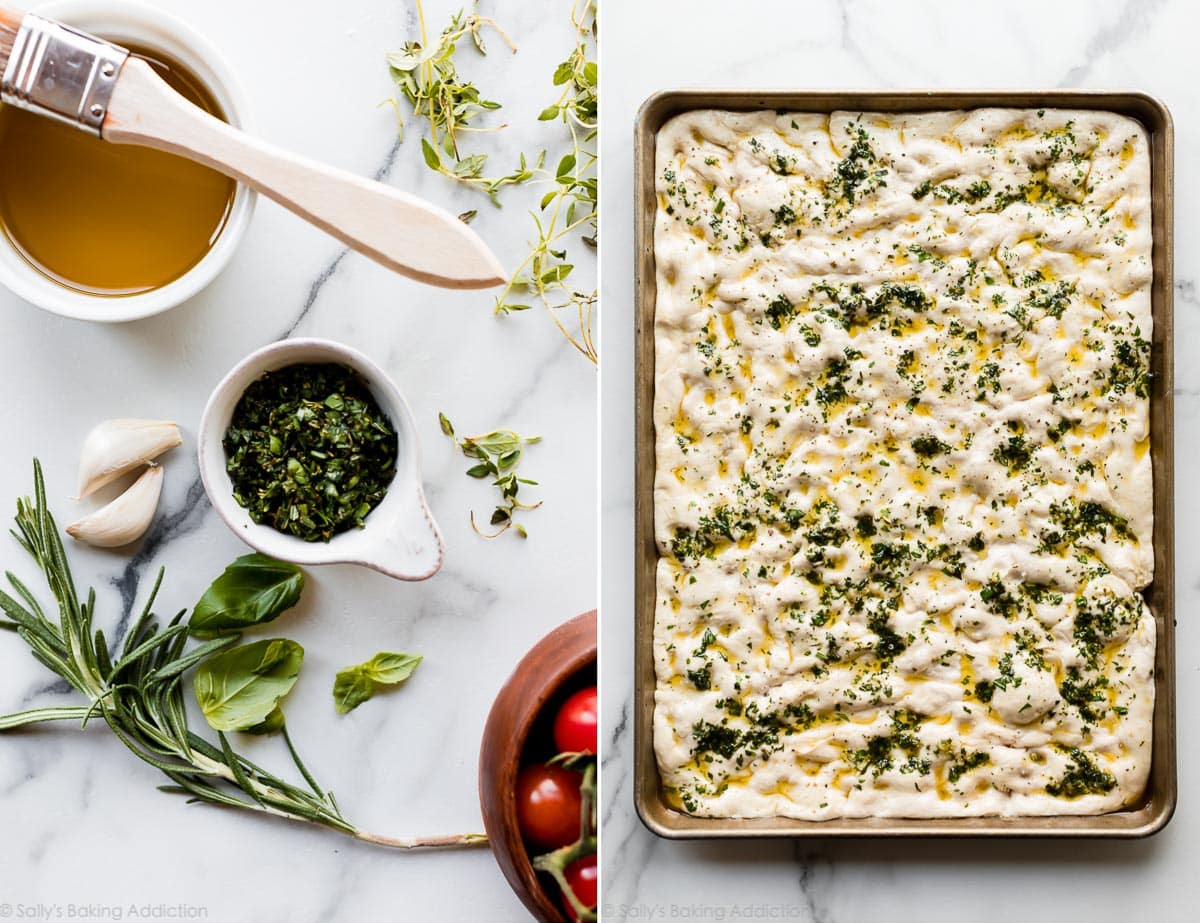
- Add toppings: A simple blend of fresh garlic, rosemary, thyme, and basil is a favorite, but I have plenty of focaccia topping suggestions listed below. No matter which topping you use, drizzle olive oil all over the surface.
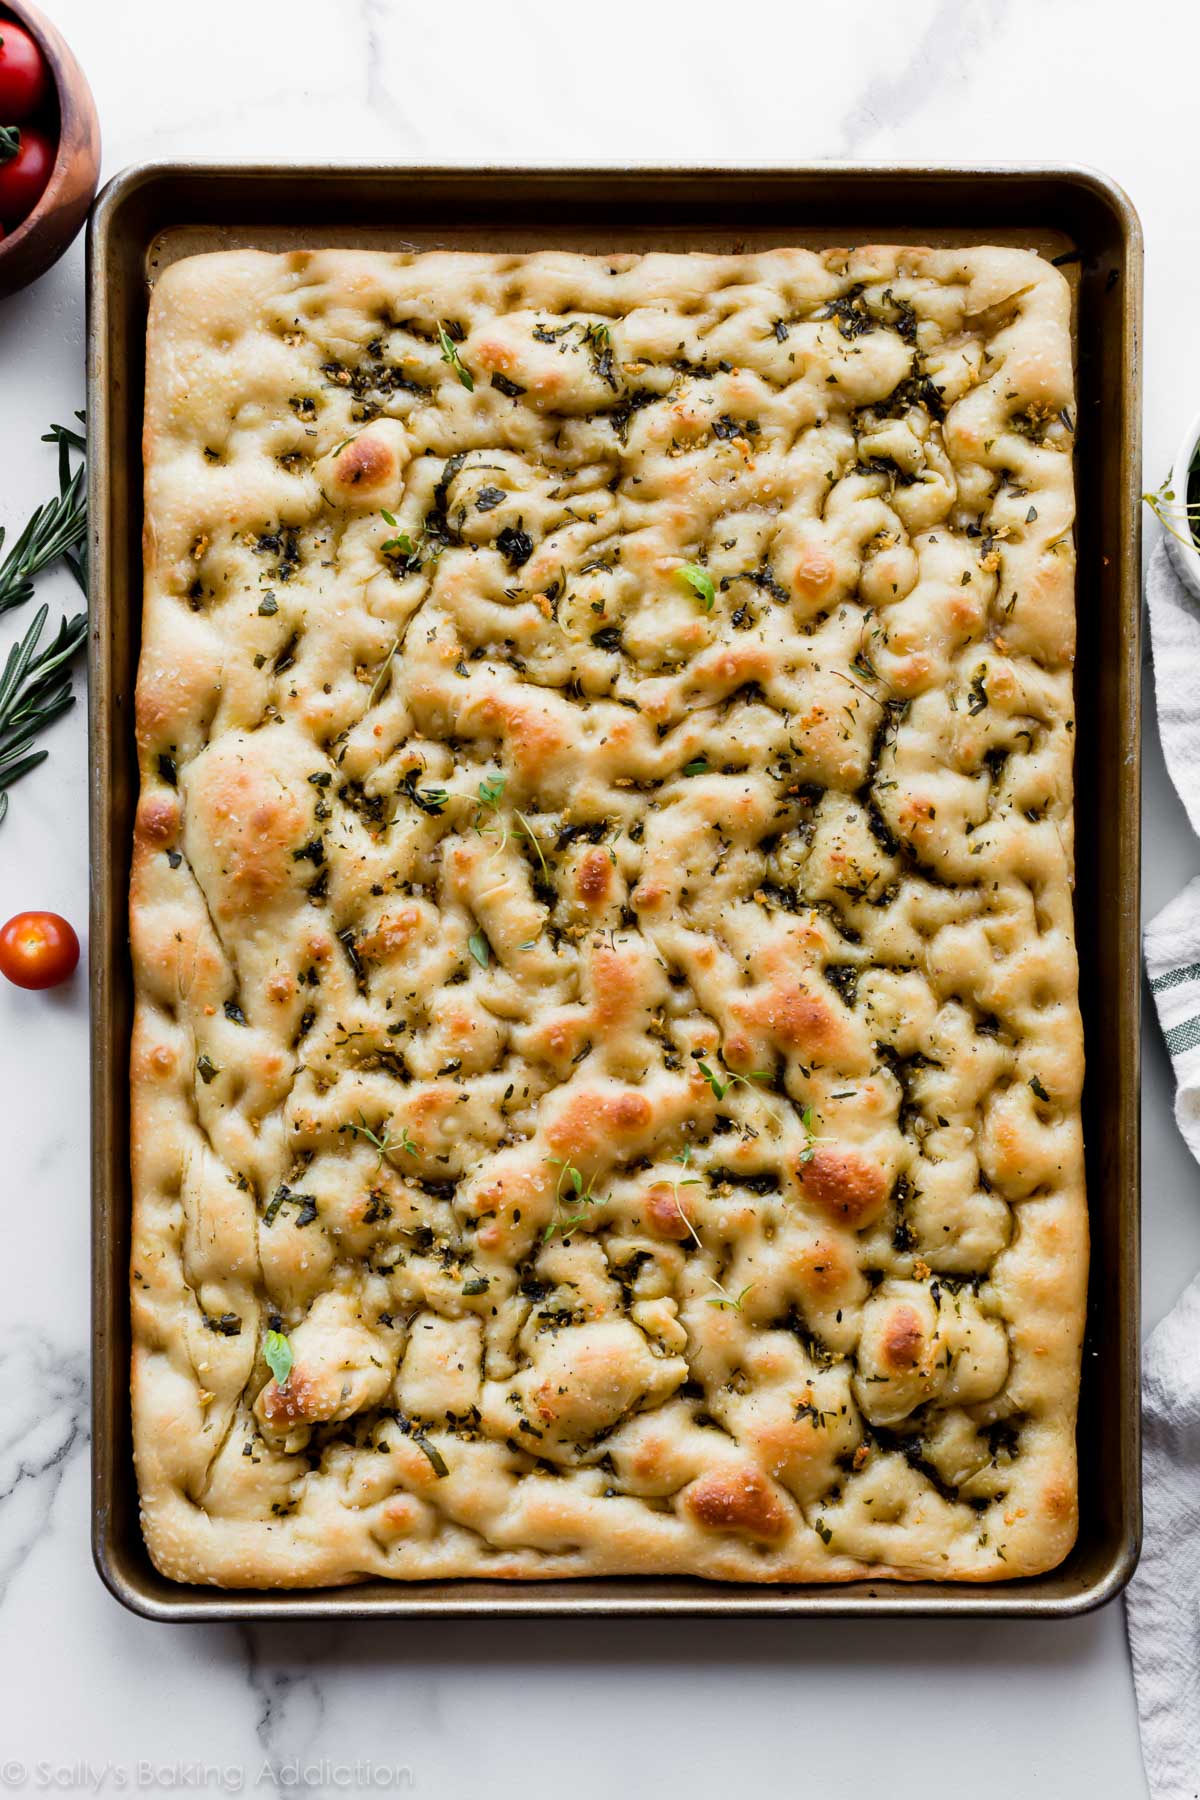
- Bake: Bake until golden brown. I set the oven to broil for the last minute to really crisp up the surface. Highly recommended!
The dough stretches to fit a large baking sheet. You can also divide the dough in half for 2 smaller focaccia loaves. I love that there’s no rolling pin or complicated shaping required.
After the dough rests in the refrigerator, dimple it with your fingers, then add toppings:
Make Ahead Recipe
As mentioned above, the longer the dough rests, the better it tastes. Focaccia is a convenient make-ahead recipe since you can do most of the work the day before serving. The bread tastes AWESOME warm from the oven, but it lasts all day if you want to bake it several hours prior to serving. Leftovers keep well for a few days or even a few months in the freezer, but some of the crispiness is lost over time. However, a few minutes in a preheated oven quickly brings leftover focaccia back to life!
Freezing dough: You can also freeze focaccia dough just as you would freeze pizza dough. After the dough rises in the mixing bowl, punch it down to release the air, coat it with a little olive oil, then cover and freeze for up to 3 months. Thaw in the refrigerator. Once thawed, remove the dough from the refrigerator and allow to rest for 30 minutes on the counter. Finally, shape the dough on the baking sheet and continue with the recipe.
Focaccia Toppings
Garlic & rosemary herb focaccia is a classic favorite, but you can customize it with various toppings. There’s truly no limit and here’s a list to prove it. Leave out the garlic and herbs (or keep them!), drizzle the dough with the olive oil, then add any of these toppings:
- Everything Bagel Seasoning
- Cherry Tomatoes or Sliced Tomatoes
- Parmesan (add before or after baking)
- Pesto (add before or after baking)
- Sliced Zucchini
- Pine Nuts
- Sliced Lemons or Lemon Zest
- Sun-Dried Tomatoes
- Olives
- Mushrooms
- Artichokes
- Raw or Caramelized Onions
I topped a test batch with the garlic & herb olive oil called for in the recipe below, plus some pine nuts and thinly sliced tomatoes. We all DEVOURED it.
More Simple Homemade Bread
- Homemade Pizza Dough
- No Yeast Bread
- Soft Pretzels
- Garlic Knots
- Brown Butter Sage Dinner Rolls
- Artisan Bread
- Homemade Garlic Bread
- Cornbread
- Olive Bread
- Whole Wheat Bread

Garlic Rosemary Herb Focaccia
- Prep Time: 16 hours
- Cook Time: 20 minutes
- Total Time: 16 hours, 20 minutes
- Yield: 2 dozen pieces
- Category: Appetizer
- Method: Baking
- Cuisine: Italian
Description
This simple 6-ingredient focaccia dough is a wonderful starting point for many different flavors, including this garlic rosemary herb focaccia. The homemade bread is chewy and soft in the center with a mega-crisp exterior. For the best flavor and texture, let the dough rest in the refrigerator overnight.
Ingredients
- 2 cups (480ml) warm water (between 100–110°F, 38–43°C)
- 2 teaspoons granulated sugar
- 2 teaspoons instant or active dry yeast (slightly less than 1 standard packet)
- 1/4 cup (60ml) extra virgin olive oil
- 1 Tablespoon kosher salt
- 4 and 1/2–5 cups (563–625g) all-purpose flour or bread flour (spooned & leveled), plus more for hands
Topping & Pan
- 5 Tablespoons (75ml) extra virgin olive oil or more as needed, divided
- 2 garlic cloves, minced
- 3–4 Tablespoons chopped fresh herbs such as basil, thyme, and rosemary (or 2 Tablespoons dried herbs)
- sprinkle of coarse salt and freshly ground black pepper
Instructions
- Prepare the dough: Whisk half of the water (1 cup; 240ml), 2 teaspoons sugar, and 2 teaspoons yeast together in the bowl of your stand mixer fitted with a dough hook or paddle attachment. Cover and allow to rest for 5 minutes.
- Add the remaining water, olive oil, salt, and 1 cup (130g) flour. Beat on low speed for 20 seconds, then add 3 and 1/2 cups (440g) more flour. Beat on low speed for 2 minutes. If the dough is still sticking to the sides of the bowl, add the last 1/2 cup (60g) of flour.
- Knead the dough: Keep the dough in the mixer and beat for an additional 5 full minutes, or knead by hand on a lightly floured surface for 5 full minutes. (If you’re new to bread-baking, my How to Knead Dough video tutorial can help here.) If the dough becomes too sticky during the kneading process, sprinkle 1 teaspoon of flour at a time on the dough or on the work surface/in the bowl to make a soft, slightly tacky dough. Do not add more flour than you need because you do not want a dry dough. After kneading, the dough should still feel a little soft. Poke it with your finger—if it slowly bounces back, your dough is ready to rise. You can also do a “windowpane test” to see if your dough has been kneaded long enough: tear off a small (roughly golfball-size) piece of dough and gently stretch it out until it’s thin enough for light to pass through it. Hold it up to a window or light. Does light pass through the stretched dough without the dough tearing first? If so, your dough has been kneaded long enough and is ready to rise. If not, keep kneading until it passes the windowpane test.
- Let the dough rise: Lightly grease a large bowl with a teaspoon of oil or some nonstick spray—just use the same bowl you used for the dough. Place the dough in the bowl, turning it to coat all sides in the oil. Cover the bowl with aluminum foil, plastic wrap, or a clean kitchen towel. Allow the dough to rise at room temperature for 2–3 hours or until double in size. (Tip: For the warm environment on a particularly cold day, heat your oven to 150°F (66°C). Turn the oven off, place the dough inside, and keep the door slightly ajar. This will be a warm environment for your dough to rise. After about 30 minutes, close the oven door to trap the air inside with the rising dough. When it’s doubled in size, remove from the oven.)
- Prepare the pan: Generously grease a 12×17-inch baking pan (with at least 1-inch-tall sides) with 2 Tablespoons of olive oil. This is the base layer of the bread, so be generous with the oil. A pastry brush is helpful to spread it.
- Flatten the dough: When the dough is ready, punch it down to release any air bubbles. Place on the oiled baking pan, then stretch and flatten the dough to fit the pan. Don’t tear the dough. If it’s shrinking (mine always does), cover it with a clean towel and let it rest for 5–10 minutes before continuing. This lets the gluten settle and it’s much easier to shape after that.
- Let the dough rest: Cover the dough tightly and let it rest in the refrigerator for at least 1 hour and up to 24 hours. The longer it rests, the better the flavor. I recommend at least 12 hours.
- Remove the dough from the refrigerator and let it sit at room temperature as you preheat the oven and prepare the toppings. Keep it covered. It may rise a little during this time, but not much.
- Preheat oven to 450°F (232°C). Allow it to heat for at least 10–15 minutes so every inch of the oven is very hot.
- Prepare the toppings: Whisk the 3 remaining Tablespoons of olive oil with the minced garlic and herbs. Set aside.
- Using your fingers, dimple the dough all over the surface. You can watch me do this in the video above. Drizzle on the olive oil topping and use your hands or a pastry brush to spread it all over the top. Add a little more olive oil if needed so the dough is completely covered. (This creates the crisp crust!) Sprinkle with a little coarse salt and freshly ground black pepper.
- Bake for 20–23 minutes or until lightly browned on top. If desired, broil on high for the last minute to really brown the top.
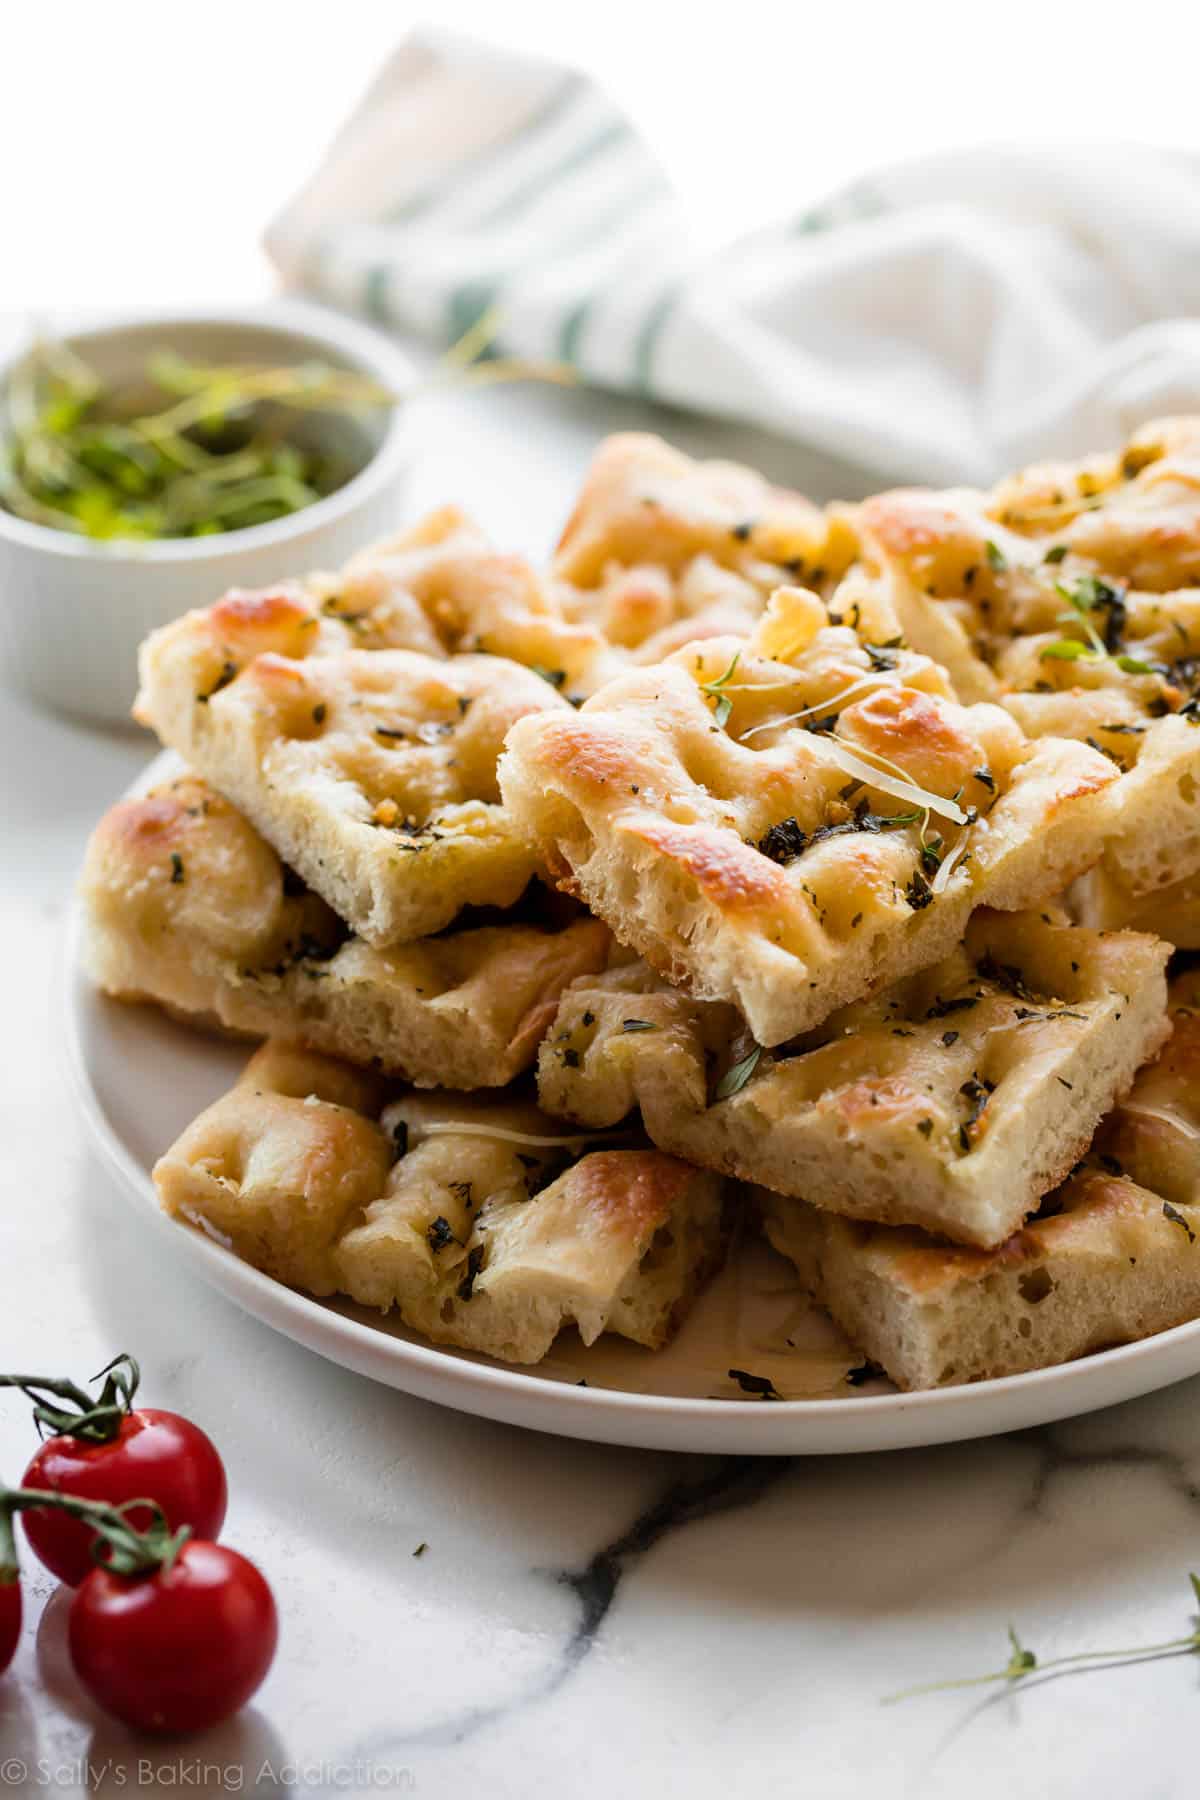
- Cut and serve hot or let it come to room temperature before slicing and serving. Focaccia tastes wonderful warm or at room temperature. Cover leftover focaccia tightly and store at room temperature for 2 days or in the refrigerator for 1 week. You can also freeze the baked and cooled focaccia for up to 3 months. Thaw in the refrigerator or at room temperature. To reheat the slices, you can use the microwave or bake in a 300°F (149°C) oven for 5 minutes.
Notes
- Freezing Instructions: After the dough rises, punch it down to release the air as instructed in step 5. Freeze the dough or portions of the dough to make at a later time. Lightly coat all sides of the dough ball(s) with olive oil. Place the dough ball(s) into individual zipped-top bag(s) and seal tightly, squeezing out all the air. Freeze for up to 3 months. To thaw, place the frozen dough in the refrigerator overnight. Remove the dough from the refrigerator and allow to rest for 30 minutes on the counter, then continue with shaping the dough to fit the baking pan as instructed in step 5. (Even after thawing, the dough must still rest in the refrigerator as instructed in step 6.)
- Make Ahead Instructions: The is a wonderful recipe to begin the day ahead of time. The dough must rest in the refrigerator for at least 1 hour and up to 24 hours, as instructed in step 6. I’ve let it go for as long as 30 hours and the flavor is incredible. I wouldn’t go past 24-30 hours.
- Special Tools (affiliate links): Stand Mixer | 12×17-inch Baking Pan | Pastry Brush
- Smaller Portions: This recipe yields a big pan of bread. You can divide the dough in half and bake smaller portions on 2 baking sheets or 9×13 inch baking pans. If desired, you can divide the dough in half and freeze half of it. Or you can halve the entire recipe.
- Yeast: You can use instant or active dry yeast instead. The rise time in step 3 may be a little quicker if using instant yeast. No matter which yeast you choose, you only need 2 teaspoons which is a little less than 1 standard 7g packet. Reference my Baking with Yeast Guide for answers to common yeast FAQs.
- Flour: You can use all-purpose flour or bread flour. All-purpose flour is convenient for most, but bread flour produces a chewier bread. No matter which you choose, the focaccia is still soft and rich with a crispy exterior. Either flour is fine and there are no other changes to the recipe if you use one or the other. You may need slightly closer to 5 cups of flour if using all-purpose.
Adapted from Bon Appetit & Pizza Crust


Reader Comments and Reviews
I am making focaccia bread and would like to change it up a little by putting sliced (diced)pepperoni and artichoke hearts(sliced) in the dough. If I put both on top I think they might burn or turn very dry. Baking with the grandkids tomorrow so always have to put grated cheese on top with seasonings. We usually make pizza but Gram needs a new bakery option.
Your thoughts Thx Linda
Hi Linda! We haven’t tested adding pepperoni or artichokes to this dough, but you may love our no-knead pizza bread recipe!
Your recipes are Always th best! Thanks for sharing.
Love your books too
If I half the recipe, do I half the yeast amount as well?
Hi Anna, we generally advise against halving yeast recipes. We find it best to make the recipe as-is and then freeze any leftover bread to enjoy at another time.
I made the focaccia recipe from Sally’s latest cookbook and found mine to come out a bit dense so I came to the website for tips and found this recipe, it’s completely different! Is there a reason why the cookbook one does a different technique? No kneading, no sugar, opposite rising temperatures/ time? I’m gong to try this recipe next time over the cookbook and see if I get less dense results. My family loved it anyways!
Hi Brittany! I’m just seeing your question about focaccia now! I’m so glad your family still loved the focaccia. Yes, the cookbook and website versions are intentionally different. The cookbook focaccia uses a more traditional, artisan-style method with folds. It develops deeper flavor but can bake up a bit denser if the dough doesn’t get enough air during the folds or rise. The website recipe is streamlined and more beginner-friendly, with a slightly different dough formula and rise method that tends to produce a lighter, airier crumb. Both are delicious, just slightly different styles of focaccia!
Awesome bread! I submitted this bread with a fancy garden flower design of sundried tomatoes at the fair! And I won a blue ribbon!
Super soft
I love this bread recipe! I made the dough the day before I needed it, spread it out on a cookie sheet as per the instructions, and left it in the refrigerator overnight. I added extra olive oil on the tray, as I found the dough was sticking a bit. Wow! The bread turned out absolutely perfect! It had risen nicely, and tasted amazing! It was way better than store bought, and totally worth the effort! It was the perfect bread to serve at my luncheon. Thanks, Sally!
I turned out with a very delicious flatbread but not a focaccia! I left it in the fridge for 13 hours. Was that too long or not long enough to end up with such a flat and dense dough in the end?
13 hours should be great, Carly! Could the dough have over-proofed on the first rise? That could cause it to collapse.
Hi,
Aarti here, from India. Your website is my go to for good bread recipes, and they are mostly successful.
I plan to start the focaccia today. I want to do 2 batches. I will do one with AP flour. However, i want to do a second one with Whole wheat flour. Any changes needed?? I have made high hydration whole wheat bread before.
Thanks, Aarti
Hi Aarti, This recipe is really best with all purpose or bread flour, but you can try replacing some of the flour with whole wheat. You can expect a slightly dryer and more dense bead. Let us know if you give it a try!
I’m f I wanted to make two pans , can I double the ingredients or do I have to make two separate batches?
Hi Theresa! It’s best to make two batches.
This is the 3rd time I am making it. I leave the dough in the fridge overnight before baking. The crust was crispy and the inside texture soft and chewy. My family loves it. I gave some to a friend and they absolutely enjoyed it. Excellent recipe!
This is the 3rd time I am making it. I leave the dough in the fridge overnight before baking. The crust was crispy and the inside texture soft and chewy. My family loves it. I gave some to a friend and they absolutely enjoyed it. Excellent recipe!
Tried to make this and have failed twice now, both times with KAF AP and a kitchen aid stand mixer. Very tacky dough even with 625g of flour would not come together. Weighing all ingredients 🙁 suggestions?
Hi Sam! There are a lot of variances that go into the consistency of dough, even down to the weather and humidity in the air. There’s nothing wrong with adding just a little more flour to bring the dough into a less sticky and knead-able consistency. Just remember that the dough is supposed to be a little soft, so don’t over-flour it. Hope this helps if you decide to give it another try.
Hey this same thing happened to me! I added loads of extra flour and kneaded and kneaded for 15 minutes. Also no air bubbles formed after first proof. It’s in the fridge for the night now I hope it doesn’t come out dry and dense.
This also happened to me, I had to add SO much extra flour (like an extra 1.5 cups) and knead for like 20 minutes until it came together into a good dough. I feel like the recipe isn’t correct
Agree with you – WAAAAY too much water listed in this recipe
Loved this recipe ! My family ate the entire thing within a day and I’m making more tonight to use for sandwiches for Mother’s Day. I also plan on using this as an appetizer for parties in the future. The one I get from the Italian market is pretty expensive and this recipe is just as good ( even with me probably not making it perfectly )
I have made this recipe many, many times. It comes out deliciously every time. My granddaughter asks me to make it for her on occasion. She thinks that it is divine! Thank you for such a great recipe!
This is the 100% BEST bread I have ever had!! I’m under 15 and my grandfather ( who is a really great cook ), asked me to make it AGAIN!! It’s not too hard and the finished product is the most wonderful thing you will ever taste!! It’s like a full blown party on your tongue!! This will always be my #1 bread recipe to go to!!
We are looking for different variations of focaccia bread. Could we easily use this recipe but change the rosemary to other flavors? Like cinnamon roll, jalapeno, apple, etc?
Hi Lisa, you can certainly experiment with other flavors and spices with this dough. Please do let us know what you try!
Simple and foolproof. Sally’s Baking Addiction scores again.
I made this in what I think is a 16″ cast iron pan, no changes, and it came out excellent! I think it would make a great base for a quick family size pan pizza; just lightly bake it a bit first and top it.
The recipe is fabulous. It was a little dense, not as light and airy. I followed the kneading instructions. Should I have kneaded it less.
I just need a little help. I tried this recipe with store-bought refrigerated pizza dough, followed the instructions on the bag to bring it up to room temp/rise, then your recipe for baking. I did 450 for 23 minutes and it was over-baked, still delicious, just very brown. Should I have baked it at a lower temp, shorter time, or both? I know I should make my own dough, but sometimes I am just to lazy…
Hi Mark! Pizza dough won’t bake the same as this homemade focaccia dough. Your store-bought pizza dough would be best suited for making pizza, Stromboli, or something similar. Let us know if you try this focaccia!
If I want to make a double batch, can I double the ingredients or do I need to make two separate batches?
Hi Theresa! We recommend making separate batches.
Please could you tell me if this could be prepared without a mixer and the hook? Would a bread machine be out of the question? Your recipes have ALL been winners! You and your team are PROS!
You can mix the ingredients together in a large bowl with a wooden spoon or spatula and then we actually prefer to knead the dough by hand anyway (you can watch this step in the video above!). We haven’t tested a bread machine, but let us know if you do!
Can I use 00 flour?
Hi Peggy, we haven’t tested it, but a few readers have reported success with using it. Let us know if you give it a try!
i have tried many focaccia bread recipes. This is by far the best – crunchy and soft at the same time. I used garlic and chopped fresh basil to season. It was delicious and easy to prepare! i loved that I could use the stand mixer to knead the dough. Thank you so very much for the recipe.
This worked out well, mostly….? Despite adding all 5 c of bread flour I still had a very tacky dough. Proceeded as best I could and the end result is airy and tasty, but I was denied the fun of dimpling (my dough was still tacky and springy after 18 h in the fridge). Possible causes: old flour or wet west coast weather? What’s the solve? More flour? Less water? Thanks!
Hi Brett, There are a lot of variances that go into the consistency of dough, even down to the weather and humidity in the air. There’s nothing wrong with adding just a little more flour to bring the dough into a less sticky and knead-able consistency. Just remember that the dough is supposed to be a little soft, so don’t over-flour it.
LOVE LOVE LOVE! Every bit went! I use a high hydration pizza dough, so I was looking for a recipe with detailed instructions. This is it! I mixed some rosemary in the dough, probably 3 sprigs worth, as well as halved olives and reserved about 3 or 4 sprigs for the top, along with the garlic and oil, as directed. I did not have a 12×17, so I popped the full recipe in a 9×13 for a thick focaccia. It came out incredible. Perfect appetizer or side to pair with a holiday dinner. My only gripe, if you can even call it a gripe, is I’m used to a focaccia with a very soft top. This one almost makes a crust but nonetheless delicious
This can make two 9×13 pans?
Hi Mike, Yes you can divide the dough in half in step 5 and use 2 9×13 inch baking pans instead.
Looks so good I’ll try it.. but nervous because my focaccia always sticks! Do I have to buy those beautiful ridged pans you recommend?
THANKS for yet another wonderful recipe to try!
Hi John, any 12×17-inch baking pan (with at least 1-inch-tall sides) will work! Be sure to generously grease it with 2 Tablespoons of olive oil to prevent sticking. We hope this recipe is a new favorite if you give it a try!
I LOVED IT SO MUCH!!!!
For better flavor rest in the fridge overnight. When should I put it away after kneading? I have seen some recipes that call for letting the dough rise for a time and then placing it in the cooler. What is the recommendation?
See recipe Notes for overnight instructions!