

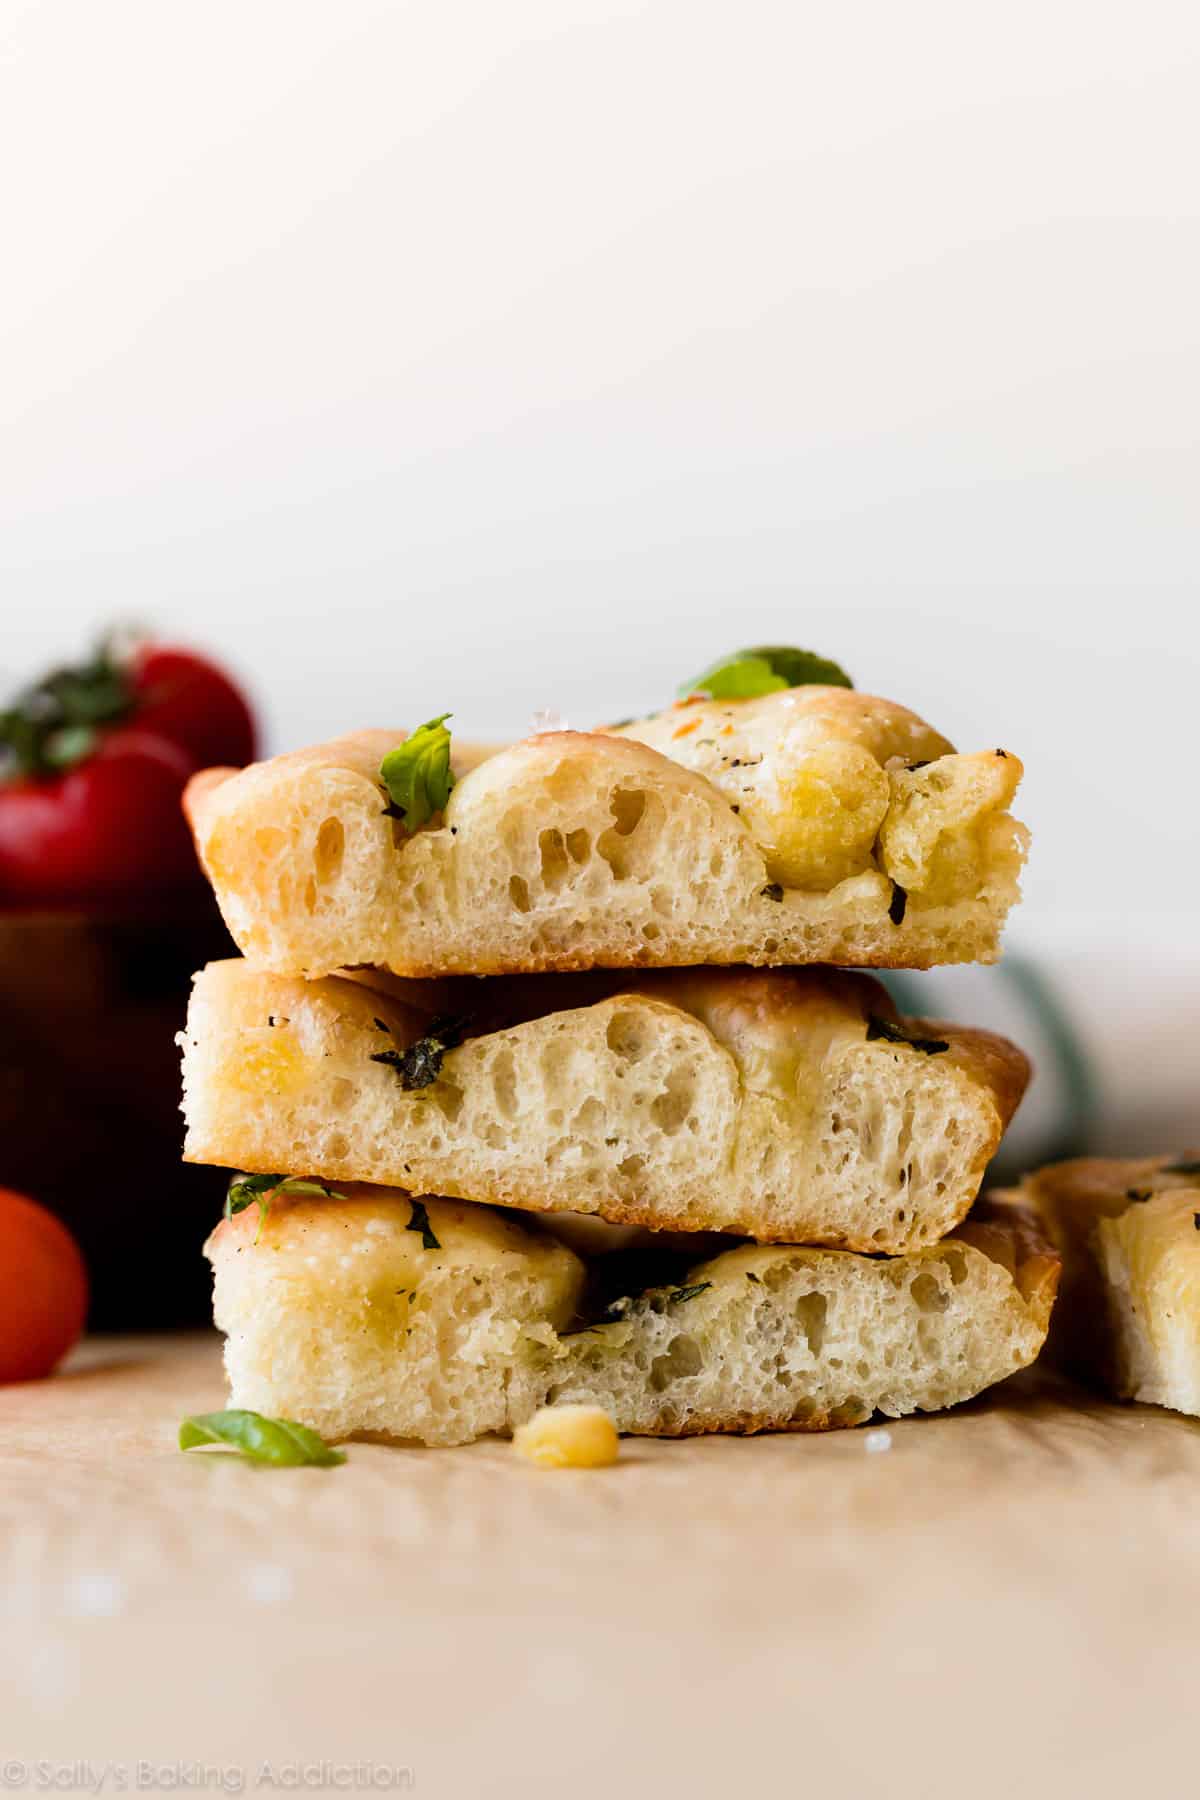
This simple 6 ingredient focaccia dough is a wonderful starting point for many different flavors, including garlic rosemary herb focaccia. The homemade bread is chewy and soft in the center with a mega crisp exterior. For the BEST flavor, let the dough rest in the refrigerator overnight. Olive oil seeps down and infuses every bite. You’ll love it!

Let’s make focaccia!! I’ve been working on perfecting focaccia for awhile. Focaccia is an Italian yeast bread. At the heart of it, focaccia is pizza dough without the sauce and cheese. Though it appears plain, focaccia is anything but boring. Its defining characteristics are the olive oil infused flavor and deliciously crisp exterior. Olive oil enrobes the entire crust, seeping into the interior as the bread bakes. Herbs and garlic are popular toppings, but you can add anything like olives, tomatoes, sesame seeds, parmesan cheese, pine nuts, pesto, caramelized onions, and more.
Pizza is a meal, but focaccia can be part of a meal, an appetizer, a soup dipper, a sauce soaker-upper, and even the crust of a sandwich or panini. I particularly enjoy serving it in the summer and always include it on my menu of Memorial Day recipes. Regardless of how and when it’s served, this garlic rosemary herb focaccia is remarkably chewy, rich, and flavorful.
Video Tutorial: Garlic Herb Focaccia
Sit back, relax, and watch as I walk through each step in this garlic rosemary herb focaccia recipe. In fact, most of the “work” is hands-off while the dough rises and rests so you can literally sit back and relax when it’s your turn to make it!
Only 6 Ingredients in Focaccia Dough
Focaccia dough comes together with only 6 basic ingredients. Whether or not you’re a seasoned baker, I bet you have most of these items in your kitchen. This recipe yields a big pan of bread and leftovers freeze wonderfully. (We’ve been snacking on test recipes for weeks now!) If you don’t need that much bread on hand, feel free to halve the recipe.
Let’s quickly discuss the importance of each ingredient.
- Yeast: Yeast raises focaccia bread. If you’re nervous about working with yeast, I encourage you to review my Baking with Yeast guide. You can use active dry or instant yeast. I played around with different amounts and ultimately favored the bread with less yeast than some other recipes call for. The flatter the focaccia, the more the interior is infused with the olive oil and toppings!
- Sugar: 2 teaspoons of sugar feeds the yeast.
- Warm Water: When combined with liquid and sugar, yeast makes dough rise. Use warm water to cut down on rise time, about 100-110°F. Anything over 130ºF kills the yeast.
- Salt: A lot of focaccia’s flavor comes from salt and this dough requires a lot of it. For the best flavor, I strongly recommend using kosher salt.
- Olive Oil: Some recipes only call for olive oil as the topping, but adding olive oil to the dough creates a richer-tasting bread. You’ll also use it to coat the pan and top the dough before baking, just like we do when we make pesto pizza. Use your favorite kind—I prefer extra virgin olive oil.
- Bread Flour or All-Purpose Flour: I tested this focaccia with both and prefer the bread flour variety. Both are great, but bread flour has a higher protein content so it yields a chewier texture. This recipe calls for 4.5–5 cups of flour, and if using bread flour, you’ll need closer to 4.5 cups since it absorbs more water. If using all-purpose flour, you’ll need closer to 5 cups. It all depends on how sticky the dough feels. Adding a bit too much or too little flour won’t ruin the recipe, so don’t be nervous.
Baking with Yeast Guide
Reference this Baking with Yeast Guide whenever you work with baker’s yeast. I include practical answers to all of your common yeast questions!

How to Make Garlic Herb Focaccia
Focaccia is a very simple bread. This recipe requires a rise, plus a considerable amount of “resting” in the refrigerator. Most of the dough’s flavor is developed during this cold resting period, so I don’t recommend rushing it. You can’t rush good bread.
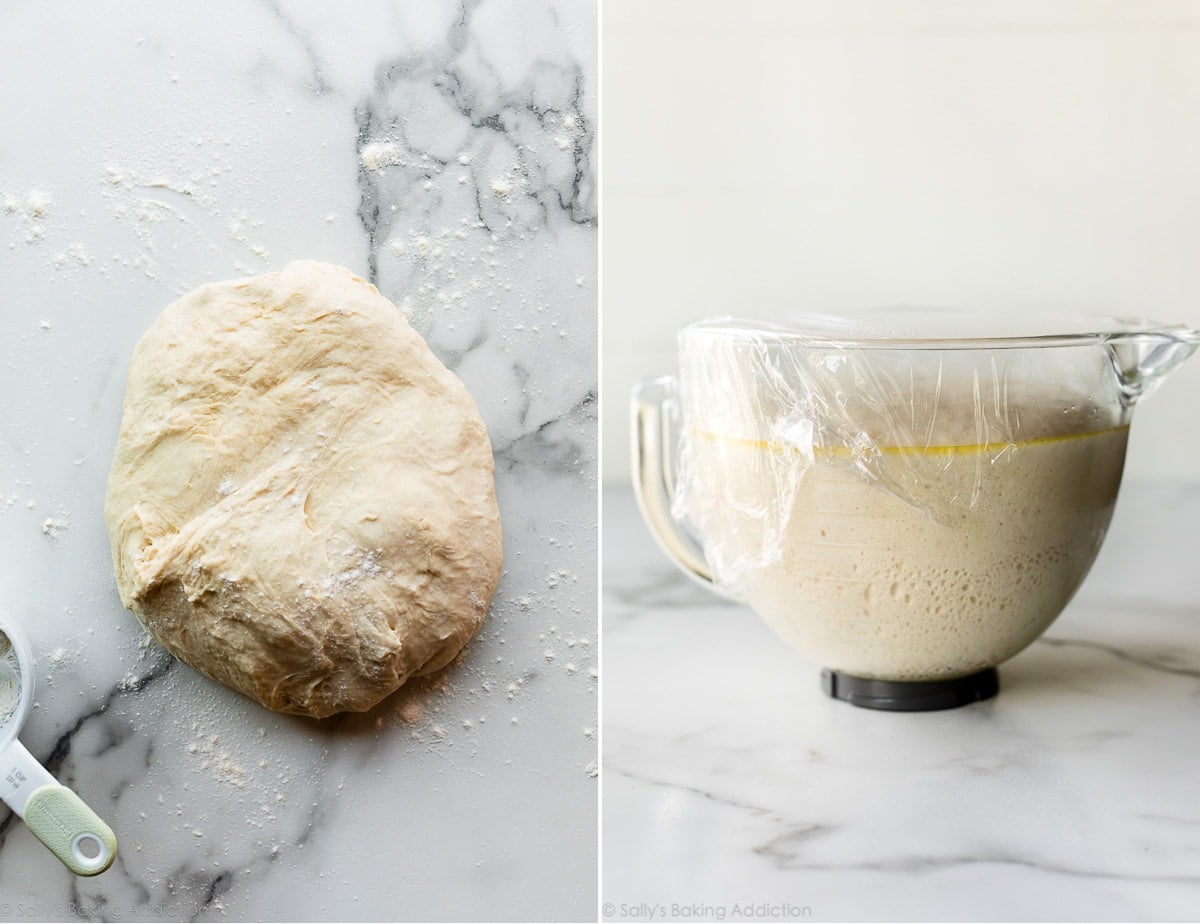
- Make the dough: Mix the ingredients together, and then knead the dough by hand or with your mixer. I like doing this by hand and you can watch me in the video, or in my separate How to Knead Dough tutorial.
- Let the dough rise: Place dough into a greased bowl, cover tightly, then set aside to rise for about 2–3 hours.
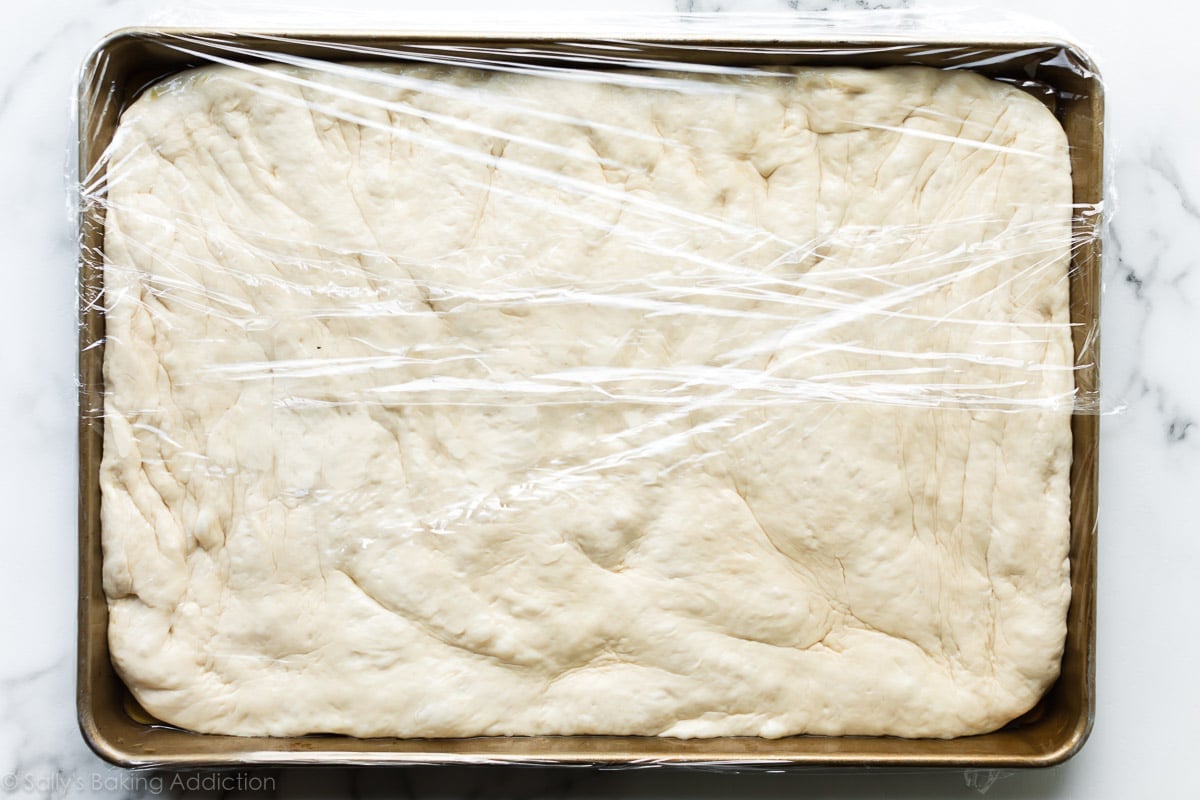
- Flatten dough out onto a baking pan: Punch down the risen dough to release the air, then use your hands to flatten the dough out onto an oiled baking sheet. If the dough keeps shrinking, cover it for 5 minutes to let the gluten settle.
- Let the dough rest in the refrigerator: The cold temperature slows down the rising. In fact, there’s so little yeast that the dough will hardly rise at all during this step. Let it rest in the refrigerator for as little as 1 hour and up to 24 hours. The longer it rests, the better the flavor. I recommend at least 12 hours, just like with my artisan bread and ciabatta bread recipes. You won’t regret it!
- Remove from the refrigerator: Let the dough hang out on the counter as you preheat the oven and prep the toppings. It will rise a little bit, but not much.
- Preheat oven: Focaccia bakes in a very hot 450°F (232°C) oven.
- Dimple the dough: A good stress reliever! Use your fingers to dimple the entire surface of the dough just like we do when making cold veggie pizza. The dimples give the olive oil and toppings “a place to go.” This step is fun!
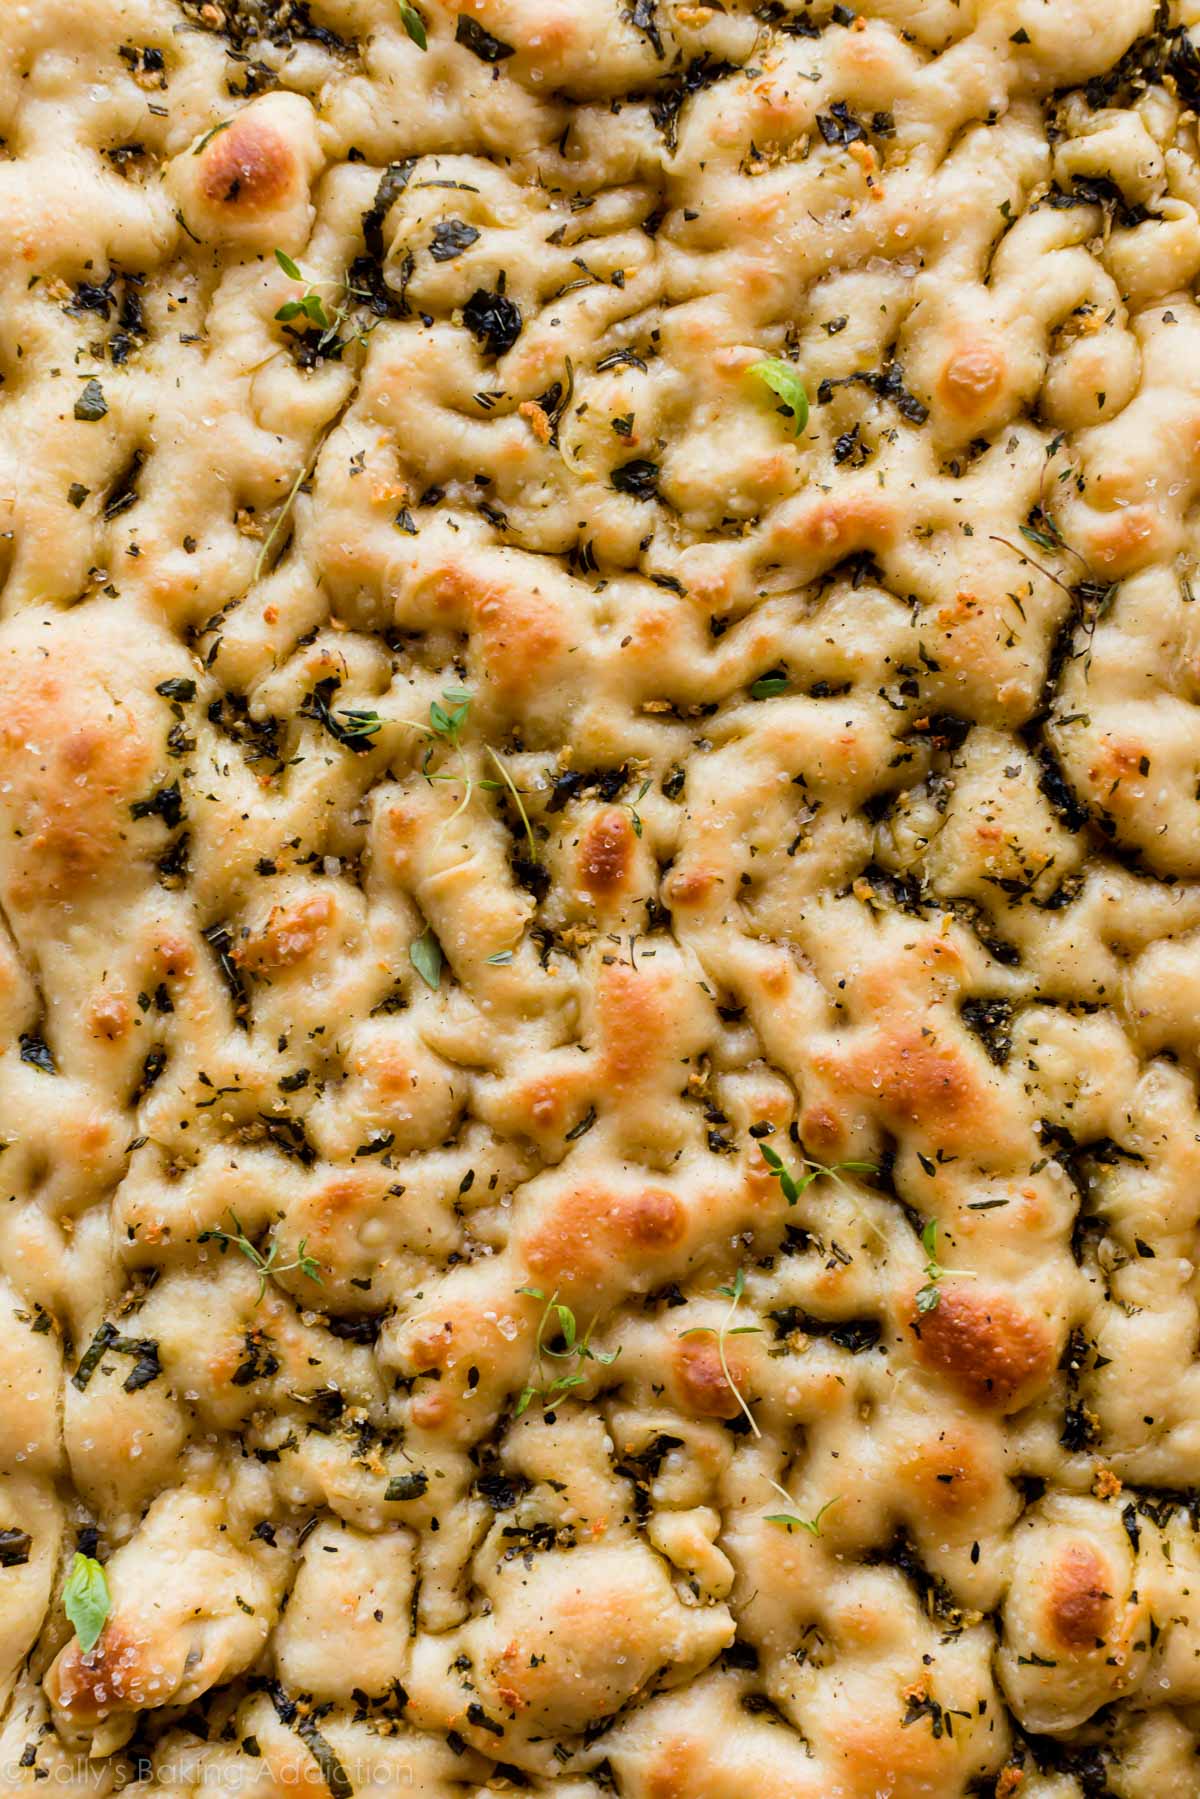
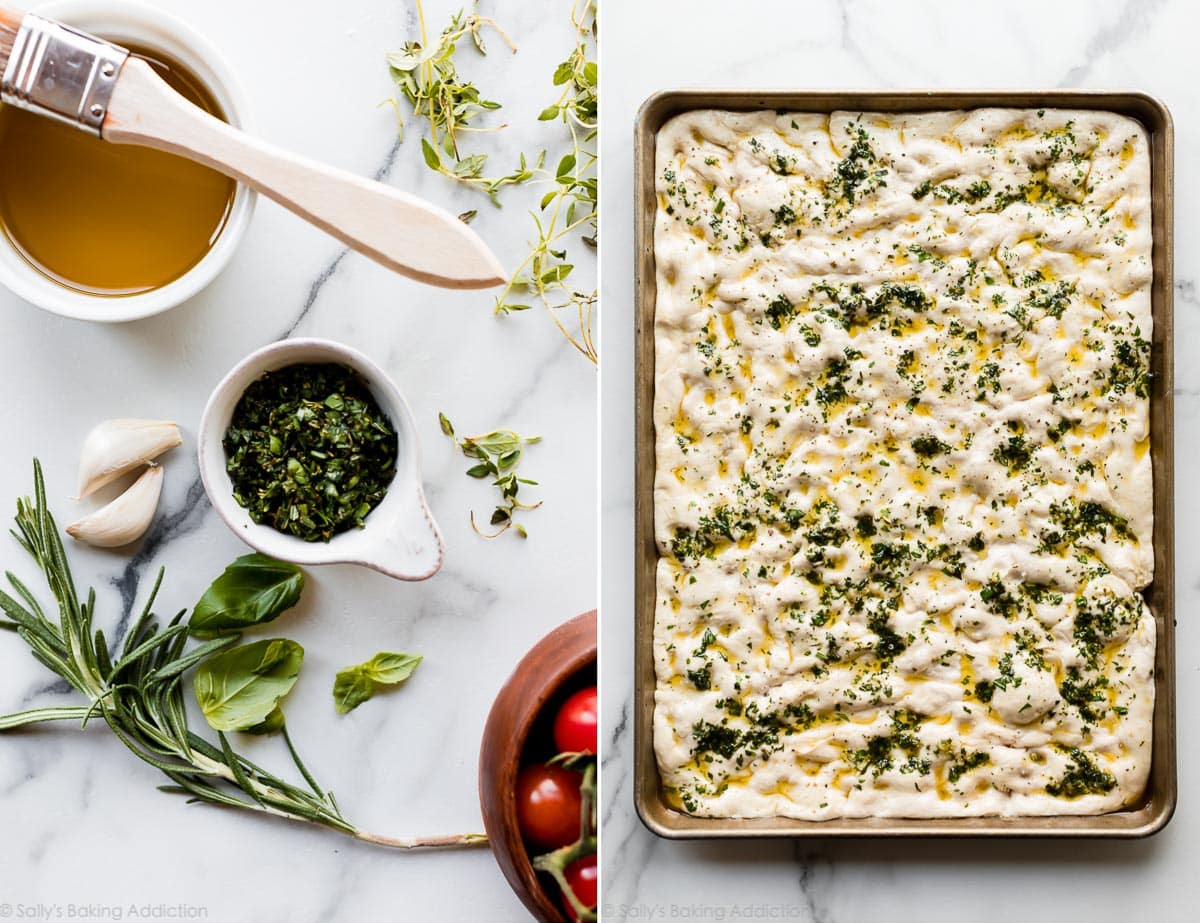
- Add toppings: A simple blend of fresh garlic, rosemary, thyme, and basil is a favorite, but I have plenty of focaccia topping suggestions listed below. No matter which topping you use, drizzle olive oil all over the surface.
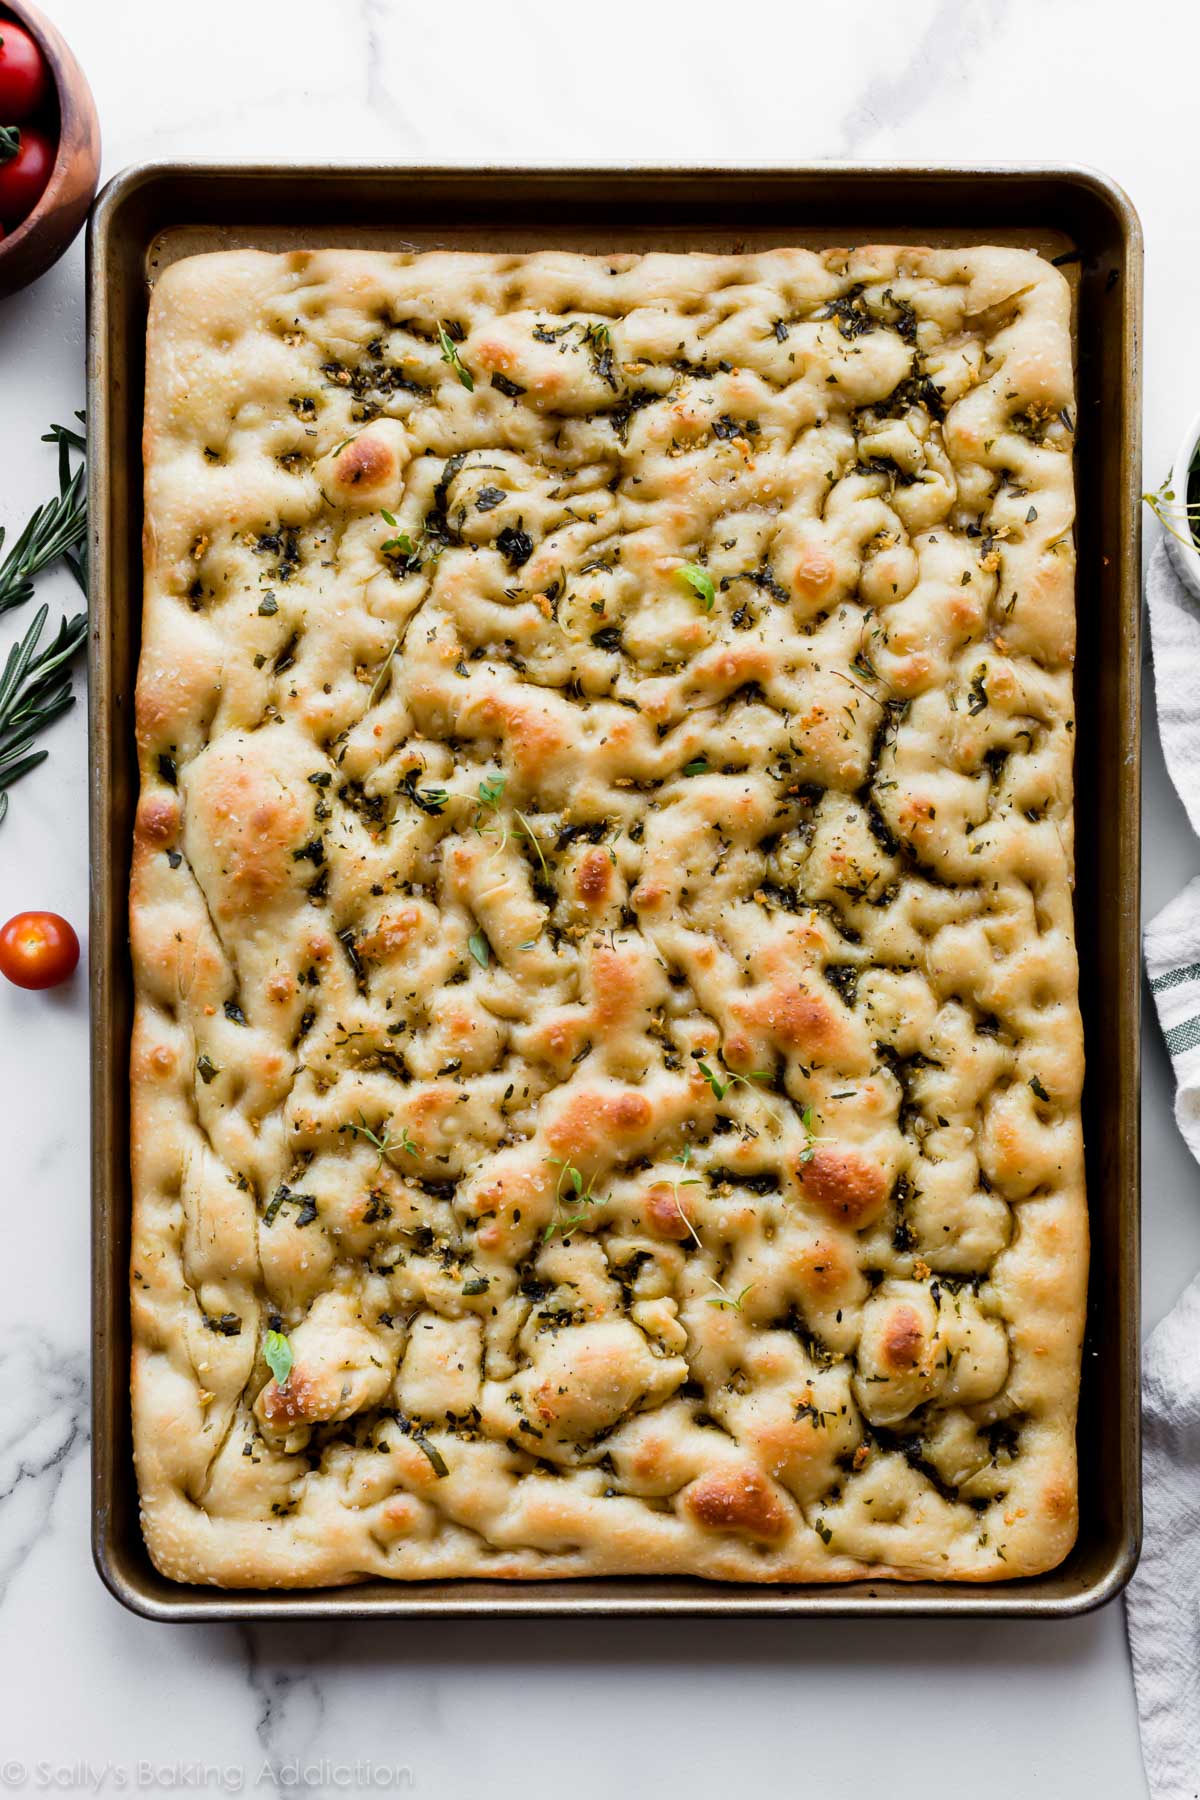
- Bake: Bake until golden brown. I set the oven to broil for the last minute to really crisp up the surface. Highly recommended!
The dough stretches to fit a large baking sheet. You can also divide the dough in half for 2 smaller focaccia loaves. I love that there’s no rolling pin or complicated shaping required.
After the dough rests in the refrigerator, dimple it with your fingers, then add toppings:
Make Ahead Recipe
As mentioned above, the longer the dough rests, the better it tastes. Focaccia is a convenient make-ahead recipe since you can do most of the work the day before serving. The bread tastes AWESOME warm from the oven, but it lasts all day if you want to bake it several hours prior to serving. Leftovers keep well for a few days or even a few months in the freezer, but some of the crispiness is lost over time. However, a few minutes in a preheated oven quickly brings leftover focaccia back to life!
Freezing dough: You can also freeze focaccia dough just as you would freeze pizza dough. After the dough rises in the mixing bowl, punch it down to release the air, coat it with a little olive oil, then cover and freeze for up to 3 months. Thaw in the refrigerator. Once thawed, remove the dough from the refrigerator and allow to rest for 30 minutes on the counter. Finally, shape the dough on the baking sheet and continue with the recipe.
Focaccia Toppings
Garlic & rosemary herb focaccia is a classic favorite, but you can customize it with various toppings. There’s truly no limit and here’s a list to prove it. Leave out the garlic and herbs (or keep them!), drizzle the dough with the olive oil, then add any of these toppings:
- Everything Bagel Seasoning
- Cherry Tomatoes or Sliced Tomatoes
- Parmesan (add before or after baking)
- Pesto (add before or after baking)
- Sliced Zucchini
- Pine Nuts
- Sliced Lemons or Lemon Zest
- Sun-Dried Tomatoes
- Olives
- Mushrooms
- Artichokes
- Raw or Caramelized Onions
I topped a test batch with the garlic & herb olive oil called for in the recipe below, plus some pine nuts and thinly sliced tomatoes. We all DEVOURED it.

More Simple Homemade Bread
- Homemade Pizza Dough
- No Yeast Bread
- Soft Pretzels
- Garlic Knots
- Brown Butter Sage Dinner Rolls
- Artisan Bread
- Homemade Garlic Bread
- Cornbread
- Olive Bread
- Whole Wheat Bread

Garlic Rosemary Herb Focaccia
- Prep Time: 16 hours
- Cook Time: 20 minutes
- Total Time: 16 hours, 20 minutes
- Yield: 2 dozen pieces
- Category: Appetizer
- Method: Baking
- Cuisine: Italian
Description
This simple 6-ingredient focaccia dough is a wonderful starting point for many different flavors, including this garlic rosemary herb focaccia. The homemade bread is chewy and soft in the center with a mega-crisp exterior. For the best flavor and texture, let the dough rest in the refrigerator overnight.
Ingredients
- 2 cups (480ml) warm water (between 100–110°F, 38–43°C)
- 2 teaspoons granulated sugar
- 2 teaspoons instant or active dry yeast (slightly less than 1 standard packet)
- 1/4 cup (60ml) extra virgin olive oil
- 1 Tablespoon kosher salt
- 4 and 1/2–5 cups (563–625g) all-purpose flour or bread flour (spooned & leveled), plus more for hands
Topping & Pan
- 5 Tablespoons (75ml) extra virgin olive oil or more as needed, divided
- 2 garlic cloves, minced
- 3–4 Tablespoons chopped fresh herbs such as basil, thyme, and rosemary (or 2 Tablespoons dried herbs)
- sprinkle of coarse salt and freshly ground black pepper
Instructions
- Prepare the dough: Whisk half of the water (1 cup; 240ml), 2 teaspoons sugar, and 2 teaspoons yeast together in the bowl of your stand mixer fitted with a dough hook or paddle attachment. Cover and allow to rest for 5 minutes.
- Add the remaining water, olive oil, salt, and 1 cup (130g) flour. Beat on low speed for 20 seconds, then add 3 and 1/2 cups (440g) more flour. Beat on low speed for 2 minutes. If the dough is still sticking to the sides of the bowl, add the last 1/2 cup (60g) of flour.
- Knead the dough: Keep the dough in the mixer and beat for an additional 5 full minutes, or knead by hand on a lightly floured surface for 5 full minutes. (If you’re new to bread-baking, my How to Knead Dough video tutorial can help here.) If the dough becomes too sticky during the kneading process, sprinkle 1 teaspoon of flour at a time on the dough or on the work surface/in the bowl to make a soft, slightly tacky dough. Do not add more flour than you need because you do not want a dry dough. After kneading, the dough should still feel a little soft. Poke it with your finger—if it slowly bounces back, your dough is ready to rise. You can also do a “windowpane test” to see if your dough has been kneaded long enough: tear off a small (roughly golfball-size) piece of dough and gently stretch it out until it’s thin enough for light to pass through it. Hold it up to a window or light. Does light pass through the stretched dough without the dough tearing first? If so, your dough has been kneaded long enough and is ready to rise. If not, keep kneading until it passes the windowpane test.
- Let the dough rise: Lightly grease a large bowl with a teaspoon of oil or some nonstick spray—just use the same bowl you used for the dough. Place the dough in the bowl, turning it to coat all sides in the oil. Cover the bowl with aluminum foil, plastic wrap, or a clean kitchen towel. Allow the dough to rise at room temperature for 2–3 hours or until double in size. (Tip: For the warm environment on a particularly cold day, heat your oven to 150°F (66°C). Turn the oven off, place the dough inside, and keep the door slightly ajar. This will be a warm environment for your dough to rise. After about 30 minutes, close the oven door to trap the air inside with the rising dough. When it’s doubled in size, remove from the oven.)
- Prepare the pan: Generously grease a 12×17-inch baking pan (with at least 1-inch-tall sides) with 2 Tablespoons of olive oil. This is the base layer of the bread, so be generous with the oil. A pastry brush is helpful to spread it.
- Flatten the dough: When the dough is ready, punch it down to release any air bubbles. Place on the oiled baking pan, then stretch and flatten the dough to fit the pan. Don’t tear the dough. If it’s shrinking (mine always does), cover it with a clean towel and let it rest for 5–10 minutes before continuing. This lets the gluten settle and it’s much easier to shape after that.
- Let the dough rest: Cover the dough tightly and let it rest in the refrigerator for at least 1 hour and up to 24 hours. The longer it rests, the better the flavor. I recommend at least 12 hours.
- Remove the dough from the refrigerator and let it sit at room temperature as you preheat the oven and prepare the toppings. Keep it covered. It may rise a little during this time, but not much.
- Preheat oven to 450°F (232°C). Allow it to heat for at least 10–15 minutes so every inch of the oven is very hot.
- Prepare the toppings: Whisk the 3 remaining Tablespoons of olive oil with the minced garlic and herbs. Set aside.
- Using your fingers, dimple the dough all over the surface. You can watch me do this in the video above. Drizzle on the olive oil topping and use your hands or a pastry brush to spread it all over the top. Add a little more olive oil if needed so the dough is completely covered. (This creates the crisp crust!) Sprinkle with a little coarse salt and freshly ground black pepper.
- Bake for 20–23 minutes or until lightly browned on top. If desired, broil on high for the last minute to really brown the top.
- Cut and serve hot or let it come to room temperature before slicing and serving. Focaccia tastes wonderful warm or at room temperature. Cover leftover focaccia tightly and store at room temperature for 2 days or in the refrigerator for 1 week. You can also freeze the baked and cooled focaccia for up to 3 months. Thaw in the refrigerator or at room temperature. To reheat the slices, you can use the microwave or bake in a 300°F (149°C) oven for 5 minutes.
Notes
- Freezing Instructions: After the dough rises, punch it down to release the air as instructed in step 5. Freeze the dough or portions of the dough to make at a later time. Lightly coat all sides of the dough ball(s) with olive oil. Place the dough ball(s) into individual zipped-top bag(s) and seal tightly, squeezing out all the air. Freeze for up to 3 months. To thaw, place the frozen dough in the refrigerator overnight. Remove the dough from the refrigerator and allow to rest for 30 minutes on the counter, then continue with shaping the dough to fit the baking pan as instructed in step 5. (Even after thawing, the dough must still rest in the refrigerator as instructed in step 6.)
- Make Ahead Instructions: The is a wonderful recipe to begin the day ahead of time. The dough must rest in the refrigerator for at least 1 hour and up to 24 hours, as instructed in step 6. I’ve let it go for as long as 30 hours and the flavor is incredible. I wouldn’t go past 24-30 hours.
- Special Tools (affiliate links): Stand Mixer | 12×17-inch Baking Pan | Pastry Brush
- Smaller Portions: This recipe yields a big pan of bread. You can divide the dough in half and bake smaller portions on 2 baking sheets or 9×13 inch baking pans. If desired, you can divide the dough in half and freeze half of it. Or you can halve the entire recipe.
- Yeast: You can use instant or active dry yeast instead. The rise time in step 3 may be a little quicker if using instant yeast. No matter which yeast you choose, you only need 2 teaspoons which is a little less than 1 standard 7g packet. Reference my Baking with Yeast Guide for answers to common yeast FAQs.
- Flour: You can use all-purpose flour or bread flour. All-purpose flour is convenient for most, but bread flour produces a chewier bread. No matter which you choose, the focaccia is still soft and rich with a crispy exterior. Either flour is fine and there are no other changes to the recipe if you use one or the other. You may need slightly closer to 5 cups of flour if using all-purpose.
Adapted from Bon Appetit & Pizza Crust


Reader Comments and Reviews
Quick question–I don’t think I will be able to fit the large baking sheet of dough in the fridge for “resting.” Would it be OK to rest the dough in the mixer bowl in the fridge after punching down and then have a shorter rest/rise once it is on the baking sheet? In general I think bread dough likes to be in the fridge at this stage but wanted to make sure. Thank you!!
Could you divide the dough in half in step 5 and use 2 9×13 inch baking pans instead? Letting the dough rest in the refrigerator before flattening wouldn’t do many favors because it will be difficult to flatten the cold dough– it will likely tear. If using 2 smaller baking pans, the bake time will still be about the same.
The bread came out great!! It was MY MISTAKE for using a pan too small, but it still turned out great I was advised to bake at a lower temp, so baked at 180c, and tented for 2 and a half minutes, and it came out wonderfully! My family devoured it all in just under a day. Although I personally thought it didn’t have much flavourful, again MY FAULT for not adding enough salt. But it’s a fabulous recipe! I strongly advise, do not copy me and measure your pan after. LISTEN TO SALLY, and you’ll be grand! Going to make another batch now, with the correct pan! Thanks for the quick and helpful reply!
HELP PLEASE! Need a quick reply!!
I made the dough this evening, (letting it rest overnight). And now I’m questioning the pan I used!
I want to make a thicker focaccia, and
I saw someone else asked about making a thicker one as well. I measured the pan I want to use, it is 24x28cm, is that too small?? The dough has already been stretched to fit the pan and has oil on the bottom, should I try to transfer it to two pans in the morning? (It also appears to be rising in the fridge?)
Im worried if it’s too thick, It might be doughy and not cook evenly. (I don’t own a thermometer to check for doneness)
Another question sorry, my oven can only go to 200C, which is 30 degrees less than what is required, so what should I do? Just bake it for longer?? Apologies for the questions and thank you in advance❤️
Hi Jamie! Your pan is a little small for this bread. It’s written for a 30x43cm (approx.) pan. But we wouldn’t try to move the dough now that it is already resting. You’ll need to bake your bread for longer at a cooler temperature, though we’re unsure how much longer. Let us know how it goes!
if I had to add caramelized onions and thinly sliced tomatoes, would I add them before the bread goes in the oven or after it comes out?
Hi Niharika, you can add those toppings before baking. Enjoy!
Hi there, I am in the process of making this bread. I just put my dough in the fridge. I ran out of all-purpose flour, so I had to use around 2 cups of whole wheat flour as part of the dough. I hope the results will be good.
Allow me to ask: In the event where I need lots of bread, do I simply double the recipe ingredients?
Hi Caroline, we always recommend making separate batches for absolute best results!
Hi Sally !! I love making your recipes and many are now my family faves! We recently are trying to live on more whole grains (bummer for so many of my faves) so my question is can I substitute half the flour for white whole wheat to help up the whole grains and if so… what’s the challenge to the recipe. Thanks so much!!
Hi Lucia! This recipe is really best with all purpose or bread flour, but you can try replacing some of the flour with whole wheat. You can expect a slightly dryer and more dense bead. Let us know if you give it a try!
Hi
It’s me again from Mexico. I tried this recipe, and as I said in my comments about the artisianl bread fiasco I had no success. The dough was so watery, even adding more flour did nothing. It was a wet mess so I had to throw it out. Please can you respond to these two posts about the bread and now the focaccia. All the recipes on this blog have been great. I have never had an issue. I am thinking it might be the humidity and the flour itself. I am going to try both bread and focaccia recipes when I return to the US next month and see if the weather and the flour do make a difference in the outcome. I would really appreciate a response tho. Thanks
Hi Aline, There are a lot of variances that go into the consistency of dough, even down to the weather and humidity in the air. Let us know how this turns out when you try it again with all purpose flour or bread flour!
This recipe is AMAZINGGGG!! I have made it a million times and have never had someone not like it. I add a ton of chopped rosemary to the dough as well as on top.
I have a question though. I made the dough last night and after making it and resting it decided that I want to bake it tomorrow.. Am I able to still throw the dough in the pan in the freezer? Or is it too late?
Hi Ashley! The dough can rest in the fridge for up to 24 hours – see step 6. The longer it rests, the better the flavor!
This was my first time making foccia bread and it was absolutely AMAZING!!! I used bread flour and was so glad I did. I let it sit in the fridge for only one hour and didn’t want to wait till the next day before we could eat it so I baked it that night and cut into it while it was still “sizzling”. The top was covered with a mixture of olive oil and fresh chopped garlic, basil, thyme, rosemary, kosher salt & fresh cracked pepper. The house smelled incredible and my husband was so impressed! We devoured it all the next day! Next time I will let it sit in the fridge for 12 hours and will add vegetable decorations next time!
This looks delicious and the review show it is. I am curious as to wether you could/should use parchment paper on the bottom of the pan? I plan on making this tomorrow!
Hi JoAnne! You definitely can, yes, but coat the parchment paper in olive oil. You want that coating of olive oil under the focaccia as it bakes.
Let me add to the chorus of praise. I made this focaccia yesterday. I actually made the dough two days ago and let it fridge sit overnight. Baked yesterday for a dinner party. I don’t know exactly why the bread was so good – overnight sit, dimples with olive oil, fresh herbs from my plants…but wow was this a hit. Huge. And it was my first time making focaccia ever! I had read every word VERRRY carefully in the recipe. Today, came back to the site and on a lark watched the video. The video gave tips on two super small details that would have helped me even more. So, of course, now I want to make it again. LOL. Great companion video!
I made this recipe on the weekend and it was a big hit. I did not have enough all purpose flour so I used half regular and half 00 flour that I use to make pizza dough. It turned out fine. I left the dough in the fridge 24 hours. It was easy to finish it and pop it into the oven an hour before my company came. Minestrone Soup and focaccia! Perfect combination. Thank you Sally.
Does anyone know the liquid change if you’re using 00 flour instead of bread flour ?
I have a 13×7 baking (cookie) sheet that has a 1” rim, but I also have a 13×17 rectangular pan that I use for roasting that has a 2” rim. Both are metal. Which do you recommend for this recipe?
Hi Michelle! We recommend the 13×17 pan – happy baking!
Absolute perfection! This always turns out and goes very quickly in our house.
WOW. Sally strikes again! This is delicious and well worth letting it sit overnight. I also used bread flour and added quite a bit more while mixing and kneading as it was super sticky . I had fresh basil so topped it with that garlic, kosher salt and pepper.
Can the dough rest in the fridge for more than 24 hours? Thank you! 🙂
Hi Tania, We don’t recommend resting more than 24-30 hours.
This recipe was delicious! I tried it in the bread machine, just added all the ingredients to the machine and ran it on the dough cycle. When that was done I took it out, spread it over the oiled pan and let it rest in the fridge for about 8-9 hours. Topped with fresh rosemary, garlic, flaky salt, pepper and Italian seasoning. It was AMAZING. Sooo delicious!! Everyone asked for the recipe last night.
I had so much fun making this recipe. This was my first time making bread, the instructions were SO thorough. To top it off, it tastes DELICIOUS!!! Will definitely be making many times over again!
This bread is incredible! An all time favourite in our home. I make it regularly on the side of soup and bake it in a cast iron pan. The crust is crispy and inside is light yet chewy. I made it this weekend for Thanksgiving to go along with our ham dinner and our company couldn’t believe how good it was.
Thank you Sally!! I never hesitate to try any of your recipes because they all turn our perfectly.
Could you do this all by hand and without a mixer? I only have a hand mixer but no dough hook.
Dana: absolutely! I do it all the time. I use a hand whisk for the first addition of flour and then a wooden spoon when mixing in the rest of the flour. A little more elbow work but definitely worth it! 🙂
Hi Sally. I have made this recipe twice now and it has been aging each time. I was so scared to work with yeast for the first time but this was amazing. Question though. If I freeze half the dough is there anything I need to do when I go to use the frozen dough? Would I just defrost, put in the pan and rest for 12 hours and then bake?
Hi there, see recipe notes for full details on using the frozen dough. So glad you’ve been enjoying this recipe!
I haven’t actually tasted my focaccia because it only came out of the oven an hour ago. Another recipe that came together exactly as described and has filled my house with an amazing smell. Will be bringing it to my parent’s house for my mother’s 75th birthday party today – looks absolutely perfect.
Accidentally grabbed the wrong measuring cup, and put a half a cup of olive oil in the dough. Is it ruined?
I loved it! I use this recipe all the time now and it is a favorite. Such an amazing flavor and texture throughout! We top it with sliced tomatoes, basil, and parmesan, but it is delish without anything but the herb and olive oil topping.
Hi,
Can I make the dough and let it rise in my bread machine? I can bake it in the oven to get the flat shape but would like to use my bread machine and skip the stand mixer and hand kneading if I can . Please let me know!
Hi Olive, We don’t own a bread machine and haven’t tried this method, but let us know if you do give it a try!
The perfect overnight focaccia!!! I’ve made this three times now and it’s been a hit every time. I top with lots of oil, garlic, rosemary, olives and baby tomatoes. I think it makes a big difference rising in the fridge longer and adding a large amount of oil underneath before placing the dough in the pan initially.
Can this be baked in a cast iron skillet?
Hi Teresa, We haven’t tested it but I don’t see why not. Depending on the size of your skillet you may need to divide the dough in half and bake it in two separate skillets.
Hi! If I want a thicker bread, do I put the entire dough in a 9×13?
If so, how long do I bake it for?
Thank you!
Hi Ashley, You can definitely use a 9×13 pan for thicker focaccia. We’re unsure of the exact bake time, but it will be longer. Keep a close eye on it — it’s done once lightly browned on top. Happy baking!
Absolutely the best Foccacia I’ve ever made outside the bakery 🙂
Had so much fun making this and decorating it. Came out wonderful!
You did make 2 out of the recipe and delivered to a neighbor. Perfect!
Wish I could post a photo we made veggie flowers everything from the garden.
Perfect! Thank you! In the oven now.
This recipe looks so yummy! I have never made Focaccia before and I am super excited! I was wondering though whether active dry or instant yeast was best? I have both and I am letting it rise overnight. Thanks! I really appreciate the help!
Hi Sofia, You can use either type! See recipe notes for details.
And once again Sally comes through with making me a success at baking and this time with yeast (again!). This focaccia is so good. I used bread flour and it needed, or should I say kneaded, an extra half cup or so of flour. I weighed it out in the beginning but after it was kneading I just kept throwing flour at it. I kneaded in my kitchenaid for about ten minutes.
It spent about 21 hours in the fridge and rose a bit. In the punching holes process it punched down but still has a few little bubbles after cooking. I was so worried and I should’ve trusted Sally cuz it came out with great chew, airiness inside, and crust. The flavor is awesome too!! Thanks Sally for giving me more confidence in yeast baking.
As a side note I topped it with the garlic herb oil and made grape tomato flowers with red pepper stems. Some of the flowers got some olive tapenade for the center. Sooooo pretty and so good.