

With a sweet pastry crust and smooth mascarpone cream filling, homemade fresh fruit tart is simply elegant. This eye-catching, colorful dessert is surprisingly easy to prepare. Plus, you can save time and make the crust and cream in advance! See my make-ahead instructions below.
I originally published this recipe in 2016 and have since made some changes to the pastry crust so it’s quicker and easier, and added new photos.
A fresh fruit tart is the kind of dessert that looks like you poured your heart and soul into it, when in reality you made the pastry crust yesterday, the cream filling takes about 5 minutes, and you spent most of the time snacking on all the fruit you were cutting.
Another wonderful thing about this beautiful dessert is that there’s minimal bake time, which makes it a favorite in the summertime! The crust only bakes for about 25 minutes, then you let it cool and fill it with the good stuff. You can make the crust ahead of time and then fill it the next day.
I have a lot of step-by-step pictures for you today. While this recipe is very manageable, I want you to have full confidence before beginning. Let’s dive into this brilliantly colored beauty!
One reader, Sarah, commented: “Made this for a Fourth of July party and it was a show-stopper! Everyone wow-ed over it and I had to admit, ‘It’s really simple—trust me!’ So yummy, so bright, and such a fun dessert. I will definitely be making this again. ★★★★★“
3 Parts to Fresh Fruit Tart
- Tender Pastry Crust
- Lightly Sweetened Vanilla Cream Filling
- Fresh Fruit Topping with a Glossy Finish
Start by Making the 5-Ingredient Pastry Crust
Since first publishing this recipe on my website, I’ve made a few small updates to the crust to make it even better. It’s now quicker, easier, and you don’t need pie weights. It’s the same base I use for the lemon curd tart in my cookbook Sally’s Baking 101, and it’s essentially a French-style pâte sucrée (sweet tart crust).
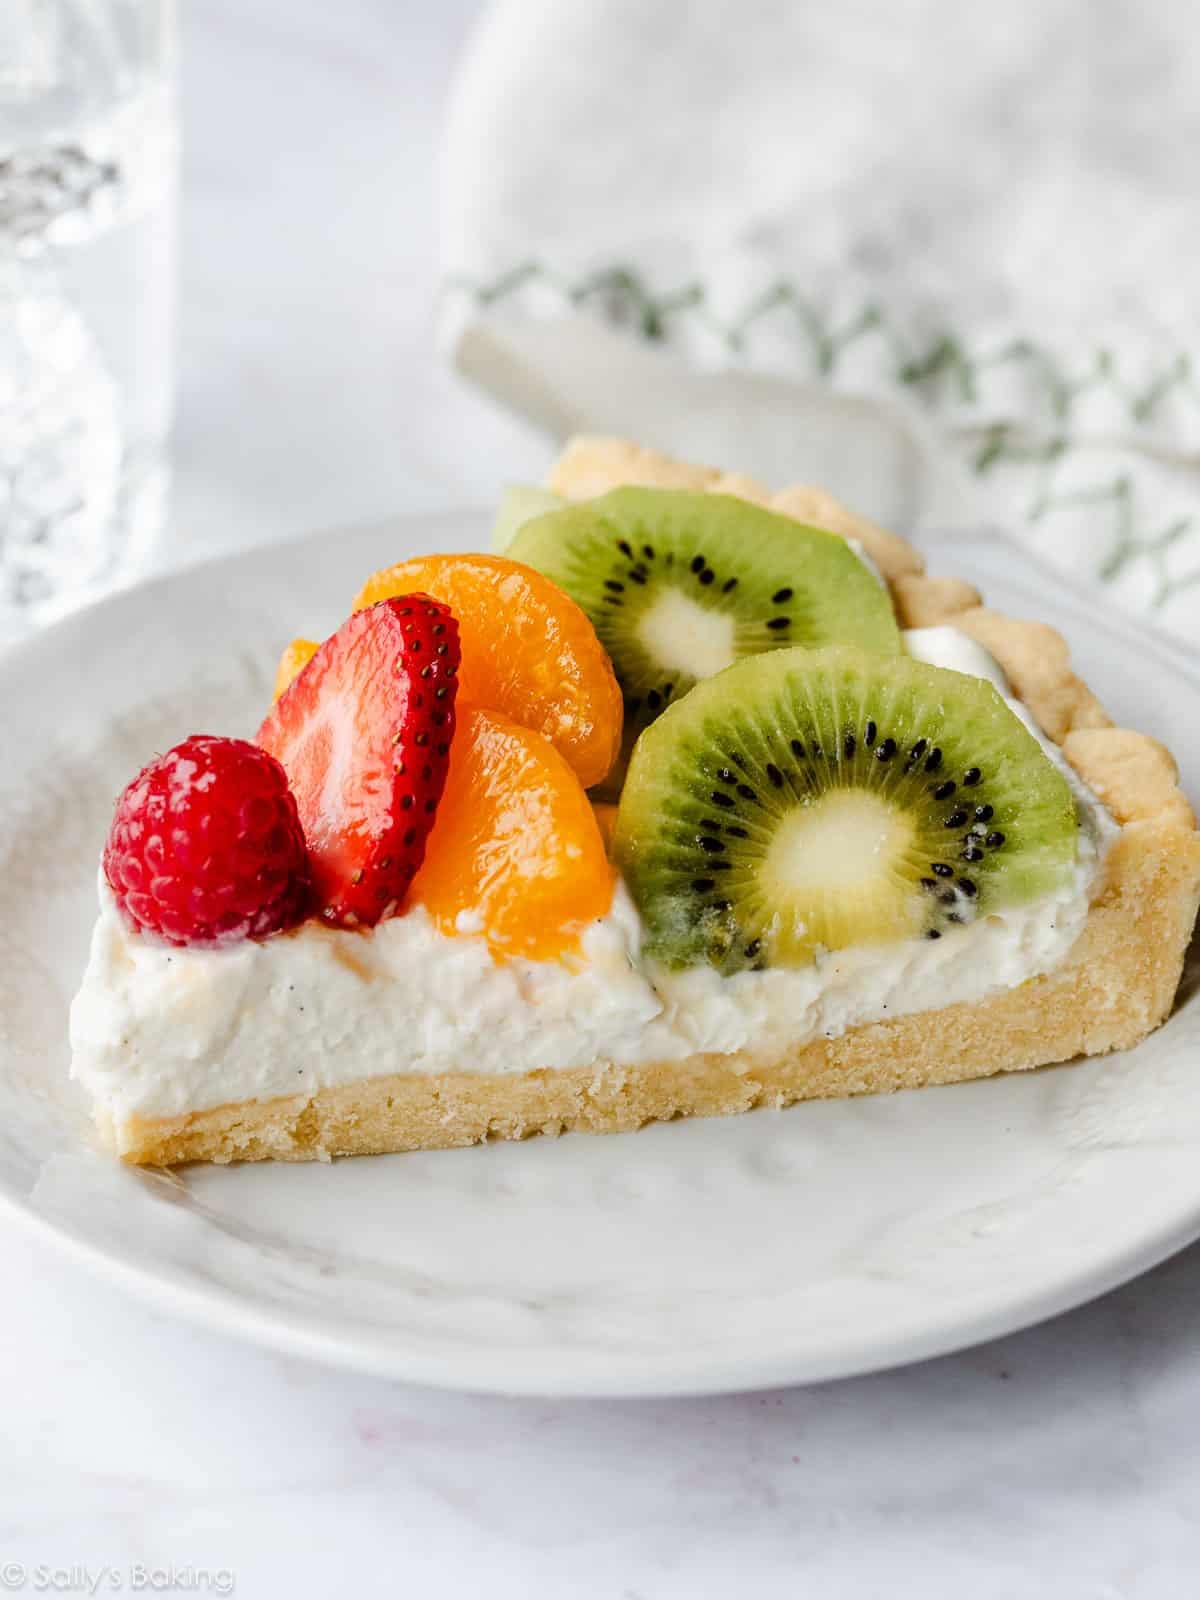
Its shortbread-like texture strikes the perfect balance between crisp and tender and holds up even after chilling, making it an ideal companion for the blanket of vanilla cream and mountain of fresh fruit.
Here are all the ingredients you need:
- Flour: All-purpose flour is the base of this pastry crust.
- Confectioners’ Sugar: Just enough to lightly sweeten the crust.
- Salt: For flavor balance.
- Butter: You need room-temperature butter: remember, it’s cooler than you think!
- Egg: Make sure it’s cold.
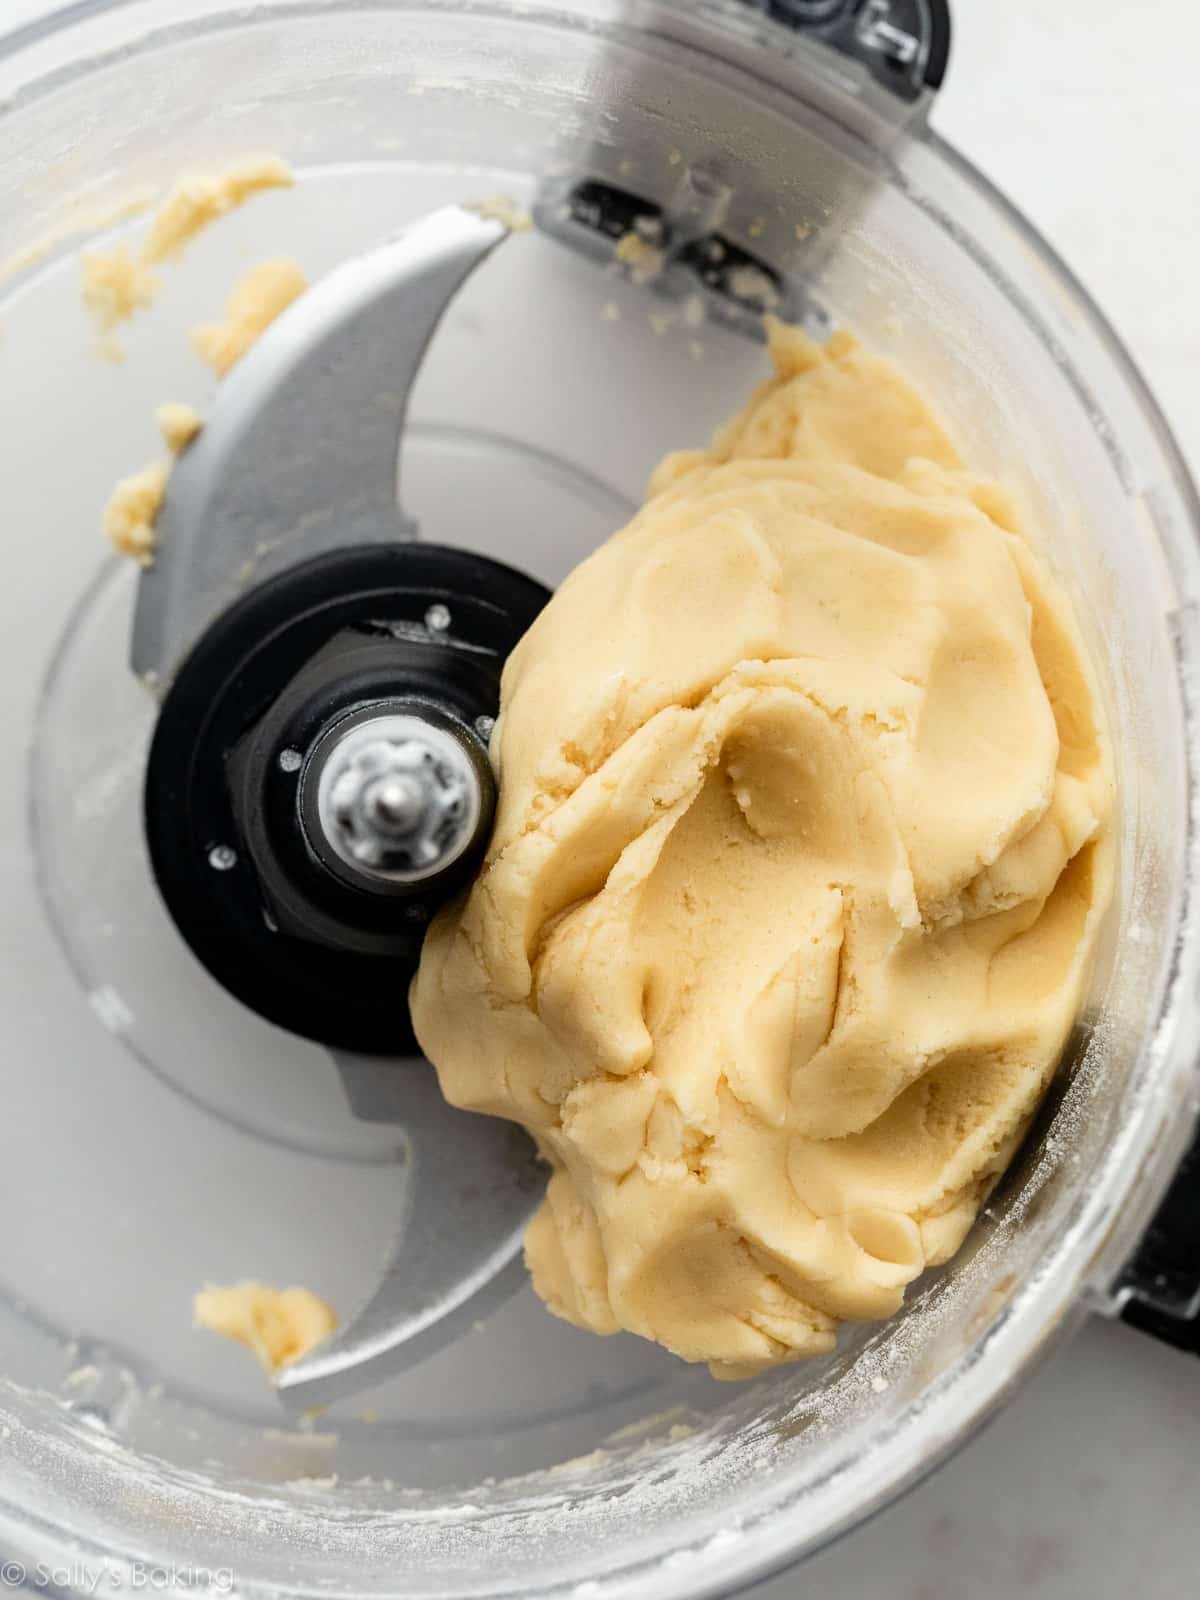
A food processor makes this dough come together easily. If you don’t have one, you can use a stand or hand mixer instead.
Pulse/beat Tablespoon-size pieces of softened butter into your dry ingredients:
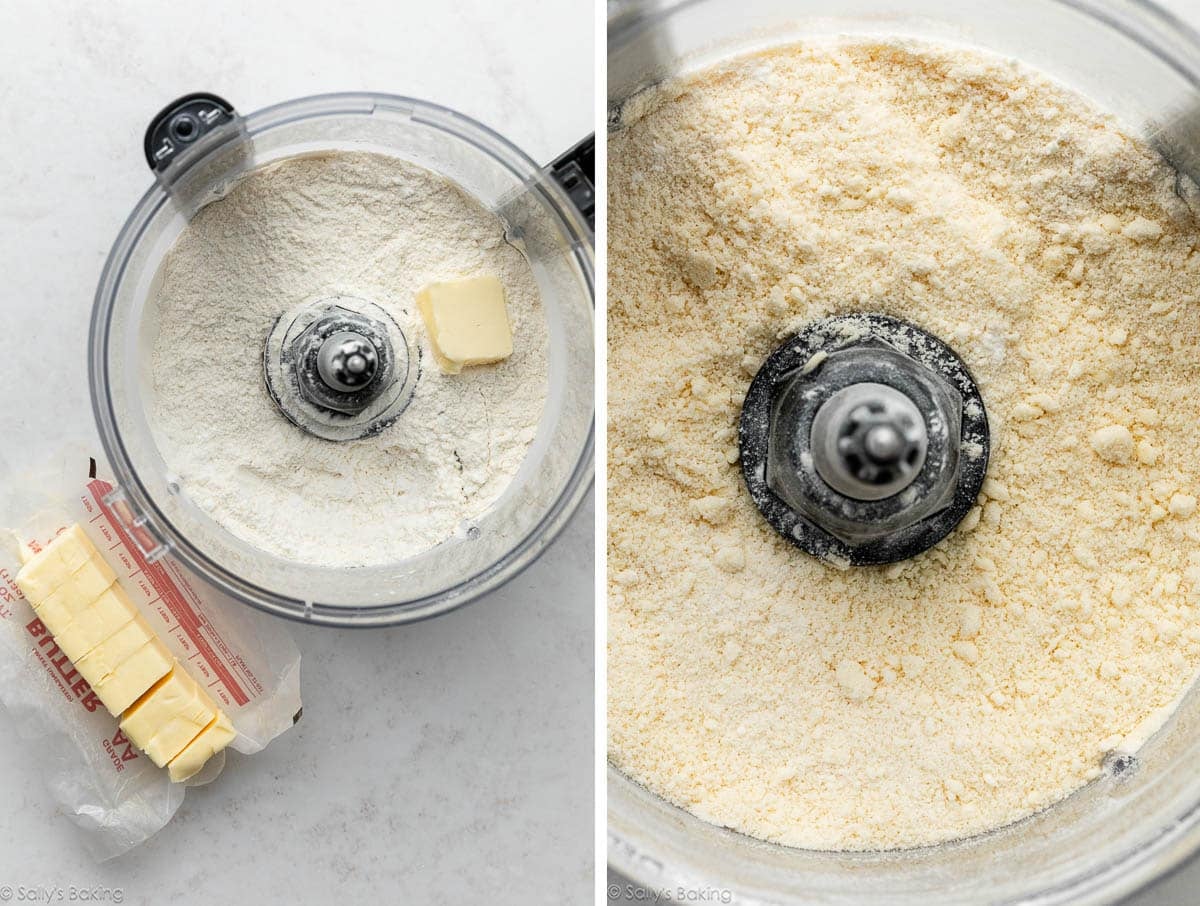
Then pulse/beat in an egg to make a soft dough, like this:
Press the soft dough into a greased 9-inch tart pan with removable sides. We use the same pan for this cranberry curd tart.
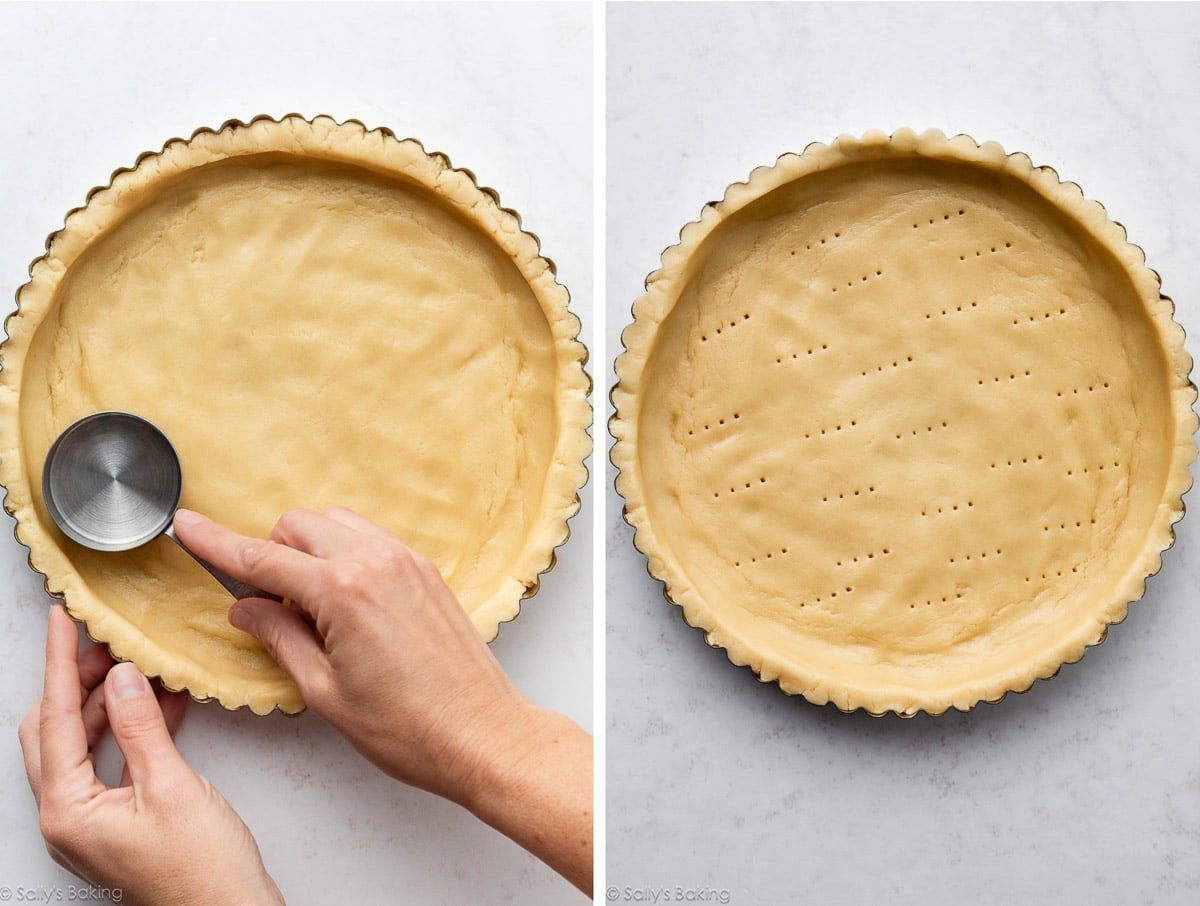
Prick the surface of the bottom crust all over with a fork. This is called docking, and we do it when we par-bake pie crust, too, to allow for steam to escape and help prevent the empty crust from bubbling up as it bakes. It may still bubble up a little—that’s normal.
Freeze the crust before baking so it holds shape in the oven. Otherwise, it will melt and slump in the tart pan. Freeze for at least 30 minutes, or up to 1 day if making ahead.
To make for easy handling when you take it out of the oven, bake the tart crust set on top of a baking sheet. It is all too easy to forget your tart pan has removable sides, trust me on this!
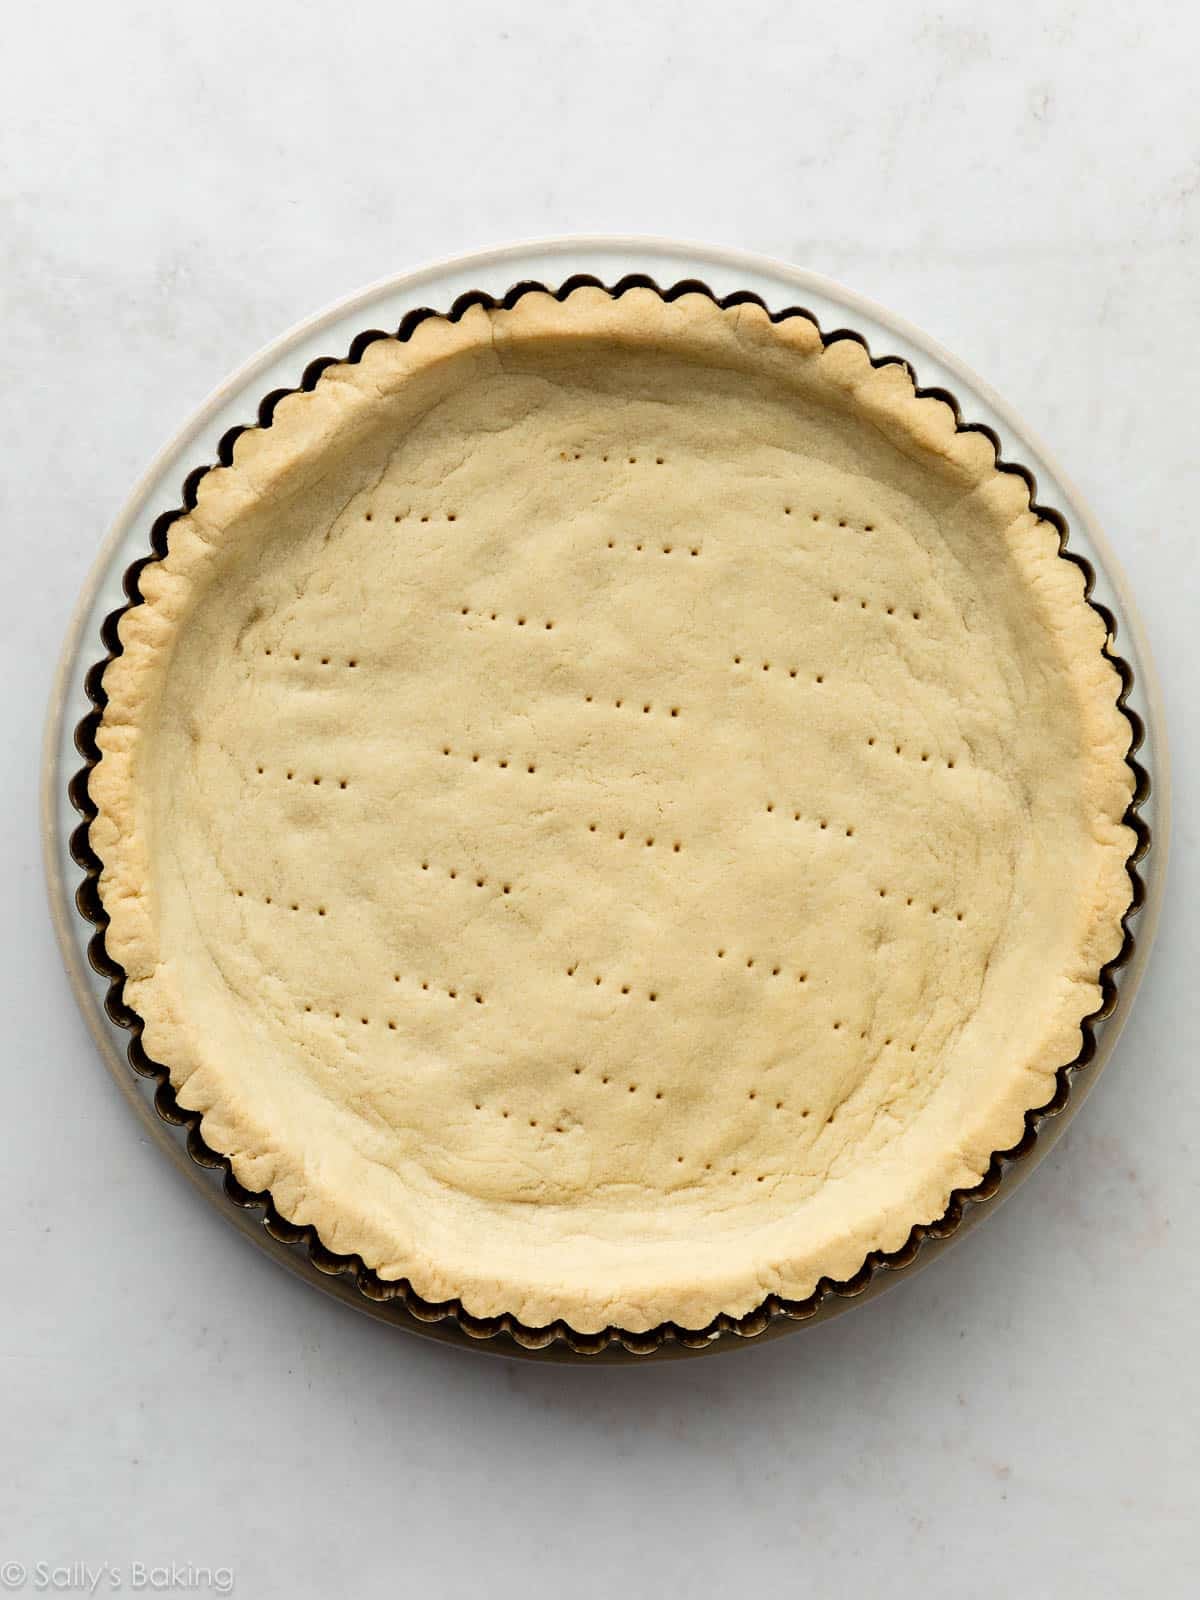
That’s it, your crust is done. It needs to cool completely before you fill it.
5-Ingredient Vanilla Mascarpone Cream Filling
Many fruit tarts call for a detailed pastry cream filling; while undeniably delicious (and you should absolutely feel free to use that instead if you’d like!), we’re keeping it simple for today’s fresh fruit tart.
Just 5 ingredients needed for our low-effort cream filling:
- Heavy Cream: We’re whipping the cream into stiff peaks, then folding the whipped cream into the rest of the filling. This is sort of how we prepare no bake cheesecake, too.
- Mascarpone: Softer than cream cheese, this mild creamy goodness is what we use to make tiramisu, so you already know this filling is going to be something special! If you don’t have (or don’t like) mascarpone, use a block of room-temperature cream cheese instead. See recipe Note below.
- Confectioners’ Sugar: Just like with the crust, we’re lightly sweetening the filling with some powdered sugar, which keeps the texture nice and smooth.
- Lemon Zest: A little fresh lemon zest adds a zingy bright note to the filling, which pairs perfectly with the fruit topping.
- Vanilla: For best flavor (and those gorgeous teeny specks), use a mix of pure vanilla extract and vanilla bean seeds, or vanilla bean paste. Vanilla pairs wonderfully with subtly sweet and buttery mascarpone, and because it’s the main flavor you’ll taste in this dreamy, creamy filling, this is not the place to skimp.
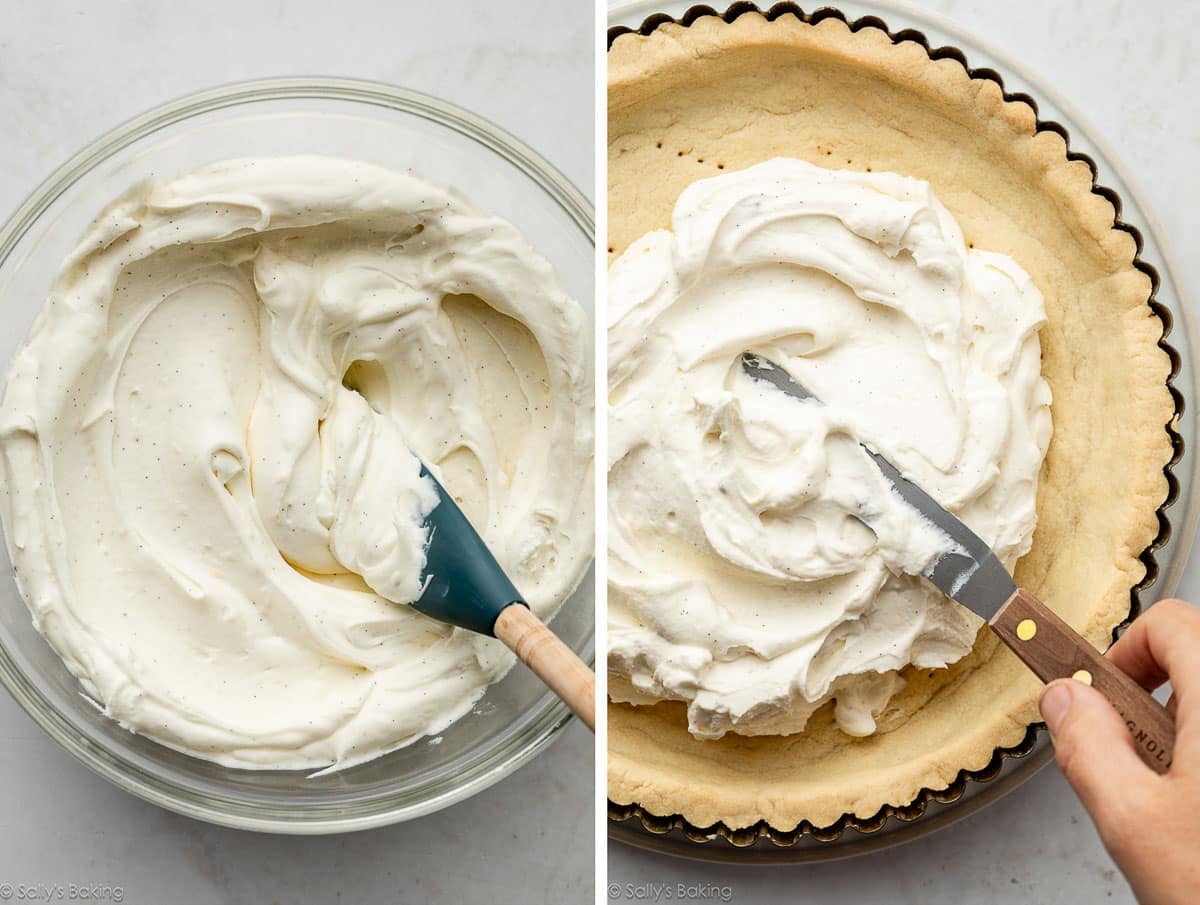
Below, left: Whipped cream, most of the confectioners’ sugar, lemon zest, and vanilla.
Below, right: Mascarpone gently mixed with the remaining sugar:
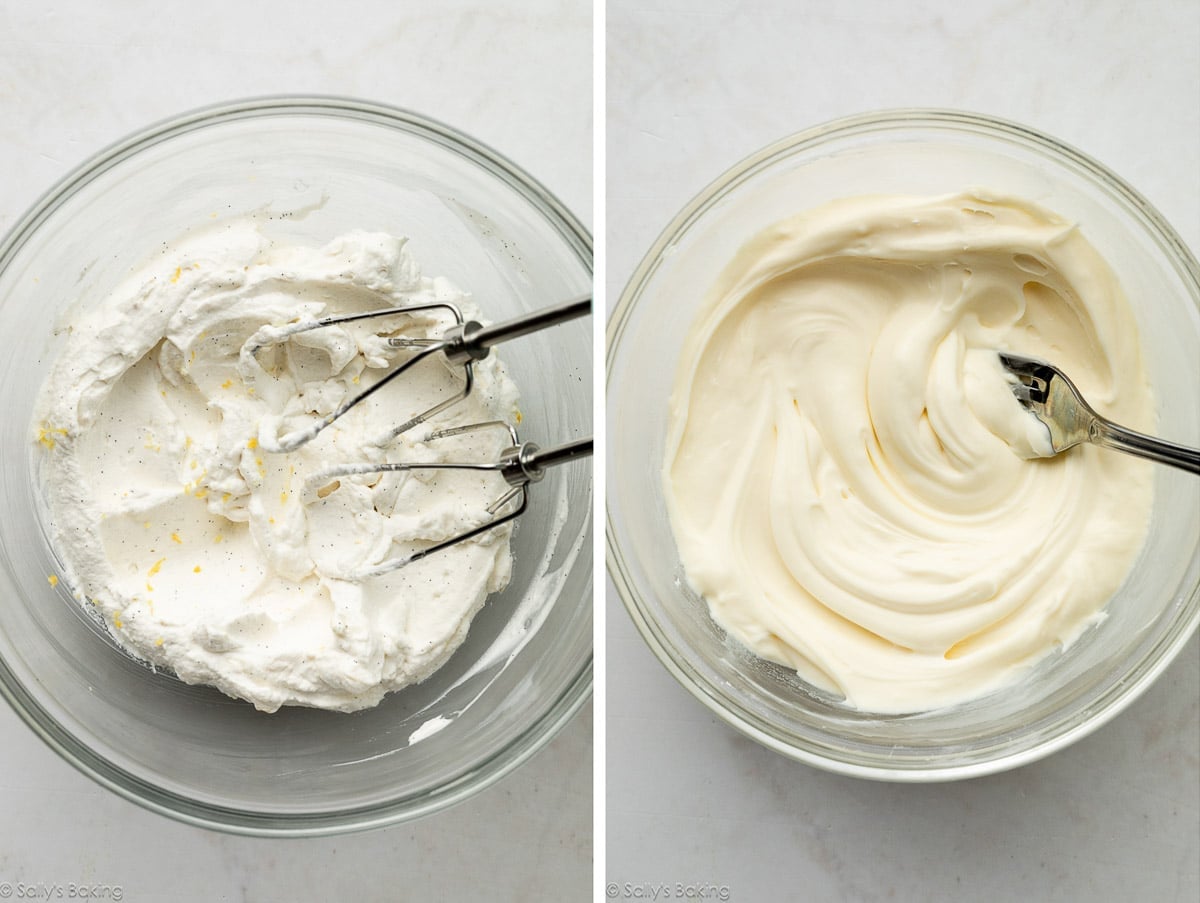
Fold the contents of both bowls together, and then spread into the cooled crust:
Fresh Fruit Topping
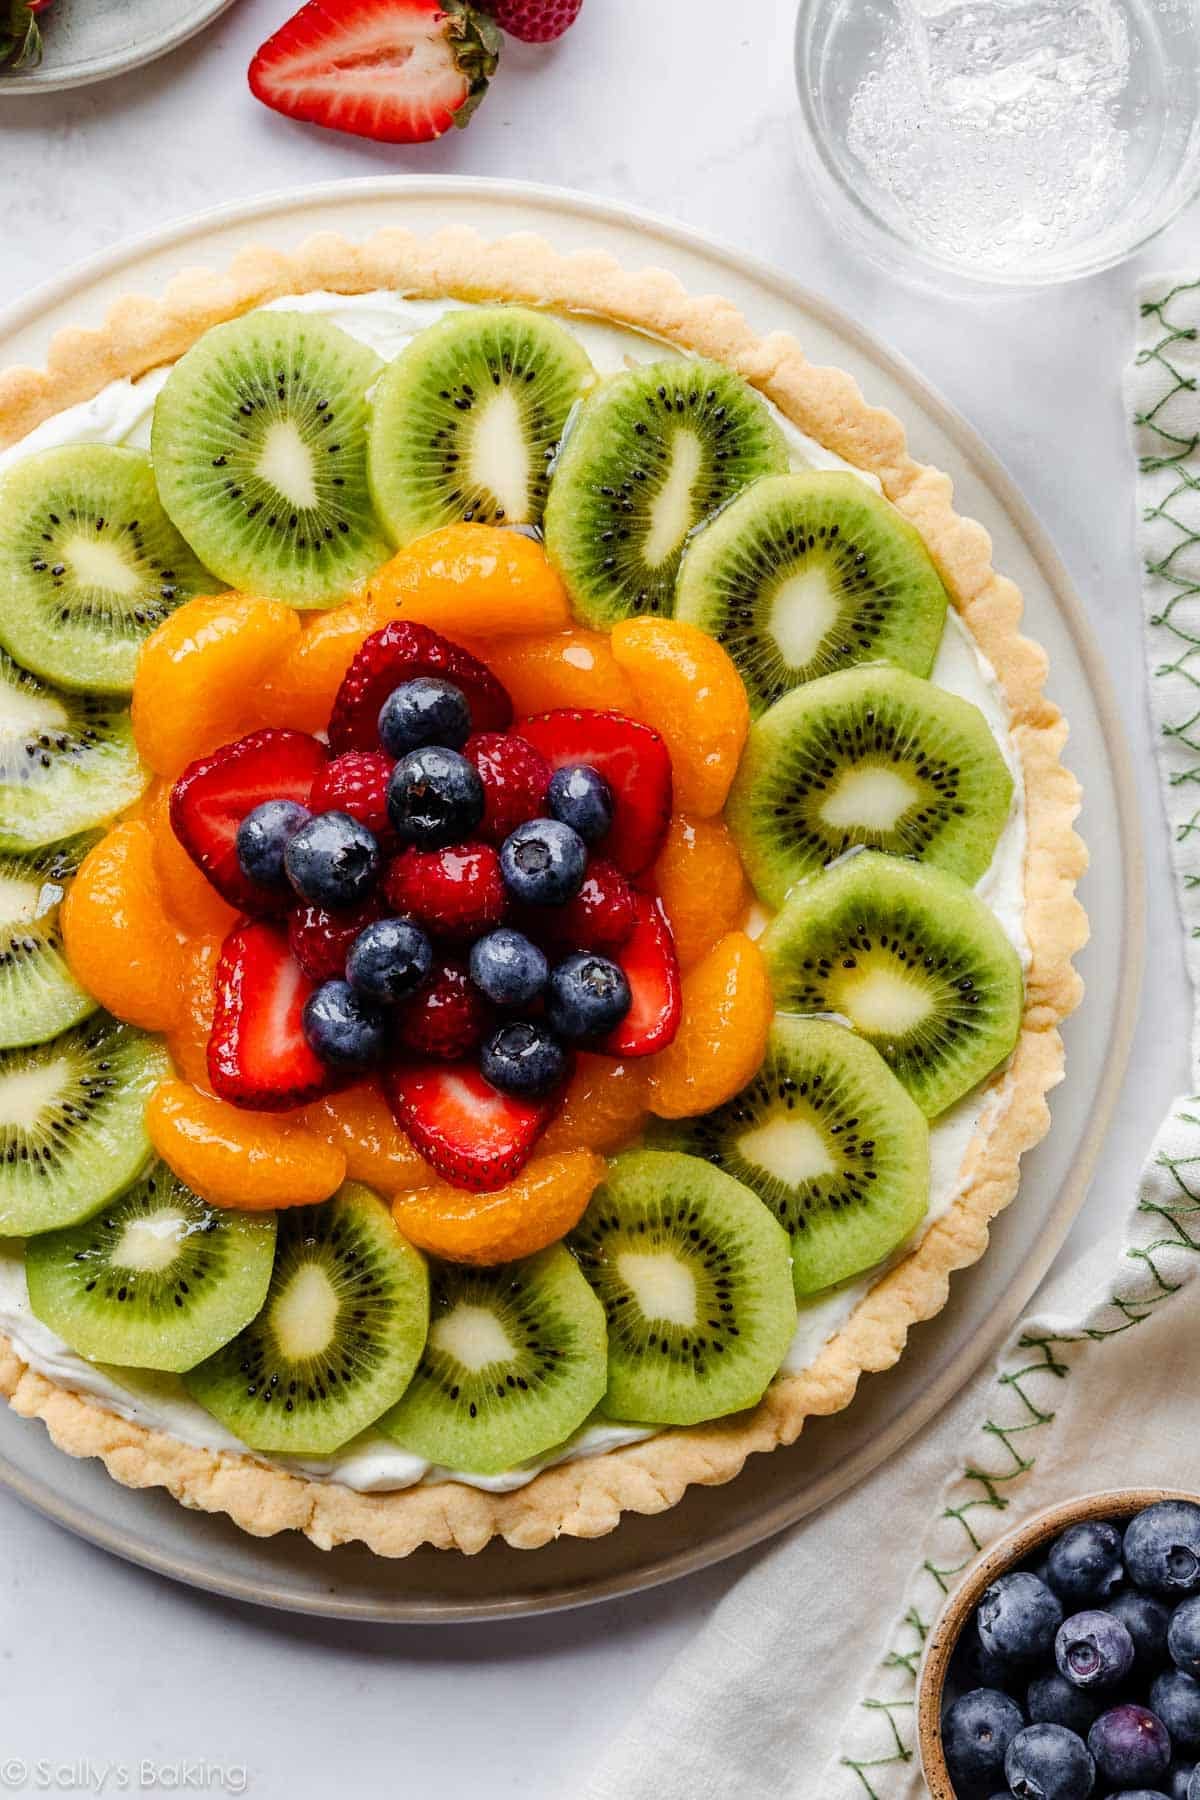
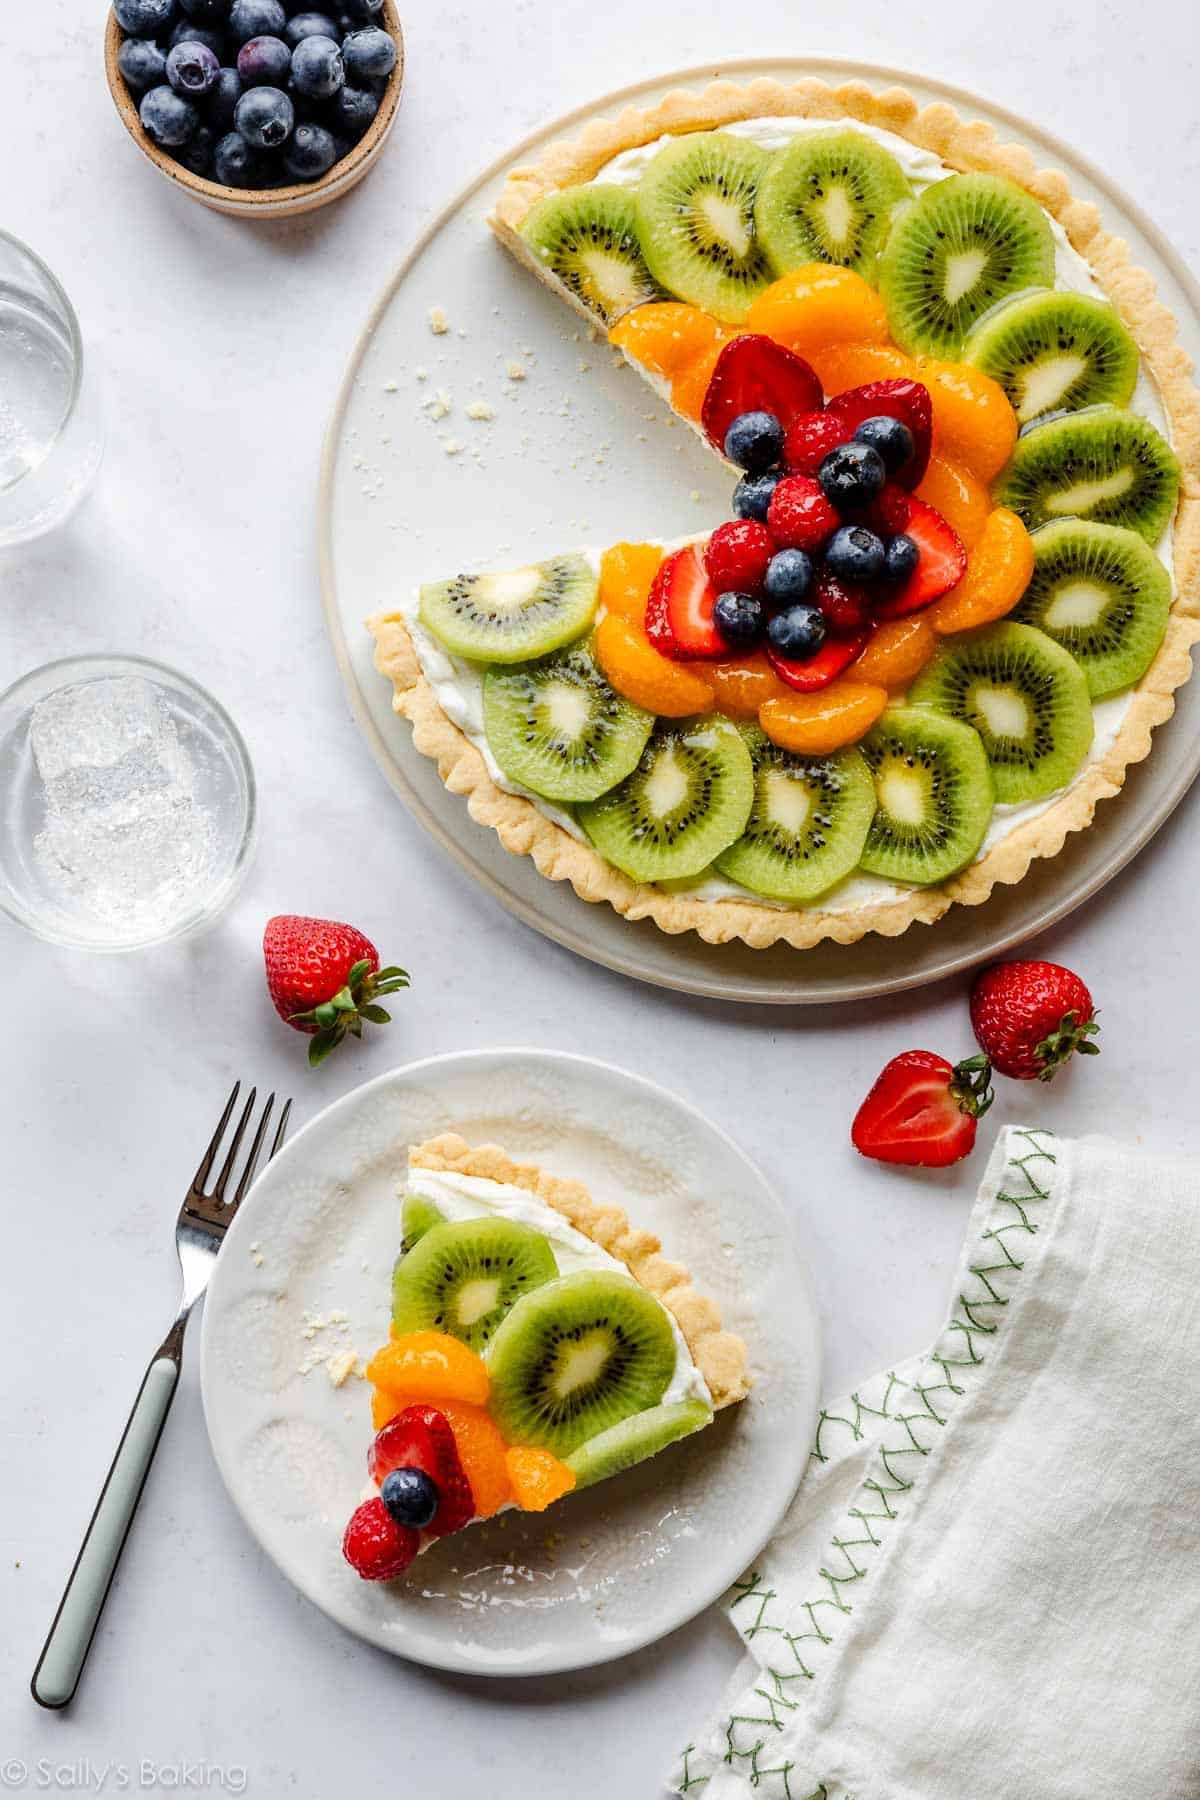
Here’s where you have full creative control. When selecting fruit for a fruit tart, I look for variation in color, texture, and size—as well as what flavors pair nicely together. Decorate the tart with concentric circles or rows of fruit, or simply pile it all on top.
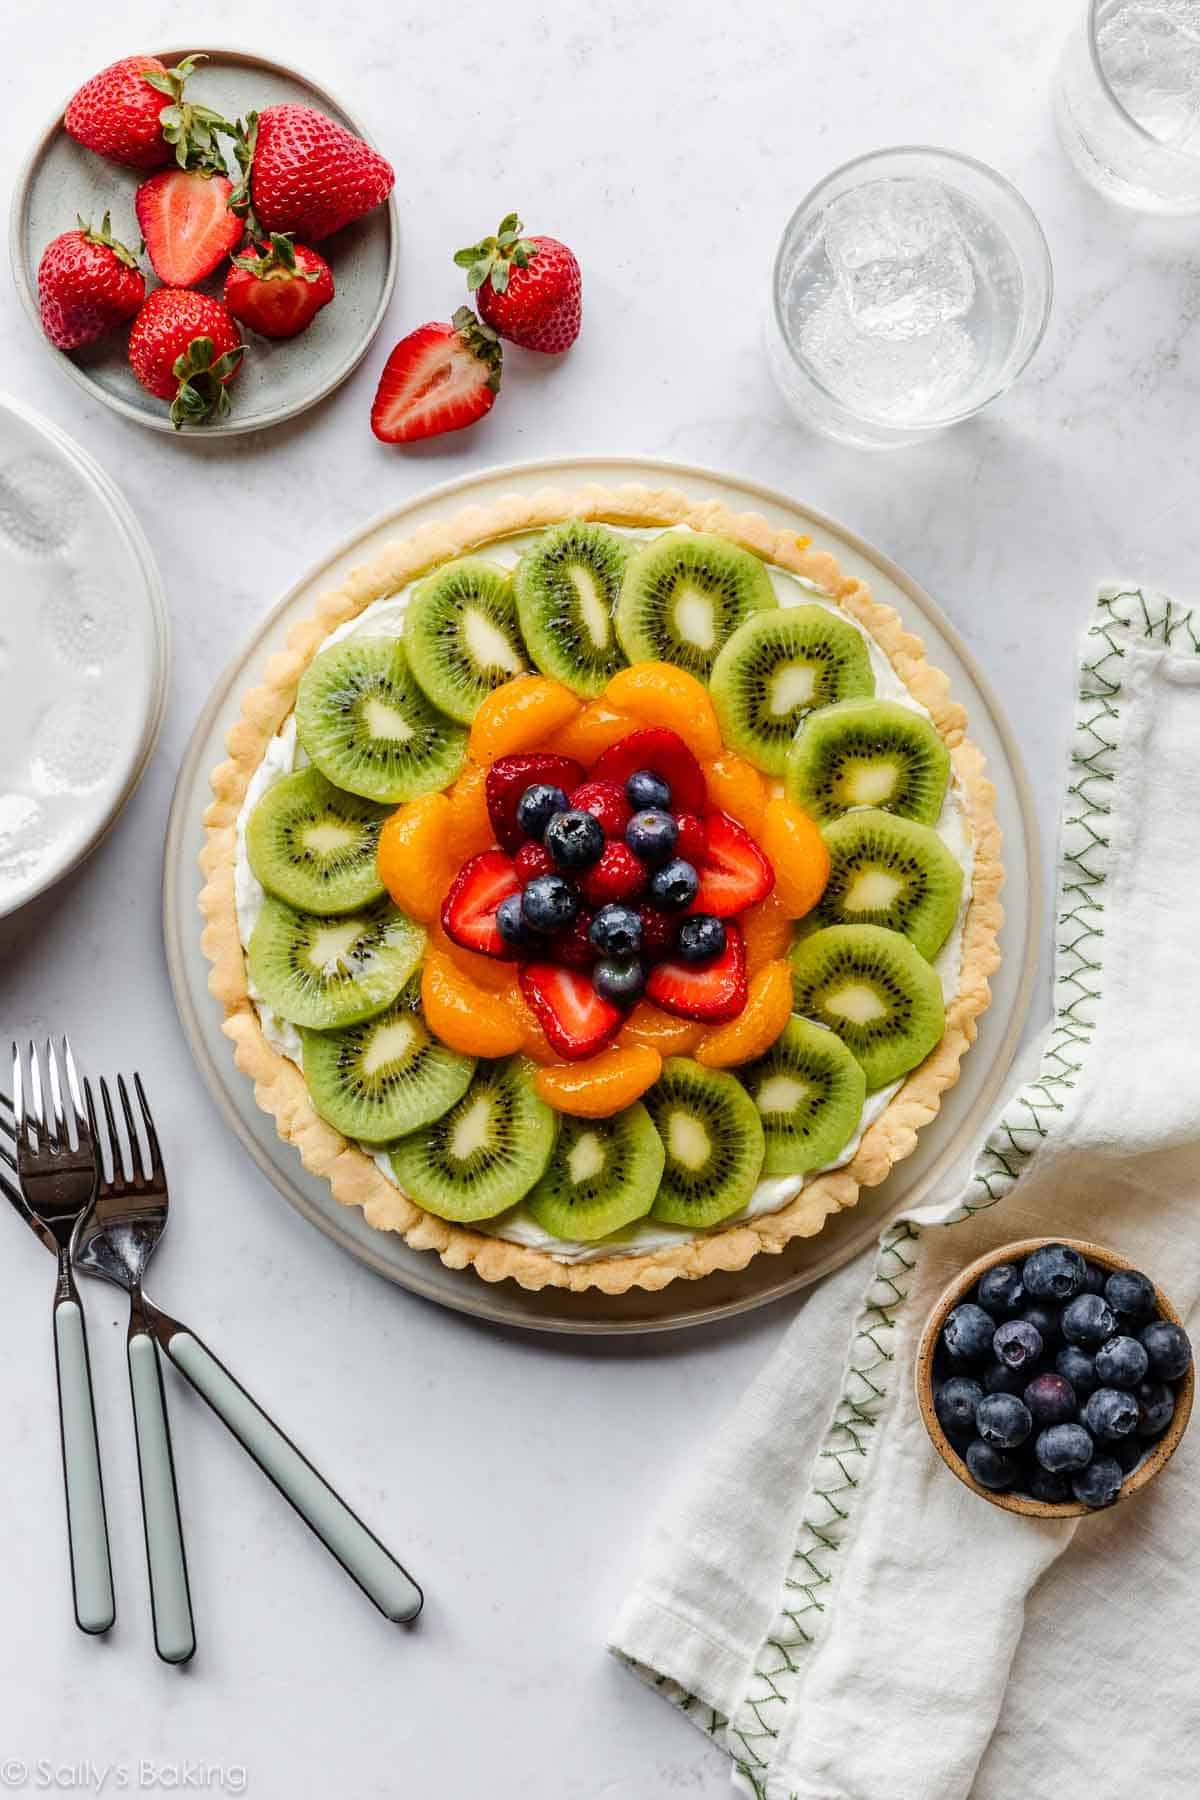
No matter how artistic you decide to get, it will taste delicious!
For a glossy shine, brush the top of the fruit with an easy glaze. Choose a light-color jam/preserves such as orange, peach, or apricot, and whisk it with some water to thin it out. This is what will make your fruit tart look just like the ones you see in a fancy pastry display case; and because the tart itself isn’t overly sweet, it’s the perfect finishing element.
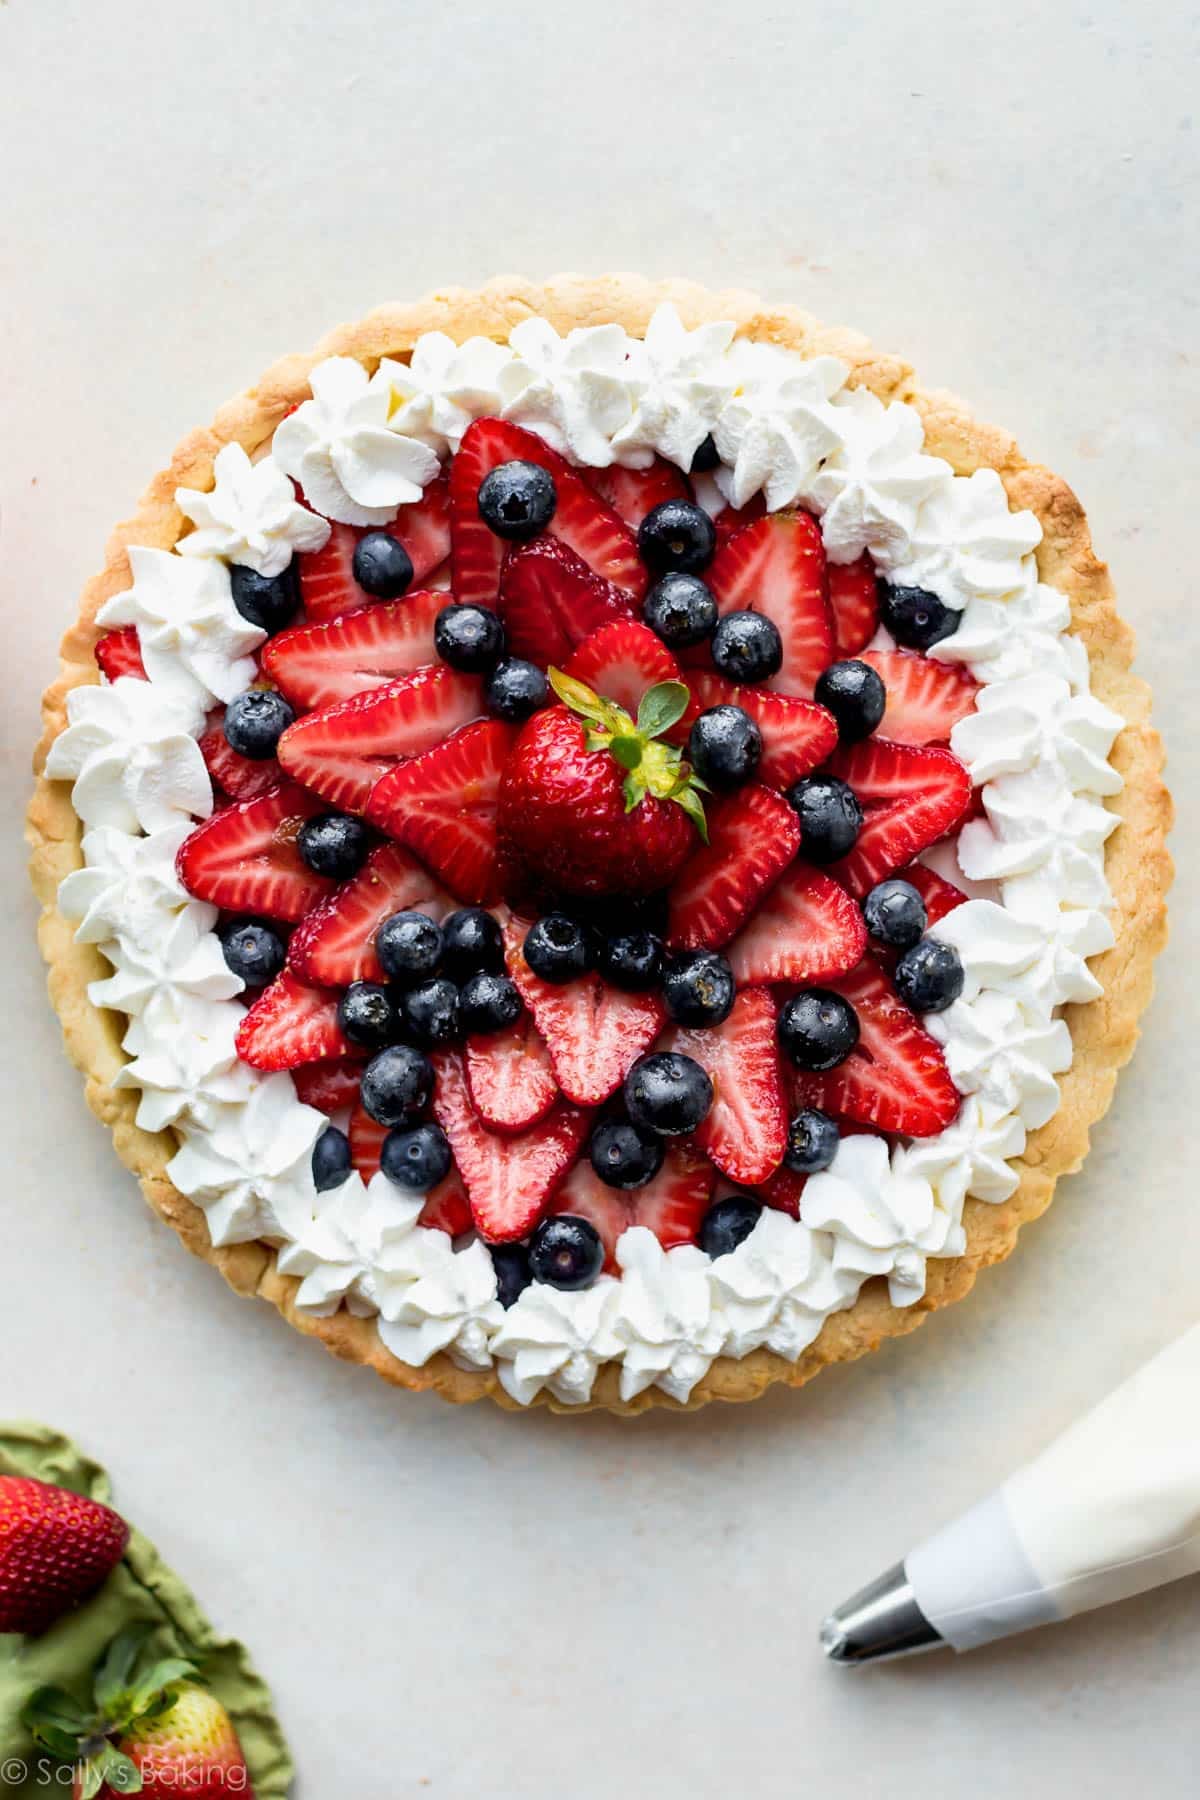
Here is my all-berry version, with extra whipped cream on top:
A bright and cheerful fresh fruit tart is a wonderful choice for summer holiday gatherings and celebrations. See more 4th of July desserts.
More Recipes with Fresh Fruit

Fresh Fruit Tart with Vanilla Mascarpone Cream
- Prep Time: 1 hour, 20 minutes
- Cook Time: 25 minutes
- Total Time: 3 hours
- Yield: 1 9-inch tart
- Category: Dessert
- Method: Baking
- Cuisine: American
Description
How to make homemade fresh fruit tart with buttery pastry crust and mascarpone cream filling. Save time and prepare the crust and cream ahead of time! See my make-ahead tips below the written recipe.
Ingredients
Crust
- 1 and 1/2 cups (188g) all-purpose flour, plus more as needed
- 6 Tablespoons (45g) confectioners’ sugar
- 1/8 teaspoon salt
- 1/2 cup (8 Tbsp/113g) unsalted butter, at room temperature and cut into 8 pieces
- 1 large egg, cold
Vanilla Mascarpone Cream
- 1/2 cup (120ml) heavy cream, cold
- 1/2 cup (60g) confectioners’ sugar, divided
- 1/2 teaspoon fresh lemon zest
- 1/2 teaspoon pure vanilla extract
- seeds scraped from 1/2 vanilla bean (or 1 extra teaspoon vanilla extract or vanilla bean paste)
- 8 ounces (226g) mascarpone, cold
Fruit Topping
- assorted fresh sliced fruit
- 2 Tablespoons orange, peach, or apricot preserves
- 1 Tablespoon water
Instructions
- Lightly grease a 9-inch tart pan with a removable base with nonstick spray.
- Make the crust: In a food processor, combine the flour, confectioners’ sugar, and salt and pulse or process on low speed to combine. Add the butter, 1 Tablespoon at a time, pulsing a few times after each addition. Add the egg and pulse only until the dough comes together in a clump. The dough should be soft. Transfer it to a lightly floured surface and press it into a 1-inch-thick disc. *If you don’t have a food processor, use a handheld or stand mixer fitted with a paddle attachment. Beat the dry ingredients together, and then beat in the butter on medium speed 1 Tablespoon at a time, and then beat in the egg.*
- Place the soft dough in the prepared pan and use your hands to press it evenly into the pan and up the sides. It may seem like you don’t have enough dough at first, but keep pressing. Use the bottom of a metal measuring cup to press the edges firmly against the rim of the pan. Flatten the top edge so it’s even with the rim of the pan, or use a paring knife to trim. Save the scraps to patch up any thin-looking areas. Prick the bottom of the crust all over with a fork. Cover and freeze for at least 30 minutes or up to 1 day.
- Preheat the oven to 350°F (177°C). Remove the crust from the freezer and place the tart pan on a large baking sheet for easy handling.
- Bake for 25 minutes or until the crust appears set. Place on a cooling rack to cool completely.
- Make the cream filling: Using a handheld or stand mixer fitted with a whisk attachment, beat the heavy cream, 6 Tbsp (45g) confectioners’ sugar, the lemon zest, vanilla extract, and vanilla bean seeds until stiff peaks form, about 3–4 minutes. In a small bowl using a fork, gently mix the mascarpone with the remaining confectioners’ sugar. Don’t over-mix; you only want to smooth out the mascarpone here. Over-mixing will result in a separated mixture.
- Transfer the mascarpone mixture to the whipped cream mixture. Fold together with a silicone spatula or beat on low speed until combined. Use right away (next step), or cover and refrigerate the filling for up to 3 days before using.
- Spread the filling into the cooled crust. I usually use a small offset spatula for this. Refrigerate until ready to garnish with fruit, or garnish right away.
- Top the tart: Garnish the tart with fresh fruit. Use a fork to whisk together the jam and water in a small microwave-safe bowl. Warm for about 15 seconds in the microwave, then brush the glaze on top of the fruit.
- Slice and enjoy! Store leftover fruit tart, covered, in the refrigerator for up to 3 days.
Notes
- Make Ahead & Freezing Instructions: Prepare the crust through step 3 and refrigerate for up to 1 day. You can also prepare and bake the crust, then let the crust cool in the pan to room temperature. Put the tart crust in the freezer for about 1 hour to let it firm up, then wrap it in plastic and freeze it for up to a month. When ready to serve, unwrap the crust and let it thaw before filling and decorating. The mascarpone cream can also be prepared ahead and refrigerated for up to 3 days before using.
- Special Tools (affiliate links): Food Processor | 9-inch Tart Pan | Electric Mixer (Handheld or Stand) | Glass Mixing Bowl | Silicone Spatula | Small Offset Spatula | Pastry Brush
- Can I Use a Pie Dish Instead? Yes, you can use a 9-inch pie dish instead of a 9-inch tart pan. Cutting into the pie neatly will be tricky though. You may want to line the pan with parchment paper so you can lift the baked and cooled crust out before filling/decorating.
- Can I Use Cream Cheese Instead of Mascarpone? Yes, absolutely! Use 1 8-ounce block of full-fat cream cheese. Cream cheese should be room temperature. The rest of the instructions remain the same.
- Can I Use Pastry Cream Instead of the Mascarpone Filling? Yes! Here is my pastry cream recipe. Make sure it has chilled before using.
- Crust Update in 2025: The crust portion of this recipe was updated in 2025 to be quicker, easier, and require fewer tools. If you’d like to make the original version, the crust called for: 2 Tablespoons (30ml) cold heavy cream, 1 large egg, 1 and 1/2 cups (188g) all-purpose flour, 1/2 cup (60g) confectioners’ sugar, 1/4 teaspoon salt, 1/2 cup (8 Tbsp; 113g) unsalted butter, very cold and cubed. Whisk the heavy cream and egg together. Set aside. To use a pastry cutter: Whisk the flour, confectioners’ sugar, and salt together in a medium bowl. Place the cubed butter on top and cut in using the pastry cutter until the entire mixture resembles pea-sized crumbs or use a food processor for this. Pour the heavy cream mixture on top and stir/pulse to combine. Flatten dough into a 1-inch thick disc. Wrap the dough in plastic wrap and refrigerate for 1 hour or up to 2 days. Remove dough from the refrigerator and use a rolling pin to roll out into a 9-inch circle. Press evenly into a greased 9-inch tart pan including up the sides. Refrigerate as the oven preheats. Preheat oven to 400°F (204°C). Remove crust from the refrigerator, line the inside with parchment paper, and fill with pie weights. Bake the crust for 12 minutes, remove crust from the oven, reduce oven heat to 350°F (177°C), and carefully remove the foil and weights. Use a fork to prick a few holes into the bottom of the crust and bake, without weights, for 7–10 more minutes or until lightly golden brown.
- Can I Make Mini Fruit Tarts? Yes. This crust fits nicely into about six 4-inch mini tart pans, such as these mini 4-inch tart pans. You can use larger tart pans for fewer tarts. Bake the mini crusts until lightly browned on the sides. The 4-inch size took about 15 minutes in my oven. Wait for them to cool, then fill and decorate.


Reader Comments and Reviews
Delicious and easy to make!
I did the alternate recipe for this month’s challenge, rave reviews of the Strawberry Shortcake Cupcakes! Easy to follow recipe and the results were outstanding. The strawberry whipped cream icing is so delicious.
Easy, light, but yummy summer treat! Love that you can use berries or fruit that is in season or that you like. I love the flexibility with the ingredients and tools that Sally puts on the notes – so helpful!
The mascarpone filling was delicious with the added lemon zest. The crust came together very easily and was flaky and buttery. I chose fresh peaches, strawberries, rasberries and blueberries for my topping. Nice light dessert after pot roast.
A lovely, but not difficult recipe. I’m serving it this evening and I know my guests will be impressed.
A lovely, but not difficult recipe. I’m serving it this evening and can’t wait to taste it. I know my company will be impressed.
Simple and impressive! My family loved it!
This is beautiful and the type of dessert I would reserve for special occasions and loved ones. The labor of love is worth it in the end for this special gem!
This is beautiful and the type of dessert I would reserve for special occasions and loved ones. The labor of love is worth it in the end for this special gem!
Love this! I’ve never made a tart before and the instructions were extremely clear. I used kiwi, strawberry, blueberry, and raspberries in my tart and everyone loved it!
Absolutely delicious and not as difficult as some tarts are! I made it for a family event and sent the recipe to several people because they liked it so much!
Super easy and impressive. Family loved it!
This was much easier to make than I expected and such a pretty presentation. I tried entering the baking challenge but could not get through.
Much easier than it looks! Completely delicious, as usual with Sally’s recipes. All I need to do better is choose riper kiwis and learn how to peel them better.
This was a very easy recipe, but it gave a big bang! It turned out so lovely and everyone thought I bought it from a high end bakery!
Sally never disappoints with her wonderful recipes and great videos. This is one of my family’s favorite recipes
I’ve never made a tart before and this recipe was so easy! Came together quick and tasted fresh and light! Perfect for summer.
this recipe was so fun! my parents loved it and the directions were super clear and easy to follow :)))
Such a fun and pretty summer recipe! I love the versatility of adding different fruits and will definitely be making this again.
Such a fun and pretty summer recipe! I love the versatility of adding different fruits and will definitely be making this again.
Very easy to make, but incredibly delicious!
Great Summer Recipe.
What a great way to use our abundance of berries. My family enjoyed the softer crust and creamy filling along with the fresh fruit. This recipe is a summer season winner for my family.
I love that you could split this recipe up over a couple of days! I substituted cream cheese since I couldn’t find mascarpone at my grocery store – it tasted fine, but it was a bit lumpy because I leaned too heavily into the “don’t overmix” part of the recipe. I think I prefer Sally’s fruit pizza recipe over this one, but it’s easy enough that it’s worth trying out!
Not only delicious but also probably one of the prettiest desserts I’ve ever made! The pastry crust was easy to put together and had a wonderful shortbread flavor. The mascarpone cream filling was rich and creamy and had a beautiful note of vanilla. The best part was that it was so incredibly easy to make! The hardest and most time-consuming part was slicing fruit and figuring out your design basically. It was a great way to use some of our mangoes from the backyard along with some fresh berries and peaches. I added some sprigs of mint and that set it over the top. I love how you can use whatever fruit you have on hand or is in season and really just make it your own. Will definitely be making this again.
Easy and delicious!
Made this for someone’s anniversary & they loved it.
Not a complicated recipe and it looks beautiful.
This was very good and pretty easy to make. I used strawberries and blueberries, and I had to use cream cheese instead of mascarpone. I think it would also taste good with a salted caramel or chocolate sauce topping (or do both and make a turtle topping).
As always great recipe. My prior tarts were made with pastry cream and a slightly different crust but this cuts perfectly and was much simpler.
Imade this. Wow’d my husband while he was working and sent him a pic. The recipe is so well written and super easy. The result? It was gobbled up quickly. Yum