

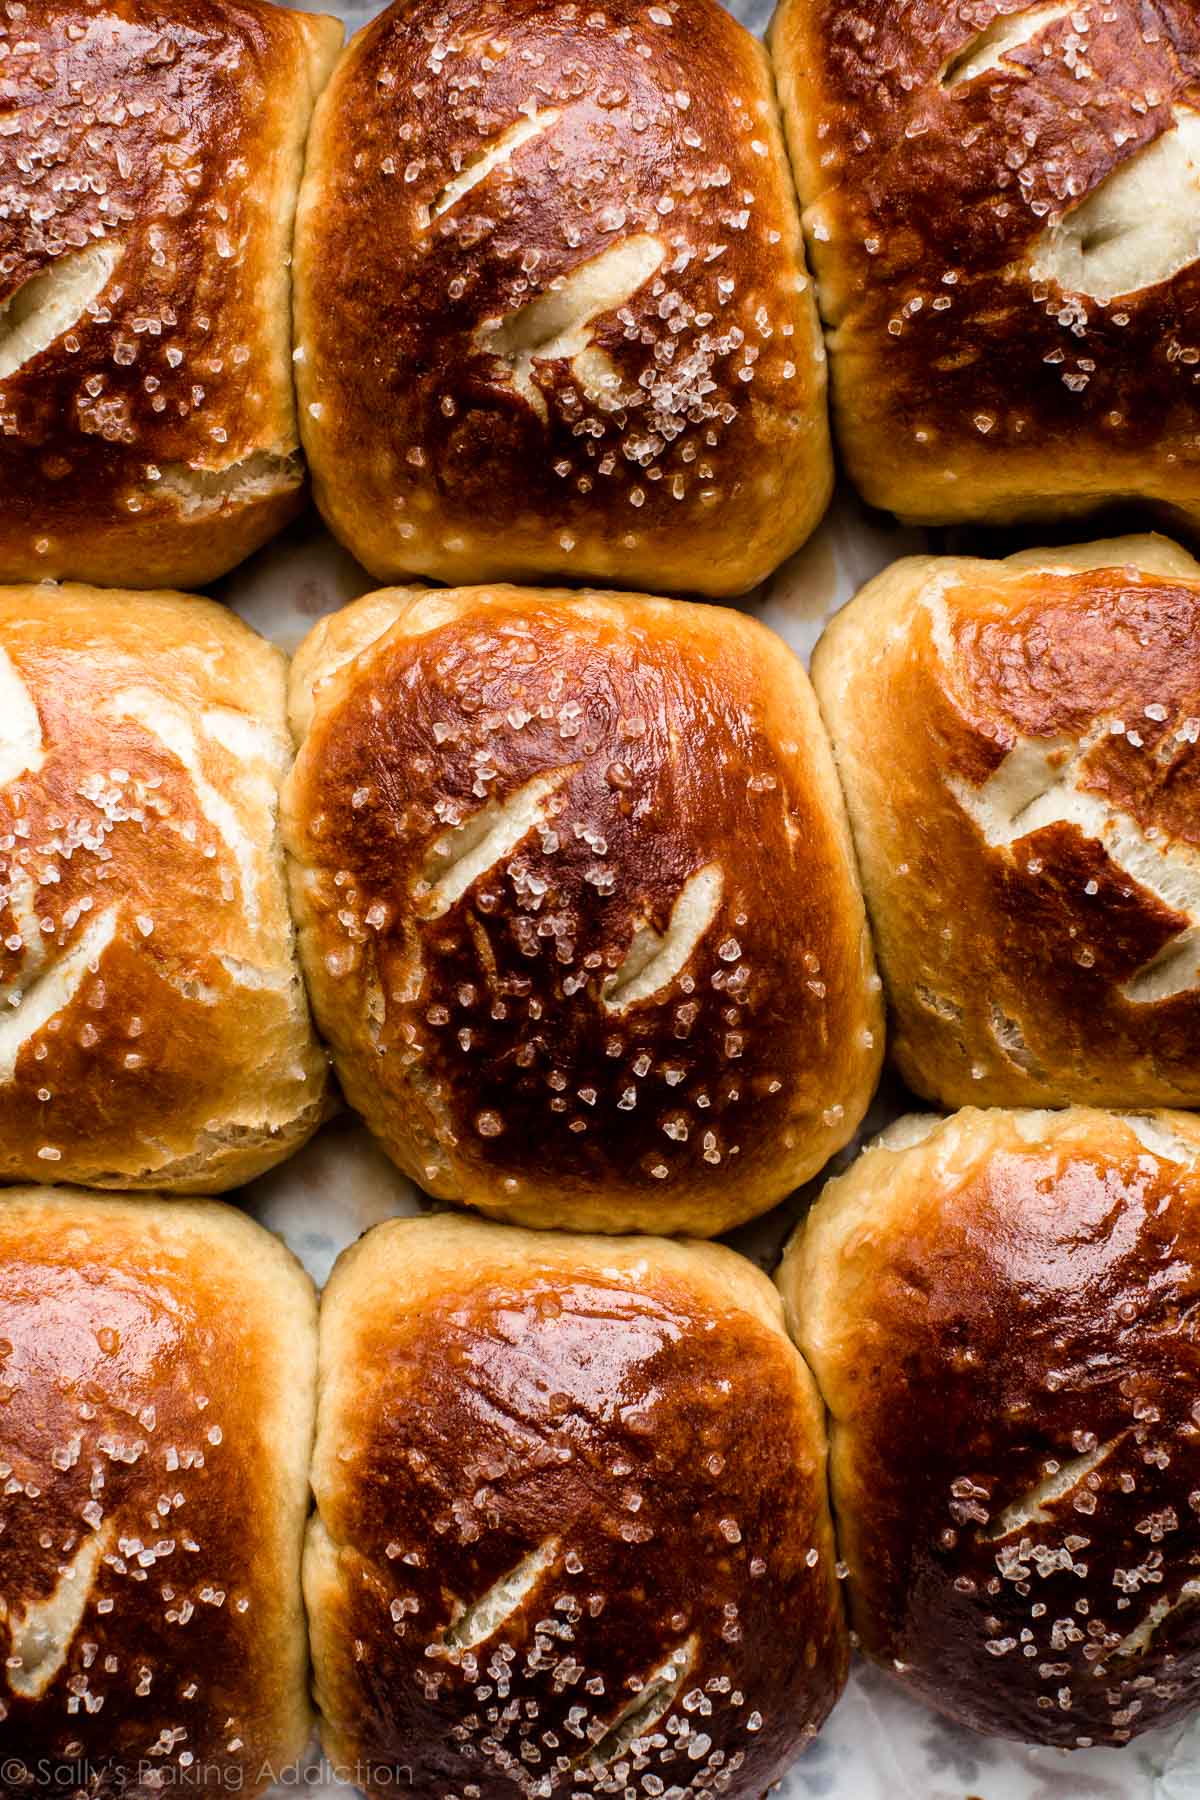
Homemade soft pretzel rolls come together quickly with a few basic kitchen ingredients. For the best results, follow my step photos and detailed instructions. You’ll love this dinner roll version of soft pretzels!
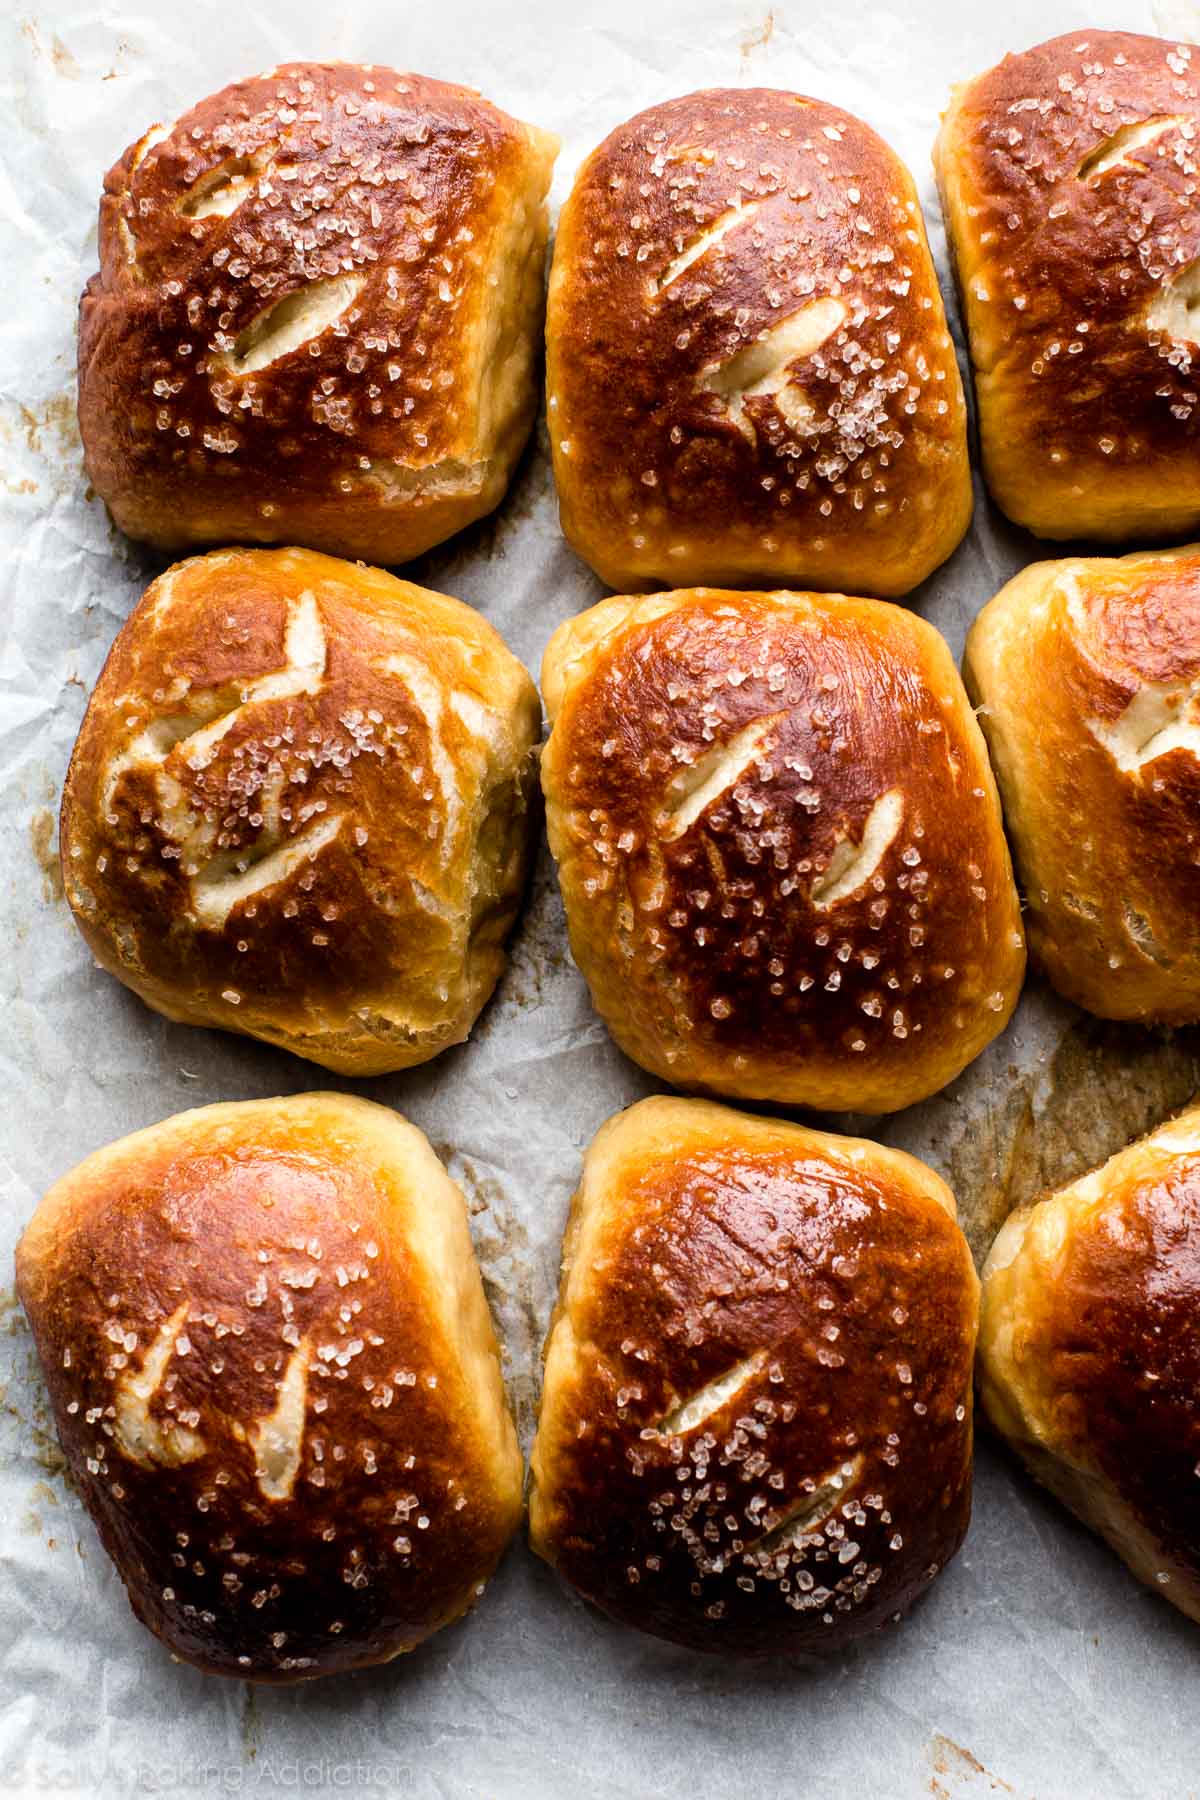
Meet soft pretzel rolls, the mealtime-appropriate version of soft pretzels. Instead of shaping the dough into traditional pretzels, we simply craft the dough into balls. Like soft pretzel bites, but bigger! I know we all like the sounds of that. There’s a lot to cover today so let’s dive right in.
These Soft Pretzel Rolls Are:
- Made with 7 basic ingredients
- Extra chewy
- Soft and fluffy in the centers
- Easier than you think
- Loaded with real pretzel flavor
- Topped with crunchy coarse salt
- Baked to golden brown perfection
Behind the Recipe
Are you familiar with my soft pretzels recipe? It’s a completely un-intimidating approach to making pretzels from scratch. If you have zero skill in the kitchen, you can make homemade soft pretzels. I even turned this recipe into soft pretzel knots and jalapeño cheddar soft pretzels, too. But for soft pretzel rolls, we skip the twisting/shaping and form the dough into balls. Much easier.
To make soft pretzel rolls, we use the exact same dough that we use to make soft pretzels. This simple dough comes together with incredibly basic ingredients like water, yeast, butter, brown sugar, salt, and flour. Separate, they’re awesome. Together? Soft pretzels!
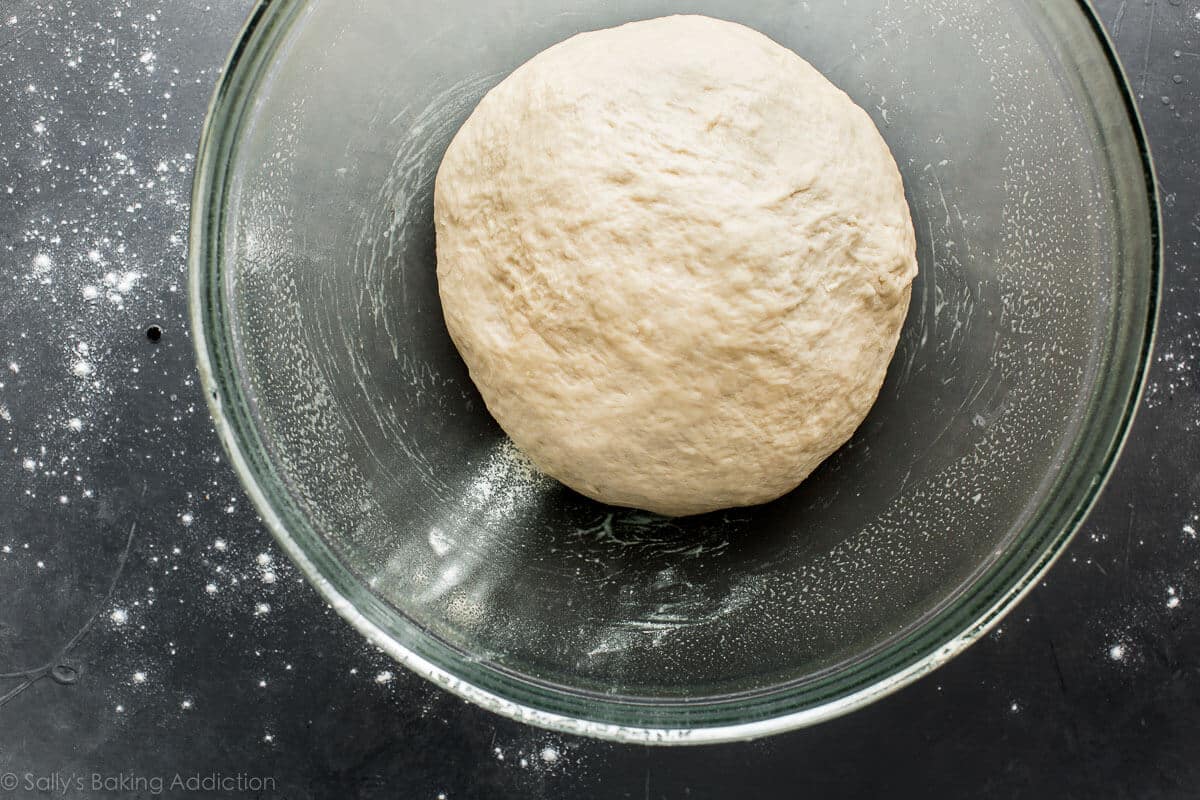
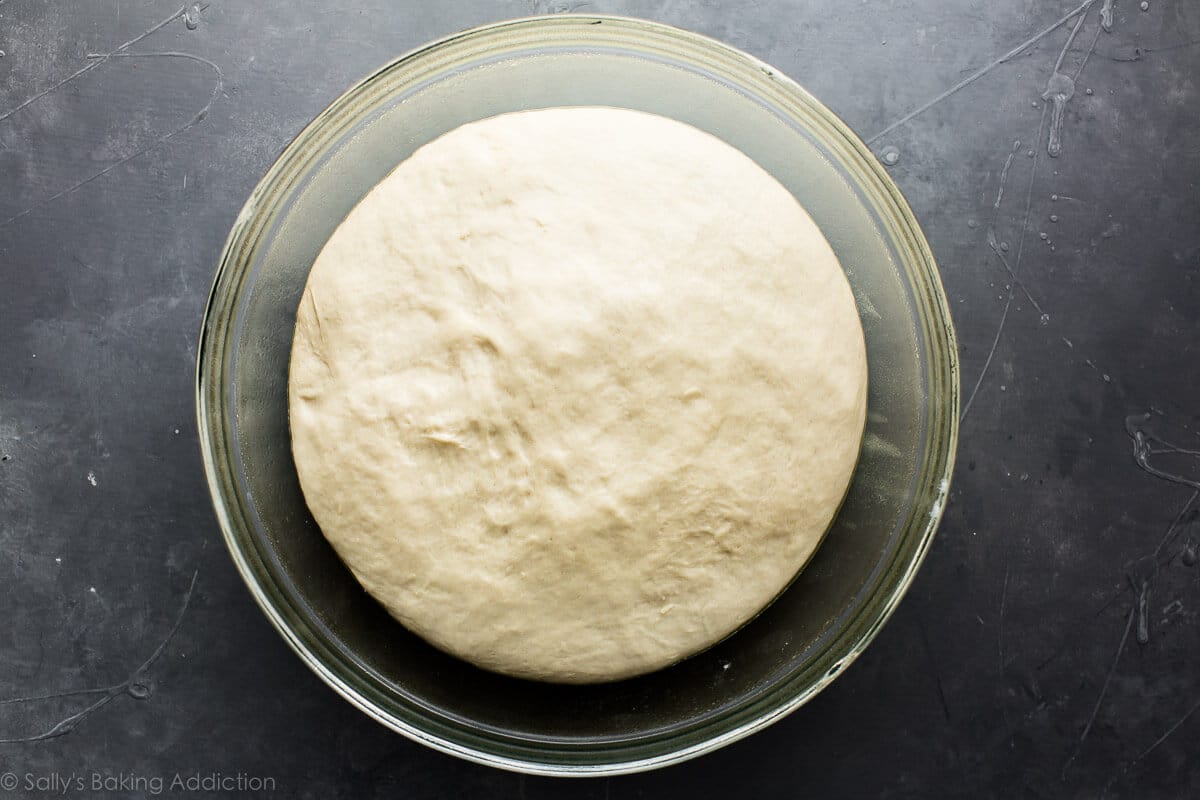
The primary difference between the two is that today’s rolls require a little extra rise time. We want the rolls to be fluffier than regular soft pretzels, so we give the dough a few extra minutes to rest—it’ll nearly double in size. See the photo of dough above and the one right below? There’s about 1 hour between the two photos—some great rise there.
Overview: How to Make Soft Pretzel Rolls
- Make the dough. See my How to Knead Dough video tutorial if you need extra help with that step.
- Let the dough rise for an hour. Or until doubled in size, as pictured above.
- Punch down the dough. This helps get rid of any air bubbles.
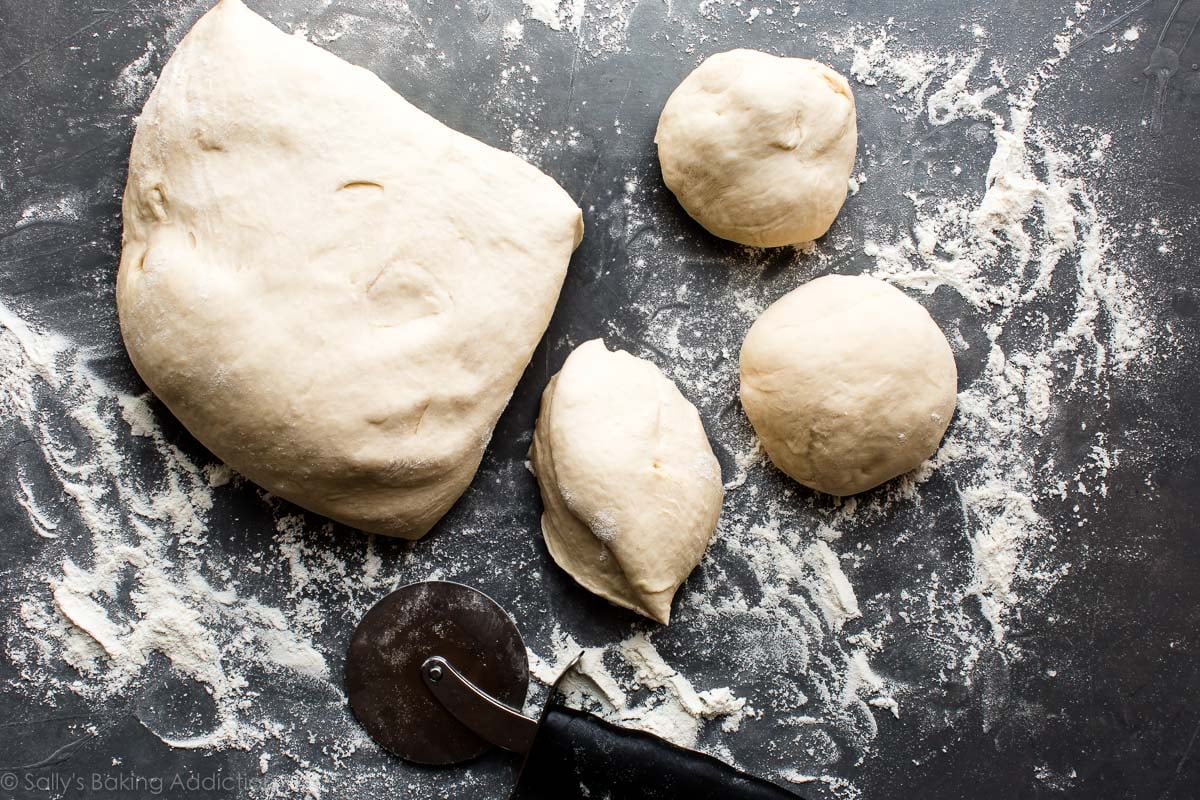
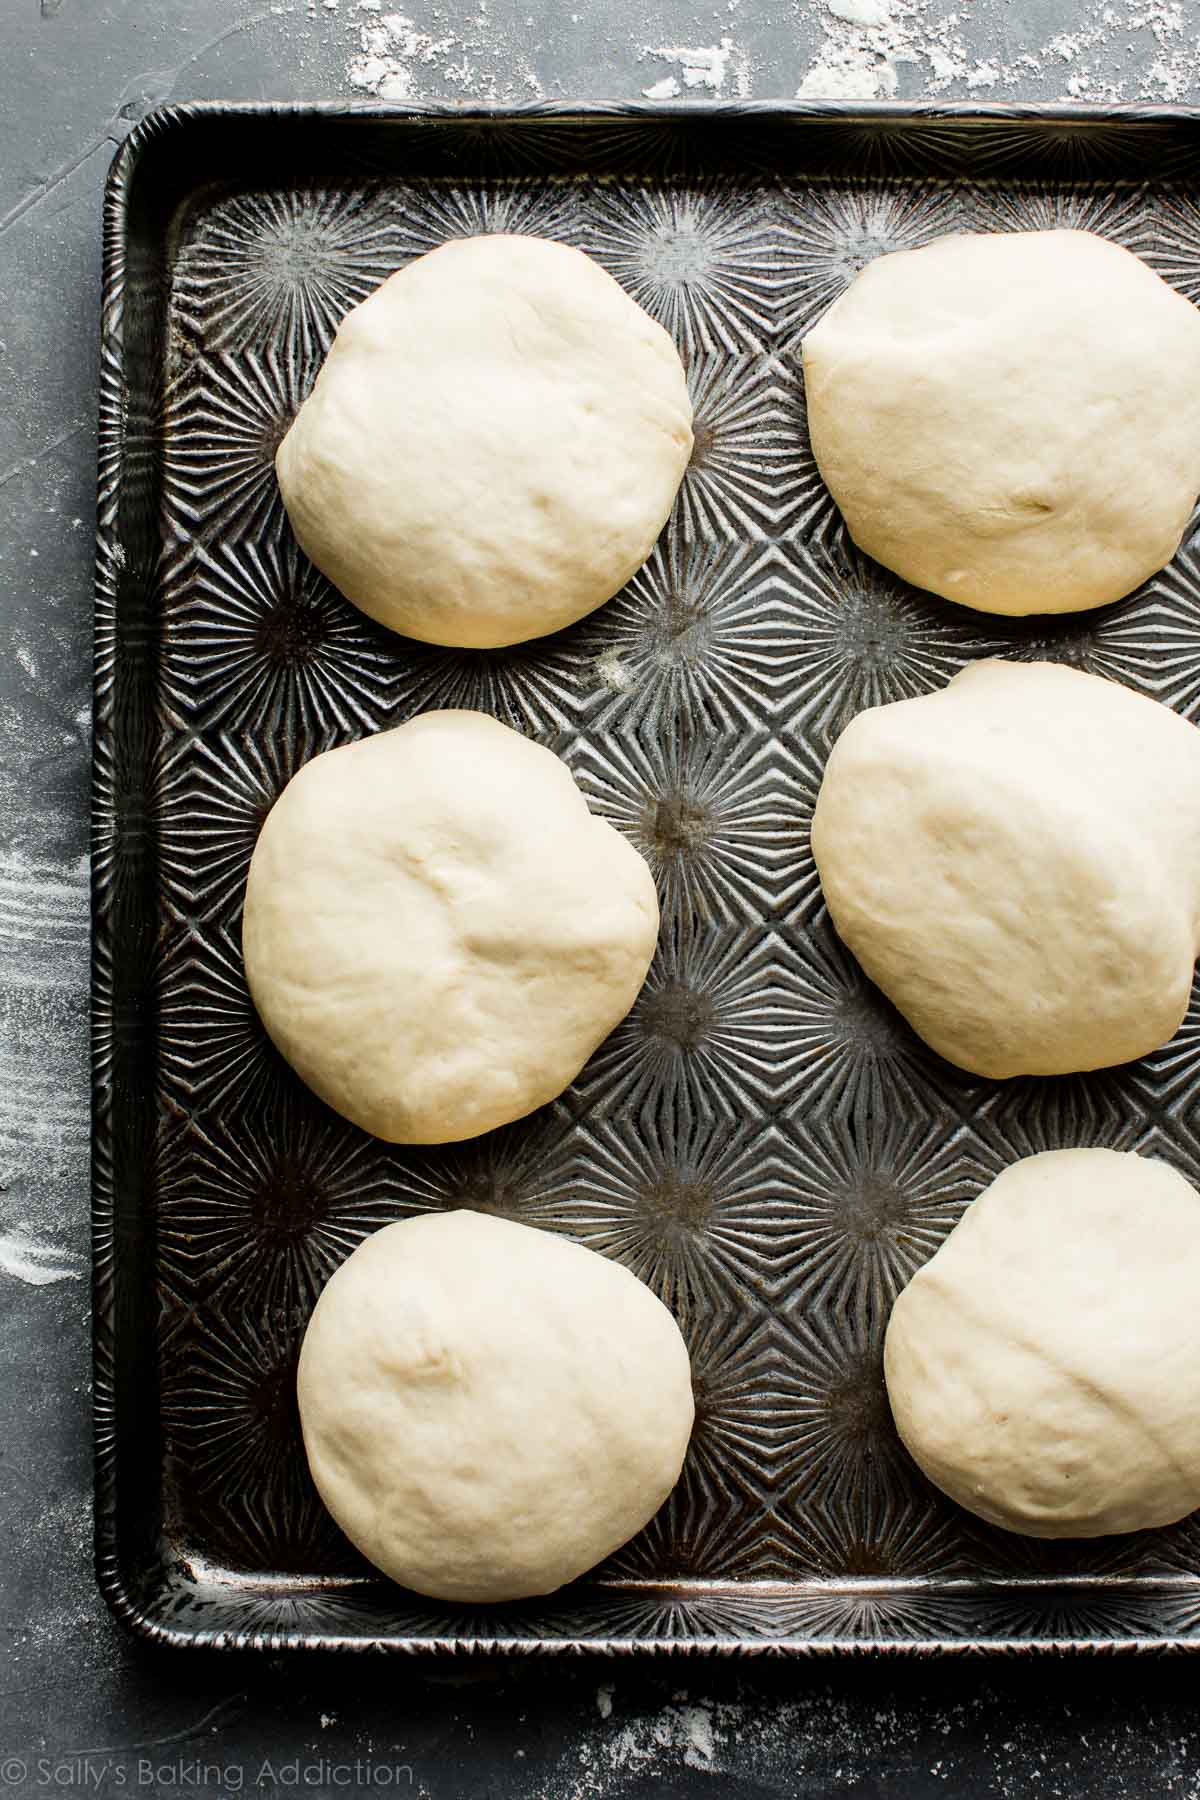
- Divide the dough to form the rolls. Aim for roughly 1/3 cup of dough each, which will yield about 12 rolls. Shape into balls.
- Give the rolls a baking soda bath. See below for more details.
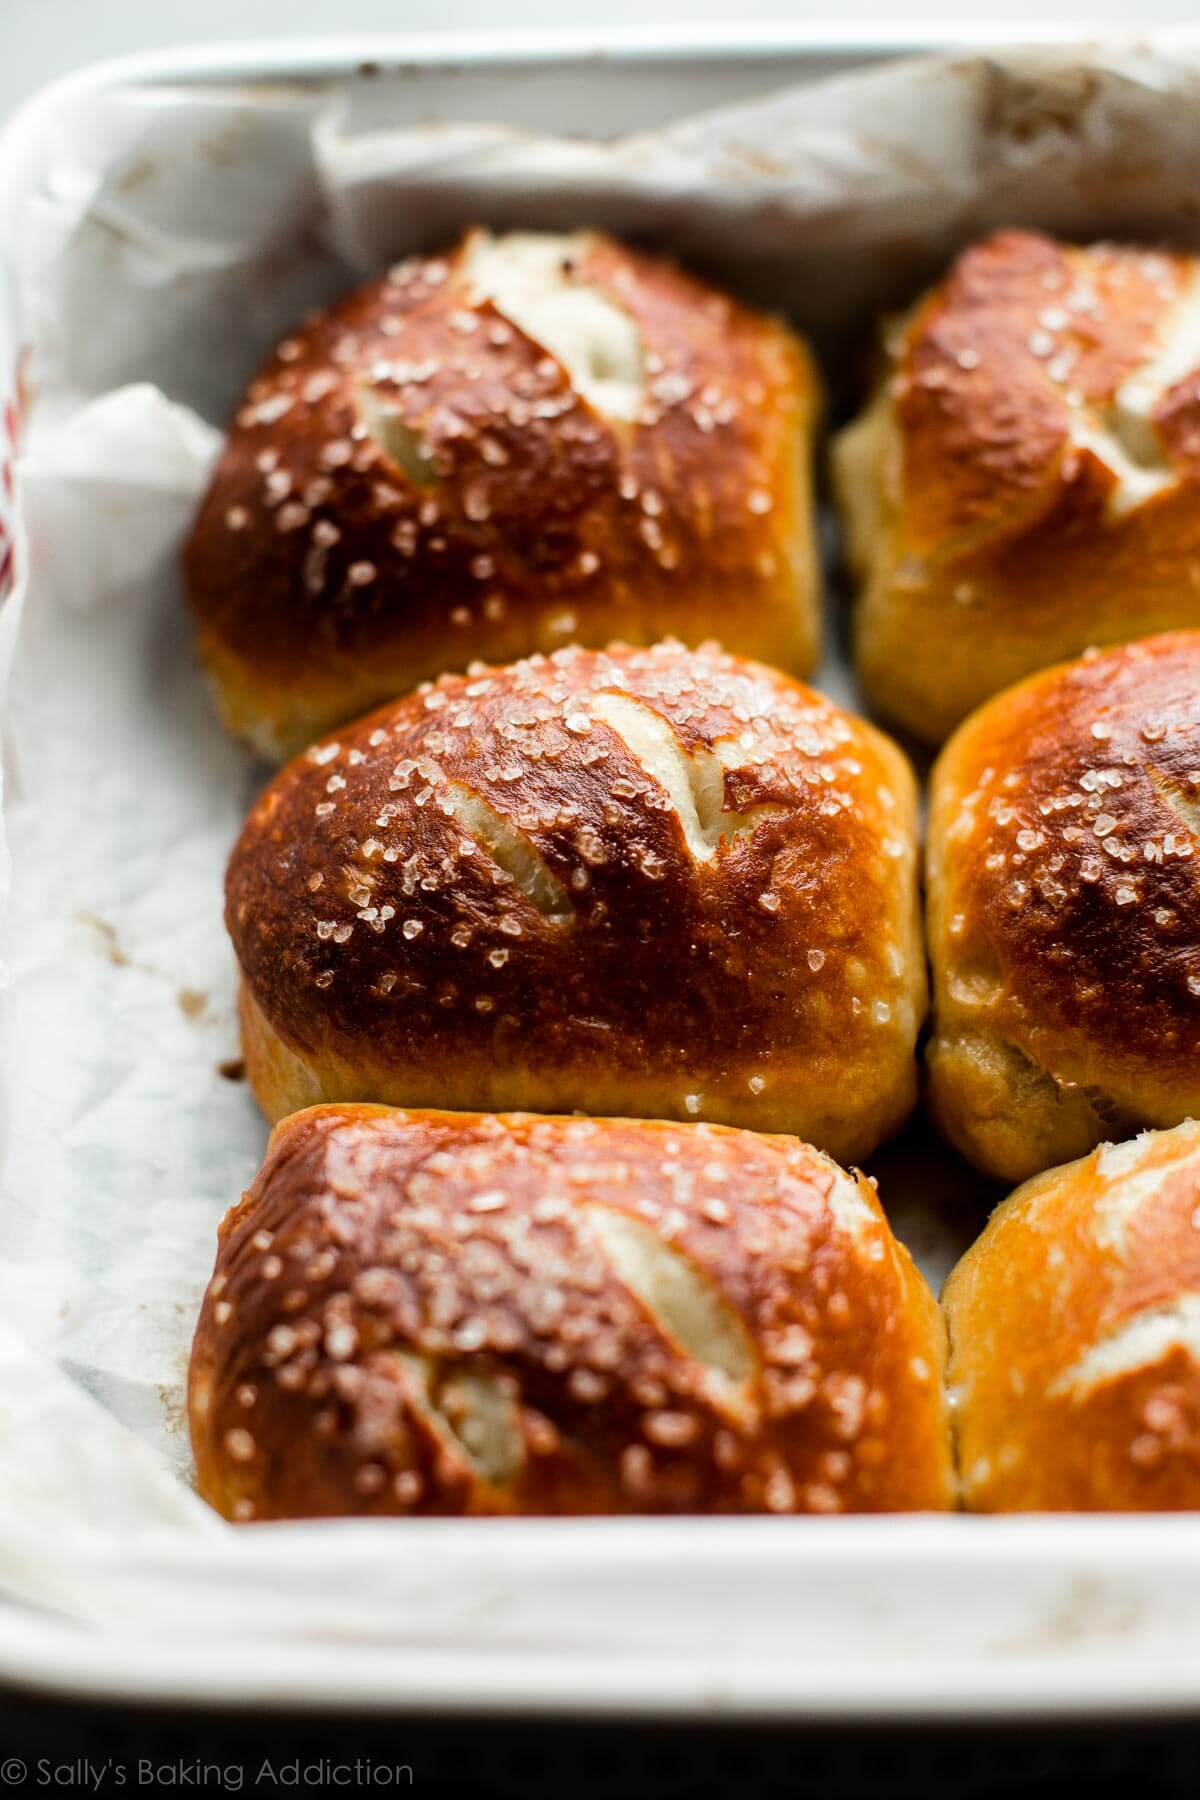
- Place rolls into prepared baking pan. I like to bake the rolls squished together in a baking pan because they hold their shape much better. You can, however, separate them on a large baking sheet.
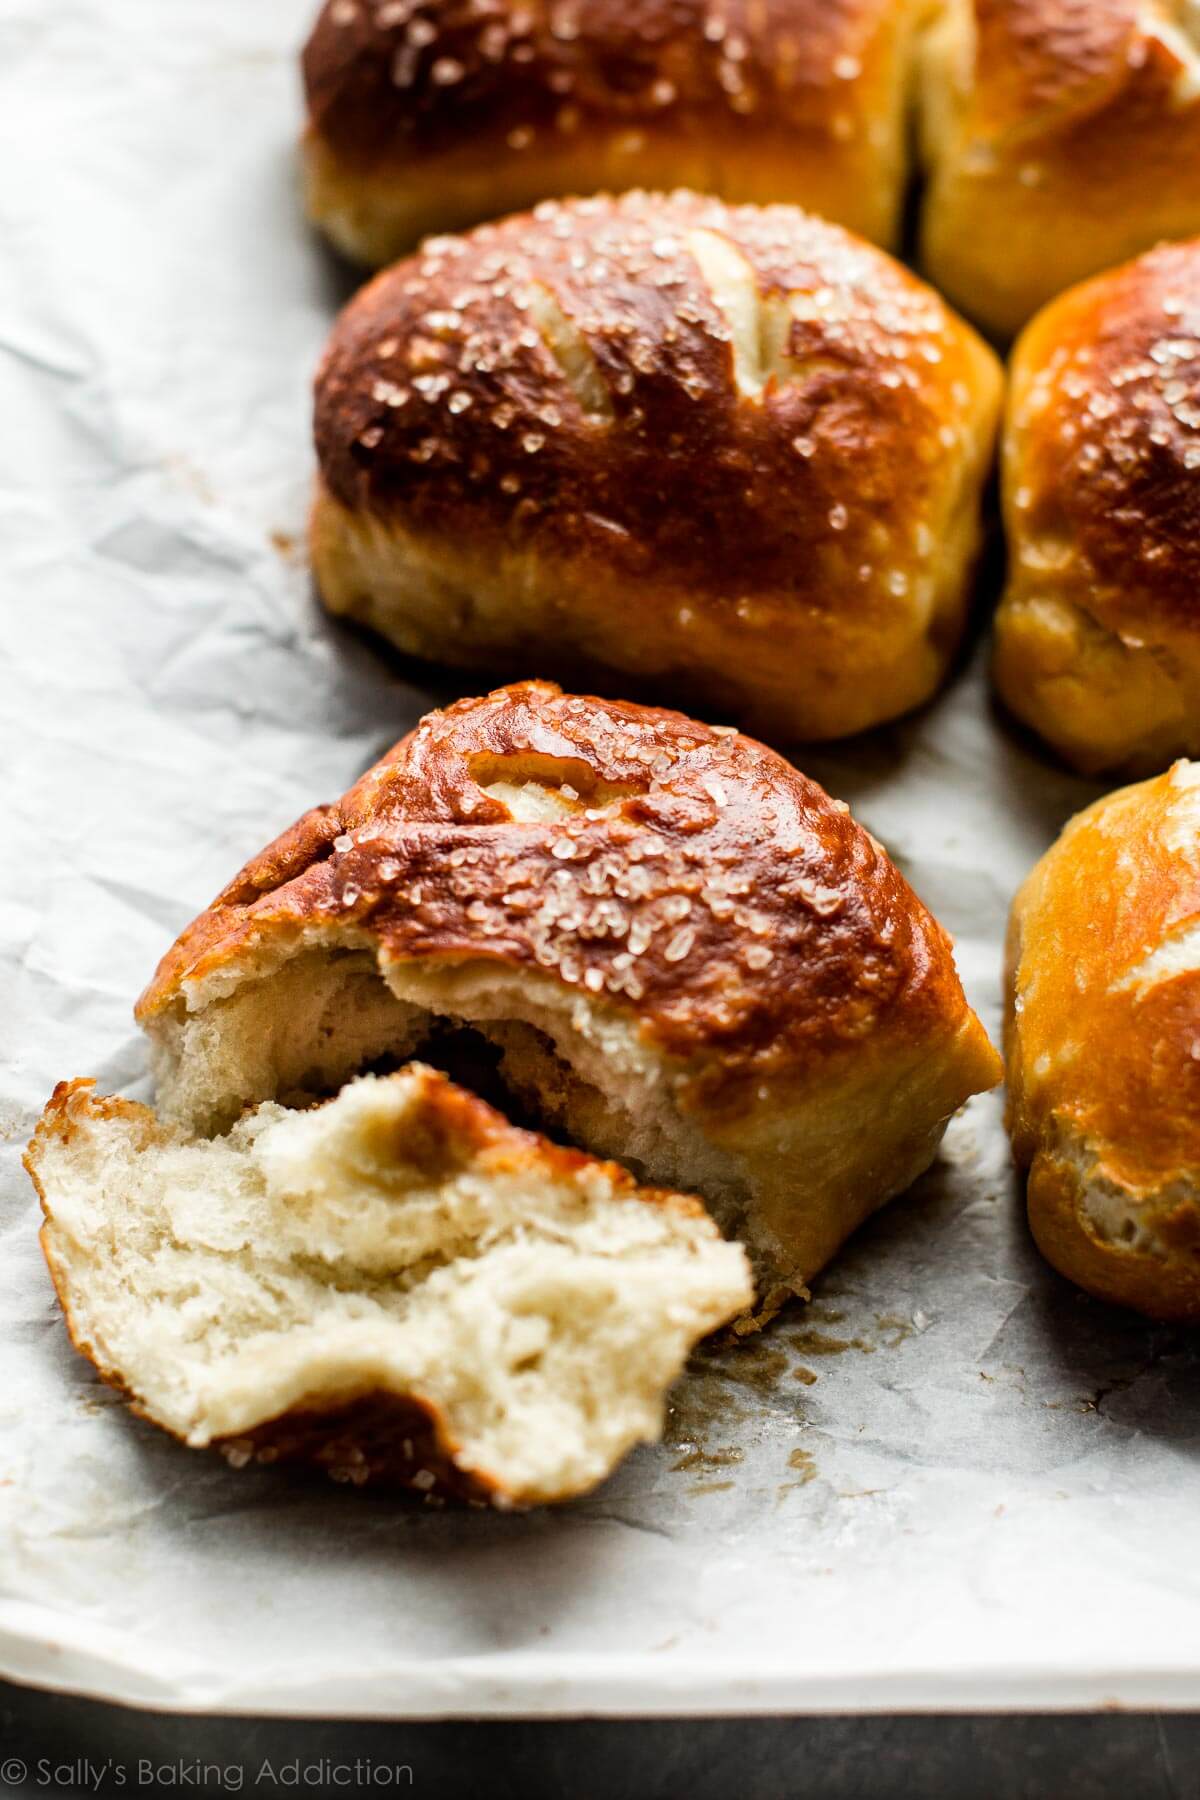
- Score the tops of each roll & top with butter and coarse sea salt.
- Bake until golden brown.
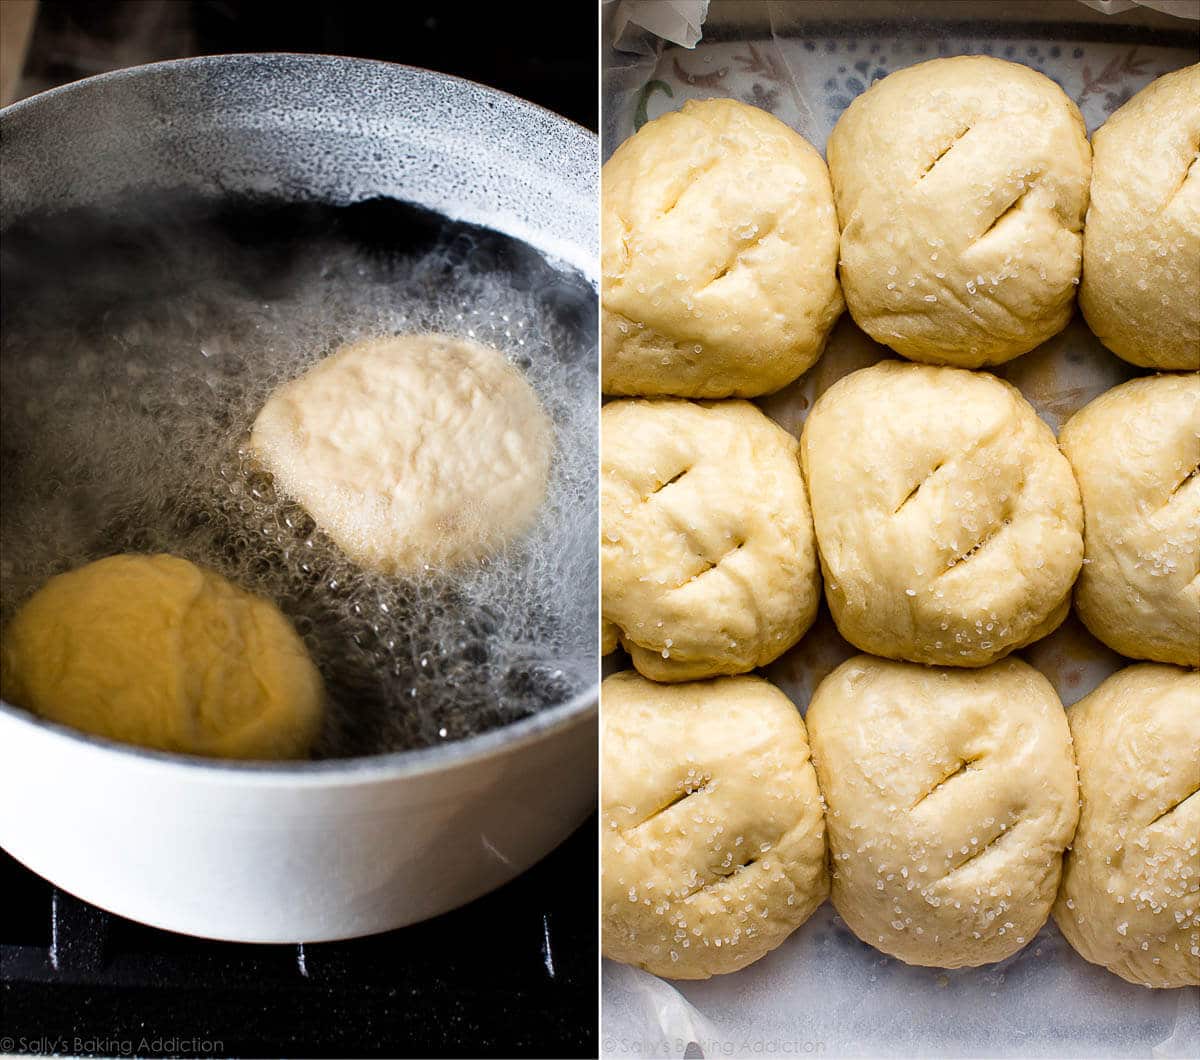
Baking Soda Bath
Each step is important but the baking soda bath is imperative. Why? It’s what gives pretzels that iconic flavor and chewy exterior, plus it locks in the super soft center and helps deepen the golden brown color on the exterior. Save time and get the water boiling as you’re shaping the dough into balls. Then drop each dough ball into the boiling water + baking soda for a quick soak. Worth it!
The rolls look wrinkly after boiling but if foods like sloppy joes + baked beans + messy casseroles teach us anything about life, it’s this: appearances can be pretty deceiving. Soon enough, those pale wrinkly buns will transform into buttery + salty + golden brown delights.
3 Success Tips for Homemade Pretzel Rolls
- Score the tops of the rolls. Use a sharp knife to do this once the rolls come out of the baking soda bath. Scoring the tops allows the rolls to expand and the centers to cook all the way through since they’re thicker rolls.
- Brush with melted butter and sprinkle with coarse salt. This gives the rolls that delicious bakery-style flavor.
- Bake until golden brown. The deeper the color, the better the flavor.
Make-Ahead Tip
If you are making pretzel rolls in advance, do not top them with coarse salt before baking. The salt draws the moisture out of the pretzel rolls, and once you’ve placed the baked and cooled pretzel rolls in an airtight container or bag, it doesn’t take long before you’ll notice water droplets forming inside and the pretzel rolls become soggy and wrinkled. Yuck!
If you won’t be serving the pretzel rolls the same day you bake them, omit the salt-topping step. Bake as directed, then allow to cool completely before placing them in an airtight container, and store at room temperature. When you are ready to serve them, place the pretzel rolls on a baking sheet and brush them lightly with melted butter, then sprinkle with coarse salt. Bake them in a 350°F (177°C) oven for 5–10 minutes, or until warmed.
Same goes for freezing homemade soft pretzel rolls: wait to top with salt until you’re ready to serve them. Cool the unsalted baked pretzel rolls completely, then freeze in an airtight freezer-safe container or zip-top bag for up to 3 months. To reheat, brush frozen pretzels (no need to thaw) with melted butter and sprinkle with coarse salt, then bake at 350°F (177°C) for 20 minutes or until warmed through.
What to Serve With Pretzel Rolls
The most delicious ways to eat these pretzel rolls? Enjoy them with beer cheese dip or garlic and bacon spinach dip, as buns for ham & swiss sandwiches, with soup (like minestrone soup or creamy chicken noodle soup), as a side with walnut crusted chicken, with a swipe of homemade honey butter, or straight from the pan. They’re big, soft, fluffy, and pretzel-y!
Print
Easy Pretzel Rolls
- Prep Time: 1 hour, 30 minutes
- Cook Time: 25 minutes
- Total Time: 2 hours
- Yield: 12 rolls
- Category: Bread
- Method: Baking
- Cuisine: American
Description
Making easy pretzel rolls from scratch is simpler than you think. Follow this easy and approachable way to make them at home!
Ingredients
- 1 and 1/2 cups (360ml) warm water (lukewarm—no need to take temperature but around 100°F (38°C) is great)
- 2 and 1/4 teaspoons (7g) instant or active dry yeast (1 standard packet)
- 1/4 cup (4 Tablespoons; 56g) unsalted butter, divided
- 1 teaspoon salt
- 1 Tablespoon brown sugar
- 3 and 3/4–4 cups (469–500g) all-purpose flour (spooned & leveled), plus more for work surface
- coarse sea salt for sprinkling
Baking Soda Bath
- 1/2 cup (120g) baking soda
- 9 cups (2,160ml) water
Instructions
- Whisk yeast and warm water together. Allow to sit for 1 minute. Meanwhile, melt 1 Tablespoon of butter (reserve the rest for step 7). Whisk in salt, brown sugar, and melted butter. Slowly add 3 cups of flour, 1 cup at a time. Mix with a wooden spoon or dough hook attached to a stand mixer until dough is thick. Add 3/4 cup more flour until the dough is no longer sticky. If it is still sticky, add 1/4–1/2 cup more, as needed. Poke the dough with your finger—if it bounces back, it is ready to knead.
- Knead the dough: Keep the dough in the mixer and beat for an additional 5 full minutes, or knead by hand on a lightly floured surface for 5 full minutes. (If you’re new to bread-baking, my How to Knead Dough video tutorial can help here.) If the dough becomes too sticky during the kneading process, sprinkle 1 teaspoon of flour at a time on the dough or on the work surface/in the bowl to make a soft, slightly tacky dough. Do not add more flour than you need because you do not want a dry dough. After kneading, the dough should still feel a little soft. Poke it with your finger—if it slowly bounces back, your dough is ready to rise. You can also do a “windowpane test” to see if your dough has been kneaded long enough: tear off a small (roughly golfball-size) piece of dough and gently stretch it out until it’s thin enough for light to pass through it. Hold it up to a window or light. Does light pass through the stretched dough without the dough tearing first? If so, your dough has been kneaded long enough and is ready to rise. If not, keep kneading until it passes the windowpane test.
- Rise: Place in a large greased bowl, cover tightly with plastic wrap, and allow to rise in a warm environment for 1 hour or until nearly doubled in size. (Tip: I preheat my oven to 200°F (93°C), turn it off, place the dough inside and shut the oven. This is the warm environment.)
- Once risen, punch down dough to release any air bubbles. Turn out onto a lightly floured surface and, with a sharp knife or pizza cutter, cut dough into 1/3-cup (about 75g) sections. You should have about 12 pieces. Shape into balls.
- Preheat oven to 400°F (204°C). Line a baking sheet with parchment paper or silicone baking mat OR line a 9×13 baking pan with parchment paper (I use a baking pan). Set aside.
- Bring baking soda and 9 cups of water to a boil in a large pot. Drop 1–2 pretzel rolls into the boiling water for 20–30 seconds. Any longer than that and your pretzels will have a metallic taste. Using a slotted spatula, lift the pretzel roll out of the water and allow excess water to drip off. Place pretzel rolls onto prepared baking sheet or close together in the baking pan. Using a sharp knife, score a couple slits into the top of each.
- Melt the remaining butter. Lightly brush each roll with melted butter and sprinkle with coarse sea salt.
- Bake for 22–26 minutes or until deep golden brown on all sides.
- Remove from the oven and serve warm. Pretzel rolls may be stored in an airtight container or zip-top bag for up to 3 days (they lose a little softness over time).
Notes
- Make Ahead Instructions: If planning to freeze baked pretzel rolls, do not top them with coarse salt before baking. Cool completely, then freeze in an airtight freezer-safe container or zip-top bag for up to 3 months. To reheat, brush frozen pretzel rolls (no need to thaw) with melted butter and sprinkle with coarse salt, then bake at 350°F (177°C) for 20 minutes or until warmed through, or microwave until warm. The prepared pretzel dough can be covered and refrigerated for up to one day or frozen in an airtight container for 2–3 months. Thaw frozen dough in the refrigerator overnight. Bring to room temperature, then continue with step 3.
- Special Tools (affiliate links): Stand Mixer or Glass Mixing Bowl and Wooden Spoon | Baking Sheets | Silicone Baking Mats or Parchment Paper | Large Pot | Slotted Spatula | Pastry Brush | Coarse Sea Salt
- Reference my Baking with Yeast Guide for answers to common yeast FAQs.


Reader Comments and Reviews
First time making pretzel rolls and they were awesome! I read some other sites while researching recipes and one said to make sure when you make them into circles, gently tuck the edges under and pinch and don’t use to much pressure to make sure they aren’t dense. I was a little concerned about the suggested oven rising temperature, but it worked like a charm! I waited about an hour and half and in the last half hour they did rise considerably more. I made 8 sandwich sized rolls and the bake time was 22 minutes and they were perfect! This recipe is a keeper!
Now I have made these a few times now and use them for hamburgers and sliders. Today I’m trying for a Hoagie roll. This is simple. Honestly I love pretzel buns but there pretty pricy so I came to this site (as I have many times). You can make these vegan by using olive oil instead of butter. I’ve made them both ways. Thanks for the simplicity and the science.
My family loved these! I made them into 16 rolls to go wth our Sunday dinner. My niece kept asking for more “ prentzles” please.
I think my dough was a little too wet, so I had a hard time cutting the slits on top. They didn’t look so great, but the taste was great.
I’ll get that correct dough texture because I ‘ll definitely be making these again.
This was such a great recipe, and worked so well when I was unprepared / didn’t plan ahead and wanted to enjoy some interesting sausages from the local butcher. I googled “easy pretzel buns” and knew I trusted Sally… great success in < 2 hours!!! thank you!
I haven’t made these yet but the recipe seems very approachable. Curious as to whether anyone made this using a food processor. Thank you!
They were very easy to make and so delicious. The only complaint from my family was that I didn’t make enough!
I have made these many times and they are delicious. I was afraid of the water bath, but it was easier than I thought. Since Covid I have been trying new things and got in the habit of weighing my dough. I make these at 45g and it is a perfect size. I also used my bread machine, forming the rolls right after dough was completed. I always use a little butter on my parchment paper. Sally, thank you for so many great recipes!! Tomorrow I’m making your blueberry and Oreo cream cookies!!
Oh my Goodness! This is my 2nd time, making these! Love this recipe, easy, decided to make bigger, because I am the biggest fan of these, ty for making it readily available….
I’m making these for the second time this week!! I put all the ingredients (only 1 tablespoon of butter) in my bread machine to make the dough, then followed recipe after. Yummm!!! No more buying pretzel rolls at the store!!
Hi, the recipe looks great! Is there anything I can substitute the butter with?
Hi Sarah, We haven’t personally tested this, but you can try to substitute Earth Balance vegan buttery sticks (or similar brand) for real butter. Let us know if you try it!
Hi! I’m going to try this recipe soon. I wanted to ask about that warm environment–that’s pretty warm! You let the oven preheat fully before you turn it off and put the dough in there? Do you let it cool at all first? Do I have to do that or is that just your preference? I was thinking of just proving the dough the way I do with most of my doughs, by putting it into the oven with the light on. Would that work? Would I expect a longer rise time than what the recipe calls for? Thanks!
Hi Brian, For the warm environment we preheat the oven to 200°F (93°C). Once it reaches 200°F turn it off, place the dough inside and shut the oven. We find this preheating method particularly helpful on cold winter days. But it’s not mandatory, you can definitely just use your oven light if that usually works for you!
Best rolls ever!!!! I’ve made these several times and can’t wait to make them again!!!
Can I make them through the baking soda bath, and then refrigerate overnight?
Hi, I love your recipes, there all so delicious. I am planing on making these for thanksgiving, and want to make the dough ahead like instructed, but I’m a little confused on when your supposed to refrigerate the dough, and if I should add extra rise time when the dough comes out of the fridge. Thank you so much.
Hi Jasmine, After you prepare the dough in step 2, instead of letting it rise in a warm environment you can place it in the refrigerator for up to one day. When you remove the dough from the refrigerator you can shape it into pretzels while still cold, but allow some extra time for the pretzels to puff up before the baking soda bath and baking. Enjoy!
I just made these and followed the recipe to a t, and I can’t figure out what I did wrong. Everything was perfect except for pulling the rolls out of the oven and the bottoms were stuck to the parchment paper. I had to cut off the bottoms of each one in order to enjoy. What did I do wrong? Delicious otherwise!
I’d definitely recommend buying the Silicone sheets. They are nice and easy to clean. This will prevent this from happening.
My family and I LOVE your pretzel recipes! Thank you Sally!
One thing which I keep encountering though is my pretzel buns are very dense and chewy in the middle, not light or fluffy. I follow the directions exactly, please do you have any suggestions for me? What if I was to separate the buns and then let them rise?
Cheers 🙂
Hi there, this recipe was absolutely amazing and easy to make. Made it with my 3 toddlers running around my feet. I’m trying to cut out white flour however and wondering if this recipe would be good with whole wheat? Or maybe 50/50?? 60/40??
Hi Jen, I’m so happy you enjoyed these pretzel rolls! We haven’t tested these with whole wheat flour. While I imagine you can use it, the rolls will end up more dense and hearty. If you are interested, we do have a different recipe for whole wheat dinner rolls. Let us know what you end up trying!
This was such a fun, simple recipe…they turned out great. Mine weren’t as brown but they were still tasty! Mine were more on the golden brown side…wasn’t sure if i didn’t do the baking soda bath long enough? I did it for 20 seconds because i didn’t want to overdo it. 😉
I made these for the first time this morning. They are pretty simple and very delicious. I made 8 larger rolls so we can use them for sandwiches. I also put some extra melted leftover butter on the when they Came out of the oven. This recipe is a keeper!
I made theses for the first time this morning. They are pretty simple and very delicious. I made 8 larger rolls so we can use them for sandwiches. I also put some extra melted leftover butter on the when they Came out of the oven. This recipe is a keeper!
How can I adapt this wonderful recipe to make pretzel hamburger buns
Hi Carolina, you can use this recipe– I would just make each roll a little larger so it can fit a burger.
I love pretzel rolls! This recipe was super easy. Thank you for always giving such detailed instructions. They turned out perfectly!
Just made these today for hamburgers my son will be cooking tonight.
Of course I had to sample them warm from the oven. They are delicious. Crunchy exterior, soft fluffy inside. Yummy golden color – I think the butter made the difference since the pretzel rolls I’ve made from other recipes have a darker somewhat tougher exterior. The dough was pretty sticky I needed to add an extra cup of flour plus a bit more while I was kneading the dough. I’ll be making this recipe again! Thanks for sharing.
I’ve now made these as both pretzels and the rolls and they are excellent. I do find mine taking a bit more flour to get the dough to not be sticky, but it hasn’t effected the outcome. Also, I’ve been using white sugar instead of brown and it has been fine (I’m sure that brown sugar ads a bit of depth to the flavor, but white works if that is what you have on hand). My kid has been missing going to the mall and getting pretzels during the Covid closures and these make an easy delicious substitute.
So much easier than I thought making pretzel buns was going to be!! Delicious, will make again!
I know this is an older post, but just made these and they are a hit! Only have 2 left after pulling out of the oven 30 minutes ago Thank you!
I used a scissors to cut the score in the top of the bun before baking.
Excellent taste! Super easy and fun to make!!!
The recipe is simple, but I was not impressed by the taste. I would say they were average.
I made these rolls and after the second rise, while getting them off the parchment paper to put in the baking soda bath they deflated. So I ended up with flat rolls. 🙁 any way I could have avoided that??
Hi Debora! Thank you so much for trying my pretzel rolls recipe. If the dough over-proofs (rises), shaped rolls/breads can easily deflate at any point in the recipe process. Try to cut the rise time if you decide to try the recipe again.
Kids could not get enough. Made a double batch and made pretzels and hotdog buns. Great with beer mustard!
I’ve made your easy pretzel recipe and pretzel bites recipe and I like them all. I’m not sure if this time, I used fresher yeast and fresher baking soda- but the dough came out great and I left them in the oven longer than I would have after reading your comment about a deep golden brown all around. I made a few rolls but then some bites and different shapes because my toddler helped me- but put them on a different pan so I could take them out of the oven separately. They were all deep brown and crunchy on the outside and soft in the inside. Delicious recipe! I will definitely keep this on my ‘favorites’ boards on Pinterest.