

This no-knead pizza bread delivers big flavor with barely any effort. The dough rests and rises overnight, so most of the process is completely hands-off—no kneading or tricky shaping required. The result is a bakery-style loaf with a crispy golden crust and a soft, chewy interior, packed with pepperoni, sun-dried tomatoes, olives, and mozzarella. Add a sprinkle of crushed red pepper for pizzeria-style heat, then serve it warm with pizza sauce or tomato soup for dipping, or slathered in hot honey butter for an extra kick.
Today’s recipe, like my homemade artisan bread, seeded oat bread, asiago-crusted bread, cranberry nut bread, jalapeño cheddar bread, and olive bread, has all the bells and whistles of a fresh-from-the-bakery loaf, yet it takes very little effort. If you are new to working with yeast, or are simply in the mood to bake a low-effort bread, this recipe is for you.
One reader, Emma, commented: “Really easy and delicious! This is a great project for someone who is newer at working with yeast. Definitely the most hands-off bread recipe I’ve ever tried but still delicious with big flavor! ★★★★★“
One reader, Jill, commented: “This recipe is a total winner! It’s super easy and quick, and the results are awesome. I made two loaves and it took almost no time at all. Both turned out very well. It’s honestly almost foolproof—try it, you will be so happy you did! ★★★★★“
One reader, Christina, commented: “Simple and delicious! I love a no-knead bread, and this was one of the best ones I’ve had. Mine sat in the refrigerator for the full three days, but I think that made it even better. The hot honey butter complimented this perfectly. ★★★★★“
A Flavorful Bread Recipe for Beginners
If you’re nervous to try homemade bread, this recipe is a great introduction. Even though the recipe is easy, the bread does NOT skimp on flavor. It’s just a simple way of baking homemade bread inspired by the no-knead technique originating from bread expert Jim Lahey. Here’s why it’s so simple:
- Absolutely no kneading (just like homemade English muffins)
- Zero complicated shaping
- No mixer required
- 90% of the time is totally hands off
- Can bake in a Dutch oven or on a baking sheet, pizza stone, or cast iron skillet (all instructions are below!)
Yeast Bread Success Tips
If you’re a bread beginner, reference this Baking with Yeast Guide for helpful, easy-to-understand answers to many yeast FAQs.
Key Ingredients You Need & Why
- Bread Flour: I strongly recommend using bread flour instead of all-purpose flour. Bread flour produces a stronger, chewier bread and that makes a big difference in an artisan-style loaf like this pizza bread or in a recipe like homemade ciabatta bread.
- Instant Yeast: While you can use active dry yeast if that’s all you have, any quick-rise or instant yeast will produce flavorful results in less time. I use more yeast in this recipe compared to my cranberry nut no-knead bread and no-knead jalapeño cheddar bread. Why? Those doughs rest and rise at room temperature. However, for more flavor and just as much rise, I use more yeast and let this dough rest in the refrigerator. (Cool air slows the fermentation process and helps develop better flavor.) Additionally, the mix-ins in today’s bread are heavy, so we need a little extra oomph!
- Salt: I recommend using coarse salt because I find the bread’s flavor lacking with regular table salt.
- Sugar: Just a little sugar helps balance all the savory, salty flavors, and also increases yeast activity. You could use honey instead if desired.
- Seasonings: Dried oregano, basil, and garlic powder add flavor to the dough. For a little pizzeria-style heat, add some crushed red pepper flakes. How spicy you like your pizza bread is up to you!
- Mix-ins: This is where you can play around with your favorite pizza toppings. See below for my recommendations.
- Mozzarella Cheese: You can use either shredded mozzarella, or diced fresh mozzarella cheese. In our testing, we found that the bread with the chunks of fresh mozzarella spread a little more. But both ways tasted delicious.
- Water: I normally encourage you to use warm liquid with yeast, like we do in no-knead seeded oat bread, because warm liquid helps the yeast work faster. However, use cool or room-temperature water here. 70°F (21°C) is great, but the exact temperature doesn’t matter as long as it’s not warm. We use the same cool-water method for no-knead honey oat bread.

Choose Your Pizza Toppings to Mix Into the Dough
In our recipe testing, the crowd favorite pizza bread included a mix of pepperoni, sun-dried tomatoes, and olives.
But you can adapt the mix-ins to your taste—just keep them to about a heaping cup altogether. If you don’t like olives, for example, simply replace them with more pepperoni and sun-dried tomatoes. (And if you LOVE olives, try this similar recipe for no-knead olive bread!) You can also try cooked and crumbled sausage, caramelized onions, and/or diced ham.
In addition to those pizza toppings, we’ll also add mozzarella cheese.
In Photos: Making No-Knead Pizza Bread
Mix the dry ingredients together and then mix in the pizza toppings and water. Use a spatula at first and then switch to your hands, if needed, to ensure all of the flour is moistened.
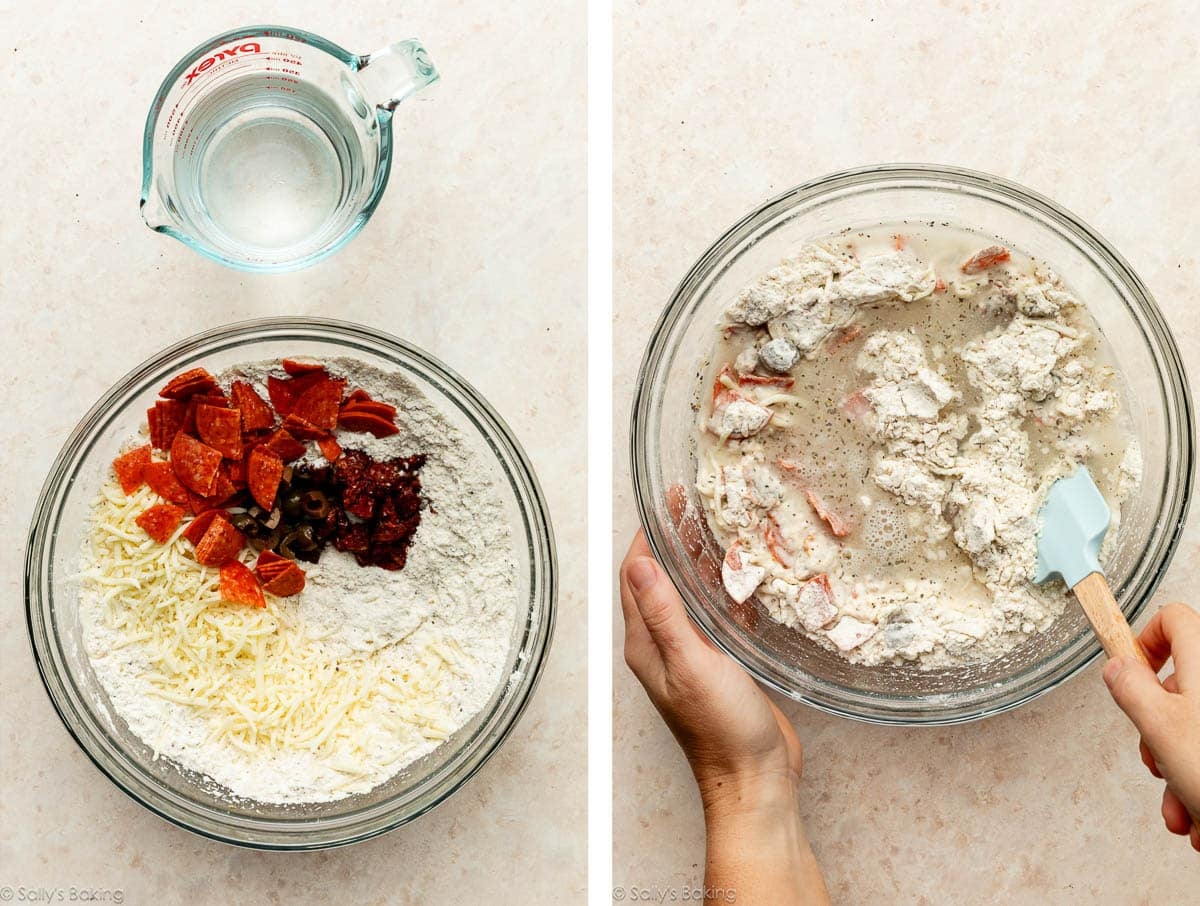
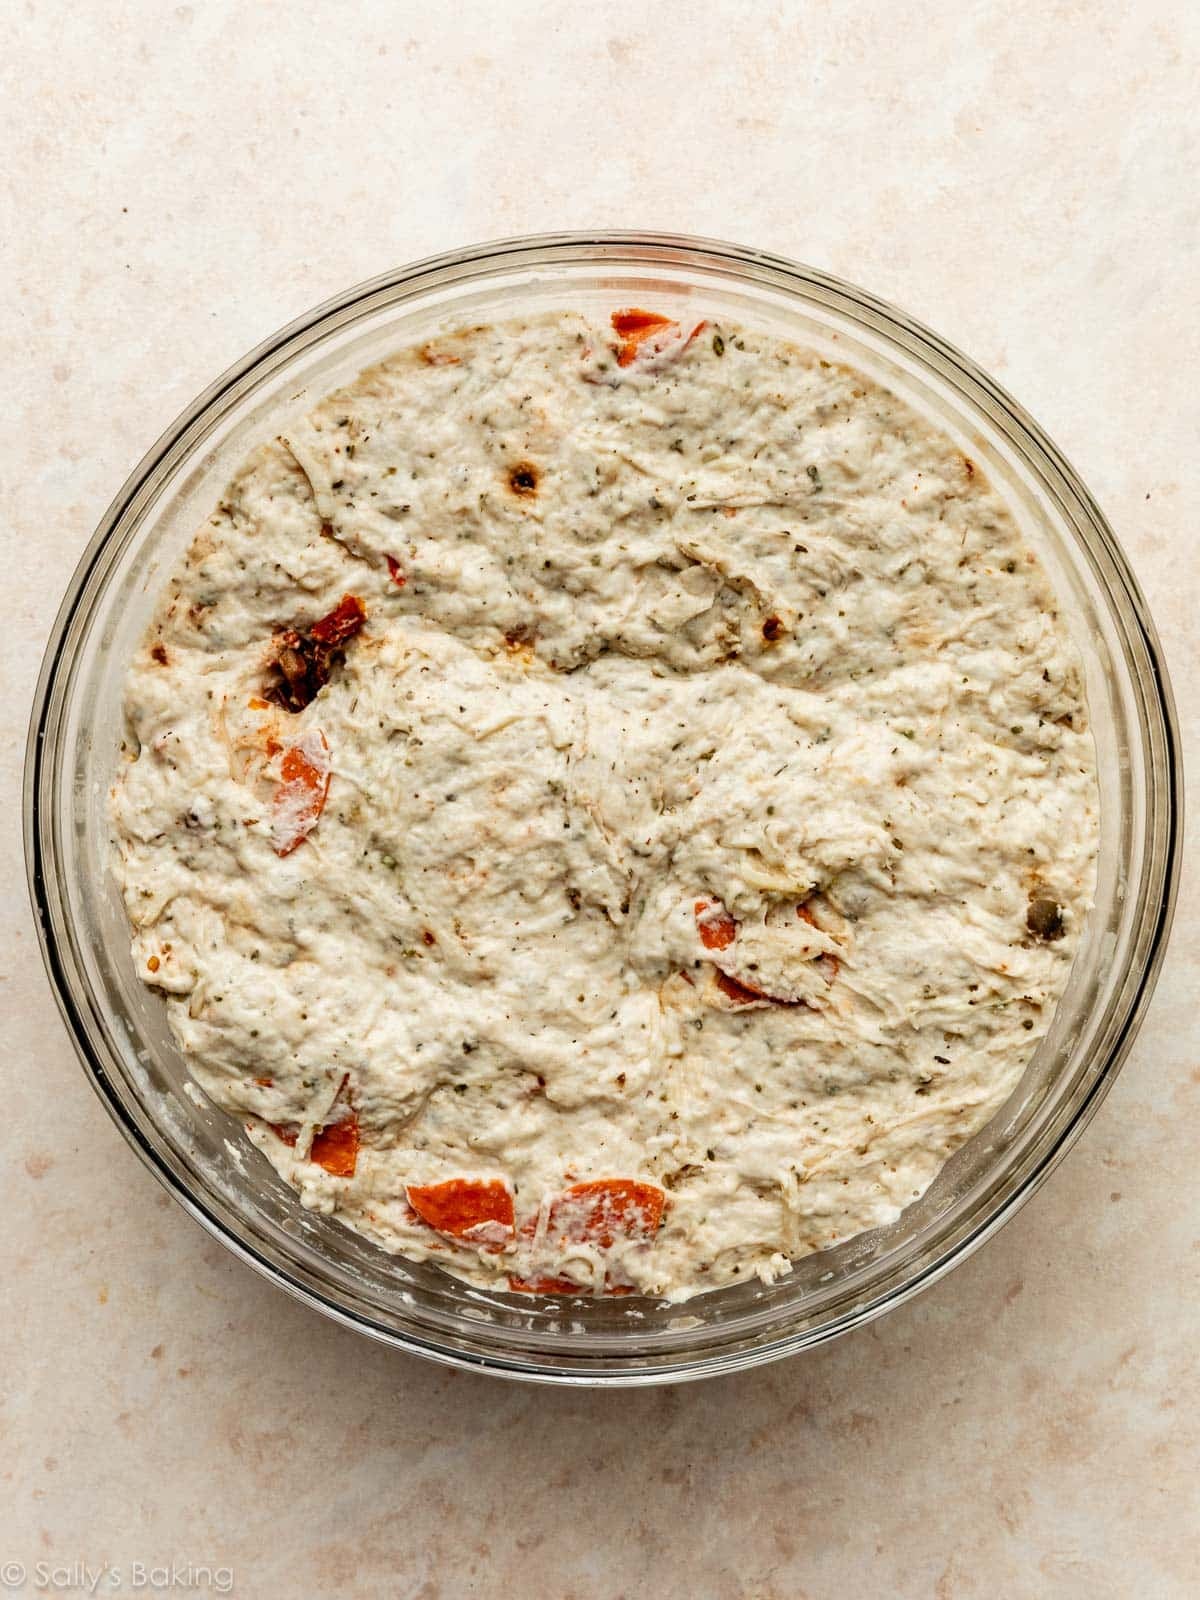
The dough is sticky after it’s thoroughly mixed:
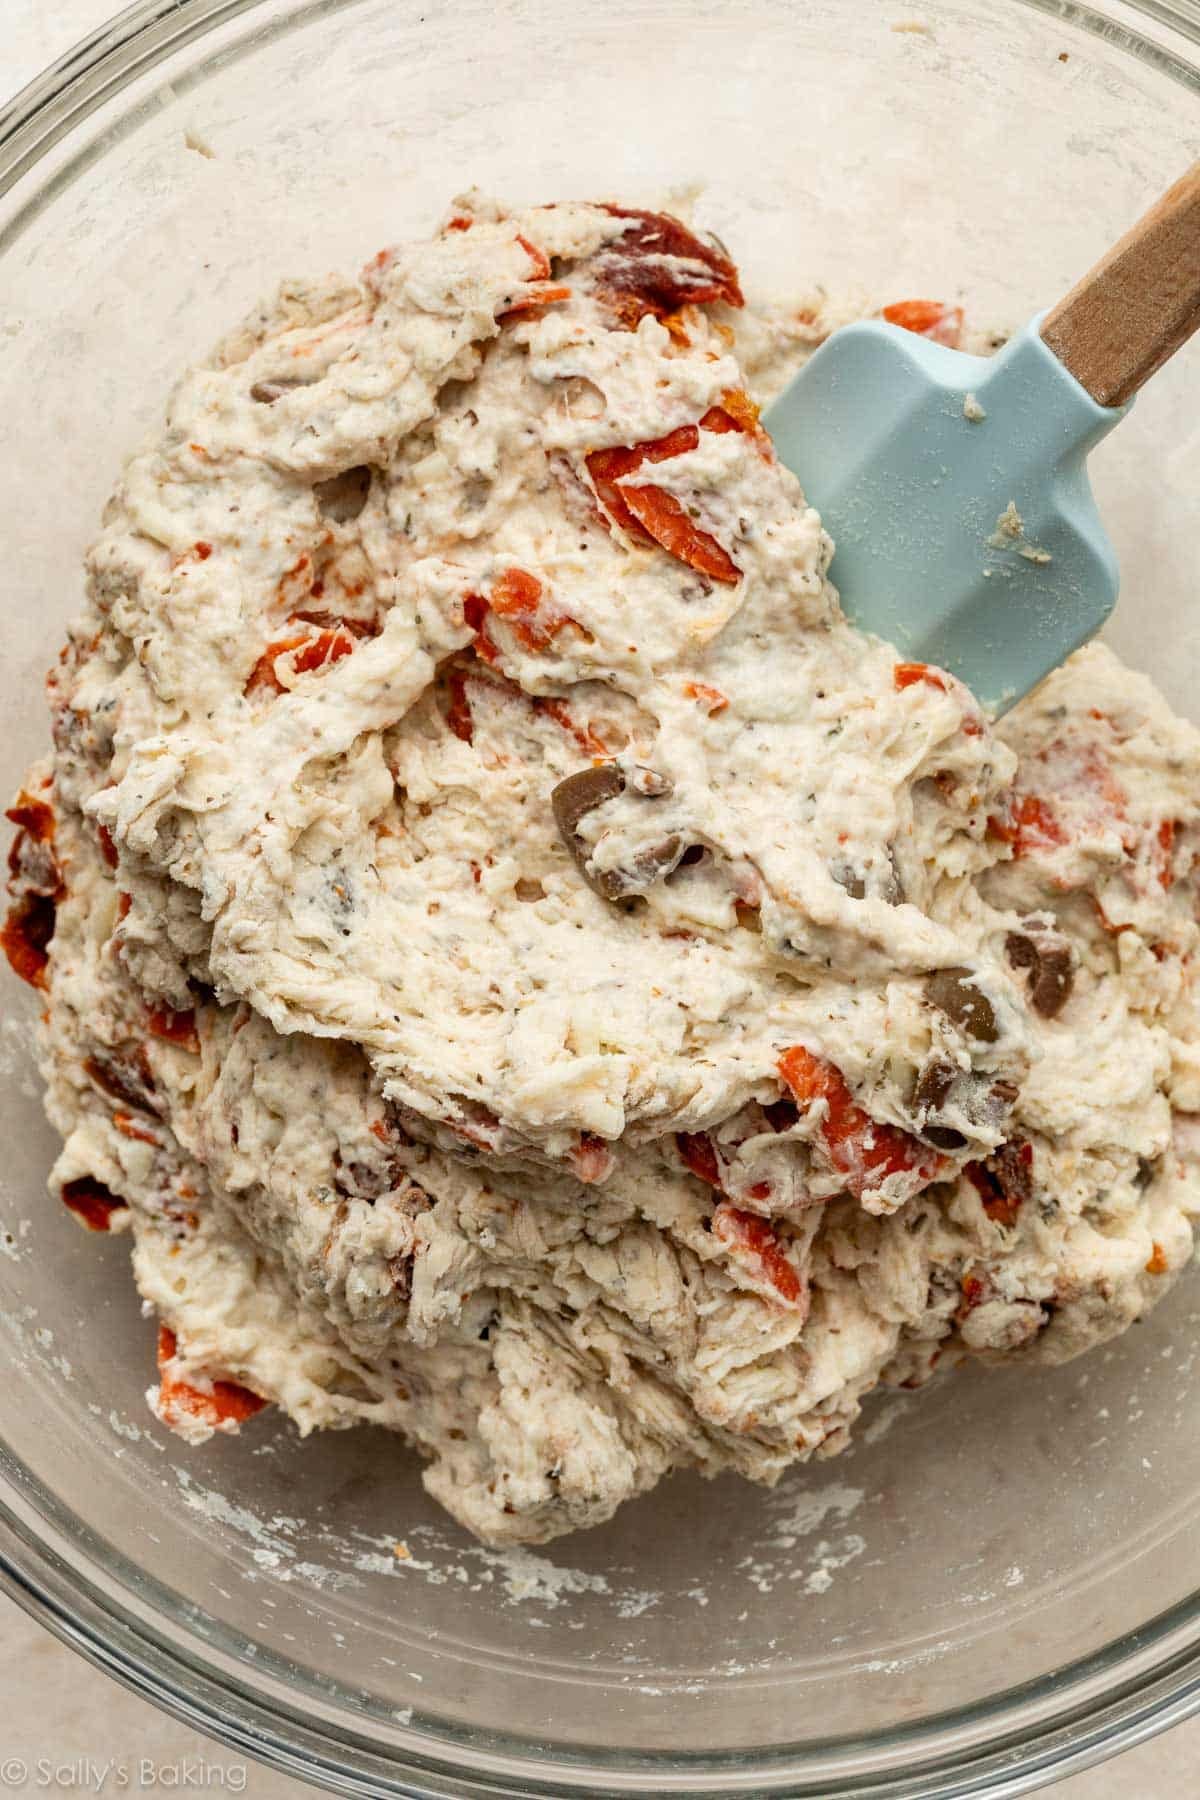
Let it rise. Cover the dough and let it rise at room temperature for 3 hours.
The dough will rise OUT instead of rising UP. After 3 hours, place the dough in the refrigerator for at least 12 hours and up to 3 days. Here is the dough after 24 hours of refrigeration:
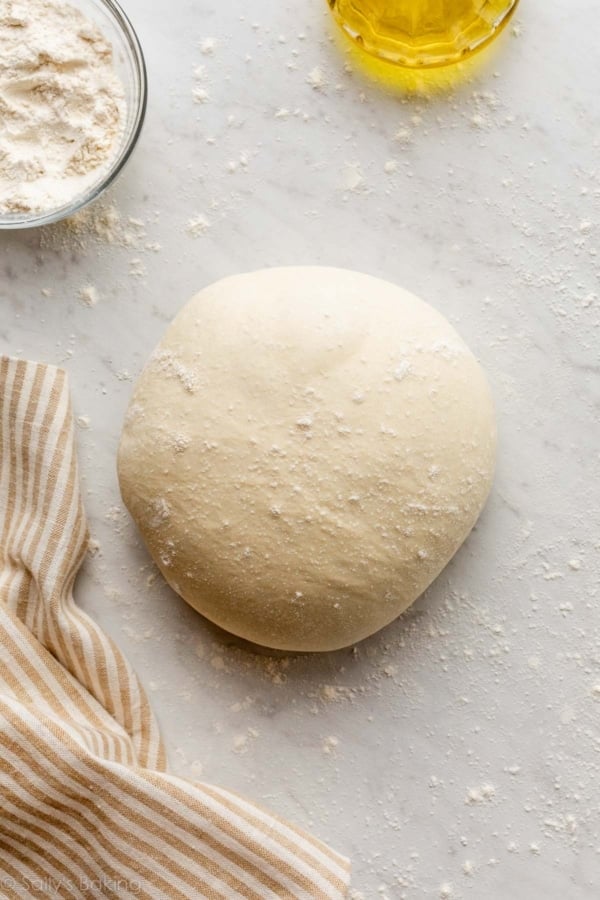
After the dough rises and rests in the refrigerator, use generously floured hands to shape the dough into a round boule or ball-like shape. Let it rest for 30 minutes as the oven preheats, and then score the surface with a bread lame or sharp knife. Scoring allows the wet, airy dough to “breathe” and expand as it bakes.

Use a Dutch Oven, Baking Sheet, or Cast Iron Skillet
You’ll bake the pizza bread in a pre-heated (super-hot!) covered Dutch oven, which traps steam inside the pot, helping to create that perfectly crusty, shiny exterior. If you plan to bake a lot of bread in the future, you won’t regret picking up a Dutch oven.
No Dutch oven? No problem. While baking the bread in a Dutch oven is key to this bread’s texture, you can get around it. Here are a few other options:
- Baking Sheet: Unlike a Dutch oven, cast iron skillet, or pizza stone, a baking sheet doesn’t retain heat as well, and since it doesn’t trap steam, the bread won’t develop quite the same crisp, crusty exterior (arguably the best part!). That said, a baking sheet is the most convenient option for many home bakers. To improve the crust, I suggest adding steam to your oven, and I explain how in the recipe Note below. This is a trick I use when baking my 4-ingredient artisan bread.
- Pizza Stone or Cast Iron Skillet: These options are fantastic if you don’t have a Dutch oven. They hold more heat than a baking sheet, but again, there’s no trapped steam inside the oven. To improve the crust, add steam to the oven using the method described in the Note below.
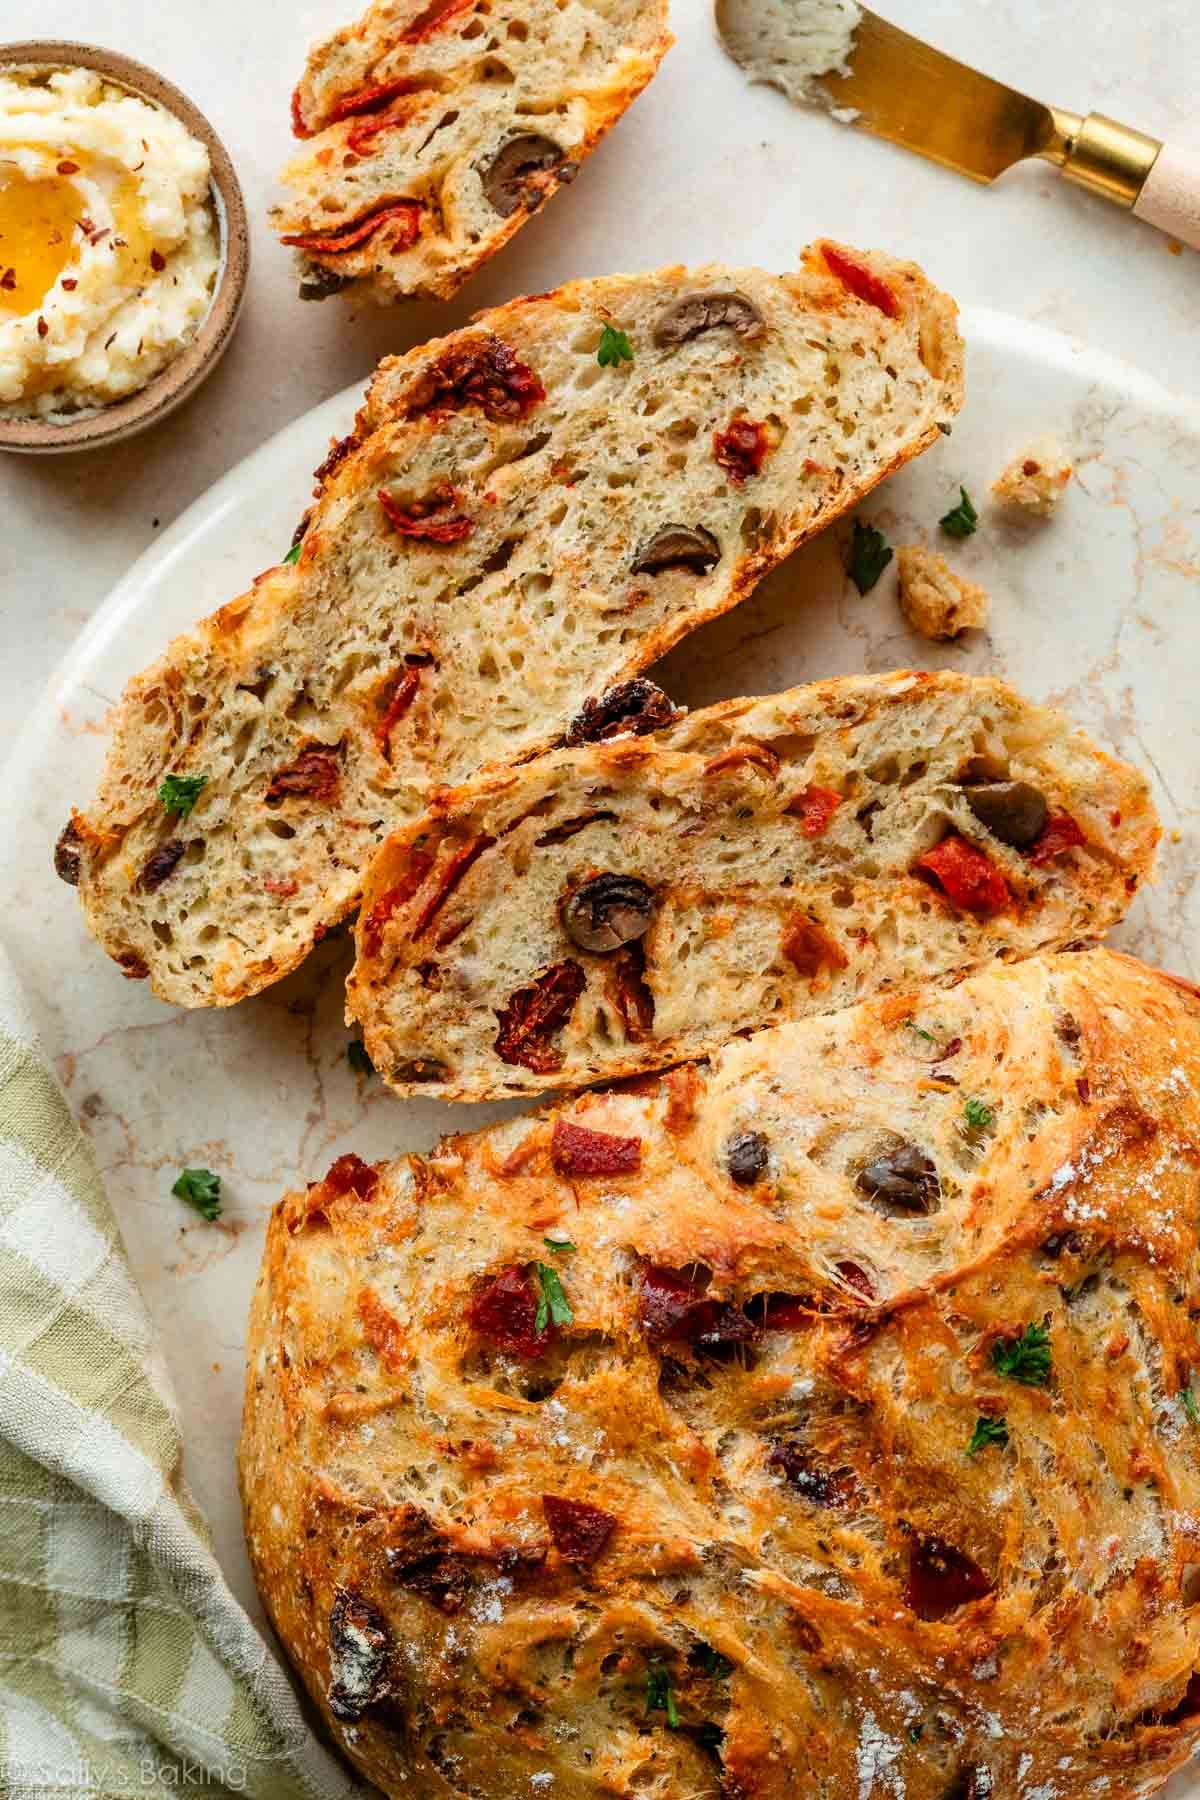
The bread is unbelievable when it’s fresh from the oven—warm, crispy, crusty, and soft and chewy inside!
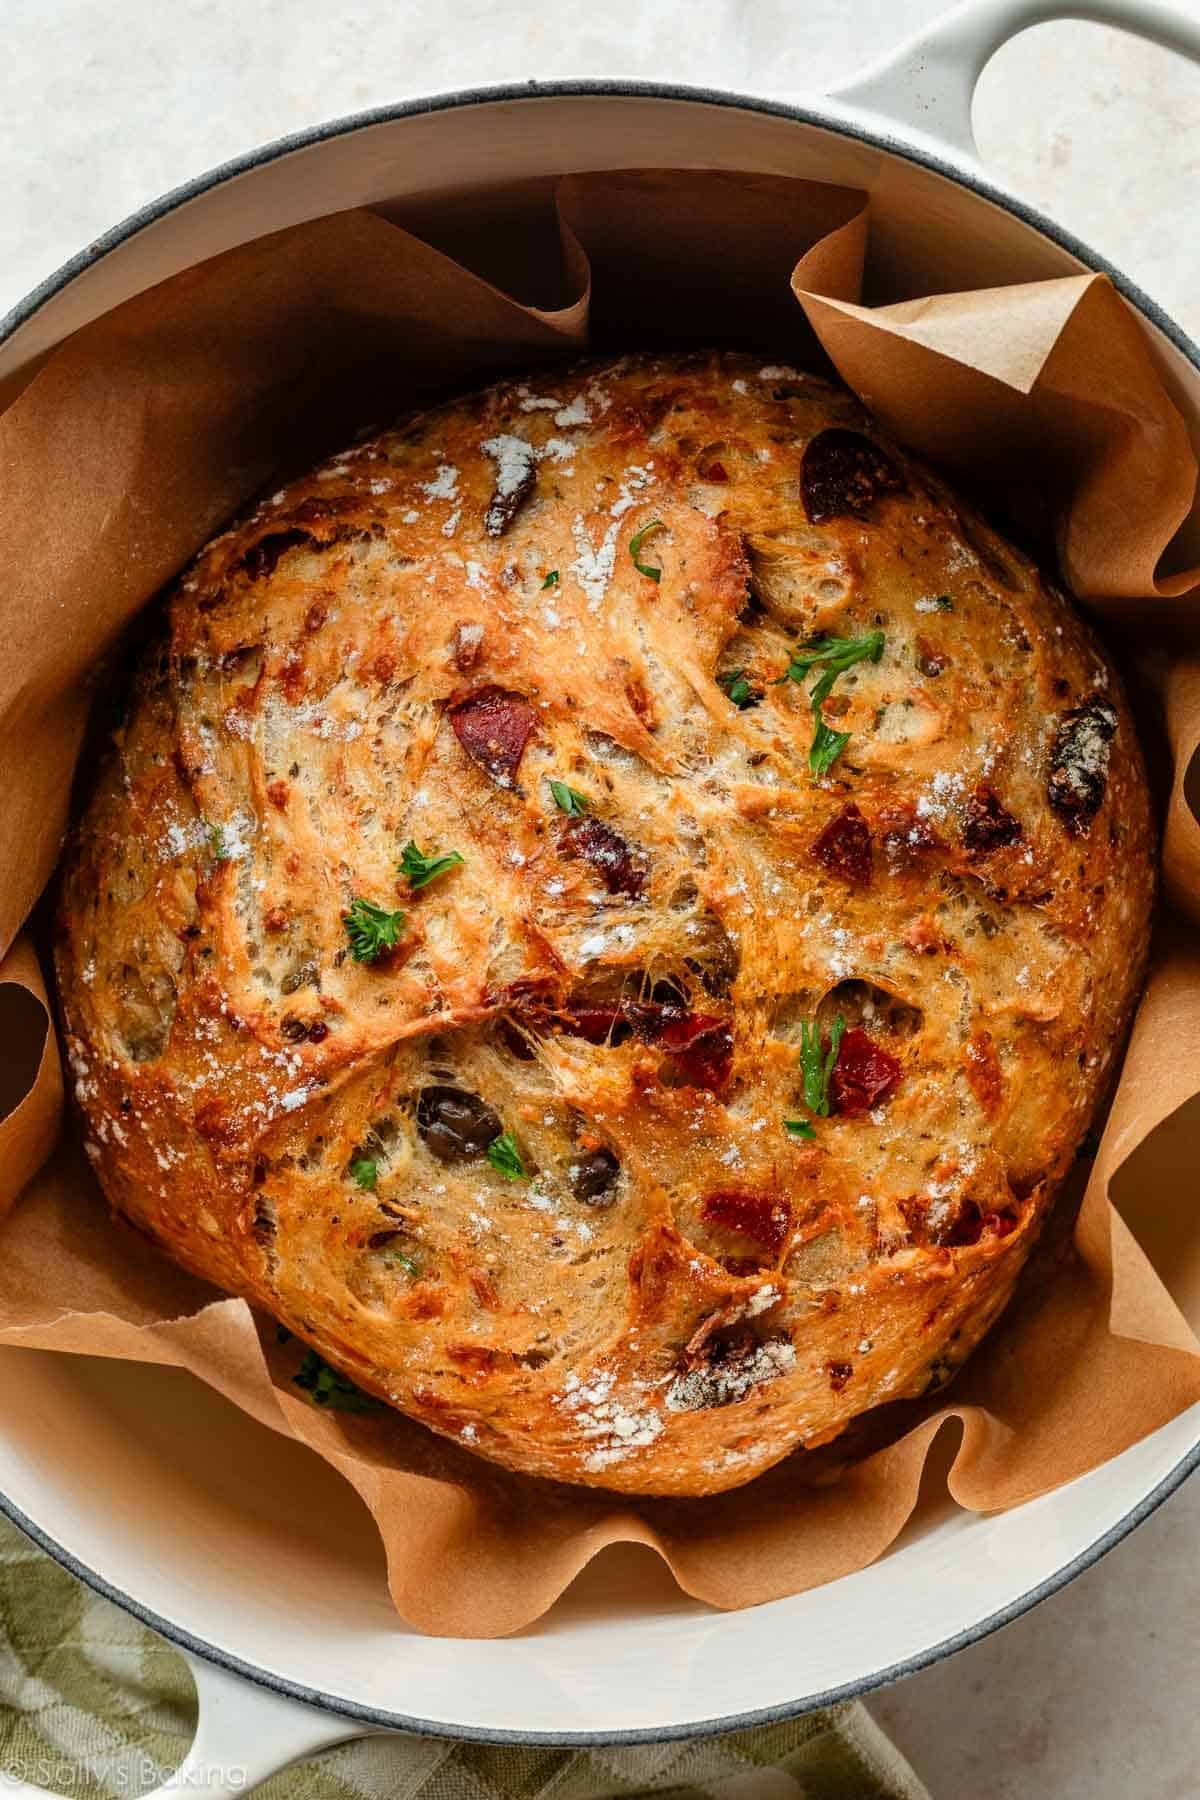
Because of the sticky dough and cheese, this bread is flatter than most boules. But this just means a higher crust-to-interior ratio! Perfect for dunking.

What Can I Serve With This Pizza Bread?
Honestly, it’s fantastic all on its own. With all of the add-ins, cheese, garlic, and herbs, there’s SO much flavor in every single bite. However, here’s what we enjoyed:
- Warm marinara sauce for dipping
- Tomato soup or minestrone soup
- Flavorful dipping oil: Mix together 3 Tablespoons extra virgin olive oil and 2 minced garlic cloves plus a sprinkle each of red pepper flakes, fresh or dried thyme leaves, dried oregano, salt, and pepper.
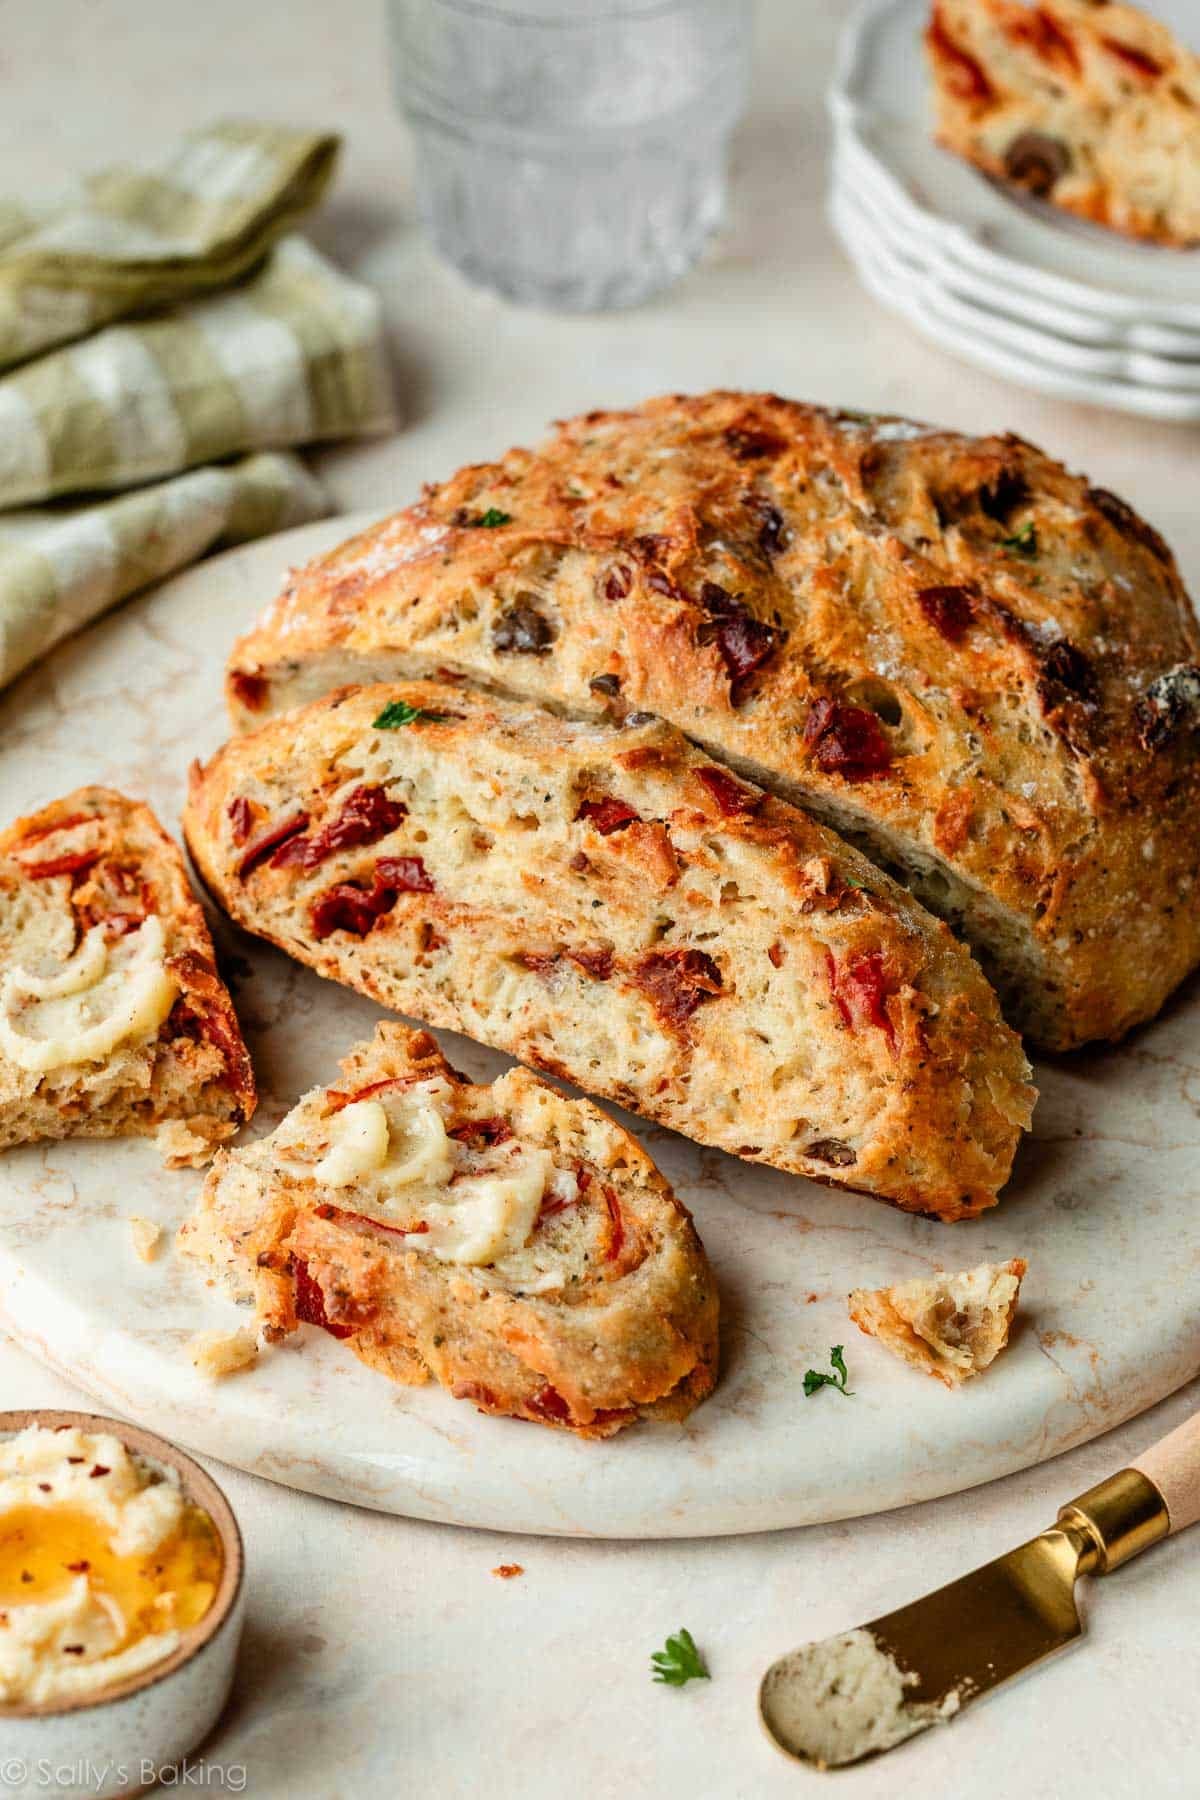
- Hot honey butter! A spread of sweet-and-spicy hot honey butter on a warm slice of this pizza bread isn’t strictly necessary… but once you’ve tasted it, you’ll likely agree with us that it actually is necessary. It’s quick and easy to make, just like my classic homemade honey butter. I included the recipe below!

Crusty No-Knead Pizza Bread with Hot Honey Butter
- Prep Time: 30 minutes
- Cook Time: 35 minutes
- Total Time: 14 hours
- Yield: 1 loaf; 10-12 servings
- Category: Bread
- Method: Baking
- Cuisine: American
Description
This no-knead pizza bread delivers big flavor with barely any effort. The dough rests and rises overnight, so most of the process is completely hands-off—no kneading or tricky shaping required. The result is a bakery-style loaf with a crispy golden crust and a soft, chewy interior, packed with bits of pepperoni, sun-dried tomatoes, olives, and mozzarella. Serve slices warm with pizza sauce or tomato soup for dipping, or slathered in hot honey butter for a touch of sweet heat! If you’re new to working with yeast, reference my Baking with Yeast Guide for answers to common yeast FAQs.
Ingredients
- 3 and 1/3 cups (about 440g) bread flour (spooned & leveled), plus more as needed for shaping and pan
- 2 teaspoons instant or active dry yeast
- 2 teaspoons coarse salt*
- 1 teaspoon granulated sugar (or honey, see Note)
- 2 teaspoons dried oregano
- 1 teaspoon dried basil
- 1 and 1/2 teaspoons garlic powder
- 1/4 teaspoon crushed red pepper flakes, optional
- 1 heaping cup (about 135g) chopped pepperoni, sun-dried tomatoes (packed in oil & drained), and/or olives
- 1 cup (113g) shredded mozzarella cheese
- 1 and 1/2 cups (360ml) water, close to room temperature at about 70°F (21°C)
Optional Hot Honey Butter
- 1/2 cup (8 Tbsp; 113g) unsalted butter, softened to room temperature*
- 3 Tablespoons (63g) honey
- 1 Tablespoon confectioners’ sugar
- 1/8–1/4 teaspoon flaky sea salt or coarse salt
- pinch of crushed red pepper flakes, to taste
Instructions
- *No need to grease the bowl, and do not use a mixer in this step because the dough is too sticky for a mixer.* In a large mixing bowl, whisk together the flour, yeast, salt, sugar, oregano, basil, garlic powder, and crushed red pepper (if using). Using a silicone spatula or wooden spoon, mix in the chopped add-ins (pepperoni, sun-dried tomatoes, olives) and mozzarella cheese. Pour in the water and gently mix together. The dough will seem dry and shaggy, but keep working it until all the flour is moistened. If needed, use your hands to work the dough ingredients together until all the flour is moistened. The dough will be sticky. Shape into a ball in the bowl as best you can.
- Cover the bowl tightly with plastic wrap or aluminum foil and set on the counter at room temperature. Allow to rise for 3 hours. The dough will just about double in size, stick to the sides of the bowl, and have a lot of air bubbles. Place the risen dough, still covered, in the refrigerator for at least 12 hours and up to 3 days. The dough will puff up during this time, but may begin to deflate after 2 days. That’s normal.
- Turn the dough out onto a lightly floured work surface and, using generously floured hands, shape into a ball as best you can. It doesn’t have to be perfect. Transfer the dough to a large piece of parchment paper. (Large enough to fit inside your pot and one that is safe for high heat. I use this parchment and it’s never been an issue.) Place the ball of dough + parchment inside a medium-size mixing bowl so the dough doesn’t spread out as it rests. Cover and let it rest for 30 minutes.
- During this rest, preheat the oven to 450°F (232°C). (Yes, very hot!) Place a 6-quart or larger Dutch oven (with the lid) or heavy-duty pot in the oven for 30 minutes so that it’s extremely hot before the dough is placed inside.
- After 30 minutes, using a very sharp knife or bread lame (some even use kitchen shears), score the dough with an X, about 1/2 inch deep. (“Score” = shallow cut.) Remove the Dutch oven from the oven and carefully place the scored dough inside by lifting it up with the parchment paper and placing it all—the parchment paper included—inside the pot. Cover with the lid.
- Bake for 25 minutes with the lid on. Carefully remove the lid and continue baking for around 10–15 minutes more until the bread is golden brown. How to test for doneness: Give the warm bread a light tap. If it sounds hollow, it’s done. For a more accurate test, the bread is done when an instant-read thermometer reads the center of the loaf as 195°F (90°C).
- Remove pot from the oven, carefully remove the bread from the pot, and allow to cool on a cooling rack for at least 20 minutes before slicing. Because of the heavy add-ins and cheese, this bread is flatter than most boules. But this just means a higher crust to interior ratio! Slice and serve with homemade hot honey butter, if desired.
- Make the hot honey butter: In a large bowl using a handheld mixer or stand mixer fitted with a paddle attachment, beat the butter on medium speed until completely smooth and creamy, about 1 minute. Add the remaining ingredients, starting with only 1/8 teaspoon of salt and a small pinch of red pepper flakes. Beat on medium-high speed until completely smooth, about 1 minute. Scrape down the sides of the bowl with a silicone spatula and beat again as needed to combine. Taste. Add more salt and/or crushed red pepper flakes if desired.
- Store leftovers loosely covered at room temperature for up to 3 days or in the refrigerator for up to 1 week. Tightly cover leftover hot honey butter and store at room temperature for up to 2 days or in the refrigerator for up to 2–3 months.
Notes
- Make Ahead & Freezing Instructions: The dough can sit in the refrigerator for up to 3 days, so this is a wonderful recipe to begin ahead of time. You can also bake the bread, allow it to cool, wrap it tightly and freeze for up to 3 months. Thaw in the refrigerator and allow to come to room temperature before serving. You can also freeze the dough. Complete the recipe through step 2. Wrap in plastic wrap and place in a freezer-friendly container or zip-top bag. Freeze for up to 3 months. To bake, allow dough to thaw overnight in the refrigerator, or for 2–3 hours at room temperature. Continue with step 3 and the rest of the recipe instructions. You can freeze hot honey butter for up to 6 months. Thaw in the refrigerator before using. If desired, after it has thawed, you can bring it to room temperature and beat with a mixer until it’s extra creamy.
- Special Tools (affiliate links): Glass Mixing Bowls | Wooden Spoon or Silicone Spatula | Dutch Oven | 2-Cup Measuring Cup | Parchment Paper | Bread Lame | Instant-Read Thermometer | Electric Mixer (Handheld or Stand) | Coarse Sea Salt | Flaky Sea Salt
- Flour: For absolute best flavor and chewy texture, I strongly recommend using bread flour. You can use a 1:1 substitution of all-purpose flour in a pinch with no other changes to the recipe. I recommend avoiding whole wheat flour in this dough. The bread will be extremely dense and heavy. Instead, try my whole wheat bread.
- Yeast: You can use instant or active dry yeast, but I highly recommend an instant (aka “rapid rise” or “quick rise” yeast). The bread will rise faster. 2 teaspoons is a little less than 1 standard packet. If using active dry yeast, there are no changes needed to the recipe. The rise time in step 2 may take longer. Reference my Baking with Yeast Guide for answers to common yeast FAQs.
- Salt: Use a coarse salt, such as coarse sea salt, in this bread. I find the flavor slightly lacking when using regular table fine salt. If you only have fine salt, reduce to 1 and 1/2 teaspoons.
- Sugar: A little sugar helps balance all the strong savory and salty flavors in this bread. Instead of granulated sugar, you can use honey. If using honey, instead of mixing it into the dry ingredients like you would the sugar, whisk it into the water you use in the dough.
- Garlic & Herbs: Feel free to use 2–3 teaspoons chopped fresh oregano and/or fresh basil instead of dried. Instead of garlic powder, you can use 2 teaspoons minced fresh garlic or roasted garlic.
- Instructions If You Don’t Have a Dutch Oven: If you don’t have a Dutch oven, you can still bake this bread on a baking sheet, pizza stone, or cast iron skillet. Baking Sheet: Place the shaped dough on a parchment-lined or generously floured (or cornmeal-dusted) baking sheet in step 3, cover, and let rest for 30 minutes. While the oven preheats (step 4), bring a kettle of water to a boil. Once the dough is scored (step 5), place the baking sheet on the center rack and a shallow metal pan (not glass) on the bottom rack. Carefully pour 3–4 cups of boiling water into the pan to create steam, then quickly shut the oven door. The steam helps give the bread a crisper crust like you’d get in a Dutch oven. Bake for around 35–38 minutes and check for doneness with an instant-read thermometer as described in step 6. Pizza Stone or Cast Iron Skillet (10–12-inch): You can preheat the stone or cast iron skillet in the oven in step 4 for a slightly crisper crust (or skip preheating if you prefer) and you can also add steam to the oven, as described in the baking sheet method. After scoring the dough in step 5, transfer it (on parchment, since the dough is very sticky) onto the hot stone or skillet. Bake as directed, but note that the bread may finish a little faster, so keep an eye on it and check for doneness with an instant-read thermometer as described in step 6.


Reader Comments and Reviews
I followed the recipe as closely as I could and was really pleased with the results. I took the inside temperature and it was not done after 25 minutes so I took another commenter’s suggestion and popped in the oven probe. That worked like a charm. Next time I’ll let it warm up a little more before baking it.
This bread is amazing. My neighbors raved about it. Excellent recipe, so easy to follow.
Simple and delicious! I love a no knead bread and this was one of the best ones I’ve had. Mine sat in the fridge for the full 3 days (because, life, lol), but I think that made it even better. The hot honey butter complimented this perfectly.
This bread turned out so good! It has a great texture; super crusty on the outside and nice and chewy inside. The process was incredibly easy and almost completely hands-off. I loved the overall flavor and thought the herbs and spices were really well-balanced. Sally does it again!
Gonna have to pass on this one. Not quite sure how you can call this recipe easy.
My dutch oven can’t be heated that high or it ruins the bottom and scorches the food.
Cookie sheet, putting water in the oven turns an “easy” recipe into more work.
I don’t own a pizza stone and could never master a cast iron skillet.
While the bread looks good, there’s no way for me to make it.
I can’t believe how many people were saying how easy it was.
I’m disappointed with this one.
I completely understand your frustration, and thank you for sharing your feedback. I call this one “easy” because it doesn’t require kneading or shaping skill, and the dough itself is very forgiving, but I agree that the baking method can feel a little fussy depending on what equipment you have. You can absolutely bake this bread without a Dutch oven, pizza stone, or cast iron skillet—just use a parchment-lined baking sheet and the water in a pan underneath it (or skip the water trick completely! that’s fine too!). I truly appreciate you taking the time to comment, and I’ll make sure to clarify these alternate options more clearly in the post.
Delicious! Made exactly described and it turned out perfect!
We made this for our church Sunday School and one person said, “This is the best thing I have ever eaten!” It was a big hit and so easy to make. Many requests for the recipe.
Made the pizza bread today!! OMG!! This is super delicious!! I used pancetta, sun-dried tomatoes, mozzarella. I love that it’s so customizable and can’t wait to try more versions! For anyone interested-I don’t have a Dutch oven so I baked on a baking steel with parchment and used a cast iron skillet with ice cubes underneath for steam. I’ve used that method before and it works like a charm!
This bread was fantastic!! It was super easy-just need to allow for time. It’s very customizable-I used pancetta, sun-dried tomatoes and mozzarella. I can’t say to try more varieties!
Has anyone just baked it after the initial counter rise? Looks so good- Perfect for football today
Tl;dr: Turned out wonderfully, but needed to bake for longer (cold kitchen?).
Slightly longer: Dough went together very easily with a spatula even without using the stand mixer. Initial rise went fine and into the fridge overnight.
Shaping the next morning was easy, but I probably should have let it proof for an hour rather than 30 minutes. Our kitchen is cold in the fall, and I don’t think 30 minutes was enough to let the dough warm up. I baked it in a 5.5 qt, glass-top Cuisinart Dutch oven and it was plenty large enough.
At the full recipe time, the bread was obviously not fully baked yet, but the magnetic roasting thermometer with the probe came to the rescue. It was roughly another 20 minutes, uncovered, before the loaf got to 195 internally. On the plus side, it looks and tastes fantastic. No topping needed, I can eat this by the slice as-is.
My big takeaway is that I probably needed to let it proof longer on the counter before baking. Also, I found you can be generous with the goodies and it still bakes up just fine. I’m now trying to get the kids to make it for themselves to compare results. Definitely going to make this again in the future.
An easy to make reciep that is so tasty!
Absolutely delicious and easy!!!! Followed the recipe exactly, so quick and easy. Great hostess gift or house warming present. Only tweak was that I added 5 minutes to the bake time to get to 195 degrees. And I used chipotle honey in the butter instead of red pepper flakes. Will make again and again!
The recipe was easy to follow and the bread was delicious. I would try some other add-ins next time I make the bread. This is an ideal recipe for bread beginners, very straight forward.
Could you substitute half of the water for tomato sauce?
Hi Michelle, that’s not ideal. Tomato sauce is thicker than water. Substituting half the water will drastically change the dough’s hydration, making it denser and heavier. It would also add extra acidity to the dough, which could mean less rise. It may be better to only substitute a couple Tbsp of water for tomato sauce. Let me know what you try.
Can I use GF flour for this recipe?
Hi Amy, you can try using a 1:1 gluten-free all-purpose flour blend, but results will be very different. You won’t get the same airy, crusty loaf. Here are some naturally GF recipes that I have on my website if you ever want to browse.
Yum! I don’t even have a rotation, but my husband just suggested that we put this pizza bread recipe into regular rotation. I said maybe I could make one for his birthday cake, and he thought that was a fine idea — that’s how special it is. Very, very flavorful! Mine came out a little denser than I would have liked, but otherwise absolutely delicious. Served it with black bean soup for a simple and tasty dinner.
This was so good! And easy! I will make this delicious bread again!
It was delicious and easy! I think it will be fun to try different add-ins.
Smells amazing! Our dog trainer walked by the door and said she needed to get pizza. That’s a win in my book!
I loved the pepperoni and sun dried tomatoes in the mix; some of my pepperonis did not separate so next time I will make sure they are separated prior to putting into the dough mix. My husband said it smells like pizza when he walked into the house, and immediately ate two slices!
This is the best bread I have ever made and it is so easy to make if you follow Sally’s instructions. When I took it out of the oven, I thought it looks like the store bought ones, then after cutting it and tasting it, I couldn’t believe I made this amazing, flavourful bread! My daughter told me that it is even better than the fancy expensive ones we get from our local bakery!
So yummy and simple to make. I used pepperoni and black olives. I was short on mozzarella so I added some shredded Parmesan into the batter. I’m serving it with a charcuterie board for dinner.
Hi! The dough smells so good!! Tomorrow when I bake it do I lower the rack in the oven from the middle level to one below like with sourdough or do I bake it with the rack in the middle position? Thank you!!
Hi Terry, either would be fine. I usually bake it on the center rack in the Dutch oven.
This bread is so easy to make and full of awesome pizza flavors! Great for a game day snack! I definitely will be making this again.
Overall pretty good. Make sure you make pieces small. My bread didn’t really rise on counter or fridge. It still tasted good.
Super good and easy recipe.
Bread is my nemesis. But with this baking challenge, it gave me the confidence to try doing bread again. With Sally’s directions and hands off approach it was easy peasy lemon squeezy and the results were delicious. I like that you can customize the adds to your liking. I highly recommend trying this recipe. You will not be disappointed.
Sally’s No knead pizza bread is excellent and easy to put together. For all of you pizza lovers…this is a must bake.
I would like to put some Asiago cheese on top but I don’t want it to burn before the bread is done. Would adding it half way through baking work?
Yes! I love asiago-crusted bread. I would add it halfway through baking, or when there’s only 15 or so minutes left.