

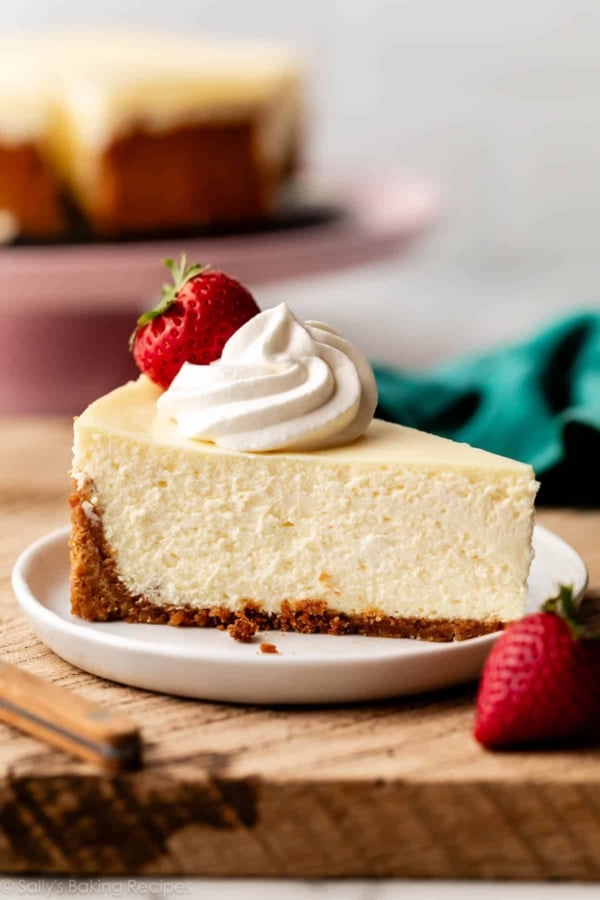
Look no further for a creamy and ultra-smooth classic cheesecake recipe! Paired with a buttery graham cracker crust, no one can deny its simple decadence. For the best results, bake in a water bath.
I originally published this recipe in 2018 and have since added new photos and a few more success tips. This recipe is such a fan favorite, that it deserved a spot in print! You’ll also find this recipe in my New York Times best-selling cookbook, Sally’s Baking 101. The one in the book also includes a recipe for an optional cherry sauce topping!
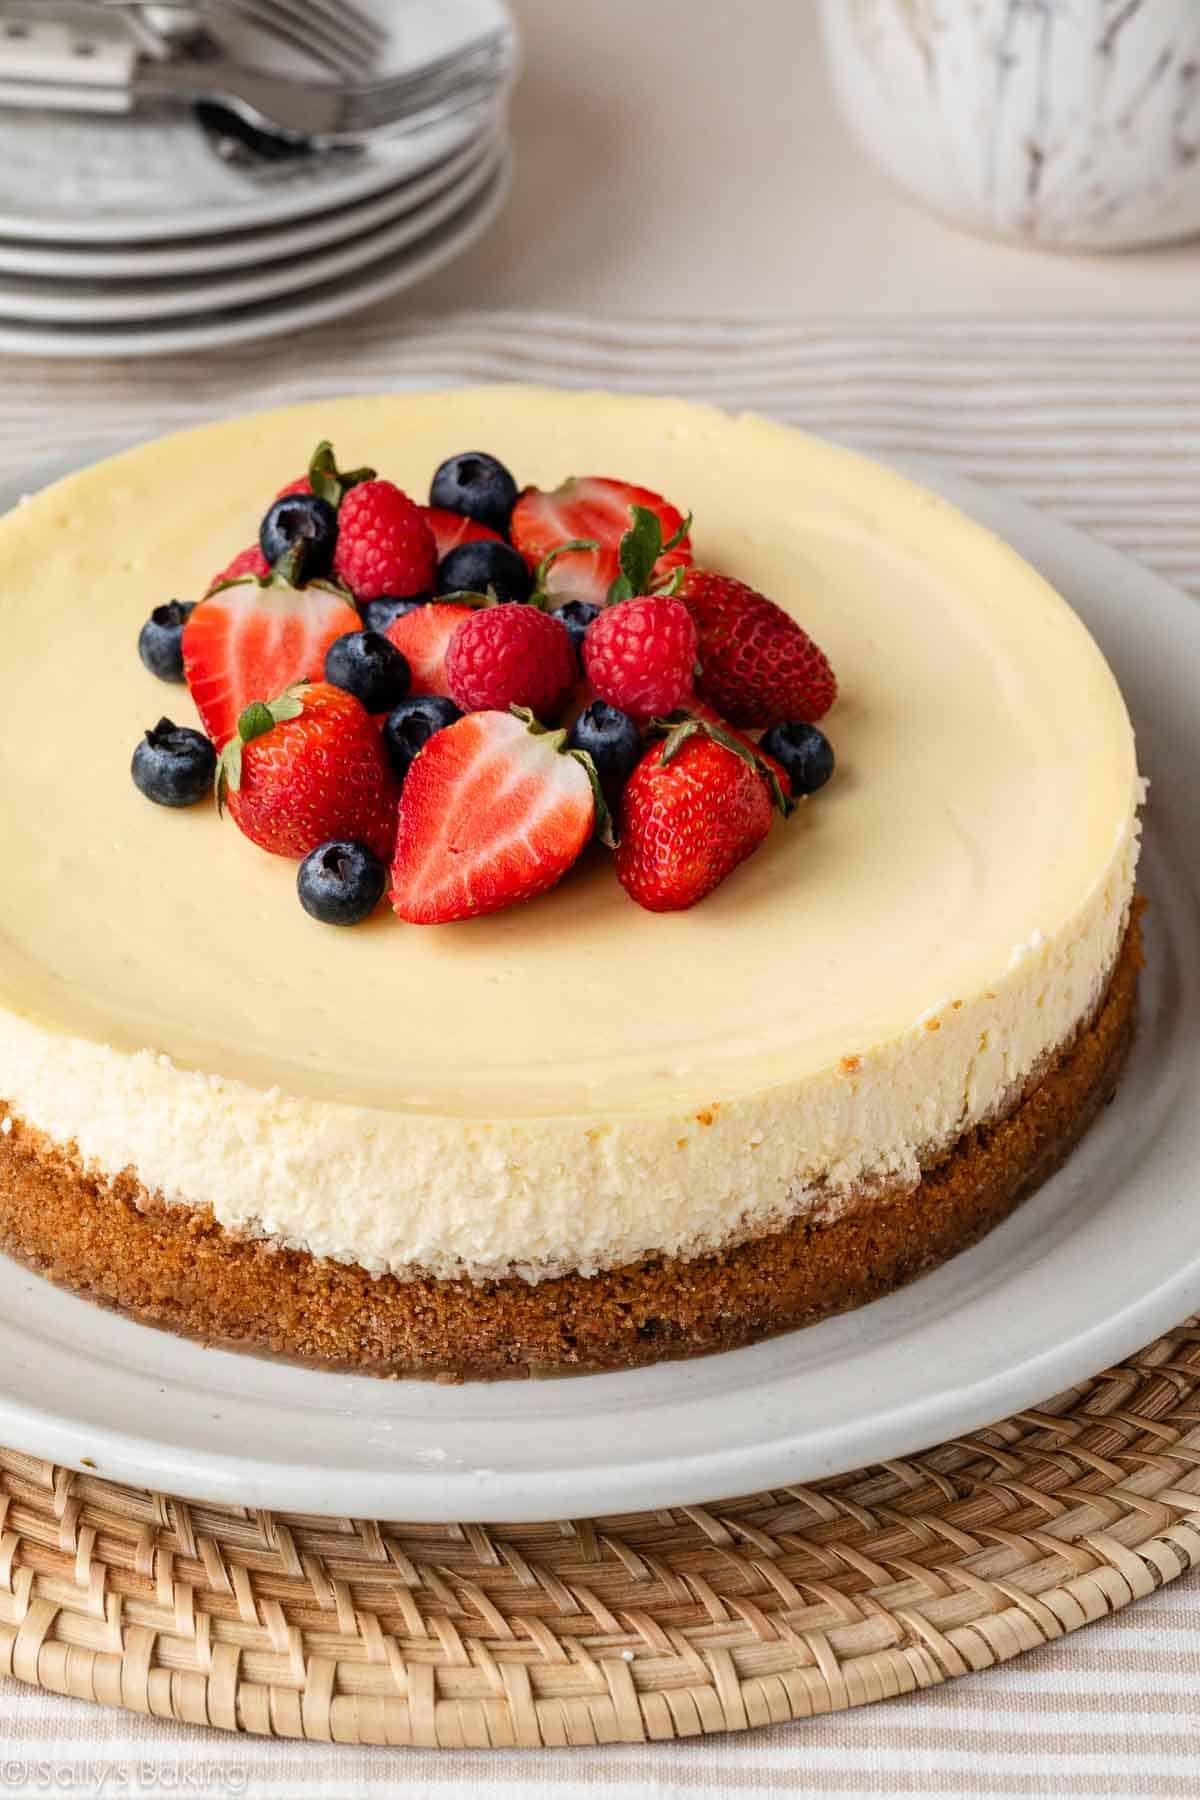
This is a classic baked cheesecake made with a graham cracker crust and a creamy, tangy filling. By following the recipe below and the success tips my team and I have included, you will be rewarded with a perfect cheesecake: no cracks, no water leaks, and no guesswork!!!
One reader, Randy, commented: “This is the best cheesecake I have ever had! I’m from New York and nothing there beats this—even in the fanciest of restaurants. The only problem is that everyone I’ve shared it with wants me to make more and more. They rave about it being the best ever. ★★★★★”
Not a Plain Cheesecake Recipe
I have shared many, many cheesecake recipes over the years.
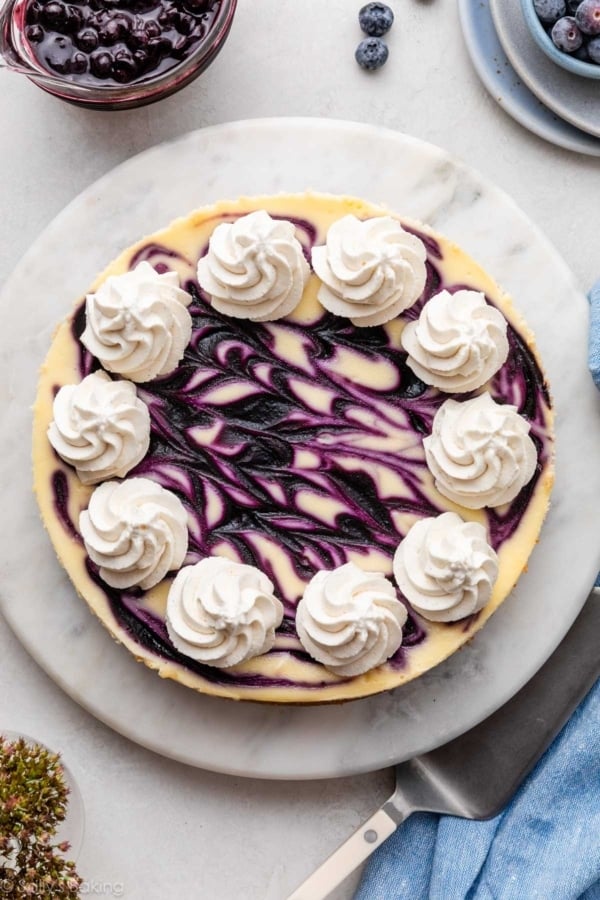
There’s been peanut butter cheesecake, blueberry swirl cheesecake, Snickers cheesecake, pumpkin swirl cheesecake, lemon cheesecake, and Amaretto cheesecake. Plus more cheesecake in my published cookbooks. That’s a lot of cheesecake recipes without a single nod to where it all originates: classic cheesecake.
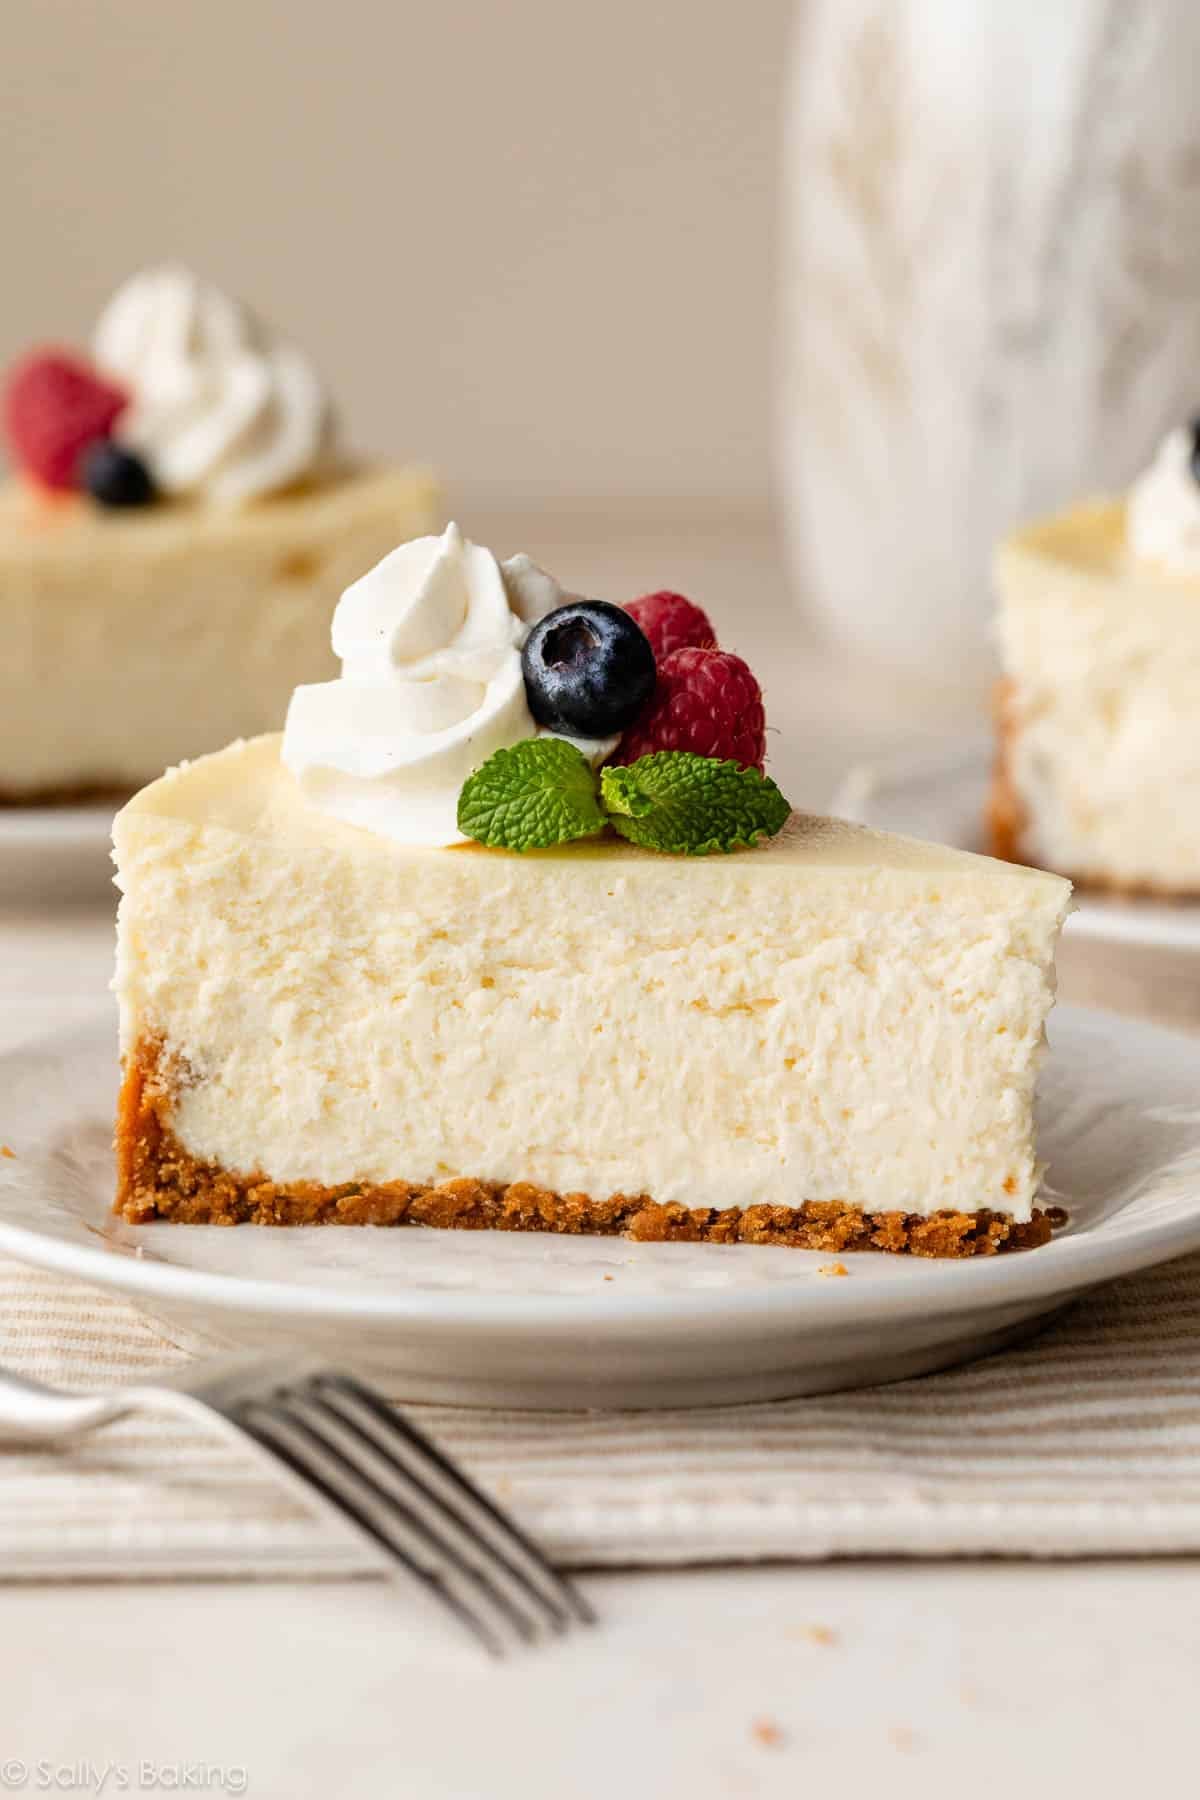
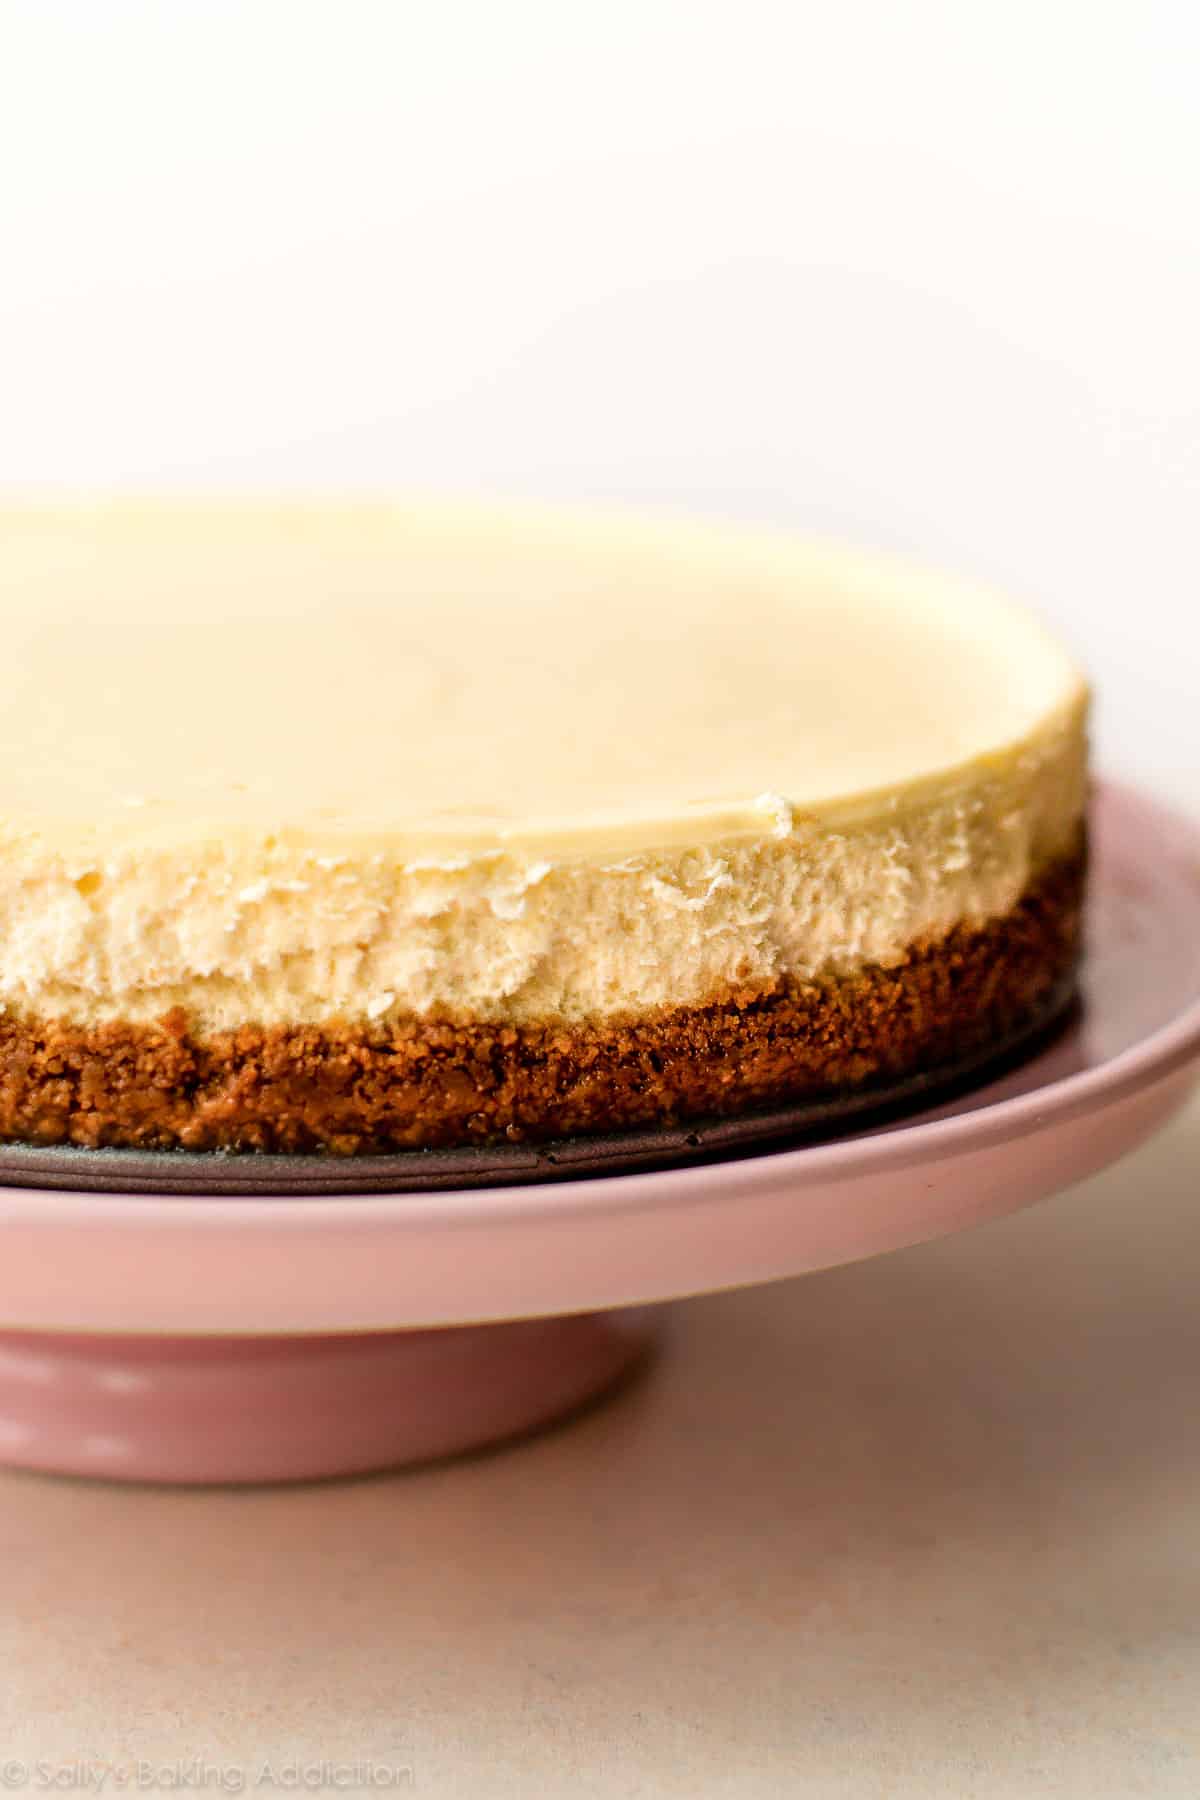
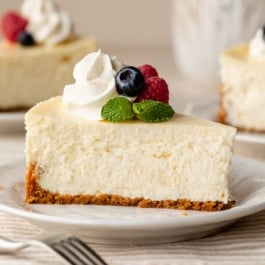
To me, classic cheesecake is creamy, rich, and smooth. My cheesecake recipe is not as dense as New York cheesecake, but it’s just as special. It’s thick, it’s velvety, and there’s no denying its decadence. When I imagine what Chandler and Rachel’s stolen cheesecake tastes like, it’s this!
While there’s a glaring absence of chunks, swirls, and sprinkles in this ivory crowned jewel, there’s nothing plain about this simply stunning dessert.
Preparing this cheesecake recipe is simple—it’s baking it that can make or break the results. Many factors are at play like the springform pan leaking, the surface of the cheesecake cracking, under-baking, over-baking, etc. I have plenty of tricks that will help guarantee classic cheesecake perfection, including determining when the cheesecake is done and everything you need to know about a cheesecake water bath.
Ingredients You Need & Why
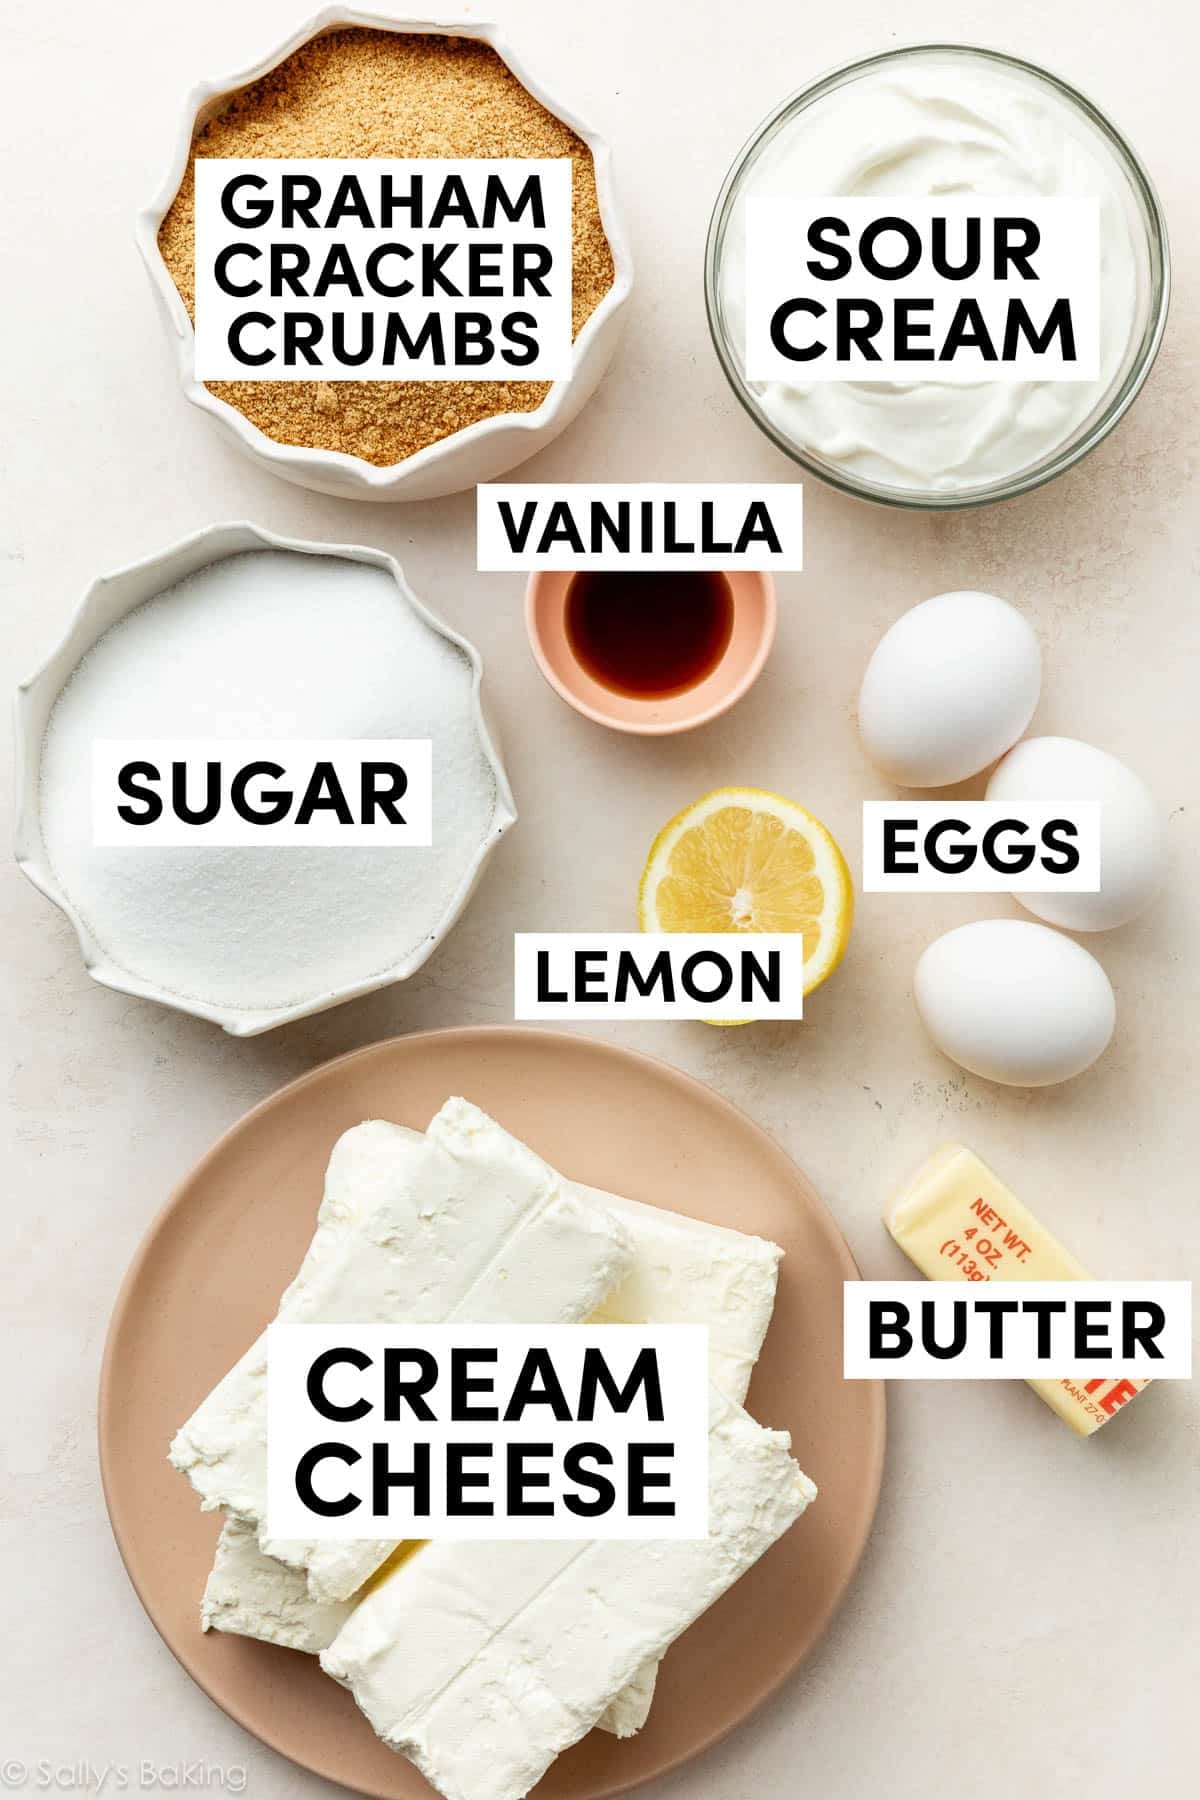
You only need a few basic staple ingredients for this cheesecake recipe.
- Brick cream cheese: Four 8-ounce bricks of full-fat cream cheese are the base of this cheesecake. That’s 2 pounds. Make sure you’re buying the bricks of cream cheese and not cream cheese spread. There are no diets allowed in cheesecake, so don’t pick up the reduced-fat variety!
- Sugar: 1 cup. Not that much considering how many mouths you can feed with this dessert. Over-sweetened cheesecake is hardly cheesecake anymore. Using only 1 cup of sugar gives this cheesecake the opportunity to balance tangy and sweet, just as classic cheesecake should taste.
- Sour cream: 1 cup. I recently tested a cheesecake recipe with 1 cup of heavy cream instead, but ended up sticking with my original (which can be found here with blueberry swirl cheesecake!). I was curious about the heavy cream addition and figured it would yield a softer cheesecake bite. The cheesecake was soft, but lacked the stability and richness I wanted. It was almost too creamy. Sour cream is most definitely the right choice.
- A little flavor: 1 teaspoon of pure vanilla extract and 2 of lemon juice. The lemon juice brightens up the cheesecake’s overall flavor and vanilla is always a good idea. Vanilla bean paste is wonderful too!
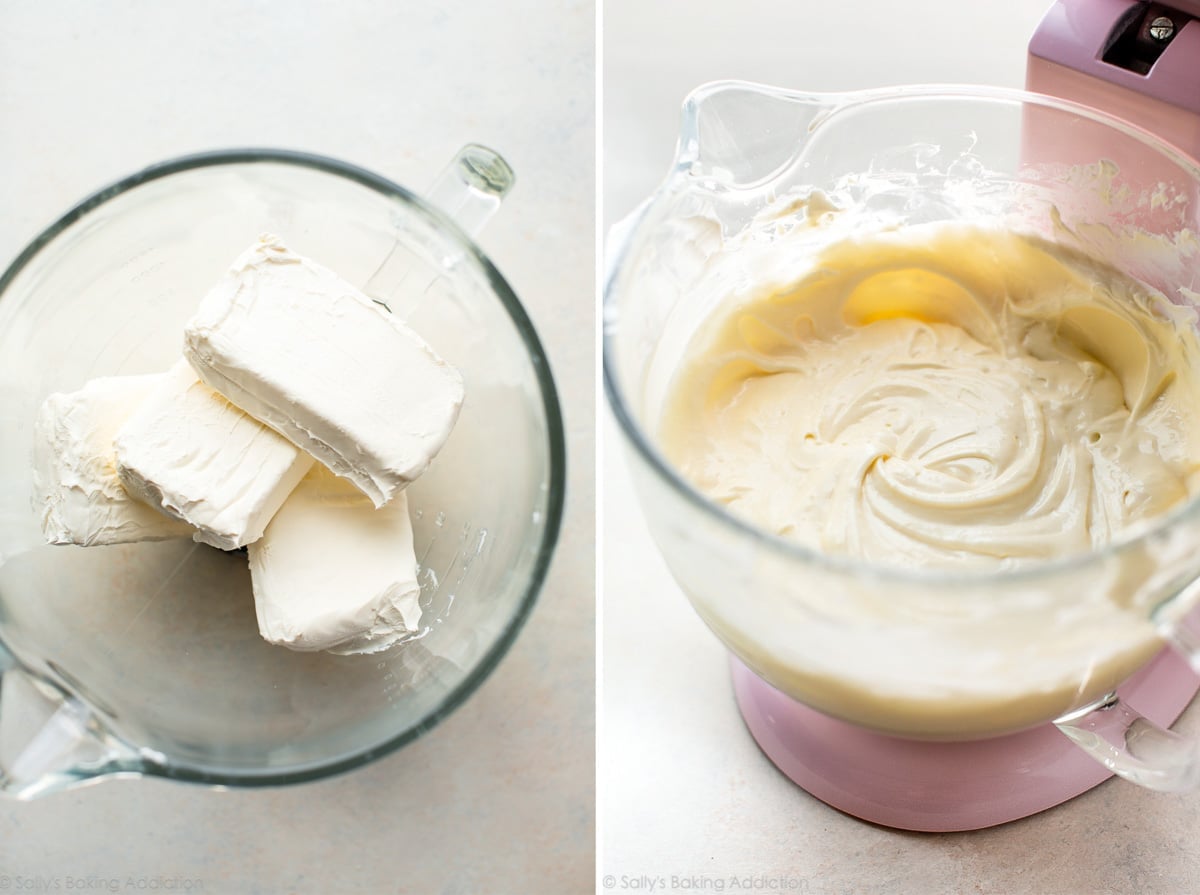
- Eggs: 3 eggs are the final ingredient. You’ll beat the eggs in last, one at a time, until they are *just* incorporated. Do not over-mix the batter once the eggs are added. This will whip air into the cheesecake batter, resulting in cheesecake cracking and deflating.
And as always, make sure all of the cheesecake batter ingredients are at room temperature so the batter remains smooth, even, and combines quickly. Beating cold ingredients together will result in a chunky, over-beaten cheesecake batter, hardly the way we want to start!
How to Make a Graham Cracker Crust
Since classic is the keyword of the day, we’re sticking with cheesecake’s main squeeze: a graham cracker crust. I reduced the butter from my original graham cracker crust recipe by 1 Tablespoon. I find this crust remains a little more crunchy. Make sure you pack the crust in tightly and pre-bake it to help prevent any sogginess.
You could use this Oreo cookie crust instead. No big changes necessary to the recipe below, but I do encourage you to lightly grease the bottom of the springform pan because Oreo crusts tend to stick. (You could also use a Biscoff pie crust instead if you’d like!)
I like to use the bottom of a small measuring cup to smooth the crust mixture into the springform pan. Speaking of, you’ll need a 9-inch or 10-inch springform pan. A springform pan has removable sides so you can safely release the cheesecake without having to flip the pan over or struggle to cut the cheesecake inside the pan. Springform pans can leak if you’re baking the cheesecake in a water bath (more on that below!), but this particular pan is reliable. I haven’t had any leaking issues.

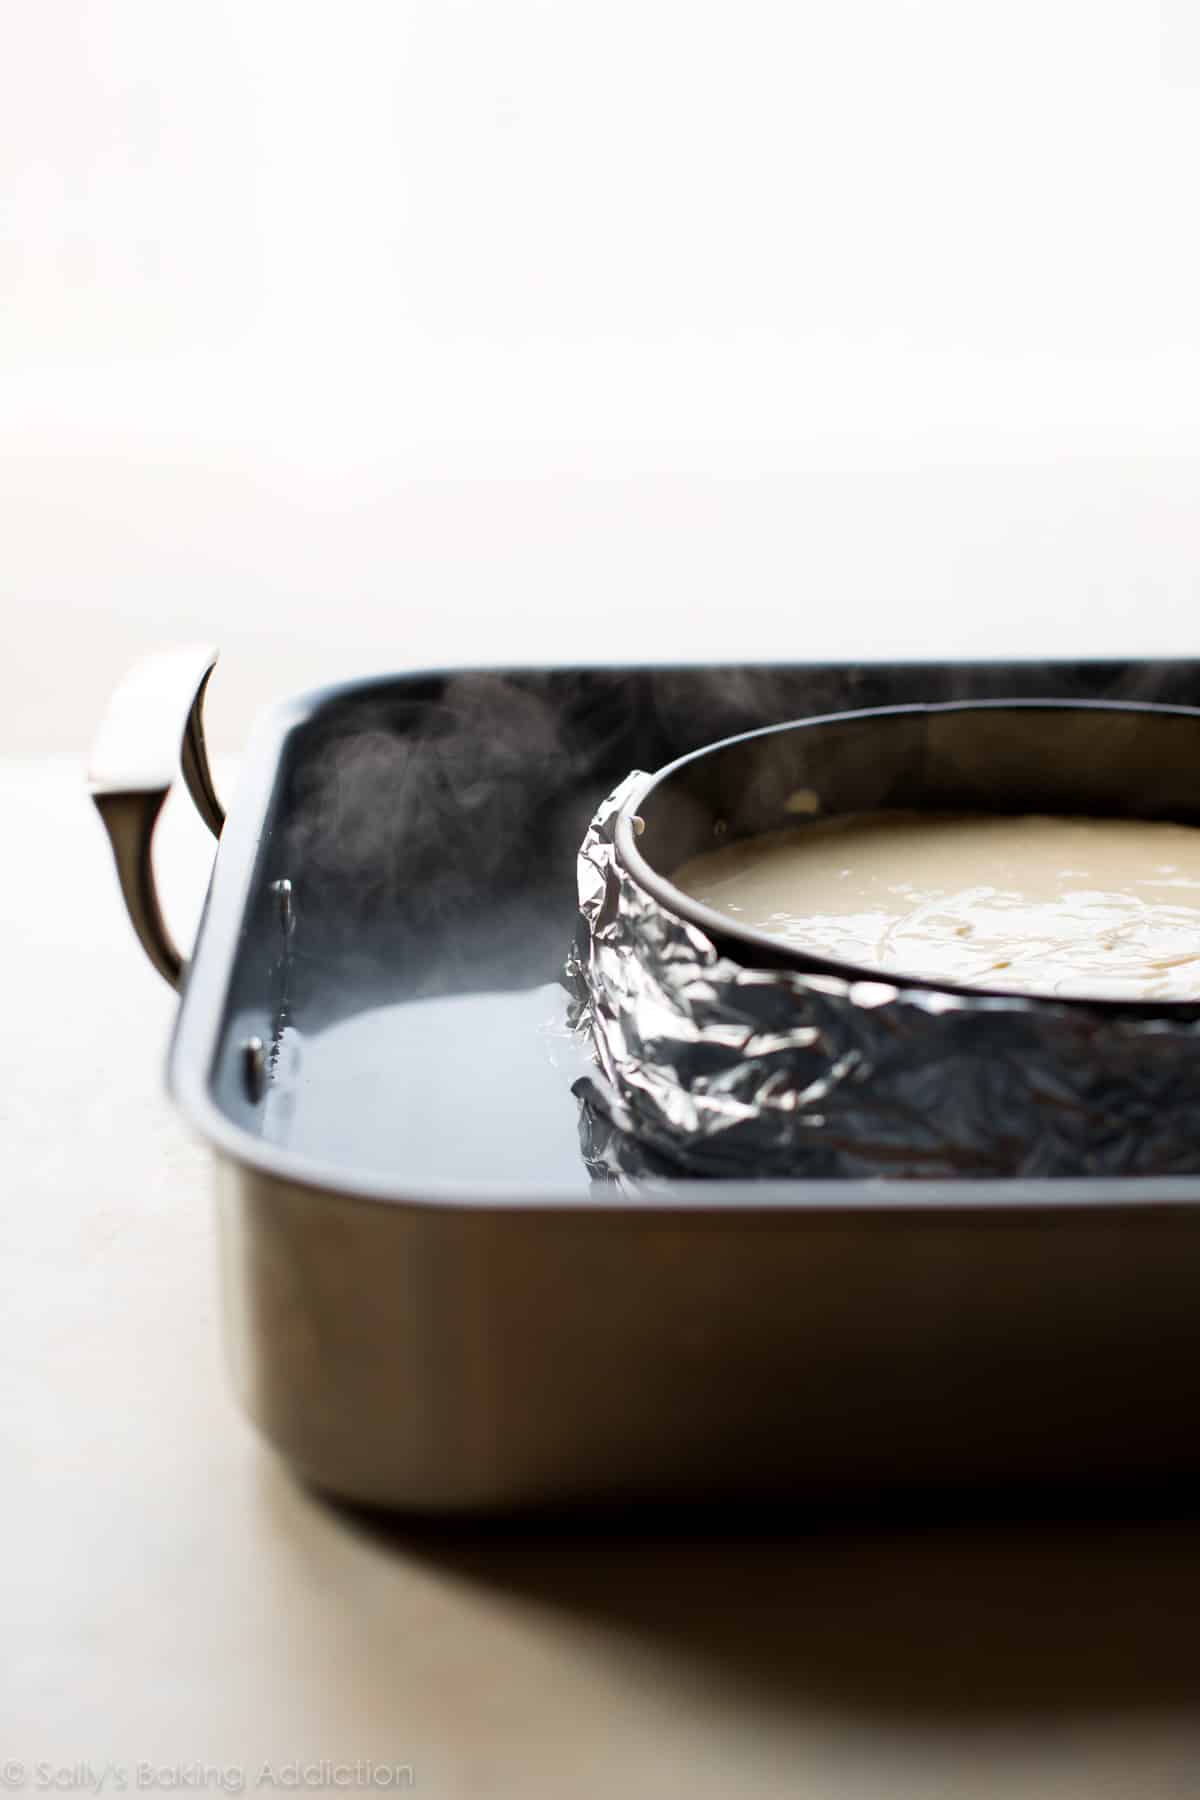
Cheesecake Water Bath
I promise a water bath is nothing complicated. All you’re doing is placing the springform pan in a roasting pan, filling it with hot water, and baking. What’s the point, you ask?
- I actually have an entire post and video tutorial for How to Make a Cheesecake Water Bath.
Cheesecake loves a humid environment. The steam from the hot water will lift the cheesecake up slowly and evenly, reducing the risk of cracks on the surface. Additionally, this slow and even baking method helps prevent the cheesecake from sinking back down as it cools. Taking a few extra minutes to prepare a water bath for this cheesecake recipe is well worth it.
Yes, but I don’t recommend it. A water bath creates a humid environment that helps the cheesecake bake gently and evenly. If you skip it, expect a slightly drier texture, browned surface, and there’s a higher chance it will crack.
Cheesecake is done when the edges are set and the center still has a slight wobble. All ovens are different, so this can take anywhere from 55 to 70 minutes.
Yes! Cheesecake is a wonderful make-ahead dessert because it needs to chill in the refrigerator for several hours and up to 2 days. You can also freeze it; see detailed instructions below.
Cooling & Chilling Cheesecake
In addition to using a cheesecake water bath, another way to help prevent cheesecake cracks is to let it cool slowly, starting inside the oven. When the cheesecake is done baking, turn the oven off, crack open the oven door, and leave the cheesecake inside for 1 hour. A drastic and sudden change of temperature isn’t ideal for cheesecake—from hot oven to cool counter—so do your best to control the environment by leaving the cheesecake inside. Does this make sense?
After the cheesecake cools in the oven for 1 hour, place it on the counter to cool completely to room temperature. After it’s cool, chill it in the refrigerator for at least 4 hours or even overnight. There’s no greater test to your willpower than those hours you’re forced to wait as the cheesecake cools down and then chills in the refrigerator. But when you take that first bite, every minute you waited will be completely worth it!
For a quicker, easier alternative to making a classic cheesecake, try this cheesecake pie or pumpkin cheesecake pie. Or if you want to completely skip the baking and cooling process, try my no-bake cheesecake instead.
4 Success Tips for This Cheesecake Recipe
To summarize the above, here are the key tips:
- Start with room-temperature ingredients.
- Do not over-mix the cheesecake batter.
- Bake in a water bath.
- Leave cheesecake in the cooling oven for 1 hour, then cool completely at room temperature.
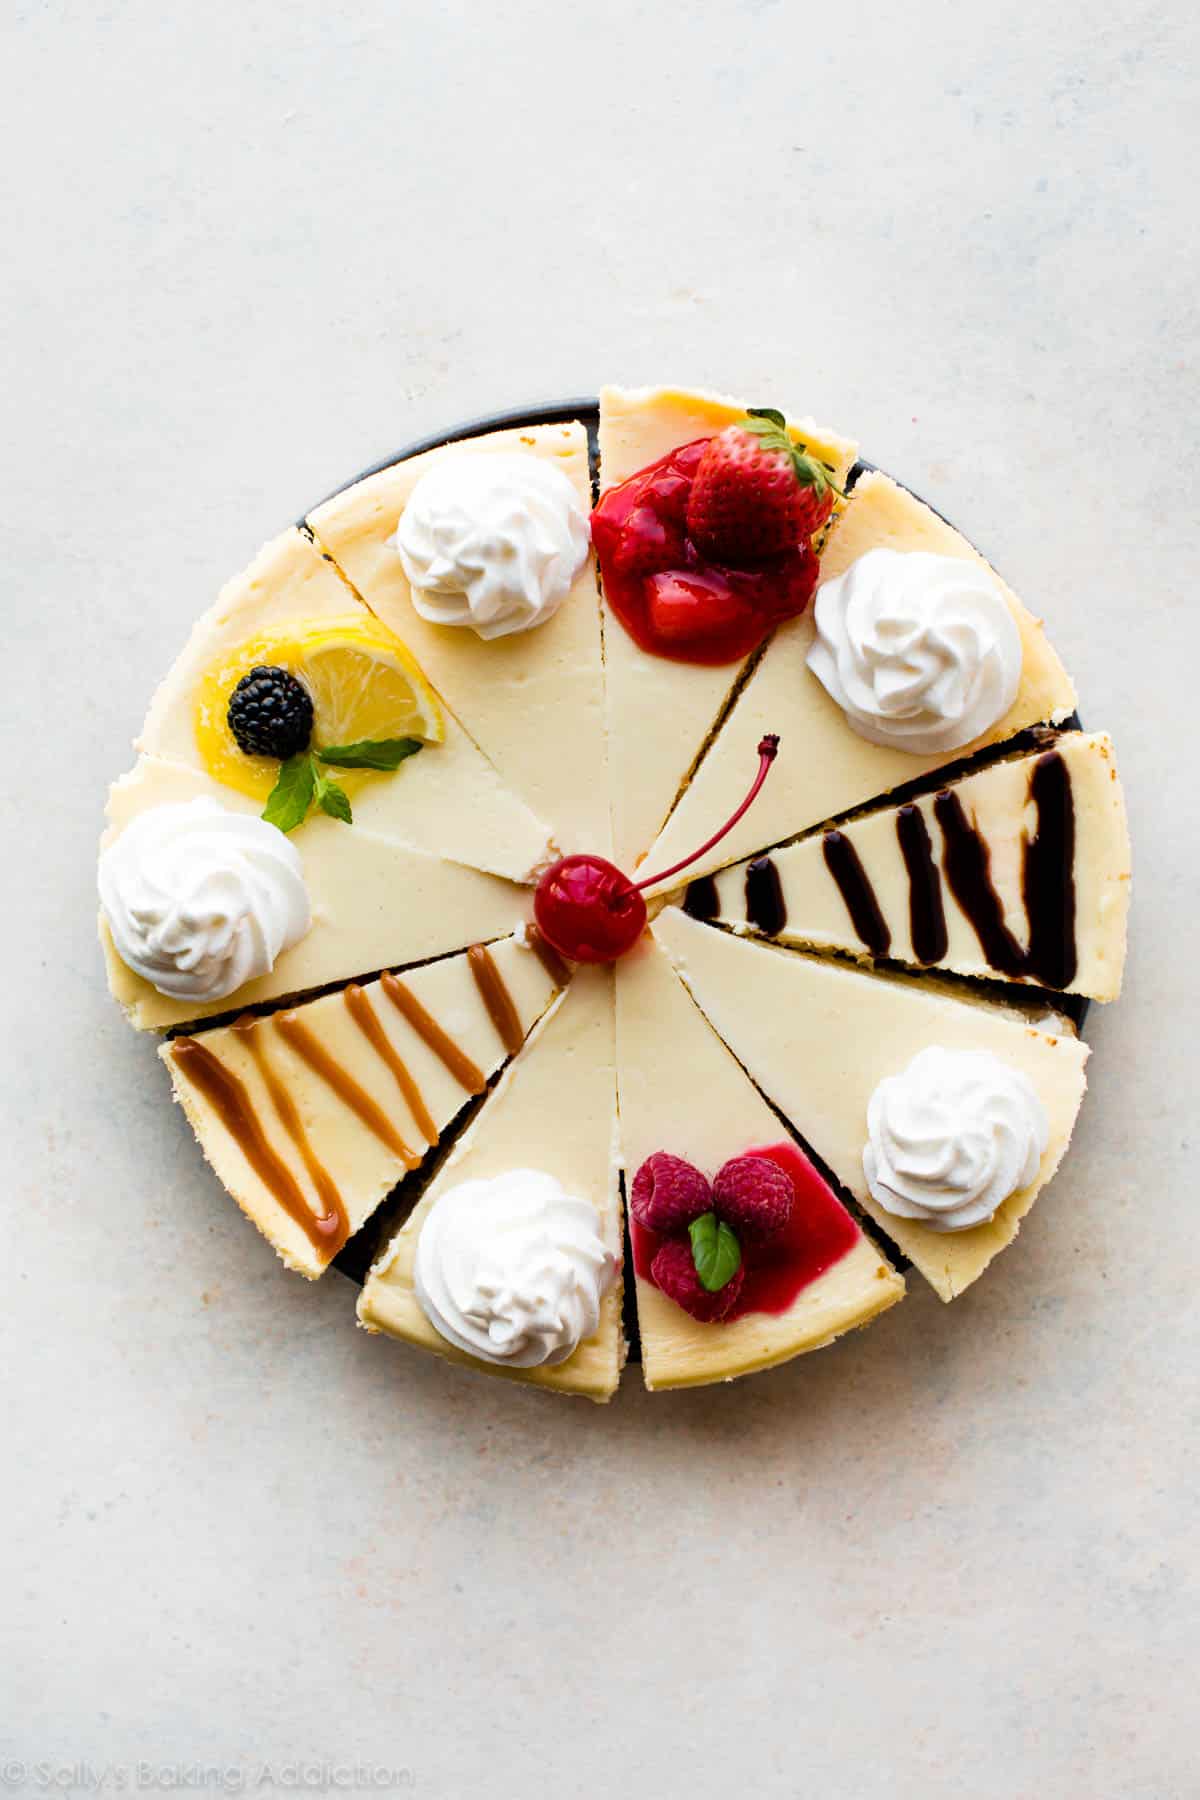
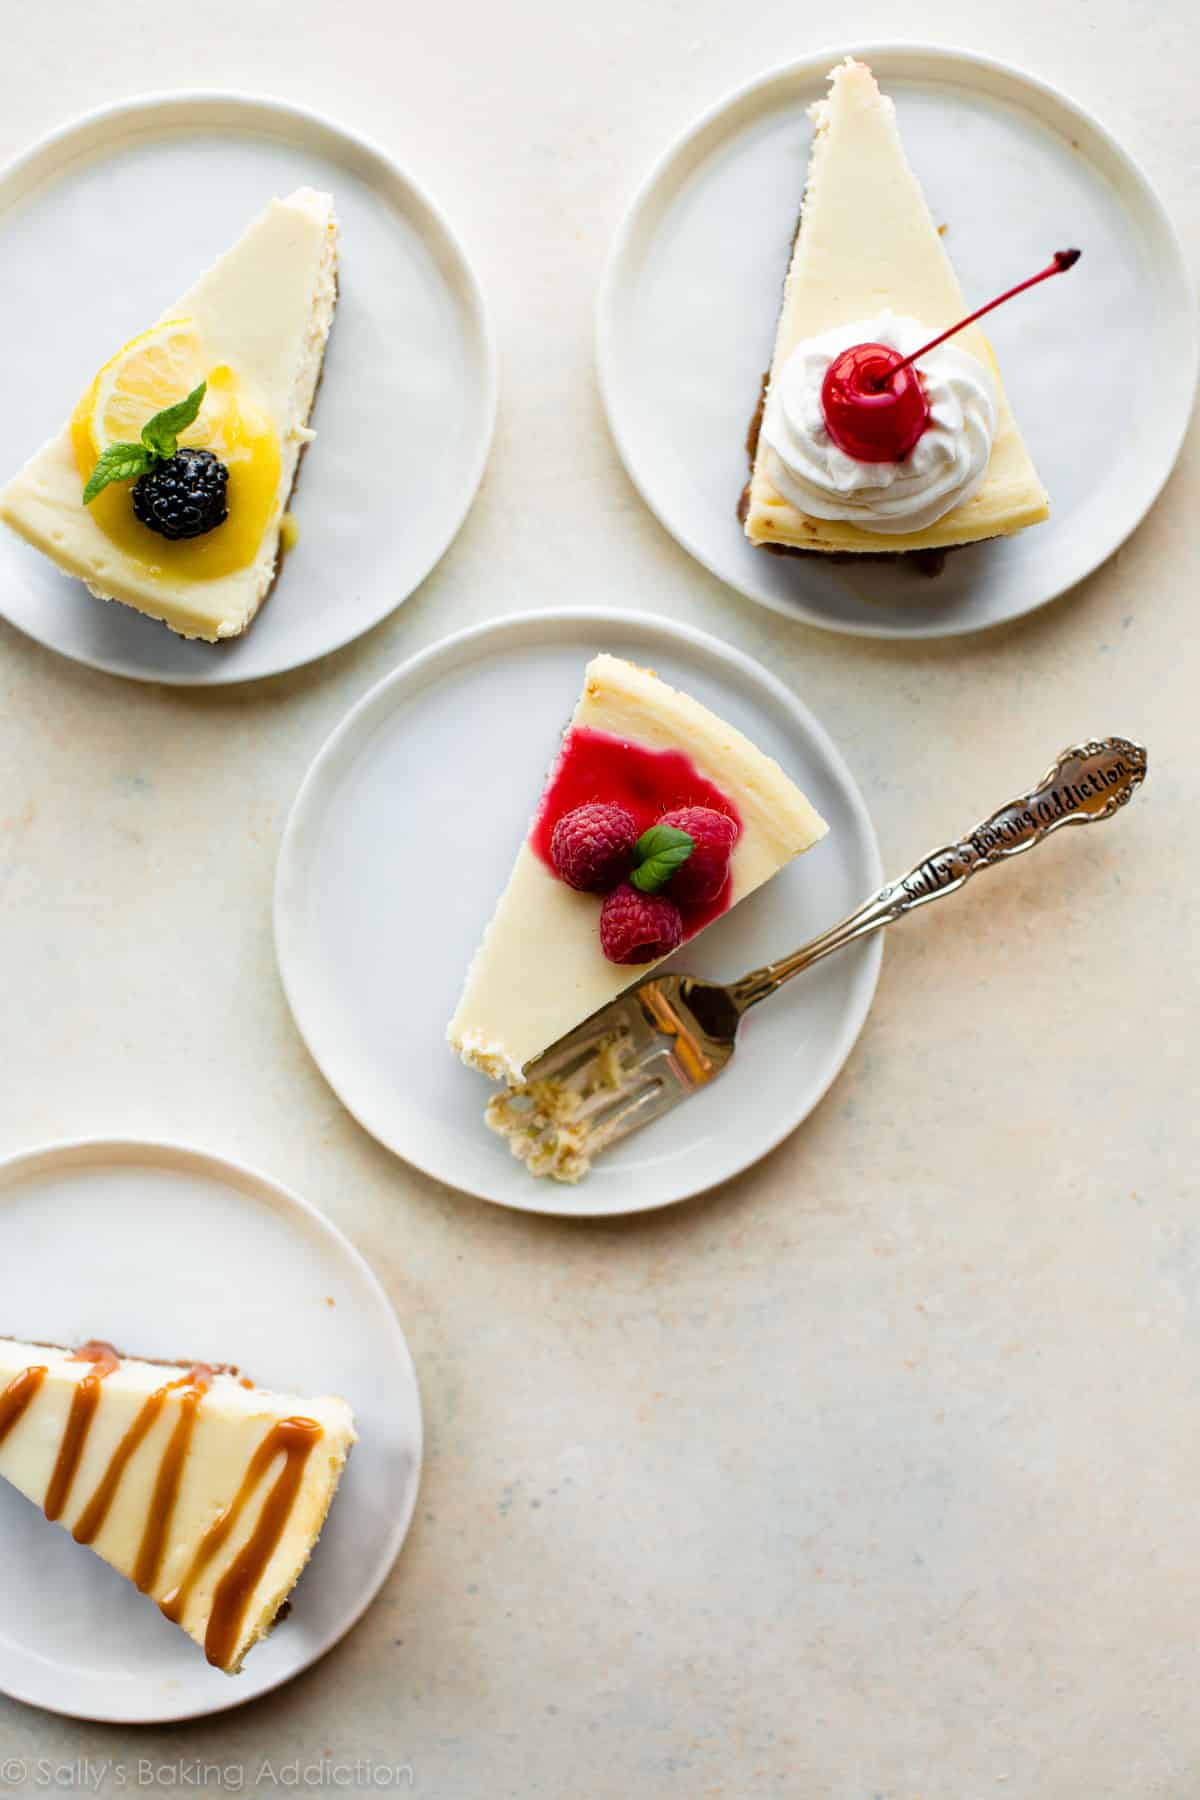
Cheesecake Toppings
Enjoy your velvet-rich cheesecake as is, or get a little fancy with a selection of toppings. Here are some recommendations:
Get creative or keep it simple. Either way, it’s going to impress.
And if you’re really looking to take your cheesecake to the next level, check out my pecan pie cheesecake, cinnamon swirl cheesecake, or caramel apple cheesecake pie.
How to Freeze Cheesecake
- Cool the cheesecake on the counter before freezing. No need to chill it in the refrigerator.
- How to freeze cheesecake on the springform pan: Remove the outer rim from the springform pan. Wrap the cheesecake with the bottom of the pan with a few layers of plastic wrap, then a final layer of aluminum foil.
- How to freeze cheesecake without the springform pan: After the cheesecake has completely cooled, run a sharp knife underneath the crust to release it from the bottom of the pan. Carefully slide it onto a parchment paper–lined piece of cardboard or use a freezer-safe plate. Wrap it all in a few layers of plastic wrap, then a final layer of aluminum foil.
- Freeze cheesecake for up to 3 months, then thaw overnight in the refrigerator before serving.
- Do not freeze cheesecake with any toppings. Add toppings just before serving the thawed cheesecake.
Classic Cheesecake Recipe
- Prep Time: 45 minutes
- Cook Time: 1 hour
- Total Time: 7 hours, 45 minutes (includes chilling)
- Yield: serves 12-16
- Category: Dessert
- Method: Baking
- Cuisine: American
Description
Look no further for a creamy and ultra smooth classic cheesecake recipe! Paired with a buttery graham cracker crust, no one can deny its simple decadence. For the best results, bake in a water bath. This recipe is also in my cookbook, Sally’s Baking 101.
Ingredients
Graham Cracker Crust
- 1 and 1/2 cups (180g) graham cracker crumbs (about 12 full-sheet graham crackers)
- 1/4 cup (50g) granulated sugar
- 5 Tablespoons (71g) unsalted butter, melted
Cheesecake
- 32 ounces (904g) full-fat brick cream cheese, softened to room temperature
- 1 cup (200g) granulated sugar
- 1 cup (240g) full-fat sour cream, at room temperature
- 1 teaspoon pure vanilla extract
- 2 teaspoons fresh lemon juice (optional, but recommended)
- 3 large eggs, at room temperature
Instructions
- Adjust the oven rack to the lower-middle position and preheat oven to 350°F (177°C).
- Make the crust: If you’re starting out with full graham crackers, use a food processor or blender to grind them into fine crumbs. Pour into a medium bowl and stir in the sugar until combined, and then stir in the melted butter. Mixture will be sandy. Try to smash/break up any large chunks. Pour into an ungreased 9-inch or 10-inch springform pan. With medium pressure using your hand, pat the crumbs down into the bottom and partly up the sides to make a compact crust. Do not pack down with heavy force because that makes the crust too hard. Simply pat down until the mixture is no longer crumby/crumbly (you can use the flat bottom of a small measuring cup to help smooth it out if needed). Bake for 10 minutes. Remove from the oven and set aside while you prepare the filling.
- Make the filling: In a large bowl using a handheld or stand mixer fitted with a paddle attachment, beat the cream cheese and granulated sugar together on medium-high speed until the mixture is smooth and creamy, about 2 minutes. Add the sour cream, vanilla extract, and lemon juice and beat until fully combined. With the mixer on medium speed, add the eggs one at a time, beating after each addition until just combined. Stop the mixer as soon as the final egg is fully incorporated into the batter; over-mixing can cause the cheesecake to deflate. You will have nearly 6 cups of batter.
- Prepare the simple water bath (see Note): (If needed for extra visuals, see How to Make a Cheesecake Water Bath; the visual guide and video will assist you in this step.) Boil a kettle/pot of water. You need 1 inch of water in your roasting pan for the water bath, so make sure you boil enough. I use an entire kettle of hot water. As the water is heating up, wrap 1 or 2 sheets of heavy-duty aluminum foil around the springform pan—be careful if it’s still warm from baking the crust! Place the wrapped springform pan inside of a large roasting pan. Pour the cheesecake batter on top of the crust. Use a spatula to smooth it into an even layer. Carefully pour the hot water inside of the pan and place in the oven. (Or you can place the roasting pan in the oven first, then pour the hot water in—whichever is easier for you.)
- Bake the cheesecake for 55–70 minutes or until the center is almost set. If you notice the cheesecake browning on top, tent it with aluminum foil halfway through baking. When it’s done, the center of the cheesecake should still slightly wobble if you gently tap or shake the pan. Turn the oven off and open the oven door slightly. With the door ajar, let the cheesecake sit in the oven in the water bath as it cools down for 1 hour. After 1 hour, remove from the oven and water bath, discard the foil, and place the springform pan on a cooling rack to cool completely at room temperature. When it has cooled, cover and refrigerate the cheesecake for at least 4 hours or up to 2 days.
- Run a knife around the edges of the springform pan to help loosen the cheesecake, then remove the outer rim. Using a sharp knife, cut into slices for serving. For neat slices, wipe the knife clean and dip it into warm water between each slice.
- Serve cheesecake with desired toppings (see Note). Cover and store leftover cheesecake in the refrigerator for up to 4 days.
Notes
- Make-Ahead Instructions: This cheesecake can be made the day before. It has to chill for quite some time before serving. See step 5. Another way to make this cheesecake ahead of time is to freeze it. Cheesecake can be frozen for up to 3 months. See instructions in blog post above.
- Special Tools (affiliate links): Food Processor | Glass Mixing Bowl | 9-inch Springform Pan or 10-inch Springform Pan | Electric Mixer (Handheld or Stand) | Roasting Pan | Silicone Spatula
- Oreo Cookie Crust: Feel free to replace the graham cracker crust with this Oreo cookie crust. Spray bottom of springform pan with nonstick spray, as Oreo cookie crusts tend to stick. Pre-bake the crust, just as you do with the graham cracker crust in step 2 above.
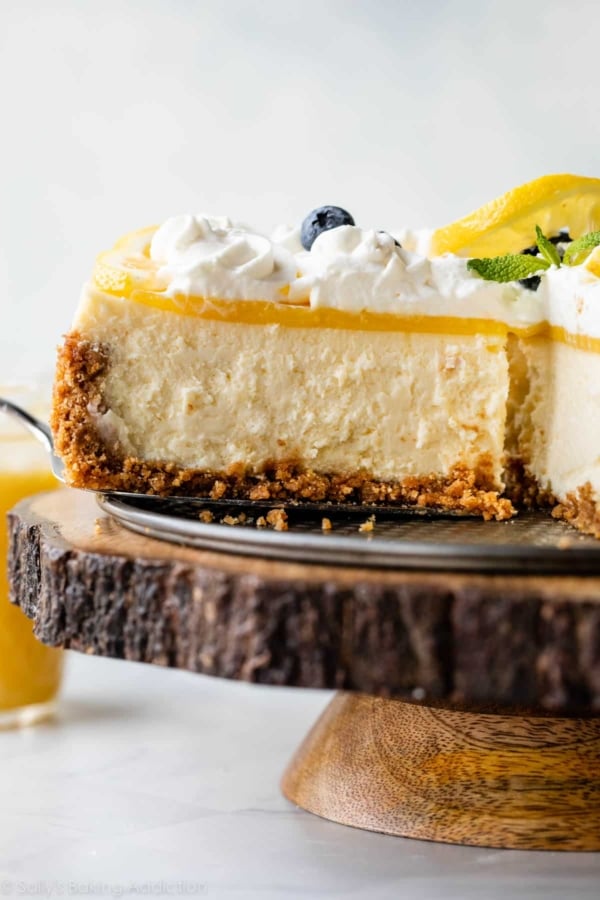
- Toppings: One of my favorite toppings for this cheesecake is raspberry sauce. Or you could top the baked and cooled cheesecake with salted caramel, lemon curd, strawberry topping, chocolate ganache, red wine chocolate ganache, fresh fruit, or whipped cream. The topping from my pecan pie cheesecake is also an option!
- Alternate Water Bath Method: This method works as well, and you don’t have to bake the cheesecake IN water. Boil a kettle or pot of water. You need 1 inch of hot water in your roasting pan for the water bath, so make sure you boil enough. Place the cheesecake on the center oven rack of the preheated oven. Place a large metal baking or roasting pan (do not use glass—I usually use a 9×13-inch baking pan or an extra-large cast iron skillet) on the bottom rack. Pour boiling water into the empty pan, about 1 inch deep. Immediately close the oven door to trap the steam inside. This unique water bath adds steam to the oven without having the cheesecake sit inside the water itself. No need to wrap the springform pan in foil. See How to Make a Cheesecake Water Bath for more information.
- Room-Temperature Ingredients: Bring all cold ingredients to room temperature before beginning. Room-temperature ingredients combine quickly and evenly, so you won’t risk over-mixing. Also, beating cold ingredients together will result in a chunky cheesecake batter, hardly the way you want to begin!
- Non-US Readers: Don’t have graham crackers where you live? Use 200g ground digestive biscuit crumbs (about 2 cups; 13–14 biscuits), 1/3 cup (67g) granulated sugar, and 6 Tablespoons (85g) melted butter. Pre-bake the crust for a bit longer, about 12–14 minutes. And from what I understand, spreadable cream cheese sold in a tub in countries outside of the US is a little different from the spreadable cream cheese in the US. It’s thicker, sturdier, and more solid and should be OK for this recipe. I have no experience with it, but this is what I’ve heard from other non-US readers. If you try it, let us know how it turns out!


Reader Comments and Reviews
This was my first time to make a cheesecake. Thank you for your great instructions. Everyone who ate some of the cheesecake loved it.
I made this for my daughter’s birthday also the mini cheesecakes. They came out great My daughter’s very happy. I didnt get the chance to taste the mini cheesecakes though
The moment i placed them on the table is the very same moment I last saw them
This was my first cheesecake and it got rave reviews! I learned a few things from my experience: I couldn’t find my springform pan so I used a 9″ Corningware. I made the crust with pre-crumbed crackers and followed the directions on the container. I would have split the recipe and made two because it took forever to bake (after guests arrived) and rose over the top of the pan (didn’t overflow). All in all, it was amazing and so easy to prepare.
This is the best recipe. Love the sound of the chunk of cheesecake slices being separated. Quality ingredients tops the rest – better than anything retail I have ever purchased! Best to purchase a bulk tub of cream cheese so you have plenty to share and gift! Best of all, freezing these cakes makes yummy popsicles too.
First.. love all your recipes! We have made your cookies, cupcakes and so much more and they never disappoint. I always adjust my oven temp accordingly (for those who have issues.. use the recipes as a guideline and adjust to your tastes along with adjusting to your kitchen and what you have on hand).
Second..our cheesecake always tastes delicious, but this time I utilized the water bath and BAM… no cracks!!! Topped with fresh cut strawberries and couldn’t be happier. No leftover would be the only complaint:( Hehehe, thank you!
Perfection! It’s really rich and YUMMY! Everybody loves it.
My son requested cheesecake for his 9th birthday and I knew I had to head straight to your site. I have never made cheesecake before and I knew you would make me look like a cheesecake master. Thanks to you and your step by step instructions it turned out perfect and everyone loved it. Thanks for another great recipe that I will make again and again!
Hi Sally – I LOVE cheesecake. I made this back in May. It came out really tasty and nothing was leftover but I do think I may have overcooked it a little bit (was brown on the outer sides all around) and it cracked slightly. Do you have any tips to avoid the cracking? I did the water bath. Did I over mix? I am not a baker so this was a win for me but just looking to improve for next time. Thanks!
Hi Jen, Overbaking is definitely the most common culprit of cracks in cheesecakes! If you would like more tips you can check out the post How to Prevent Cracks in Cheesecake.
This recipe is the “ONE”
My wife and made this a week ago. It came out as good or Better than any Cheese Cake I have had at any restaurant.
P.S. We are still Married too!!
This is amazing! I made it in a 10” round springform pan. Did the water bath. Followed everything and it was delicious! My now go to cheesecake recipe! IF I was to change it, I think next time I will do half the lemon juice because of the tartness and depending on the topping, it might be good. Example I tried lemon curd this time so that’s quite tarte already so I could have reduced the lemon in the cheesecake. With chocolate, I bet it’s perfect! I will try that too! Thank you!
I made this exactly as the recipe said. It came out perfect. I was so happy with the taste-tangy from the cream cheese, sour cream and lemon juice. Not too sweet and creamy smooth. My family raved about it. I paired it with a strawberry sauce and whipped cream. Yummy
Thank you.. turned wel tasty cheesecake…
I have made your simple cheesecake and a few other recipes so far. All of them turned out so well and received many compliments!! I have always had sunken and cracked cheesecakes and your recipe was so simple and clear on how to prevent that. Thank you for taking the time to explain each step and the reasoning behind it. I can’t wait to try the pumpkin cake cheesecake recipe!!
My family loved this! I’m gluten intolerant so I replaced the crust with fruity pebbles and it was amazing! New family favorite!
Hi Sally, if I were to turn this into a chocolate cheesecake, what changes should I make to the filling?
Cheers!
p.s this recipe is SO good, I have to force myself not to make it too often. A lifetime on the hips and all that lollll
Hi Shanta, We haven’t tested it but you can try to slightly reduce the sour cream and add 3 or 4 ounces of melted (and slightly cooled) unsweetened chocolate. Let us know how it turns out!
This recipe was perfect! My entire family loved it. I added a very very thin layer of pureed fresh figs just because I had them and was in the mood for the taste. But everything about the recipe was perfect. Thank you!
Excellent!!! Thanks so much for sharing this recipe and the detailed instructions. I have been baking and cooking since I was a kid, but I have never made a cheesecake. So I tried your recipe and it came out awesome!!! My husband freaked out and our friends too, they absolutely LOVED it! I will be making this again,and again and again! Thanks for taking the time to post this incredible cheesecake recipe.
Hi Sally! I would love to try your recipe and techniques. I would prefer to use an 8″ springform pan. Can you tell me how I would alter the recipe for an 8″ and also any idea for baking time? The 9″ and 10″ are too large for our family of two. 🙂
Thanks!!
Hi Cinder, There is too much batter for an 8 inch springform pan. You can make the recipe as written and use extra batter for some mini cheesecakes though!
Thanks for the info Stephanie. At the time I sent that question I was thinking that if a 9″ or 10″ pan was used for 4 packages of 8oz cream cheese, then I would use 3 packages for an 8″. But after giving it some thought, all of the ingredients would need to be altered for the 8″. I will continue to search for an 8″ recipe and if I cannot find one, I shall just make the 9″ version.
I’ll try checking with Food Network and Kraft foods and see if they have an 8″ standard recipe.
Thanks again.
Wow I would love to have this problem. I can not keep any baked goods in my house. I love this recipe and my VERY skinny hubby ate half of this the first night. I finally had to cover and hide my second piece or not get more. I am glad that he likes my baking and I am now using recipes from here as everything I have made we have loved. The only recipes that o use is for my old Scandinavian recipes at Christmas. I bet you might be surprised at how fast this cheesecake recipe disappears! But hood luck at finding a smaller recipe but this is great.
Problem I had was the top got really brown, although didn’t split. I had a roasting pan with boiling water on the shelf underneath, although it still tasted yum.
This recipe is perfect! It’s my first time baking cheesecake, I first thought it was hard but just by following your recipe it’s a success. My family loved it and we had fun putting toppings of our choice. Thank you for this!
I used this recipe. Didn’t have a blender or mixer of any kind and didn’t have a spring foam pan or even a pie pan. So I mixed by hand (not fun) and made a pan out of foil. On top of this I did the water bath. It did great yes the texture was great and lost some of the side perfection but it was so good and lasted maybe 2 days.
I now have a hand mixer and a spring foam pan and making it again tonight.
Is it possible to make this cheesecake into “cupcake” sized cheesecakes?
Hi Shelby, try our mini cheesecakes! They’re baked in a standard muffin/cupcake pan.
Hi Sally! Your recipe is spot on. Baked it the first time and everyone loved it. This time I am planning to try to bake it in a 6-inch cake pan, is the oven temperature still the same at 350F, and how many minutes baking time? Thank you.
Hi Angela! I’m so glad that you enjoy this cheesecake recipe. I’m unsure of the exact bake time for a 6 inch cheesecake. Same oven temperature.
Is it possible to turn this recipe into more of a lemon cheesecake?
If so, how would you recommend going about that?
Hi Ciara! Follow my recipe for Key Lime Cheesecake and use lemons in place of limes. Let me know if you try it!
Hi sally,
Would a disposable aluminum roast pan work? I don’t have a roast pan but I’m afraid this will cause the cake to bake u evenly.
For the water bath? Yes, definitely!
Hi Sally! Love this recipe! Make it all the time! My question is about making an Espresso Cheesecake! How much Espresso powder would I use? Is there anything else that gets added or changed in this recipe? Thank you! Hoping you answer like right away! I just found out someone needs me to make it for them now! Ugh! emergency help requested! 🙂 thanks….
Hi Laura! So glad you enjoy this cheesecake recipe. Adding flavor would require testing, so I can’t offer any advice at this time. A few teaspoons of espresso powder will definitely help add flavor though!
Hi Sally,
I have always wanted to bake the perfect cheesecake and ur recipe was foolproof.. my kids and husband loved it.. I used digestive biscuits instead of Graham crackers .. the crust was still amazing ..
Only the second time making a cheesecake, and it’s sooooo good! This cheesecake makes me want to eat cheesecake forever. Only problem was that mine did crack a little on the sides, but I don’t mind because it was absolutely delicious. I’m definitely coming back to this recipe 🙂
This cheesecake was perfection! The recipe was easy to follow. The texture was incredible. I made Sally’s Chocolate Ganache and Salted Caramel to serve along side it. It was a hit for my moms birthday party!
Hi Sally, love your website and your creations, has helped me make a few things. I’ve tried making two cheesecakes using two different springforms, in both cases there has been a residue on the underside of the pan that continues to form/leak for a while after its out the oven. It smells like digestives/butter (I’m from the UK so no gram crackers).
Any pointers for preventing this? I’ve yet to eat the second one but the first, the base was very wet unfortunately, not really sure why this is happening, doesn’t make sense to me especially if butter has leaked out the bottom, if anything I’d expect it to be super dry/crumbly lol, please help with any insights! Much love
Hi Jason, Instead of baking the cheesecakes directly in a water bath, try placing a large pan of hot water on the rack beneath the baking cheesecake instead. This should help any leaking issues! See recipe notes for details.
Sally, i believe this recipe has too much ingredients for a 9-inch pan
I followed instructions closely but had to throw out around 40% of the of the mix unfortunately.
Hi Josef! Thanks so much for giving this recipe a try. Next time, make sure you’re using a 9-inch or 10-inch springform pan. Those are much larger and hold more volume than a traditional 9-inch pan.
Thanks i thought springform refered to 9-inch foil pie pan but it was my mistake haha. Other than that the recipe tasted great.