

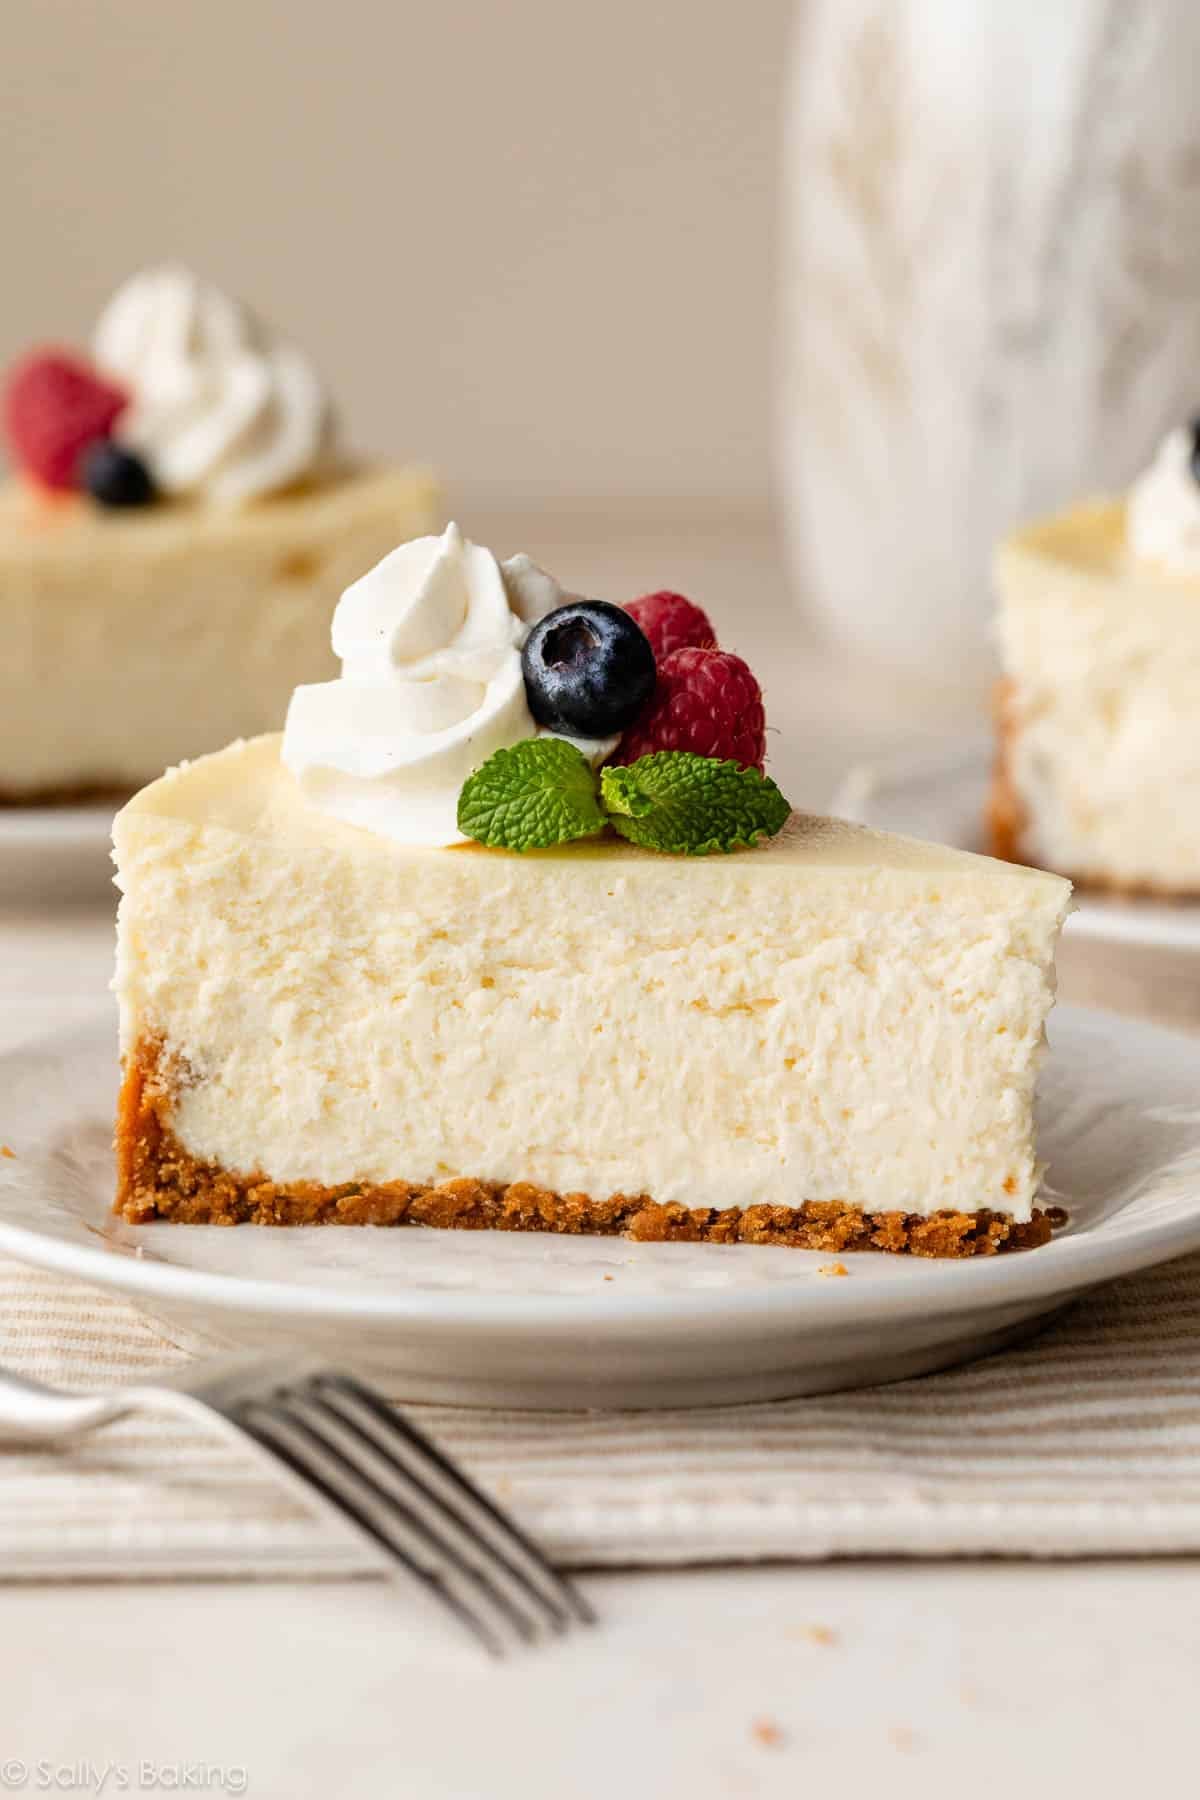
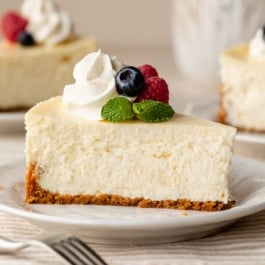
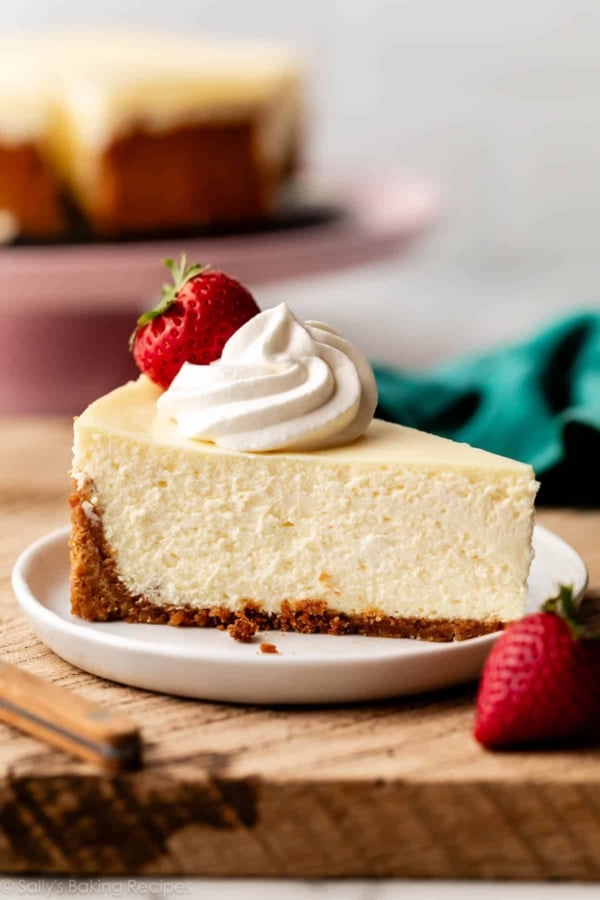
Look no further for a creamy and ultra-smooth classic cheesecake recipe! Paired with a buttery graham cracker crust, no one can deny its simple decadence. For the best results, bake in a water bath.
I originally published this recipe in 2018 and have since added new photos and a few more success tips. This recipe is such a fan favorite, that it deserved a spot in print! You’ll also find this recipe in my New York Times best-selling cookbook, Sally’s Baking 101. The one in the book also includes a recipe for an optional cherry sauce topping!
This is a classic baked cheesecake made with a graham cracker crust and a creamy, tangy filling. By following the recipe below and the success tips my team and I have included, you will be rewarded with a perfect cheesecake: no cracks, no water leaks, and no guesswork!!!
One reader, Randy, commented: “This is the best cheesecake I have ever had! I’m from New York and nothing there beats this—even in the fanciest of restaurants. The only problem is that everyone I’ve shared it with wants me to make more and more. They rave about it being the best ever. ★★★★★”
Not a Plain Cheesecake Recipe
I have shared many, many cheesecake recipes over the years.
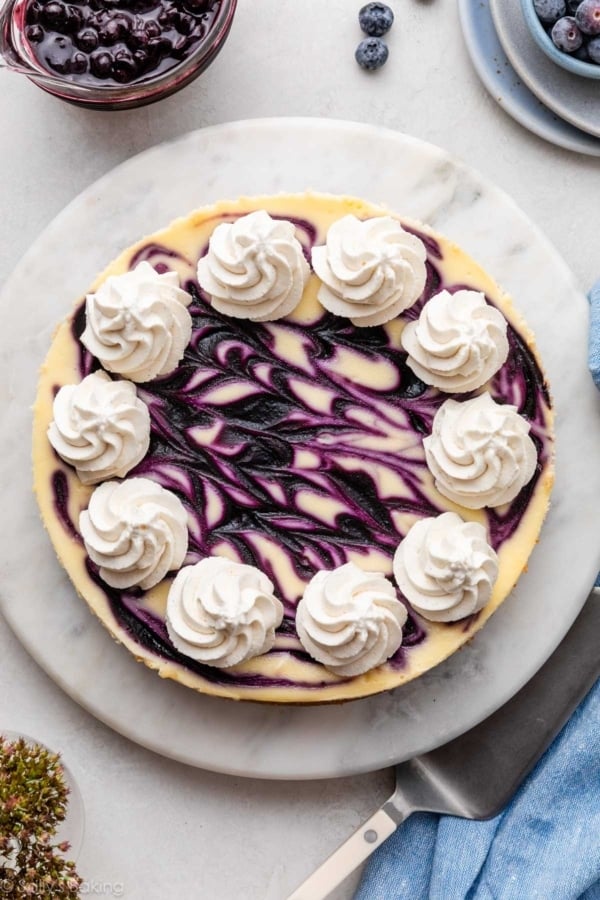
There’s been peanut butter cheesecake, blueberry swirl cheesecake, Snickers cheesecake, pumpkin swirl cheesecake, lemon cheesecake, and Amaretto cheesecake. Plus more cheesecake in my published cookbooks. That’s a lot of cheesecake recipes without a single nod to where it all originates: classic cheesecake.
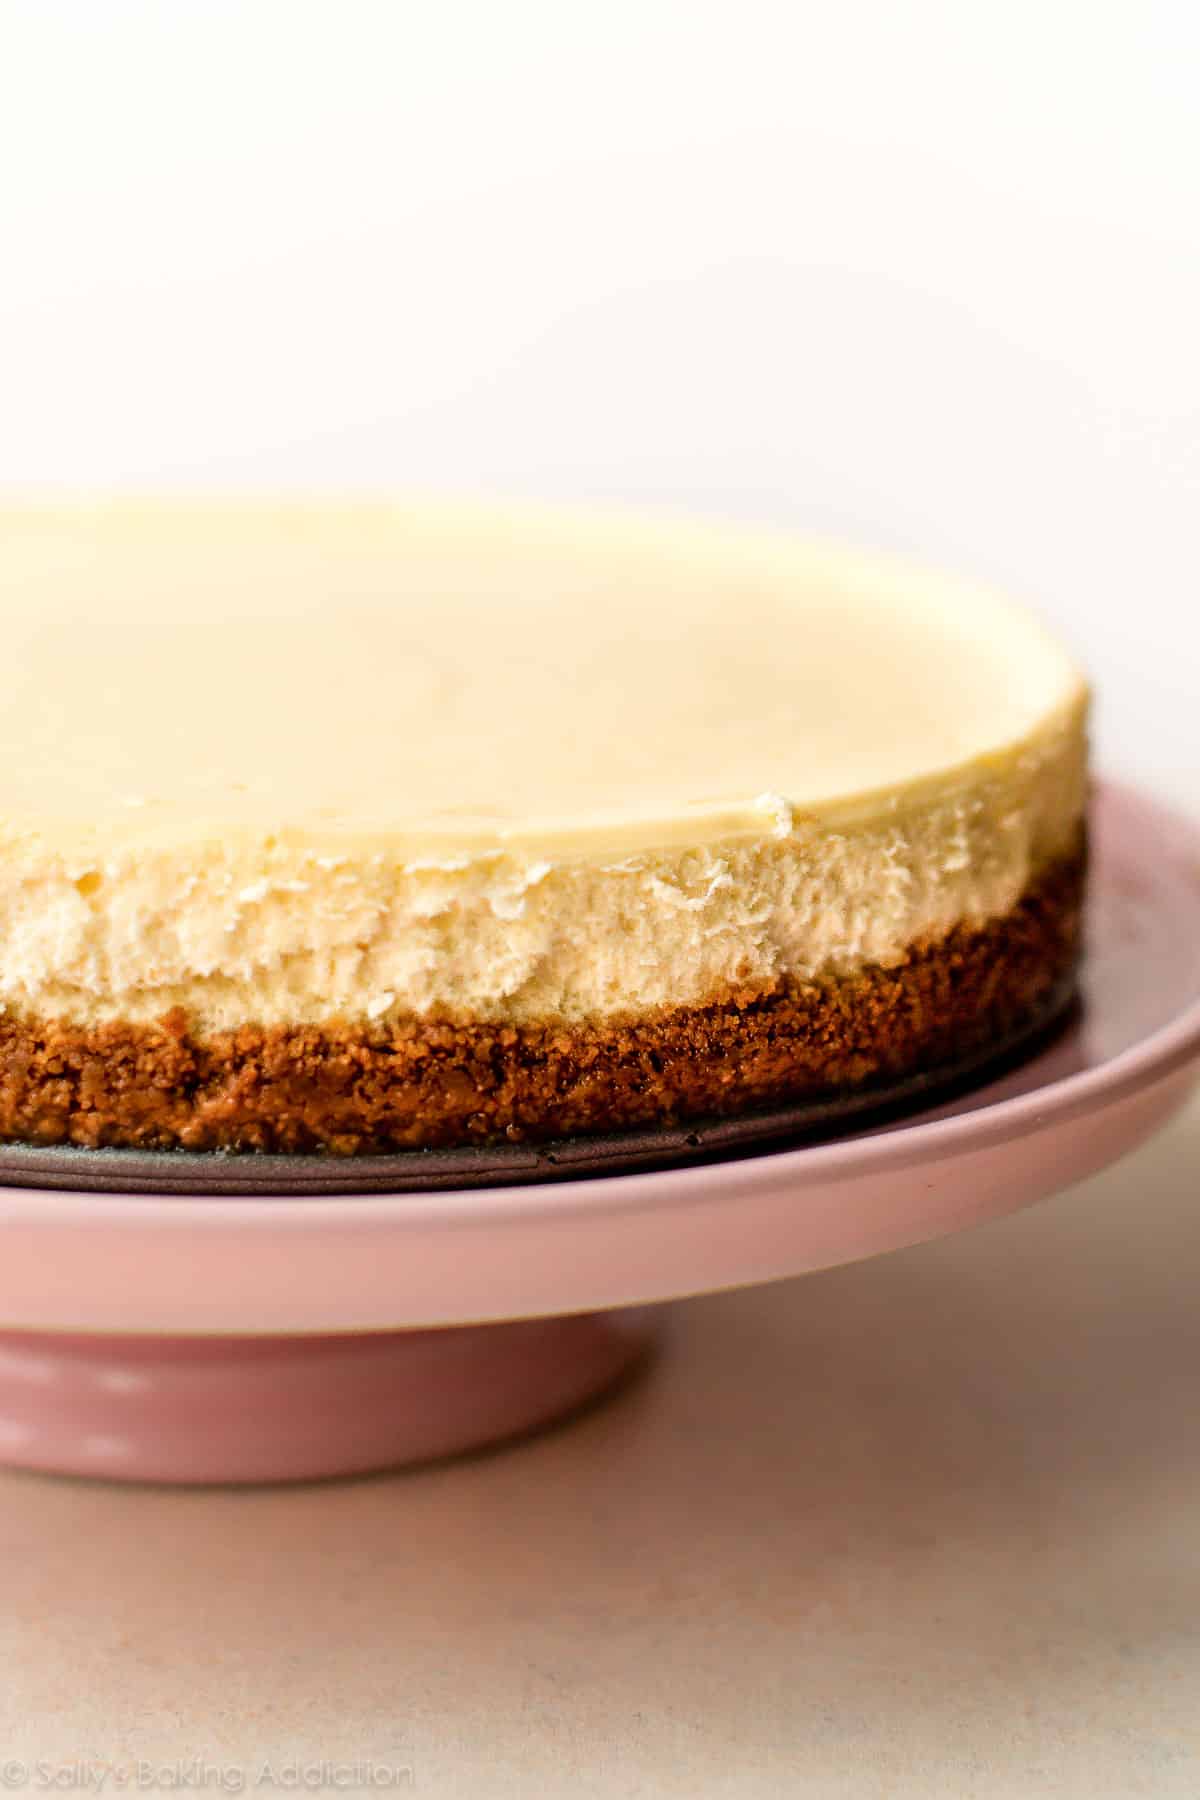
To me, classic cheesecake is creamy, rich, and smooth. My cheesecake recipe is not as dense as New York cheesecake, but it’s just as special. It’s thick, it’s velvety, and there’s no denying its decadence. When I imagine what Chandler and Rachel’s stolen cheesecake tastes like, it’s this!
While there’s a glaring absence of chunks, swirls, and sprinkles in this ivory crowned jewel, there’s nothing plain about this simply stunning dessert.
Preparing this cheesecake recipe is simple—it’s baking it that can make or break the results. Many factors are at play like the springform pan leaking, the surface of the cheesecake cracking, under-baking, over-baking, etc. I have plenty of tricks that will help guarantee classic cheesecake perfection, including determining when the cheesecake is done and everything you need to know about a cheesecake water bath.
Ingredients You Need & Why
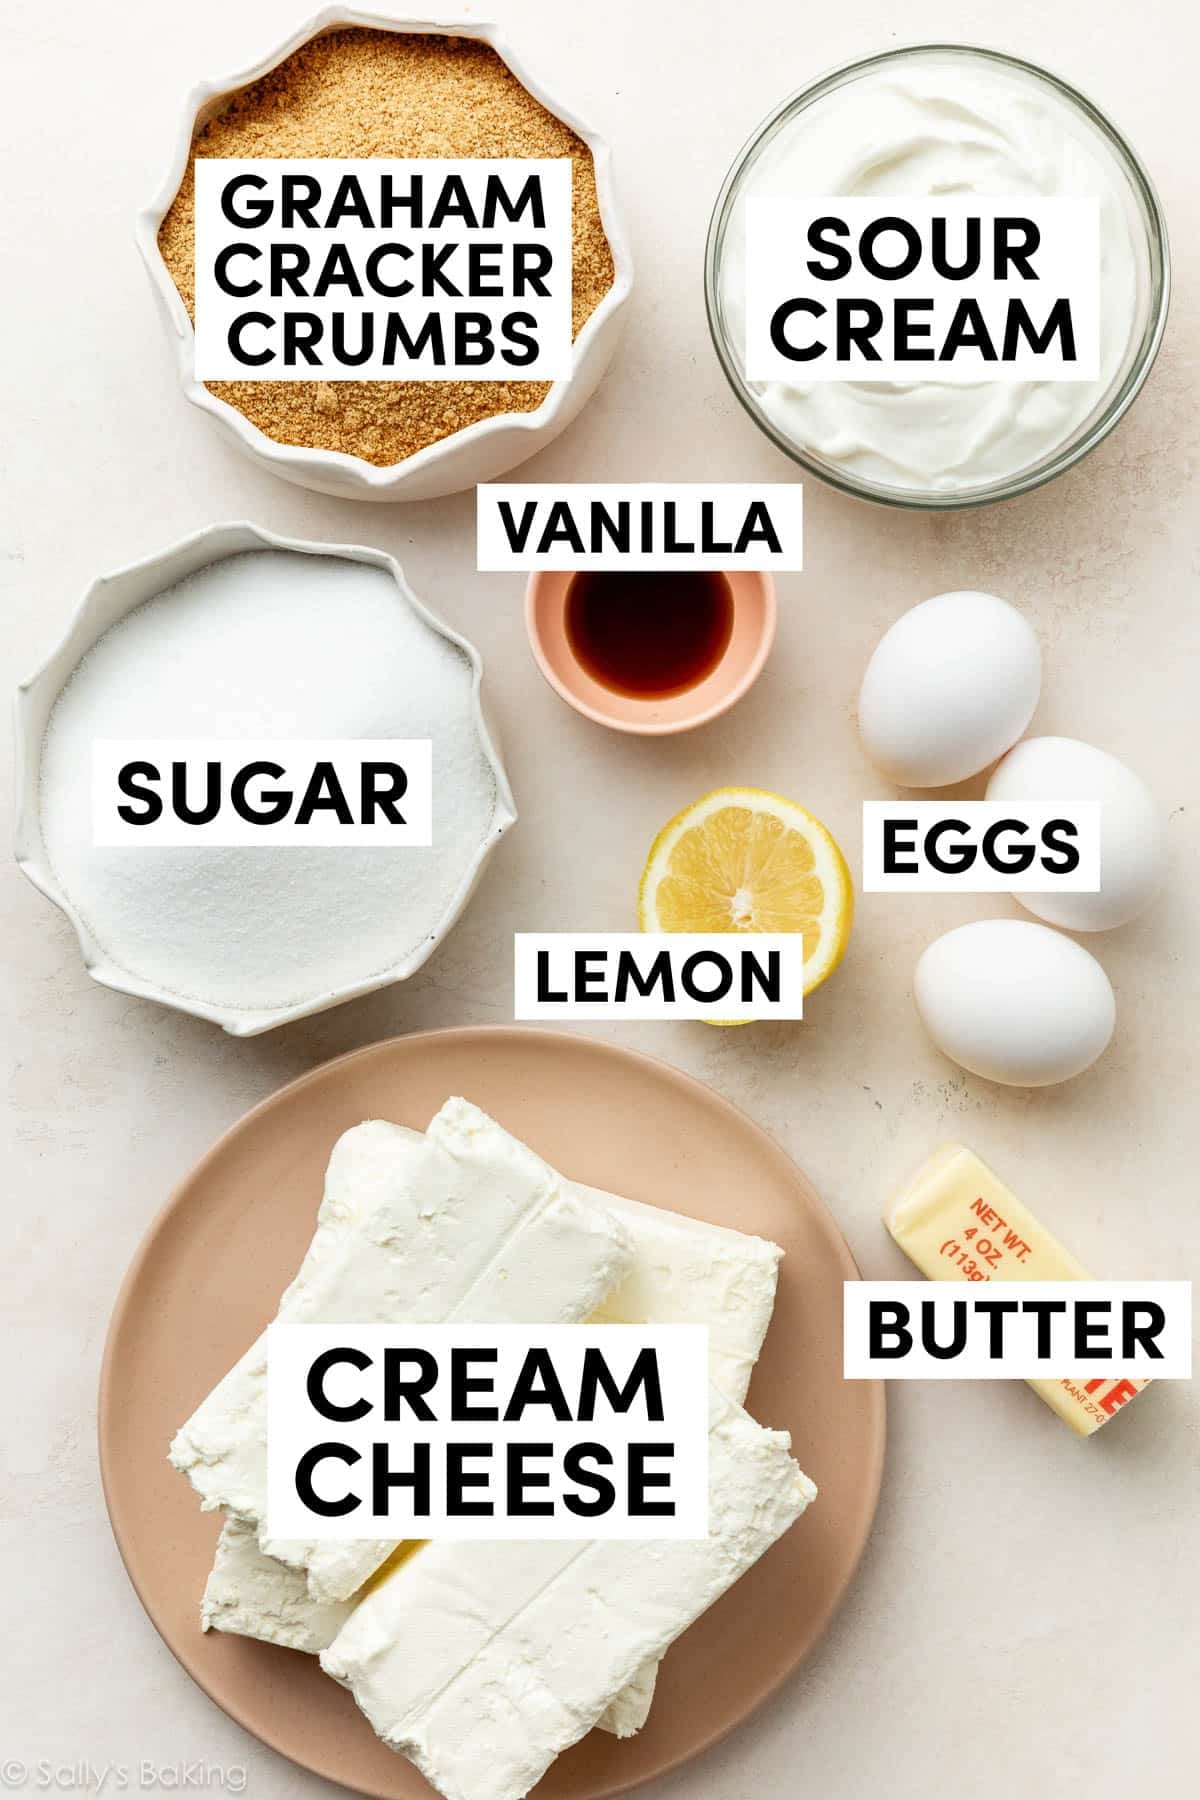
You only need a few basic staple ingredients for this cheesecake recipe.
- Brick cream cheese: Four 8-ounce bricks of full-fat cream cheese are the base of this cheesecake. That’s 2 pounds. Make sure you’re buying the bricks of cream cheese and not cream cheese spread. There are no diets allowed in cheesecake, so don’t pick up the reduced-fat variety!
- Sugar: 1 cup. Not that much considering how many mouths you can feed with this dessert. Over-sweetened cheesecake is hardly cheesecake anymore. Using only 1 cup of sugar gives this cheesecake the opportunity to balance tangy and sweet, just as classic cheesecake should taste.
- Sour cream: 1 cup. I recently tested a cheesecake recipe with 1 cup of heavy cream instead, but ended up sticking with my original (which can be found here with blueberry swirl cheesecake!). I was curious about the heavy cream addition and figured it would yield a softer cheesecake bite. The cheesecake was soft, but lacked the stability and richness I wanted. It was almost too creamy. Sour cream is most definitely the right choice.
- A little flavor: 1 teaspoon of pure vanilla extract and 2 of lemon juice. The lemon juice brightens up the cheesecake’s overall flavor and vanilla is always a good idea. Vanilla bean paste is wonderful too!
- Eggs: 3 eggs are the final ingredient. You’ll beat the eggs in last, one at a time, until they are *just* incorporated. Do not over-mix the batter once the eggs are added. This will whip air into the cheesecake batter, resulting in cheesecake cracking and deflating.
And as always, make sure all of the cheesecake batter ingredients are at room temperature so the batter remains smooth, even, and combines quickly. Beating cold ingredients together will result in a chunky, over-beaten cheesecake batter, hardly the way we want to start!
How to Make a Graham Cracker Crust
Since classic is the keyword of the day, we’re sticking with cheesecake’s main squeeze: a graham cracker crust. I reduced the butter from my original graham cracker crust recipe by 1 Tablespoon. I find this crust remains a little more crunchy. Make sure you pack the crust in tightly and pre-bake it to help prevent any sogginess.
You could use this Oreo cookie crust instead. No big changes necessary to the recipe below, but I do encourage you to lightly grease the bottom of the springform pan because Oreo crusts tend to stick. (You could also use a Biscoff pie crust instead if you’d like!)
I like to use the bottom of a small measuring cup to smooth the crust mixture into the springform pan. Speaking of, you’ll need a 9-inch or 10-inch springform pan. A springform pan has removable sides so you can safely release the cheesecake without having to flip the pan over or struggle to cut the cheesecake inside the pan. Springform pans can leak if you’re baking the cheesecake in a water bath (more on that below!), but this particular pan is reliable. I haven’t had any leaking issues.

Cheesecake Water Bath
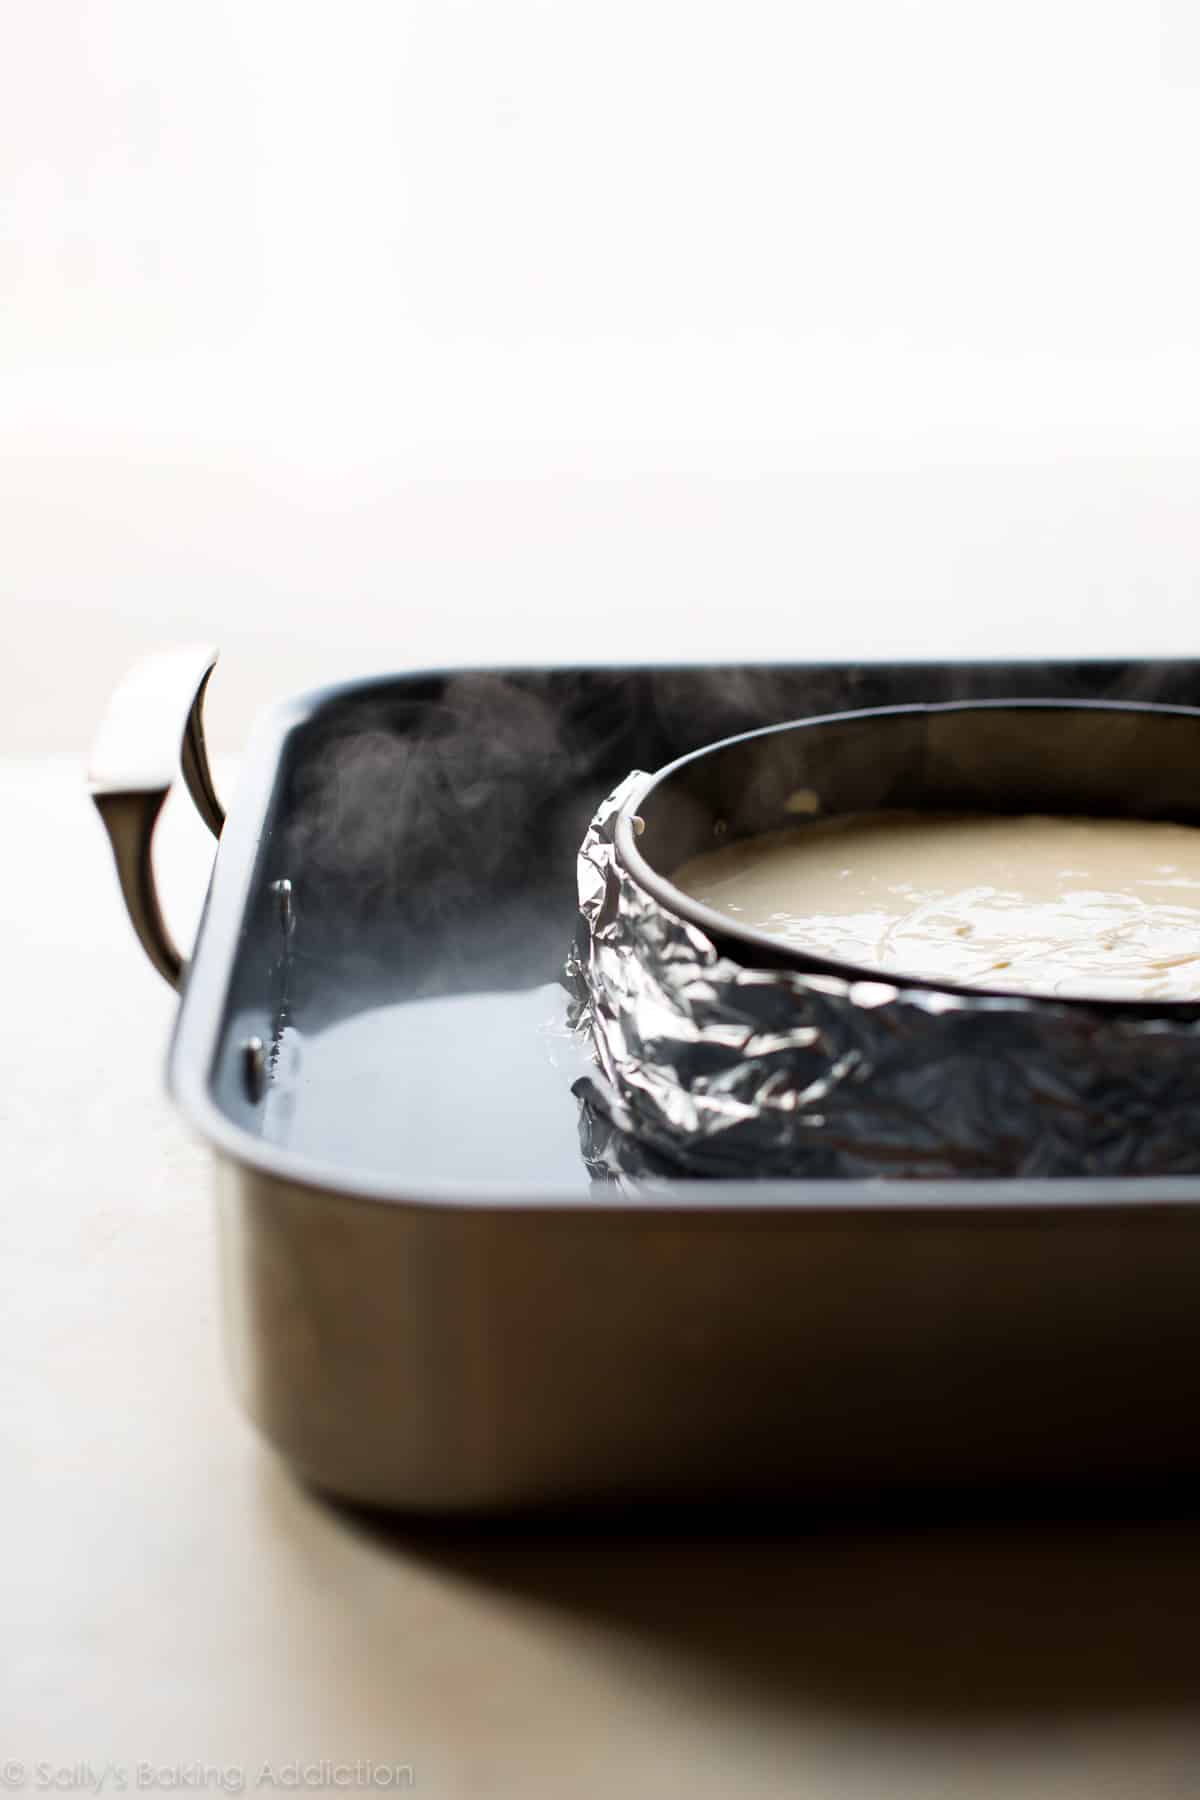
I promise a water bath is nothing complicated. All you’re doing is placing the springform pan in a roasting pan, filling it with hot water, and baking. What’s the point, you ask?
- I actually have an entire post and video tutorial for How to Make a Cheesecake Water Bath.
Cheesecake loves a humid environment. The steam from the hot water will lift the cheesecake up slowly and evenly, reducing the risk of cracks on the surface. Additionally, this slow and even baking method helps prevent the cheesecake from sinking back down as it cools. Taking a few extra minutes to prepare a water bath for this cheesecake recipe is well worth it.
Yes, but I don’t recommend it. A water bath creates a humid environment that helps the cheesecake bake gently and evenly. If you skip it, expect a slightly drier texture, browned surface, and there’s a higher chance it will crack.
Cheesecake is done when the edges are set and the center still has a slight wobble. All ovens are different, so this can take anywhere from 55 to 70 minutes.
Yes! Cheesecake is a wonderful make-ahead dessert because it needs to chill in the refrigerator for several hours and up to 2 days. You can also freeze it; see detailed instructions below.
Cooling & Chilling Cheesecake
In addition to using a cheesecake water bath, another way to help prevent cheesecake cracks is to let it cool slowly, starting inside the oven. When the cheesecake is done baking, turn the oven off, crack open the oven door, and leave the cheesecake inside for 1 hour. A drastic and sudden change of temperature isn’t ideal for cheesecake—from hot oven to cool counter—so do your best to control the environment by leaving the cheesecake inside. Does this make sense?
After the cheesecake cools in the oven for 1 hour, place it on the counter to cool completely to room temperature. After it’s cool, chill it in the refrigerator for at least 4 hours or even overnight. There’s no greater test to your willpower than those hours you’re forced to wait as the cheesecake cools down and then chills in the refrigerator. But when you take that first bite, every minute you waited will be completely worth it!
For a quicker, easier alternative to making a classic cheesecake, try this cheesecake pie or pumpkin cheesecake pie. Or if you want to completely skip the baking and cooling process, try my no-bake cheesecake instead.
4 Success Tips for This Cheesecake Recipe
To summarize the above, here are the key tips:
- Start with room-temperature ingredients.
- Do not over-mix the cheesecake batter.
- Bake in a water bath.
- Leave cheesecake in the cooling oven for 1 hour, then cool completely at room temperature.
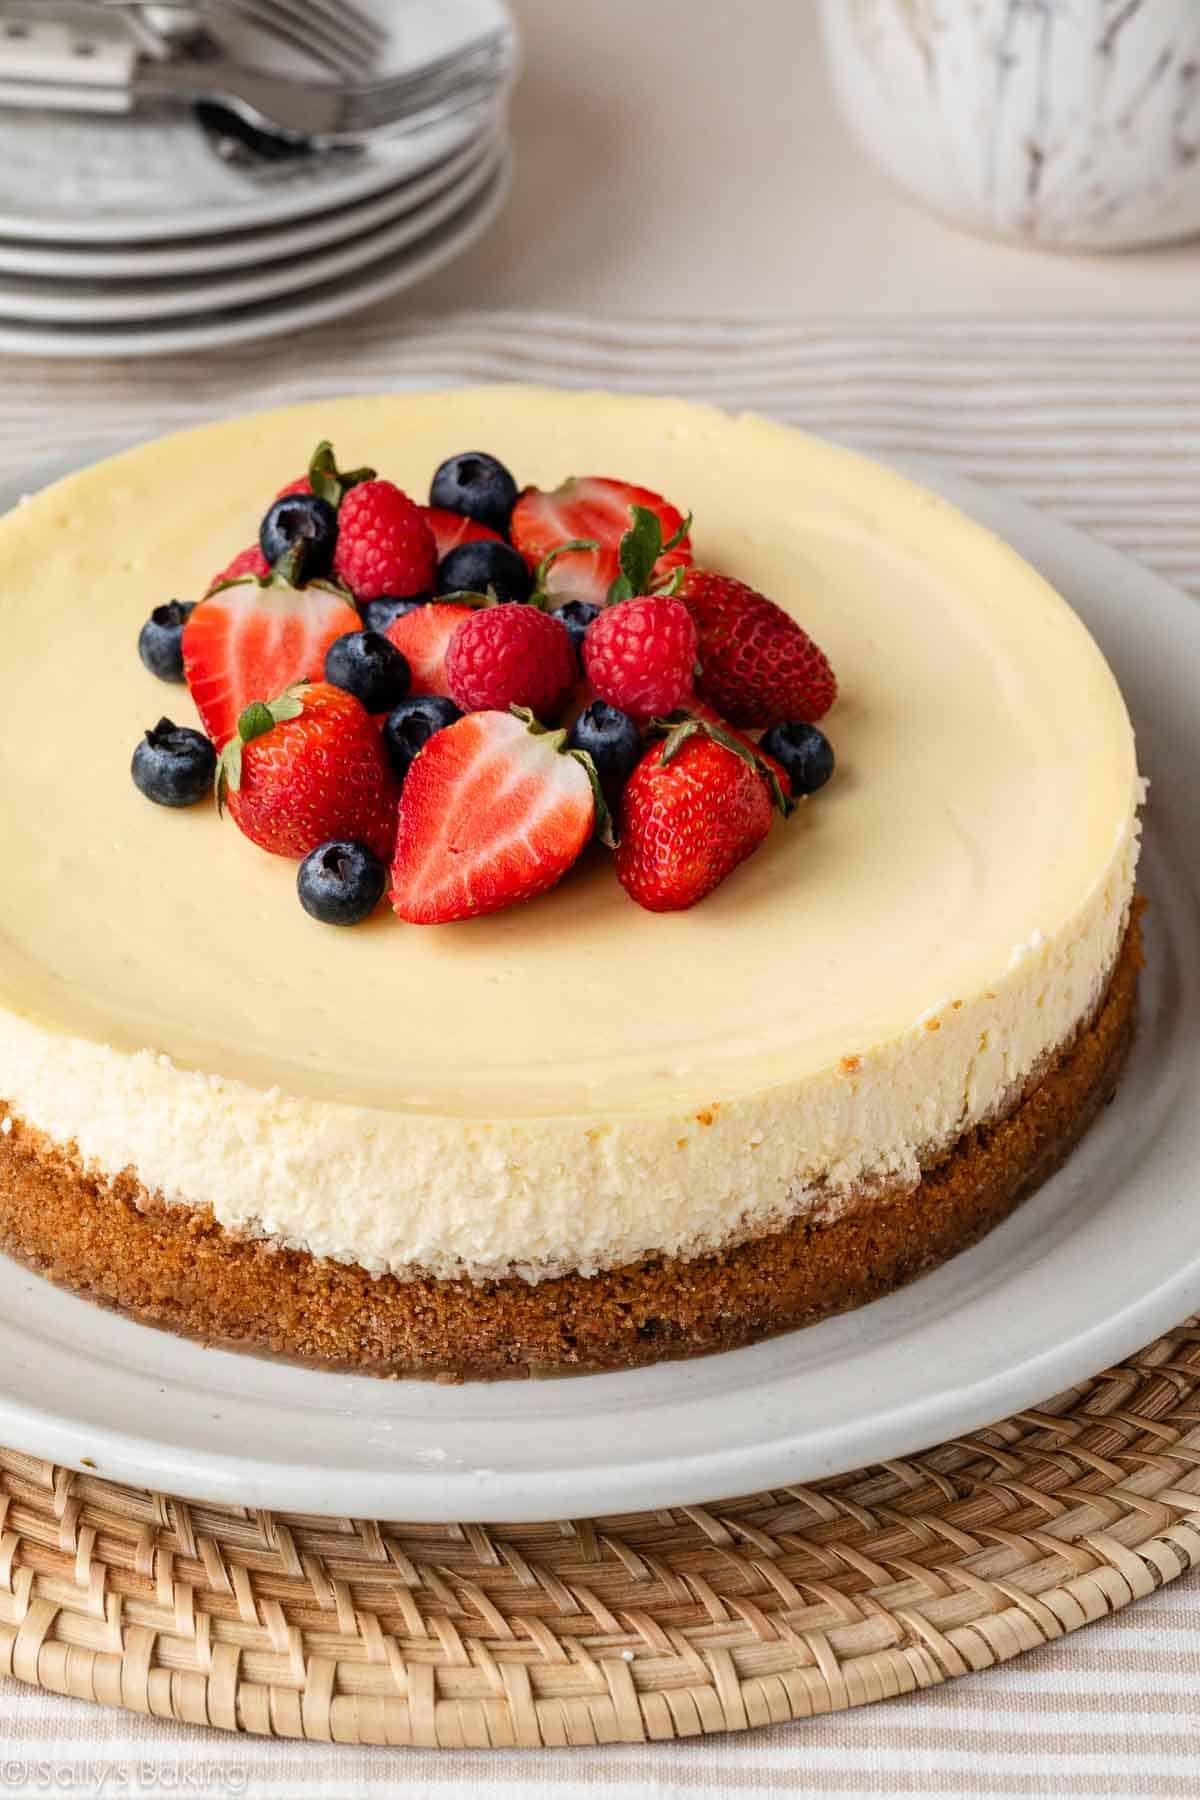
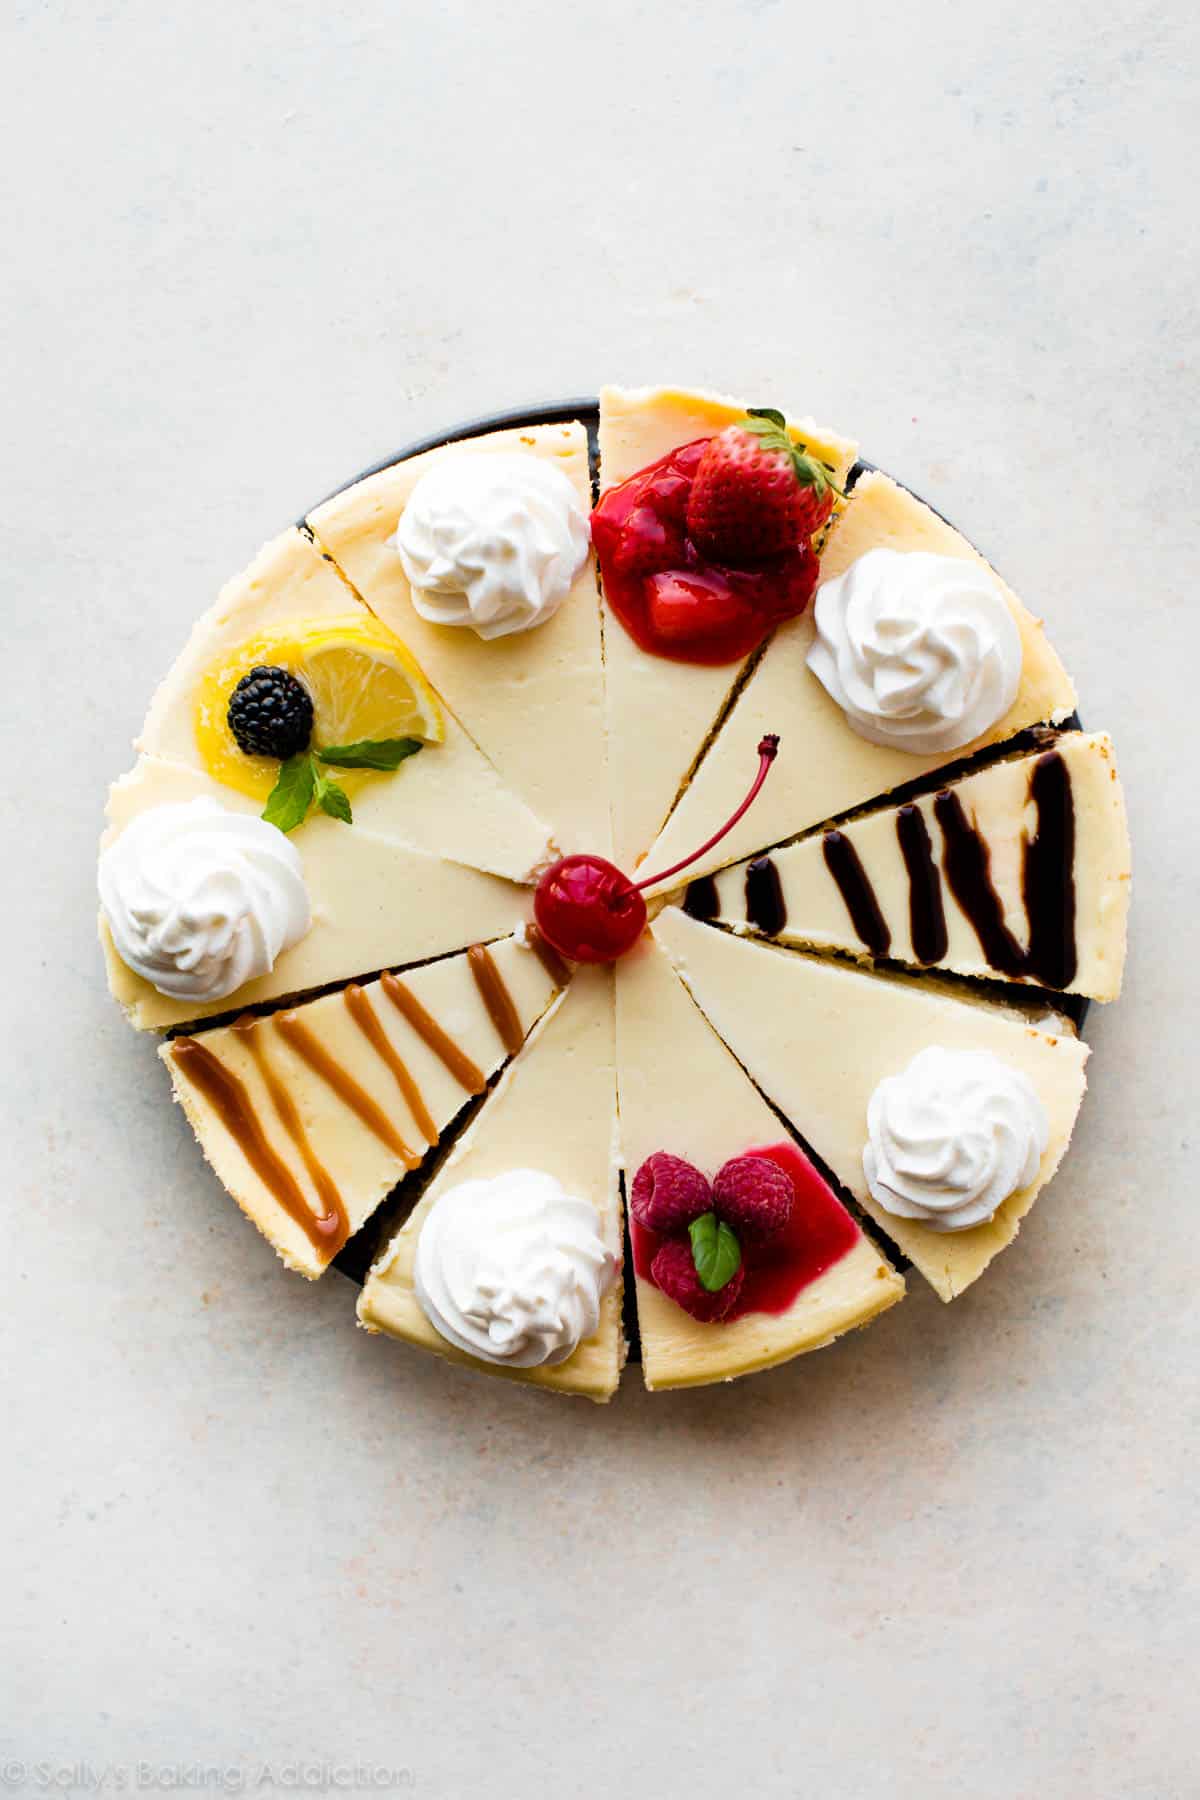
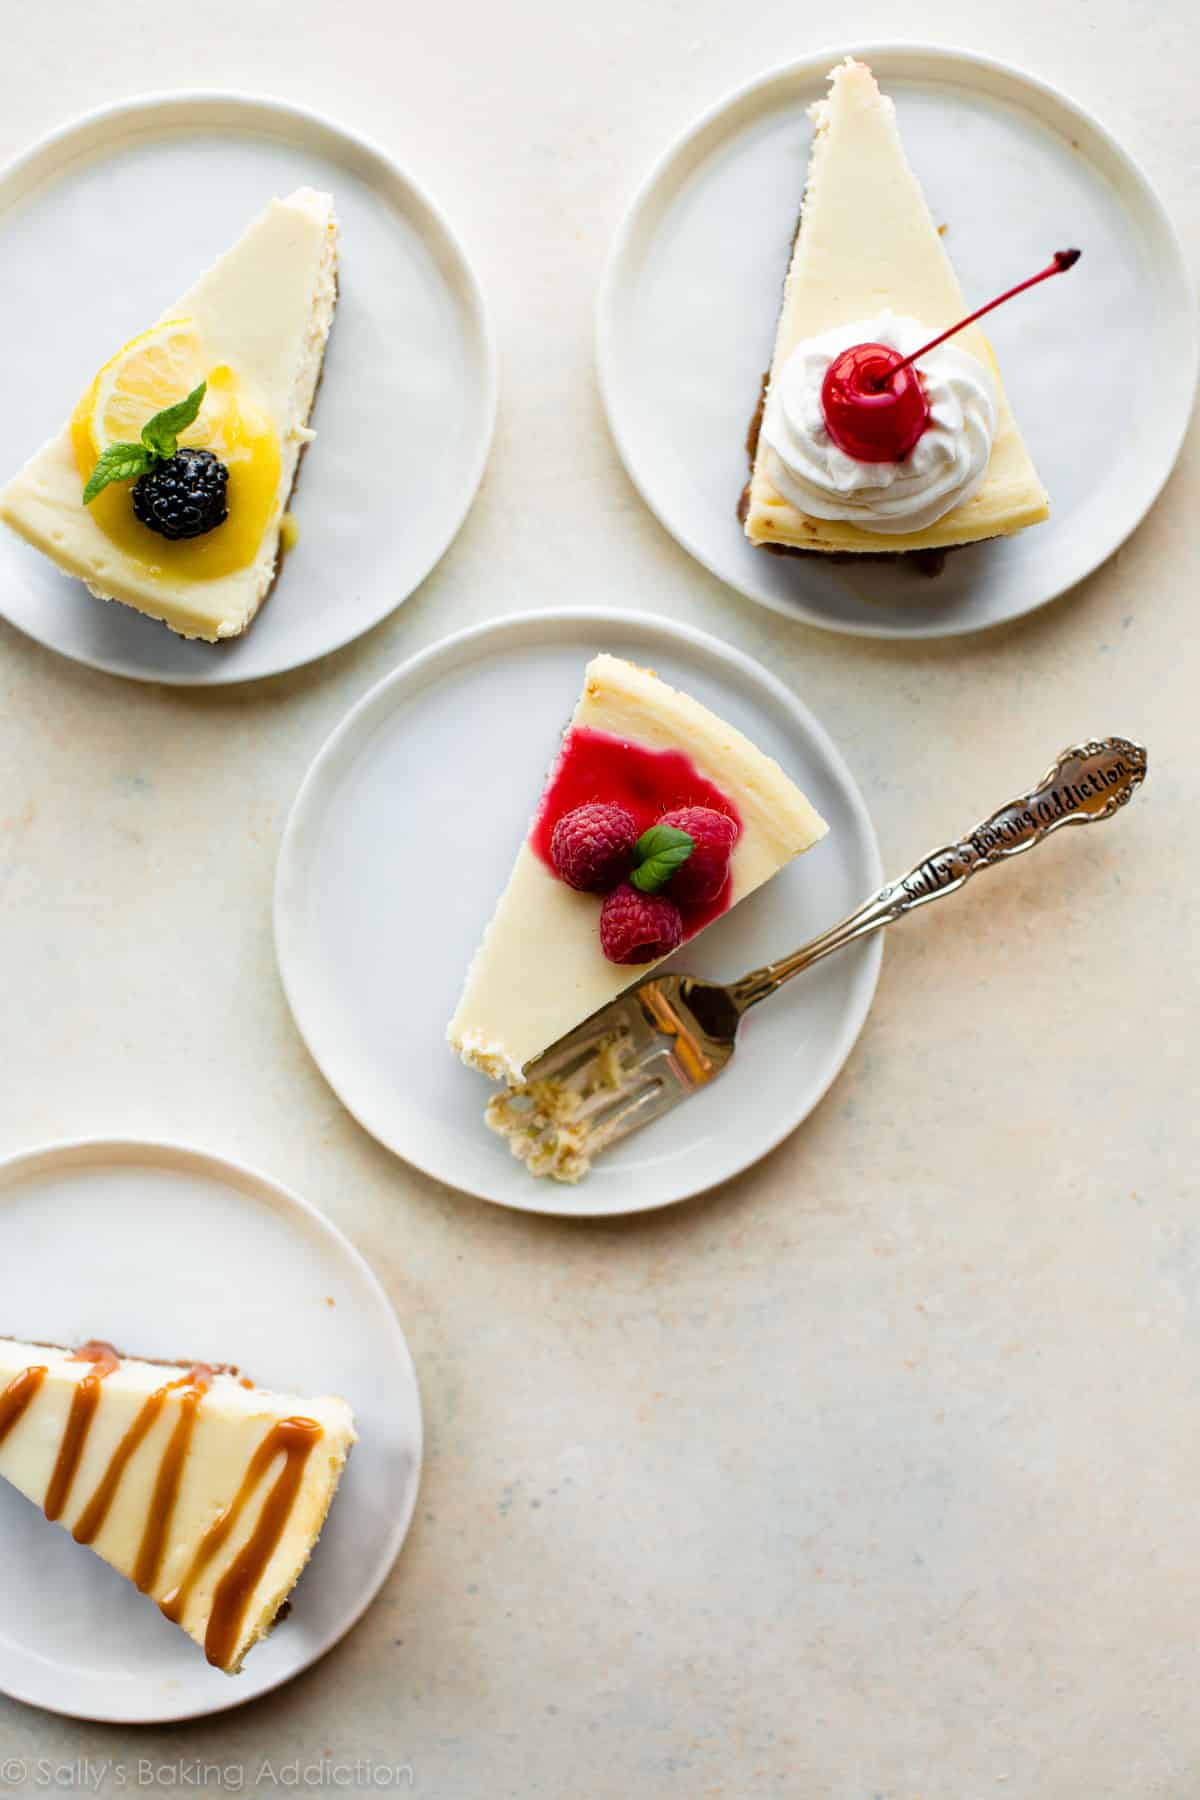
Cheesecake Toppings
Enjoy your velvet-rich cheesecake as is, or get a little fancy with a selection of toppings. Here are some recommendations:
Get creative or keep it simple. Either way, it’s going to impress.
And if you’re really looking to take your cheesecake to the next level, check out my pecan pie cheesecake, cinnamon swirl cheesecake, or caramel apple cheesecake pie.
How to Freeze Cheesecake
- Cool the cheesecake on the counter before freezing. No need to chill it in the refrigerator.
- How to freeze cheesecake on the springform pan: Remove the outer rim from the springform pan. Wrap the cheesecake with the bottom of the pan with a few layers of plastic wrap, then a final layer of aluminum foil.
- How to freeze cheesecake without the springform pan: After the cheesecake has completely cooled, run a sharp knife underneath the crust to release it from the bottom of the pan. Carefully slide it onto a parchment paper–lined piece of cardboard or use a freezer-safe plate. Wrap it all in a few layers of plastic wrap, then a final layer of aluminum foil.
- Freeze cheesecake for up to 3 months, then thaw overnight in the refrigerator before serving.
- Do not freeze cheesecake with any toppings. Add toppings just before serving the thawed cheesecake.
Classic Cheesecake Recipe
- Prep Time: 45 minutes
- Cook Time: 1 hour
- Total Time: 7 hours, 45 minutes (includes chilling)
- Yield: serves 12-16
- Category: Dessert
- Method: Baking
- Cuisine: American
Description
Look no further for a creamy and ultra smooth classic cheesecake recipe! Paired with a buttery graham cracker crust, no one can deny its simple decadence. For the best results, bake in a water bath. This recipe is also in my cookbook, Sally’s Baking 101.
Ingredients
Graham Cracker Crust
- 1 and 1/2 cups (180g) graham cracker crumbs (about 12 full-sheet graham crackers)
- 1/4 cup (50g) granulated sugar
- 5 Tablespoons (71g) unsalted butter, melted
Cheesecake
- 32 ounces (904g) full-fat brick cream cheese, softened to room temperature
- 1 cup (200g) granulated sugar
- 1 cup (240g) full-fat sour cream, at room temperature
- 1 teaspoon pure vanilla extract
- 2 teaspoons fresh lemon juice (optional, but recommended)
- 3 large eggs, at room temperature
Instructions
- Adjust the oven rack to the lower-middle position and preheat oven to 350°F (177°C).
- Make the crust: If you’re starting out with full graham crackers, use a food processor or blender to grind them into fine crumbs. Pour into a medium bowl and stir in the sugar until combined, and then stir in the melted butter. Mixture will be sandy. Try to smash/break up any large chunks. Pour into an ungreased 9-inch or 10-inch springform pan. With medium pressure using your hand, pat the crumbs down into the bottom and partly up the sides to make a compact crust. Do not pack down with heavy force because that makes the crust too hard. Simply pat down until the mixture is no longer crumby/crumbly (you can use the flat bottom of a small measuring cup to help smooth it out if needed). Bake for 10 minutes. Remove from the oven and set aside while you prepare the filling.
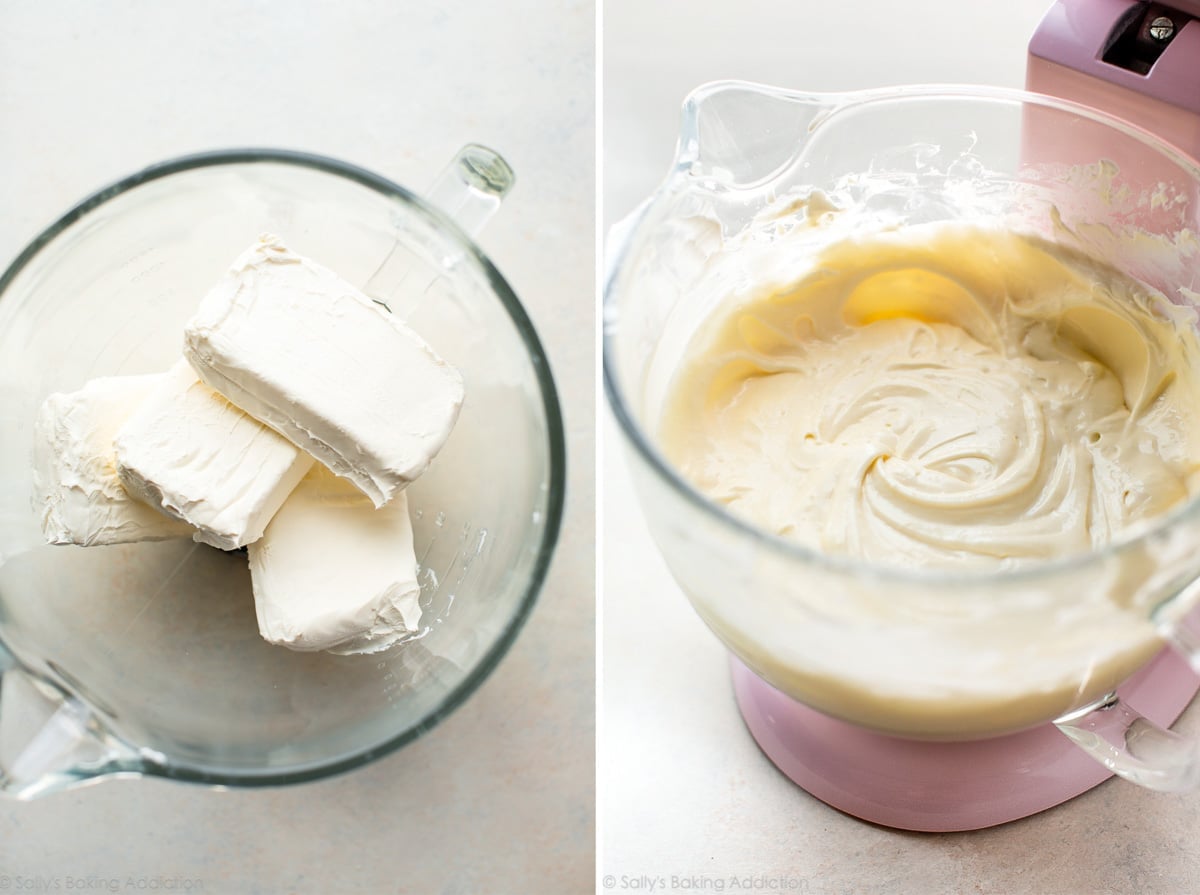
- Make the filling: In a large bowl using a handheld or stand mixer fitted with a paddle attachment, beat the cream cheese and granulated sugar together on medium-high speed until the mixture is smooth and creamy, about 2 minutes. Add the sour cream, vanilla extract, and lemon juice and beat until fully combined. With the mixer on medium speed, add the eggs one at a time, beating after each addition until just combined. Stop the mixer as soon as the final egg is fully incorporated into the batter; over-mixing can cause the cheesecake to deflate. You will have nearly 6 cups of batter.
- Prepare the simple water bath (see Note): (If needed for extra visuals, see How to Make a Cheesecake Water Bath; the visual guide and video will assist you in this step.) Boil a kettle/pot of water. You need 1 inch of water in your roasting pan for the water bath, so make sure you boil enough. I use an entire kettle of hot water. As the water is heating up, wrap 1 or 2 sheets of heavy-duty aluminum foil around the springform pan—be careful if it’s still warm from baking the crust! Place the wrapped springform pan inside of a large roasting pan. Pour the cheesecake batter on top of the crust. Use a spatula to smooth it into an even layer. Carefully pour the hot water inside of the pan and place in the oven. (Or you can place the roasting pan in the oven first, then pour the hot water in—whichever is easier for you.)
- Bake the cheesecake for 55–70 minutes or until the center is almost set. If you notice the cheesecake browning on top, tent it with aluminum foil halfway through baking. When it’s done, the center of the cheesecake should still slightly wobble if you gently tap or shake the pan. Turn the oven off and open the oven door slightly. With the door ajar, let the cheesecake sit in the oven in the water bath as it cools down for 1 hour. After 1 hour, remove from the oven and water bath, discard the foil, and place the springform pan on a cooling rack to cool completely at room temperature. When it has cooled, cover and refrigerate the cheesecake for at least 4 hours or up to 2 days.
- Run a knife around the edges of the springform pan to help loosen the cheesecake, then remove the outer rim. Using a sharp knife, cut into slices for serving. For neat slices, wipe the knife clean and dip it into warm water between each slice.
- Serve cheesecake with desired toppings (see Note). Cover and store leftover cheesecake in the refrigerator for up to 4 days.
Notes
- Make-Ahead Instructions: This cheesecake can be made the day before. It has to chill for quite some time before serving. See step 5. Another way to make this cheesecake ahead of time is to freeze it. Cheesecake can be frozen for up to 3 months. See instructions in blog post above.
- Special Tools (affiliate links): Food Processor | Glass Mixing Bowl | 9-inch Springform Pan or 10-inch Springform Pan | Electric Mixer (Handheld or Stand) | Roasting Pan | Silicone Spatula
- Oreo Cookie Crust: Feel free to replace the graham cracker crust with this Oreo cookie crust. Spray bottom of springform pan with nonstick spray, as Oreo cookie crusts tend to stick. Pre-bake the crust, just as you do with the graham cracker crust in step 2 above.
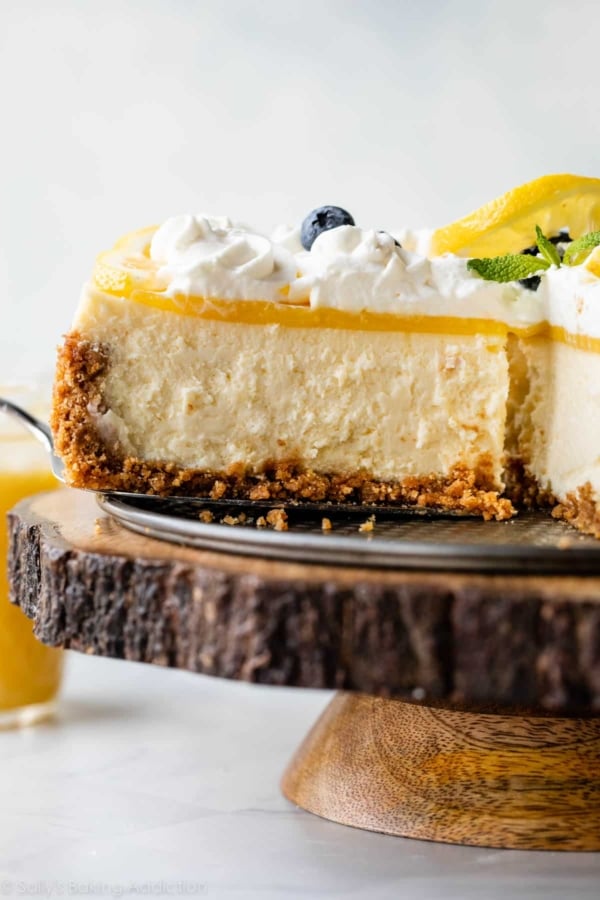
- Toppings: One of my favorite toppings for this cheesecake is raspberry sauce. Or you could top the baked and cooled cheesecake with salted caramel, lemon curd, strawberry topping, chocolate ganache, red wine chocolate ganache, fresh fruit, or whipped cream. The topping from my pecan pie cheesecake is also an option!
- Alternate Water Bath Method: This method works as well, and you don’t have to bake the cheesecake IN water. Boil a kettle or pot of water. You need 1 inch of hot water in your roasting pan for the water bath, so make sure you boil enough. Place the cheesecake on the center oven rack of the preheated oven. Place a large metal baking or roasting pan (do not use glass—I usually use a 9×13-inch baking pan or an extra-large cast iron skillet) on the bottom rack. Pour boiling water into the empty pan, about 1 inch deep. Immediately close the oven door to trap the steam inside. This unique water bath adds steam to the oven without having the cheesecake sit inside the water itself. No need to wrap the springform pan in foil. See How to Make a Cheesecake Water Bath for more information.
- Room-Temperature Ingredients: Bring all cold ingredients to room temperature before beginning. Room-temperature ingredients combine quickly and evenly, so you won’t risk over-mixing. Also, beating cold ingredients together will result in a chunky cheesecake batter, hardly the way you want to begin!
- Non-US Readers: Don’t have graham crackers where you live? Use 200g ground digestive biscuit crumbs (about 2 cups; 13–14 biscuits), 1/3 cup (67g) granulated sugar, and 6 Tablespoons (85g) melted butter. Pre-bake the crust for a bit longer, about 12–14 minutes. And from what I understand, spreadable cream cheese sold in a tub in countries outside of the US is a little different from the spreadable cream cheese in the US. It’s thicker, sturdier, and more solid and should be OK for this recipe. I have no experience with it, but this is what I’ve heard from other non-US readers. If you try it, let us know how it turns out!


Reader Comments and Reviews
What if you don’t use the water bath what will happen
Hi Caleb, using a water bath helps to prevent cracks in cheesecake. You can read more about water baths here, or see recipe notes for a water bath alternative.
This came out delicious! Despite doing the water bath and in-oven cool down method mine had quite a few cracks but I don’t really care about presentation as long as it tastes good. I also overbaked mine a little since it was my first cheesecake and I wasn’t sure much jiggle it should have, but the browning on top actually looked nice and didn’t affect flavor. Will try again with a shorter bake time and perhaps more water in the water bath.
I just put my cheesecake in the oven. This is probably the 5th or 6th time that I have made it. I follow the recipe exactly and it always comes out perfect. Tomorrow is my son’s 21st birthday and this was the cake that he chose. Thanks so much for this amazing recipe!
Loved the recipe and turned out amazing. What’s the nutritional info on this cheesecake?
Hi Veronica, We don’t usually include nutrition information as it can vary between different brands of the same ingredients. Plus, many recipes have ingredient substitutions or optional ingredients listed. However, there are many handy online calculators where you can plug in and customize your exact ingredients/brands. Readers have found this one especially helpful: https://www.verywellfit.com/recipe-nutrition-analyzer-4157076 We’re so glad to hear you loved the cheesecake!
I’m making mothers day dinner and dessert. I was wondering I could make the crust the day before so that I have less work to do on mothers day. Will it taste different depending on ow long i cool the crust?
Hi Chloe, that should work, but you can also make the whole cheesecake the day before! See make ahead instructions in the notes. Enjoy!
This recipe is so good and creamy! I’ve done a raspberry sauce swirl in one, a strawberry sauce swirl and an Oreo crust with some Oreos in the filling. Today I am going to make a banana pudding version and a coffee Heath bar one. Thank you for the wonderful recipe!
Hi, thank you so much for the recipe. What’s the optimal oven setting that you recommend for this cheesecake? Fan on?
Hi Maya! We always recommend conventional settings for baking (not convection/fan). The flow of air from convection heat can cause baked goods to rise and bake unevenly and it also pulls moisture out of the oven. If you do use convection/fan settings for baking, lower your temperature by 25 degrees F and keep in mind that things may still take less time to bake.
I didn’t have a spring pan. Just made this in a 9.5 inch round glass pie dish. I had left over filling i just saved however i did still use the water pan underneath the cake. I did about 45-50 mins
I’d like to substitute the sugar for honey. Any suggestions on how to do this? I assume I would have to adjust the liquid to compensate? Thanks!
Hi Will, we haven’t tried this recipe with honey – it may take some testing to get right. Let us know if you do!
Please can you provide a recipe for a baked Pistachio Cheesecake?
Hi Safira, we haven’t tested a pistachio cheesecake recipe, but let us know if you give anything a try!
This recipe is fantastic. I wanted to try an orange-flavored cheesecake (think Creamsicle vibes), so I subbed one of the tsp of lemon juice with orange juice and added the zest from two large naval oranges to the batter. Followed the baking instructions to the letter and no cracks at all! I topped with with sliced of candied oranges (first time I ever made those). Everyone at our Easter dinner went nuts over it, and agreed it was the best cheesecake they had ever had. Thanks, Sally!
If I don’t have unsalted butter can I use salted?
Hi Mel, you can use salted butter if needed.
I’ve made cheesecake a number of times. This is my first time with this recipe. I used a 10 inch pan, so I actually made a bit more crust crumbs to compensate because it looked a bit lacking and I wanted some up the sides.
After doing this, I realized I didn’t have a large enough roasting pan for my 10 inch! So I frantically tried to figure out how to bake without a water bath. I found the tips on the pan with water and settled on that. I had already covered the pan with foil, which I left on. Btw – I use crème fraiche instead of sour cream and I understand it has a higher fat content but I do do this every time I bake a cheesecake so not sure if that’s causing the issue below.
The cheesecake looks great, and I’m fairly certain it was fully baked. But once it cooled and I removed the foil, there was a lot of runny oil/grease in the foil and under the pan. It basically looks like melted butter or broken dairy. I’m kind of scared to cut into it since it’s for a birthday party! Any thoughts? It does look really nice, so I think it’s okay?! Hoping just from the crust and maybe this always happens but I don’t notice it due to the water bath?
Hi JB! That grease under the pan is likely just butter that seeped out of the crust when baking. We hope this classic cheesecake is a hit!
PERFECTION!!!!! I have made this recipe several times. I have done various types pumpkin, banana, coffee (just added tbsp instant coffee), pineapple (added TBSP pineapple extract to classic recipe and crushed pineapple topping),lemon (Just added Tablespoon extract), and sugar free(using monk fruit granulated as a granulated substitute. the pumpkin one I used one cup of puree of pumpkin and 1 tbsp pumpkin pie spice in place of sour cream, or one cup of mashed bananas for the banana. Garnish top accordingly, I used shaved dark chocolate on the coffee. I put candy corn on top of the pumpkin. sliced pineapple and lemon and the sugar free versions used monk fruit for the various fruit syrup types.
What great ideas! I can see some of these I my future! Thanks for sharing!
This is definitely my go to cheesecake recipe, everyone loves it. I was wondering if i could bake this in a 9×13 pan for cheesecake bars? Would i need to double it? What would be the bake time?
Hi MJ, We haven’t tested this recipe as bars in a 9×13 inch pan but you can use our white chocolate raspberry cheesecake bars as a guide for baking times. See the recipe notes for directions using a 9×13 inch pan size.
Great recipe. I’ve made it 3 times now… with a couple small tweaks. The pointers and attention to the details are nice too. Highly recommend.
I have made this recipe many times and ALWAYS turns out perfectly!
My go to !
Hi there, so excited to try this recipe! I’m going to bake it outside of the water bath, with a pan of water underneath. In this case, should I still wrap the spring form pan in foil? Thanks!
Hi Olivia! You can skip wrapping the pan in foil for the alternate water bath method.
I thought I had ruined the cheesecake when I found moisture in the tin foil but it turned out perfect. The whole family said it was the best cheesecake ever. I will make this again with your suggestion to put a pan of hot water on rack below instead if immersing it right in the water bath. Thanks Sally you make baking easy and fun!!
I made this baked cheesecake, followed directions but when I took it out of the oven after leaving it for the hour and removed the foil there was moisture in the foil. I made it for my granddaughters birthday today. I haven’t taken it out of the spring pan yet to decorate it so hoping it’s not ruined. What did I do wrong???
Hi Leslie, It shouldn’t be ruined. The crust may taste a little moist but it’ll blend right into the cheesecake filling. Next time instead of baking the cheesecakes directly in a water bath, you could try placing a large pan of hot water on the rack beneath the baking cheesecake instead (detailed in the recipe notes). This should help any leaking issues!
This is such a good recipe. I haven’t had any trouble with cracking the few times I’ve made it. But if someone sees this and could advise…if I wanted to make a banana-flavored version of this…what would I add? I want to get a “banana pudding” vibe. I’m not confident enough to just dump banana pudding mix into the recipe. Should I get a banana extract? Any advice would be helpful 🙂
Hi Erin, we’re so thrilled to hear that you love this cheesecake recipe. We’ve never tested a banana version before so can’t offer much advice. Banana extract would be the best choice to add without changing the consistency of the filling. Maybe you could do a banana pudding or fresh bananas with whipped cream as a topping. Let us know what you try!
Hi! Can i swirl in the raspberry sauce before baking it?
Hi Sha, yes! we like to swirl in the sauce from these white chocolate raspberry cheesecake bars.
I will honestly never make another cheesecake thanks to this post. Sometimes I put another brick of cheese, sometimes I add a little more sour cream, sometimes my crust is a little thicker (depends on the level of my depression). But, none the less, this is my go-to, die hard, $50 cheesecake.
I’d really love to try this recipe out for my friend’s birthday but I’m wondering what sort of adjustments I should make if I’m planning on using vegan cream cheese and vegan sour cream? Still using eggs, just no dairy. Any tips or advice would be so appreciated 🙂
Hi Andrea, we’ve never tested vegan substitutes in this cheesecake recipe. Let us know how it goes!
How would you suggest making it strawberry with strawberry extract? Replace the vanilla or just add a tbs of strawberry to the current recipe. My 8 year old niece wants strawberry flavor cheese cake as her birthday cake.
Hi Shaun, We would add it with the vanilla. Enjoy!
I tried this recipe but it turned out sour. What could be the reason behind this?
Hi Kristen, You could try to use full fat plain or Greek yogurt in the place of sour cream if you try this recipe again.
I was amazed that my cheesecake turned out like a professional, and I swear the best cheesecake I have ever tasted.
I have never made cheesecake before so I appreciated all of the little tips. Also, I did not have sour cream available so I used heavy cream and just baked it a little longer. The cake was firm.
I love this recipe! I tried it for the very first time and it was a great hit. Wanted to know if I wanted to make 2 x 6” cakes (springform pan) what would the measurements be or how can I do the conversions?
Hi Gladys, this batter should divide evenly between two 6 inch springform pans. We have not tested it this way so we’re unsure of the bake time.
How long do you cook it? I looked through the whole page, and never saw a cook time.
Hi Marty, are you viewing the recipe? It’s in a gray box and you can get there quickly and bypass the step photos by using the Jump to Recipe button. Step 5 includes the baking time– 55-70 minutes. The center of the cheesecake should slightly wobble if you gently shake the pan.
I made the recipe exactly and its my first time attempting to make a cheesecake. Its still in the springform pan as I write this. I can tell already that I wished you had mentioned to grease the pan. I am pretty sure its going to stick. I loved all the other tips and tricks. Cant wait to taste it!
Hi Jill! There shouldn’t be any need to grease the pan. Hope you love the cheesecake!
Most of the time it may look as if it will stick but just make sure you release it slowly it should stay together
I have baked this so many times with absolutely a wonderful outcome every time!!!
I’d love to try this recipe but I only have an 8″ pan. Any suggestions for modification?
Hi Annie, There is too much batter for an 8 inch pan. You can make the recipe as written and use extra batter for some mini cheesecakes though!