

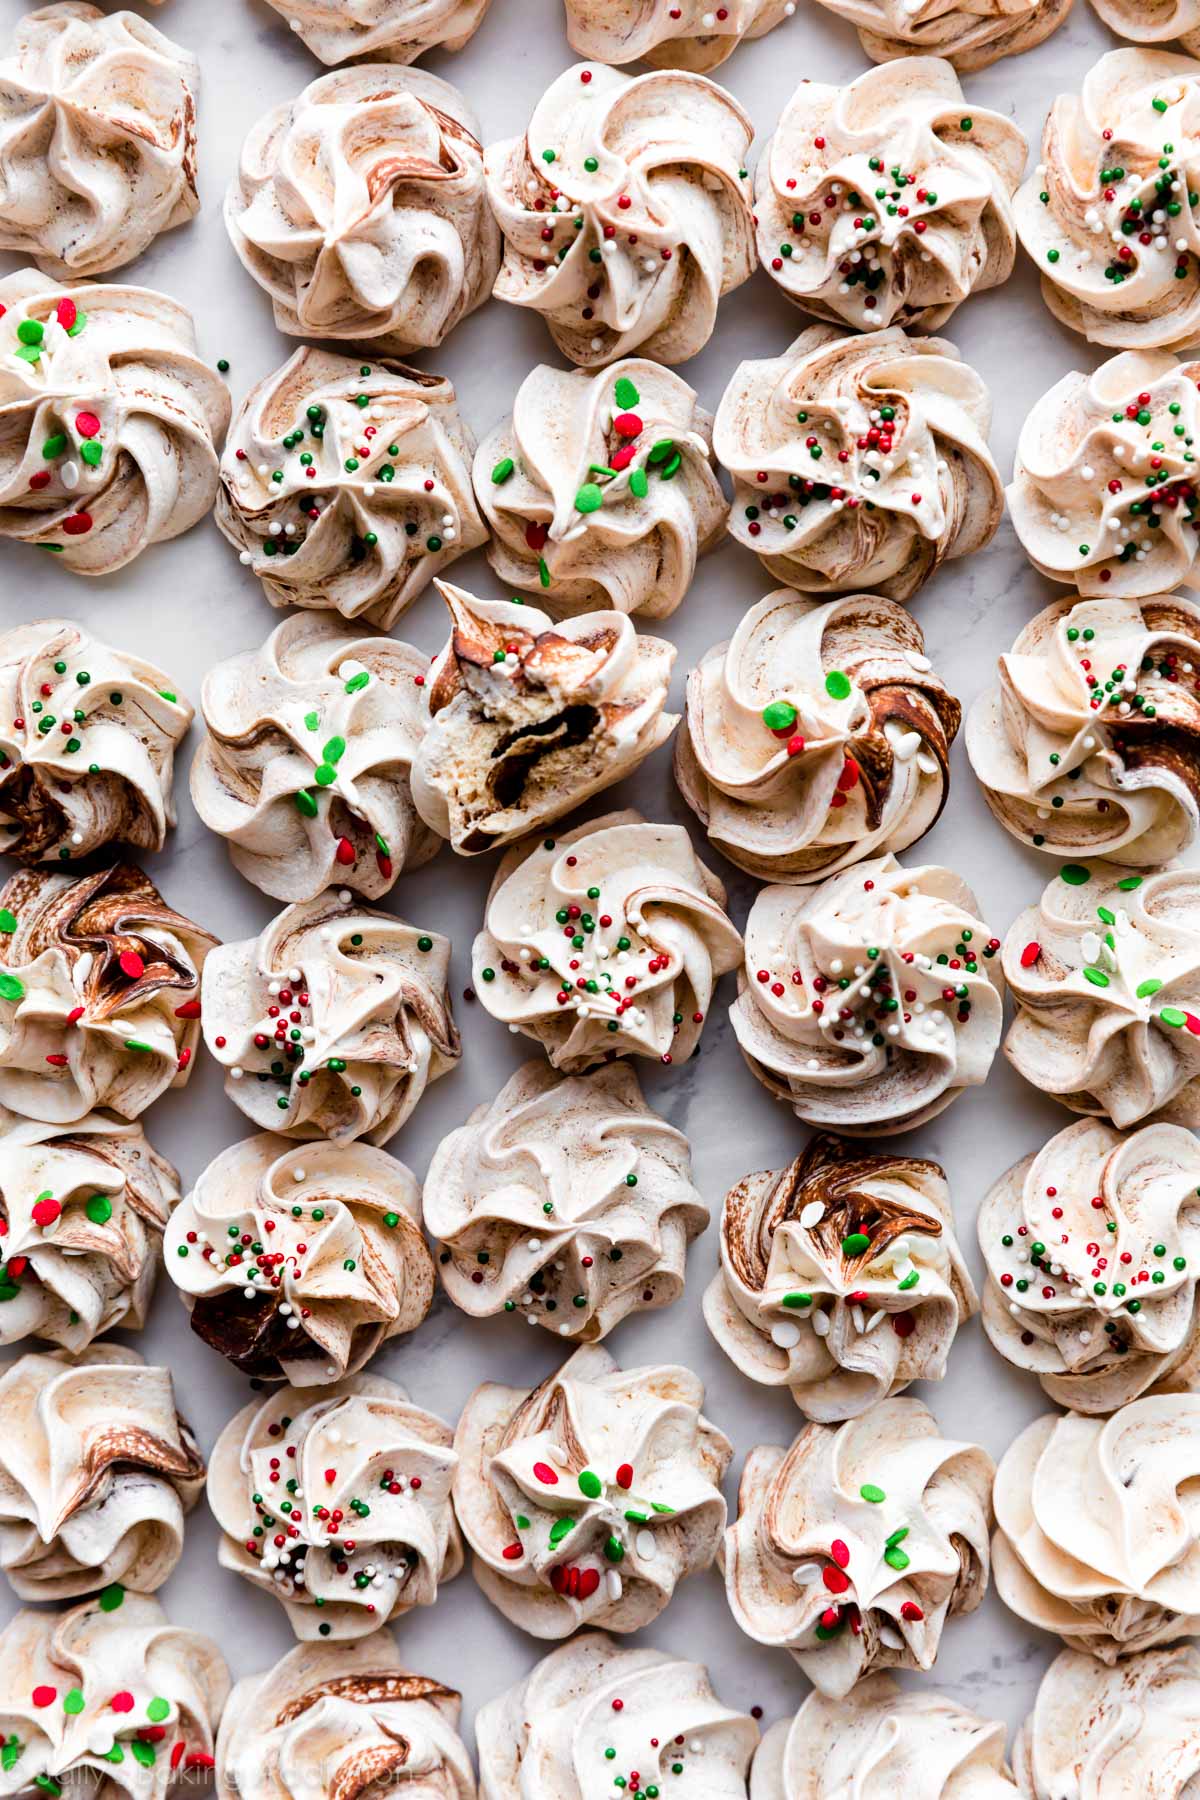
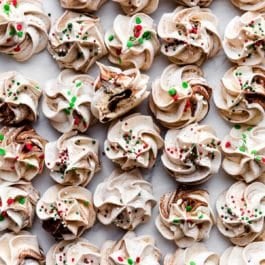
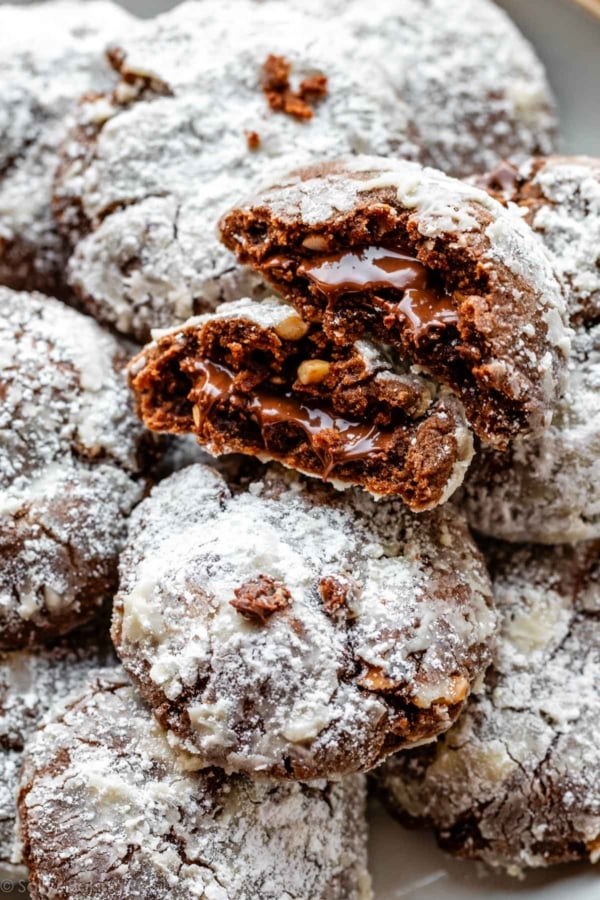
These chocolate swirled meringue cookies are made from just 5 ingredients. Delightfully crisp on the outside with a melt-in-your-mouth texture inside, these naturally gluten free chocolate meringues are simply irresistible. Follow the recipe closely because these require precision. Use my video tutorial, step-by-step photos, and success tips as your guide.
This recipe is part of my annual holiday cookie countdown called Sally’s Cookie Palooza!
What are Meringues?
Though they’re enjoyed throughout the year, meringues are extra special on holiday cookie trays. Made mostly from egg whites and sugar, meringue cookies are piped onto baking sheets and baked at a low temperature for a considerably longer time than most other cookie recipes. The low temperature guarantees the shaped meringues won’t immediately melt. Rather, they’ll crisp up on the edges while remaining puffy, light, and cloud-like in the centers. Think of a meringue cookie as an extra mini pavlova. Perfect for tea parties, paired with coffee or hot chocolate, and lovely as a decoration on cakes! 🙂 They’re also a gluten free dessert recipe—it’s always nice to have a gluten free option or two in your usual lineup of Christmas cookies!
Though I have a recipe for classic fairy-like meringues in Sally’s Cookie Addiction, I wanted to publish a meringue cookie recipe with swirls of real chocolate. If you’ve enjoyed regular meringues, wait until you taste them with chocolate baked and swirled throughout.
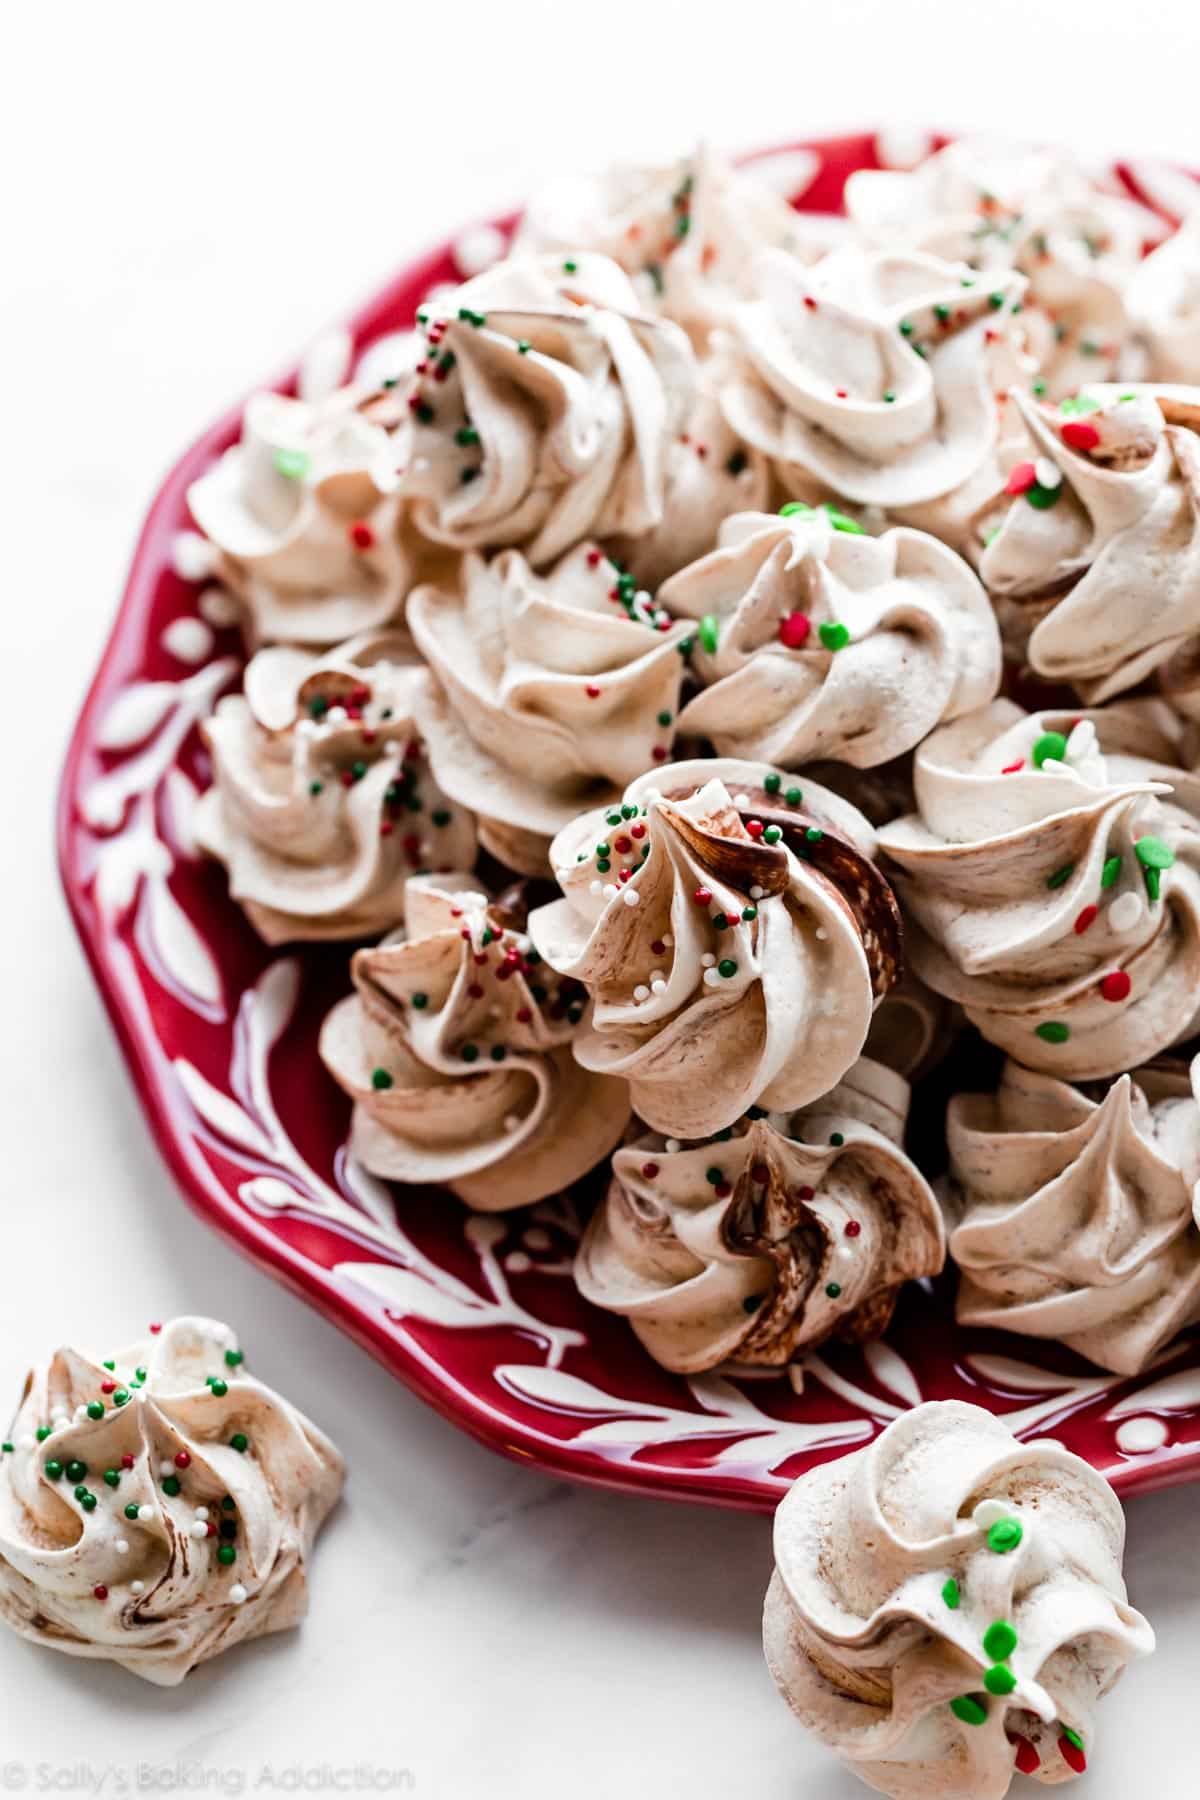
These Chocolate Swirled Meringue Cookies Are:
- Light-as-air
- Sweet & swirled
- Naturally gluten free
- Delicate, yet crisp
- Swirled with real chocolate
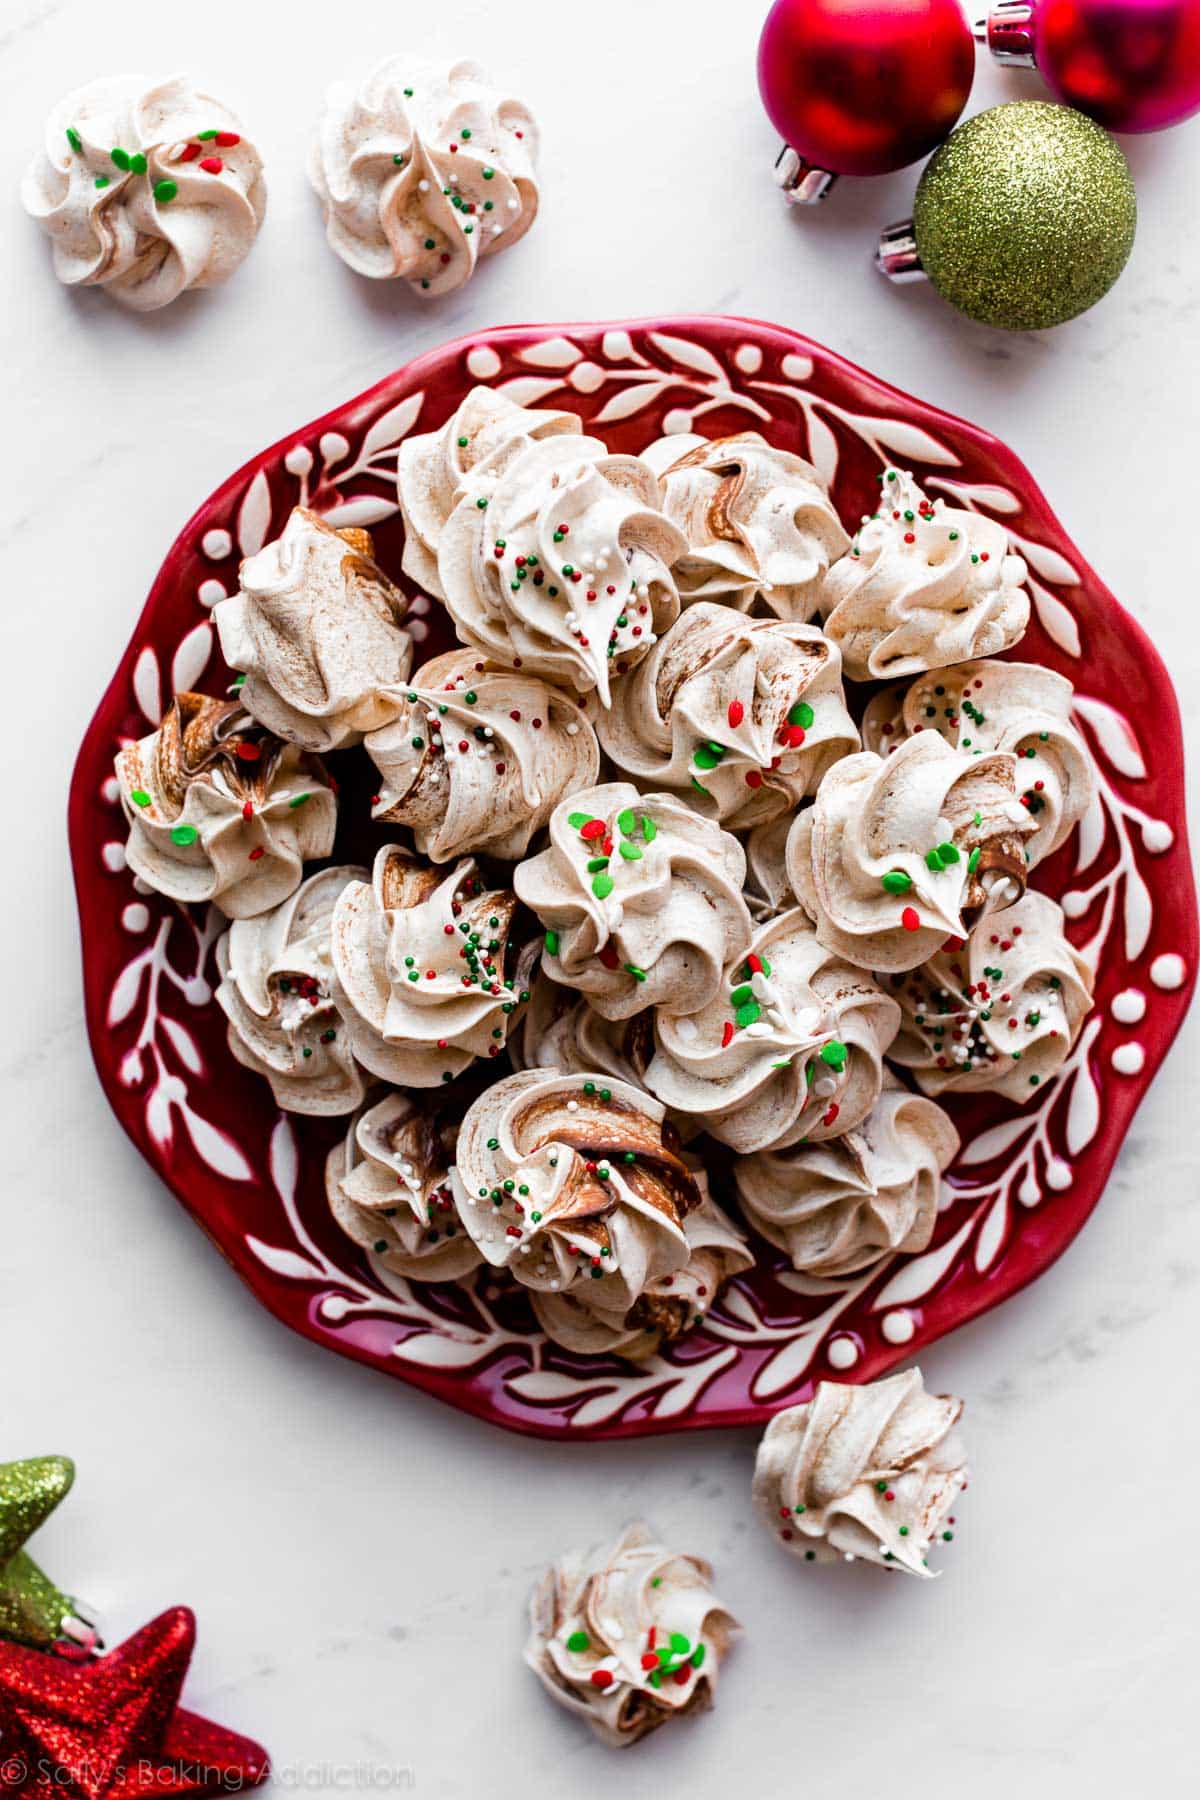
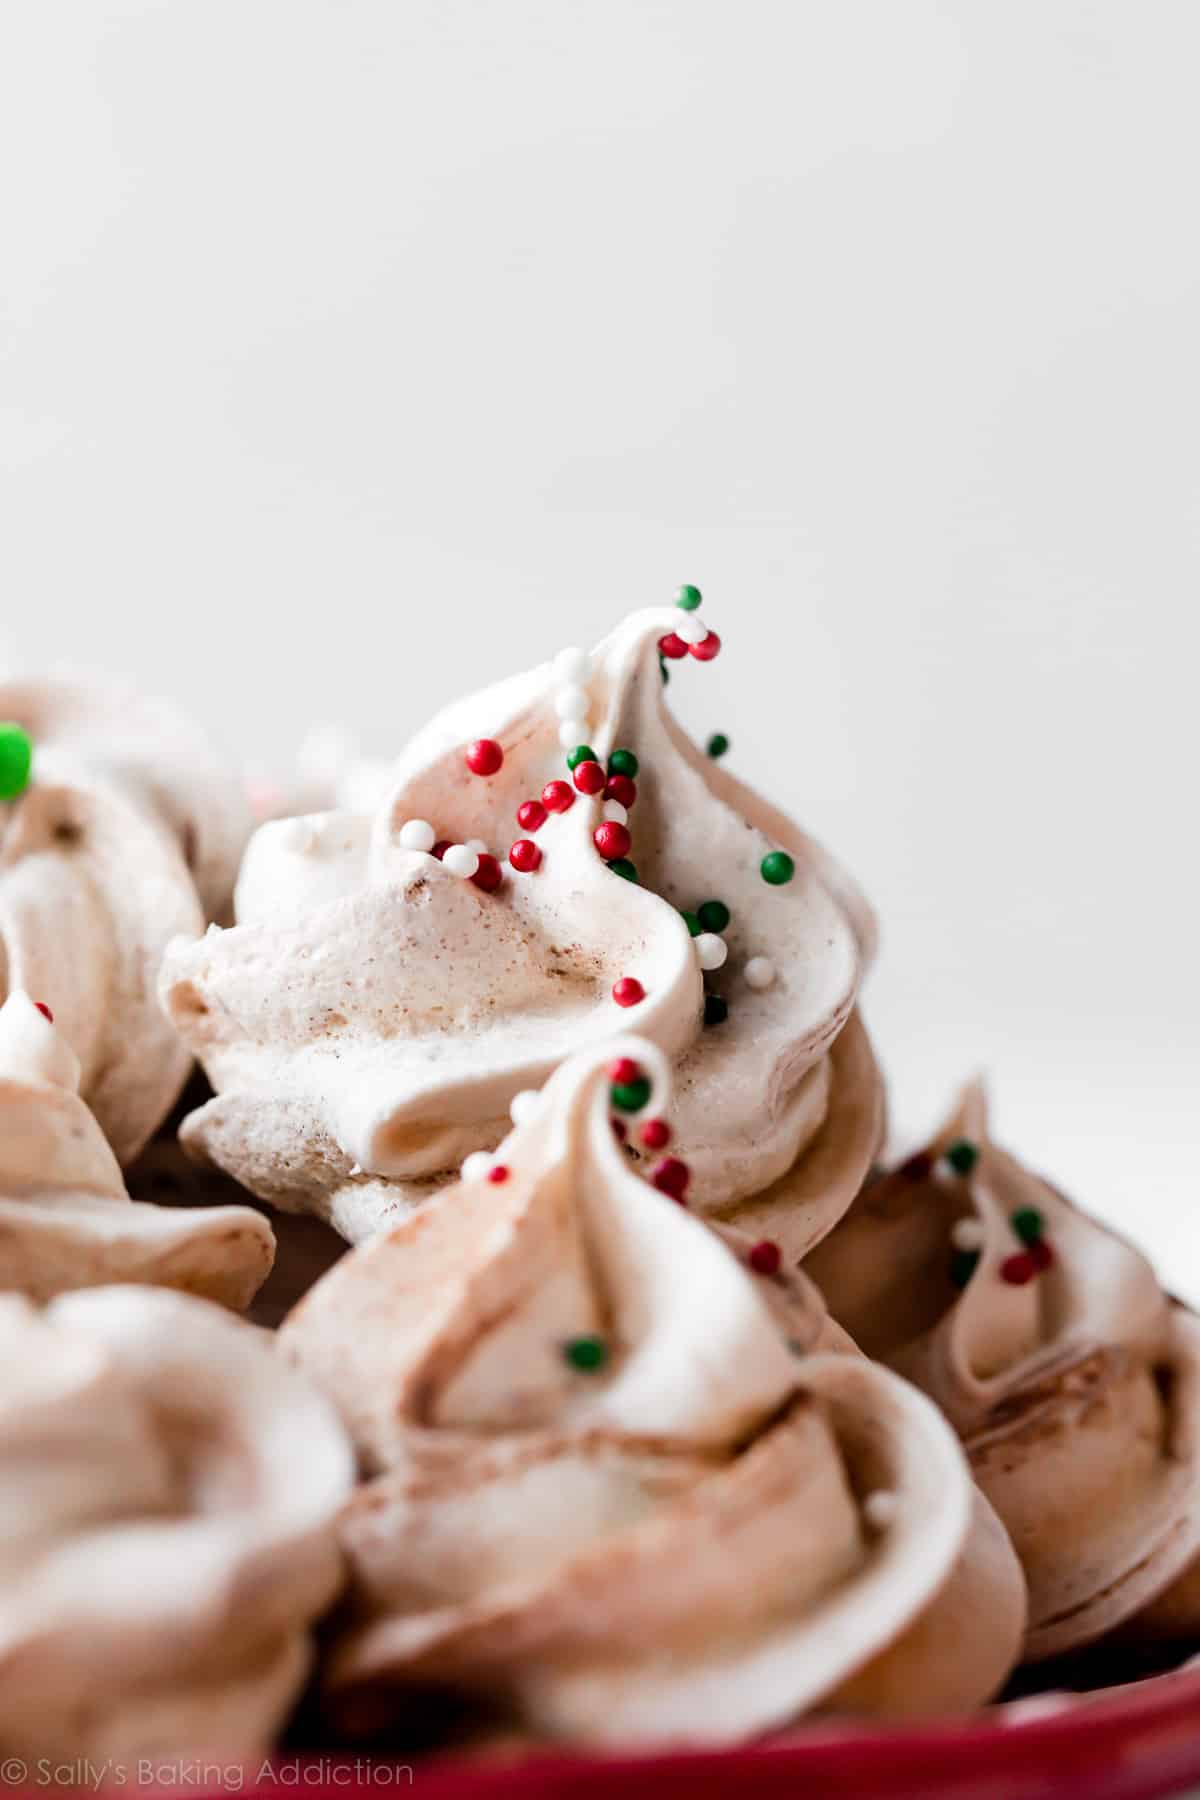
- Topped with sprinkles
Each bite is light, yet irresistibly crisp. The centers are hollow in spots and literally melt in your mouth. That’s why these cookies have been loved for so long—they’re just that good.

Meringue Ingredients
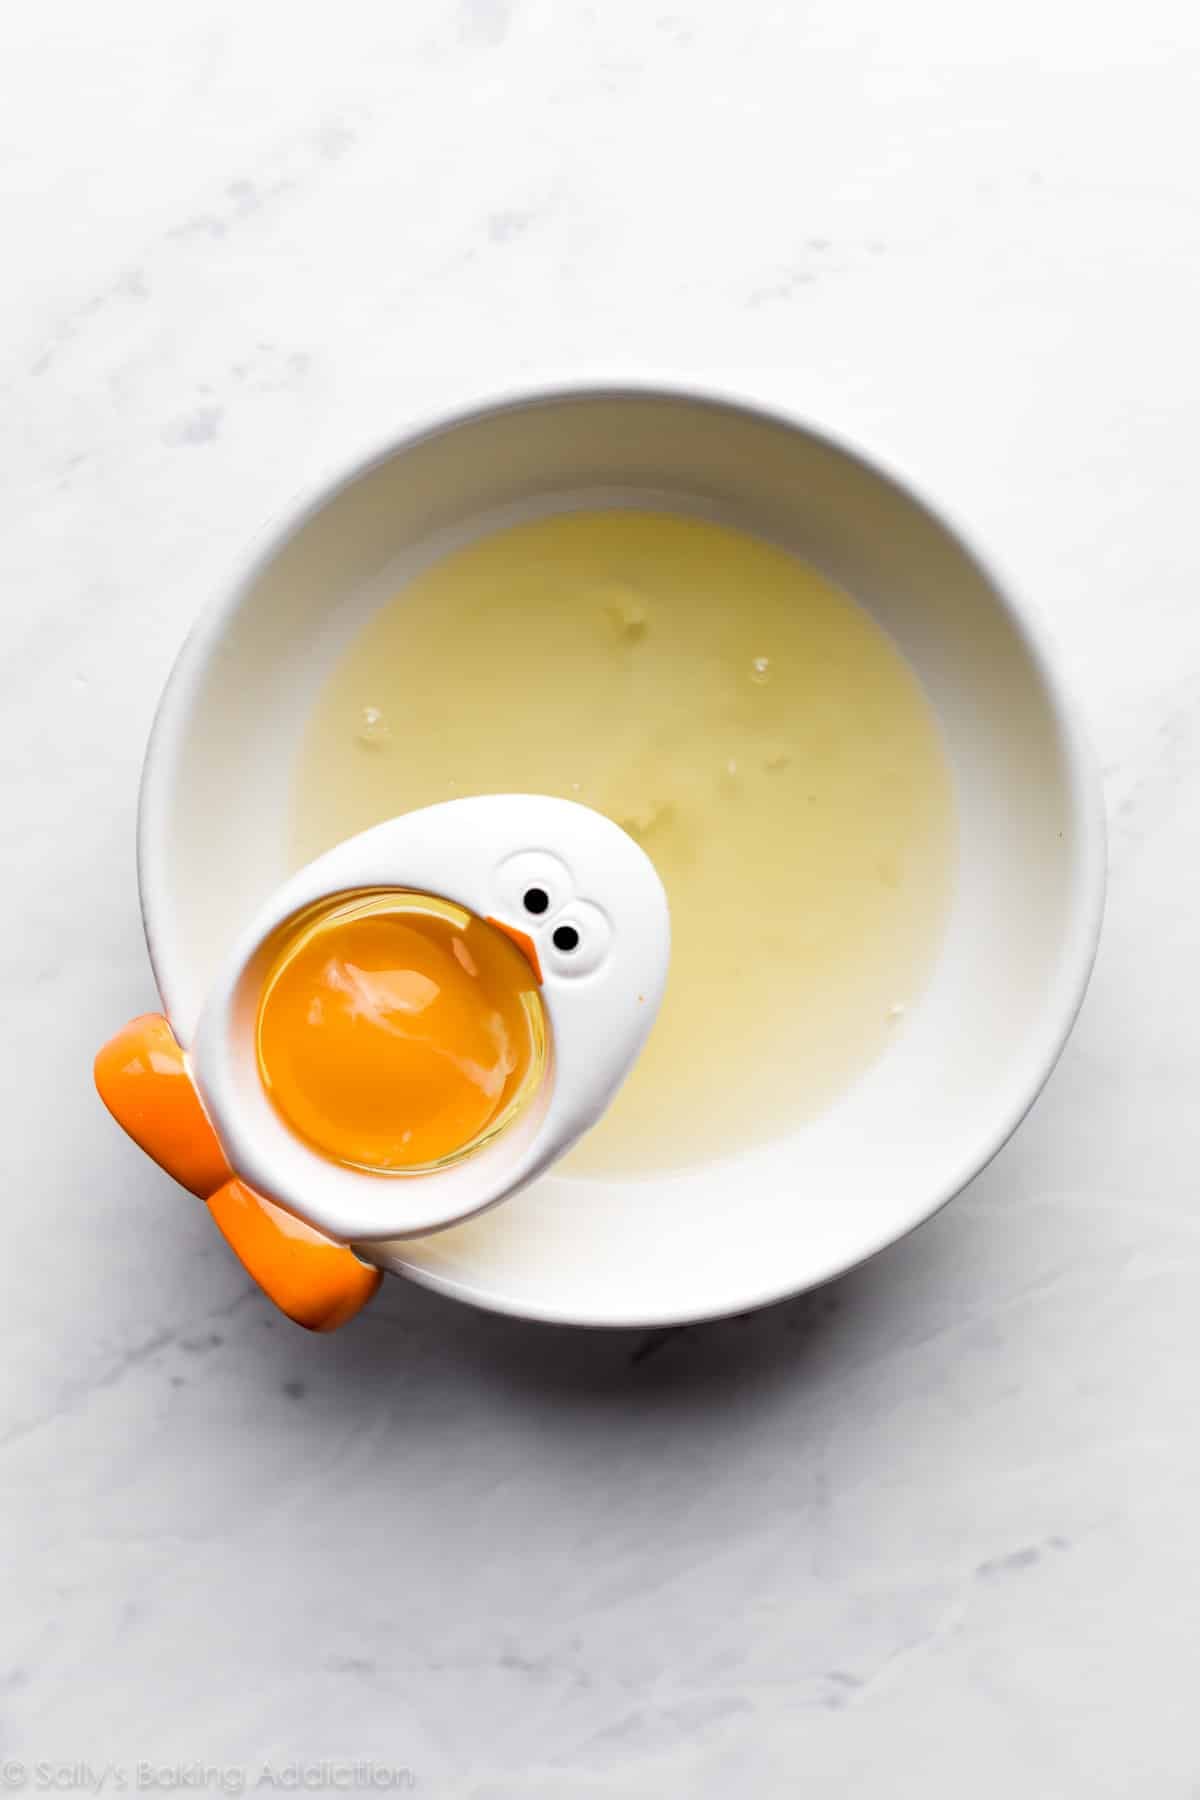
- Egg Whites: Beaten into stiff peaks, egg whites are the base of meringue cookies. Just as I recommend when making French macarons, use fresh eggs instead of carton egg whites. Here are all my recipes using egg yolks. Eggs separate much easier when they’re cold, but room temperature egg whites whip into a higher volume. Separate the eggs right out of the refrigerator, then let the egg whites sit for about 30 minutes before starting.
- Cream of Tartar: The acidity in this crucial ingredient helps the egg whites hold onto air and, like the sugar, helps prevent the egg whites from collapsing. If you’re making snickerdoodles or angel food cake, you already have this ingredient on hand. It’s sold with the spices. Because the chocolate can weigh down the batter, I use a little more cream of tartar in today’s recipe than the recipe in my cookbook.
- Salt: Salt offsets the sweetness.
- Sugar: Without sugar, the protein molecules in egg whites will collapse. Additionally, sugar helps achieve the delightfully crisp texture. (Sugar is so much more than a sweetener!) You can use regular granulated sugar in this meringue cookie recipe.
- Chocolate: You need 2 ounces of pure melted chocolate. Pick up a 4 ounce baking chocolate bar, such as Bakers or Ghirardelli, then melt half of it. You can even melt the leftover 2 ounces and dip your cooled meringues into it. No waste!
I strongly recommend using an egg separator (isn’t it cute?!). You don’t want any egg yolks in the bowl—the slightest drop of fat will prevent the egg whites from properly stabilizing. An egg separator is an inexpensive but super handy tool in the kitchen.
How to Make Chocolate Swirled Meringue Cookies
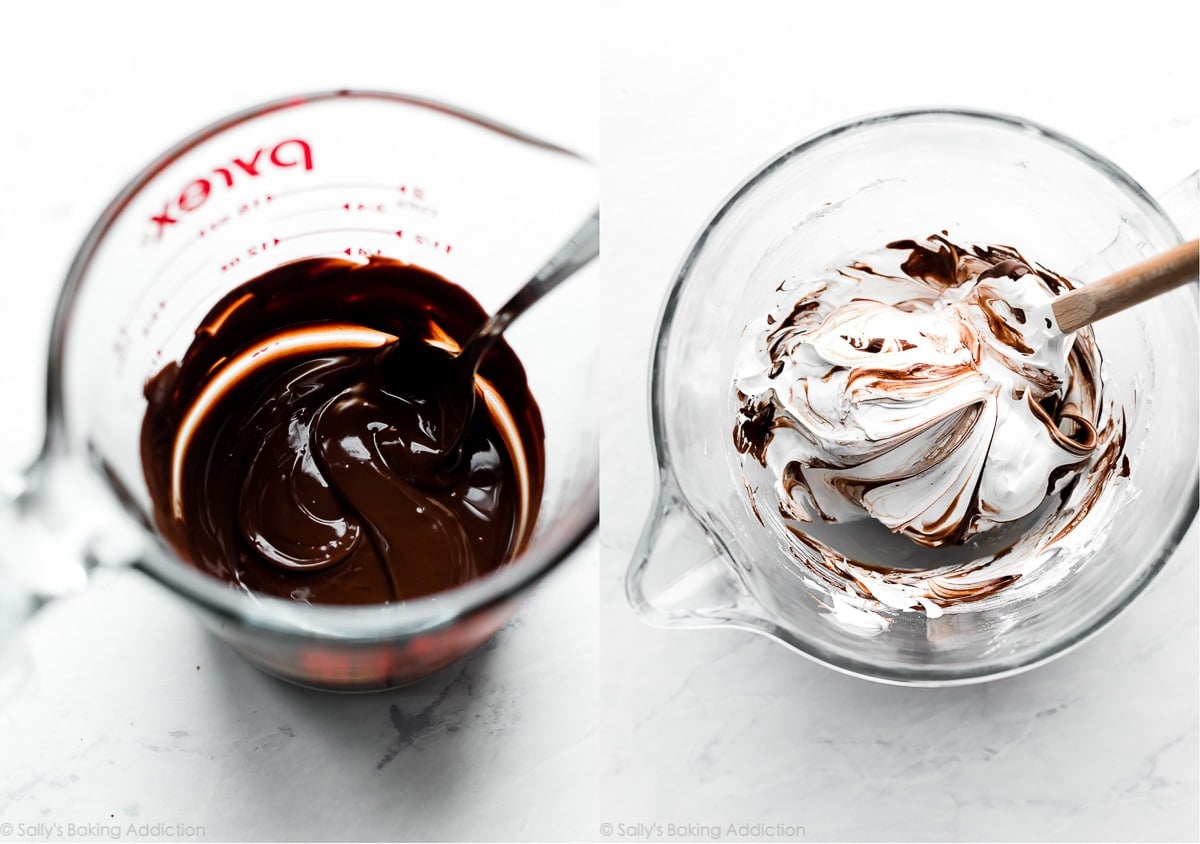
- Melt the chocolate. I recommend doing this first because the chocolate needs to cool down before folding into the meringue batter.
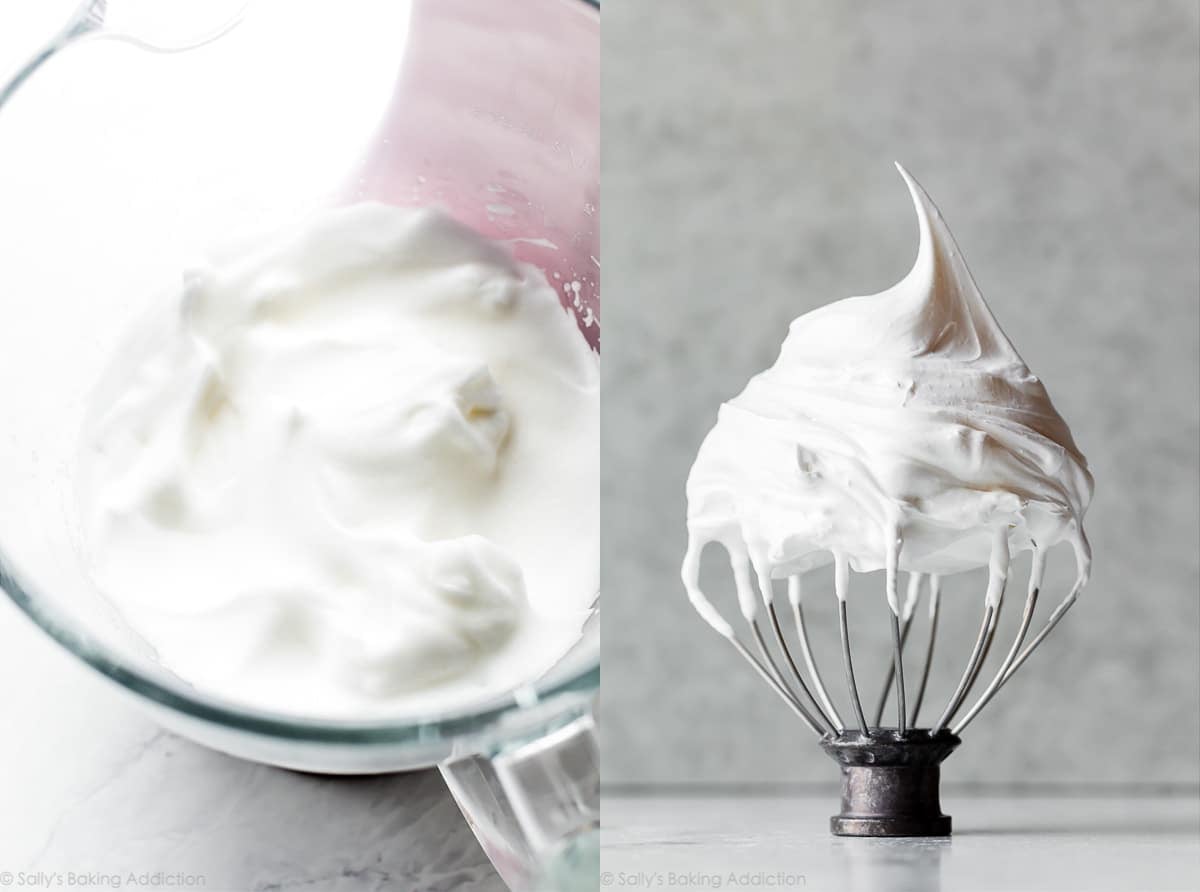
- Beat the egg whites, cream of tartar, and salt together. On high speed, beat these ingredients into soft peaks, pictured below on the left.
- Gradually add the sugar. Beat on high speed into stiff peaks. Stiff peaks hold their point when you lift up the whisk attachment. See picture below on the right.
- Fold in the melted chocolate. You want swirls all throughout the batter.
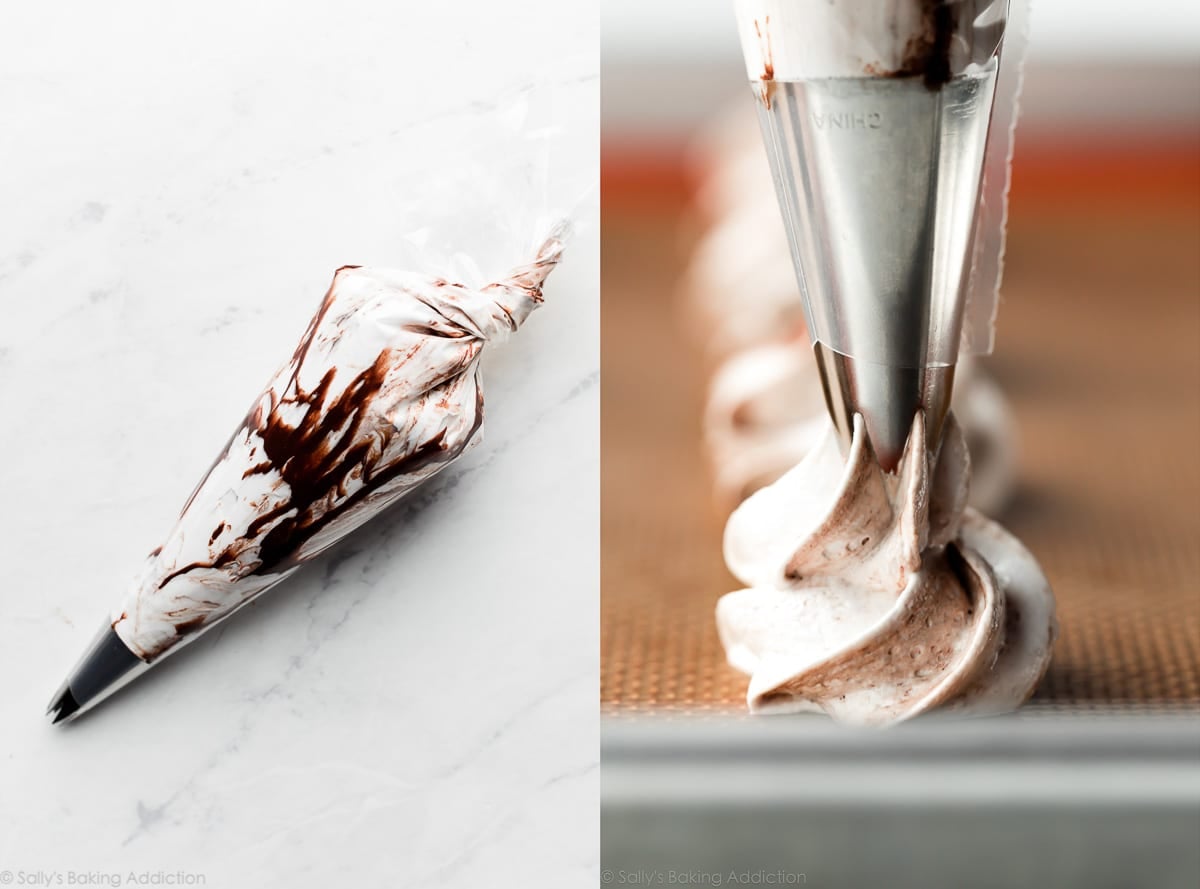
- Pipe onto baking sheets. I recommend using an open star tip and piping little 1.5 inch swirls. You can watch me do this in the video tutorial above. Feel free to add sprinkles on top of the piped cookies.
- Bake at a low temperature. These cookies take 1 and 1/2 hours at 250°F (121°C).
- Partially cool the meringues in the oven. Turn off the oven and let the cookies sit in the cooling oven for about 30 minutes.
- Cool the meringues completely. Remove meringues from the oven. They can cool completely right on the baking sheets.
Soft peaks, then stiff peaks:
Fold in the chocolate:
You can even drizzle some of the melted chocolate right into the open piping bag before spooning in the meringue batter. That’s what I did for this particular batch:

Success Tips for Chocolate Swirled Meringue Cookies
- No fat in the mixing bowl. Though we’ll add chocolate to the batter after the egg whites have reached stiff peaks, we can’t have ANY fat in the mixture prior to that. As you may remember from my lemon meringue pie, fat will prevent the egg whites from reaching those crucial peaks. Use a glass or metal mixing bowl. (Plastic can hold onto fat residue.) Wipe your mixing bowl completely clean and use an egg separator. Separate the egg whites one at a time and place the egg white in the mixing bowl before separating the next. This way, if a yolk breaks in one of them, you don’t waste the whole batch. (If an egg yolk breaks, use that for scrambled eggs the next morning!)
- Follow the recipe closely. Each ingredient is crucial. No substitutions.
- Don’t make meringues on a humid day. Weather can affect how your meringues set up before and during baking. Make meringues on a dry day to help guarantee they’ll beat into stiff peaks and crisp up in the oven.

Chocolate Swirl Meringue Cookies
- Prep Time: 20 minutes
- Cook Time: 1 hour, 30 minutes
- Total Time: 2 hours, 30 minutes (includes cooling)
- Yield: 3 dozen
- Category: Desserts
- Method: Baking
- Cuisine: American
Description
These chocolate swirled meringue cookies are made from just 5 ingredients. Follow the recipe closely because these require precision. Use my video tutorial, step-by-step photos, and success tips as your guide.
Ingredients
- 2 ounces (55g) semi-sweet chocolate, finely chopped
- 3 large egg whites (120g), at room temperature (see note)*
- 1/4 teaspoon cream of tartar
- 1/8 teaspoon salt
- 2/3 cup (130g) granulated sugar
- optional: sprinkles
Instructions
- Preheat oven to 250°F (121°C). Line two large baking sheets with parchment paper or silicone baking mats. Set aside.
- Melt the chocolate first so it can cool down before folding into the batter. You can melt the chocolate in a double boiler or the microwave. If using the microwave: place the chopped chocolate in a medium heat-proof bowl. Melt in 20 second increments, stirring after each increment until completely melted and smooth. Set aside.
- In a completely clean residue-free large glass or metal mixing bowl, using a handheld mixer or stand mixer fitted with a whisk attachment, beat the egg whites, cream of tartar, and salt together on high speed until soft peaks form, about 2 minutes. With the mixer running on high speed, slowly add the sugar and beat until stiff glossy peaks form, about 2 more minutes. Do not over-beat.
- Gently fold in the chocolate. To maintain swirls, you don’t want to completely mix it in. Don’t worry if you don’t use all 2 ounces—you can add some to the piping bag in the next step.
- Add an open star piping tip (I recommend Wilton 1M) to your piping bag (disposable or reusable). Drizzle any leftover chocolate along the inside of your piping bag (this is optional). Add the meringue batter. It won’t all fit, so only use half to start.
- Pipe 1.5 inch swirls until you use up all the batter. See the video tutorial above if you need a visual. The cookies don’t spread, so you can pipe them just 1-2 inches apart. Top each with sprinkles, if desired.
- Bake for 1 and 1/2 hours. (You can bake both baking sheets at once.) Do not open the oven as the meringues bake. Turn off the oven after 1.5 hours and let the meringues sit inside as the oven cools for 30 minutes or until the oven has cooled completely.
- Remove meringues from the oven and cool completely on the baking sheets. Once cool, use a flat spatula to remove the meringues from the baking sheets.
- Cover and store meringues at room temperature for up to 2 weeks.
Notes
- Make Ahead & Freezing Instructions: Meringues stay fresh and taste wonderful for up to 2 weeks, so they’re a great cookie to make a week or so ahead of time. Baked meringues freeze well for up to 1 month. Since they are delicate, I recommend carefully arranging them in a sturdy freezer-friendly container instead of a freezer bag. Thaw at room temperature inside the container.
- Special Tools (affiliate links): Baking Sheets | Silicone Baking Mats or Parchment Paper | Double Boiler or Mixing Bowl | Electric Mixer (Handheld or Stand) | Egg Separator | Piping Bag (Reusable or Disposable) | Open Star Piping Tip (I used a Wilton 1M for the pictured cookies)
- Chocolate: For the best results, use half of a 4 ounce “baking chocolate” bar found in the baking aisle. I prefer Bakers or Ghirardelli brands. You can use semi-sweet, bittersweet, or even milk chocolate. Do not use chocolate chips, as they contain stabilizers preventing them from melting into the proper consistency.
- Egg Whites: For best success, I recommend using fresh eggs instead of carton egg whites. Here are all my recipes using leftover egg yolks. Eggs separate much easier when they’re cold, but room temperature egg whites whip into a higher volume. Separate the eggs right out of the refrigerator, then let the egg whites sit for about 30 minutes before starting. Separate the egg whites one at a time and place the egg white in the mixing bowl before separating the next. This way, if a yolk breaks in one of them, you don’t waste the whole batch.
- No piping tip or piping bag? No problem! Simply use a spoon to spoon 1.5 inch mounds 2 inches apart on the baking sheet.


Reader Comments and Reviews
Could we use any acidic substitute for cream of tartar in the meringue, like naybe lemon or vinegar?
It’s best to stick with cream of tartar for these. Sometimes using a little more lemon juice works, but we recommend using cream of tartar. It’s found in the baking aisle with the spices.
could I make this without the chocolate?
Absolutely!
Hey Sally, I had a question. I am planning on making a cake with meringue. I need to whip up the egg whites and use 1/3 each to make 3 layers. I need to bake each layer separately in the oven. Is it ok to place the remaining whipped egg whites to the fridge until the other one bakes? Will the egg whites not get runny? I would appreciate your response.
Hi Emily, We recommend keeping the whipped egg whites at room temperature instead of in the refrigerator.
Can I add food coloring to the meringue?
Definitely!
i love this website and made these a couple of months ago. after about 2 days, the meringue became really sweet and super super rubbery.
Hi Sally, I just made these following exactly what’s in the instructions. However, my batter started to get runny half way through piping, not sure why. They are in the oven now. Fingers crossed…
Hi! The tips on how to make the meringue fluff up were 100%! But I couldn’t pipe after the first tray because the chocolate hardened in the piping bag and stopped it up! I wound up mixing chocolate chips in and making spoonful drop cookies with it the way my mom used to ☺️ But it irks me that I couldn’t do it your way. What did I do wrong?
Hi Mary! You just need to work quickly, the warmth from your hands can also help keep the chocolate from setting up in the bag. So glad you loved these!
My weird oven only goes down to 275. Is meringue still doable at this temperature, and if so, how should I adjust the time?
That’s completely fine. I would bake them for 1 hour, 15 minutes.
Fun to make, beautiful, delicious. Maybe make a note to not let the chocolate cool too much. It is really annoying when it gets stuck in your piping nozzle and you have to start over again or loose a portion of your batch.
Hi Sally! I was wondering how high I should pipe the batter? Since the peaks are stiff I feel like my dollops could be pretty tall.
thanks!
Hi Maddie, we usually pipe them about 1 1/2 inches, but there’s really no wrong way to do it!
Made these last year with great success! Tried again this year and my chocolate solidified on my piping tip and caused a mini explosion! Still giving this recipe 5 stars because I was able to save them and they still taste spectacular and the recipe is super easy to follow and I learned a lot about my baking in just this short blog! Will definitely be making every year!
Hey Sally and team! I’m wondering if chocolate syrup could be used with the method of adding it to the piping bag before piping. Do you think that would work?
Hi Ashley! We don’t recommend using chocolate syrup – it will be too wet for this meringue recipe.
Approximately how many cookies do you get out of this recipe when the cookies are about the size you show in your you tube video? Thank you!
Hi Amanda, this recipe yields about 3 dozen cookies.
Can I use a good cocoa powder instead of baker’s chocolate?
Hi Gracie, we haven’t tested this recipe with cocoa powder so I can’t say for sure how it would go.
I wondering if these would be ok to pack and ship? If so, what would be the best method? Thanks!
Hi Donna, For packing, see this post on how to ship cookies — hope you find it helpful!
Not sure I let my whites get to stiff peaks (was worried about overbeating) and not sure if this is the problem but mine was just crunchy. Not what was expecting. Did I not beat the egg whites enough? Oven too hot?
Hi Beth, They should be nice and crisp on the outside and softer on the inside. Were they crunchy all the way through?
Yes very crunchy. Not softer on the inside. I was worried it might be my oven but I put in a thermometer and it registered 250 exactly.
I had some leftover egg whites from another recipe and decided to give these a try…since we didn’t have anything besides chocolate chips on hand, I excluded the chocolate swirl. Our oven runs a little too hot and so the meringues were a bit browner than they should be, but they still tasted great and the texture was nice and crisp. We sandwiched them with a swirl of Nutella in between, which tasted great! Overall, this is a simple, tasty way to use up spare egg whites, so thanks for the recipe, Sally! 🙂
Made these tonight. They are good, but they lost their shape in the oven and became little domes instead of piped florets. Not sure if my chocolate wasn’t cooled enough, or if it’s because the temp was too high? Or placement of the oven rack? Usually when I make meringues I place the rack higher and bake between 200-225. I’ve never had them flatten and spread before. I’ll have to play around with it and see what helps. But the flavor is good. I sprinkled with some cute fall colored sprinkles since it’s October.
I cannot tell you how much I love this site! We homeschool our kids and one of my sons has wanted to take a culinary class. There are no children’s culinary classes in our area so we have been using this site. Every recipe we have used has come out amazing, and I love that you so clearly list the tools, explain why the ingredients are important, and explain when substitutions can be made and should not be made! All of the content is relevant to the baking projects and it has improved his reading and attention to detail, and he is shaping up to be a pretty darn good baker! Thanks again for such a great resource!
Hi Wendy, thank you so much for your kind and thoughtful feedback. We’re so thrilled that our website has been a great resource for you and your son. We wish you both the best and happy baking!
So something interesting happened when I made these. I love Sally’s recipes and I have made well over a dozen of her recipes. This time I forgot to let the eggs go to room temperature. As a result the batter was runny. I decided to add powdered sugar because I always do that when my cake frosting is too thin. Well, I kept adding and adding until in was finally thick enough. It was probably 1 cup of unsifted powdered sugar. By this time the chocolate had cooled and it incorporated easily. I piped them and put them in the oven. Thirty minutes later when I checked on them they were done and they look like and taste like macaroons! Delicious! So happy about this happy accident.
Hi! I’m making these for the first time and wanted to share my observations. I live in a dry, desert climate. The mix reached both the soft peak and stiff peak form in a matter of 30 seconds. I’m not sure if it’s due to the dry air but I watched the mixture instead of going by the time. I melted the Enjoy Life mini chocolate chips (due to allergies) and they folded in perfectly. They are still in the oven but they are holding their shape so I am excited to try these. I’m always looking for treats that can be adapted to a soy, gluten, and dairy free option. Thanks for the recipe!
Gonna try these this weekend, but I do not have a silicone mat. Can I use parchment paper instead?
Thank you in advance.
Absolutely. Enjoy!
Next tiime I will get a bigger piping bag and barely mix in chocolate. I’m a little bummed that over time the chocolate seemed to dissipate and I lost the ripple effect. I added a little mint to chocolate, the taste is amazing. The meringue held up so well. I washed the bowl in hot soapy water right before making and made sure to get stiff peaks. Meringue is tricky. Thanks for breaking down the instructions so well. I might skip the chocolate altogether and dye with natural food coloring for Easter treats.
A+ recipe! I made these today with leftover egg whites; so delicious! Followed the recipe exactly – it was very simple. Thank you for the great details and easy to follow instructions. The cookies baked up crunchy and light as air with good chocolate flavor (I used bakers chocolate; once melted/cooled it was easy to fold in). I was too lazy to use a bag for piping so I just used my cookie scoop – worked great. Mine won’t win any beauty contests (no pretty swirl) but they taste divine!
*Also made Sally’s Buchê de Noel for Christmas- holy cow that was fantastic!
Hello! i made these cookies today, and let me just say, these were melt in your mouth good, buttery and creamy. But in the oven, they all went flat, and when i bit into one, there was a huge air bubble at the top of each one, they became flat, and thin. Do you know of any ways that that could happen? Thank you so much for all of your wonderful information and recipes, my absolute favorite is the pumpkin cinnamon chip cookies. Merry Christmas!
Hi Sally! Do you think these would turn out without the chocolate? Thanks!
You bet!
I wanted to make vanilla merengues (trying to cut down on fat in my diet). I assume the same recipe will work and just substitute a teaspoon of vanilla instead of the chocolate?
On a side note, maybe some of them I can add chocolate chips instead of sprinkles?
Hi Jon, you can simply leave out the chocolate. No need to replace with anything, though 1 teaspoon of vanilla extract would be tasty. You can add it with the cream of tartar and salt. Mini chocolate chips should be just fine instead of sprinkles.
I’ve never made meringue cookies ever. I ran across your recipe and decided I was feeling advantageous lol. I made the recipe but realized that I’d have to refrigerate it because I already had something in the oven. Four hours later, I pulled out the batter from the fridge only to discover, the chocolate had all hardened. It was heck to pipe but I managed to be able shove out some of the bigger chocolate chunks. I had filled up a whole pan and then my ziploc bag exploded because of the pressure I was applying to it. I was so upset! I was convinced that these were not going to turn out at all but I put ’em in the oven anyway. Let me just tell you…they turned out DIVINE!!!!!!! They were perfectly crisp and light and ohhhhhhhhhh so yummy! The chocolate was perfectly melted throughout. I will be making again tomorrow but without putting them in the fridge first this time lol. Thank you for a wonderful recipe with all the tips!!! Merry Christmas!
How long will they store? What is the best type of container to store them?
Hi Rita, I recommend storing them in an airtight container at room temperature for up to two weeks.
Thank you
Made two batches of these last week and they’re delightful! Much easier than I expected. Thanks for the detailed instructions. My family wants to try these on top of hot cocoa soon. They have a perfect mild and creamy chocolate flavor and melt in your mouth!