

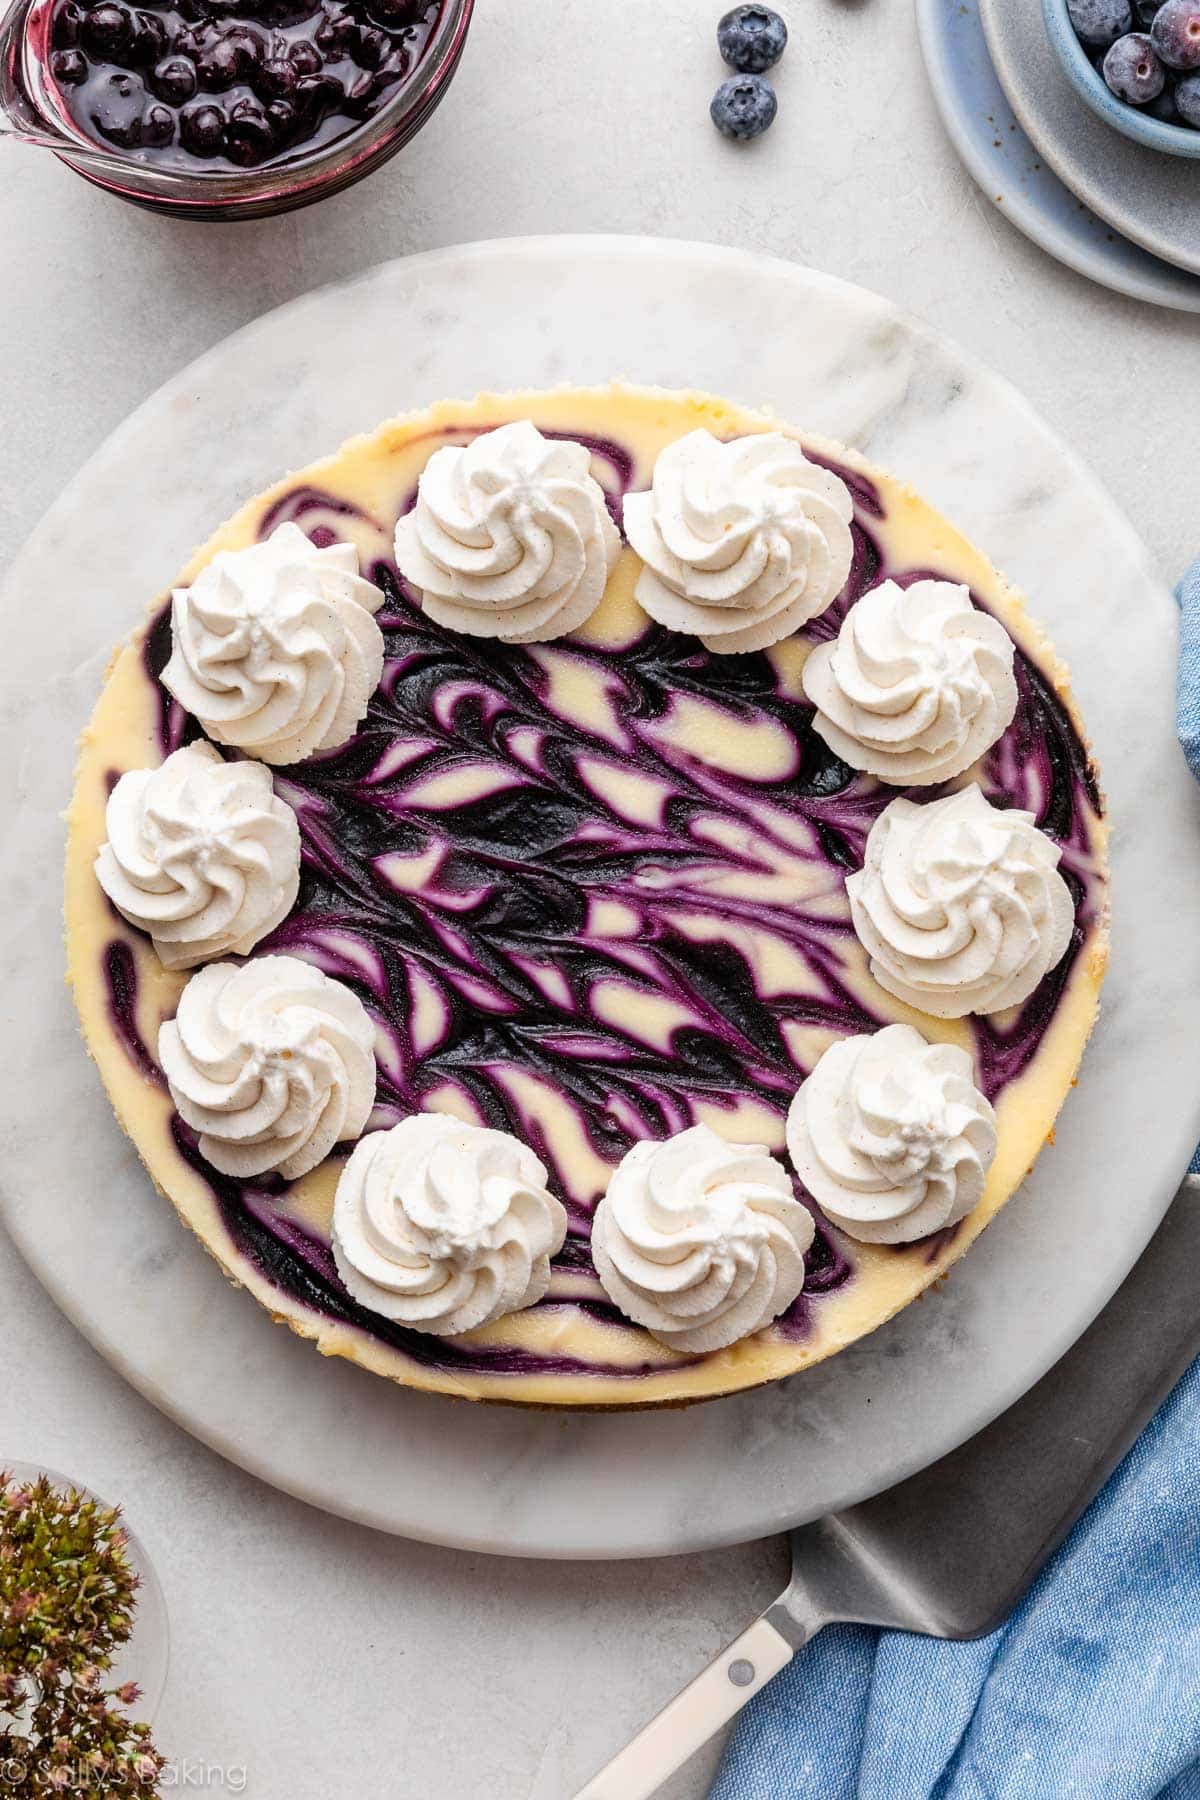
This blueberry swirl cheesecake features a buttery graham cracker crust, ultra-creamy classic cheesecake filling, and thick ribbons of homemade blueberry sauce baked right into the top. The texture is rich and smooth without being heavy, and the bold blueberry flavor perfectly balances the tangy cream cheese base.
If you’ve ever felt intimidated by making cheesecake from scratch, this approachable recipe (with my detailed video tutorial and water bath tips) will guide you step by step for crack-free, bakery-quality results.
I originally published this recipe in 2014, and I’ve since updated it with new photos, a video tutorial, and extra success tips for consistently excellent results.
One reader, Katie, commented: “This is THE BEST recipe for blueberry cheesecake on the internet. Do the advanced techniques as described and you’ll come out with a perfect cheesecake. I let mine sit for 2 days in the fridge, set up perfectly. I was immediately asked by picky bf to make another in 2 weeks. ★★★★★”
This show-stopping blueberry swirl cheesecake needs to come with a warning label. Really, it does. Cheesecake so creamy, a graham cracker crust so buttery, and blueberry swirls sooo swirly.
The best part: you can easily use frozen blueberries, making this a fruity dessert you can enjoy year round!
What Makes This Blueberry Cheesecake Special?
- Year-round: Use frozen blueberries, so you can make this anytime.
- Never watery: The blueberry swirl is strained for a silky, jam-like ribbon — no thin, streaky swirls.
- Beautiful presentation: Vibrant blueberry ribbons make this cheesecake as stunning as it is delicious.
- Dreamy texture: Dense, rich, and ultra-creamy—never dry or fluffy.
- Baked like a pro: A water bath ensures a smooth, bakery-style finish.
- Perfectly balanced flavor: Sweet blueberries, tangy cream cheese, and bright lemon in every bite.
- Make-ahead friendly: Cooling and chilling are essential, making this the perfect dessert to prepare in advance.
Are you intimidated by making a whole cheesecake? Don’t be! Yes, cheesecake seems fancy, but with a little patience (and a water bath to keep cracks at bay), this is totally doable—even for beginners.
Love blueberry cheesecake but don’t want to mess with a springform pan or water bath? Try these lemon blueberry cheesecake bars instead!
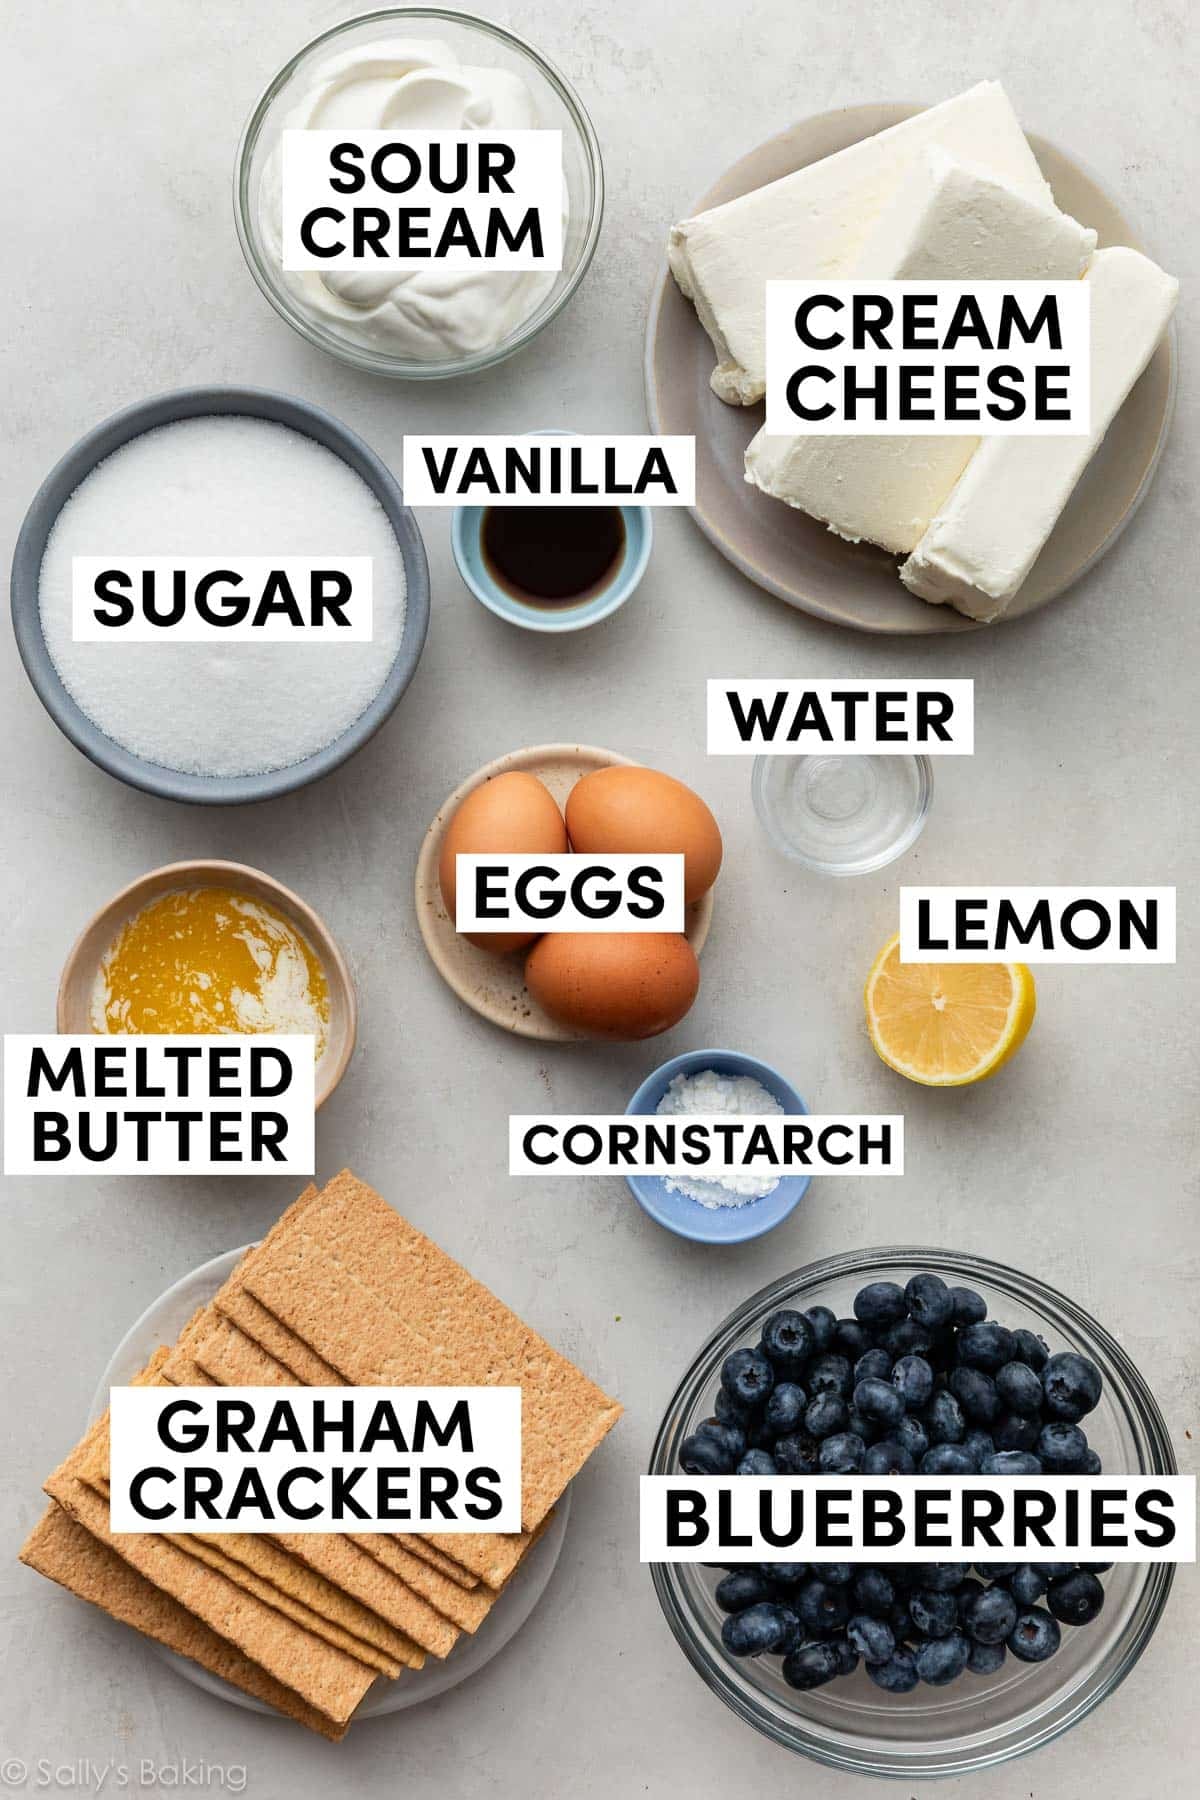
Ingredients You Need
Each ingredient plays a role in creating this ultra-creamy blueberry swirl cheesecake.
- Blueberries: Fresh or frozen both work, so you can make this year-round.
- Lemon Juice: Brightens and enhances the blueberry flavor.
- Cornstarch + Water: Thickens the blueberry sauce so the swirls stay defined instead of sinking.
- Graham Crackers: Crushed into fine crumbs for the crust.
- Unsalted Butter: Melted to bind the crust together and give it rich flavor.
- Granulated Sugar: Sweetens the blueberries, the crust, and the cheesecake filling.
- Full-Fat Brick Cream Cheese: Use three 8-ounce blocks. Avoid spreadable cream cheese in tubs because it won’t set properly.
- Full-Fat Sour Cream: Adds tang and keeps the filling creamy and smooth.
- Pure Vanilla Extract: Enhances the cheesecake’s flavor.
- Eggs: 3 large eggs bind everything together. Add them one at a time and mix just until incorporated to prevent over-mixing.
Crucial Success Tip: Make sure the cream cheese, sour cream, and eggs are at room temperature. Room-temperature ingredients blend smoothly and help prevent a lumpy batter or cracked cheesecake.
How to Make Blueberry Swirl Cheesecake
Make sure you plan ahead because this cheesecake has a few stages. First, it takes a while to bake through. Second, it must sit in the oven after baking as the oven cools down—this is another trick to avoid cheesecake cracks. Then, once the cheesecake is room temperature, you must chill it. Because of all these steps, this is a great recipe to begin the day before.
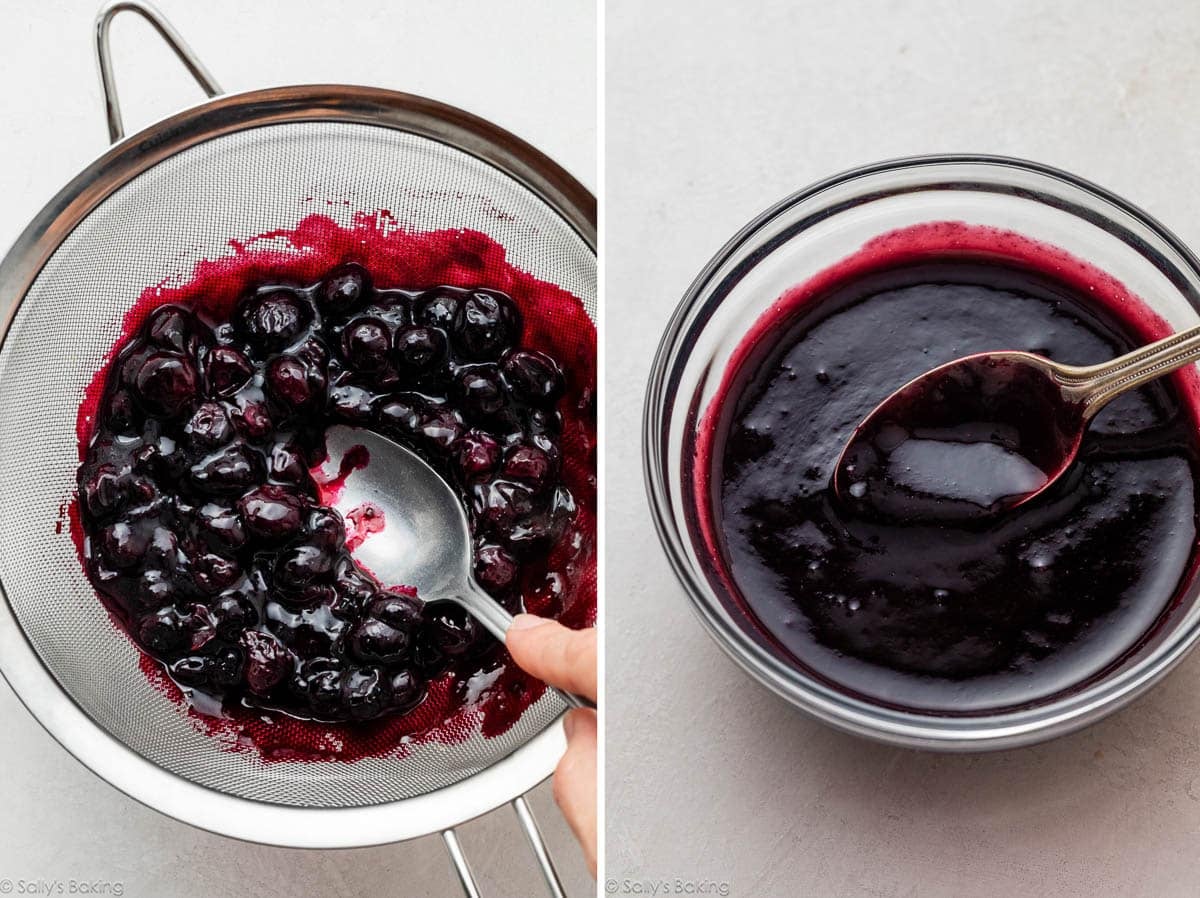
Let’s begin by making the blueberry sauce for the swirl. The blueberry swirl is similar to my blueberry sauce recipe; today’s is a bit thicker for the cheesecake.
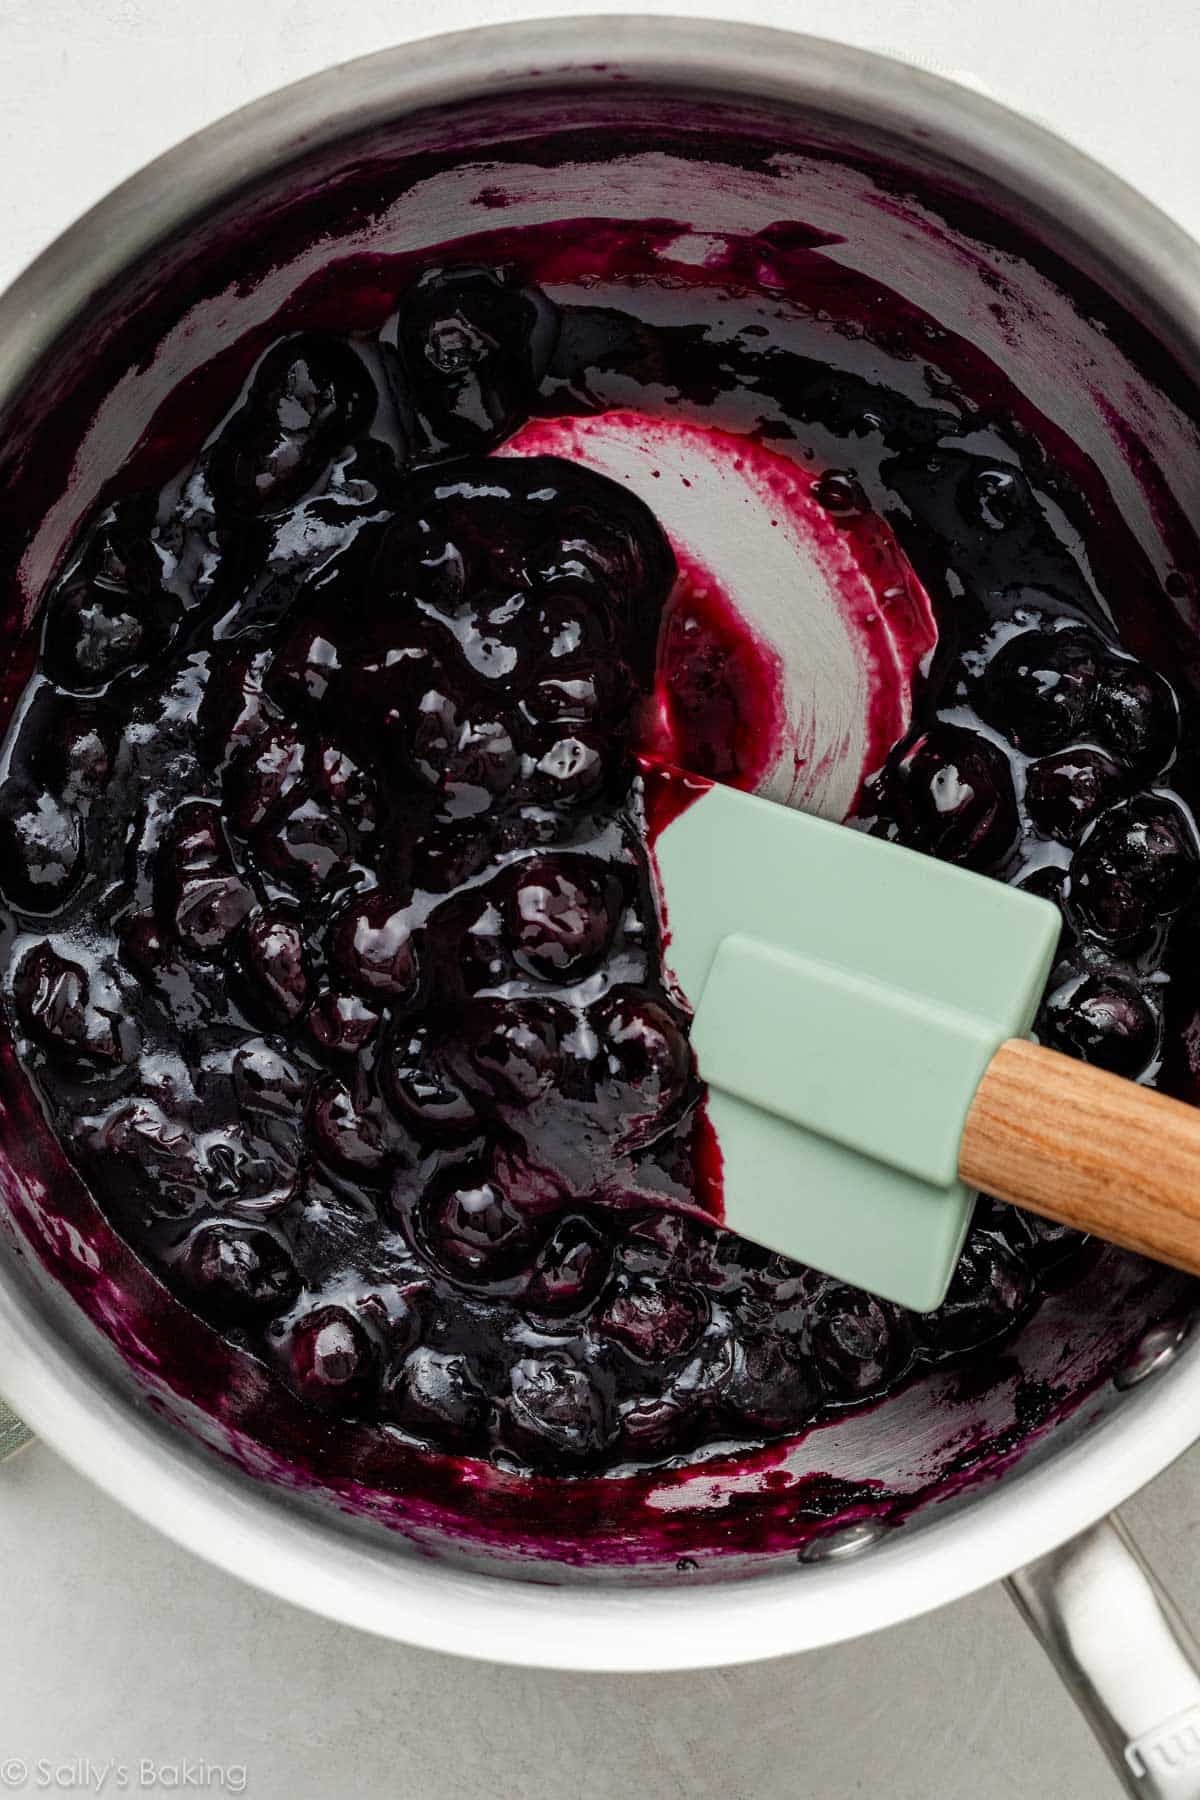
After cooking on the stove, you’ll remove it from heat and press the mixture through a fine mesh strainer. Why? This is to separate the cooked berries from the juice.
The thickened blueberry juice is what you’ll swirl into the cheesecake batter for smooth ribbons. The cooked berries can be stirred back in for a chunkier topping, if desired, or saved for topping the cheesecake slices.
Set both aside while you continue.
How to Make a Graham Cracker Crust
Next, make the graham cracker crust. The recipe is basically the same as my traditional graham cracker crust, but with slightly less butter since cheesecake is so heavy and wet. The crust turns out buttery, soft, and crunchy at the same time.
Pour the crust mixture into a 9-inch or 10-inch springform pan and pat the crumbs down into the bottom and partly up the sides to form a compact crust.
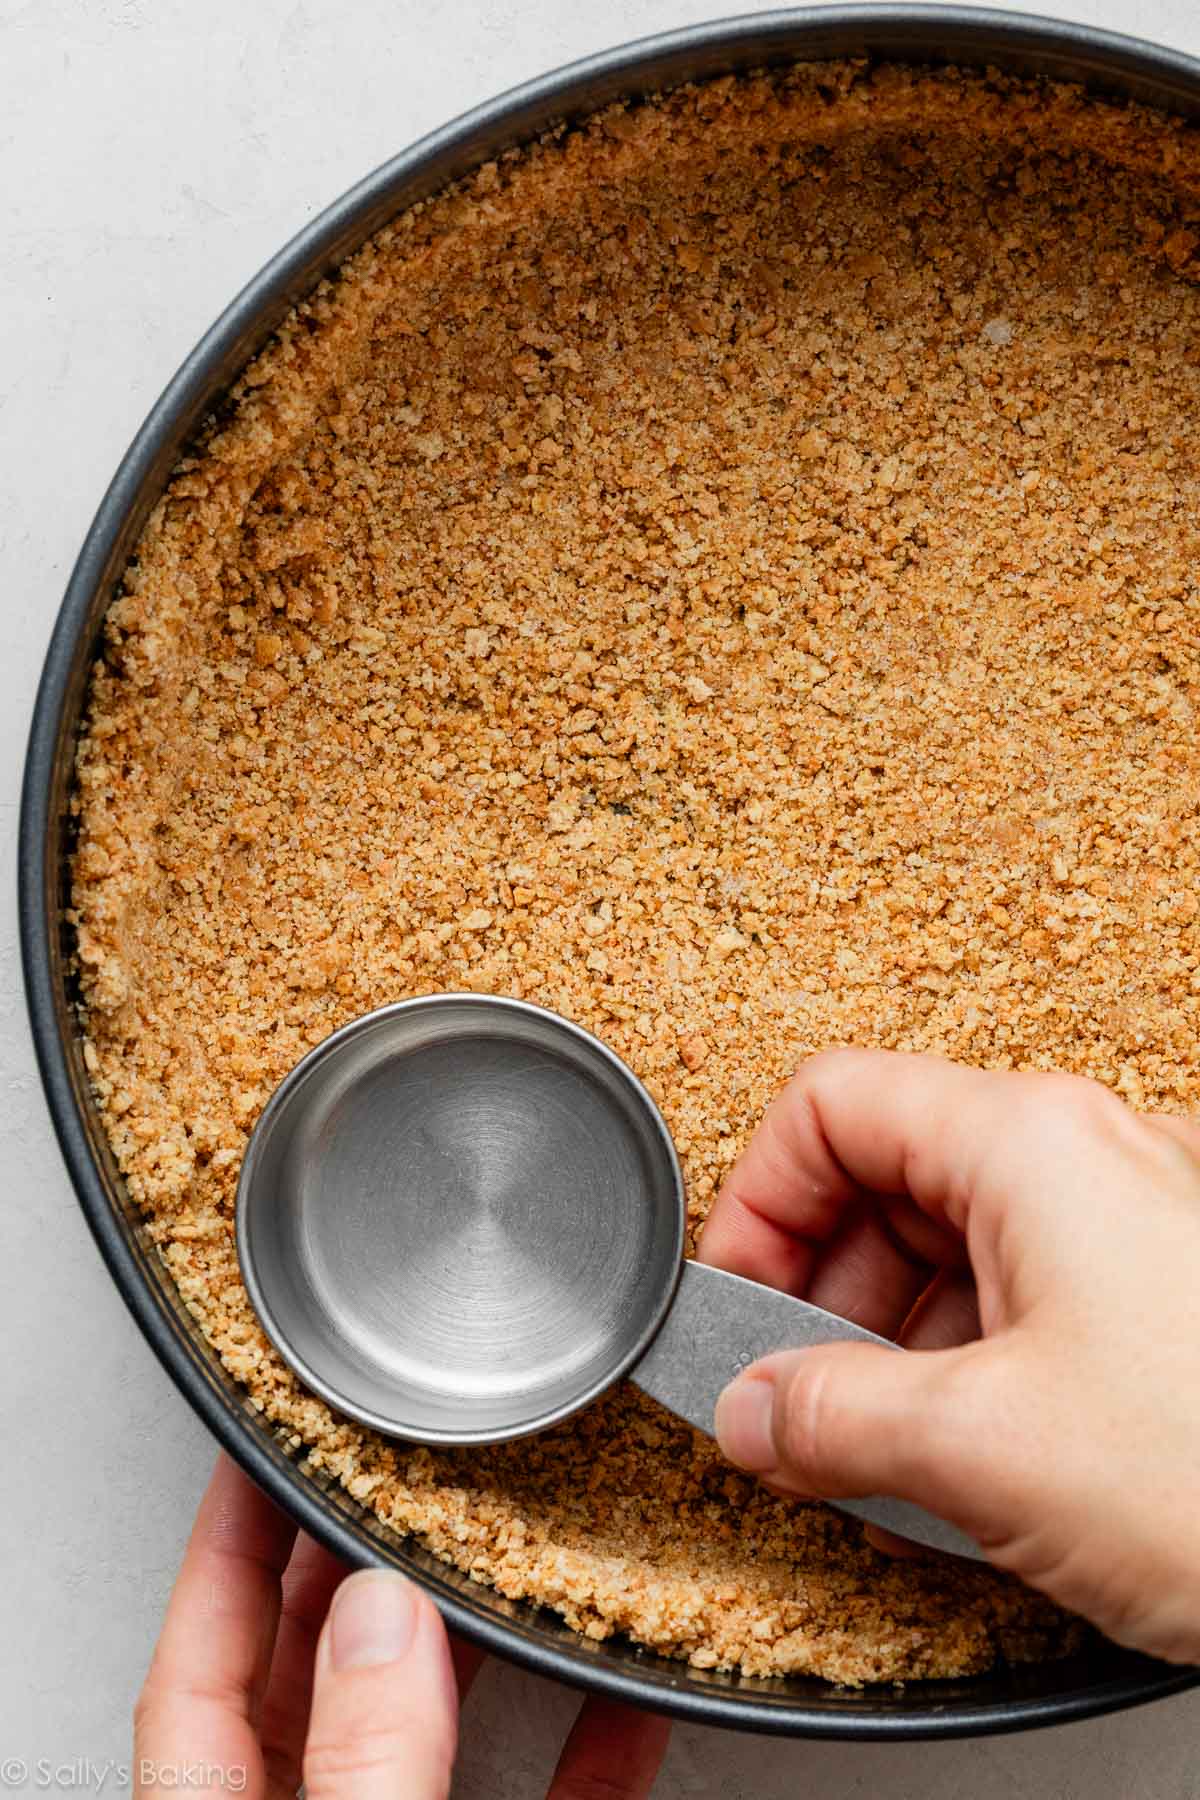
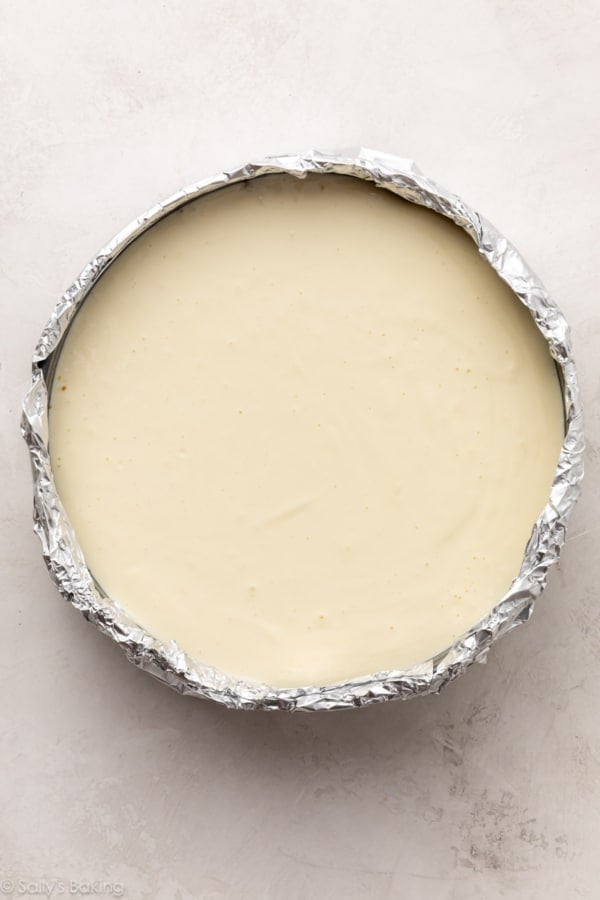
Wrap aluminum foil tightly around the bottom and sides of the pan, then bake the crust for 10 minutes. Allow the crust to slightly cool as you prepare the filling.
Cheesecake Filling
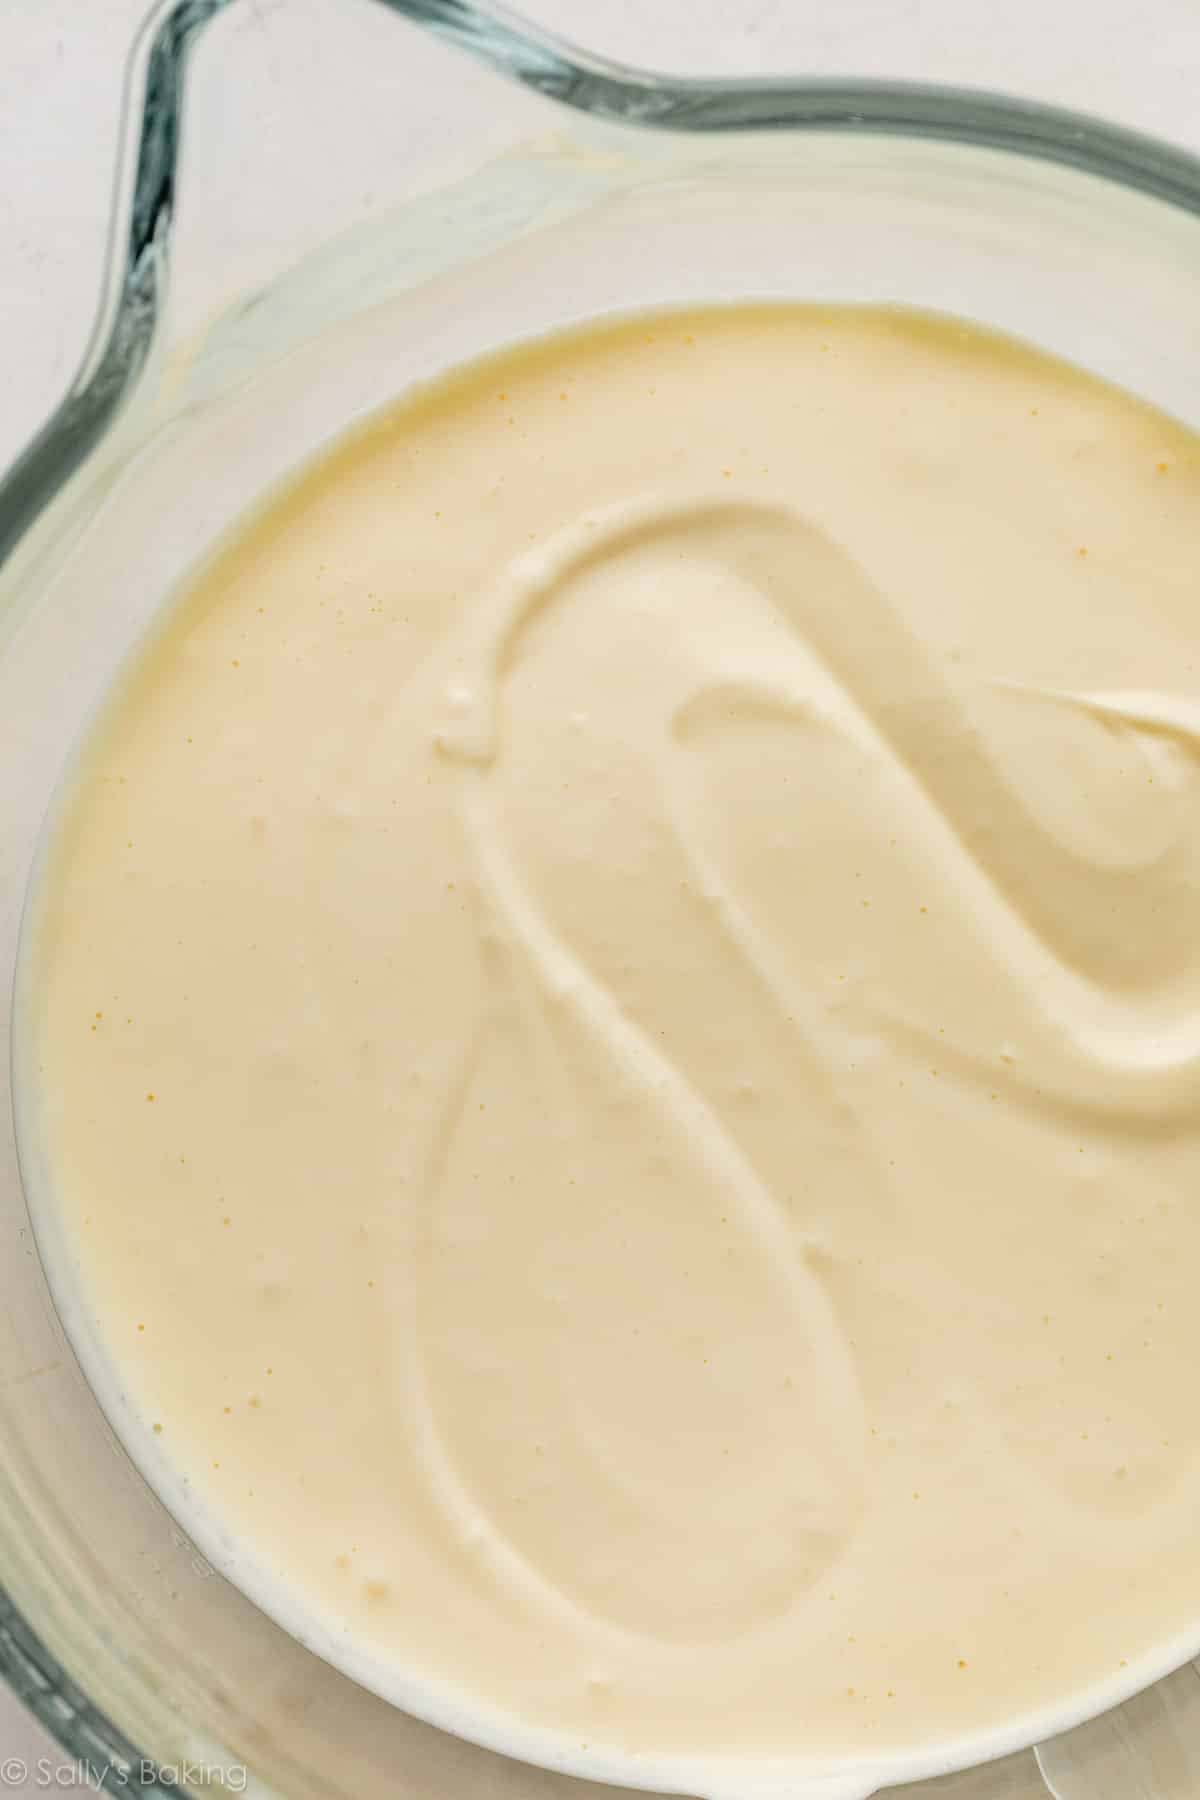
Now, make the cheesecake filling. The cheesecake filling is nearly identical to my classic cheesecake recipe, but today’s version doesn’t use quite as much cream cheese. The texture is creamier, but it still sets beautifully. Do not over-mix the filling after you have added the eggs.
Time-saving tip: You’re going to bake this cheesecake in a water bath, so get a kettle of water boiling during this time.
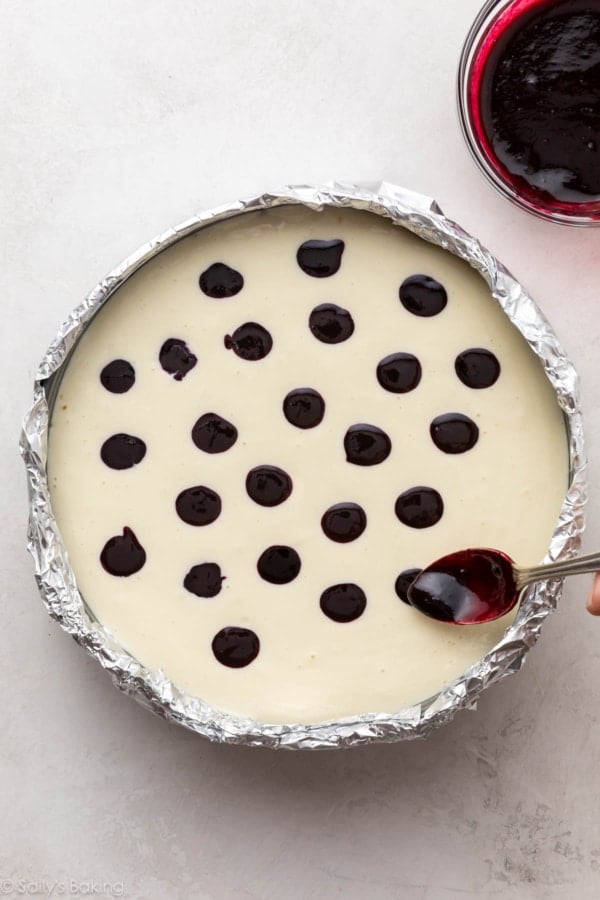
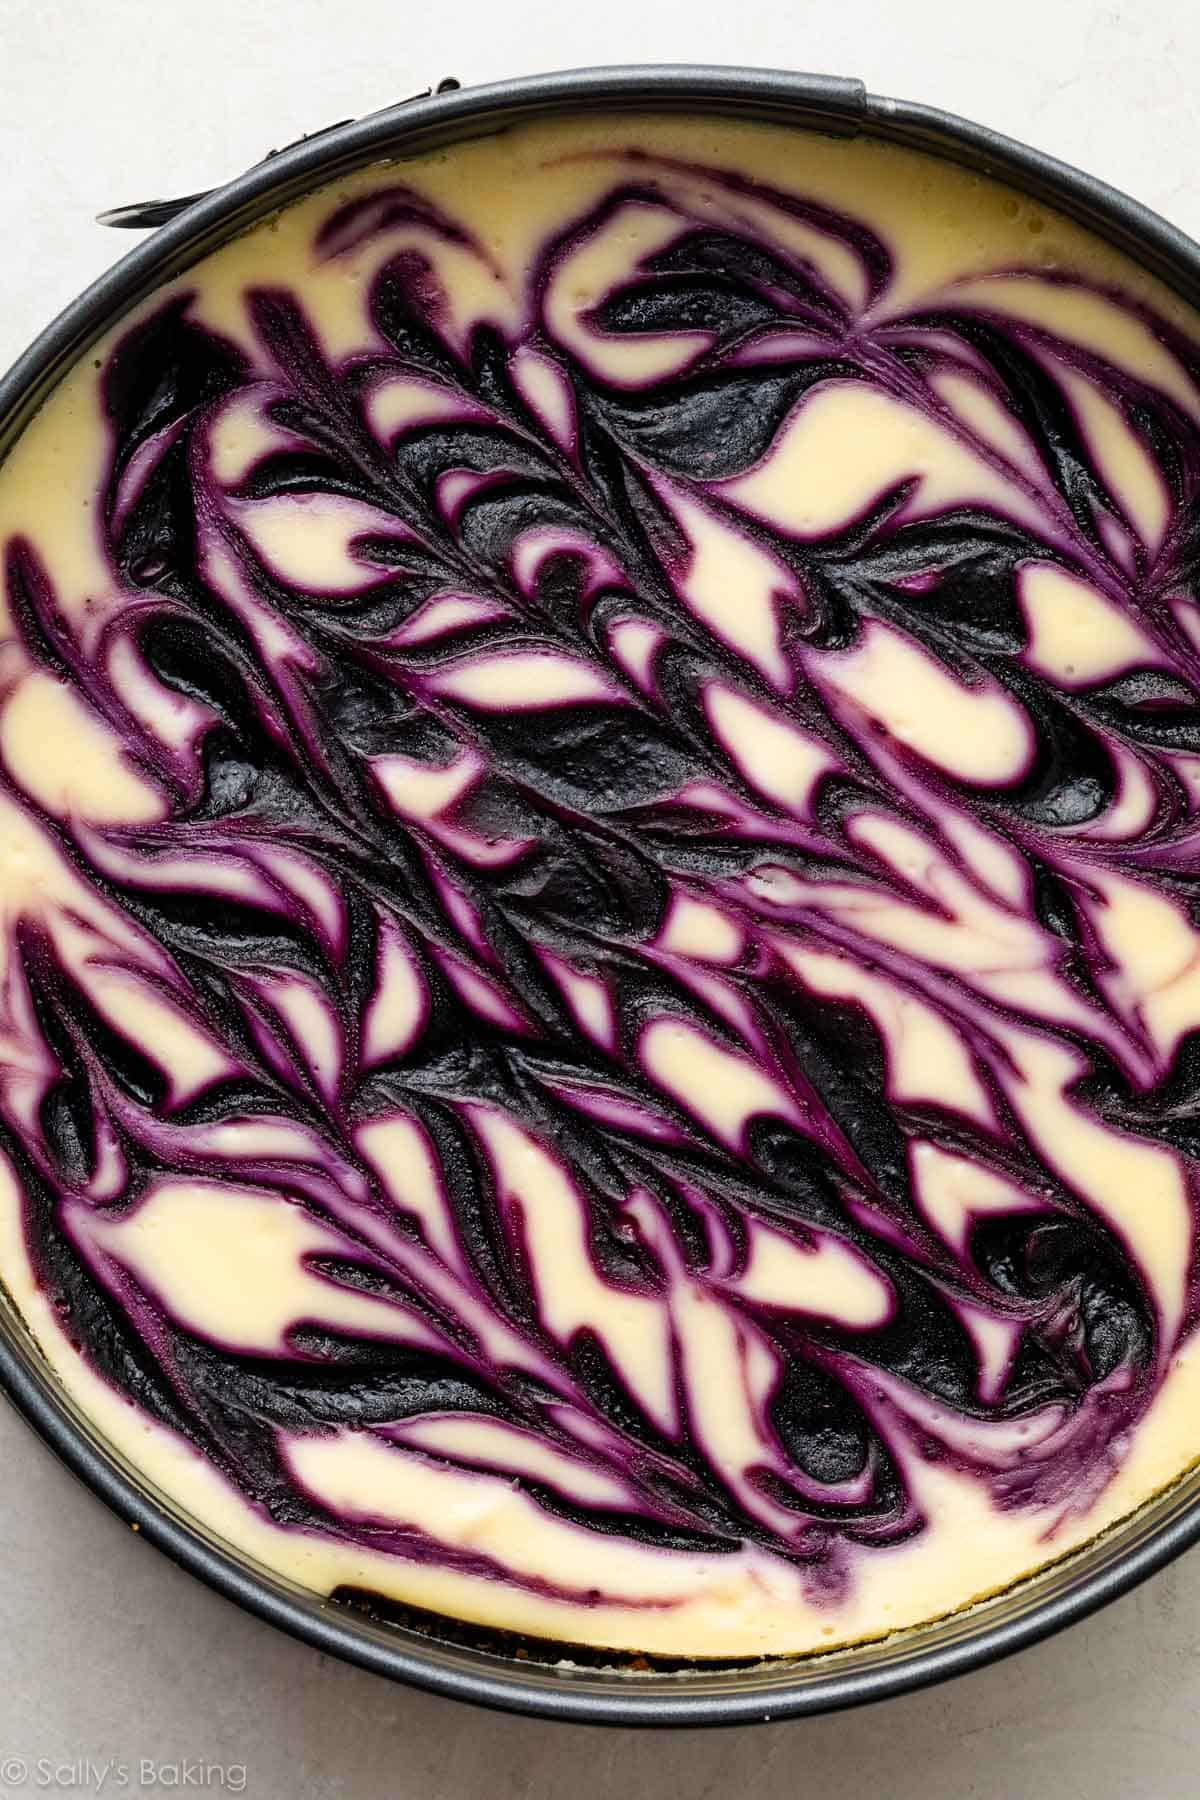
Pour the filling into the crust and smooth the top. Then drop spoonfuls of the smooth blueberry sauce onto the filling and gently swirl with a knife.

If you have leftover blueberry sauce, mix it with the cooked blueberries you set aside and save it for topping the cheesecake when it’s time to serve.
Cheesecake Water Bath
I actually have an entire post and video tutorial for How to Make a Cheesecake Water Bath. I promise that it’s nothing too complicated. All you’re doing is placing the springform pan in a roasting pan, filling it with hot water, and baking.
But what’s the point, you ask? The hot water in the roasting pan creates a steamy, humid environment. This helps the cheesecake bake slowly and evenly, reducing cracks and preventing sinking.
Place the wrapped pan in a large roasting pan, pour in boiling water until it reaches about halfway up the sides, and bake in the roasting pan until the center is almost set—it should still slightly wobble.
When baking is complete, turn off the oven, crack the door open, and let the cheesecake cool inside for 1 hour. Then cool completely at room temperature and refrigerate for at least 6 hours or overnight before serving.
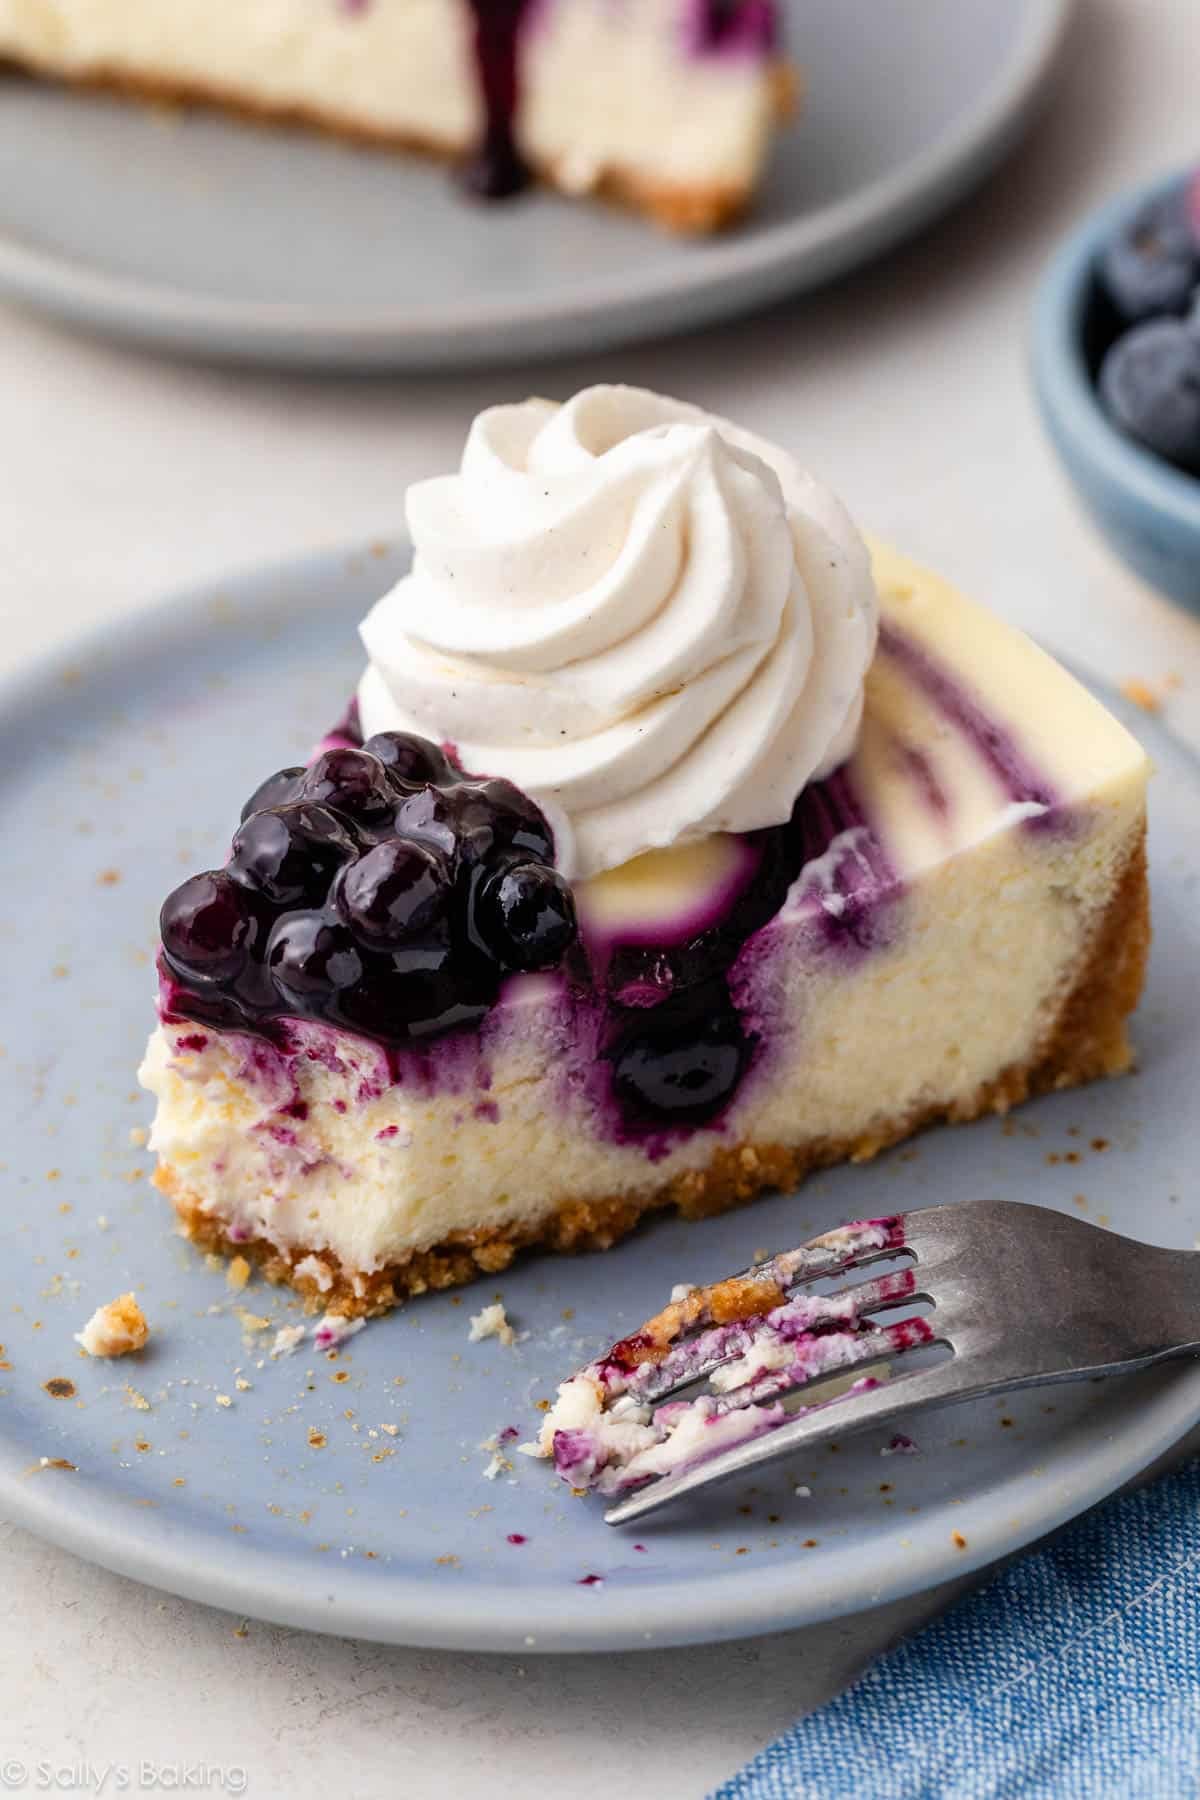
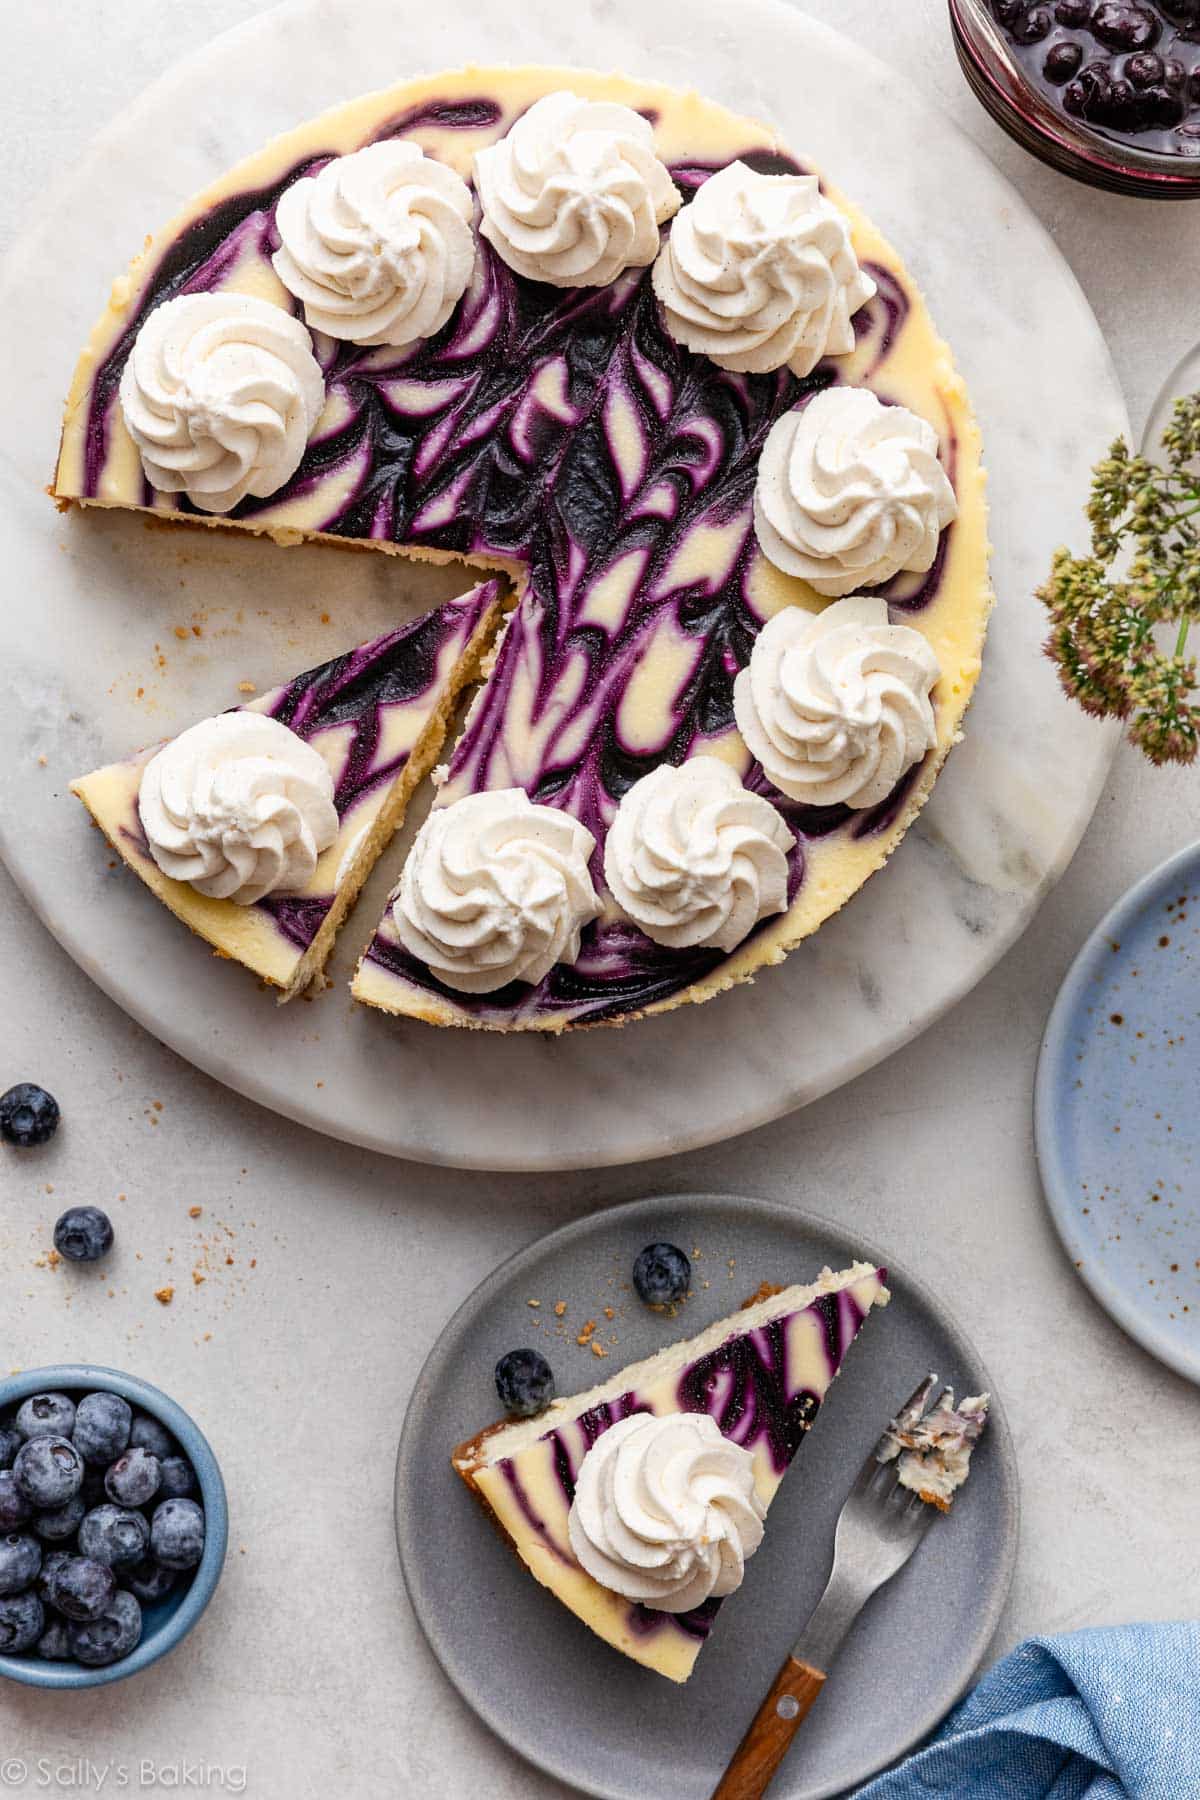
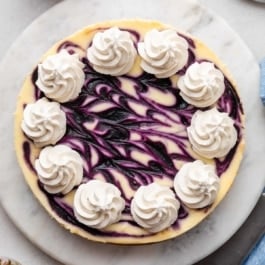
When you’re ready to serve, loosen the sides, remove the ring, and slice. Decorate with whipped cream if you’d like, and spoon the reserved blueberry sauce over the top.
For clean slices, use a sharp knife wiped clean between cuts!
Success Tips for Perfect Cheesecake
To summarize, here are some tricks we reviewed above:
- Make sure cheesecake batter ingredients are room temperature.
- Do not over-mix the cheesecake batter after you add the eggs.
- Bake in a water bath.
- Let cheesecake cool in the (turned-off) oven for 1 hour.
- Cool completely at room temperature, then chill.
Blueberry Swirl Cheesecake
- Prep Time: 1 hour
- Cook Time: 1 hour
- Total Time: 9 hours (includes cooling and chilling)
- Yield: serves 12
- Category: Cake
- Method: Baking
- Cuisine: American
Description
Ultra-creamy blueberry swirl cheesecake with a buttery graham cracker crust and thick homemade blueberry sauce swirled into every slice. Bake in a water bath for smooth, crack-free results. Top with the leftover cooked blueberries and optional fresh whipped cream.
Ingredients
Blueberry Sauce
- 2 teaspoons (6g) cornstarch
- 1 teaspoon fresh lemon juice
- 1 Tablespoon (15ml) warm water
- 2 cups (280g) fresh or frozen blueberries (do not thaw)
- 2 Tablespoons (25g) granulated sugar
Crust
- 1 and 1/2 cups (180g) graham cracker crumbs (about 12 full-sheet graham crackers)
- 1/4 cup (50g) granulated sugar
- 5 Tablespoons (71g) unsalted butter, melted
Filling
- 24 ounces (678g) full-fat brick cream cheese, softened to room temperature
- 1 cup (200g) granulated sugar
- 1 cup (240g) full-fat sour cream, at room temperature
- 2 teaspoons pure vanilla extract
- 3 large eggs, at room temperature
Instructions
- Adjust the oven rack to the lower-middle position and preheat oven to 350°F (177°C). Tightly wrap 1 or 2 sheets of of heavy-duty aluminum foil around the bottom and sides of a 9-inch or 10-inch springform pan and set aside.
- Make the blueberry sauce first: Whisk the cornstarch, lemon juice, and warm water together in a small bowl until the cornstarch has dissolved. Set aside. Warm the blueberries and sugar together in a small saucepan over medium heat. Stir continuously for about 3 minutes, until the blueberries begin to release their juices. Add the cornstarch mixture and continue to stir for another 2–3 minutes, smashing some blueberries as you go. The mixture will begin to thicken. Remove from heat and press the mixture through a fine mesh sieve into a small bowl to separate the cooked berries from the thickened juice. Transfer the cooked blueberries to another bowl and set both (the cooked berries and the juice) aside.
- Make the crust: If you’re starting out with full graham crackers, use a food processor or blender to grind them into fine crumbs. Pour into a medium bowl and stir in the sugar until combined, and then stir in the melted butter. The mixture will be sandy. Try to smash/break up any large chunks. Pour the mixture into the prepared pan. With medium pressure using your hand, pat the crumbs down into the bottom and partly up the sides to make a compact crust. Tips: You can use a small flat-bottomed measuring cup to help press down the bottom crust and smooth out the surface, but do not pack down with heavy force because that makes the crust too hard. Simply pat down until the mixture is no longer crumbly. For more shaping technique tips, see the graham cracker crust recipe page.
- Bake the crust for 10 minutes. Allow to slightly cool as you prepare the filling.
- Make the filling: In a large bowl using a handheld or stand mixer fitted with a paddle attachment, beat the cream cheese and granulated sugar together on medium speed until the mixture is smooth and creamy, about 3 minutes. Add the sour cream and vanilla extract and beat until fully combined. With the mixer running on low speed, add the eggs one at a time, beating after each addition until just incorporated. Stop the mixer as soon as the final egg is incorporated; over-mixing can cause the cheesecake to deflate.
- Pour the cheesecake batter into the crust and smooth the top. Drop spoonfuls of the smooth blueberry sauce onto the batter. Using a knife, gently swirl as shown in the photo above. If you have leftover blueberry sauce, mix it with the cooked blueberries you set aside, tightly cover, and refrigerate until you serve the cheesecake.
- Prepare the water bath: (If needed for extra visuals, see How to Make a Cheesecake Water Bath; the visual guide and video will assist you in this step.) Boil a kettle/pot of water. You need 1 inch of water in your roasting pan for the water bath, so make sure you boil enough. I use an entire kettle of hot water. Place the wrapped springform pan inside of a large roasting pan. Carefully pour the hot water into the roasting pan and place it in the oven. (Or you can place the roasting pan in the oven first, then pour the hot water in—whichever is easier for you.) Quickly shut the oven door to trap the steam inside.
- Bake the cheesecake for 55–65 minutes, or until the center is almost set. If you notice the cheesecake browning too quickly on top, tent it with aluminum foil halfway through baking. When it’s done, the center should still slightly wobble when you gently tap or shake the pan.
- Turn the oven off and open the oven door slightly. With the door ajar, let the cheesecake sit in the oven in the water bath as it cools down for 1 hour. After 1 hour, remove the cheesecake from the oven and water bath, discard the foil, and place the springform pan on a wire rack to cool completely at room temperature. After it has cooled, cover and refrigerate the cheesecake for at least 6 hours or up to 2 days.
- Run a knife around the edges of the springform pan to help loosen the cheesecake, then remove the outer rim. Using a sharp knife, cut into slices for serving. For neat slices, wipe the knife clean and dip it into warm water between each slice. Top with reserved blueberry sauce and whipped cream, if desired.
- Cover and store leftover cheesecake in the refrigerator for up to 4 days.
Notes
- Freezing Instructions: After the cheesecake has cooled completely at room temperature (no need to refrigerate first), you can freeze it with or without the springform pan base. To freeze with the base, remove the outer rim and wrap the cheesecake (still on the bottom of the pan) tightly in several layers of plastic wrap, followed by a layer of aluminum foil. To freeze without the pan, run a sharp knife under the crust to release it, carefully slide it onto a parchment-lined piece of cardboard or a plate, and wrap tightly in several layers of plastic wrap and a final layer of aluminum foil. Freeze for up to 3 months. Thaw overnight in the refrigerator before serving.
- Special Tools (affiliate links): 9-inch Springform Pan or 10-inch Springform Pan | Small Saucepan | Silicone Spatula | Fine Mesh Sieve | Glass Mixing Bowls | Food Processor | Electric Mixer (Handheld or Stand) | Large Roasting Pan
- Blueberries: If using frozen blueberries, do not thaw.
- Alternate Water Bath Method: This method works as well, and you don’t have to bake the cheesecake IN water. Boil a kettle or pot of water. You need 1 inch of hot water in your roasting pan for the water bath, so make sure you boil enough. Place the cheesecake on the center oven rack of the preheated oven. Place a large metal baking or roasting pan (do not use glass—I usually use a 9×13-inch baking pan or an extra-large cast iron skillet) on the bottom rack. Pour boiling water into the empty pan, about 1 inch deep. Immediately close oven to trap the steam inside. This unique water bath adds steam to the oven without having the cheesecake sit inside the water itself. No need to wrap the springform pan in foil. See How to Make a Cheesecake Water Bath for more information.
- Avoid Over-baking the Cheesecake. When the cheesecake is done, there will still be a 2- or 3-inch wobbly spot in the center; the texture will smooth out as it cools.
- Non-US Readers: Don’t have graham crackers where you live? Use 200g ground digestive biscuit crumbs (about 2 cups; 13–14 biscuits), 1/3 cup (67g) granulated sugar, and 6 Tablespoons (85g) melted butter. Pre-bake the crust for a bit longer, about 12–14 minutes. And from what I understand, spreadable cream cheese sold in a tub in countries outside of the US is a little different from the spreadable cream cheese in the US. It’s thicker, sturdier, and more solid and should be OK to make this pie. I have no experience with it, but this is what I’ve heard from other non-US readers. If you try it, let us know how it turns out!


Reader Comments and Reviews
Hi Sally,
How long should I bake this if I am going to use an 8-inch springfoam pan? And also if I am going to cut down the recipe in half and use a 4-inch springfoam pan?
Thank you!
Hi Beatrice! There is too much batter for an 8-inch pan. You can certainly cut the recipe in half to make a thinner 8-inch cheesecake or 2 4-inch cheesecakes. I’m unsure of the bake time, but they’re done baking when the centers are only *slightly* jiggly.
Hey Sally if I wanted to try this without the blueberries do you think it’d turn out? I couldn’t find a plain one in your recipes.
Yep! You can simply leave the blueberry swirl out. 🙂
Hey there,
If I wanted to just have the blueberry filling on the top of the cake, would you recommend doubling the recipe or would it be enough?
This should still give you a good amount to spoon on top. Enjoy!
I loved this recipe. My cheesecake cane out perfect and my family was so impressed. I used frozen blueberries and it was just delicious! Thank you so much for sharing your wonderful recipe 🙂
Hi Sally,
Thanks for your recipe! I made the cheesecake yesterday and it was soooooo good! Creamy yet not too heavy! so beautiful!!!
But just a little question,my cheesecake it doesn’t turns out like milky white colour as yours,it’s a bit brown.
I baked that in lower third rack position as you wrote,should I cover the top with aluminum foil so it won’t get brown next time?
That’s the best way to prevent the top from browning too much– covering loosely with aluminum foil. So glad you loved it!
I made this amazing cheesecake for a dinner party we went to last night, and the reviews are in! Awesome; OMG this is amazing; Wow, you can make this again…” It was so good and looked amazing with the blueberry swirled through it. It wasn’t heavy and with fresh local blueberries, it was the perfect seasonal dessert. Thank you so much for your details instructions. I have never done a water bath, but it worked so well, I may do it for all my future cheesecakes!
This is my very first cheesecake ever that I have made and I thought it was going to be really difficult but its in the oven as I speak and smells amazing!!! I can not wait to try it when it comes out. Thank you for a great and easy recipe. I used fresh blueberries for the swirl and put the rest in a food processor to blend them for a drizzle!!! 🙂
If I were to use yogurt instead of sour cream, what flavor of yogurt would I use? Plain?
Plain, yep!
Hello Sally,
Thank you for this beautiful recipe. So crunchy and creamy! I couldn’t find blueberries when I needed them and turned this into a raspberry cheesecake which was pretty good too and will attempt mango next. It’s summer after all! 😉
Best wishes from Berlin, Germany where you can really impress people with a cheesecake like this! So thank you again, also, for using the metric system as well!
Lisa
I’ve made raspberry and it is just as delicious as blueberry! Definitely let me know how the mango turns out – that sounds incredible for summer!
Hey Sally… I have made this twice and it truly is the best cheesecake I have ever eaten!… the texture is perfect!… I have a question though… if I want to give this cheesecake away, how do I remove the bottom.? .. I feel like this is a silly question….
Unfortunately, it is quite difficult to do that after the cake has been baked in the springform pan. I suggest just making sure the recipient knows you need it back! Next time, you can use a disposable one. 🙂
Becky, cut a circle of parchment paper (not waxed paper) and put it on the bottom before you press the cracker crumbs in. Use a metal flipper to help move the cake to a cardboard cake plate when it has cooled completely. This won’t guarantee that the transfer to a cardboard cake plate will be flawless, but it will make it a lot easier. Best thing; they can keep the plate and paper.
thank you John!… I will try this… because I can’t seem to find disposable springform pans…this sounds like it will work! 🙂
Made this exactly per directions for Easter. It was fabulous!!!!! Thank you for a true winner, Sally.
By far the best cheesecake recipe I have found. Made this for our family Easter dinner and had nothing left! This will be a repeat dessert for a long time!
Made this cheesecake for the first time, it is SO GOOD seriously. Huge hit with everyone at the event I brought it to.
Really give yourself time to make this, it took ingredients over an hour to get to room temp, about 45 min for crust, filling and assembly, nearly an hour to bake and an hour for temp to come down in the oven with heat off. But totally worth the effort! I added the fresh lemon juice to sauce plus a tiny bit of lemon oil, I like how rich and fragrant the oil is, also added some cinnamon to the sauce for more depth of flavor.
Hi Sally! I’m baking this cheesecake tonight for christmas. Can I left it two days on the refrigerator, or shall I freeze it? Thank you so much for this recipe, I already made it once and its wonderful 🙂
I’d leave it in the refrigerator, covered tightly, until Christmas Day. Merry Christmas!
Hi sally!
I’ve made it as the recipe says a couple of times now and each time it has worked great. This time i wanted to switch it up a bit for fall but i’m afraid the sauce will be too runny if i replace it with orange juice. I would like to make the cheesecake with an orange sauce instead of the blueberry one, could i just substitute the blueberries with fresh orange juice?
Hi Laurea! I’m unsure how to make an orange “swirl” but what about adding orange zest and a Tablespoon or two of OJ to the batter? That may be your best bet!
I made this for Thanksgiving and my husband (who is crazy picky!) said it was the best cheesecake I’ve ever made. Every recipe I’ve made from your blog is a show stopper! Thank you!
Hi Sally. When freezing this cheesecake, do I freeze after it has cooled or after it has set in the fridge for 6 hrs? Thanks!
Great question! Either would be fine, but I always freeze after I have chilled it in the fridge.
If I’m looking to add liquor to this recipe what would you suggest? I was thinking grand marnier in the blueberry sauce or something cream based in the filling.
I really like the idea of a couple Tbsp of Grand Marnier in the sauce!
HI Sally, this cheesecake looks so good! Can’t wait to make this for the fam:) but because I only have 2 10-ounce packages of cream cheese can I just up the amount of Greek yogurt to replace the other 4 ounces? If that makes sense. It would be a great help if you could answer! Thank you so much,
Alyssa
I *think* that should be fine because it is only 4 ounces. Let me know how it goes!
Sally,
What would you recommend I change if I wanted to make a strawberry swirl cheesecake?
Hi Courtney! Here is what I would do: Since I don’t have a recipe for strawberry sauce at the moment, I would just sub in chopped strawberries for the blueberries 🙂
I’ve made this cheesecake about six times, both exactly to the recipe and with variations and it has come out perfect everytime with no cracks or brownibg, and perfectly smooth and creamy. However, I just moved into a new house and was not able to bring my beautiful brand new oven with me. It hasn’t seemed to effect any other recipes, however I’ve made two cheesecakes in it so far, both of which have browned on the top. They haven’t cracked and they are very creamy, they just aren’t as appealing looking. I know the problem is viciously my oven, but how would you suggest fixing it? Should I try cooking for less time? Should I lower or raise the rack? Should I lower the temperature ? I don’t know, and would love a suggestion! 🙂
It’s never easy leaving a beloved oven! But the fix can be very simple. I would lower the oven rack and you can even “tent” a piece of aluminum foil on the top of the cheesecake during the last bit of baking time. This will help protect the top from over-browning.
Hi Sally!! I made this cheesecake for Mother’s Day a while back, and it was delicious! I usually have terrible luck with cheesecakes, but this one turned out amazing. I wanted to make it again, but this time adapt it to be a lemon blueberry cheesecake- how would you suggest adding in the lemon flavour? Thanks so much for the great recipe!!
Hi Bianca! I’d beat in about 1 Tablespoon of zest and 1/4 cup of fresh lemon juice. 🙂
My daughter and I made this last night for my husband for Father’s day. IT IS WONDERFUL! we added a bit more blueberry sauce to the top since we had tons of them from picking the night before. This will be my go to cheesecake, super easy, creamy, and delish! Thanks
Hello Sally! My mother really loves cheesecake, especially lemon raspberry, so I was thinking I’d switch out the blueberries for raspberries and try and make the cheesecake more lemony. I was thinking lemon juice, lemon zest, or lemon extract; any idea on which would be best and how much I should use?
Thank you so much, none of your recipes have failed me yet!
Your creation sounds amazing. I’d use about 1 Tablespoon of zest and 1/4 cup of fresh lemon juice. No need for extract.
Hi dear! What type of yougurt do you use here? Natural? I can`t find sour cream where I live and will have to use this substitute. Does it affect the taste/texture somehow? Thanks!
Any plain yogurt will do. I would avoid nonfat yogurt though. Low fat or full fat would be best.